1
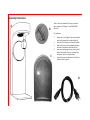
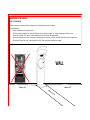
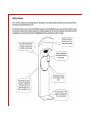
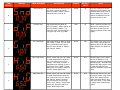
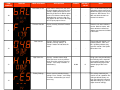
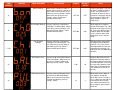
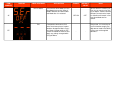
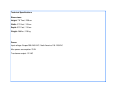
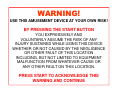
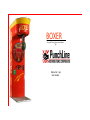
BOXER Strength Testing Amusement Game By Menu Set -Up User Guide Important Safety Instructions WARNING: Failure to follow these safety instructions could result in fire, electric shock, or other injury or damage. Read and follow these instructions to use your Boxer Amusement Game safely. Do not use this apparatus near water. Do not install near any heat sources such as radiators, heat registers, stoves, or other apparatus that produce heat. Protect the power cord from being walked on or pinched, particularly at plugs and at the point where they exit from the apparatus. Protect power cord from exposure to liquids and moisture. Refer all servicing to qualified service personnel. Tempering with electronic components while machine is switched on may cause electric show, injury or death WARNING: To reduce the risk of fire or electric shock, do not expose this apparatus to rain, liquid, moisture, excessive heat, or naked flame. Unless proper precautions are used by a qualified personnel, machine should be switched off while service area is accessed. Servicing is required when the apparatus has been damaged in any way, such as power-supply cord or plug is damaged, liquid has been spilled or objects have fallen into the apparatus, the apparatus has been exposed to rain or moisture, does not operate normally, or has been dropped. This apparatus has an on/off switch. To disconnect this apparatus from power, you must turn off the machine and disconnect the power cord. Make sure the power cord is always easily accessible. The power cord included with this apparatus is for indoor use only. Assembly instructions A “Boxer” comes pre-assembled. The only parts that require assembly are LID (figure C.) and POWER CORD (Figure D.). B LID installation: 1. 2. 3. 4. C 5. Remove the 4 nuts (Figure B.) which are screwed onto 4 bolts attached to the inside off the LID. Place the LID horizontally on the top of the Boxer. Align the four bolts with corresponding holes on the frame of the machine and lower the LID. Lower the punching bag either by pressing “Start” button (insert credits first) or by choosing “bag release test” option in the game menu. Screw on the nuts onto the bolts until the LID sits firmly on top of the game. D Installation instructions NOTE TO THE OPERATOR: In order for the game to be operated safely, the game has to be placed properly within the location. We recommend that: 1. Machine is placed with its back against a wall. 2. The machine must be placed on flat, stable, level flooring surface, allowing no “wiggle” or “rocking” motion when machine is in use. 3. Allow at least 2 Meters (6’5”) radius of unobstructed space around the machine for safe game play. 4. Do not place the game next to other amusement or vending equipment, furniture, kitchen or any other objects which may harm game user. 5. Affix included “Rules of the Game” sticker along with a Liability Disclaimer (sample provided) on the game. WALL 2 Meters / 6’5” 2 Meters / 6’5” 2M ete rs / 6’5 ” ITEM NUMBER DISPLAY VOICE RESPONSE APPLICATION RANGE DEFAULT VALUE Sound volume Adjust sound volume down by pressing “Setup 1” button and up by pressing “Setup 2” button. To mute sound, decrease value to “0”. 0-100 70 Increase or decrease volume depending on the location and customer base. Keep in mind that the game plays voice responses and demo music during game and on its own. Difficulty level Adjust game difficulty down by pressing “Setup 1” button and up by pressing “Setup 2” button. The higher the value, the more difficult it is to get a high score (e.g. 900). 0-50 35 Value is arbitrary and does not represent an actual pressure, strength or speed. Precision may vary between several units slightly. Girl’s Advantage Adjust advantage of “Setup 2” mode over “Setup 1” mode. This will determine score difference of a punch with the same strength in “Setup 1” and “Setup 2” modes. 0-975 100 This setting is very rarely used and is there simply to give the option to adjust it for those who might consider such option important. Boy’s High Score Resets current high score for “Setup 1” mode and determines what the high score value resets to. Press “Setup 1” and “Setup 2” buttons simultaneously to manually reset the High Score. Press “Setup 1” button to decrease and “Setup 2” button to increase default High Score. 0-975 650 Resetting high score is important for an operator as it encourages continued competition between players. Also note that default High Score will be used in “High Score Reset Time” option for automatic High Score Reset. High Score Girls Resets current high score for “Setup 2” mode and determines what the high score resets to. Press “Setup 1” and “Setup 2” buttons simultaneously to manually reset the High Score. Press “Setup 1” button to decrease and “Setup 2” button to increase default High Score. 0-975 650 Default High Score in this setting will be used in “High Score Reset Time” option for automatic High Score Reset. Also note, that “Setup 1” and “Setup 2” modes have separate High Scores. 0 1 2 3 4 Notes ITEM NUMBER DISPLAY VOICE RESPONSE APPLICATION RANGE DEFAULT VALUE Notes Resettable Counter Option displays counter value since last reset. Reset is done by pressing “Setup 1” and “Setup 2” buttons simultaneously. 0-999,999 0 Value uses both top and middle digits with a total of 6 digits (or 999,999 max. number). Display example to the left shows 1,570 punches since last reset. This option is useful for accountability or keeping track of specific events. Demo Repeat Time Option displays frequency of Demo melodies played (in minutes). Decrease demo frequency by pressing “Setup 1” button and increase it by pressing “Setup 2” button. 0-250 15 Demo tunes are only several seconds long and serve to attract public attention. Keep mindful that Demos may be irritating in a quiet location (e.g. bar during the day). One may increase Demo delay value to maximum or decrease volume. High Score Reset Time Adjusts delay of automated High Score reset time. This adjusts amount of hours machine needs to be IDLE (no buttons pressed) before High Score is reset to default value (e.g. 650). Turn on or increase by pressing “Setup 2” button, decrease or turn off “by pressing “Setup 1” OFF-48 OFF This is an important feature to encourage competition. Machine will never reset the High Score in the middle of the game or right after a game, as machine has to be idle for at least an hour before it will reset itself (when option is used). Display Test Test for Display LEDs. Press “Setup 2” button to turn on all of the Display LEDs. - - LEDS will remain on for several seconds to conveniently test their functionality. Lights Test Test for Display lamps and play area illuminating LEDs. Press “Setup 2” button to start the test and “Setup 1” button to stop the test. - - Display lights and play area illuminating LEDS will turn on in rotation. Test will continue until “Setup 1” button is pressed. 5 6 7 8 9 ITEM NUMBER DISPLAY VOICE RESPONSE APPLICATION Ball Release Test Tests release mechanism. Be mindful of the dropping Punch Ball. Press “Setup 2” button to activate the test. Manually lift the Punch Ball to repeat the test. If ball does not drop within allowable time, error message “Err” may appear on the screen. Message will rest upon proper release. 10 Firmware Version RANGE - DEFAULT VALUE - Display currently installed Firmware version. Total Counter - - Please note that counter is affected by tokens, coins and bills. Updating software may reset this counter. See Option #5 for other info. Displays Total non-resettable counter. Pressing “Setup 1” or “Setup 2” button will not affect this value. - 12 High Score Hits 13 Factory Settings 14 Displays number of times High Score has been set since previous reset. Reset this value by pressing “Setup 1” and “Setup 2” buttons simultaneously. Resets machine to default factory settings. Press “Setup 1” and “Setup 2” buttons simultaneously to reset, if necessary. This is a convenient way to test and adjust release mechanism, without having to listen to voice responses. Ball Release Test does not affect electronic or mechanical counters. Contact us for latest software version. Machine comes with latest software installed, but updates may become available in the future. 11 - Notes 0-999 0 - - A high value may be indicating that Difficulty Level should be increased for location. Please note that beating High Score rewards player with a free game. This setting should only be used in case of a problem. Resetting to default factory settings may help with incorrectly adjusted settings (e.g. coin acceptor channel settings). ITEM NUMBER DISPLAY VOICE RESPONSE APPLICATION Bonus Settings Bonus means number of credits required to be inserted in a row for an extra credit. Increase or turn on this feature by pressing “Setup 2” button; decrease or turn off by pressing “Setup 1” button. Encourages spending by the player 15 Bill Acceptor Settings 16 Coin Acceptor Settings 17-22 Ball Release Time Displays # of pulses required for 1 credit given via Bill Acceptor. Adjust value up by pressing “Setup 2” and down by pressing “Setup 1”. Note available decimal places. Displays # of pulses required for 1 credit given via Coin Acceptor. Adjust value up by pressing “Setup 2” and down by pressing “Setup 1”. Note available decimal places. OFF-99 OFF-999 OFF-999 5-40 Ball Release Pulses DEFAULT VALUE OFF 0.25 0.25 Displays length of each Ball Release Pulse milliseconds. Adjust value up by pressing “Setup 2” button and down by pressing “Setup 1” button. 23 24 RANGE Displays number of Release Pulses on each Punch Ball drop attempt. Adjust value up by pressing “Setup 2” button and down by pressing “Setup 1” button. 1-3 10 3 Notes E.g.#1 if your game is set at $1 per game, and Bonus Setting set at 5, every time $5 bill is inserted or $5 worth of coins is inserted in a row player will get an extra credit. E.g.#2: ¢50 a game and Bonus 2 gives 3 credits for $1. Value depends on programming of Bill Acceptor. E.g. If Bill Acceptor sends 4 pulses per $1 bill, value set at 0.25 will give 1 credit per dollar. Bill Acceptor set at 1 pulse per dollar Ch0 needs to be set at 1 to give 1 credit. Note that various coins/tokens are programmed on different channels (1-6), hence values need adjustment for each coin programmed accordingly. Default value may vary depending on locale. Length of Ball Release Pulse determines how long hinge of the Release Mechanism will be in elevated position. Increasing this value may sometime solve minor flaws in Release Mechanism performance (due to friction etc). While value set at 3, Mechanism attempts to drop the Punch Ball 3 times, instead of just 1. It decreases the odds of a malfunction due to friction, rust, unbalanced mechanism, but also affects wear and tear of the unit. ITEM NUMBER DISPLAY VOICE RESPONSE Service Game APPLICATION OFF-ON Exit DEFAULT VALUE Turn Service Game Mode (or Freeplay Mode) by pressing “Setup 2” Button. Machine will return to Normal Mode after it is restarted. 25 EE RANGE For operator convenience, Exit points have been place at various locations through the Menu. Pressing “Setup 2” button while on “EE” screen will reboot the machine and apply any settings changed while using the Menu. - OFF - Notes Service Game is used for Free Play (e.g. an event) or for Testing or Repair. It does not affect electronic or mechanical counters. Machine will remain in Service Game Mode until restarted. Please note, it is necessary to use Exit function to apply any adjustments made in the Menu, as they may not be applied otherwise. Technical Specifications: Dimensions: Height: 7’0” Feet / 230 cm Width: 2’3” Feet / 125 cm Depth: 3’5” Feet / 110 cm Weight: 266 lbs / 125 kg Power: Input voltage: Europe 200-240 VAC / North America 110-120 VAC Max. power consumption: 75 W Transformer output: 12 VAC Warranty Information This product comes with limited one year parts replacement warranty (12 months since the time of original purchase from Punch Line Distribution). Warranty covers replacement or repair of mechanical or electrical parts of the game. Parts covered under warranty do not include parts damaged as a result of vandalism, physical damage or incorrect installation. We do not cover shipping charges associated with parts replacements as they vary on destination and service type. Please contact us for all of your service and warranty questions via email at [email protected] or visit our website at www.punch-line.info for appropriate phone numbers. Regards, PunchLine Distributions Corp. WARNING! USE THIS AMUSEMENT DEVICE AT YOUR OWN RISK! BY PRESSING THE START BUTTON YOU EXPRESSIVELY AND VOLUNTARILY ASSUME THE RISK OF ANY INJURY SUSTAINED WHILE USING THIS DEVICE WHETHER OR NOT CAUSED BY THE NEGLIGENCE OR OTHER FAULT OF THIS LOCATION INCLUDING, BUT NOT LIMITED TO EQUIPMENT MALFUNCTION FROM WHATEVER CAUSE OR ANY OTHER FAULT ON THIS LOCATION. PRESS START TO ACKNOWLEDGE THIS WARNING AND CONTINUE