1
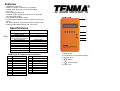
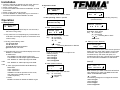
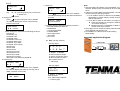
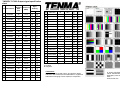
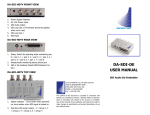
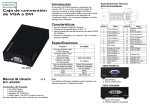
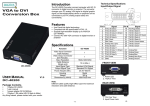
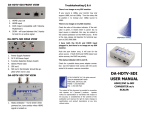
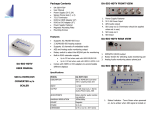
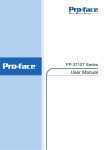
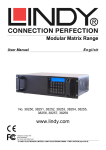
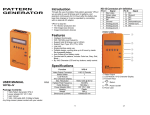
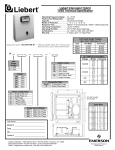
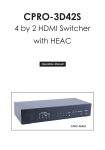
PATTERN
GENERATOR
Introduction
Through the use of portable HDMI pattern generator
MODEL 72-7480, you are able to use 48 timings and 34
patterns, and operate it continuously for 6~8 hours after
the battery has been fully charged or it can be operated by
connecting with an external AC adaptor.
MODEL 72-7480 is ideal for:
TV / Monitor production line
HDMI image input devices
USER MANUAL
MODEL 72-7480
Package Contents
1 HDMI pattern generator MODEL 72-7480
1 power adapter DC 12V 1.25A
1 user manual
1 HDMI 1.2M cable
Any thing missed, please contact with your vendor.
Features
Intelligent functionality.
HDMI 1.3, HDCP 1.2 and DVI 1.0 compliant
Support total 48 timings. (up to UXGA/1080p)
Low cost.
Single interface easily use.
Portable design, working time up to 8 hours by inside
Re-chargeable battery.
Auto Power-off on battery mode.
Provide total 34 patterns, Include: Color bar, Gray, Grid,
Block…
By 16x2 Character LCM and key buttons, easily control.
Support audio 48KHz sample rate, 1KHz tone.
FRONT VIEW
○1
○2
Specifications
V1.0
Function
MODEL 72-7480
Output Connector
Select Switch
LCD Module:
16*2 Character Display
Max. Resolution
Highest TMDS Frequency
Cable Distance
Power Adapter (Min.)
Housing
Weight
Dimensions (LxWxH)
1 HDMI Type A
7
Signal
TMDS Data2+
TMDS Data2 Shield
TMDS Data2TMDS Data1+
TMDS Data1 Shield
TMDS Data1TMDS Data0+
TMDS Data0 Shield
TMDS Data0TMDS Clock+
Pin #
11
12
13
14
15
16
17
18
19
○4
1
○5
○6
UXGA/1080p
225 MHz
5M
DC 12V 1.25A
Plastic
398 g
180x95x35 mm
HDMI Type A Connector pin definition
Pin #
1
2
3
4
5
6
7
8
9
10
○3
Signal
TMDS Clock Shield
TMDS ClockNC
NC
DDC-SCL
DDC-SDA
DDC-Ground
+5V Power
Hot Plug Detect
1. HDMI Output
2. LCD Module: 16*2 Character Display
3. Function Keys
4. “
”: Return
”: Power On/Off
5. “
6. Power Jack
Installation
“
B. Operation Guide:
a.
P01 640x480 @60
H8
MENU
Start setting: Key “MENU” Switch
b. After pressing ”MENU” option
3. Factory preset starting value:
P01 640x480 @60
P01 Pattern 01
640x480 Resolution 640X480
@60 Refresh rate 60Hz
4. The bottom left corner of LCM will display the current
MODEL 72-7480 status:
a. HDMI mode
DVI: MODEL 72-7480 output signal is DVI
H 8: MODEL 72-7480 output signal is HDMI 8bit
H10: MODEL 72-7480 output signal is HDMI
10bit
H12: MODEL 72-7480 output signal is HDMI
12bit
b. Video Type (Refer EIA/CEA-861B Standard)
RGB: RGB
Y444: YCbCr4:4:4
Y422: YCbCr4:2:2
If MODEL 72-7480 is operated on DVI mode,
then Video type is RGB (4:4:4 with
8-bits/component)
c. HDCP:
MODEL 72-7480 has started the HDCP engine
640x480
▲▼
@60
Note: The chosen option will blink
Key: “▲”: Increasing
“▼”: Decreasing
“ ”, ”
rate
“: Output
“
”: Choosing Resolution or Refresh
640x480 @60
Output …
Under H12 mode, there is no output for the
following timings:
1280x1024@85
1400x1050@75
1600x1200@60
1920x1200@60RB
▼
▲
Note: The chosen option will blink
BLK: Black, WHT: White
Key: “▲”: Increasing
“▼”: Decreasing
“ ”, ” ”: Choosing BLK or WHT
“
“: Enter
▼
2. Only valid for the corresponding key found below the
LCM. After confirming the press, it will sound a short
confirm “beep”.
▲▼
1> Tim: (Timing selector)
▼
1. After pressing power On/Off key for 2~3 seconds, it
will sound a long ”beep”.
Set: Setting black and white blinking frequency
(frames/number)
BLK:001 WHT:001
▲
P01 640x480 @60
H8
MENU
P02 Blinking
▲▼
set
P01 640x480 @60
Tim Ptn Func Hky
▼
A. Starting status
▲
Operation
P02 Blinking setup guide
▲
1. Insert the external AC adaptor into AC outlet, Connect
the power cord to MODEL 72-7480 for charging.
2. Switch off the monitor.
3. Connect the HDMI cable between the MODEL 72-7480
and monitor.
4. Switch on the power of the monitor.
5. Press the MODEL 72-7480 power key for more than 3
seconds to switch on/off the MODEL 72-7480.
3> Func: (Function Selector)
P01 640x480 @60
Setup
Info
In Function Selector menu, there are two options of
Setup and Info, under Setup option, it is provided
with Mode, Video Type and HDCP Function for
functional set up; and under Info option, it is
provided with Timing Info, HTPLG Info and HDCP
Info for observation of MODEL 72-7480 status.
【Setup】
2> Ptn: (Pattern selector)
P01 FLAT
▲ ▼
Note: Pattern Index option will blink
Key: “▲”: Increasing
“▼”: Decreasing
“: Output
H8
Y444
X
MOD CSC HDCP
MOD: Switching to HDMI mode DVI/H 8/H10/H12
CSC: Switching to Video Type RGB/Y444/Y422
HDCP: Enable/Disable HDCP
“: Output
“
The following timings do not support H12 mode:
1280x1024@85
1400x1050@75
1600x1200@60
1920x1200@60RB
【Info】
Timing Info
▲ ▼
c. HDCP Info
HDCP Info
▲ ▼
Key: “▲”, “▼”: Choosing Timing Info, HTPLG Info
or HDCP Info
“
“: Enter
a. Timing Info
Press “
“ to enter Timing Info menu, MODEL
72-7480 will display the current output’s timing
format on the LCM.
Pixel Clock:
▲ ▼ 148.5MHz
Under Timing Info, it features the following functions:
Pixel Clock
Horizontal Freq
Horizontal Total
Horizontal Active
Horizontal Front Porch
Horizontal Back Porch
Horizontal Sync Width
Horizontal Sync Polarity
Vertical Freq
Vertical Total
Vertical Active
Vertical Front Porch
Vertical Back Porch
Vertical Sync Width
Vertical Sync Polarity
and Video Code defined by EIA861B
b. Hot Plug Info
HTPLG
Info
▲ ▼
Not
HDCP Status
No Rx Attached
The HDCP Status features the following functions:
a. Rx Attached/No Rx Attached
b. Read EDID
c. Transmit DVI/HDMI
d. Validate BKSV
e. Exchanges KSVs
f. Encryption
g. Ri = xxxx
Status
Detect
Assembly application diagram:
4> Hky: (Hot key selector)
HDMI Cable
Hot Key page1
O O O X
R G B Rev ︾
O: Enable X: Disable
R: Red component output
G: Green component output
B: Blue component output
Rev: Pattern reverse
︾: Next page
Hot Key page2
“ to enter HTPLG Info menu, MODEL
Press “
72-7480 will display the status of Hot Plug Pin on
HDMI connector on the LCM.
HTPLG
Press “
“ to enter HDCP Info menu, MODEL
72-7480 will display the current HDCP STATUS on
the LCM.
Note:
1. After purchasing and before using the MODEL 72-7480
first time, please charge it continuously for more than 16
hours.
2. If there is no image while using the MODEL 72-7480,
please ensure the following matters:
a. If it is unable to switch onthere is a possibility of
dead battery or inferior battery. Please connect it
with the transformer.
b. If it is able to switch on but there is no image
Lower the resolution or change the resolution
and vertical frequency.
Please ensure the compatibility of HDMI or
HDCP mode of the monitor.
3. We suggest you to charge the battery when the battery
power indicator has become low.
4. The MODEL 72-7480 will save the last setting
automatically.
X O
AVM OUT
︽
O: Enable X: Disable
AVM: AV Mute
OUT: Video output ON/OFF
︽: Previous page
or
Twins pair
**MODEL 72-7480 Output signal specification
chart:
NO Resolution
1
2
3
4
5
6
7
8
9
10
11
12
13
14
15
16
17
18
19
20
Refresh
Pixel Freq
Rate
(MHz)
(Hz)
640x350
85
31.5
640x400
85
31.5
640x480
60
25.175
640x480
72
31.5
640x480
75
31.5
640x480
85
36
720x400
85
35.5
800x600
56
36
800x600
60
40
800x600
72
50
800x600
75
49.5
800x600
85
56.25
848x480
60
33.75
1024x768
60
65
1024x768
70
75
1024x768
75
78.75
1024x768
85
94.5
1152x864
75
108
1280x768
60 RB
68.25
1280x768
60
79.5
75
102.25
85
117.5
60
108
85
148.5
60
108
75
135
85
157.5
21 1280x768
22 1280x768
23 1280x960
24 1280x960
25 1280x1024
26 1280x1024
27 1280x1024
Sync
Polarity
Hor
Ver
P
N
N
N
N
N
N
P
P
P
P
P
P
N
N
P
P
P
P
N
N
P
N
N
N
N
P
P
P
P
P
P
P
N
N
P
P
P
N
P
N
N
P
P
P
P
P
P
P
P
P
P
P
P
28
29
30
31
32
33
34
35
36
37
38
39
40
41
42
43
44
45
46
47
48
1360x768
60
85.5
1400x1050
60 RB
101
1400x1050
60
121.75
1400x1050
75
156
1600x1200
60
162
1920x1200
60 RB
154
1280x800
60
83.5
1366x768
60
80
1440x900
60
106.5
1440x1050
60
125.25
1680x1050
60
146.25
1440x480i
59
27
1440x576i
50
27
720x480
59
27
720x576
50
27
1280x720
50
74.25
1280x720
60
74.25
1920x1080i
50
74.25
1920x1080i
60
74.25
1920x1080p
50
148.5
1920x1080p
60
RB: Reduced Blanking
P: Positive
N: Negative
148.5
P
P
N
N
P
P
N
N
N
N
N
N
N
N
N
P
P
P
P
P
P
P
N
P
P
P
N
P
N
P
N
P
N
N
N
N
P
P
P
P
P
P
Trademarks:
All the companies, brand names, and product names
referred to this manual are the trademarks or registered
trademarks belonging to their respective companies.
© Tenma Test Equipment
405 S. Pioneer Blvd
Springboro, Ohio 45066
USA
www.tenma.com