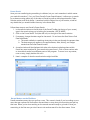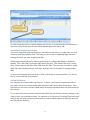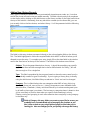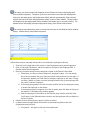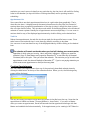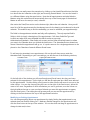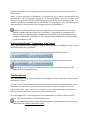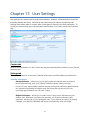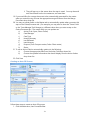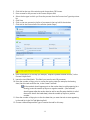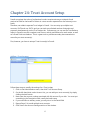
1
LEARNING TO USE THE PREVAIL CASE MANAGEMENT SYSTEM VERSION 7 © 2013 Practice Technology, Inc. 2311 Mount Vernon Street, Orlando, Florida 32803-4919 Phone: (407) 228-4400 Fax: (407) 228-4414 www.prevail.net Revised: 9/23/2015 Table of Contents Volume I: Using Prevail........................................................................................................................................................ 9 Chapter 1: Getting Started .................................................................................................................................................. 9 Basic Rules of Engagement ................................................................................................................. 12 Matter ............................................................................................................................................................................... 12 Rolodex ............................................................................................................................................................................ 13 User.................................................................................................................................................................................... 14 Task.................................................................................................................................................................................... 14 Appointment ................................................................................................................................................................. 14 Attach ............................................................................................................................................................................... 14 History .............................................................................................................................................................................. 15 Merge Document........................................................................................................................................................ 15 Ledger .............................................................................................................................................................................. 15 Database ......................................................................................................................................................................... 15 Report............................................................................................................................................................................... 16 How it’s supposed to work in the real world .................................................................................... 16 Chapter 2: The Interface .................................................................................................................................................... 20 Logging In.............................................................................................................................................. 20 The Home Tab ....................................................................................................................................... 20 The Upcoming Appointments Window ........................................................................................................... 21 The Upcoming Tasks Window .............................................................................................................................. 22 Statute Warnings List ................................................................................................................................................ 22 The Prevail Messages Window ............................................................................................................................. 23 Last Matter Tab ............................................................................................................................................................ 23 Navigating Between Matters............................................................................................................... 23 Searching for Matters and Rolodex Entries: The Combined Search Tool....................................... 24 Power Search ................................................................................................................................................................ 26 Recent Matters on the File Menu........................................................................................................................ 26 “Go to Matter” Icon.................................................................................................................................................... 27 i Extras ...................................................................................................................................................... 27 Do Not Disturb............................................................................................................................................................. 27 Grid Layout Control .............................................................................................................................. 28 Grid Options .................................................................................................................................................................. 29 Filtering Grid Entries .................................................................................................................................................. 29 Saved Filters in History and Ledger.................................................................................................................... 30 Sorting Grid Entries .................................................................................................................................................... 30 Grouping Grid Entries ............................................................................................................................................... 31 Printing Tabs ......................................................................................................................................... 31 Viewing Notes (Detail) ......................................................................................................................... 32 Daily Backups of Your Prevail Data .................................................................................................... 33 Chapter 3: The Rolodex ..................................................................................................................................................... 34 Rolodex .................................................................................................................................................. 34 Adding New Rolodex Entries ................................................................................................................................ 34 Avoiding and Consolidating Duplicate Rolodex Entries .......................................................................... 35 Putting Sticky Notes on Rolodex Entries ......................................................................................................... 37 Deleting a Rolodex Sticky Note ........................................................................................................................... 38 Chapter 4: Matters ............................................................................................................................................................... 39 Matters ................................................................................................................................................... 39 The Matter Tab...................................................................................................................................... 39 Window Resizing......................................................................................................................................................... 40 Related Parties: The Matter Tree ....................................................................................................... 40 Attaching Rolodex Entries to an Existing Matter ......................................................................................... 42 Adding a new Rolodex entry on the fly ........................................................................................................... 43 Detaching a Rolodex Entry from a Matter ...................................................................................................... 43 Viewing Other Matters Related to a Rolodex Entry ................................................................................... 44 Viewing Other Matters Related to the Client(s) ........................................................................................... 45 The Additional Information Window ................................................................................................. 45 Attaching Sticky Notes to Matters ..................................................................................................... 45 Additional Matter Page Functions ...................................................................................................... 46 Show Phone Address ................................................................................................................................................ 46 ii Changing Matter Status........................................................................................................................................... 47 Chapter 5: Creating a New Matter ............................................................................................................................... 48 New Prospect or New Matter (both are actually Matters) .............................................................. 48 Creating a new Matter or Prospect using the Questionnaire feature ........................................... 50 Closing or Deleting Prospects or Matters ....................................................................................................... 51 Chapter 6: Producing Documents ................................................................................................................................... 53 Merge Across Related............................................................................................................................................... 55 Merge Across Query .................................................................................................................................................. 56 Chapter 7: The History Tab .............................................................................................................................................. 59 Adding New History Records .............................................................................................................. 60 The Prevail Connector .......................................................................................................................... 62 Cloning a Document From a History Entry ....................................................................................... 64 Viewing a History Entry ........................................................................................................................ 65 Printing History ..................................................................................................................................... 65 Deleting a History Entry ....................................................................................................................... 65 Recovering Deleted History Entries.................................................................................................... 65 Changing Which Columns and Data are Displayed on the History Page ..................................... 65 Sorting Records on the History Page ................................................................................................................ 66 Grouping Records on the History Page ........................................................................................................... 66 Filtering Records on the History Page .............................................................................................................. 67 The Notes Page ..................................................................................................................................... 68 Adding a Note to the Notes Page ...................................................................................................................... 69 The Photo Page..................................................................................................................................... 69 Attaching an image to the Photo Page............................................................................................................ 69 Taking a photo with a Webcam and attaching it as an Image ............................................................. 69 Chapter 8: Additional Tabs .............................................................................................................................................. 70 Process (Claims) Tab............................................................................................................................. 70 Starting a New Process (Claim) on the Process (Claims) Tab ................................................................ 71 Adding Steps from a Process (Claim) on the Process (Claims) Tab .................................................... 71 Damages Tab ........................................................................................................................................ 72 Adding Damages Entries ......................................................................................................................................... 73 iii Adding Payments to Damages Entries ............................................................................................................. 74 Disabilities Tab ...................................................................................................................................... 74 Adding Ailments to Disability Information ..................................................................................................... 75 Employment (Work) Tab ...................................................................................................................... 76 Adding an Employment (Work) Entry ............................................................................................................... 76 Events Tab.............................................................................................................................................. 78 Evidence Tab ......................................................................................................................................... 79 Adding an Evidence Entry ....................................................................................................................................... 79 Evidence Tab Options ............................................................................................................................................... 80 Ledger Tab ............................................................................................................................................. 80 Adding a Ledger Entry.............................................................................................................................................. 81 Medical Tab ........................................................................................................................................... 82 Requesting the Initial Set of Records from a Medical Provider............................................................ 83 Requesting an Updated Set of Records from a Medical Provider....................................................... 84 Negotiation Tab .................................................................................................................................... 85 Adding Demands and Offers................................................................................................................................. 85 Adding Liens.................................................................................................................................................................. 86 Strategy Tab .......................................................................................................................................... 87 Trust Ledger Tab ................................................................................................................................... 87 Adding a Trust Ledger Entry .................................................................................................................................. 88 Chapter 9: The Calendar.................................................................................................................................................... 90 Appointments vs. Tasks ....................................................................................................................... 90 Appointment ................................................................................................................................................................. 90 Task.................................................................................................................................................................................... 90 The Events Tab and its relationship with the Calendar.................................................................... 91 Calendar Navigation .................................................................................................................................................. 91 Calendar Views ...................................................................................................................................... 92 Day View ......................................................................................................................................................................... 92 Week View...................................................................................................................................................................... 92 Month View ................................................................................................................................................................... 92 Appointment List ........................................................................................................................................................ 93 iv Task List ........................................................................................................................................................................... 93 Creating Appointments ....................................................................................................................... 93 Modifying an Existing Appointment .................................................................................................................. 94 Cancelling vs. Deleting an Appointment ........................................................................................... 95 Rescheduling an Appointment ........................................................................................................... 95 Creating Tasks ....................................................................................................................................... 95 Completing a Task...................................................................................................................................................... 96 Chapter 10: Email.................................................................................................................................................................. 97 Initiating Emails in Prevail .................................................................................................................... 97 Scanning for Replies to Email Sent from Prevail .............................................................................. 98 Attaching Email from Outlook to a Prevail Matter ........................................................................... 98 Linking an Email to an Email in Prevail .............................................................................................. 99 Chapter 11: Administration Menu ............................................................................................................................. 100 Chapter 12: User Settings .............................................................................................................................................. 101 Contact tab .......................................................................................................................................... 101 Settings tab ......................................................................................................................................... 101 Calendar Information ............................................................................................................................................. 101 Miscellaneous Information .................................................................................................................................. 102 Sync tab ............................................................................................................................................... 104 Email tab .............................................................................................................................................. 104 Appearance tab................................................................................................................................... 104 Shortcuts .............................................................................................................................................. 105 Chapter 13: Tools............................................................................................................................................................... 107 The Help Menu ................................................................................................................................... 107 Client Package..................................................................................................................................... 108 Creating a Client Package PDF .......................................................................................................................... 109 Quick Print Envelope .......................................................................................................................... 109 Map-it Tool .......................................................................................................................................... 109 Reports ................................................................................................................................................. 109 Running Reports....................................................................................................................................................... 109 Chapter 14: QuickBooks™ Integration .................................................................................................................... 111 v QuickBooks™ Transfer Wizard .......................................................................................................... 111 Overview .............................................................................................................................................. 111 Initial Set Up ............................................................................................................................................................... 111 QuickBooks™ Transfer Wizard .......................................................................................................... 112 System Defaults ........................................................................................................................................................ 113 QuickBooks™ Sync .................................................................................................................................................. 117 QuickBooks™ Field Lengths ................................................................................................................................ 117 Setup Wizards............................................................................................................................................................ 117 Initiating QuickBooks™ Transactions from Prevail ......................................................................... 121 Transfer Wizards ................................................................................................................................. 121 Check Request........................................................................................................................................................... 122 Trust Check Request ............................................................................................................................................... 123 Checks Printed........................................................................................................................................................... 125 Invoice Transfer......................................................................................................................................................... 126 Customer Payments................................................................................................................................................ 129 Deposit Transfer ....................................................................................................................................................... 130 Third Party Billing ..................................................................................................................................................... 130 Matching Matters with a QuickBooks Customer Job ............................................................................. 132 Common Error Messages..................................................................................................................................... 133 Volume II: Administrative Functions ......................................................................................................................... 135 Chapter 15: The Administration Menu................................................................................................................... 135 Chapter 16: Setting up Prevail ................................................................................................................................... 137 Employee Setup .................................................................................................................................. 137 Security/Group Setup......................................................................................................................... 140 Creating a Security Group ................................................................................................................................... 140 Security Settings by Type ..................................................................................................................................... 141 Branch Office (Firm Info) .................................................................................................................... 142 Chapter 17: User Settings............................................................................................................................................. 144 Contact tab .......................................................................................................................................... 144 Settings tab ......................................................................................................................................... 144 Calendar Information ............................................................................................................................................. 144 vi Miscellaneous Information .................................................................................................................................. 145 Sync tab ............................................................................................................................................... 147 Email tab .............................................................................................................................................. 147 Appearance tab................................................................................................................................... 147 Shortcuts .............................................................................................................................................. 148 Chapter 18: Law Type/Case Type/Rolodex Type Setup .................................................................................... 150 Modify the settings for a law type ................................................................................................... 150 Setting Up Case Types ....................................................................................................................... 152 Steps to create a new case type .......................................................................................................................... 154 Setting up Rolodex Types .................................................................................................................. 154 Steps to create a new Rolodex type................................................................................................................... 158 Chapter 19: Databank ....................................................................................................................................................... 159 Location of User-Definable Lists in Prevail .................................................................................................. 159 Modifying Lists in the Databank ....................................................................................................................... 161 Chapter 20: Questionnaire Setup................................................................................................................................. 162 Creating a New Intake Questionnaire ............................................................................................................ 163 Intake Questionnaire Example ........................................................................................................................... 165 Chapter 21: Creating Merge Document Templates – the Document Designer .................................. 167 The Document Designer .................................................................................................................... 168 Creating a New Merge Document Template from Scratch ................................................................. 170 Editing an Existing Merge Document Template ....................................................................................... 174 Cloning a Merge Document Template .......................................................................................................... 174 Transferring Your Existing Form Letters into Prevail ............................................................................... 175 Creating Merge Document Templates from Adobe PDF Files ........................................................... 175 Deleting a Merge Document Template ........................................................................................................ 177 Document Designer Fields .................................................................................................................................. 177 Chapter 22: Query Manager ........................................................................................................................................... 188 Chapter 23: Process Builder .......................................................................................................................................... 189 Standard vs. Auto-Fill Processes ....................................................................................................... 190 Creating a Standard Process .............................................................................................................................. 191 Creating an Auto-Fill Process ............................................................................................................................. 194 vii Chapter 24: Trust Account Setup................................................................................................................................. 197 Adding a Trust Account ........................................................................................................................................ 197 Setting up Payment and Deposit types In the Databank for Trust Accounts ............................. 198 Chapter 25: Report Designer ......................................................................................................................................... 199 Chapter 26: Firm Log ........................................................................................................................................................ 200 Chapter 27: Prevail Control Panel............................................................................................................................. 201 Updating Your Version of Prevail ..................................................................................................... 201 Chapter 28: Control Panel Tools .................................................................................................................................. 202 Control Panel - Tools ......................................................................................................................... 202 Increase Field Size ................................................................................................................................................... 202 Rebuild Search Lookup ......................................................................................................................................... 202 Rolodex Consolidation .......................................................................................................................................... 202 Chapter 29: Server Tools................................................................................................................................................. 204 Calendar Sync ............................................................................................................................................................ 206 Installing and Configuring Calendar Synchronization............................................................................ 207 Lead Import Settings .............................................................................................................................................. 210 Update Options ........................................................................................................................................................ 211 Maintenance Options ............................................................................................................................................ 211 Archiving Options .................................................................................................................................................... 211 viii Volume I: Using Prevail Chapter 1: Getting Started Hi folks, Carl Dirkes here. I founded Prevail in 1993 and have spent most of my adult life automating law firms. I retired from day-to-day operations a few years back, but they dragged me out of retirement to write this chapter because I’m the resident “big picture” guy. I’ve been through this process more than a thousand times and I’ve seen enough success and failure to know exactly what causes each. Nothing in this chapter is going to tell you what buttons to push or where to click. This is more about WHY than the mechanics of how. We learned many years ago that firms who take the time to understand the big picture and plan their Prevail implementation thoughtfully tend to get EXPONENTIALLY better results than firms who don’t. The firms that do it right almost always experience a paradigm shift where they analyze their procedures, throw out the ones that don’t make sense and move forward with a specific plan to implement Prevail as the framework of a more efficient and profitable practice. My goal in this chapter is to make sure your firm is one of the ones that does it right. If you want to do it right, here’s a good place to start: Repeat after me: “Automating your practice is a process, not an event.” Think about that and let it sink in. Maybe you should say it a few more times just to be safe. The process you’re about to undertake is not one to be entered into lightly. There are lots of questions you must ask yourself before you even START messing around with Prevail. Sure, you can charge ahead blindly if you want – but if your plan is to start clicking randomly and typing stuff into the system without any idea of what you’re even trying to accomplish, you’re pretty much wasting your time. If you charge ahead without knowing what you’re doing, probably most of the work you do will have to be redone anyway, so let’s be smart about this and take our time. First, let’s consider what Prevail is and is not. It’s NOT a five dollar iPhone app you can figure out by exploring a few menus. It’s a very complex piece of software with literally hundreds of functions, most of which affect other functions. Until you understand the system architecture, terminology and ground rules, nothing is going to make much sense to you. There’s nothing particularly scary or complicated about the way Prevail works, but there’s a LOT to it. Every practice does things differently and Prevail accommodates that reality by providing a number of different tools to accomplish any given task. As you move through the process you simply choose the tools in Prevail which best suit the way you want to do things. Here’s the scary part: With great flexibility comes great responsibility. Because there might be several different ways to accomplish any given task in Prevail, you need to have some discussions with your staff about how you’re doing them now and how you’re going to do them in the future. You don’t want 9 just “a” way to accomplish a given task – you want the BEST way to accomplish a given task. There’s often more than one way to do something and the best way to do it may vary widely from one firm to another. Generally speaking, the existing procedures in many law offices were arrived at not through diligent planning and efficiency analysis, but through happenstance, the limitations of tools available at the time and the old standby, “we’ve always done it this way.” Since you’re making a fresh start with a lot of new tools, take this opportunity to take an honest look at how things COULD be done more efficiently. If you’re just looking for ways to fit Prevail into your old way of thinking you’re doing yourself a disservice. The best way to think of Prevail is to envision it as a very large tool box – one of those big double-decker monstrosities you see up against the wall in a mechanic’s garage. A good mechanic has hundreds, if not thousands of tools. Some he uses all the time and some he hardly ever uses – but if he’s any good he knows how to use them all. He’ll use a 9/16” socket wrench every single day but may only use a flywheel-puller once or twice a year. Prevail is no different. It has hundreds of functions – some you’ll use every day, some you’ll hardly ever use and some you may never use. Prevail was designed to work for a lot of different types of firms, so a tool that makes perfect sense to an insurance defense firm may make no sense whatsoever to a veteran’s law firm (and vice-versa). The key is to understand what Prevail CAN do and implement those tools which make sense in YOUR practice. Don’t worry about the tools that don’t. Nobody ever said a mechanic has to use every tool in his toolbox. The same goes for law firms. Prevail has an awful lot of tools. That’s a good thing – but don’t get freaked out by the sheer scope of it all. You’ll find when all is said and done that the parts of it you use every day will be remarkably simple. The first thing you’ll want to think about when planning your Prevail installation is this: What are you trying to accomplish? Why did you buy Prevail in the first place? That seems an obvious question, but I’m amazed at how often it never gets asked, and even if it does the answer is never communicated adequately to the staff. It’s safe to say that you bought Prevail to help you accomplish one or more goals – but what are they? Do you want to increase your caseload? Do you want to improve your responsiveness in dealing with clients? Do you want to protect yourself against blowing statutes? Do you want to speed up document production? Do you want to improve accountability? These are all perfectly valid goals, as are any number of other goals I didn’t mention. It doesn’t matter to me what your goals are. The key is to make sure YOU know exactly what you’re trying to accomplish and convey that to your staff. Otherwise they’re just as likely to stumble blindly through this process with no idea why they’re doing any of it. That is a recipe for failure. Before you move on, take a minute to write down your most important goals. What do you hope to get out of Prevail? You have to know yourself before you can share it with your staff. Now, let’s talk about staff for a minute. Don’t think for a minute that you can just say to your staff, “Here’s your new case management system – go use it, and let me know how it works out.” If you have any interest in doing this right YOU are going to have to be involved in the process 10 at least from the big picture status. A properly executed Prevail implementation almost always involves a paradigm shift, and YOU have to drive that process and be a part of that paradigm. If you don’t, some combination of the following will happen: 1. Nobody will do anything to implement Prevail because they’re “too busy.” 2. They’ll TRY to implement Prevail, but they’ll only go as far as randomly poking around like I just told you not to do. After doing a few things wrong they’ll conclude that it’s too hard to figure out and they don’t have time anyway because they’re “too busy.” 3. One or two people will make an honest attempt at doing something, but they’ll quickly realize that in order for this to work EVERYBODY has to use it. The rest of your staff won’t bother because they’re “too busy.” You won’t bother to make them because you’re “too busy,” too. In the absence of tangible goals and a tangible plan, even the people who tried to do it right will lose interest. They’ll figure that if it’s not important enough for YOU to get involved, it must not be that important. 4. Your staff will make a half-hearted attempt at putting a few things in without bothering to learn how the system is supposed to work. After doing two or three things wrong, they’ll decide for themselves that it doesn’t work and hope you don’t notice they’re not using it. After a few months of doing nothing they’ll tell you they couldn’t implement Prevail because they tried and it didn’t work. Not knowing any better because you haven’t bothered to learn how to use it yourself, you’ll let the whole thing slide because you’re “too busy” to deal with it yourself. Seems a little harsh, doesn’t it? It is, but it’s true more often than not if you don’t get involved in the process. You see, there’s a REASON everybody is “too busy.” It’s usually because they way you’re doing things now is inefficient and the status quo is leaving everybody feeling a bit overwhelmed. Prevail can and will fix that – eventually. Here’s the rub, though: Implementing Prevail (or anything else, for that matter) requires some thought and some work UP FRONT before it can start saving you time and money. Productivity WILL GO DOWN while you’re going through this process. It sucks that you have to ask people who are already overwhelmed to do MORE work and learn a totally new system – but that’s what you have do. Things will get worse for a little while but then they’ll get much, much better, sooner than you think. This is a process you will all go through together. You have to get involved yourself, but you also have to get your staff involved in the planning process. Have a few meetings where you talk about goals and priorities. There are a couple of reasons why this is important. First of all, getting a buy-in from the staff is essential. If you come up with a plan in your own head and simply spring it on your staff, it will always be “your” plan. People don’t get too excited about implementing any plan they weren’t consulted about. By all means take the lead, but remember to listen to your staff. Remember that the person whose name is on the door isn’t always going to have all the ideas – or even the best ideas. I came up with the idea that would eventually become Prevail back in the 1980’s while working a temp job in a law firm. 11 Fortunately, nobody back then said “what do you know, you’re just a temp?” In the marketplace of ideas, it is the idea that is important, not the source. Ideally everybody will offer ideas in this process. Some will be gems and some will be downright stupid. Make sure you arrive at a consensus on ideas, considering each on its own merits and paying little-to-no attention to the source. Implementing a comprehensive case management system is doing some pretty major surgery on your firm’s operating routine. While you’ve got the patient opened up you’ve got a golden opportunity to fix a lot of other things (mostly relating to communication) that need to be addressed. Don’t squander that opportunity. You’re going to disrupt everybody’s routine anyway, so you may as well come out of this process with a better operating model for your firm. Basic Rules of Engagement Hopefully by now I’ve scared you into taking this implementation seriously. Now we can talk a little bit about some basic terminology and rules of engagement. I’m still not going to tell you where to click or what buttons to push to make Prevail work, but I’m going to tell you how it was designed to work, define some commonly-used terms and try to give you a feel for what a properly-implemented Prevail system looks like in the real world. First of all, Prevail is based on the concept of centralization of data. Everything is in one place so that everybody can see what everybody else did, when they did it and what comes next. Everything that happens is automatically stamped with the time, date, and author (the user that did it). In your physical file storage scheme, each physical file (yeah, that giant stack of paper in a folder of some sort) is SOMEWHERE. It might be on your desk. It might be on the front seat of your car. It might be in a filing cabinet. The point is, each physical file is currently in ONE location. And, only one person at a time has access to it, that is, once they find it. Think of each file or matter in Prevail the same way you think of the physical file, with one big exception: In Prevail, each file is always EVERYWHERE. Every user in the system has access to the very latest information in each and every case AT THE SAME TIME. From the very second one user saves a new document or logs a phone call in a case, every other user can see and access that information on his or her computer. The framework behind Prevail is a large, relational database that contains every bit of information about every one of your cases. Computer terminology is inherently a bit confusing in a law firm because it brings two very different worlds together. To a lawyer the word “File” has a very specific meaning. To your computer it has an equally specific (yet completely different) meaning. Just so we’re on the same page as to what each word means in Prevail, here’s a quick rundown of common terminology which will be used in this manual and throughout the Prevail system: Matter A MATTER in Prevail is one individual case. It is roughly analogous to one of those fat paper files stacked on the corner of your desk. If you’re a personal injury plaintiff's lawyer “Smith vs. Jones” is a Matter and Smith is your client. If you happen to be an insurance defense firm, the 12 matter is still called “Smith vs. Jones” but your client is probably Mr. Jones’ insurance company. Regardless of where your firm fits into the picture, that one case and all data associated with it (documents, appointments, tasks, deadlines, notes, related parties, etc.) is considered by Prevail to be one MATTER. Throughout this manual we’ll use the terms case and matter interchangeably. Note that depending on what kind of law you practice, there may be a 1:1 relationship between clients and matters or there may be a 1-to-many relationship. That is to say if you’re a Social Security Disability firm and John Smith is your client, he’s likely to have one matter and one matter only in your system. If you do general practice and John Smith is your client, he may have several matters in your system (maybe you represented him in a DUI, prepared a living will, represented him in a divorce and then did a pre-nuptial agreement for his next marriage). There’s still only one John Smith in your Rolodex, but he happens to have several different matters in your Prevail system. John Smith only goes into your Rolodex one time, but that Rolodex entry will get attached to each of his matters. Keep in mind that any matter will fall into one of several categories as far as Prevail is concerned. If it’s an active case that you’ve already signed up it’s considered an “Open” matter. If it’s a case you’ve already handled and completed, it’s a “Closed” Matter. It’s still a matter, but in Prevail we segregate the closed files so you don’t have them mixed in with the open matters. There is a third possibility which most systems don’t accommodate but Prevail does: The “Prospect” matter. This is a case which you haven’t necessarily signed up yet but you still need to create documents and track basic information. If your firm does insurance defense you won’t really need this because you either have a file or you don’t – but contingency-based plaintiff/claimant practices will use this all the time. Prevail can, of course, instantaneously transfer a matter from Prospect to Open to Closed and back again if need be. Rolodex The Rolodex in Prevail is analogous to that old-school thing on your desk with a knob on the side and a bunch of name and address cards in it. OK, for you of the younger generation, it’s like the contacts in your smart phone. In Prevail, it works the same way except that it contains a LOT more information on each card/contact. It’s also centralized for your entire firm. In the old days each employee probably had his or her own rolodex on their desk. The problem with that is: a) the same information had to be entered in a dozen places (i.e. in a dozen different rolodexes on a dozen people’s desks), and b) if one user updated a record in his/her rolodex that meant the other 11 rolodexes still had outdated information. Prevail solves that problem by putting everything together into one big firm-wide rolodex. EVERYBODY your firm deals with goes into the Rolodex – clients, medical providers, police departments, judges – any person, company or entity which plays any roll at all in any of your cases will go into the Rolodex. This can be a bit confusing because in defining Matters we have already mentioned that every client has a matter (or multiple matters) in your system. So – is a client a Matter or is a client a Rolodex entry? The answer is BOTH. You will create a matter for your client and put the “meat on the bones” of that matter by attaching various Rolodex entries to it so you know who the players are. The first Rolodex entry you attach to any matter is your own client. The Matter contains information about the incident (or disability, or whatever it is that caused them to become your client in the first place), while the Rolodex entry FOR that client contains the expected biographical data (name, address, phone numbers, DOB, SSN, etc.) ABOUT the client. 13 Not every Rolodex entry has a matter associated with it, but every Matter has at least one Rolodex entry (the client) attached to it. User A User in Prevail is simply an employee of your firm: One person sitting at a desk logged into the Prevail system. Everybody who uses Prevail in your firm (e.g. attorneys, paralegals, secretaries, receptionists) is a user. Each user has a unique login so the system can track who did what. Warnings, reminders, system messages and appointments are all directed to specific users, so it’s important that each user be logged into Prevail using his/her own unique user name. Prevail is licensed by concurrent user. Therefore, you can create as many users in Prevail as you wish. The number of licenses you own determines how many of those users can be logged in at the same time. Task A Task in Prevail is a reminder of something that needs the attention of a particular user as of a particular date. A task starts showing up on the user’s task list on the STRT DATE of that particular task and stays on that list until the user marks it as completed. If a task is not completed on the due date, it simply stays on that user’s task list until it is marked as completed. A task is usually associated with BOTH a Matter and with a User. That way the task (and its completion date and time) show up not only on the User’s individual list, but also in the Matter to which it is attached. Prevail keeps track of when each task is completed or deleted to assure accountability. Appointment An Appointment in Prevail is exactly what the name implies: An event where a user (or group of users) is supposed to be at a particular place at a particular time for a particular duration of time. Hearings, depositions and meetings are all examples of appointments. The difference between a task and an appointment is that a task has a due date but no particular start or end time. An appointment, on the other hand, has a start time and an end time. Tasks automatically remain active if not completed, whereas an appointment happens on a specific day and does not move unless it’s rescheduled to another day. Attach Think of the matter in Prevail as the framework for a case. The matter is the skeleton and just about everything else is the meat on the bones. In Prevail you put the meat on those bones by “attaching” things to the Matter. What do you attach to a matter? Just about anything and everything. The most important thing you’ll attach is a number of Rolodex entries. For example, if your matter is a personal injury case there will be lots of Rolodex entries to attach to the matter: Plaintiff(s), Defendant(s), a couple of Insurance Companies, an Opposing Attorney, a Court and a bunch of Medical Providers, etc.. Each of these people or entities will exist in your Rolodex and be “attached” to the matter. It is important to note that many (if not most) Rolodex entries will be attached to more than one Matter. If one medical provider happens to treat 50 of your clients, he doesn’t go into your Rolodex 50 times. He goes into your Rolodex ONE time and that single Rolodex entry gets ATTACHED to 50 different cases. Throughout 14 Prevail you’ll see a small paperclip icon appear on various menu bars. The paperclip icon is the tool used throughout the system to attach things. History Creating a Matter in Prevail gives you a framework to attach Rolodex entries so you know who’s who in the case. That’s a good start, but there’s a lot more you need to know about that case than who the various players are. The whole point of Prevail is that you can pull up a matter and see EVERYTHING that has happened in that matter. This happens on the HISTORY page for that particular matter. Just about anything that happens in a case gets recorded on the History page. Documents (both incoming and outgoing), phone calls, emails, evidence, tasks, appointments and notes all go on the History page for each Matter. If you want to see what’s happened in a case, look at the History page. If you want to record something that has happened (e.g. a phone call or a note), go to the History page. If Prevail is used properly any user should be able to know EXACTLY what’s going on in a case by simply looking at the history page. Merge Document The information you put into Matters and Rolodex entries doesn’t just stay there. One of Prevail’s most powerful features is the ability to automatically merge that information into documents. Documents automatically created through Prevail’s merge document feature are called (appropriately enough) Merge Documents. The process is pretty simple in theory – Once a document template has been set up in Prevail, any Prevail User can merge that document template in ANY matter so that all the case-specific information, and rolodex information from that matter, and the related parties, is automatically inserted in the appropriate places in the document. The resulting (already merged) document is automatically saved on the History page of the matter in which it was merged. You can then modify this copy of the document like you would any other, if necessary. This feature, more than any other, allows Prevail users to leverage their time. Any document which your firm creates frequently should be turned into a Merge document. This is one area where a little setup time creating good merge templates will pay for itself many times over. If you’re using Prevail and NOT using merge documents I think it’s safe to say YOU’RE THROWING MONEY AWAY! Don’t overlook this powerful feature -- It takes a little time to set up good templates, but the document merge is probably the most lifechanging feature in Prevail – ESPECIALLY for a high-volume practice. Ledger Regardless of what type of law you practice or how you get paid, you’re going to want to track some combination of time, costs and fee payments in each of your cases. Prevail does this on the Ledger page for each matter. Basically anything to do with time or money gets recorded here. The page has a variety of powerful tools that allow you to sort, group, filter and subtotal by just about any criteria. Prevail also contains a completely separate Trust Ledger for recording deposits into, and payments from Trust. This is a great tool for satisfying the requirement for a secondary accounting method for your trust account. Database The word Database is used to refer to your Prevail data in general. Your database includes everything you’ve typed into it – Rolodex entries, matters, tasks, appointments, etc. Information 15 in a database is organized into rows and columns so the program can access and manipulate it in a consistent and orderly fashion. When you use Prevail you’re actually viewing and manipulating your database through the lens of the Prevail program. You may, from time to time, hear us mention ADS, which is short for Advantage Database Server. That is, in fact, the database we use to store all of your Prevail data. Report One of the advantages of having your information stored in orderly database tables is that the information can be extracted and analyzed through reports. A report is a feature in the Prevail program that lets you extract a virtually infinite variety of lists, counts, and even some calculations. In its most simple terms, a report is a list – A list of matters, a list of medical providers, a list of cases with approaching SOL deadlines, etc. Prevail comes pre-loaded with more than a hundred reports, and running them is as simple as choosing them off the reports menu. You can easily print them if you like. Reports also have the ability to count and do basic math. For example, you might want to know how many of your cases are at a particular status? Or, how many active cases does each attorney in your firm currently have? These are the type of questions that are answered by looking at reports. Prevail will handle the basic stuff right out of the box, but if you want to get fancy you can call our tech support staff and get custom reports created to do just about anything you want. Once we’ve created a custom report and load it onto your system you can run it any time you want. Just remember the old adage “garbage in, garbage out!” How it’s supposed to work in the real world Prevail has an awful lot of moving parts and it’s tough to describe how they relate to each other in a vacuum, so I’ll give you a brief example of a typical working scenario using a properlyimplemented Prevail system. For the purposes of this example we’ll spend a few minutes in the offices of ABC Law Firm, an imaginary personal injury practice. The phone rings. Mary, the new receptionist, is familiar with Prevail but has only been with the ABC firm for a few a days so she’s not familiar with any of the firm’s files or clients. On the other end of the phone a woman says, “Hi, this is Gladys – I need to find out what’s going on in my case.” Since Gladys didn’t even give her last name, Mary assumes she’s been around long enough to expect everyone to know her by first name. Without letting on that she has no idea who Gladys is, Mary clicks into the Prevail search window and types “Gladys”. Within one second Mary knows that the firm only has one active case with a client with the first name of “Gladys”, so she retrieves that matter. She can see before she even pulls up the matter that the case manager responsible Gladys’ case is Sue. Since Sue is currently at lunch, Mary tells Gladys that she’ll be happy to take a look at her file and see what’s going on. As soon as Mary retrieves Gladys’ matter, a sticky note pops up to let her know that Gladys is very hard-of-hearing, so she knows to speak slowly and clearly. Mary checks the History page in Gladys’ matter and sees that the last entry was made by Sue this morning at 9:23 a.m. In that entry Sue indicated that she called and left a message for Gladys to let her know that her IME 16 appointment with Dr. Walton has been scheduled for next Friday at 10:00 a.m. Mary passes this information along to Gladys, who promptly asks where Dr. Walton’s office is located. Mary looks at the Matter page in Prevail and clicks on Dr. Walton’s name. His address and phone number is instantly displayed. She gives this information to Gladys, who mentions that she has a few other questions for Sue and asks Mary to have Sue call her when she gets a chance. Mary adds a history entry to make a note that she talked to Gladys and gave her the information about her appointment. Since Gladys wants a call back from Sue, Mary links a task entry to her note so that Sue will get an automatic task alert to call Gladys when she gets back to the office. When Sue returns from lunch she has a Prevail message alerting her that Mary set a task for her to call Gladys. She opens the task and clicks on the Go To Matter icon, which takes her directly to Gladys’ matter. She gets Gladys’ number from the matter page and calls her back. While she’s talking to her she makes notes about her conversation. When the conversation is over she marks the task Mary set for her as “completed” so it disappears off her pending task list. Sue follows up on her conversation by sending Gladys a letter reminding her of her IME appointment. She clicks on the “Document Merge” button on her Prevail toolbar and selects the merge template called “Letter Reminding Client of IME Appointment.” The letter is created for her automatically and she is left in Word with a completed document with Gladys' personal information already inserted. Dr. Walton’s name and address have been inserted automatically as well as the date and time of the appointment. The whole process takes less than 30 seconds. She prints the document and drops it in the mail. The whole process has automatically been recorded for her in history, where the document has also been saved automatically. A time entry (for document generation) and a cost entry (for postage) have also been made on the ledger automatically. Anybody else in the firm can now see exactly when Sue created the document and can retrieve it with a single mouse click. Notice that in this example, Mary knew nothing about Gladys or her case but was still able to provide prompt, personalized service to the client. Whether or not they tell you about it, clients HATE it when they call your firm and nobody can tell them what’s happening in their case. The fact that only one person ever seems to know what’s going on and that person isn’t available doesn’t give clients a warm fuzzy feeling. The whole point of using an integrated system like Prevail is putting your firm in a position where just about anyone in the office can tell exactly what’s going in any given matter by simply looking at Prevail. If your staff can’t do that, you’re not using it correctly. The most important rule you can have in your office is this: “IF IT’S NOT IN PREVAIL, IT DIDN’T HAPPEN!” In my office we actually have a sign in the break room that says exactly that. Here’s why: The Prevail system is based on complete accountability for everyone and everything. It is designed so that, if used properly, NOTHING can fall through the cracks. The history page for each matter should read like the story of the case, with absolutely everything recorded there. Every phone call, every document sent, every document received, every email, every deadline – every action 17 of any sort. Since you can link a task for an individual user to pretty much any action, Prevail gives you the ability to follow up on an employee-by-employee basis to see what tasks are outstanding and which ones have been completed. Anybody can tell at a moment’s notice if somebody’s dropping the ball (i.e. not completing their tasks). If each employee simply completes his/her tasks in Prevail in a timely manner, nothing will fall through the cracks. The best case scenario is for Prevail to be used in this manner. Rather than taking anybody’s word for anything, management personnel can see exactly what’s going on by simply looking at each user’s task list and seeing whose tasks are being completed and whose are stacking up. Lessthan-scrupulous employees will no doubt resist this level of accountability. Some even go so far as to delete tasks off their task lists rather than completing them and marking them as completed. Unfortunately for those unscrupulous employees, The Prevail firm log keeps track of deleted tasks, too. If somebody deletes a task, Prevail knows exactly who did it, right down to the computer name and IP address, and exactly WHEN they did it. So: The best-case-scenario is that everybody uses Prevail for everything, and absolutely everything that happens in the office is recorded in Prevail. What’s the worst-case-scenario? You might think it’s the opposite (where nobody puts anything in Prevail and you just go on doing things the way you’ve always done them) – but you’d be wrong. The WORST case scenario is that SOME people in your office use Prevail for everything and come to rely upon it as the end-all gospel, while OTHER people don’t bother learning how to use it and just go on doing things the way they’ve always done them. Think about it: If you have no comprehensive system for knowing what’s going on in your cases, you pretty much have to go on a hunting expedition to find out anything. While that’s time-consuming and certainly no fun, at least you KNOW you have to go on a hunting expedition to find out anything and you’re inherently suspicious of anything you THINK you know. If you’ve got MOST things in Prevail so that MOST people know what’s going on and come to rely on the history records as being accurate, you’re at a much greater risk of getting an unpleasant surprise – like failing to show up at a hearing because somebody who DOESN’T use Prevail got a Notice of Hearing three weeks ago but never bothered to log it in Prevail and forgot to put it on your calendar. The people who use Prevail every day and use it correctly become used to EVERYTHING being in there. They have a high degree of confidence in the data they see because they’re used to having it at their fingertips and they’re used to it being right. One user doing it wrong can really screw things up for an office full of people who are doing it right. Here’s the bottom line: In order to work the way it’s supposed to, Prevail requires consistency of use. EVERY office has one or two people who don’t like to learn new things, don’t see a problem with the way they’re doing them now and will resist any system that makes their work product instantaneously trackable. These people will do their best to look busy and give you every lame excuse imaginable about why they don’t think they should have to use Prevail to do their particular job. Accept these excuses at your peril. Always remember the prime directive: IF IT’S NOT IN PREVAIL, IT DIDN’T HAPPEN. As I mentioned earlier, Prevail is simply too expansive to get up and running using the old poke around randomly and see what happens method. You have to have something of a plan. 18 Different firms might have different reasons for doing things in a given order, but I’ve found the best way to implement Prevail is to adhere reasonably closely to the following implementation outline: Administrative setup that needs to be done before end-users start poking around Set up Employees and Firm Information Set up Security Groups Review the Law Types/Case Types/Rolodex Types setup o Adjust as necessary Administrative functions that can be done concurrently with end-users getting trained Set up merge documents Set up intake questionnaire Set up processes Identify reports Functions that can be done by all users as they’re learning Prevail Begin building Rolodex Begin setting up Matters Firm-wide implementation meeting If we haven’t scared you too much, let’s move on to some housekeeping operations that need to be taken care of right off the bat. 19 Chapter 2: The Interface Okay – we’ve taken care of a little pre-implementation housekeeping and we’ve talked enough about the big picture so you should have a reasonable idea of the terminology and concepts at play here. By now you should understand that using Prevail (or any case management system, for that matter) is essentially an all-or-none proposition. NOW we can start poking around in Prevail. Our discussion of the Prevail user interface must be prefaced by this caveat: The interface is highly configurable for each user in the system. It can be changed to suit individual user preferences, and those preferences may be dramatically different between users. It is quite common to have one user’s Prevail screen look a certain way and another user’s screen to look like a completely different program. For example, one user may have his screen configured so that the pages of information in a particular matter appear as tabs along the bottom of the screen. Another user may opt to have these same data pages appear as buttons along the left edge of the screen. The data displayed doesn’t change, but Prevail allows each user to view it in the manner most appealing to him or her. Those changes are made under the File/User Settings menu. We’ll get to the specifics of that later, but for our purposes in discussion of the user interface, we’ll assume the standard setup (page tabs along the bottom, toolbar along the top). Logging In You can’t log into Prevail without a valid Prevail login ID. If you’re already set up as a user, log into Prevail using your login ID and password. If you’re running Prevail for the very first time and haven’t set up any user accounts yet, you’ll have to log in as SAMPLE. You can go into User Setup later on and set up actual users later on, but you have to get into the program first. The SAMPLE login will get you in. Prevail requires every user to have a password. The password for the SAMPLE login is “Prevail1234” (omit the quotation marks make sure there are no spaces). The Home Tab Once you’ve successfully logged into Prevail, you’ll be presented with a screen known as the Home tab (or Home page). Think of this page as a dashboard that tells you, as an individual Prevail user, the critical things you need to know about today. What appointments do you have? What tasks are coming due? Do you have any cases that are approaching the statute of limitations? Are there any Prevail system messages waiting for you? When you’re on the Home tab you’re not “in” any particular case – you’re merely looking at system-wide information that pertains to YOU as an individual. Information presented on the home page is different for each individual Prevail user. If user Bob logs in, he’s going to see HIS statutes, tasks, appointments and messages. If user Fred logs in somewhere else, it’s obviously not going to do him any good to see information that pertains to Bob, so he’s only going to see his own tasks, appointments, messages and statutes. It is possible to see statutes for others if desired. The home tab is the only place in Prevail where you’re not in any particular case. The home tab, by definition, shows you information that pertains to many different cases. It also shows you 20 information that may not pertain to any case at all (like personal appointments and tasks).Take a look at the graphic below for a brief description of the various elements of the Home tab: The Home tab is comprised of four main window sections, as described below. Note that if any of these sections are not applicable for your login ID you may not see all four windows (i.e. if you’re not a member of a team that has approaching statute warnings, you won’t see the Statute warning window at all). Each individual user within Prevail can customize the dimensions of his or her home page by dragging the horizontal and vertical bars between the window sections to change the size of the windows relative to each other. The Upcoming Appointments Window This window displays any appointments on YOUR calendar (that is, the Prevail calendar for your unique login ID) coming up within the next 7 days. You can access any of those appointments (to read notes, details, etc.) by either double-clicking on the appointment text or clicking on the VIEW icon in the mini-toolbar at the top of the Upcoming Appointments window. You can also add appointments right from here by clicking on the ADD button (the plus sign) in that same toolbar. You can also click the PRINT icon (the picture of a printer) in the same toolbar to print the currently displayed appointments. There are several other ways to print appointments in Prevail, all of which are covered in the Calendar chapter. Note that in the Upcoming Appointments window, as with most display grids in Prevail, you can pick and choose which fields are displayed on this grid and how they’re displayed. The Options icon on the far right (the one that looks like a Tetris game) will get you to a menu where you can choose the fields you want to display on this grid by placing check marks next to them. After choosing which fields you want to display you can also re-size the columns by dragging the vertical lines between the column header to the left or to the right. Prevail will remember which fields you want displayed and how wide you want the columns to be. 21 The Upcoming Tasks Window Prevail maintains a task list for each user in the system. A task is simply something that needs to be done by someone, on or by a particular date (i.e. the Due Date for that task). Any task can be related to a specific matter (e.g. “Call Dr. Fisher and schedule IME in Smith vs. Jones”), or completely unrelated to any matter (e.g. “Call landlord and get them to fix thermostat on upstairs A/C unit”). The three primary defining characteristics of tasks in Prevail are 1. Each task belongs to a SPECIFIC user, and 2. Tasks first appear on the user’s task list on their Start Date, and 3. Tasks remain active (i.e. they continue showing up on that user’s task list) until they are marked as completed. That is to say that when you set a task for somebody to do something today, it goes on their task list immediately. If they don’t do it today, it’ll still be on there tomorrow (and the next day, and the next day, etc.) until they physically mark it as completed. When they DO mark it as completed, it disappears off their active task list and goes onto their completed task list, indicating exactly when it was completed. This system, when used properly, insures total accountability and allows you to track completion of tasks delegated to other users. You can even have Prevail send you a message when tasks you have set for other users have been completed. We’ll get to all those details in the chapter on Tasks. For our purposes here you only need to know what they are as they relate to the Upcoming Tasks window on the home page. This window shows YOUR active (pending) tasks regardless of who set them and what matter (if any) each one is attached to. This gives you a quick overview of all things that need your attention. You can zoom in and view the detail of any task on the list by either double-clicking on the text of the task itself, or by highlighting the task and clicking the VIEW button in the mini-toolbar at the top of the Upcoming Tasks window. If you want to set a new task for yourself or someone else, you can do so by clicking the Add icon on that same toolbar. You can also delete a task by clicking on the Delete button, but keep in mind that tasks should almost never be deleted. You only delete a task if it is no longer applicable (e.g. you had a task set to draft a motion in a case that just settled) and isn’t EVER going to be done. In most cases when a task has been completed you should make it go away off this display by highlighting the task and hitting the Complete Task button (the checkered flag icon) on the mini toolbar at the top of the Upcoming Tasks toolbar. If you think you’re getting rid of the record of a task having been set for you by someone else by simply deleting the task, think again. Prevail tracks just about everything (including who deleted tasks, when and where they did it) in the firm log. Statute Warnings List Every case type within Prevail has the ability to automatically calculate and display statute warnings on the home page of the people on your staff who are responsible for those cases. Multiple people within a security group assigned to a case can receive these statute warnings. Security group setup and statute warning parameters are covered in detail in their respective administrative functions chapters. All you need to know about statute warnings at this point is that any statute warnings for any given matter will continue to show up on the statute warning lists of the appropriate staff members, and will also pop up in a separate window any time anybody accesses that matter. Once somebody on the team dismisses the popup statute warning, a record is made in the Firm Log to indicate who dismissed the statute warning and 22 when. Like the other windows on the home page you can change display column widths by dragging the vertical bars between fields on column header. You can also pick and choose which fields are displayed in the grid by clicking on the Options icon in the mini toolbar above the Statute Warnings List icon. You can also select which users Statute Warnings you want to see. If you select none, the Statute Warning section will no longer be displayed and your Message List will take up the entire left side of the screen. In that case, “Select Users to Display in Statutes” will be available under the Options button in the Message List section in case you change your mind. The Prevail Messages Window Prevail has a robust messaging system built in right in. It allows you to communicate instantly with other Prevail users. It also allows the system to communicate with users either individually or in groups. The Messaging function will be covered later in its own chapter, but we’ll go over the basics here anyway so you understand what you’re seeing on the Home Page. The Messages window on the Home page will show you (by default) any recent messages in your inbox. Notice that just to the right of the words Message List at the top of this window there is a pull-down which will let you select a couple of other display options. Choosing Sent from this pull-down will display only messages sent BY you to other users. Selecting Inbox will display ALL messages in your inbox, regardless of who sent them or when they were sent. Regardless of the view you have chosen, you can view any message by simply double-clicking on it or by highlighting it and clicking on the View button at the top of the Message List Window. If you wish to send a new message you can do so by simply clicking on the NEW (plus sign) button at the top of the Message List Window. You can get rid of old messages by selecting them in the window and clicking on the Delete button (the red X) at the top of the Message List Window. Like the other windows on the home page, you can change the fields displayed in the grid by clicking on the Options button (the one that looks like a Tetris game) at the top of the window. After you choose which fields you want displayed you can set the column widths by dragging the vertical lines between the column headers until each column is the desired width. Last Matter Tab Take a look at the bottom of the Home tab. You’ll see two page tabs. The one you’re currently sitting on is the Home tab we’ve just described. When you first load Prevail, that’s where you always land. The tab to the right of that is the Last Matter tab. Prevail always remembers the last matter each user accessed. You can always jump straight to the last matter you were in (immediately before the last time you closed Prevail) from the HOME tab by simply clicking on the Last Matter tab. There are lots of other ways to pull up matters, but that’s a handy shortcut to get right back to the last one you were in. Navigating Between Matters As we mentioned earlier, when you first log into Prevail you land on the Home Page. You’re not in any matter or case yet. This is simply a dashboard that shows YOUR upcoming appointments, YOUR pending tasks, YOUR pending statutes and YOUR pending messages. Notice the 23 operative term here is “YOUR”. Each person who logs into Prevail sees their own stuff. Two users can log in side-by-side and will see completely different information because each is seeing his or her own appointment, task, statute and message lists. How do you pull up an actual case? There are a number of ways to do it and they’re all quite simple. The most direct is the Search tool on the left side of the Prevail toolbar at the top of your screen. Prevail uses a combined search tool that lets you search for matters and Rolodex entries simultaneously. You don’t have to know whether a person has a matter or is just a Rolodex entry, because the search tool will find them either way. Notice on the left side of the Prevail toolbar at the top of the screen there’s a blank space where you can type data. To the right of that space there are two tool icons: The Search button (The Binoculars Icon) and the Power Search button (the Cordless Drill Icon). The regular combined search is the one you’ll use most often, so we’ll cover that one first. Searching for Matters and Rolodex Entries: The Combined Search Tool Prevail allows you to simultaneously search Rolodex and contacts and matters using a handy combined search tool on the left side of the toolbar. This tool allows you to type any word or partial word into the search window, then either click on the Binoculars icon or simply press the ENTER key. The text string you just typed will then be submitted for a search throughout all Matters (both open and closed matters, as well as prospects) and Rolodex entries. After you’ve typed in a search string you’ll see the following window: You should notice a couple of things about this window. First of all, notice that in the search criteria window we only typed a partial word. When it comes to searching in Prevail or any other database, LESS IS MORE. The default for this search is “Any Part of Matter Title”. The Matter Title is a field in Prevail which is essentially the name of the case as you refer to it internally. When Prevail creates Matter titles it normally does so using the name of the Plaintiff and Defendant, so that you could find the case by typing in any portion of the Plaintiff’s name OR the Defendant’s name. It will find all things that match what you typed as long as the word or 24 partial word is found SOMEWHERE in the Matter Title. Cases with no plaintiffs or defendants (e.g. Social Security, Wills & Trusts, etc.) are generally search using just some portion of the client name. In this case the client we were looking for was “Michaels” and the search tool found it just fine even though we only typed “mich” in the search window. If there were more than one Michaels (or Micheals, or Michells) on the matter list, it would have displayed them all and let us choose which one we wanted by simply clicking on it. What if we’d typed the whole name? Assuming we spelled it correctly, we would have found it just the same. But what if the client’s name was actually spelled “Micheals”? We wouldn’t have found it by typing “Michaels” because the search tool searches for EXACTLY what you type. If you type something different than what the name really is you’re not going to find it -- That’s why less is more when searching within the database. We get tech support calls on a daily basis from clients who insist that Prevail “ate” one of their cases because they can’t find it. In 99.99% of those cases we connect to their system and find they were searching for something that was almost (but not quite) the right name, and they were typing the whole name as they thought it was spelled. Our support technicians always work “magic” in finding the missing matter by simply typing a partial name, retrieving the matter and pointing out that it was there all along. You can also search by Social Security Number, or the last 4 digits of the social, phone number, or case number. All of these options can be used with or without punctuation. Another thing you’ll notice about this search results window is the pull-downs available to the right of the search string which allow you to limit the scope of your search. If you have a big firm and you’re looking for a file you know is closed, you can limit your search to only closed files by simply choosing “Closed Only” from the Open/Closed pull-down. In a big database this will save you from scrolling through results which may not be relevant. You can similarly limit your results by Law Type or search only through Prospects (i.e. cases being tracked but not yet signed up). NOTE: the search remembers your settings! Therefore, if you set a filter to show "Closed Only,” that’s how your search will be set the next time you use it, even after you close Prevail and re-launch it. There’s one more thing you should notice on the search results screen. See the tabs at the bottom of the screen, labeled “Matter Search” and “Rolodex Search”? As we’ve already mentioned, the default search is by any part of the Matter Title field. That’s great for looking up cases, but what if the name you’re searching for is someone who doesn’t even have a matter in your system? What if it’s some insurance adjuster or expert witness who happens to be in your Rolodex? No problem. You do your search exactly the same way. If the name or partial name you typed is found BOTH in Matters AND in the Rolodex you’ll get those two tabs at the bottom to let you know the search string was found in more than one place. The Matter Search Tab will show you all Matters which match your search string, while the Rolodex Search tab will show you all Rolodex entries which match your search string. 25 Power Search Have you ever recalled typing something in a Matter, but you can't remember in which matter you made this notation? If so, you'll love Prevail's Power Search feature! It allows you to search for a character string within any of the tabs on Prevail, as well as within Appointments, Tasks, Rolodex entries, and Sticky Notes. It searches both the Subject line of your entries, as well as any details that you entered within the entry in the Notes field. Follow these steps to use Prevail's Power Search. 1. In the search window on the left side of the Prevail Toolbar (at the top of your screen), type in the search string you’re looking for (remember, LESS IS MORE) 2. Click on the Power Search Tool (the drill icon) to the right of the search window 3. If necessary, change the date range for the search. Do not leave the Start Date or End Date fields blank. a. The search defaults to searching ninety days in the past through the present date. b. The date range only applies to the appointments, tasks, History, and Ledger entries that the Power Search locates. 4. A results window will be displayed with tabs at the bottom indicating where within Prevail any exact matches for your search string was found. Click on those various tabs to view search results from different parts of the program. To zoom in on any matter, note or entry, simply double-click on it. 5. Here’s a sample of what the results window might look like: Recent Matters on the File Menu Prevail remembers every time you pull up a case. This comes in handy if you’re working on one case, then get a phone call for another case and have to stop what you were doing and pull up that case. When you’re done working on the second case and ready to go back to what you were doing in the first case you don’t have to do another search for the client name. Since 26 you’ve already been in that matter recently, all you need to do is click on the FILE menu at the top left corner of your Prevail screen and select the matter from the pull-down list. The last ten matters you’ve accessed will be on that list and you can instantly jump to any of them by simply clicking on the matter title in the display list. “Go to Matter” Icon As you work in Prevail you’ll see a number of different windows pop up for tasks, appointments, documents, time entries, cost entries, etc. Any of these windows can be linked to a specific matter – in fact most ARE linked to matters. That is to say, if you have an appointment (let’s say a deposition in the Smith vs. Jones Matter), it is not only a part of YOUR calendar, but a part of the Smith vs. Jones matter as well (i.e. it will show up on the Events tab for that matter). Any time you’re looking at an appointment, task, email, etc. that is linked to a matter, you can jump DIRECTLY to that matter without doing a search by clicking the “Go to Matter” icon (the picture of a file folder) on the mini-toolbar at the top of the window. As soon as you click on the icon you’ll immediately jump to the linked matter. This works for all appointments, tasks, messages, etc. Extras As you'll soon discover, there are numerous extra features that you'll enjoy using as you work more in Prevail. This section provides an overview of those features. Do Not Disturb Prevail contains a Do Not Disturb function. You’ll find it on the tool bar. It informs other users that you are in Do Not Disturb mode, and for how long. While in DND mode you will not receive any message from other users or from the system, with the exception of appointment and task reminders. When you come out of DND mode, you will receive all your messages that have been waiting to be delivered. To enter DND mode, simply click on the Do Not Disturb button on the tool bar. When you do, you’ll see a screen where you can enter a message to display to other users. You’ll also see a drop down field where you can set the duration from fifteen minutes up to eight hours. Once your DND duration has expired, the system will automatically show you as available. Also, if you logoff while in DND mode, your status will automatically be shown as logged off. You can exit DND mode at any time by clicking the Do Not Disturb button and then click the End Do Not Disturb button. With the addition of the Do Not Disturb feature, we’ve added a status icon in the Employee Search window. This window appears whenever you click on a dropdown field that lists users, e.g. Appointment, Calendar, Message, Task, or Task List. For each user you will see one of three status icons in front of their name: Logged In, Logged Out, or Do Not Disturb. When you hover your cursor over the Do Not Disturb icon, it will display the user’s DND message and it will show the time when their DND status is set to end. When you hover your cursor over the Logged In icon, it will display the PC name where the user is logged on, and the day, date, and time when they logged on. 27 Grid Layout Control Throughout Prevail, most of the tabs have a grid layout (i.e., the screen layout appears as a table, with columns and rows of information), some have more than one grid. This layout is a useful feature as it allows you to filter, group, and/or sort the entries on the page. For example, if you are working through your task list and want to filter your view to display only a certain type of tasks, you can do so by applying a filter. Or, if you're working on the History tab and want to quickly find all the notes entered by a particular user, you can use a filter to make your search much faster! The grid layout exists in the following key areas of Prevail: Calendar o Task List View o Appointment List view Claims/Processes Damages Disabilities Employment/Work Events o Appointments o Tasks Evidence History Home tab o Message List o Statute Warning List o Upcoming Appointments o Upcoming Tasks Ledger Medical Negotiation Notes Photo Trust Ledger You may apply multiple grid settings at the same time. For example, you may choose to first filter on a particular column or columns and then sort in date order. Your grid settings DO NOT affect the data and they do not affect any other user. They only apply to how you see the data in the particular grid you’re viewing. All your grid layout settings, including grouping, sorting, column position, and options, will be saved by the program and will remain in place from matter to matter, and login to login, until you change them. 28 All your filter settings will remain engaged from matter to matter until you logoff. However, you can create and save custom filters and use them whenever you like. More on that later. Grid Options In every single grid in the program you’ll see the Options button: . It is unique for each grid, and the settings are unique for each user. The Options settings allow you to select which columns of information you wish to see in each and every grid in the program. Here’s a sample of the Options on the Upcoming Tasks grid on the Home tab. In every grid, you simply check the columns you want to display, and uncheck those you do not. The program will automatically save your settings from matter to matter, and login to login. You can change them anytime you wish. You should investigate the Options button on every grid to see all the data columns that are available. For example, the Evidence, and History grids allow you to view certain information that was created elsewhere in the program. Filtering Grid Entries When you are in any area of Prevail that contains a grid layout, you will see a drop-down arrow for each column header when you hover over it. To apply a filter, simply click on the drop-down arrow for the column you wish to filter by, and choose the appropriate selection(s). The filtered view will display. 29 To clear a filter and return to the full display, click on the “X” in the lower left of the window, or click on the drop-down arrow for the column header again, and choose "All". Saved Filters in History and Ledger If you have a particular grid setting that you use often on the History or Ledger tabs, you may choose to save that particular view. That way, you don't have to repeatedly apply the same settings each time you want to apply that filter. Follow the procedures above for filtering grid entries to configure the filter(s) to display as desired. Then, click Filter in the upper right area of the grid. Click Create Filter from Current View. Enter a name in the Filter Name field, and click Save. The next time you need to quickly apply the current display settings, click Filter, and then click on the name of the appropriate filter. To return to the regular grid view, click on Filter, and choose to remove the filter. Or, click on the “X” in the lower left of the window. Sorting Grid Entries You may also sort entries within a grid layout. To apply a sort based on a particular column (e.g., date) click on the column header label (the word itself, not the drop-down arrow). Each time that you click on the column header label, the entries will reverse their sort order, based on that column. To sort by more than one column, hold down the Shift key and click the column headings in the order in which you want them sorted. For example, to sort History by Date and Time, hold down the Shift key and click the Date column heading; continue holding down the Shift key and click the Time column heading. 30 The program will save your sort order for that particular grid from matter to matter, and login to login, until you change it. Grouping Grid Entries You may group entries within a grid layout, as well. For example, you may group the entries on the History tab according to their type, rather than having all of the entries displayed in order of their entry. You can group by multiple columns. The example above is grouped by Type by Category. To apply a grouping within a grid, click on the appropriate column header, and hold your left mouse button down while dragging the column header up to the shaded area just above the grid. (Green arrows will appear to help guide you.) Release your left mouse button, and the entries in the grid will then be classified in groups. Click on the “+” sign next to any of the group names to expand the group and show all entries in that particular category. To remove a group setting, and return to the normal view, drag the column header back to its original position. The program will save your grouping order for that particular grid from matter to matter, and login to login, until you change it. Printing Tabs 31 Prevail allows you to print entire tabs or particular sections of tabs. On each tab within the program, you'll see a Print Screen button in the Prevail toolbar at the top of the screen. Click on this button to print a screenshot of your entire view. Alternatively, you may print individual sections of a tab. On each tab section, you'll notice a Print button. Click on this button to print only that specific section of the tab. Viewing Notes (Detail) By default, tabs in Prevail do not display the notes (or detail) that you input within a particular entry. In order to see these notes, you must double-click on the entry to open it and see all notes. 32 However, you may choose to display the notes/detail as part of the regular grid view. In order to display notes in the grid, click on the Options button in the upper right area of the grid, and make sure that Detail is checked. Daily Backups of Your Prevail Data It is extremely important that you backup your Prevail data daily! In order to do this, you'll need to save a copy of your PREVAIL_SERVER folder to an external device, such as a USB external hard drive. The size of your database will determine the capacity that you will need for your backup device. To backup your data, browse to your “X:\PREVAIL_SERVER” folder (where “X” represents the drive on which your Prevail server is installed). Right-click on the folder, and click on "Send To". Choose the appropriate device for backing up your Prevail data. Regardless of the type of backup software, backup method, or backup device you use, You MUST regularly do at least a partial restore of your data from your backup. That’s the only way to be absolutely certain that your backup is good. If this all sounds like a bunch of “geek speak” and you have no idea what I’m talking about, then make an appointment to discuss it with whomever maintains your server. You NEED to understand the importance of verifying the integrity of your backup. And, make sure it gets done regularly. Here’s the bottom line. Every year we have at least a few clients who didn’t do this, and didn’t find out until after they experienced some sort of catastrophic system failure, that their backup was worthless. Then it was too late. Don’t be one of them! 33 Chapter 3: The Rolodex Rolodex The Rolodex is the heart of Prevail. It works just like a manual rolodex (that floppy, rolly thing on your desk with all the cards in it) except that the cards in the Prevail Rolodex are virtual. All people, companies and entities who play a role in any of your matters must be entered in the Rolodex in order to be attached to a matter. Each party should be entered into the Rolodex only once. If the same medical provider treats 100 of your clients, that provider gets entered into the Rolodex ONE time and that single Rolodex card gets attached to 100 different matters. The same goes for opposing attorneys, adjusters, insurance companies, experts, etc. The Rolodex is shared among ALL users in your firm. This is something of a double-edged sword: On the positive side, it means that once ANYBODY in the firm creates a Rolodex entry, it is available for anyone else to use and can be attached to any matter without that same information being re-typed. On the negative side, it means that is somebody puts something into the Rolodex in a less-than-perfect manner (misspelled, all caps, etc.), that Rolodex entry will show up in the same less-than-perfect manner in every case to which it is attached. Fortunately, it’s a quick fix – you can simply fix the Rolodex entry one time (in the Rolodex) and all cases to which it’s attached will now show the corrected version. Although as a general rule, each person, company or entity should only be entered into the Rolodex ONE time, there are some exceptions to that rule. Let’s say a medical provider has three different offices. If correspondence (medical records requests, etc.) need to go to all three of those offices, then each office should have its own Rolodex entry. The names would be the same but the addresses would be different in each of the three records. Users could then simply attach the appropriate entry to each matter. Adding New Rolodex Entries The Rolodex is a tool that is woven throughout the fabric of Prevail, yet largely invisible until you need it for something. You will rarely be in the Rolodex directly, but almost everything you do will access the Rolodex in some way. Any time you search or attach anything to any matter, you will be in the Rolodex. If you click on any matter tree entry and make changes to the information displayed to the right of the Related Parties window, you are changing that entry in the Rolodex. Any time you complete a New Prospect Questionnaire you are, most likely, creating at least one Rolodex entry. You can also (though you will rarely need to) put a new entry directly into the Rolodex. This can be done from anywhere in Prevail by simply clicking on the New button on the toolbar at the top of the program (this button has an icon shaped like a star and is on the right-hand side of the toolbar). When you do this a menu will pop up below the toolbar. Chose Rolodex and you’ll be presented with the following window: 34 This screen is a blank Rolodex card where you can input the contact information for your new entry. You will notice that some of the fields are highlighted in Yellow. This is to let you know that those fields are required. You MUST include a Rolodex type for each entry, but it merely serves as the default for that entry – any entry can later be attached to any Matter as ANY type, so don’t get too hung up on the type at this point. Because some entities in the Rolodex are people and others are companies, you must fill out EITHER the proper name fields or the company name field. You don’t have to fill out both but you can if you want to. Once you have filled in the required fields you can save your entry into the Rolodex by clicking the Save button at the top of the Rolodex entry window (The Save icon looks like a pencil). Once your entry is saved it can be attached to this or any other Matter. Although we have told you how to create a new Rolodex entry directly from anywhere in Prevail, it should be noted that you will almost never need to do it this way. Most of the time you will create entries as necessary in the process of attaching them to matters. It’s actually a better way to do it because when you’re attaching a Rolodex entry to a Matter, the process forces you to search for that entry FIRST, then gives you the opportunity to add it (using the New Contact button) if you find that it’s not already in your Rolodex. Don’t worry, the system will warn you if it looks like you’re about to create a duplicate entry in the Rolodex. Avoiding and Consolidating Duplicate Rolodex Entries When you create a new contact, after you’ve typed a few characters in the Office field, or First Name, or Last Name, you may see a Potential Duplicates section appear. It looks like this: 35 This will help you to avoid creating duplicate rolodex records for the same person or company. Also notice there is a Consolidate tab in the Rolodex window. Should the need ever arise, we have included a tool that can help consolidate two (or more) Rolodex entries into one. Often times, you will find that a person (or party) has been entered into your Rolodex more than once. It is also common, for these people or parties to have more than one Matter associated with them. This tool will show rolodex records that appear to be duplicates, based on your selection settings on the Consolidate tab. It will consolidate them into the entry you currently have open, and remove the other matching Rolodex entries. Any Matters that were associated with the other matching Rolodex entries will now be associated with just the one entry. Also, any notes contained in the removed entries will be combined into the remaining entry. You may edit the notes as you wish. To consolidate multiple rolodex entries into one, open the entry you want to keep. Click on the Consolidate tab. Adjust the sliders for First Name, Last Name, and Office to increase or decrease the number of characters being compared for each of those fields. Click on the check box next to each entry you want to combine into the record you have open, and click Next. 36 You’ll see this warning: “The following list contains all of the fields that have data that does not match the data contained in the contact (contact office/name). This data will be permanently lost if the data is combined and cannot be recovered. Please use caution when proceeding.” Click Next to proceed. The next screen you’ll see will contain all the notes from all the Rolodex entries that are about to be consolidated. You may edit the notes if you wish. Then click Finish. You’ll see a final warning and you must enter your password before you can click OK to complete the consolidation. Putting Sticky Notes on Rolodex Entries You may have noticed that there is a button on the Rolodex entry screen called Sticky Note. That is a powerful feature, but one which should be used sparingly. A Sticky Note is a pop-up message that can be attached to a Rolodex entry to inform all users of some important piece of information whenever they view that entry. Sticky notes are, by design, somewhat of a nuisance. If you attach a sticky note to a Rolodex entry it will pop up any time any user views that Rolodex entry. They will not be able to even see what’s underneath it until they acknowledge and close it. Similarly, if you attach a sticky note to a Rolodex entry and that Rolodex entry happens to be attached to a whole bunch of Matters, the sticky note will pop up every time any user pulls up any of the Matters to which the Rolodex entry bearing the Sticky Note is attached. That’s a whole lot of acknowledging and closing, so you don’t really want to attach a sticky note to a Rolodex entry unless you have a good reason. 37 To attach a Sticky Note to a Rolodex entry, first retrieve the entry you want to attach it to, then click on the Sticky Note button on the Rolodex window toolbar. You will be given an entry screen to type your note. As soon as you click the Save button in the same window, your note will be saved and will immediately begin popping up anywhere that Rolodex entry is displayed. Here’s what a completed Rolodex sticky note looks like (and a pretty good reason for creating one): You can also attach a Sticky Note to a Matter. The same basic principles apply. Deleting a Rolodex Sticky Note To delete a Sticky Note attached to any Rolodex entry, simply access the entry. When the Sticky Note pops up, click the Delete button at the top of the sticky note. 38 Chapter 4: Matters Matters What’s a matter? In Prevail lingo, it’s a case. Just remember that as far as Prevail is concerned, a matter is a case and a case is a matter. It may be a case for a new or existing client, or for a potential client (which Prevail refers to as a Prospect). Matters and Prospects, open or closed, all have the same functional capabilities in Prevail. A matter contains all of the related parties (attached via the Rolodex), facts, notes, critical dates, tasks, costs, appointments documents, and whatever other information you need to store about a SINGLE cause of action (if it’s a litigation matter), a SINGLE work-related accident (if it’s a Workers’ Compensation case), or a SINGLE disabled person (if it’s a Social Security case). Get the picture? The key word here is SINGLE. Prevail can contain as many matters as you want. Some firms have a hundred, some have tens of thousands. When you’re going through your daily routine, you’ll be going from matter to matter as the need arises, working first in one matter, then moving on to the next. Think of each matter as the skeleton or framework of the case. It’s a structure to which you attach things. What do you attach? Just about anything! You start with Rolodex entries. Who’s who in the case? Plaintiff, Defendant, Judge, Police Department, Medical Providers, Insurance Companies, Adjusters – these are all Rolodex types that would get attached to a typical personal injury matter. A social security matter who have a whole different set of Rolodex entries attached (Claimant, SSA Office, Vocational Expert, Medical Providers, ODAR, etc.). There’s usually a bit of overlap in the types of Rolodex entries attached between one law type and the next, but you should get the picture by now. Because you can create your own Rolodex entry types, if they don’t already exist in Prevail, you can use Prevail to handle ANY kind of case. We don’t even have to know what your Rolodex types mean (as long as you do). The Matter Tab By now you should understand what a matter is and what rolodex entries are. In any given matter, the place where those two concepts intersect is the Matter Tab. Every matter in Prevail has a Matter Page. Pull up any matter and click on the Matter tab at the bottom of the page (it’s the second one from the left) and you’ll see something like this: 39 Window Resizing You may have noticed that there are lines, both vertical and horizontal, on the Matter page between the various sections. Prevail allows you to resize any of these sections and it remembers your settings so that if you resize them and close the program, they’ll still be the way you left them when you restart the program. Any line or bar in Prevail that has four dots (i.e. “….”) in the middle of the bar is a sizing bar. You can move any of these bars either, up and down (horizontal bars) or left and right (vertical bars) by clicking and dragging anywhere on the bar. The windows will be resized accordingly. This feature works the same way throughout Prevail. Virtually every grid column anywhere in the program can be resized by clicking on the dividing line on the header bar and dragging it right or left. Related Parties: The Matter Tree Now let’s take a look at the various parts of this page. Starting at the top left you’ll see the Related Parties window. This part of the page tells you who’s who in the matter. As you attach Rolodex entries to the matter they’ll show up in this window. Note the lines connecting the entries and the fact that some Rolodex entries are indented like an outline. This is to indicate hierarchy and the fact that, at least for the purposes of this case, some Rolodex entries are associate with other Rolodex entries. For example, a Defendant in a case might have an insurance company, an adjuster and an attorney attached TO THE DEFENDANT. It makes sense when you think about it -- If a case has three defendants, each with their own insurance company, adjuster and attorney it wouldn’t make any sense to just have nine Rolodex entries randomly attached to the matter. You’d have no way of knowing who represents who. Prevail allows you to use hierarchy when you attach Rolodex entries so it’s clear which entries go together. Notice that on the right side of the page you have a number of fields of information about this particular matter. Exactly what you see on the screen changes depending on the law type you’re looking at, but regardless of law type all of this information will relate to this specific 40 matter. Typically this is where you see information about the cause of action (accident date, accident description, case type, SOL date, etc.), the status of the case and who within your firm is working on the case, i.e. Case Manager, Lead Attorney, and Hearing Attorney. It is important to note that the Related Parties window on the left side of the screen and the matter information on the right are interactive. That is, when you click on various parties on the left side of the screen, what you see on the right side of the screen changes to match the party you click on. If you click on the matter title at the very top of the window on the left, the right side of the screen will display matter information as described in the previous paragraph. If, however, you click on any of the names in the related parties window (also referred to as the Matter Tree), the information you see on the right side of the screen will change accordingly. For example, if you click on a Medical Provider on the left side of the screen, the right side of the screen will display the full contact details of that medical provider as well as a treatment history detailing when and why this medical provider treated this patient. If you click on the Court, you’ll see full contact details as well as well as case-specific details such as court case number and county of filing. You can attach as many Rolodex entries as you want to a case, but there are a couple general rules of engagement you must adhere to in order to insure that your hierarchy actually makes sense. They are as follows: Medical Provider – must be attached to an individual, plaintiff/claimant. Medical providers treat people, not cases, so you have to attach them to the person they treated. Also, medical history follows the person. Therefore, if you have more than one case with your client, the medical detail records for that client will show up automatically in all the other matters for that client as well, but only on the Medical tab. You’ll be able to tell at a glance which records belong to the matter you’re viewing, and which ones came from other matters. Employer – must be attached to an individual, plaintiff/claimant. Employment history follows the person, and functions just like medical history. Only on the Employment/Work tab will you see employment history from other matters for the same client. Referral Source – must be attached to your client. Opposing Counsel – should be attached to the party they represent. Insurance Company – should be attached to the party they represent in the case. Adjuster – should be attached to the insurance company they represent. 41 Related Matters for the Client – When you see that the folder button on the top right of the “Related Parties” section is active, it indicates that you have one or more other matters for this client. You can click on it to easily go to any of the other matters listed there for this client. Attaching Rolodex Entries to an Existing Matter The mechanics of attaching a Rolodex entry to a matter are simple. From the Matter page, simply click the ATTACH button at the top of the Related Parties Window. When you do, the following window will be displayed: This window gives you the opportunity to search your Rolodex for the entry you want to attach to this matter. Type any part of the name (first, middle, last, OR company), press the Enter/Return key and all matching results will be displayed. Remember when you’re searching in the Rolodex (or anywhere else in Prevail) LESS IS MORE. You’re almost always better off typing a piece of a name rather than the whole name. Even if you only know the first couple of letters you can scroll through the list and choose from among the matching entries. When you find the one you want, click on the desired entry and continue the attach process by selecting in the bottom left part of the window WHERE on the matter tree you want to attach this entry (this is the hierarchy we talked about earlier, which allows you to attach an entry either generically to the matter or to another Rolodex entry already attached to the matter). You can also choose the role the person or company you’re attaching plays in this particular matter, using the “Attach As” pull-down field on the bottom right. We include the attach as option because it is quite common for a Rolodex entry to play one role in one case and play quite another role in another case. You might have a medical provider who is a treating physician in one case, but refers another one of his patients to you. Therefore, he would be attached to that matter as a referral source rather than a medical provider. Attaching a Rolodex entry to a matter as a different type doesn’t change its default type in the Rolodex – it simply defines the role that this person or company plays in THIS particular matter. 42 Once you have chosen the desired Rolodex entry, where in the matter tree you want to attach it and the role that Rolodex entry plays in this case, you complete the process by clicking the Attach button at the top of the window. You can even attach the same party to a matter more than once, in different roles. For example, if Dr. Jones referred one of his patients to you and you’re now representing them, you would attach Dr. Jones to the client as Medical Provider, and you would also attach Dr. Jones as Referral Source. Adding a new Rolodex entry on the fly This process as we’ve just described it will be repeated thousands of times as you build your cases. It only takes a few seconds because most of the time you’ll simply be choosing entries from your central Rolodex rather than typing new information from scratch. Occasionally, however, you’ll want to attach a Rolodex entry to a case, only to find that it’s not in the Rolodex at all. It is for this reason that we’ve included the New Contact button at the top of the window. Always search FIRST, but if you don’t find the entry you’re looking for you can always add a new entry by clicking the New Contact button and adding the entry from scratch. Once you do that you can continue the attach process as previously described. There are a few other features of this window worth mentioning. One is the “Display List” checkbox. Most of the time you don’t need it, but there will be times when you’re not sure of a name. You can simply choose the appropriate Rolodex type (if desired) and check the Display List box to display an alphabetical list of ALL Rolodex entries. You can then scroll through the displayed entries and choose the one you want. Another helpful option when searching for a Rolodex entry is the “View” button. If you’re not quite sure a displayed entry is the one you want and would like to see the full entry, simply click the View button. The full entry will be displayed in a new window. If it’s not the one you want simply close the window and keep looking. Detaching a Rolodex Entry from a Matter Let’s say for sake of argument that you (or somebody else) has attached the wrong entry to a matter. No big deal – you can simply detach the entry from the matter. That won’t delete the entry from the Rolodex – it will simply remove its association with this matter. To remove a Rolodex entry from a matter, simply click on the entry in the matter tree (The top left window on the Matter page), then click the “Detach Related Party” button at the top of that window. Depending on your screen resolution and your user settings, that button will probably looking like a red “Do Not Enter” sign. In any case, it’s the one to the right of the Attach button. When you click that button you’ll see a message that looks like this: 43 This is just to warn you that if you delete a related party from a matter and there are other parties attached to the one you’re deleting, you’re going to delete all of them from this matter simultaneously. This is just Prevail’s way of asking if you’re sure you really want to do what you’ve just asked it to do. If you answer in the affirmative by clicking the “Detach” button in the warning window, the entry will be removed. If you click cancel the whole operation will be cancelled and you’ll be right back where you started with nothing changed. There are a couple exceptions to that process, however. You may have noticed that when you attach medical providers and employers to the matter tree you are given additional fields to describe their history with this plaintiff/claimant. Prevail protects the integrity of this additional information by keeping you from accidentally breaking the link. If a medical provider or employer truly has been added in error you can still remove it, but you must first remove the treatment history (for medical providers) or employment history (for employers) records. If you click on the medical provider (or employer) in the matter tree, the associated records will be displayed in the window at the bottom of the page to the right. Notice that at the top of the window where this information is displayed (either “Medical” or “Employment,” depending on which you have clicked on) you have a “Delete” button. Clicking this button allows you to delete the currently-selected employment or medical record. Both employment and medical allow you to include multiple records. As soon as the last history record is deleted, the employer (or medical provider) will also be removed from the matter tree. Keep in mind that the medical information which appears on the Matter tab as medical history entries attached to medical providers is exactly the same information that appears on the Medical tab. Deleting this information from the Matter tab will also cause it to be deleted from the Medical tab (and vice-versa). Viewing Other Matters Related to a Rolodex Entry As we’ve already mentioned, any Rolodex entry that appears in one case might very well also show up in any other number of other cases. This information is handy to have if you’re on the phone with somebody (say an adjuster or opposing attorney) with whom you have more than one case in common. Rather than making separate calls and playing phone tag, why not talk about those other cases right now? From the Matter tab you can find out what other matters an entry appears in by simply right-clicking on that Rolodex entry in the Matter tree (that is, the “Related Parties” window in the top left corner of the Matter tab) and selecting “Related 44 Matters”. You can instantly jump from the current matter to any of those listed matters by simply double-clicking on the Matter title in the displayed window. Viewing Other Matters Related to the Client(s) Clicking on the icon that looks like a file folder in the Related Parties section of the Matter screen will display a list of all Matter Titles for the same client(s). You can jump directly to any one of them by clicking on the one you want. The Additional Information Window You may have noticed on the Matter tab that there is a window in the lower left corner called “Additional Information”. This window is present on all matters regardless of type. It is simply a place to put information about this specific matter that doesn’t really fit into any field but is still worth knowing. This is where you put any piece of information which might be of use to anyone who might pull up this matter but not be very familiar with the case or the client. This is a memo field, which means the amount of text you can put into it is virtually unlimited, but that doesn’t mean you should write a book. It’s best used for short sentences or paragraphs. If this is a personal injury case but you also have a Social Security case with the same claimant, you might want to type in “We also have an SS case.” If the client is half deaf and impossible to communicate with via telephone, you might want to type something like “Client is very hard of hearing – don’t assume he understood you if you told him anything via telephone.” If the client is going to be out-of-town for a month and can only be reached at an alternate phone number, you might want to note that in the Additional Information section. It’s important to understand that the Additional Information section is actually several distinct data fields in the same physical location. The easiest way to see this is to click once on the top line, which is the Matter Title, in the Related Parties section. Enter some text in the Additional Information field and click the save button. Now click once on the next party in the list, which will be your client. Notice the Additional Information field is empty. That’s because there is a unique Additional Information field for the Matter, as well as for each related party. However, there is no Additional Information field for Medical Provider, Employer, or Referral Source. Also, these fields are unique for each Matter. In other words, anything you put in the Additional Information field for any party in one matter will not appear in any other matter for the same party. Attaching Sticky Notes to Matters The Additional Information window on the Matter page is great for random bits of information which warrant being collected somewhere, but Prevail also includes a tool that takes this concept to another level: The Sticky Note. We already talked about attaching a Sticky Note to a Rolodex entry. Same concept here, but relative to a Matter. Conceptually, a Sticky Note is quite simple. It is roughly analogous to those little yellow Post-it notes you stick all over your hard copy files. It does exactly the same thing, but it does it electronically. Sticky notes are, by design, somewhat in the way. If you pull up a Matter that has a Sticky Note attached to it, it pops up in your face and it’s the first thing you see. You can’t 45 even see what’s behind it unless you acknowledge or close it. Sticky notes can be used for a variety of purposes. Let’s say there’s some piece of information about a Matter that is so important that you don’t want ANYONE in your firm doing ANYTHING on that Matter without knowing it. That’s where you’d use a Sticky Note. To attach a sticky note to any Matter, simply retrieve that Matter and click the New button on the right hand side of the Toolbar at the top of your screen. Choose Sticky Note from the menu which appears below the button. A window will appear for you to type the text of your Sticky Note. Type your desired message, then click the Save button on the Sticky Note window. Your message will be saved and will pop up any time anybody pulls up the Matter to which it’s attached. You can also attach a Sticky Note to a Rolodex record. The same basic principles apply. Here’s what a Sticky Note looks like (and a pretty good example of when creating one is appropriate): Additional Matter Page Functions Most of what you’re going to do on the Matter tab will be done from the Matter tree in the Related Parties window, but there are a couple of additional options on the toolbar worth noting: Show Phone Address This button only appears on the toolbar when you’re on the Matter tab at the top level of the matter tree (i.e. you’ve clicked on the matter title in the Related Parties Window rather than one of the attached entries). Clicking on this button causes a grid to be displayed at the bottom of the page which includes the name, role, address and phone number of all rolodex entries attached at the Matter level, to the current matter. Why would you need this? 99% of the time you don’t, since you’re never more than a single mouse click away from full contact information on any of these entries anyway (clicking on any Rolodex entry in the Matter tree causes full contact information to be displayed in the window to the right of the matter tree). There are times, however, when you want to see everybody’s contact information at the same time on a single screen without clicking ANYWHERE. That’s what this button is for. Be forewarned that 46 turning this button on will steal some of your screen space from the area normally allocated for matter information fields. The information is still there, but if your law type includes more matter information that will fit on the screen, a scroll bar will appear to the right, and you’ll have to scroll down to see all of it. If you’ve got a huge monitor and your screen resolution set very high it won’t be a problem – you can simply re-size your windows within the matter tab by clicking and dragging the window divider bars (the ones with four dots (….) in the middle) so that everything fits. If you have neither a big monitor nor high screen resolution, you probably don’t want to turn on this feature. Clicking this button really only makes sense if the type of law you practice requires relatively few matter fields and you’re more interested in seeing all the names and phone numbers listed in a single grid without having to click anywhere. It’s a toggle, so if you turn it on Prevail will remember that you did and it will stay that way until you turn it off (and vice-versa). If you click this button and don’t like what it does, you can easily turn it off by clicking on the “Hide Phone Address” button at the top of the grid on the bottom of the screen. Since every individual user has his or her own unique Prevail settings you can set this setting however you like it and it won’t affect other users on your system. Changing Matter Status If you’re on the Matter tab you can change the general status of the current matter by clicking on the Status button on the top right portion of the screen (just below the toolbar). Don’t confuse this status with the individual user-definable status field which can be defined for any law type. This button addresses a broader distinction between matters, and the choices are predefined. Prevail groups all matters into one of four categories: Open Prospect, Closed Prospect, Open Matter, and Closed Matter. This button ONLY moves the current matter from one of these categories to another. If the current matter is an Open Prospect (i.e. a case you are tracking but haven’t actually signed up yet) you can either activate it (i.e. turn it into an Open Matter) or close it (turn it into a Closed Prospect). If the current matter is already an Open Matter you can either close it (turn it into a Closed Matter) or revert it to a Prospect. How do you tell which category it currently fits into? Simple – just look to the left of the Status button (next to the folder icon) and you’ll see a heading that will tell you whether it’s open, closed or a prospect, and tell you what law type the matter is. Anything done by accident with the Status button can easily be undone by simply clicking the button again. You can reopen a closed matter or revert an open matter to a prospect and none of the other information in the matter will change. 47 Chapter 5: Creating a New Matter New Prospect or New Matter (both are actually Matters) There are two ways to create a matter in Prevail. One is through the Rolodex and the other is through the Questionnaire feature. We’ll cover the Rolodex method first since it’s faster and will be the method you use to load your existing cases into Prevail when you’re getting started. You can access this feature from anywhere in Prevail by clicking the New button on the right side of the Toolbar at the top of the screen. Choose Rolodex from the menu that pops up below. When you do so, a new Rolodex screen will be displayed. Below is a standard Rolodex entry screen. That’s the screen you will use it to input information and contact details about your client. The name fields highlighted in yellow are required. You must fill in EITHER a first and last name, OR a company name, and you must choose a type. Once that requirement is met, as in the example below, you will notice a previously grayed-out button, “Create Matter/Prospect,” appear at the top of the window. Click on that button and Prevail will move you to the next step of the process. 48 The following screen will be displayed: On this screen you must fill out the prospect type, case type, and incident date (if applicable). You must also choose a group security (staff) assignment for the case. The prospect type determines the screen layout for the matter, while the case type and incident date are necessary to calculate the statute of limitations for the case. Incident date will only be required in case types where it is appropriate. The security group establishes who within your firm will have to the case, and to what degree, so that Prevail knows who to give the statute warnings to as they approach. Because all of these things are necessary to create a matter, all must be filled in. 49 When these fields have all been filled out you have two options which appear as buttons in the top right corner of the window: “Create Prospect” and “Create Matter”. The two buttons do exactly the same thing, except that Create Prospect will create a matter which is assigned to “Open Prospect” status, while Create Matter will create a matter which is assigned to “Open Client” status. Choose whichever one is appropriate for the current individual (i.e. if you’re putting in a case which has already been signed up, choose Create Matter and if you’re putting in a potential case choose Create Prospect). A Prospect matter will not be assigned a case number and the intake date field will not be populated. If and when it is “Activated”, it will be assigned the next sequential case number and the intake date field will be populated with the current date. Once you click on either Create Prospect or Create Matter, a new matter will be created. The information in the matter will be quite sparse and there will be only one Rolodex entry attached (the one you just created), but you can now add other parties and matter information as it becomes available. Creating a new Matter or Prospect using the Questionnaire feature The Questionnaire feature in Prevail allows you to pre-determine a series of questions for your staff to ask while conducting a new client interview with a prospective client. This is feature is designed specifically for firms which take cases directly from the public at large and don’t sign up every potential case. If your practice is an insurance defense firm that has cases assigned by an insurance company, you won’t need to use the questionnaire feature at all – there’s no interview to conduct if they’re just sending you a file. Follow these steps to create a new prospect or matter using the Questionnaire feature (these steps assume at least one Questionnaire has been set up): 1. Click on “Questionnaires” on the Toolbar. A search window appears to allow you to check and see if a questionnaire has already been created for this matter. Type a piece of the name of the client for this matter. If one already exists you can double-click on it in the displayed list and continue with the existing questionnaire. 2. If no questionnaire exists for that prospect, click the Add button. 3. A window will appear which allows you to input contact information for your new prospect. Enter as much information as possible. Fields highlighted in yellow are required and you will not be allowed to continue until they have been filled out. 4. When you have completed the information in the first window, click the Next button at the bottom right corner of the window. You will be advanced to the next step of the process, which is to answer questions which have been pre-defined for this questionnaire. 5. Continue entering information as specified by the questionnaire, clicking Next after completing each screen. Some entries may require you to enter contact information for related parties relevant to this case. Hint: If you know an entry is already in the Rolodex, you don’t need to type the whole name and address – just put in enough information (either company or first and last name) so the questionnaire will allow you to continue. 50 You’ll be given a chance later to match the information you’ve entered with existing Rolodex entries to eliminate duplicate data. 6. The last step of each questionnaire will be a window which prompts you to choose a security group if you’ve created one or more in addition to the “Default Group.” This determines who in your firm has access to this case. 7. At this point you will be prompted to “resolve” the various Rolodex entries you have created during the intake process to determine whether they already exist in the Rolodex. Prevail will attempt to match up every entry you create with an existing entry. All entries that need to be resolved will be listed in a grid at the bottom of the window. Double-click on them one at a time. Each time you, do a search will be executed to see if that entry already exists in the Rolodex. When this search window appears you may or may not find matching entries in the Rolodex. If nothing that matches the desired entry is found, simply click “New Contact” and the Rolodex record you created during the interview process will be used. If, on the other hand, a Rolodex entry displayed in the search results matches what you want, click on that entry and then click the “Attach” button at the top of the window. 8. After you have resolved the first Rolodex entry you will be returned to the final Questionnaire page to resolve additional entries. Notice each resolved contact listed in the grid will have a check mark to the right of the name, in the “Matched” column. Continue repeating step 7 as necessary until all names have been resolved. When all names have been resolved, the “Finish” button will appear in the bottom right corner of the Questionnaire window. Click that button to complete the process and save your prospect. You will be placed in the completed prospect matter. All information gathered during the interview process will already be there and any associated Rolodex entries will be already be attached. The Questionnaire Search window will remain open, allowing you to search for any remaining questionnaires that have not yet been resolved, or to create a new questionnaire. Closing or Deleting Prospects or Matters Closing a prospect or matter does not remove it from your system. It simply changes the way it appears in search results (i.e. “Closed” rather than “Open"). It’s a good idea to leave closed prospects in your database indefinitely because it’s not uncommon for a prospect to call your firm, ask a few questions and then hire another lawyer. That same person may call you back a year later if they don’t like the lawyer they hired the first time around. In that case it’s helpful to already have most of their information in your system already. You can simply re-open the closed prospect and hit the ground running. It’s also a good idea to have a record of every prospect whose case you turned down – that way if they call back a year later threatening to sue you for malpractice for blowing their filing deadline, you will have a record of turning down their case and a copy of the letter you (hopefully) sent them informing them that you don’t represent them. Although the capacity of the database is virtually unlimited and it’s a good idea leave closed prospects and files in there, you can delete them from your database if you prefer. We recommend you DO NOT delete closed matters (client or prospect). To delete a matter or a prospect, you must first close it. To close a prospect, click on the “Status” button on the tool bar 51 and choose "Close Prospect". To close a matter, click on the “Status” drop-down, and choose "Close Matter". When you close a Matter (not a Prospect) you will see a new screen in which you can enter the file location for the hard copy file. You can access the file location information again by clicking on the Tools menu and selecting File Location. Only after you have closed the prospect or matter, may you then delete it by once again clicking on the Status dropdown, and selecting either "Delete Prospect" or "Delete Matter". There is NO “oops” button, or “undo” button. If you delete a client matter or prospect matter, IT’S GONE FOR GOOD! There are only two good reasons to delete a matter: 1) it was created by mistake, or 2) it was just a place for testing and/or practice, such as a sample matter that came with the program. 52 Chapter 6: Producing Documents Setting up merge document templates can only be done by a user with Administrator access to the Document Designer. Administrative functions are covered in Volume II. This section tells you how merge document templates which have already been created with the client and case-specific data from any Matter. In order to merge a document for any Matter you must first be IN that Matter. Once you’re in the appropriate Matter you can merge a document by simply clicking on the “Document Merge” button on the Toolbar at the top of your screen. Your window will be slightly different, in that the documents displayed will be the ones which have already been set up by your firm. The list of documents displayed in this window will also depend on the law type of the current matter. In this example we were sitting on a Personal Injury Matter when we clicked the Document Merge button, so Prevail displayed Personal Injury and generic documents (generic documents can be merged in any kind of Matter). The list displayed will always be comprised of documents set up specifically for the current law type, plus generic documents. Follow these steps to generate a merge document for a matter: 1. Click Merge Document on the Prevail toolbar. 2. The Document Merge window appears, displaying a complete list of all available merge documents. The Wizard will display generic documents, as well as documents that are specific to the type of matter you are working in. For example, if you are working in a Criminal Defense matter, the Wizard will allow you to select from Generic & Criminal Defense, Generic Only, or Criminal Defense Only merge documents. 3. To narrow the list of available documents, enter any character string from the Document Title in the Document Search field. 53 4. Highlight your desired document in the list of results, and click Next. After Prevail builds the merge document information, a new window will appear. 5. Typically, you will leave the “Merge Across Related” box unchecked, and the “Merge Across Query” box unchecked. These will be discussed in detail later in the chapter on Producing Documents. You may set or change any of the values for Ledger Time, Ledger Cost, and Task to create a corresponding entry for each. And, each will be posted in their proper locations in the program, automatically. 6. Click Next. a. If there is more than one of the same related party type the letter is coded to fetch, you will see a list of possible choices for whom to merge the letter. b. Click on the one you want. Then, click Next. c. After Prevail builds the document, it will display in your word processing program upon completion of the merge. 7. Make any adjustments necessary to this copy of the merge document, and then print it as you would normally print a document in your word processing program. 8. When you’re finished, close the word processor program window. If you made any postmerge changes to the document, you will be prompted to save the changes you made. Click Yes. The merged document will automatically be saved (with any changes you made after the merge) on the matter's History tab. Also, if there are Time, Cost, and/or Task entries associated with the document in the Document Designer, Prevail will automatically record the appropriate entries on the matter’s Ledger tab or calendar, as appropriate. One of the most common issues new Prevail users run into is to merge a document and find that it contains [ERROR] in one or more places in the document. That is what happens when you merge a document containing field codes for a particular rolodex type, e.g. Medical Provider, but there is no Medical Provider attached to the matter. 54 Merge Across Related THIS IS A HUGE TIME SAVING FEATURE. Now picture this. Suppose you have a new matter with six medical providers attached and you need to send a request for records to each of them. Using the techniques described below you can create six letters, six cost entries, six time entries, and six follow up tasks in less than 30 seconds without typing a single keystroke! If want to merge a copy of the same letter to more than one party of the same Rolodex type that is attached in the matter (e.g., if the letter refers to a Medical Provider, and there is more than one Medical Provider attached to the client), you'll want to check the Merge Across Related box. This feature allows you to choose multiple parties to merge the document for on the following screen. Notice in this example that each detail record is displayed for each medical provider. That’s to allow you to select the specific dates of service you need for each medical provider. You can construct a document to request medical records that includes the merge codes for the dates of service (From Date and the To Date). Then, using the Merge Across Related feature, you can create a separate letter to each medical provider with the specific dates of service for each and you can do them all at once without typing a single keystroke! Furthermore, your document can be constructed to create a Ledger Time entry for document production, a Ledger Cost entry for postage, and a follow up task to make sure you got the records. And each value will post automatically for each copy of the document created using the Merge Across Related feature. Here’s how it works: 1. Click Merge Document on the Prevail toolbar. 2. The Document Merge window appears, displaying a complete list of all available merge documents. a. The Wizard will display documents that are specific to the law type for the matter you are working in, as well as generic documents. For example, if you are working in a Criminal Defense matter, the Wizard will allow you to select merge documents from Criminal Defense & Generic, Criminal Defense Only, or Generic Only. 3. To narrow the list of available documents, enter any character string from the Document Title in the “Document Search” field. 55 4. Highlight your desired document in the list of results, and click Next. After Prevail builds the merge document information, a new window will appear. 5. Check the “Merge Across Related” box. You may set or change any of the values for Ledger Time, Ledger Cost, and Task to create a corresponding entry for each. And, each will be posted in their proper locations in the program, automatically. 6. Click Next. 7. If there is more than one of the same related party type the letter is coded to fetch, you will see a list of possible choices for whom to merge the letter. Hold down the Ctrl key and click on each of the ones you want. Then, click Next. After Prevail builds the document, it will display in your word processing program upon completion of the merge. 8. You may, if necessary, make adjustments to this copy of the merge document, and then print it as you would normally print a document in your word processing program. 9. When you’re finished, close the word processor program window. If you made any postmerge changes to the document, you will be prompted to save the changes you made. Click Yes. a. The merged document will automatically be saved (with any changes you made after the merge) on the matter's History tab. b. If there are Time, Cost, and/or Task entries associated with the document in the Document Designer, Prevail will automatically record the entries on the matter’s Ledger tab or calendar, as appropriate, for each copy of the document. Merge Across Query A query, in database terms, is simply a list of criteria to select a specific subset of your cases that match that criteria. For example, suppose a significant number of your personal injury cases are waiting for the client to achieve maximum medical improvement, and they all have the Matter Status set to “Awaiting MMI.” Let’s further suppose you want to send each of them the same letter every three months to remind them of what they need to be doing to help you win their case. With a query in the system to select all your matters with the status of “Awaiting MMI”, the Merge Across Query feature would allow you to merge a document for each of the matters that matched that query. 56 Here’s another example. Suppose you’re a Personal Injury firm that’s just hired some new attorneys who specialize in Social Security/Disability cases and you want to send a letter to all your current and former clients to let them know you can now provide those new services. The Merge Across Query is the tool to do it. When you use the Merge Across Query feature, it saves a copy of the document in the History of each matter that matched the query. Furthermore, if the document includes a Time, Cost, or Task element, each of them will be posted in every matter that matched the query. Here’s how it works: 1. Click Merge Document on the Prevail toolbar. 2. The Document Merge window appears, displaying a complete list of all available merge documents. a. The Wizard will display generic documents, as well as documents that are specific to the type of matter you are working in. For example, if you are working in a Criminal Defense matter, the Wizard will allow you to select from Generic & Criminal Defense, Generic Only, or Criminal Defense Only merge documents. 3. To narrow the list of available documents, enter any character string from the Document Title in the Document Search field. 4. Highlight your desired document in the list of results, and click Next. After Prevail builds the merge document information, a new window will appear. 5. Check the “Merge Across Query” box. You may set or change any of the values for Ledger Time, Ledger Cost, and Task to create a corresponding entry for each. And, each will be posted in their proper locations in the program, automatically. 6. Click Next and you’ll see a screen like the one below with a list of all your available queries. 57 7. Click on the query you want. Then, click Next. After Prevail builds the document, it will display in your word processing program upon completion of the merge. 8. You’ll end up with one large document with page breaks in the appropriate places so when it’s printed the result will be a separate document for each matter. 9. Make any adjustments necessary to this copy of the merge document, and then print it as you would normally print a document in your word processing program. 10. When you’re finished, close the word processor program window. If you made any postmerge changes to the document, you will be prompted to save the changes you made. Click Yes. a. A copy of the merged document will automatically be saved (with any changes you made after the merge) on the matter's History tab for every matter that matched your query. b. If there are Time, Cost, and/or Task entries associated with the document in the Document Designer, Prevail will automatically record the entries on the matter’s Ledger tab or Calendar, for each matter as appropriate. The Merge Across Query could take quite a bit of time to run, depending on the number of matters that match your query, the size and complexity of the document, and a number of other factors. Therefore, it’s a good idea to start this process prior to taking your lunch break, or toward the end of the day. 58 Chapter 7: The History Tab Once you’ve created a Matter and attached the related parties from your Rolodex you can start using Prevail to record, and look up, everything that happens in that Matter. You can access any Matter’s History page by clicking on the tab at the bottom right corner of your screen labeled “History”. If you’re looking at a newly created matter, there probably won’t be much there besides the initial questionnaire (if the case was created using the questionnaire feature). This will change rather quickly because many other parts of the program automatically feed information to the History page. If you schedule, re-schedule or cancel an appointment, schedule or complete a task, make a note or merge a document, those things will be recorded in History automatically. The History tab is a simple grid that is laid out like a spreadsheet, with rows and columns of information. Each ROW of information is a single record, containing information about one activity (one note, one document, one appointment, etc.). Each COLUMN represents a specific field of information relating to that record (Date, User, Type, Description, etc.). Like all grids in Prevail, you are given virtually unlimited control over how the data is displayed. You can rearrange the columns, change their width, change the sort order, change the sort field or group the records by any combination of the column headers. Since each Prevail user on your system has his or her own unique user settings, you can rearrange any of the grids to suit your own liking without affecting what anyone else sees when THEY log into Prevail. If you make changes to any of your settings (column widths, displayed columns, etc.), Prevail will remember them and continue displaying grids according to your preferences until you change them again. It remembers your settings even after you exit the program. Let’s take a look at a typical Prevail History page and discuss some of the fields and features: 59 Adding New History Records Many types of entries are added to history automatically (appointments, tasks, etc.), but other entries like phone calls and notes get added manually. You add a History entry from anywhere on the History tab by clicking on the Add button on the History toolbar on the right hand side at the top of the window. Alternately, from any tab within a matter (not the Home tab), you can just as easily click on the New button, and select History. You’ll be presented with the following entry screen: The fields in this entry window correspond directly to the column header fields on the History Tab. The fields highlighted in Yellow are required fields which MUST be filled in before you’re allowed to save the entry. To complete your entry, simply fill out the data fields in the window and hit the Save button at the top of the window. The fields in this window are as follows: Subject: This is the general description of entry. It should be something very specific (e.g. “Called client and left message that he has an IME schedule for Friday.”), but still short enough to fit in a single line. Type: This field is populated by the program based on where the entry came from (i.e. automatically created or typed in manually). If you’re typing a History entry in directly using the Add button, this field will be pre-selected to “Note” and can’t be changed. Category: This is a field that lets the user categorize what KIND of entry this is (e.g. document, phone call, note to file, etc.). History Categories are user-definable under Administration / Databank / History and should be set up in advance and agreed upon by all staff so that usage is consistent. The best way to categorize items is based on how you’re most likely to look for them when you need to find something in a hurry. Filtering, sorting and grouping is much more effective when everybody’s using category in the same way. Think of Category this way: When you create a paper file for a case, you probably have a standardized way of arranging the contents so you don’t have to look at every single piece of paper to find what you’re looking for. Now use Category to let you quickly rearrange the history 60 data in a similar fashion to make it fast and easy to find exactly what you’re looking for. Some clients go as far identifying documents as incoming or outgoing by using categories like Discovery-In, Discovery-Out, Pleadings-In, Pleadings-Out, etc. Entry Date & Time: These fields indicate exactly WHEN this entry was made. By default they are filled in automatically with the date and time from your computer’s clock. You can change the date and time manually if you’re logging in an incoming document and want to change the entry date to match the date on which the document was received by your firm. Or, you might be catching up on a few phone message entries you didn’t get an opportunity to enter when they were received, and you want the date/time to match when the messages were received. Time Category: If you bill hourly and want to track History entries for billing purposes, or if you just want to track time for future analysis, you can have Prevail automatically create a corresponding time entry on the Ledger page. This will save you from duplicating effort. The Time Category field you select on the History entry will also be used in the automatically-generated time entry. These categories are user-definable under Administration / Databank / Ledger Time and should be set up to match your existing billing terminology (e.g. “receipt and review”, etc.). If you don’t track time on an hourly basis you can ignore this field. Timekeeper: If you bill time, this field determines WHOSE time is being billed on the Ledger page for this particular entry. If you don’t track time on an hourly basis you can ignore this field. Hours: This is the amount of time (in 0.01 hour increments) that you want to bill or track on the Ledger page for this particular entry. The total will calculate automatically using the default rate (in their user settings) for the specified timekeeper. If you don’t track time on an hourly basis you can ignore this field. Notes: This is where you enter notes about the document, conversation or event you’re documenting with this History entry. This is a scrolling window with a virtually unlimited capacity, so don’t hesitate to be thorough. Remember, History is where other people are going to look to see what’s going on in this case so you want to use this field to paint as complete a picture as possible. Attachments: Prevail allows you to log in documents (photographs, emailed documents, scanned documents, etc.) directly to the History page. If you want to attach a file to your history entry, simply click on the Attachments icon at the bottom of the History item entry window. You will then be prompted to browse to the file location of the file (or files) you want to attach. Note that in addition to attaching individual files, 61 you can attach an entire folder of documents to the history entry. Prevail also includes a scanning interface, so that if you have a scanner, configured with a TWAIN device driver, on your system you can scan a paper document directly into the History entry in Prevail by clicking on the attachment icon and choosing Scan Document. The Prevail Connector There’s an additional button present on all History entries. It’s also present on appointments, tasks, ledger entries and messages. It’s the “Link” button, which accesses a powerful feature called the Prevail Connector. Before we get into specifics about how to use it, let’s discuss a little theory about how it works: Most things you deal with on a day-to-day basis in Prevail (documents, tasks, appointments, etc.) are in some way related to other things. The Connector allows you to tie all those related things together into a single package so you can access any of them without having to go searching through a bunch of different parts of the program. Here’s an example: Let’s say the phone rings and your client, William (Bill) Thomas, is on the phone. He wants to know what’s going on in his case. He says he got a bill with a cost entry he doesn’t think even goes with his case. He wants a call back from his case manager immediately and says if he doesn’t get satisfaction he’s going to go find another attorney. That sounds pretty serious. It’s a little complicated to deal with because you’re dealing with a cost entry from the Ledger page, you need to record the phone call on the History Page and you need to make very sure that somebody follows up with him immediately. Normally you’d do that with a Task, but since he’s already mad you’ll probably want to send an instantaneous Prevail message to his Case Manager. The Prevail Connector lets you handle all of those things at once. Here’s what you’d do: First, you make a history entry to log your phone call. While you’re at it, you can go ahead and make a time entry for the conversation. Your History entry will look something like this: 62 Take a look at the very bottom of the window – you’ll notice there are actually TWO page tabs on this History entry: One for the Phone call and one for the time entry. By simply including any time amount other than zero, you have caused Prevail to automatically link the Time entry to the History entry. The time entry on the Ledger page is identical to the History entry except that it includes a time value (.2 hours). Since this is a pressing matter that requires follow up, you may as well set a Task for Robin (his case manager) to call him as soon as possible. You do that by clicking on the Link button (the chain link icon at the top of the entry window) and choosing “Task Link”. You now have a new tab at the bottom of the entry window for task information. You can fill out task information and recipient (in this case, Robin) and add any notes you want for the task. So now you’ve got a History entry that’s linked to a Ledger time entry AND Task entry. By now it looks something like this: This is still the original History entry, but now we’re on the Task tab of it. Notice that it’s all tied together with the History Entry and the Ledger time entry. This task will give Robin an automatic pop-up reminder, but just to be safe you might want to include another direct message to her. Here’s what the message would look like: 63 If Robin’s logged into Prevail, she’ll get this message instantaneously. If she’s not, she’ll get it as soon as she logs in. Since the phone call, the task, the time entry and the message are all linked together, Robin can see them all in one place by just clicking at the various page tabs at the bottom of her message window. It should be noted that, upon receipt of this message, Robin could just click the “Go to Matter” button (the file folder icon) in the top right corner of the message and Prevail would take her immediately to this Matter. Get the picture? The connector allows you to connect things to other things, and those things to still other things. The moral of the story is to always pay attention to the bottom of any task, appointment, history, time, cost or message window – because there might be other things attached that you’ll want to know about. Linking an email to an email is the equivalent of FORWARDING that email. NO OTHER LINKED ITEMS WILL BE INLUDED. In other words, if you also had a History, Task, Cost, or any other items linked to the original email, none of those items will be included with your new email. The email you’re now creating will include the email you’ve linked it to as well as any attachments from that email and any attachments you may have included with your email. Cloning a Document From a History Entry If you open a History entry that has a document (Word or Word Perfect) attached to it, you can clone the document to create a new history entry. The new entry will be linked to the original. If you are using Microsoft Word, you’ll have the additional option to clone it as a PDF. To clone a document attached to History, open the History entry with the document, and right-click on the attachment. You’ll see the following list: Option A) Click the Clone Document option to create a new History entry with a copy of the document attached to it. The new entry will have the current Date/Time stamp and show the user that created the clone as the Author. Option B) Click the Finalize PDF button to create a new History entry with a copy of the document attached to it as a PDF. The Subject will be appended with - [FINALIZED]. 64 The PDF option is only available if you’re using Microsoft Word. Viewing a History Entry To view the full detailed entry of any history item, either click on the desired item in the History grid and hit the Enter/Return key, or click the “View” button at the top off the window. Alternatively, you can right-click and select view, or simply double-click on the desired entry. Printing History To get a printout of the History page in any matter, simply go to the History tab in the matter and click on the Print button at the top of the History page. Any Options settings, sorting, grouping or filtering applied to the History page prior to hitting the Print button will be reflected in the printout. In other words, using any combination of the Options button, and the group, sort, and filter tools to arrange the page the way you want to see it, and that’s how it will print. Deleting a History Entry If you make a History entry in error and want to delete it, simply click on the entry you want to delete and click on the Delete button at the top of the History window. If other items are linked to it, you will be required to open the item to delete it. Deleting one item from a group of linked items does not affect the other linked items. Recovering Deleted History Entries If you need to recover a deleted History entry, simply click on the Recover Deleted History icon. Double-click on the desired entry to open it. Then click on the Recover Deleted History icon in that History window. To return to the active History tab, you will need to select the “Hide deleted history” option. Changing Which Columns and Data are Displayed on the History Page Different users may have different preferences as to which columns they want to see on the History tab. By default all fields are displayed, but you don’t necessarily need to see ALL of them all the time. If your screen is small or your resolution isn’t set very high, you may run into space issues trying to fit all those columns into the grid. You can change what you see on the screen at any time by clicking on the Options button on the right side of the toolbar. A men will pop up with a list of all the columns and record types which are able to be displayed on this page. Notice there is a horizontal line about halfway down the window. Everything ABOVE the line represents a column of data which will be displayed for all records. Putting a check mark beside any item will cause it to be displayed as a column in the grid, while removing the check mark will cause that column to be hidden (the data doesn’t go away – it just isn’t displayed unless you tell the program to display it). Each item BELOW the horizontal line in the options window (items beginning with the word “Display”) represents a TYPE of record that can be displayed on the History page…or not. The data is tracked regardless of whether or not you choose to display it and these settings can be 65 changed at will without affecting anyone else in your office. You can come back at any time and change these settings and the data will appear retroactively if you add columns or record types to your settings. Remember, you’re not changing the data at all, you’re just displaying what you wish to see on that particular tab. Sorting Records on the History Page Notice that the labels at the top of each column (Date, Time, Type, etc.) are on a header bar at the top of the grid. The sort order of records in the grid is determined by clicking on one of those field labels on that bar. For example, if you want to sort the records in the grid in alphabetical order by the Subject, you would click on the word “Subject” at the top of the grid. When the records in any grid are sorted by a column, you will see triangle beside the column label pointing either up or down. An upward triangle (with the point at the top) indicates that the records are sorted by the selected column field in ASCENDING order (either numerical, date or alphabetical, depending on the type of field). A downward triangle (with the point at the bottom) indicates that the table is sorted by the selected column field in DESCENDING order. To sort by more than one column, hold down the Shift key and click the column headings in the order in which you want them sorted. For example, to sort History by Date and Time, hold down the Shift key and click the Date column heading; continue holding down the Shift key and click the Time column heading. Your sort settings for each grid in the program are automatically saved. They remain as you left them till you change them. Grouping Records on the History Page If you look at the header bar above the grid on the History page you will see a blank area that’s labeled “Drag a column header here to group by that column.” This is a special function which is quite powerful, especially in matters with thousands of history records. You activate this feature by clicking and dragging any column header (e.g. Time, Type, etc.) up about a half inch into the blank space above it. When you release the mouse the entire history display will be GROUPED by the column you dragged into that space. What does “Grouped” mean? Generally speaking it means creating a collapsible outline of all the records, grouped together by the chosen field. All records with a common value in the grouped field will be listed together and you can “drill down” (i.e. expand the group) by clicking on the plus sign next to it. Grouping works in conjunction with the sort feature, so you can group according to one field (by dragging its header into the group pane) and then sort by another field by clicking on its column header). You can also group by MULTIPLE fields, by dragging their respective column headers into the group pane in the order in which you want the grouping to be applied. It should be noted that these features won’t make a whole lot of sense (or even be useful) in a matter with only a few History records. To get a feel for how sorting and grouping work, find a Matter with hundreds of history records and experiment – you can’t really hurt anything because sorting and grouping doesn’t change the data, it merely changes the way it’s presented. If you want to undo any grouping you’ve applied, simply click 66 on the column header(s) you dragged into the grouping pane and drag them back down onto the column header bar. Filtering Records on the History Page Although the whole purpose of the History tab is to capture as much information as possible about the Matter, it is sometimes desirable to filter out extraneous history events to get to a specific thing (or things) you’re looking for. For example, if you wanted to filter out all the phone calls and random documents and see just a list of Pleadings in a particular case, or you only want to see the entries made by a particular user, a history filter is the right tool for the job. You create a Filter by hovering your mouse cursor over the column header you want to use for the filter. As you near the right edge of the column header you’ll see what looks like a small funnel superimposed on a tiny box. Click on that and you’ll get a list of all values in that field. You’ll notice boxes to the left of them. Create your filter by checking the boxes for any of the values you want included in your filter. Here’s a real-world example: Let’s say you want to set up Prevail be able to generate a Pleadings index automatically. In order to accomplish that you'd probably want to create one History category called “Outgoing Pleading” and another one called “Incoming Pleading” (These categories are user-definable and you can set them up under Administration / Databank / History). When you set up your Merge Documents (under Administration / Document Designer) one of the properties you can define for your merge template is “Category”. You should set up all merge templates that happen to be pleadings with the Category of “Outgoing Pleading” so that category will be selected in History automatically whenever these documents are created. Similarly, when you log incoming pleadings into History you should use the Category “Incoming Pleading”. Assuming those things have been done and you now have an assortment of incoming and outgoing pleadings in History (as designated by the “Category” field), you could very easily set a filter by clicking on the little box at the far right corner of the “Category” column header. When the various values appear with spaces for checkboxes beside them, check ONLY “Incoming Pleading”, and “Outgoing Pleading”. The filter will then be automatically set and all other History records which don’t match one of those two categories will temporarily become invisible. While you’re at it, you might want to use the other sorting and grouping features (which are still fully active when filters are applied). For example, if you want the results to be displayed in context in date order, click on the “Date” field column header to sort by date. If you want the results grouped together (all incoming pleadings together in date order, followed by all outgoing pleadings together in date order) you could also click and drag the “Category” column header into the group pane (the area above the column headers that labeled “Drag a column header here to group by that column). By now you will have noticed that you can do a LOT with sorting, grouping and filtering in History. Take the time to really get familiar with these tools. You’ll be glad you did. Fortunately, Prevail gives you the ability to create a custom filter ONE time and then save it so that ANY user on your system can turn it on with a single mouse click. Once you’ve got your 67 filtering, grouping and sorting set the way you want for a given task you can easily save it for future reference. You do so by clicking on the “Filter” button in the top right corner of the History window. A menu will be displayed below that button. Chose “Create Filter from Current View” and the following window will be displayed: Give your filter a name that is sufficiently descriptive that other users (who will have access to it, by the way) can tell what it does just from the name you give it. As soon as you name your filter and click “Save”, it will now show up on the “Filter” Menu (the button at the top right corner of the History window). As soon as a filter is saved by any user, all other users will be able to access it by clicking on the “Filter” button on the History page. The Notes Page The History page is a perfect catch-all location for goings-on in any Matter. It includes just about every conceivable type of event and you can put unlimited detail in your entries. You can then filter, group and sort your entries to only see certain information in a certain order. Be that as it may, some users don’t LIKE to see everything in context and don’t WANT to have to sort, filter and group the information. It is for those users that we have created the NOTES tab. It is a page that works just like history and operates according to exactly the same set of rules. Take everything you’ve learned about the History Page and apply it to NOTES, because they work exactly alike. What’s the difference, then? The NOTES page is simply a pre-filtered view of History to only include items whose type is “Note”. It’s just a slightly different view of History that doesn’t include all the automatic stuff. We’ve found that many users have their options on the Notes tab set to show “Detail” and their options on History set to hide the detail. And there are some who don’t even use the Notes tab at all. It can even be turned off in the law type setup (Administration / Law Type Setup). If, however, you have a user who doesn’t quite get the concept of using the sorting, grouping and filtering tools and still wants to be able to see all the human-generated activity in a case, it’s there if you need it. Aside from working exactly like History, the Notes page actually shares its data with the History page. Any entry you manually put into History will show up in Notes automatically and vice-versa. 68 Adding a Note to the Notes Page To add a Note entry in any Matter, retrieve the desired Matter and click on the Notes tab at the bottom of the page. Click the Add button on the Toolbar at the top of the window. From here, it’s exactly the same as adding a new History entry because a Note is, in fact a History entry. Type a subject (one-line description) for the entry. If desired, choose a category for your entry (The categories on this pull-down list are user-definable and can be set up under Administration/Databank/History). You can also add a simultaneous time entry (on the Ledger page) by including any value in the “Time” field other than zero. If you want to add significant detail to your entry you can do so in the “Notes” field of the entry window. You can link other things to this entry, just like in History. That’s because it is a History entry. When your entry is complete, click the Save button at the top of the window. The Photo Page The Photo page works exactly like the History page, except that it is a specialized view optimized for images. All sorting, grouping and filtering options work exactly the same way they do in History, but there’s an additional thumbnail feature that allows you to attach scans and photos and have thumbnails of those images show up directly in the grid. You can, of course, attach scans and photographs directly to the history page as well. Any photo or scan you attach in History will also show up on the Photo page and vice-versa, because it’s all History. The only difference is that when you view the Photo page you see thumbnails of every image right in the grid, whereas on the History page you only see the description of the image that was entered when it was added (you can then view the image by double-clicking on the description, then clicking on that attachment at the bottom of the window. Attaching an image to the Photo Page To attach an image to the Photo page in any Matter, retrieve the desired Matter and click on the “Photo” tab at the bottom of the screen. Click the Add button at the top of the page and enter a description for the image in the “Subject” field of the resulting window. Here again, you’re actually creating a History entry. Attach the image to this window by clicking the Paper Clip icon (under the word “Attachments”) at the bottom of the window. You can then browse to the location of the image you want to attach. Select the desired image and click Open and the image will be copied into Prevail and attached to the photo page. Taking a photo with a Webcam and attaching it as an Image If you have a webcam attached to your computer you can use it to capture an image and save it directly to the Photo page. To capture a webcam image in any Matter, retrieve the desired Matter and click on the Photo tab at the bottom of the screen. Click the Add button at the top of the page and enter a description for the image in the Subject field of the resulting window. Capture the webcam image by clicking on the pull-down arrow to the right of the Paper Clip icon (under the word “Attachments”) at the bottom of the window. Choose “Attach Webcam” and you will see a live feed from your webcam. Capture the picture when ready by clicking the “Grab Frame” icon at the top of the window. If you’re satisfied with the result, click Save. 69 Chapter 8: Additional Tabs Process (Claims) Tab This tab can be labeled “Process” or "Claims". The setting is found under Administration > Law Type/Case Type/Rolodex Type Setup, and on the Law Type tab. Since Social Security matters follow essentially the same path regardless of jurisdiction, Prevail has a built-in process for Social Security matters. For all other law types (e.g., Personal Injury, Workers’ Compensation, Bankruptcy, etc.), you’ll need to build your own process(s) using the Process Builder. To learn how to build a new process, see the Process Builder chapter in Volume II. For the purposes of this section, we’ll use the built-in Social Security process that you’ll see when you’re working in a Social Security matter as our example. You can track an unlimited number of claims simultaneously on the Claims tab. It’s not uncommon to have one claim at the Appeals Council level, and then re-file at the initial level. Prevail can track both claims simultaneously. The claim descriptions of the claims will appear in the narrow window on the left side of the screen. When you click on a claim description in that window, the corresponding history for that claim will be displayed on the right side of the screen. For reporting purposes, Prevail keeps track of the “current step” in every claim process in every matter. That way you can easily see exactly which matters are currently at what step in the process (Reports | Social Security | SS Claim Status Report with Totals). 70 Starting a New Process (Claim) on the Process (Claims) Tab Follow these steps to create a new process (claim) on the Process (Claims) tab: 1. Click Add on the left side of the screen. A new “Process" window appears. 2. Enter a description in the Subject field. a. You may simply enter “Claim 1,” “Title II,” etc., or you may enter a more specific description (e.g., “SSD Claim Filed on 7/22/2008,” or “Hearing Prep.”) 3. Choose the appropriate process from the Process drop-down list. 4. Click Save. The new process/claim now appears in the list on the left side of the screen. Adding Steps from a Process (Claim) on the Process (Claims) Tab Follow these steps to update the status of a claim on the Claims tab: 1. Click on the appropriate claim in the list of claims on the Process side of the screen. 2. Click Add on the Process Steps side of the screen. 3. Choose the appropriate level (e.g., Initial Application, Appeals Council) from the "Level" drop down-list in the middle of the window. a. By choosing the appropriate level, your list of choices for the next step will be filtered to include only those steps that belong at the chosen level. 4. Click on the appropriate step from the list of steps at the bottom of the window for the level you selected. 5. Click Next. 6. In the next window, edit the date and/or time, as necessary, based on what the step represents. For example, if the step is “Hearing Scheduled,” you should enter the actual date and time of the hearing. If the step is a “Rating Decision,” or a “Denial of Claim” letter, you should enter the date of the letter, which will trigger the deadline for filing the next action. It is extremely important, in the case of a denial notice, to enter the date printed on the actual notice from the SSA, particularly since Prevail will automatically calculate your Statute of Limitations (the Filing Deadline) date based on this entry date. Prevail will schedule the statute warning task on your task list accordingly. 71 7. If the "Responsible" field is set to an “Employee Type,” or is set to “Prompt for User,” you must double click on the task and select one or more individuals from that list. 8. You may also enter any additional notes in the "Notes" field. 9. Click Finish. It is possible to set certain fields on the Matter tab (e.g., Case Status) to automatically update when a step is entered on the Claims tab. Please refer to the Administration | Process Builder section, or call our training department for instructions on how to establish this link between the Claims/Process tab and the Matter tab. Damages Tab By default, this tab appears only if you're working in a Personal Injury or Workers' Compensation matter. You'll use the Damages tab to record special damages (such as medical bills, lost wages, pain & suffering, etc.), as well as payment history against any of those damages. As you proceed through negotiation and a possible trial, you'll want to ensure that your settlement is sufficient to cover the damages that your client has incurred. 72 Adding Damages Entries Follow these steps to add a damage entry or payment against a damage entry: 1. Click Add. A new Damage entry window appears. 2. Attach the provider in the Provider field: a) click on the paper clip to the right of the Provider field b) search for the provider's name in the Rolodex i. If the provider's name appears in the list of search results, double-click on it to attach it to the damage entry. ii. If the provider's name does not appear in the list of search results, click New at the top of the Rolodex search window to add the provider to your Rolodex, and then double-click on it to attach it to the damage entry. 3. Enter the account number for the provider in the Account # field if you wish. 4. Enter a brief description of the bill/damage in the Subject field. 5. Select a damage type from the Type drop-down list. 6. Enter the starting date of service for the provider in the From Date field and the ending date of service in the To Date field. 7. Enter the due date of the bill in the Due Date field by manually entering the date or clicking on the drop-down arrow next to the Due Date field and selecting the date from the calendar display. 8. Enter the amount of the bill/damage in the Bill field. 9. If you don’t have a payment to apply to the new damage entry, click Save. You have finished setting up the new damage entry. 10. If you have a payment entry to apply to the new damage entry, click Add in the Payment section at the lower half of the Damage entry window. A new Payment entry window appears. 11. Attach the payer in the Provider field: a) click on the paper clip to the right of the Provider field b) search for the payer’s name in the Rolodex i. If the payer's name appears in the list of search results, double-click on it to attach it to the damage entry 73 12. 13. 14. 15. 16. 17. ii. If the payer's name does not appear in the list of search results, click New at the top of the Rolodex search window to add the payer to your Rolodex, and then double-click on it to attach it to the damage entry. Enter the payer’s account number in the Account # field. Enter a brief description of the payment entry in the Subject field. Enter the payment date in the Payment field by manually entering the date or clicking on the drop-down arrow next to the Payment Date field and selecting the date from the calendar display. Enter the amount of the payment in the Bill field. If desired, enter detailed notes about the payment in the Notes field at the bottom of the Payment entry window. Click Save. Adding Payments to Damages Entries You may return to an existing damage entry at any time to apply a payment. Simply doubleclick on the damage entry on the Damages tab, and follow steps 10 -16 in the procedure above. Disabilities Tab By default, the Disabilities tab only appears when you're working in a Social Security matter. It can be turned on for other law types in the Law Type/Case Type/Rolodex Type Setup. You’ll record information about the claimant’s disabilities and the client’s description of his or her disabilities on the Disabilities tab. Record objective information (facts and details backed up by medical evidence) in the Ailments section (top half) of the screen, and record subjective information (a description of the claimant’s disabilities in his or her own words) in the Claimant’s Description of Disabilities section (bottom half) of the screen. The table below explains the buttons on the Disabilities tab. Button Purpose Add Click this button to add an ailment entry to the Disability Information list in 74 Delete View Save Cancel the matter. After highlighting an entry in the Disability Information list, click this button to delete the entry. After highlighting an entry in the Disability Information list (top half of the screen), click this button to view the disability entry window for the entry. Alternatively, you may open the disability entry window by double-clicking on the item in the Disability Information list. Click this button to save any changes you make to the Claimant’s Description of Disabilities section (lower half of the screen). Click this button to cancel any changes you make to the Claimant’s Description of Disabilities section (lower half of the screen). Adding Ailments to Disability Information The top half of the Disabilities tab is reserved for ailments specifically diagnosed by a medical provider. To insert an ailment in this section, click on Add at the top of the Disabilities window. Then, complete the fields in the Disability window with the appropriate information. Field Ailment Description Choose the appropriate ailment from the drop-down list. (Our pre-loaded list of ailments contains approximately 180 ailments. If you would like to add other options to the list, follow the steps outlined in Modifying Lists in the Databank. Severity Your office should choose how you would like to classify the severity of an ailment. Many offices choose to use a scale of 1-5 (with 5 being most severe). By using a numerical scale, you'll be able to sort and filter the information in this section in a meaningful way. (For more information on sorting and filtering, see Grid Layout on page 28.) Whatever method you 75 Duration Work Load Treatment Notes choose, make sure your users are consistent! Enter the length of time your client has suffered from this ailment. Your Office should choose how to describe work load. Many offices use terms such as "sedentary," "light duty," etc. Again, regardless of the method you use, just be consistent! Describe the treatment that the medical provider is rendering for this specific ailment. Add any other details not already explained in the other fields in the Disability window. Employment (Work) Tab By default, this tab appears when you're working in a Workers' Compensation matter. It may not be turned on for other law types. You can choose Employment or Work as the label for this tab (See: Law Type/Case Type/Rolodex Type Setup.) In a workers' compensation matter, it is vital to keep track of your client's work history, so that you'll have easy access to information regarding salary, job duties, dates of employment, and work load. This data will undoubtedly help you as you build your case to win benefits for an injured employee. Adding an Employment (Work) Entry When you attach an employer to the workers' compensation claimant in the matter tree on the Matter tab, Prevail also automatically enters that employer's information on the Employment (Work) tab. During the attachment procedure, you have the opportunity to input employment detail (such as dates of employment, salary, occupation, etc.), or you can simply attach the employer, and return later to add other details. You can attach multiple employers and multiple employment detail records for each, as needed. 76 The reason you have to attach the Employer to the Claimant is because the employment history follows the person. Therefore, if you have more than one matter with employment history for the same person, the Employment (Work) tab will automatically divide into two sections and you’ll see their full employment history in each of their matters. The top section will display only the employment history entered in the matter you’re currently viewing. The bottom section will display all other employment history from all their other matters. The mechanics described above work in exactly the same way on the Medical tab for medical history. Medical history also follows the person. Follow these steps to manually add entries to the claimant’s employment history: 1. Click Add on the right side of the screen. A new Employment entry window appears. 2. Click on the paper clip button, which is located to the right of the Employer field. A Rolodex search window appears. 3. Enter any character string from the employer’s name in the Search Criteria field. a. Sometimes, you may not know the specific employer's name. You may simply know the occupation that your client has held at various places over the years. If this situation applies, you'll still need to attach an employer to the client. Simply use Step 4 below to create or use an existing Rolodex entry for an employer with the name "Unknown Employer". b. If the employer appears in the list of results, double-click on the employer’s entry to attach the employer to the matter. c. If the employer does not appear in the list of results, then click New at the top of the window. A Rolodex entry window appears. d. Enter the employer’s information in the Rolodex entry window, and click Save. You’ll return to the Rolodex search window, and the employer will now display in the list of results. 4. Double-click on the employer’s name in the list of results. 5. If desired, enter the appropriate information in the remaining fields in the new Employment entry window: a. Occupation – the type of work the client performed 77 b. Title – the official title the client held c. Start Date – beginning date of employment d. End Date – ending date of employment (if not currently working for this employer) e. Current Employer – click in the checkbox if the employer is the claimant’s current employer. f. Salary – may be entered as an hourly, weekly, or annual rate g. Work Load – choose no work, light duty, full duty, or other h. Classification – choose part-time, full-time, seasonal, or other i. Duties – enter a brief description of the client's duties at this occupation. j. Notes – enter more detailed information about the claimant's position with this particular employer. 6. Click Save. Events Tab The Events tab is like a calendar within a calendar. As you know, your full Prevail calendar lists all appointments and tasks, related to all matters (or no matter at all, in the case of a personal appointment or task). The Events tab, on the other hand, displays only those appointments and tasks related to the specific matter in which you are working. On this tab, you may view, create, delete, cancel, or complete appointments or tasks just as if you were working in your full Prevail calendar. The top half of the Events screen displays appointments related to the matter, whether they have already taken place or are scheduled to take place in the future. The bottom half of the screen displays pending (i.e., incomplete) tasks related to the matter. This table explains the purpose of each of the buttons located in the Appointments and Tasks sections of the Events screen. Button Purpose Add Click this button to add a new appointment (or task) to the matter. The new appointment (or task) will also automatically appear on your calendar. 78 Delete View After highlighting the entry in the appointment list you want to delete, click this button to delete the appointment (or task). The appointment (or task) will also automatically be removed from your calendar. After highlighting a specific entry in the list of appointments (or tasks), click this button to view the Appointment or Task window for the entry. Evidence Tab The Evidence tab is much like the Employment and Medical tabs. It gives you a place to track all other types of evidence or records requests. It includes fields for the period of the records, e.g. From Date, To Date, as well as fields for the date the evidence/records were requested, date received, and date submitted. On this tab you can attach any type of related party to each detail record so you can see at a glance who it was requested from. If the evidence detail entry includes a dollar amount, such as the fee required to obtain the information, you can check the box Ledger Cost and select the appropriate cost category to automatically create a ledger cost entry from the evidence detail you’ve already entered. Similarly, if the dollar amount would be included as part of the damages in the case, checking the Damage box and selecting the damage category will automatically create the corresponding damage entry on the Damages tab for you. The evidence detail screen looks like this: Adding an Evidence Entry Follow these steps to create a new Evidence entry: 1. Click on New and select Evidence. a. Or, on the Evidence tab, click the Add button to open a new Evidence detail window. b. If you’re presented with a list, select the appropriate party for whom the evidence is being collected. 2. Enter a description of the new entry in the Subject field. 3. Select the desired category. The category list can be edited in the Databank. 4. Click on the paper clip to select the appropriate party from whom the evidence/record is to be obtained. 79 5. In the Attach Type dropdown, you may change the type if necessary. It will apply only to this evidence record. 6. If there is a cost associated with obtaining this evidence, enter it in the Bill field. a. Then check the Ledger Cost checkbox and select the appropriate cost category from dropdown. b. Click the paperclip to the right of the Pay to the Order field to attach the party to whom the cost will be paid. 7. If there is a damage amount directly associated with this evidence, enter it in the Bill field. a. Check the Damage checkbox and select the appropriate damage category from the dropdown. 8. Enter any detail you wish to add in the Notes field and click the Save button. Evidence Tab Options You can also display Medical detail records and Employment detail records on the Evidence tab if you wish. Simply click on the Options button and check whatever you like. Ledger Tab Since you have invested countless hours and incurred various costs in a matter, you'll obviously want to track your time, costs, and/or fees on Prevail's Ledger tab. When used properly, this tab can help you generate several useful accounting reports – such as reports of outstanding monies due and invoices that you can print and send to clients. Entries can automatically be sent to the Ledger from various screens within Prevail, such as merge documents, the Medical tab and the History tab. You’ll keep track of all time, cost, and fee entries with the Ledger tab. This table explains the purpose of each of the buttons located on the Ledger: Button Purpose Export Click this button to export the data on the Ledger to a Comma Separated Values (.csv) file that can be imported into any other program that accepts .csv files. The resulting .csv file will automatically be saved on the matter's 80 Add Delete View Add Cost Add Fee Add Time History tab so you know who created it and when. Click this button to add a new time, cost, or fee entry to the matter. After highlighting the entry in the list to delete, click this button to delete the ledger entry. After highlighting a specific entry in the list of ledger entries, click this button to view the detailed time, cost, or fee entry window. Alternatively, you may double-click on a Ledger entry to open it. Click this button to add a new cost entry to the Ledger. Click this button to add a new fee entry to the Ledger. Click this button to add a new time entry to the Ledger. Adding a Ledger Entry Follow these steps to create a new Ledger entry: 1. Click on Add Cost, Add Fee, or Add Time. A new Ledger entry window appears. 2. Click on the Category drop-down list, and select a category for the new entry. a. The category drop-down lists for Cost, Fee, and Time can be edited to suite your firm through the Databank, found under the Administration menu. 3. Enter a description of the new entry in the Subject field. 4. Click on the Timekeeper drop-down list to select the appropriate party for the entry. 5. If entering a cost, enter the amount of the cost in the Amount field. 6. If entering time, enter the number of hours in the Hours field. If the Calculate box is checked, the Amount will calculate automatically based on the Timekeeper’s rate (from their employee settings). If it is not checked, only the Hours value will be stored; the amount will remain zero. 7. Enter the date you billed the client for reimbursement in the Billed On field. 8. Enter the invoice # on the bill that you sent to your client in the Invoice # field. 9. If you are entering a cost, enter the name of the party you paid in the Pay to the Order of field by clicking on the paper clip icon to the right of the field to open a Rolodex search window. Then, search for the party in the Rolodex, and double-click on the appropriate name in the result list to attach to the Ledger entry. a. If the party doesn't yet exist in your Rolodex, click New at the top of the Rolodex search window to create a new Rolodex entry. 10. If you are entering a cost, enter your firm’s check # used to pay the cost in the Check # field. 11. If desired, enter any notes relevant to the entry in the Notes field at the bottom of the window. 12. Click Save. 13. When you receive payment against a particular ledger entry in the future, double-click on the entry in the Ledger tab. Then, click in the Reconciled On checkbox, and enter the date you received payment, or click on the drop-down arrow to display a calendar from which you may choose the payment date. a. When you receive a payment, in addition to reconciling the original entry, you may choose to create a Payment entry (entered as a negative value) on the 81 Ledger tab in order to have an accurate balance due displayed at the bottom of the Ledger tab. To create a payment entry, follow steps 1-11 above, as appropriate, and simply make the Amount negative by typing a "-" sign in front of it. Prevail also contains a completely separate Trust Ledger. For more detail, see the Trust Ledger chapter. Medical Tab The Medical tab contains a list of all medical providers attached to a client in a matter, as well as detailed treatment information, including reason for treatment, dates of service, dates medical records copies were requested and received, date submitted, payment information (recorded as a cost or damage entry), and more. When you attach a medical provider to a client on the Matter tab, Prevail automatically creates an entry for that provider on the Medical tab, as well. Here is a display of the Medical tab. It’s important to understand that in Prevail, a person’s medical history always follows the person. Therefore, when you see the Medical tab separated into two panels, as in the example below, the upper panel displays a complete list of all medical records that have been entered in the system within this matter. The lower panel displays medical history entries from all other matters for the person. The mechanics described above operate in exactly the same way on the Employment (Work) tab for employment history. Employers are attached to a person and the employment history follows the person. There are several buttons located in the top right portion of this tab. The table below describes the purpose of each of these buttons. When you click on this button… You will… 82 Export Export data to a comma-delimited (.csv) file. Add See a new medical record entry window. See Adding a Medical Record below for more details about adding a new record. Delete Delete the medical record that is currently highlighted in the list. View Open the medical record entry window for the record that is currently highlighted in the list. From this window, you can make additions or deletions to the record or delete the record entirely. You can also view the medical record by double-clicking on it from the list of medical records. Requesting the Initial Set of Records from a Medical Provider As previously mentioned in this section, when you attach a medical provider to a client on the Matter tab, the medical provider will also appear on the Medical tab. As you're attaching the medical provider, you will see a window prompting you to input the reason for treatment, dates of service, and records requested/received dates. At that point, you will probably only be able to complete the reason for treatment and dates of service. Since you don’t usually know the exact dates of service initially, the From Date and To Date fields are actually text fields. That way you can enter general information like “July 2012” to “Present”. When the time comes to request an initial set of records from a provider, follow the steps below to update that provider's entry on the Medical tab. 1. Double-click on the appropriate provider's entry on the Medical tab. Make sure that the Subject and From Date and To Date fields are completed. 2. Enter the date that you are requesting records in the Records Requested field. 3. Click Save. Once you’ve updated all the medical entries for which you need to request records, if you’ve properly set up your merge document template, you can use the Merge Across Related feature produce the request letters all at once. 4. When you receive the initial set of records, follow these steps to input the appropriate information: a. Double-click on the appropriate provider's entry on the Medical tab. b. Enter the Records Received date. c. Update the From Date and To Date fields to match the set of records you now possess. For example, if you originally entered the word "present" or "ongoing," you'll want to look through the records and determine the last date of service referenced in that particular set of records. Because the “From Date” and “To Date” fields are text fields, if you want to be able to sort your medical records in chronological order, enter the actual dates of service in the format YYYY/MM/DD (Year/Month/Day). 5. If you had to pay for the copies of the records, enter the amount you paid in the Bill field 83 a. Check the Add to Costs box, and choose a Cost Category. b. If your client had to pay any amount to this provider, you may enter that amount in the Bill field. c. Check the Add to Damages box, and choose a Damages Category. d. Cost entries will automatically transfer to the Ledger, and Damages entries will automatically transfer to the Damages tab (usually found in personal injury and workers' compensation matters). 6. Enter a summary of the records in the Notes area. 7. If you have a TWAIN driver installed for your scanner, you may scan the records into Prevail by clicking on the Attachments button drop-down, in the lower-left area of the window, and clicking Scan Document. Upon completion of the scan, the scanned image will be saved and linked to this medical detail entry. 8. Click Save. Requesting an Updated Set of Records from a Medical Provider If you need to request a later set of records from a provider who is already listed on the Medical tab, you'll need to create a new entry for that medical provider on the Medical tab. (In other words, don't attach the medical provider again on the Matter tab, and don't modify the provider's existing entry on the Medical tab!) Follow these steps to add a new entry for a medical provider on the Medical tab (when you're preparing to request an updated set of records). 1. Click on the appropriate Medical Provider's name in the matter tree on the Matter tab. 2. In the lower-right area of the screen (Medical History), click Add. 3. Enter the reason for treatment with this medical provider, e.g., Spinal Adjustment, MRI Follow up, etc., in the Subject field. 4. Refer back to the records that you already have in your possession from this medical provider to determine the new From Date. For example, if the To Date (ending date) on the prior set of records was 11/1/2008, you'll want to make the From Date on this new entry 11/2/2008, so that you don't have overlapping dates. 5. Enter the date that your client stopped treating with this medical provider in the To Date field. a. If treatment is ongoing, you can enter "present" or "ongoing" in the To Date field. 6. Choose the date that you requested records from this medical provider in the Records Requested field. 7. Click Save. 8. After you receive records from this provider at a later date, follow steps 4 - 8 from the Requesting the Initial Set of Records from a Medical Provider procedure on the previous page to enter the necessary information. There are merge field codes for the dates of service (see: Document Designer > Rolodex Types > Medical Provider > From Date, To Date). Proper use of these fields in your merge documents, in combination with Prevail’s Merge Across Related feature will allow you to produce your letters to request medical records for all the Medical 84 Providers in a matter all at once, each with the correct dates of service. This one feature alone will save you countless hours of time. Negotiation Tab By default, the Negotiation tab appears only when you're working in a Personal Injury or a Workers’ Compensation matter. You'll use the Negotiation tab to record offers and demands that are made as you attempt to settle a case out of court. You'll also use this tab to track any liens that are held against a potential settlement. Adding Demands and Offers Follow these steps to add a demand or offer entry to the Negotiation tab: 1. Click Add Demand or Add Offer. 2. Enter the date the demand or offer was made by a. manually entering the date or 85 b. click on the drop-down arrow and selecting the date for the entry 3. Enter a brief description of the entry in the Subject field. a. Many clients choose to enter the amount of the demand or offer as part of the Subject line so that it is easily visible on the Negotiation tab. 4. If the demand or offer is final, click in the checkbox for Final. 5. If desired, enter detailed information about the entry in the Notes field at the bottom of the window. a. Many clients choose to enter the name of the adjuster with each entry since adjusters often change throughout the course of the case. Adding Liens Follow these steps to add a lien entry on the Negotiation tab: 1. Click Add in the Lien section of the tab (lower half of the screen). 2. In the lien entry window, enter a brief description of the lien in the Subject field. 3. Enter the date of the lien in the Date field (either by typing the date or choosing it from the drop-down calendar). 4. Attach the lienholder in the Provider field: a) Click on the paper clip to the far right of the Provider field. b) Search for the provider's name in the Rolodex. c) If the provider's name appears in the list of search results, double-click on it to attach it to the lien entry. d) If the provider's name does not appear in the list of search results, click New at the top of the Rolodex search window to add the provider to your Rolodex, and then double-click on it to attach it to the lien entry. 5. Enter a policy number, insured amount, and lien amount in the appropriate fields. 6. If a lien notice has been received, check the Received notice box. 7. Enter any additional details, as desired, in the Notes field in the lower half of the lien entry window. 8. Click Save. 86 Strategy Tab During the course of a case, attorneys obtain information that may be useful in the future as they prepare their overall strategy for winning. The Strategy tab is a useful tab for recording notes about this strategy. To enter strategy notes on this tab, simply start typing. You'll notice that the window changes color when you start making changes. When you're finished, either click Save to save the updated information, or click Cancel if you don't want to save your changes. The Strategy tab should NOT be used as a catch-all for miscellaneous notes. It should only be used to map the overarching strategy of the case. Trust Ledger Tab Prevail recognizes that when a lawyer is in possession of a client’s funds, the lawyer owes the client a fiduciary duty to protect, safeguard and segregate this money from the lawyer’s own personal business accounts. Therefore, we added a great new feature called the Trust Ledger. It works much like the Claims/Processes Tab, in that you can track an unlimited number of deposits and payments simultaneously on the Trust Ledger tab. Follow these steps to turn on the Trust Ledger tab within a Matter for a law type: 1. Click on the Administration menu, then Law Type/Case Type/Rolodex Type Setup, and click on the Law Types tab at the bottom. 2. Choose the law type that your firm practices. 3. Then check the box beside Trust Ledger Tab. Click Save in the Law Type Settings section of the window. 4. Repeat steps 2 – 4 for each law type that needs to display the Trust Ledger. 87 Once you’ve turned on the Trust Ledger, and setup at least one trust account in Prevail, you’ve got a place to record your deposits into Trust and your Payments out of Trust. Properly maintaining this data will give you the backup you need as well as an easy way to reconcile your bank trust account with a second source. The picture below is an example of what the Trust Ledger might look like in a personal injury case. Deposit Entry Example: Payment Entry Example: This table explains the purpose of each of the buttons located on the Trust Ledger: Button Purpose Add Click this button to add a new time, cost, or fee entry to the matter. Delete After highlighting the entry in the list to delete, click this button to delete the ledger entry. View After highlighting a specific entry in the list of ledger entries, click this button to view the detailed time, cost, or fee entry window. Alternatively, you may double-click on a Ledger entry to open it. Add Payment Click this button to add a new payment entry to the Trust Ledger. Add Deposit Click this button to add a new deposit entry to the Trust Ledger. Adding a Trust Ledger Entry Follow these steps to create a new Trust entry: 88 1. 2. 3. 4. 5. 6. 7. 8. 9. Click on Add Deposit or Add Payment. A new window appears. Click on the Category drop-down list, and select a category for the new entry. Enter a description of the new entry in the Subject field. Click on the Attorney drop-down list to select the appropriate attorney for the entry. Enter the dollar value of the entry in the Amount field. a. Payments are automatically recorded as negative values. Enter the name of the party you paid, or that paid you in the Payer field by clicking on the paper clip icon to the right of the field to open a Rolodex search window. Then, search for the party in the Rolodex, and double-click on the appropriate name in the result list to attach to the Trust entry. a. If the party doesn't yet exist in your Rolodex, click New at the top of the Rolodex search window to create a new Rolodex entry. Enter your firm’s check # used to pay the payment, or the check # of the person paying you in the Check # field. If desired, enter any details relevant to the entry in the Details field at the bottom of the window. Click Save. 89 Chapter 9: The Calendar Prevail’s calendar works much like any other – it is a straightforward multi-user calendar that lets you schedule tasks and appointments for multiple users and resources within the system. What is different about the Prevail calendar is that it allows all events, be they appointments or tasks, to be linked not only to individual users, but to individual Matters and even individual Rolodex entries. Appointments vs. Tasks ALL events in Prevail fall into one of two categories: Appointments or Tasks. They are similar, but there is an important distinction between them: Appointment An appointment is when a particular person or group of people need to be in a particular place for a particular event at a specified time on a specified date for a specified duration of time. Task A task is a reminder that a particular thing should have happened or needs to be done by a specific person or group of people by a certain date. There are two primary distinguishing factors between appointments and tasks. First of all, appointments have start and end times, tasks do not. An appointment is something that happens at a specific time on a specific day, whereas a task is something that should have happened BY a particular day, but may just as well happen any time BEFORE that day or AFTER that particular day. The second distinction between appointments and tasks is what happens to them after the day for which they were set passes. If you schedule an appointment on your calendar for 3 p.m. today, you’ll be looking at it today because it’s on your calendar today. Whether your appointment happens or not today, by this time tomorrow it’ll already be in the past in you won’t see it anymore. It’ll technically still be on your calendar, but by tomorrow, today will be yesterday – and nobody bothers looking at their calendar for yesterday. You could look back a year from now and you’d see it, but you’d have no way of knowing whether or not it actually happened. A task, on the other hand goes on your task list and stays on there until you mark it as completed. If you’ve got five things that you really need to get done this week, put them on your task list. If you only get one of them done today, the other four will be there waiting for you on your task list tomorrow. If you get two more things on that list done tomorrow, you’ll have two more waiting for you the next day. Get the picture? Tasks go on your list and stay there until YOU tell them to go away (either by marking them as completed or by deleting them). 90 The Events Tab and its relationship with the Calendar As we mentioned previously, every user in the Prevail system has his or own calendar and tasks. When you click on the calendar in Prevail you are generally looking at YOUR appointments and tasks (although you can view other users’ as well). It could be said that those appointments and tasks belong to you. Many (and in fact most) appointments and tasks ALSO belong to a particular case or Matter. If Prevail user Bob has a deposition scheduled in the Smith vs. Jones Matter, that deposition is part of Bob’s Calendar. It is also a part of the Smith vs. Jones Calendar. When you look at the Prevail calendar you are looking at appointments and tasks through the lens of a particular Prevail user. There might be appointments involving many different matters on your calendar, and the thing they all have in common is YOU. The Events Page (which appears as a one of the page tabs along the bottom of the screen in any Matter) is the exact opposite – it is a case calendar which may contain appointments from many different Prevail users, but the thing all those appointments have in common is that CASE. Whenever you create a new appointment you have the opportunity to attach it to a particular Matter. Doing so causes that appointment to AUTOMATICALLY show up on the events page for that Matter. The same goes for tasks. Don’t freak out when you see things magically showing up on the Events page but don’t remember putting them there. The simple act of linking any appointment or task on a user’s calendar to a Matter will cause that appointment or task to show up on BOTH the user’s calendar AND the Events page for the Matter to which it was linked. Modifying any of those events in either location will cause it to be modified in the other location as well. Calendar Navigation Prevail's calendar component allows you to view multiple users' appointments or tasks side-byside. This feature is particularly useful if you are trying to coordinate an appointment among numerous staff, or if you need to complete tasks for a staff member who is out of the office for the day. The thumbnail calendar in the top right corner of the window allows you to navigate to the date that you would like to view. The table below explains how to choose whose calendar(s) to view and how to navigate in the thumbnail calendar. 91 Button/Field 'Today' 'Jump To Date' 'Skip Days' 'User Selection' Reset Function Jumps you to the current date. Enter a date or select one from the drop-down calendar to jump to a specific date. You can jump to a date in the future, or a date in the past. Skips forward or backward the set number of days (plus or minus) from the date you have selected in the thumbnail calendar (which may or may not be the current date, depending on which date you have selected). Click on this drop-down menu to check off the calendar(s) that you would like to view. Adding users to the view will cause their calendars to be displayed side-by-side. The Reset button brings you back to the Day view on the current date on your default calendar. Calendar Views Notice that when you open the Prevail calendar there are page tabs along the bottom of the calendar window. Each of these page tabs provides a different view of calendar information. Each has its own unique purpose. When you select more than one user, you see the calendar information for all of them, regardless of which view you select. The views are as follows: Day View The Day View is the default view for the Calendar, and arguably the most useful. It provides a graphic representation of the day. You can add an appointment by clicking your cursor on the desired start time for the appointment, then clicking the Add button. You can navigate between days using the thumbnail calendar in the top right corner of the window. You change days by simply clicking on the day of the month you want to display. You can go forward and backward a month at a time by clicking on the arrows on the thumbnail calendar. You can also change dates by using the previously-described jump and skip functions. One handy feature in the Day View is the ability to click and drag across several days in the thumbnail calendar. When you do this, Prevail will display multiple days graphically side-by-side. You can click and drag across as many days as you like, but unless you have a huge screen and very high resolution you’ll rapidly run out screen space and the limited detail you won’t be useful much beyond the span of about a week. Week View This view works just like the Day view, except that it displays an entire week’s worth of appointments at a time for the selected user or users. To add an appointment on any displayed day, click on the desired day in the thumbnail calendar, and then click the Add button. You can zoom in and see detail on any of the displayed appointments by double-clicking on the desired item. Month View The Month view works just like the week view except that it shows an entire month of appointments at once for the selected user or users. Unless you have a large screen with high 92 resolution you won’t see much detail on any particular day, but the view is still useful for finding holes in the calendar (i.e. days with little or nothing scheduled) and for spotting trends in scheduling. Appointment List Some users like to see their appointments listed out in a grid rather than graphically. That’s what this view does. It displays exactly the same information as the Day View, but instead of spacing them along a graphical representation of the day (or days) it simply lists them in plain text one right after the other. This view also works with a click and drag feature in the thumbnail calendar to create a printer-friendly list of appointments across multiple days. You can zoom in and see detail on any of the displayed appointments by double-clicking on the desired item. Task List Rather than appointments, the task list view shows tasks for the specified user or users. Since tasks have no start and end time, it sorts them (by default) according to due date. You can zoom in and see detail on any of the displayed tasks by double-clicking on the desired item. The calendar will remain on the date where you last left it during your current session, regardless of which view you’re using. Here’s why that’s important. Suppose you used the calendar’s Jump To Date feature and jumped to December 25th to see what day of the week Christmas falls on this year. Then you closed the calendar. The next time you go to add a new appointment or task, the date will default to December 25th. If you’re not paying attention you could create a new appointment or task for the wrong date. Creating Appointments You can create a new appointment from any of the previously-described calendar views by clicking the Add button at the top of the calendar window. When you do, the following entry screen will be displayed: The very first thing you should notice about this screen is the title bar at the top: Note that the appointment is linked to a Matter “Thomas (William) v. Jones Paints.” If you are in a Matter when you create an appointment, Prevail will assume that the appointment belongs with that Matter and establish the link automatically. If the appointment you’re creating is NOT linked to 93 a matter you can easily sever the connection by clicking on the Attach/Detach button (the little icon above the mini calendar on the right) and choosing Detach Matter. You can also attach it to a different Matter using the same button. Note that all appointments and tasks linked to Matters using this mechanism will automatically show up on the Events page of the attached Matter as well as on the user (or users’) calendar. Also notice the Date/Time section on the bottom right, below the mini calendar. Here you will see a list of all the appointments for the selected users for the date(s) you’ve selected in the mini calendar. This makes it easy to find the availability you need to schedule your appointment(s). The fields in the appointment window are fairly self-explanatory. The only required field is Subject, which is simply a description of the appointment. Pull-down fields like Type and Location are taken from user-definable lists which can be set up under Administration/Databank. Other fields such as start and end time will default based on where you were in the Calendar when you clicked the Add button. The Attendees Button determines whose Calendar this appointment will go on. It is quite common for a single appointment to be placed on the Calendars of several different Prevail users. To add users (or attendees) to an appointment, click on the pull-down arrow under the Attendees field. Depending on your user settings, you will see one of the following windows,: Checklist view Employee Search view On the left side of the window you will see all employees (Prevail users) who have not been selected for this appointment. On the right you will see all employees who HAVE been selected for this appointment. Double-clicking on any name in either column will cause it to move to the other column. You can also choose (using the icons to the right of the Save button), either ALL users or NO users. Regardless of which mechanism you use to get there, once the column on the right reflects the user or users on whose Calendar you want this appointment to appear, click the Save button. That dialog box will go away and you can save the appointment by clicking on the Save button at the top of the appointment window. Modifying an Existing Appointment You can change anything about any appointment by simply finding that appointment in any calendar view and double-clicking on it. Make any desired changes to the appointment and click the Save button at the top of the window. You can also click and drag an appointment to change its date and/or time. 94 Cancelling vs. Deleting an Appointment In Prevail, you have the ability to cancel or delete an appointment, and there's a big difference between the two! We recommend that you never delete an appointment, unless it was scheduled in error. Always cancel appointments that were scheduled correctly but were later called off. When you cancel an appointment, the appointment remains on the calendar, but is marked as cancelled. Also, there is an entry made on the History tab noting that the appointment was cancelled, and the appointment is marked with a strikethrough on the Events tab. There are two ways to cancel an appointment in Prevail – from the calendar or from the Events tab for the appropriate matter. Follow these steps to cancel an appointment: 1. Click on the appointment to select it (regardless of where you see it). 2. Click Cancel Appointment button at the top of the window. 3. Click Yes to confirm that you want to cancel the appointment. Rescheduling an Appointment In Prevail, you can mark an appointment as rescheduled if you change its date. By marking an appointment as Rescheduled you preserve the original appointment on all calendars where it existed, and create the new appointment on its new date and time. As with cancelled appointments, rescheduled appointments are displayed on the Events tab with a strikethrough, and they are marked as Rescheduled on the calendar. The idea of Cancelled and Rescheduled appointments it to give you a way to preserve an audit trail of all the times someone has wasted your time and resources by not keeping their scheduled appointments. Creating Tasks As you'll learn over time, certain types of tasks will appear in your task list automatically. For example, case managers will automatically receive statute reminder tasks from the Claims/Processes tab, and users can receive automatic tasks when documents are merged. You may also create tasks directly in the calendar for yourself or for other Prevail users. Follow these steps to create a task for yourself or another Prevail user: 1. 2. 3. 4. Click New; click Task. Enter a brief description of the task (i.e., what needs to be done) in the Subject field. Choose a task type from the Type drop-down list. Enter the date that you want the task to begin appearing in the task list in the Start Date field. 5. Enter the deadline for completing the task in the Due Date field. 6. If you would like a reminder pop-up window to appear on a certain date/time, check the Reminder box, and indicate the date/time to be reminded. a. You'll need to be logged into Prevail at this date/time in order to see the reminder. 7. Choose the responsible user(s) from the Responsible drop-down list. 95 If a task is assigned to multiple users, when any of the users marks the task as complete, it will be marked as completed for all Responsible and moved to their Completed Tasks list. We DO NOT recommend setting a single task for multiple users. 8. The calendar assumes that the task should be associated with the matter that you currently have open in Prevail. a. To change or remove the matter association, click on the Attach/Detach button (the little icon at the top of the task with 3 people on it). b. You can either search for a different matter or detach it so it isn’t attached to ANY matter. 9. Enter any other notes about the task in the Notes field. 10. Click Save. Completing a Task When you finish a task, you'll need to mark it as complete in Prevail. Otherwise, the task will remain on your calendar and in the Upcoming Tasks section of your Home tab forever! When you mark a task as complete, the task is removed from the calendar and the Events tab, and a Task Completed entry is automatically made on the History tab to indicate when the task was completed. There are four ways to mark a task as complete – from the calendar/Task List, the Home tab, within the task itself, or from the Events tab for the appropriate matter. To mark a task as complete in the calendar, click once on the task in your task list, and then click Complete Task (the checkered flag icon) at the top of the task list. Follow these steps to mark a task as complete from the Events tab for the appropriate matter: 1. Go to your Home tab, the Calendar, or the Events tab for the related matter. In other words, anywhere you can see the task you want to mark as completed. 2. Right-click on the task, and choose Complete, or click once on the task and click the Complete Task button. 96 Chapter 10: Email The email tool in Prevail allows you to initiate an email within a matter, and have it automatically saved to History in that matter. The email feature also allows you to scan for replies to emails you previously generated through Prevail. If any replies are found, Prevail can automatically attach them to the History tab for the matter to which they are related. Outlook must be open in order to send email from Prevail. The email features in Prevail require that you are running a 32 bit version of Microsoft Outlook (2003 or newer). Microsoft Exchange is not required, but will certainly work with Prevail. Initiating Emails in Prevail Follow these steps to initiate an email in Prevail: 1. Click the New button at the top of your screen. 2. Choose Email and New Email. 3. In the Email window, choose the person(s) to whom you want to send your message, as well any person(s) you would like to copy on the message to. You may also type email addresses in the appropriate box. If you type more than one email address in the same field, you must separate them with a semicolon. 4. When you are on the Home tab you’re not in a matter. Therefore, any email you send from the Home tab will not be stored in Prevail. It will, however, be stored in your Sent Items folder in Outlook. When you are in a matter, your email will be stored in History for that matter. 5. Enter a Subject for your email. 97 6. If you would like to attach a file to your email, click the Attach File button, and browse out to the file you want to attach. 7. Type your message in the Email window. 8. Click Send. If you were in a matter (not on the Home tab) when you sent the email, Prevail will automatically save the message, as well as any file attachments it contained, in one History entry. Outlook must be open in order to send email from Prevail. If Outlook was not open when you clicked Send, the email will be held in your Outbox in Outlook and will get sent when you open Outlook. Scanning for Replies to Email Sent from Prevail Follow these steps to scan for replies to emails you previously sent through Prevail: 1. Click the Tools button at the top of your screen. 2. Choose “Scan for Replies to Email Sent from Prevail". 3. A new Scan window will display, listing any replies that you received to emails you initiated in Prevail. 4. Click in the far-left column of the email grid to uncheck any email you do not want to attach to History. 5. If there is a green checkmark beside the email, Prevail will save it as a History entry in the appropriate matter. 6. If there is not a green checkmark beside the email, Prevail will not create a History entry for that email. 7. Click Attach to History to attach all the checked emails to their respective matters and the Scan email window is closed. Attaching Email from Outlook to a Prevail Matter Follow these steps to attach emails you previously sent or received through Outlook: 1. Click the New button at the top of your screen. 2. Choose Email and Attach Email. 3. This will open a window showing your Outlook mail folders on the left, and the last two weeks of email, within the selected folder, on the right. You’ll see the detail of the selected email at the bottom of the window. 4. Select the mail folder containing the email you want to attach. 5. If you need to expand the date range for the email displayed click on the “Set Email Range” button in the upper right corner of the screen. The default range always reverts to one week. 6. Select the email you want and click the button in the Preview pain. 7. Select the History category for the email and click Save. 8. From this point you can reply to the email from Prevail, and/or link other items to it just like you can with any other History entry. 98 Linking an Email to an Email in Prevail Suppose you have an email in History, you open that record, click the Link button and select Create Email Link. The email you’re now creating will include the email you’ve linked it to as well as any attachments from that email and any attachments you may have included with your email. This is the equivalent of FORWARDING an email. NO OTHER LINKED ITEMS WILL BE INLUDED. In other words, if you also had a History, Task, Cost, or any other items linked to the original email, none of those items will be included with your new email. 99 Chapter 11: Administration Menu There are a number of administrative features in Prevail that are reserved for users with one or more administrative security settings. The Administration menu option in Prevail is on the menu bar to the right of File. Users who don’t have any administrative security rights won’t even see the Administration menu. Users with access to the Administration menu can use it to accomplish a variety of functions within Prevail, such as creating/modifying merge document templates, creating/modifying Rolodex types, and modifying user-definable lists, based on their particular security settings. Each user with access to the Administration menu will see only the admin areas to which they’ve been given permission. The Administration menu includes the following items: Databank Document Designer Employee Setup Firm Log Law Type/Case Type/Rolodex Type Setup Process Builder Query Manager Questionnaire Setup QuickBooks Transfer Report Designer Security/Group Setup Trust Account Setup 100 Chapter 12: User Settings Each Prevail user has access to a number of individual user settings which allows them to custom tailor certain parts of Prevail to suit their preference. To access your user settings, go to File and select User Settings. You’ll see a screen that looks like this: Contact tab Much of the information on the Contact tab may have already been entered by your Prevail administrator. Settings tab There are two sections on this tab: Calendar Information, and Miscellaneous Information. Calendar Information Startup Calendar – allows you to pick your preferred calendar view and have it launch automatically, with your Default Calendars setting, when you login. If much of your responsibility revolves around setting and confirming appointments this option will probably be helpful since the Home tab only shows you your upcoming appointments over the next 7 days. Default Calendars – allows you to select one or more user’s calendars as your default view. Whenever you open the calendar, you’ll see the selected users ’ calendars, side by side, in your preferred view. If you selected an option in Startup Calendar, your Default Calendars will launch automatically when you login. Start of Day; End of Day; and Time Blocks – these settings affect how your calendar: Day View will look, as well as the default duration for a new appointment. 101 Also, if you schedule an appointment and check the All Day box, the start & end times will match your Start of Day and End of Day settings. New Appt Warning Days – this setting allows you to receive new appointment warning notices more than one day in advance of the approaching appointment if you wish. New Task Warning Days - this setting allows you to receive new task warning notices more than one day in advance of the approaching task if you wish. Appointment Reminder – allows you to select how far in advance of an upcoming appointment (from zero minutes to eight hours) you want to receive a reminder. 2nd Appointment Reminder – allows you to select how far in advance of an upcoming appointment (from zero minutes to eight hours) you want to receive a second reminder. The 2nd Appointment Reminder should always be a smaller value than the Appointment Reminder, e.g.: Appointment Reminder=1 Hour; 2nd Appointment Reminder = 15 Minutes Miscellaneous Information Word Processor – this setting is fixed during the installation process. Popup Windows Stay On Top – checking this box will cause any popup windows, message windows, e.g. task or appointment reminders, task completed messages, etc., to remain open and on top of your main Prevail window till you close them. This setting is most often used by people who are frequently called away from their desk. That way they won’t miss any messages that appeared while they were away. Prompt for confirmation – with this box checked, when you attempt to exit Prevail, the system will prompt you with a confirmation message where you must click one of the following: Exit Prevail, or Continue Prevail. Receive Appointment Messages – if this box is not checked, you will not receive appointment reminders, or messages advising you when other users schedule or edit appointments for you. Receive Task Messages – if this box is not checked, you will not receive task reminders, or messages advising you when other users schedule or edit tasks for you, or complete tasks you’ve assigned to them. Alert Doc Side – allows you to dock your messages and reminders in your preferred location. This setting doesn’t do anything if you have the Popup Messages setting checked. 102 Alert Duration – allows you to set how long your alerts will remain on the screen at your selected dock location. Popup Messages – this setting will override the two previous settings and revert to displaying all your message windows as stand-alone popup windows. Employee Search Window – this setting applies to the calendar, tasks and appointments. It toggles between a dropdown checklist of employees, or a separate employee listing window. Here is an example of each: Checklist view Employee Search view Combined Search – this setting toggles between a combined search, which includes the Matter & Rolodex searches combined, or a separate search button for each. With the combined search, you’ll enter your search criteria and press Enter. You’ll get a results screen with two tabs at the bottom: Matter Search; Rolodex Search. Then click on the tab for the results list you desire. With the combined search button unchecked, you’ll have separate Rolodex Search and Matter Search buttons on the tool bar. You’ll enter your search criteria and then click the desired search button. Button Tips – When this setting is checked, and you hover your mouse over a button, a description of that button will appear. Spell Checker – toggles the spell checker on or off. 103 Sync tab If you’re using Microsoft’s Exchange Server for your Outlook email, and it has already been setup in Prevail, your Sync Type will already be set to Exchange and you will not be able to change the settings on this tab. If you are not running Exchange, this is where you configure your local Outlook sync to sync your Prevail and Outlook calendars. If you’re not sure if you’re running Exchange or not, DO NOT GUESS! When you see the screen below, please contact your network administrator before saving these settings. Once you save your Outlook Sync settings, they can not be changed except by a Prevail Technical Support Specialist. Email tab Here you’ll configure your email settings for Prevail. The settings are pretty selfexplanatory. The important thing to note here is that Prevail is not able to use your email signature from Outlook. Therefore, you need to create the email signature you wish to use with Prevail. Appearance tab This is where you get to have some fun and personalize your view of Prevail. 104 Toolbar Style – Pick the one you prefer: Consolidated Standard Highlight Color – this is the highlight color for “required fields”. Font Name, Size, and Large Icons apply to the text and field names in Prevail. It’s important to note that they are somewhat affected by your screen size and resolution settings. Skins & Buttons – pick the ones you like to customize the appearance of your Prevail. If more than one Skins and/or Button style is selected, a random selection will be used each time you launch Prevail. Shortcuts tab Here you can create a keyboard shortcut for just about every action you can take in Prevail. You can create more keyboard shortcuts than you can probably remember. Click the Add button and you’ll see this screen: 105 Simply pick the Shortcut key or key combination and the Action you want it to trigger, and click save. Once you save a shortcut, it’s related key and action will be removed from their respective lists. 106 Chapter 13: Tools The Help Menu The Help menu gives you direct access to help in a variety of ways. The first item is the Prevail Manual. The fact that you’re here means you probably found it. As new features are added to the program, they are also added to the manual. Therefore, when you download and run a Prevail update you’re getting the software updated and you’re getting an updated Prevail Manual as well. Now let’s skip down to “What’s New.” This is the first thing you’ll see when you login after an update has been run. If you’re like most users who skip right past it, you can always come back to read it by going to the Help menu and clicking on “What’s New.” We’ve also added some enhancements that we hope you’ll find helpful. Here’s what it looks like. When you see a picture on the right side for an entry, you can double click on it to open the picture for a closer look. Here’s the first one from the example above: 107 Double-clicking on an image, like the one above with the “play” button, will actually open up a brief video to better explain the new feature or changes to an existing feature. Below is an example of what you get by double-clicking on one of the pictures in “What’s New.” Client Package The Prevail Client Package is a feature that was developed to allow you to create PDF’s of one (or several) Matters from Prevail. With Client Package PDF’s, there is no internet connection needed, or the need to have Prevail installed to be able to view information from a Client’s Matter. In reality, someone need only have Adobe (or a PDF reader) installed on their computer, to view this information. Once a Client’s Matter has been created into PDF, you gain all of the access and freedom that comes with having this format. Save the PDF to a portable storage device, and take it with you to a hearing. Email the PDF to a consulting expert or attorney for quick correspondence, or quick comparisons; the choice is yours! Once a Client Package PDF has been created, none of Prevail’s Security Settings will apply to this PDF. Your firm is solely responsible for implementing the proper security protocols to protect the confidentiality of this information. 108 Creating a Client Package PDF 1. Click the Client Package button at the top of your screen. Using the Check Boxes under Select Contact Types and Select Tabs; choose the areas that you would like included in your Client Package(s) 2. Choose the location where your new Client Package should be saved. You can type in the complete path, or click on the Select a Folder button toward the bottom right. 3. Click the Finish button at the bottom of the window. This process may take several minutes to complete. The finished PDF will open automatically when the process is complete. Quick Print Envelope There are two ways to quickly and easily print an envelope from any Rolodex entry. You can click the Envelope button, to the right of the address field, when viewing a rolodex entry attached to the matter. Or, click on the Envelope button within the rolodex record. You can add your firm’s return address to the envelope template if you like. Go to the drive where your Prevail_Server folder is located, and go into the Docs folder. There you’ll find the Envelope template. Manually edit the document to add your return address, and format the font to suit your preference. Map-it Tool There are two ways to quickly and easily map an address from any Rolodex entry. You can click the Display Map button, to the right of the address field, when viewing a rolodex entry attached to the matter. Or, click on the Display Map button within the rolodex record. This will open your web browser and plug in the address for this entry into Google Maps. This requires two things: 1) the entry must contain a valid address, and 2) you must have an active internet connection. Reports After you get your office up and running with Prevail, and you're inputting lots of valuable information into the program, you'll want to be able to analyze this data in a meaningful way. For example, you may want information readily available regarding monies due, lists of open matters, case status reports, etc. You'll use the Prevail Reporter to gather such information from your Prevail database. Numerous reports are built into the software. And, if you need a report that doesn't already exist, customized reports are available by contacting us at [email protected]. Running Reports Follow these steps to run a Prevail report: 1. Click on the Reports menu, and go to the appropriate folder and report that you would like to generate. 2. Depending on which report you choose to generate, you may see a window prompting you to enter information (such as a name or case number) to limit the results that the report will display. 109 3. If you do not want to limit the results to a specific case number, date range, employee login, client name, etc., simply click on OK in the window, without entering information in any of the fields. 4. If you want to limit the results that will display in the report, enter the appropriate case number, date range, employee login, client name, etc., in the fields provided, and then click OK. If you enter a specific name to limit the report, you must capitalize the first letter of the name (just as the name appears in that person's Rolodex entry). If you specify a certain employee login, you must enter that employee login in ALL CAPS, just as it appears on the Prevail login screen. 5. You may choose to Save or Email as a PDF, or Print a report after it is generated. 6. To save a report, click on Save at the top of the report window. Then, browse to the appropriate location to save the file. The folder will be saved as a PDF document. 7. To email a report to another user in your office, click on the Email drop-down list at the top of the report window, and choose the appropriate user to receive the report. In order for a user's email address to appear in the drop-down list, you must have an email address entered for that user in their employee setup (located under the Administration > Employees menu in Prevail). 8. To print a report, click on Print at the top of the report window. 110 Chapter 14: QuickBooks™ Integration QuickBooks™ Transfer Wizard Should you wish to incorporate QuickBooks™ Integration into your Prevail System, there is a one-time purchase necessary. This is a firm wide purchase, and as such, you will not pay per end-user or workstation. You will also need to make sure that you have purchased and installed QuickBooks Pro or Premier 2008 or newer, or QuickBooks Enterprise 8 or higher for all workstations that need to run the QuickBooks™ integration. Simply call our tech support at (407) 228-4400, option 3, to get started. The QuickBooks™ integration DOES NOT WORK with any of the on-line versions of QuickBooks™. Overview The purpose of the integration with QuickBooks™ is to completely eliminate the need to manually enter into QuickBooks™, transactional data that’s already in Prevail. You can also add Customers and/or Vendors from one program into the other. And, you can keep your Customer and Vendor information consistent in both programs using the syncing tool. The key to making this integration work for your firm is to understand that: 1. You must have a working company file in QuickBooks™. 2. You can only integrate with one QuickBooks™ company file. 3. All transactions must be initiated from Prevail. 4. You must go through a simple process to match Customers, Vendors, Items and/or Accounts between the two programs. The QuickBooks™ Integration Setup can only be run when no one is logged into Prevail. If anyone is logged in, the option will be greyed out. Initial Set Up When you select the QuickBooks™ Integration Setup from the Tools menu, you see the following window: 111 When you click Continue, you will see a progress bar as the new fields are added to the tables. When the progress bar goes away and you’re back on the main screen, you can close the Prevail Control Panel and launch Prevail and login. Once the QuickBooks™ Integration Setup has been completed, each Prevail user who is also running QuickBooks™ on their machine, and only those users, will have access to the QuickBooks™ Transfer on the Prevail Administration menu. QuickBooks™ Transfer Wizard In order to run the QuickBooks™ Transfer, QuickBooks™ must be running. In the initial setup, a QuickBooks™ administrator must allow Prevail to access the QuickBooks™ data. This permission only needs to be granted during the initial setup. After that, QuickBooks™ won’t ask again. Prevail users, also running QuickBooks™, can open the QuickBooks™ Transfer wizards by going to Administration > QuickBooks™ Transfer. Next do the following: 1. Click on the Transfer Wizards 2. Click on Item Wizard 3. Click Get From QuickBooks™ 4. Make QuickBooks™ the active window and you’ll see the first image below. 5. Click the option: “Yes, when the QuickBooks™ company file is open, then Continue. 6. Click Done when you see the Access Confirmation message (see image below). 112 On the first screen of the wizard you will see the following: System Defaults This is where you’ll configure how you want certain data coming from Prevail to appear in QuickBooks™. For example, do you want customer names from Prevail to go into QuickBooks™ in the form of Last Name first, or First Name first. Start by clicking the System Defaults button. You’ll see the screen below. Notice there are 5 tabs in the System Defaults screen. The first is the Customer Wizard. Click the Edit button (bottom right side of the screen) and select your preferred naming convention. You may also select the Prevail Rolodex fields, and their order, to configure how your Prevail data will populate the 5-line Customer address block in QuickBooks™. Then click Save. Next you should go through the same process on the Vendor Wizard tab in the System Defaults. It looks and works just like the Customer Wizard system defaults screen. Click on the Invoice & Bill/Check Transfers tab and you’ll see this screen: 113 Here you can set a default category for each of the listed items. This will allow ledger entries from Prevail that did not have a category assigned to be transferred to QuickBooks™ without interruption using the default settings you have selected. If no default value has been set, items with no category will need to have a category assigned before they can be transferred. It is recommended that these values be left blank in the beginning to help identify and correct improper use of categories, and hopefully reinforce the proper use of categories. The Invoice & Bill Transfers screen also allows you to set you defaults for Invoices, Bills, and Statement Charges for their corresponding items transferred from Prevail. If your firm has some clients that receive invoices and other clients that receive Statements, select the type you use the most as your default. You can change that option on the fly whenever necessary. The Build Initial Detail option allows you to include any combination of the fields listed below in the first detail line of the invoice. Check the box, click the button and here’s an example of what you’ll see: 114 You create the label you want for each option, and you create the separator you want to use between them. Then, when you create an invoice, it pull the respective data from the matter and puts it into the first detail line of the invoice. On the Check Requests tab, you’ll see the following: 115 Once again, click the edit button, set the default values as you prefer. In QuickBooks™, each trust account should have a corresponding liability account. Click the Match Trust Accounts button and you’ll see a screen like this: Match each trust account to its respective liability account and click the save button. If you don’t have a liability account setup for trust, you’ll need to add one in QuickBooks. Go to your Chart of Accounts, right-click anywhere on the screen and click New. Select the option for Other Account Types. Click the dropdown and select Other Current Liability. Click Continue. Name the account as you wish. For the Tax-Line Mapping select B/S-Liabs/Eq.: Other current liabilities. Last but not least in the System Defaults, is the Deposit Transfers tab. 116 Select your Trust bank account and its corresponding Liability account as your default. If you use more than one trust account, select the one you use most often along with its corresponding liability account. You’ll be able to select a different trust account if necessary on the Trust Check Request transfer screen or the Deposit Transfer screen. QuickBooks™ Sync The QuickBooks Sync is temporarily disabled pending a resolution of issues associated with Third Party Billing. QuickBooks™ Field Lengths The QuickBooks™ Field Lengths screen is for informational purposes only. Because several of the fields in QuickBooks™ are shorter than their corresponding fields in the Prevail rolodex, you may sometimes receive a message warning that if you transfer the selected items some data may be truncated. There is no way to avoid this as it is a limitation within QuickBooks™. You can still transfer the information. You’ll just have to review the data in QuickBooks™ and edit it, if necessary, to best suit the field lengths in QuickBooks™. Setup Wizards The Setup Wizards are: Item Wizard, Vendor Wizard, and Customer Wizard. These elements must be matched between Prevail and QuickBooks™ in order for Transfer Wizards to pass data from one program to the other. Don’t worry, you don’t have to spend hours trying to match them all at once. You can match them as you process the transactions. The wizards will warn 117 you and display unmatched elements and allow you to match them as necessary to complete the transaction. Item Wizard The Item Wizard allows you to get a list of your QuickBooks™ items and accounts and match them to your Cost, Fee, Time, and Damage items in Prevail. You can also add items from QuickBooks™ into Prevail. You cannot import these items from Prevail into QuickBooks™. That’s because items in QuickBooks™ must be assigned to an account in your Chart of Accounts in QuickBooks™. Only users with full access in QuickBooks™ can run the Item Wizard because of its need to access your QuickBooks™ Chart of Accounts. In Step 1 of the Item Wizard, click the Get From QuickBooks™ button. Once the wizard gets your items from QuickBooks™, click Next to go to Step 2 of the Item Wizard. You’ll see a screen that looks like this: On the left, you’ll see your Prevail items listed by type, such as Cost, Damage, Fee, and Time. On the right, you’ll have a dropdown list of your QuickBooks™ items and a list of your QuickBooks™ accounts. You can match each of the Prevail items with their corresponding QuickBooks™ item and/or account. Match Prevail Items that could be invoiced to a client to their corresponding item in the QuickBooks Item for Invoices list. Match Prevail Items that could be billed to the firm to their corresponding item in the QuickBooks Account for Bills list. Depending on how your QuickBooks™ items are setup, you may have more than one Prevail item that matches the same QuickBooks™ item. That’s perfectly acceptable. You don’t have to match all the items at once. You can handle them on a transactional basis if you wish. That is, only match the items for which you have transactions to pass to QuickBooks™. Select the QuickBooks™ matching item for each of the Prevail items you wish to match and click Next. The selected items will be matched with their QuickBooks™ counterparts. You may notice Step 3 of the Item Wizard allows you to import items from QuickBooks™ into Prevail. This is most often used for new Prevail clients who have not yet used the Prevail Databank to customize their item lists in Prevail. On the left you’ll see a list of your QuickBooks™ items. To import QuickBooks™ items into Prevail, click the Type dropdown next to the item and select the appropriate type match for 118 Prevail: Cost, Damage, Fee, or Time. Check the Add box to the right for each item you want to import into Prevail. Note, if you check the Select All box, only those items with a Type selected will be added to Prevail. Vendor Wizard Step 1: Import Vendors From QuickBooks™. Begin by clicking the Get From QuickBooks™ button. When you see the Completed Successfully message, click Next. In Step 2 you’ll see a list with all the parties in your Prevail Rolodex on the left, and a dropdown list on the right next to each of them so you can match your QuickBooks™ Vendors with their corresponding party in Prevail. In Step 3 you’ll also have an option to add parties from Prevail to you Vendor’s list in QuickBooks™. And you can add vendors from QuickBooks™ into your Prevail Rolodex. You’ll need to assign them a Rolodex type from the drop down list. 119 You’ll also notice in the Customer Wizard, as well as the Vendor Wizard, the drop down list includes the options ‘Ignore’ and ‘None.’ Here’s the difference: Use Ignore for a party you never expect to match, and that causes them to no longer show up in the list (except when you select the Show All Parties option). Note: Remember the field lengths issue we discussed earlier. You may encounter an error when adding a rolodex entry from Prevail into QuickBooks™ if the number of characters in the Office + Firstname + Lastname fields is greater than the number of characters allowed in the Vendor Name field in QuickBooks™. The vendor will be added but the Vendor Name will be truncated to fit QB. As a cross-reference, double-clicking a rolodex entry in the Vendor Wizard will open a window that shows a list of all the Prevail Matters where that party is attached. Customer Wizard Step 1: Import Customers From QuickBooks™. Begin by clicking the Get From QuickBooks™ button. When you see the Completed Successfully message, click Next. Step 2: You’ll see a list with all the parties in your Prevail Rolodex on the left, and a dropdown list on the right next to each of them so you can match your QuickBooks™ Customers with their corresponding party in Prevail. If you sometimes do third party billing, e.g. someone other than your client is paying their legal fees, you can handle that here. Simply match your customer to the party in QuickBooks who is paying their bill. As with Vendors, you can add Parties from your Prevail Rolodex to your Customer list in QuickBooks™. Simply select the Add to QuickBooks™ option. Step 3: Here you can add QuickBooks™ customers to your Prevail rolodex. Select the appropriate rolodex type and check the Add box. The drop down list also includes the options ‘Ignore’ and ‘None.’ Here’s the difference: Use Ignore for a party you never expect to match, 120 and that causes them to no longer show up in the list (except when you select the Show All Clients option). Step 4: If you’re using Jobs in QuickBooks™, this step allows you to match a Prevail matter with a QuickBooks™ Job. For example, suppose you do insurance defense. One of your clients is XYZ Insurance Company and you have a separate matter In Prevail for each case against them. You would most likely have a separate Job in QuickBooks™ for tracking each case. Therefore, you’d want to match the Prevail matter to its corresponding Job in QuickBooks™. Remember the field lengths issue we discussed earlier. You may encounter an error when adding a rolodex entry from Prevail into QuickBooks™ if the number of characters in the Office+Firstname+Lastname fields is greater than the number of characters allowed in the Customer Name field in QuickBooks™. The customer will be added but the Customer Name will be truncated to fit QB. Initiating QuickBooks™ Transactions from Prevail Note: Only transaction items initiated in Prevail can be transferred to QuickBooks and also receive information back from QuickBooks™. All users who have access to the Prevail Ledger tab will see the following buttons: All users who have access to the Prevail Trust Ledger tab will see the following buttons: Depending on your Prevail user settings and button styles, your buttons may look a bit different than the examples above. Transfer Wizards The Transfer Wizards are: Invoice Transfer, Check Request, Customer Payments, Checks Printed, and Deposit Transfer. Let’s start with a Check Request transaction because you’ll usually incur advanced client costs and need to create check requests to pay them before you’ll need to create an invoice to recover those costs. Later, when it’s time to do so, you can mark those same check request items to create an invoice to recover your advanced client costs. Go to the Ledger tab, or Trust Ledger tab in the matter where you want to initiate a check request. Click the QuickBooks™ Check Request button. The only items that will show up here are those that have a party attached in the Pay to the Order field, and nothing in the Check # field. 121 Select the item(s) for the check request. If you want to select multiple items, use Shift+click, or Ctrl+click to select the desired items. Click the Set Batch drop down and select Set the selected items to “Check Req.” If you only want to select one item you can click the drop down next to the item and select “Check Req.” In Prevail version 6.x it is possible to type information into the Pay to the Order field on the ledger. Such entries will not show up in the Check Request window. You must click on the paper clip icon to the right of this field and attach the party from the rolodex in order to initiate a check request. You’re likely to encounter this issue if you upgraded from an older version of Prevail. The next time the Check Request Transfer Wizard it is run, all the items set to Check Request will appear. Each of the items selected for transfer will get passed over to QuickBooks™ as a bill to be paid, or a check to be printed, based on your previously set system defaults. When a transferred item is paid in QuickBooks™, the Pay Date and Check Number are passed back to the Checks Paid wizard and can be transferred back to Prevail and mark the item(s) they came from as Paid in the ledger. Check Request In the Check Request screen you have a separate selection to process check requests from the Ledger, or the Trust Ledger. They work basically the same way. Pick the one you want to work with and click Next. Click the Select box next to the items you want to send to QuickBooks™, and click Next. The items will be transferred to QuickBooks™. Clicking on the word Select in the column heading is the equivalent of select all. 122 Notice in step 2, you have the option to override the system defaults to allow for exceptions for any of the following items: Create a Bill/Check Class Date to Use (bill date or check date) Process all Ledger Items for the same vendor on separate bills. Once the items are transferred to QuickBooks, the QB Chk Req field on the Ledger will be updated to say Processed. Trust Check Request This wizard lets you transfer check requests to be paid from your trust account. The mechanics are the same as a Ledger check request. The difference from the ledger check request is on the Prevail side in that some of the items to be paid from trust, e.g. advanced case costs and damages, don’t appear on the Trust ledger at all. When you click the QuickBooks Check Request button on the Trust Ledger you’ll see a screen like the one below. Notice the three tabs at the bottom of the screen: Trust, Ledger, Damages. This allows you to select items from any of the three tabs to create a check request from Trust. 123 In the QuickBooks Transfer, go to the Transfer Wizards, and click Check Request. Then click The Trust Check Request option. You’ll see a screen like this: Notice ‘View’ option toward the top left side on this screen. Only Trust check requests from Payments on the Trust ledger appear in the Trust Payments view. Trust check requests from the ledger, or from damages, appear in the Ledger Items view. When selecting items from the Ledger or from Damages to create a Trust check request, it is not necessary to manually create a Trust Payment entry on the Trust ledger. Running the Checks Printed wizard will do that for you. 124 Also notice in the example above, the Check option (rather than Bill option) has been selected at the top left. This will transfer the selected item to QuickBooks as a Check. In order to have QuickBooks mark the check To Print, be sure to check the Print box. The same applies to check requests from the Ledger. On this screen you have the option to override the system defaults to allow for exceptions for any of the following items: Bank Account to use (some firms have more than 1 trust account) Class (You may or may not be using Classes in QuickBooks, it doesn’t matter.) Date to Use (Bill or Check Date) Once the items are transferred to QuickBooks, the QB Chk Req field on the Trust Ledger will be updated to say Processed. Checks Printed This wizard allows you to select Ledger Check Printed, or Trust Check Printed. It will then import the check # and date from QuickBooks™ for all the checks written to pay the check requests from Prevail. You’ll see the following screens: It will update each corresponding ledger record with the payment information and mark the item Paid in the QB Chk Req field. Anyone with access to the Ledger can see which items were paid and when. 125 As of this writing, Prevail does not have a Date Paid field in the Ledger. Therefore only the check number from QuickBooks™ is imported into Ledger items marked Paid from the transfer wizard. Remember, your individual ‘Options’ settings on the Ledger controls the columns displayed, and their respective order. Therefore, your ledger page might not look exactly the same as the example above. Invoice Transfer This screen displays all Prevail ledger items marked To Invoice, regardless of the matter they came from or the user that marked them as such. Click the Select box for each item you want to transfer to QuickBooks™, or click the Select column heading to select all. Click Next, then click yes to continue. If you want the selected items to be marked in QuickBooks™ ‘to email’ or ‘to print,’ check the Email or Print check boxes accordingly. As with the Select option, clicking the column heading Email, or Print, will “select all.” The selected items will be transferred into QuickBooks™, creating a separate invoice for each customer. Each invoice will contain all of the selected items for that particular customer. You’ll see a message on the screen notifying you that the transfer has been completed. If there were any transfer errors, such as items not matched, or customers not matched, or any other transfer errors, you’ll see a screen like the one below detailing the issues. Click Match Now and you’ll see the screen below. Here you’ll match the Prevail client/customer(s) to the corresponding party in QuickBooks™. If they’re not already in 126 QuickBooks™, simply select the option Add to QuickBooks™ and click Done. If you’re not sure click the Get Customer List From QuickBooks™. If they’re on the list, select the correct match. Do this for each unmatched party and click Done. Next you see a message screen letting you know how many clients you’re about to add to QuickBooks™. Click Yes to continue. Then you’ll see the confirmation that they’ve been added. The steps above are virtually the same for a Check Request where the Vendor has not been matched to QuickBooks™. If you try to initiate an Invoice Transfer or Check Request in the Transfer Wizards and you have any unmatched parties or items, you’ll see a message like the one below. 127 Just click Match Now and you’ll see a screen like this, where you can match or add the appropriate items and or parties. You can also match a matter to a Customer Job in QuickBooks. Suppose you do insurance defense. You’d want to attach the matter to the insurance company as a job in QuickBooks. For more on this, refer to the section on Matching Matters to Jobs. Once the customers and items are matched, you’ll see the item(s) available for transfer and you can complete the transfer process. Notice in step 1, you have the option to override the system defaults to allow for exceptions for any of the following items: A/R Account Class Invoice Date Invoice Term Template (the QB template you wish to use) Invoice/Statement Each of the items that has been transferred to QuickBooks™ will now be marked in Prevail as Billed. This way, the Prevail users who do not have access to QuickBooks™ can still see the status of their transactions. After payment has been received in QuickBooks™ for the 128 transactions transferred from Prevail, the payment information for each of those transactions can be transferred back to Prevail using the Customer Payments wizard. Then they will be marked Paid in Prevail. A corresponding ‘Payment’ record will be written into the Prevail ledger. Here’s an example: It’s also important to note that items previously marked to create a check request can also be marked ‘To Invoice.’ An example would be advanced client/case costs that are now recoverable at the conclusion of the case. Prevail has no control over how QuickBooks applies payments to invoices or Statement Charges. Therefore, if you have billable items of more than one type for a client, the only way to correctly apply payments from QuickBooks to their corresponding type in Prevail e.g., Cost, Fee, or Time, is to invoice these types separately. We’ve provided checkboxes in the Invoice Transfer to allow you to filter items by type to make it easy to invoice them separately if you wish. Customer Payments This wizard lets you transfer payment information from QuickBooks™ to Prevail, for payments made against invoices created from Prevail. It will create a Payment record in the ledger for each payment made against an Invoice created from Prevail. When an Invoice created from Prevail is paid in full in QuickBooks™ it will add the payment type or check number to each ledger item in Prevail that was paid, and the item will be marked as Paid. You should know that the Customer Payments wizard can take several minutes to run, based on the number of open invoices you’ve transferred from Prevail, and how long it’s been since you ran it last. It has to look all the open invoices and find all the payments posted to those invoices and transfer that payment data into Prevail. So, it’s best not to be in a hurry when running the Customer Payments wizard. The important thing to remember regarding customer payments is the original invoice must have been created from one or more items in Prevail marked ‘To Invoice.’ Then, subsequent payments, made against that invoice can be recorded directly in QuickBooks™. The payment information can be transferred to the respective client in Prevail using the Customer Payments transfer wizard. 129 Deposit Transfer This wizard allows you to transfer Trust ledger deposits from Prevail to QuickBooks. Notice the two radio buttons on the top left of the screen: Vendors/Other Names, and Clients. Because QuickBooks stores these list separately, you must select from the appropriate list based on whom you’re receiving the deposit from. Also on this screen you have the option to override the system defaults to allow for exceptions for any of the following items: Class Date to Use From Account (for Trust deposits this must be a liability account) To Account (for Trust deposit this must be your Trust account) Once the items are transferred to QuickBooks, they are marked as Deposited in Prevail. Third Party Billing Suppose you have a client who’s legal expenses are being paid by someone else such as Legal Aid Society for example. In order to create an invoice in QuickBooks with the Ship To as your client, and the Bill To as Legal Aid Society, in the Customer Wizard, or in the Match Now option, you would match your client with the party who is paying their bill, i.e. Legal Aid Society. Then when you run the Invoice Transfer wizard, you’ll get the result you’re looking for. You’ll need to do the same for each client who’s bills are getting paid by the same third party. Here’s an example of the screens you’ll see after clicking on the Stmnt/Invoc. button: 130 Click Match Now and you’ll see this screen. Match the client to the QuickBooks Customer who’s paying the bill. If they’re not already in QuickBooks, select Add to QuickBooks. Then click Match Matters with a QuickBooks Customer Job. Probably you don’t already have a Job for this third party biller in QuickBooks, so you’ll need to select Add to QuickBooks. Be sure to check the Third Party Billing checkbox. Then click Done. 131 Now transfer the item(s) as usual. Here’s what this example looks like in QuickBooks: As you can see above, Legal Aid Society has a separate job for the legal fees for each matter. It’s important to note that once you’ve matched someone through the Customer Wizard, or the Vendor Wizard, that party no longer shows up in the list. The only exception is when you check the box for Third Party Billing. Therefore if you need to see any previously matched parties, you must check the box to ‘Show all QuickBooks Customers’ or ‘Show all QuickBooks Vendors.’ If you’re in the Invoice Transfer wizard or the Check Request wizard and they still don’t show, you can refresh the list by selecting the ‘Get From QuickBooks’ button. Matching Matters with a QuickBooks Customer Job From the screen below, click Match Now. Now there are two possiblities: 1) your customer (in this example, the insurance company) exists in QuickBooks but hasn’t been matched, or 2) your customer doesn’t yet exist in QuickBooks. Here’s how you handle each of them. 1) In this screen match the insurance company with it’s corresponding customer in QuickBooks, and match the other party to the same customer (in this example, the insurance company). 2) If the insurance company (in this example, your customer) doesn’t yet exist in QuickBooks as a customer, click the Add to QuickBooks option in the dropdown list and click Done. Then come back and match the other party from the case to the insurance company (customer) you just added, and click Match Matters with a QuickBooks Job. If you’re matching matters to a customer job, don’t be concerned if you see the same invoice item appear twice in the Invoice Transfer wizard. It will NOT create a double entry in QuickBooks. Here’s an example below. 132 Common Error Messages Here are some typical error messages you might encounter during the Customer Payments transfer process. The first was an invoice that was transferred from Prevail and then deleted in QuickBooks™. This typically occurs when a manual invoice had already been created in QuickBooks™. The others are all due to having a dialog box open in QuickBooks™, which interfered with the transfer process. 133 134 Volume II: Administrative Functions Chapter 15: The Administration Menu This chapter will give you a brief overview of each of the items found under the Administration menu. An entire chapter will be devoted to each of the Administration Menu items, starting with the Employee Setup. When you set up your users in Prevail, under Administration>Employee Settings you can decide which users are each granted rights to the various administration functions of the program. In deciding which rights to grant to each user you must balance the need for employees to access as much information as necessary to do their job with the need to keep them from screwing up things they don’t understand. Make sure you limit access to the administrative portions of the program to people who know what they’re doing and have your permission to be doing it. A person poking around without knowing what they’re doing can screw up a lot of things and cost you a lot of staff time. Every firm needs to have at least one Power User who understands how your practice operates AND makes it their business to really know how to use Prevail. THIS is the person, along with input from management, you want to determine security settings in Prevail. There are a number of administrative features in Prevail that are reserved for users with one or more administrative security settings. The Administration menu option in Prevail is on the menu bar to the right of File. Users who don’t have any administrative security rights won’t even see the Administration menu. Users with access to the Administration menu can use it to accomplish a variety of functions within Prevail, such as creating/modifying merge document templates, creating/modifying Rolodex types, and modifying user-definable lists, based on their particular security settings. Each user with access to the Administration menu will see only the admin areas to which they’ve been given permission. The Administration menu includes the following items: Databank o The Prevail Databank is the home of twenty-six of the user-definable lists that reside in various parts of the program. The Databank is essentially a list of lists. 135 For example, the Databank allows you to control the list that contains all of your choices for appointment types (e.g., Hearing, Meeting, Deposition, etc.). Document Designer o All Prevail document template setup is done through the Prevail Document Designer. Employee Setup o User management, including controlling their access to the administrative functions in Prevail is done through Employee Setup. Firm Log o The Firm Log displays a list of items that users have deleted from your database. Law Type/Case Type/Rolodex Type Setup o The Law Types section allows you to make certain modifications to each Law Type in the program, up to and including deleting law types. However, we strongly suggest that rather than deleting a law type, you simply mark it as Inactive. The Case Types section allows you to add/edit/delete Case Types and create your SOL (Statute of Limitation) definitions and warnings for each case type. Rolodex Types allows you to create an unlimited number of party types to use in your Rolodex and to attach to your matters. Process Builder Query Manager Questionnaire Setup QuickBooks Transfer Report Designer Security/Group Setup Trust Account Setup Next, we’ll address each of the administrative functions in their natural order for setting up a new Prevail installation, starting with the Employee Setup. 136 Chapter 16: Setting up Prevail Here’s where we dive into the logistics of getting Prevail set up properly. There are a number of things that need to be set up before you can really use Prevail to its fullest capability. I can assure you that by the time you get them all done you’ll be complaining about how long it’s taking. Don’t worry – you only have to do this stuff once and it’ll be worth it. You’ll be amazed at how cool it is when you see it all come together at the end. Employee Setup In this context the term “Employee” refers to your firm’s employees or Prevail users. If you have ten employees who will be using Prevail, each will need his or her own unique login ID so that Prevail knows who did what and when they did it. NEVER work in Prevail logged in as someone else. The system is based on individual accountability and all actions are recorded by individual login. Logging in as someone else would be like wearing a disguise to work and trying to pass yourself off as someone else. Every employee gets his or her own login and unique password. These should not be shared with ANYBODY. Before you do anything in Prevail, go find yourself a list of the firm’s employees. You’ll need (at the very least) everyone’s full name and a good idea of what parts of the program you want them to be able to access. Got your list in front of you? Good – let’s move on. Setting up employees in Prevail is very straightforward. First, log into Prevail using the SAMPLE login. The SAMPLE employee came with the system and can be deleted once you’ve set up a few real employees. The password for the SAMPLE employee is “Prevail1234” (remember to capitalize the P and omit the quotation marks). Once you’re into Prevail, click on the ADMINISTRATION menu at the top of your screen. Once you choose EMPLOYEE SETUP, you’ll see the following screen: 137 You can add new employees by clicking on the green plus sign (+) icon to the right of the word Employees at the top left corner of the Employee Setup screen. When you do this you’ll be placed into the edit mode and given the opportunity to start typing information about your first employee in the contact fields to the right of the list. Notice that the Login field turns yellow – that is because it is a required field (this is a convention you’ll see throughout Prevail – required fields are bright yellow). You can’t have an employee without a login. The login is a 1-word identifier for the employee. Most of our smaller offices just use each person’s first name. That obviously won’t work if you have multiple people on your staff with the same first name. In that case, first name and last initial are typically used. It doesn’t really matter what you use as long as it’s no more than ten characters and is sufficiently descriptive that other users within the firm will know who you mean when they see that login ID in tasks, appointments, history entries, etc. Note that once you create a Login ID and save it, it cannot be changed. All the other fields on the Employee contact screen can be changed any time you want, but the Login ID field can’t. If you want to change a Login, you’ll have to re-add the user with a new login, then delete the old one. You don’t have to fill out all the other fields on this employee contact screen, but the information is handy to have because all these fields are mergeable (that is, they can be automatically merged into documents). This screen is where Prevail gets the information about your firm’s attorneys and employees to merge into documents. If you include the field codes in your documents but don’t bother putting the information in here, it’ll show up blank in your documents as well. Make sure that each employee you add has the Employee is Active box checked. That is the field that tells Prevail this is an active employee who works for your firm right now. It also determines whether or not the employee will be included on pull-down lists within the program. When an employee is no longer with your firm you can simply edit their employee record and un-check this box. If the box is unchecked they won’t show up on pulldown lists but all of the other information related to that employee will remain visible in your database. The fields on this screen are fairly self-explanatory. After you’ve filled them out, simply click on the SAVE icon in the upper right hand corner of the window (depending on your screen resolution and display settings, this button may simply appear as a pencil). The program will prompt each newly created user to create his/her password the first time they log into the system. Once you’ve got the basic contact information filled out on this employee, look at the page tabs on the bottom of the employee window. You’ll see tabs for Contact, Security, Sync, and Notes. Click on the Security tab to determine which administration functions of Prevail this user will have access to. Each function is listed with a simple pull-down which either denies or grants access to that feature. Note that access to administrative functions like Trust Account Setup, Employee Setup, Rolodex Setup and Process Builder should be denied to most users. These security settings, like just about everything else in Prevail, can be modified at any time. Select the administrative security rights you wish to grant this user. Then click the SAVE button in the upper right hand corner of the screen again. These settings will be recorded. 138 The Sync tab, pictured below, allows you to select the Microsoft Exchange Server user profile for the selected Prevail user, if you are running Exchange. This will sync the Prevail calendar with the Microsoft Outlook calendar for selected profile. This feature allows mobile device users, who sync their device to Outlook, to see all their Prevail appointments on their mobile device. This is a live, two-way sync. Therefore, updates to either calendar are synced to the other. If you’re not running Microsoft Exchange Server, you can still sync your Prevail calendar with your Outlook calendar using our Local sync settings. However, the local sync is dependent on your PC being logged onto the network. The sync will only run while your PC is logged onto your network. Once it’s properly configured, it doesn’t require any further action on the part of the user. DO NOT GUESS ON THE SYNC SETTINGS. If you’re not absolutely positive of the exact Exchange profile name for each user, consult your network administrator or your IT professional. If you’re not running Exchange, each user can set up their local sync settings under File | User Settings | Sync. See Local Sync Settings below. Be sure to check the box “Launch Outlook Sync and Automatically Launch at Windows Startup.” The Notes tab to the right of the Security tab simply lets you record general notes on that employee. There’s no need to do anything with it at this point, but it’s a handy place in the 139 future for the administrator to make notes about vacation requests, absences, sick leave, etc. Continue putting the rest of your firm’s employees into the system using the method described above. Remember to appropriately limit security access to administrative functions as you see fit. Security/Group Setup Security Groups are what Prevail uses to determine who within your firm has access to which matters. Each matter must have a security group assigned to it. Each user may have a different role and level of access within each security group. Furthermore, you can allow for exceptions to the security group for a particular matter. If you’re a small firm where everybody works on every case and nobody needs to be kept from viewing any matters, then you’ll only have one security group (the Default Group, which already exists in the system) and every user will belong to that group. Each user will belong to that group in some capacity (e.g. employee type: attorney, secretary, paralegal, etc.). If that’s the case you can simply add every employee to the default security group and you’re done. Let’s assume, however, that your practice is a little bigger and you have different teams within the firm, and those teams work on different cases. You may or may not want all (or any) members of one team to be able to access another team’s cases. You may have some members of your staff (like the administrator or bookkeeper) who might work on MULTIPLE teams and need access to those cases. Prevail accommodates this by allowing you to have multiple groups, and allowing individual users to belong to more than one group. Creating a Security Group You access Security/Group Setup in Prevail by clicking on the Administration menu at the top left corner of your Prevail screen, then choosing Security/Group Setup. The following screen will be displayed: Working in this screen is simple -- The left side of the window lets you create new groups by clicking the Add (plus sign) button. Once a group is created, the right side of the window lets you attach users to that group. To do this, first make sure you’ve selected the appropriate 140 group in the left side of the window. Then click the Attach icon. A window will pop up that looks like this: Select the USER you want to add with the pull-down on the left, and then choose the role this user will play in this group using the Action pull-down on the right. When those two things are done you can complete the operation by clicking the Save icon. If you’ve made it this far, but there aren’t any users to select on the User pull-down, you’re doing it backwards. Go back to Employee Setup and create the users there first. You can’t add employees to the group unless you’ve first created the group and the employees you want to add. Security Settings by Type Notice there are two tabs at the bottom left of the Security/Group Setup window. Click on the Security tab and you’ll see the following window: On the left side you can add, edit, or delete employee types. For each Type on the left, select the desired security settings on the right. These settings control access to certain tabs and functionality within the program. Also notice that each employee type can be configured to appear in the matter screen drop-down lists for Lead Attorney and Hearing Attorney by checking the Attorney box. Similarly, checking the Case Manager box will cause employees of this type to appear in the matter screen drop-down list for Case Manager. Check the Statute Warning box for any employee types that you want to receive Statute Warning notifications. A word about employee types and Statute Warnings: Anyone designated as any type where the Statute Warning box is checked, in any group, will automatically get popup reminders and statute warnings. Also, each user who is allowed to receive statute warnings may change their settings on the Home screen 141 Branch Office (Firm Info) Prevail has the ability to merge documents and include information about your firm, such as address, phone numbers, and more, in those documents. You plug the appropriate field codes into your documents and Prevail will insert the corresponding information into the documents when they are merged. While you could certainly just type that information (firm name, phone number, address, etc.) as it is right now into all of your document templates, DON’T DO IT!!! Why not? If you do it you’ll find out why you shouldn’t have the first time something about your firm changes…like the firm name address or phone number. If you have 150 merge document templates with that information manually typed into all of them, somebody will have to go edit all 150 of those merge document templates to put in the correct information – and that information will only remain correct until the next time something changes. Most of the information Prevail merges into documents comes from Rolodex entries in the centralized Rolodex. Your firm information is no different – it is pulled from the Rolodex. There is a special Type of Rolodex entry which is designated for information about your firm. It’s called the Branch Office Rolodex type. We put this information in the Rolodex entries because that allows you to have as many branch offices as you want. If yours is a one-attorney firm with one office, you won’t especially care – but if your firm has 7 different offices all with different phone numbers and addresses, this becomes a very big deal. It allows you to set up your documents ONE time and then use them seamlessly in ALL your offices, with documents in each office automatically pulling in the appropriate information for that office. You can even operate with multiple firm names as long as you create a Branch Office Rolodex entry for each name. The Mechanics of setting up your branch office(s) are very simple. Look at the toolbar on the top of your Prevail screen. On the far right side you’ll see an icon that says New. Click on that icon. When the menu pops up below it, choose Rolodex. This is the screen you’ll see: This will give you a blank screen to make a new Rolodex entry. The VERY FIRST thing you’ll want to do on this screen is go to the TYPE pull-down at the top right corner and choose BRANCH OFFICE as the Rolodex type. Once that’s done, type in the rest of the information about your 142 firm (address, phone numbers, etc.), and click the Save icon (the pencil on the Rolodex window’s mini-toolbar) when you’re done. DO NOT enter anything in the Name fields (First, Middle, Last) for your Branch Office record(s). If you have more than one office, simply repeat this process once for each office. Once you’ve successfully created at least one branch office you can go back and get rid of the “ABC Law Firm” Rolodex record. That was just a placeholder we created because you have to have SOMETHING selected for a branch office in each matter. Once you’ve got at least one real one you can go into the Rolodex and delete the placeholder record from your Rolodex. 143 Chapter 17: User Settings User settings can’t be accessed through Administration. However, all administrators should be intimately familiar with them. Each Prevail user has access to a number of individual user settings which allows them to custom tailor certain parts of Prevail to suit their preference. To access your user settings, go to File and select User Settings. You’ll see a screen that looks like this: Contact tab Much of the information on the Contact tab may have already been entered by your Prevail administrator. Settings tab There are two sections on this tab: Calendar Information, and Miscellaneous Information. Calendar Information Startup Calendar – allows you to pick your preferred calendar view and have it launch automatically, with your Default Calendars setting, when you login. If much of your responsibility revolves around setting and confirming appointments this option will probably be helpful since the Home tab only shows you your upcoming appointments over the next 7 days. Default Calendars – allows you to select one or more user’s calendars as your default view. Whenever you open the calendar, you’ll see the selected users’ calendars, side by side, in your preferred view. If you selected an option in Startup Calendar, your Default Calendars will launch automatically when you login. 144 Start of Day; End of Day; and Time Blocks – these settings affect how your calendar: Day View will look, as well as the default duration for a new appointment. Also, if you schedule an appointment and check the All Day box, the start & end times will match your Start of Day and End of Day settings. New Appt Warning Days – this setting allows you to receive new appointment warning notices more than one day in advance of the approaching appointment if you wish. New Task Warning Days - this setting allows you to receive new task warning notices more than one day in advance of the approaching task if you wish. Appointment Reminder – allows you to select how far in advance of an upcoming appointment (from zero minutes to eight hours) you want to receive a reminder. 2nd Appointment Reminder – allows you to select how far in advance of an upcoming appointment (from zero minutes to eight hours) you want to receive a second reminder. The 2 nd Appointment Reminder should always be a smaller value than the Appointment Reminder, e.g.: Appointment Reminder=1 Hour; 2 nd Appointment Reminder = 15 Minutes Miscellaneous Information Word Processor – this setting is fixed during the installation process. Popup Windows Stay On Top – checking this box will cause any popup windows, message windows, e.g. task or appointment reminders, task completed messages, etc., to remain open and on top of your main Prevail window till you close them. This setting is most often used by people who are frequently called away from their desk. That way they won’t miss any messages that appeared while they were away. Prompt for confirmation – with this box checked, when you attempt to exit Prevail, the system will prompt you with a confirmation message where you must click one of the following: Exit Prevail, or Continue Prevail. Receive Appointment Messages – if this box is not checked, you will not receive appointment reminders, or messages advising you when other users schedule or edit appointments for you. Receive Task Messages – if this box is not checked, you will not receive task reminders, or messages advising you when other users schedule or edit tasks for you, or complete tasks you’ve assigned to them. Alert Doc Side – allows you to dock your messages and reminders in your preferred location. 145 This setting doesn’t do anything if you have the Popup Messages setting checked. Alert Duration – allows you to set how long your alerts will remain on the screen at your selected dock location. Popup Messages – this setting will override the two previous settings and revert to displaying all your message windows as stand-alone popup windows. Employee Search Window – this setting applies to the calendar, tasks and appointments. It toggles between a dropdown checklist of employees, or a separate employee listing window. Here is an example of each: Checklist view Employee Search view Combined Search – this setting toggles between a combined search, which includes the Matter & Rolodex searches combined, or a separate search button for each. With the combined search, you’ll enter your search criteria and press Enter. You’ll get a results screen with two tabs at the bottom: Matter Search; Rolodex Search. Then click on the tab for the results list you desire. With the combined search button unchecked, you’ll have separate Rolodex Search and Matter Search buttons on the tool bar. You’ll enter your search criteria and then click the desired search button. Button Tips – When this setting is checked, and you hover your mouse over a button, a description of that button will appear. Spell Checker – toggles the spell checker on or off. 146 Sync tab If you’re using Microsoft’s Exchange Server for your Outlook email, and it has already been setup in Prevail, your Sync Type will already be set to Exchange and you will not be able to change the settings on this tab. If you are not running Exchange, this is where you configure your local Outlook sync to sync your Prevail and Outlook calendars. If you’re not sure if you’re running Exchange or not, DO NOT GUESS! When you see the screen below, please contact your network administrator before saving these settings. Once you save your Outlook Sync settings, they can not be changed except by a Prevail Technical Support Specialist. Email tab Here you’ll configure your email settings for Prevail. The settings are pretty selfexplanatory. The important thing to note here is that Prevail is not able to use your email signature from Outlook. Therefore, you need to create the email signature you wish to use with Prevail. Appearance tab This is where you get to have some fun and personalize your view of Prevail. 147 Toolbar Style – Pick the one you prefer: Consolidated Standard Highlight Color – this is the highlight color for “required fields”. Font Name, Size, and Large Icons apply to the text and field names in Prevail. It’s important to note that they are somewhat affected by your screen size and resolution settings. Skins & Buttons – pick the ones you like to customize the appearance of your Prevail. If more than one Skins and/or Button style is selected, a random selection will be used each time you launch Prevail. Shortcuts tab Here you can create a keyboard shortcut for just about every action you can take in Prevail. You can create more keyboard shortcuts than you can probably remember. Click the Add button and you’ll see this screen: 148 Simply pick the Shortcut key or key combination and the Action you want it to trigger, and click save. Once you save a shortcut, it’s related key and action will be removed from their respective lists. 149 Chapter 18: Law Type/Case Type/Rolodex Type Setup In Prevail, "Law Types" refer to the areas of practice in which a firm specializes, such as Bankruptcy, Criminal Defense, Personal Injury, Social Security, Workers' Compensation, etc. A matter's law type determines the fields that will display on the Matter tab for that particular case. When you click on a specific law type in the list of law types on the left, the top section on the right side of the window will display all the settings you can adjust for that law type. The bottom section is where you can edit the case types and their corresponding statutes for each law type. The Law Types section allows you to make certain modifications to each Law Type in the program, up to and including deleting law types. However, we strongly suggest that rather than deleting a law type, you simply mark it as Inactive. It also includes the Case Types section, which allows you to add/edit/delete Case Types and create your SOL (Statute of Limitation) definitions and warnings for each case type. Rolodex Types allows you to create an unlimited number of party types to use in your Rolodex and to attach to your matters. The Rolodex Type in Prevail is what determines what fields show up on the screen on the right side of the Matter screen for each Rolodex type attached to the matter. The Rolodex Setup is where you customize the program to include all the rolodex types you need to build your list of related parties you can attach to matters. If you’re not confident in your ability to set up Prevail to ideally match your practice, call us! We’ll be happy to walk you through the process and help you understand it better. We’d MUCH rather spend a little extra time with you to make sure things are getting done correctly than risk having you make a mess of your database. Modify the settings for a law type 1. Click on the Administration menu and then Law Type/Case Type/Rolodex Type Setup, and click on a Law Type in the list on the left. 150 2. For each of the law types your firm practices, be sure the Active box is checked. For all the rest, you may wish to leave this box unchecked, rendering those law types as inactive. 3. If you would like for your client's contact information to display on the Matter tab, check the Display Client checkbox. The section below will be displayed on the Matter screen. Otherwise, leave this box unchecked. 4. Depending on your screen resolution and the size of your monitor, you may prefer to leave this unchecked to reduce the need to scroll up and down. You can always see your client’s contact information, or any other party for that matter, by simply clicking once on any party attached to the matter tab. 5. Check the box for each of the tabs that you would like to have available within a matter for each law type. For the Employment tab, you may choose to name the tab Employment or Work. Likewise, for the Process tab, you may choose to name the tab Claims or Processes. 6. If you would like to have a drop-down list on the Matter tab to assign a Hearing Attorney (in addition to being able to assign a Lead Attorney), check the Display Hearing Attorney checkbox. Otherwise, leave this box unchecked. 7. In the Settings section of the window, notice the drop-down field at the bottom, below the Incident Date/Onset Date. The option you select here, in conjunction with Case 151 Type, controls how the program calculates the statute date. 8. Only one of these four settings can be applied to each law type. Typically, they are applied as follows: a. Incident Date/Statute Date – Personal Injury b. Incident Date/Statute Date/Statute Override – Insurance Defense, and Personal Injury c. Incident/Last Compensation/Statute Dates – Workers’ Compensation d. Onset Date/Date Last Insured – Social Security, and VA 9. Click Save. Setting Up Case Types Prevail allows you to set up an unlimited number of case types within a single law type. For example, under the Personal Injury law type, you may have case types such as Motor Vehicle Accident, Slip & Fall, Wrongful Death, etc. These are all subsets of the Personal Injury law type. You can have as many case types as you want within each law type. The Law Type is what determines the fields of information which are displayed about each matter. Different case types within a law type will all display the same information on the screen as other case types under the same law type but may (and often do) have a different SOL (Statute of Limitations) calculation (e.g. 2 years rather than 4 years). Once again, go to the Administration menu, then select Law Type/Case Type/Rolodex Type Setup. You will be on the Law Type tab by default. Notice the Case Types section in this window. 152 This is where you can add/edit/delete case types for each law type. More importantly, this is where you set the Statute of Limitations for the jurisdictions in which you practice. When you click the Add button in the Case Types section, based on your law type settings, you’ll see one of the screens below: Check the Statute Date box, enter the appropriate number in the Statute Years field, and enter the number of days prior to the statute date that you want the automatic Statute Warning to first appear. If the Compensation Years field is populated in the case type setup, and the Last Compensation Date field is populated in the matter, then the statute will be calculated based on those two factors, overriding the statute based on the incident date. If you happen to practice in jurisdictions that have different statutes for the same case type, such as an auto accident in Virginia or Washington, DC, you’ll need to create that case type for each of them. For example, you could use Auto Accident (DC) and set the Statue Years to 3, and use Auto Accident (VA) and set the Statute Years to 2. 153 Steps to create a new case type 1. Click on the Administration menu, then Law Type/Case Type/Rolodex Type Setup. 2. Choose the appropriate Law type from the left. 3. In the Case Type section at the bottom right, click Add. 4. Enter a name for the case type in the Description field. 5. If this type of case has a Statute of Limitations (SOL) date (for example, two years for a motor vehicle accident case), check the Statute Date box. a. In the Statute Years field, enter the number of years after the incident date that the SOL date will occur. b. In the Statute Warning field, enter the number of days prior to the SOL date that this type of case should appear in the Statute Warning list. 6. If this type of case will not have a Statute of Limitations date, leave the Statute Date box unchecked. a. Prevail will initially calculate the SOL date based on the incident date and the Statute Years. The Last Compensation Date field is only available in the Case Type setup when the Incident/Last Compensation/Statute Dates option is selected for the Law Type in the Law Type Settings. Only select this setting if the Last Compensation Date would override the date of accident to determine the statute. This might not apply in your state, or jurisdiction. For Workers' Compensation case types, enter the number of years after the Last Compensation Date that the SOL date will occur. b. If you populate the Last Compensation Date field on the Matter tab, Prevail will recalculate the SOL date based on the number of years you enter in the Compensation Years field in Case Type Setup. 7. Click Save. Follow these steps to delete a case type: 1. Click on the Administration menu and then Law Type/Case Type/Rolodex Type Setup, and click on a Law Type in the list on the left. 2. Click once on the case type you want to delete. 3. Click Delete. 4. Confirm the deletion by clicking on Delete again. Setting up Rolodex Types We’ve already established that Prevail stores much of its information in a centralized Rolodex. Pretty much any person, company or entity that you deal with is going to be included in this Rolodex. It is one big Rolodex that will be shared by your entire firm in what is referred to as a relational database. What this means is that if you have one particular entity (a medical provider, for example), who appears over and over in many of your firm’s cases, you don’t need to re-enter that information for each case. Instead, you simply attach that medical provider’s single Rolodex entry to as many cases as you need. The information from that Rolodex entry will then show up in each of these cases. The benefits of this structure are two-fold: First of all, 154 it saves you a whole bunch of duplicated effort because you don’t have to type the same information over and over again into the 100 or so matters where that medical provider may appear. Secondly (and more importantly), it gives you accurate and instantly updatable data. Let’s say that medical provider moves his office. By simply changing the address one time in his single Rolodex entry, you have now caused his updated address to show up in all 100 matters to which he is attached. As you move through your prevail implementation you’ll be adding literally THOUSANDS of Rolodex entries (that sounds like a lot, but it isn’t -- many firms add HUNDREDS of thousands). Each time you add a new client, insurance adjuster, Judge, opposing attorney, etc., you’re adding a new Rolodex entry. Before you can do this, however, you’ll need to define what TYPES of Rolodex entries you’ll have. Each time you attach a rolodex entry to a case, you’ll be asked to define the role that Rolodex entry plays in that particular case. It’s perfectly acceptable to have a single rolodex entry attached to different cases in different roles. For example, Dr. Jones may be a Medical Provider in one case and a Referral Source in another. Or, he could be attached both as Medical Provider and Referral Source in the same matter. He may even get into an accident himself and become a PI Plaintiff in a third case. He’s still only in the Rolodex one time, but he gets attached to different cases in different roles. Before you get very far into creating Rolodex entries you’ll have to create the Rolodex types that will be used in your firm. Prevail comes pre-loaded with a base set of Rolodex types which will make sense for a pretty good cross-section of practice areas, but you’ll almost certainly want to add some Rolodex types of your own. Here’s how you do it: Once you’re in Prevail, click on the Administration Menu in the top left corner of your screen. Choose Law Type/Case Type/Rolodex Type setup from the menu that pops up. The screen that pops up will look like this: 155 This is a fairly powerful and multi-function setup screen, but the part of it you need right now is quite simple. See the two tabs at the bottom of the screen on the left side? Click on the one that says Rolodex Types and you’ll be presented with the following input screen: The first thing to do when considering whether or not to add new Rolodex types is look at the ones that are already there and see if you even NEED to add new ones. There are a lot of types already there and they’re already set up properly. If you decide you need to add any Rolodex types, now’s the time to do it – it makes sense to add them BEFORE you start putting your cases in, so all the various players can be attached to your cases using the proper types. If you wait until AFTER you put all your Matters into Prevail before you define your Rolodex types, you’ll just end up having to detach all the Rolodex entries from your matters and re-attach them with the newly-created types. You can create new Rolodex Types from this screen by simply clicking the Add button. The screen will turn yellow to indicate that the Description field is required. Type in the name of the new Rolodex type you want to create in that field. There are also a few other fields you will need to fill out before you save your entry. You’ll notice checkboxes for Client and Opposition. If members of this new rolodex type will be clients of your firm, check the Client box. For example, if your firm does claimant side Workers’ compensation the Rolodex type WC Claimant would refer to your firm’s clients, so the box would be checked. If, on the other hand, your firm does WC defense (i.e. you represent the employer), the client box would NOT be checked because the WC Claimant would not be your client – If you represent the employer then the Claimant would be your opposition. In that case you would leave the Client box unchecked and instead check the Opposition box. Note that most rolodex types will have neither box checked. A medical provider in a case is neither your client nor the opposition, so neither box would be checked. A single Rolodex type can be designated either as client, by checking the Client box or as opposition, by checking the Opposition box, but should not have both boxes checked (except 156 under very special circumstances). If you checked the Client box to designate a Rolodex type as your client, you will also need to choose the Law type from the pull-down list to indicate the type of law in which this Rolodex type would be your client (e.g. if you created a Rolodex type for PI Plaintiff, you would select the Personal Injury law type). Similarly, if you checked the Opposition box to designate your opposition, you will also need to choose the Law type from the pull-down list to indicate the type of law in which this Rolodex type would be your opposition. The only time you would check both Client and Opposition for a single rolodex type would be if you sometimes represent the client, and sometimes represent the opposition in the same types of cases. For example, suppose you handle Workers’ Compensation cases and you usually represent the injured party, you’d check the Client box for the rolodex type WC Claimant, and the Law Type would be set to Workers’ Compensation. However, suppose you sometimes you represent the Employer. Then you’d also check the Opposition box for WC Claimant. There are a few other fields which you’ll need to complete your rolodex type. First of all you’ll need to decide whether or not to check the Display Personal information box. If you check the box it will cause a number of additional fields to be displayed on the Rolodex screen for new entries of this type. These fields include age, nickname, gender, social security number, age, etc. These fields are crucial if this Rolodex type is going to be used for client data, but would be superfluous screen clutter if you’re setting up a Rolodex type for Vocational Experts. I’m pretty sure you don’t care how old your Vocational expert is, and you certainly don’t need his Social Security number. Prevail includes these extra fields for pertinent client data, but allows you to turn them off for other Rolodex types where you don’t need them. The Rolodex in Prevail contains 4 phone numbers for each entry. They can be defined any way you want them (i.e. home, mobile, work, fax, etc.), and these definitions can be different for each Rolodex type. Make sure that when you create a new Rolodex Type you define the phone number descriptions. If no specific ideas spring to mind, just go with the old standby (Phone, Fax, Phone 3 and Phone 4). It doesn’t really matter how you define them as long as you define them. When you’re done making any desired changes to your newly-created Rolodex type, simply hit the SAVE button and the type will be created. A note about changing Rolodex Types: Most end-users should be denied access to Prevail’s Rolodex type definition functions. This is not because it’s particularly difficult to use (it’s not), but because the implications of any change in this section of the program are very far-reaching. Reports and merge documents in Prevail are all based on Rolodex type definitions. You may notice in Rolodex setup that we don’t let you edit the Description or delete a Rolodex Type once it’s been used somewhere in the system. If you’ve got a Rolodex type you want to get rid of you can always go to every matter where you’ve used that Rolodex type and detach the party for which the type is used. Once the type is no longer in use in any matter, Rolodex setup will let you delete it. Obviously that would be time consuming, so we give you a shortcut: If you simply uncheck the ACTIVE checkbox in 157 Rolodex setup for any Rolodex type and then click the SAVE button, that type will no longer show up on the pull-down list. This will keep users from attaching new entries to matters using that Rolodex type (because they won’t even see it on the list). It will still exist as a type and anywhere it’s been used in the past will still work fine, but people won’t be able to use it in the future. This is an easy way to decommission Rolodex types you no longer want to use. Steps to create a new Rolodex type 1. Click on the Administration menu, then Law Type/Case Type/Rolodex Type Setup, and click on the Rolodex Types tab at the bottom. 2. Click Add. 3. Enter a name for the new Rolodex type in the Description field. 4. Check the Active checkbox. 5. If you would like for personal information (nickname, Social Security number, gender, date of birth, age, deceased status) to appear for this Rolodex type when you select it on the Matter tab, check the Display Personal Information checkbox. Otherwise, leave this box unchecked. 6. If this Rolodex type is a client, check the Client checkbox, and choose the law type in which this Rolodex type would be the client. Otherwise, leave this box unchecked. 7. If this Rolodex type is the opposition party, check the Opposition checkbox, and choose from the drop-down list, the law type in which this Rolodex type would be the opposition. Otherwise, leave this box unchecked. 8. Enter the label you want to use for each of the phone number fields, e.g., Home Phone, Cell Phone, Work Phone, etc., in the Phone #1 Description, #2, #3, and #4 Description fields. You should enter a description in each of these fields even though it is not required. 9. Click Save. Follow these steps to delete any unnecessary Rolodex types: 1. Click on the Administration menu, then Law Type/Case Type/Rolodex Type Setup, and click on the Rolodex Types tab at the bottom. 2. Click once on the Rolodex type you want to delete. 3. Click Delete. 4. Confirm the deletion by clicking on Delete again. Once a rolodex type has been attached to a matter, the program will not allow you to delete that type. You may, however, make it Inactive by un-checking the Active box in the Rolodex Type Setup. 158 Chapter 19: Databank Think of the various lists in the Databank as the labels or tabs on the hanging folders you’d put into a file cabinet. You’d use those labeled folders to help you store information in a way that would make it easy to find it when you need it. That’s what the Databank is for. The difference is that in Prevail you apply the ‘label’ to each piece of information as you store it. Then you can use Prevail’s grouping, sorting, and filtering capabilities to virtually create the folders. You can, and should, control which users have access to the Databank through the Employee security settings. Changes made in the Databank will NOT affect data that already exists in the program. They will only apply to data entered from that point forward. Location of User-Definable Lists in Prevail This table explains where the various user-definable lists are located throughout Prevail: List Where the list is located in Prevail… Ailments Ailments section of the Disabilities tab (By default, the Disabilities tab is only turned on for the Social Security law type.) Appointments Calendar (appointment entry window: Type) Communication Rolodex: labels for phone numbers, email, social media, etc. Countries Rolodex: for international addresses, users will only be able to select from this list. They won’t be able to free-type the country name. Damages Damages tab (By default, the Damages tab is turned on for the Personal Injury and Workers’ Compensation law types only.) Evidence Evidence detail: Category 159 History History tab (category selection) Note: This list also applies to Merge Document Templates (category) ICD9 Medical detail: Subject Medical “Subject” does not share the “Subjects” databank list. You can add your own list of Medical Subjects, e.g. “Primary Physician,” “Ongoing Treatment,” “Routine Visit,” etc. to the ICD9 list. Languages Rolodex entry window Ledger Costs Ledger tab Ledger Fees Ledger tab Ledger Time Ledger tab Locations Calendar (appointment entry window) Mailing Lists Rolodex: you may select one or more mailing lists for each rolodex record Matter Status Matter tab Salutations Rolodex entry window Severity Ailments section of the Disabilities tab (Social Security matters only) Step Outcome Process Builder: Step settings Subjects This list appears in the following data entry windows: Appointment, Damages, Damage Payment, Evidence, History, Ledger (Cost, Fee, Time), Negotiations (Offer, Demand, & Lean), Task, Trust Ledger (Deposit & Payment). Suffixes Rolodex entry window (*see note below) Tasks Calendar (task entry window) Titles Rolodex entry window (*see note below) Trust Deposits Trust Ledger: Deposit Trust Payments Trust Ledger: Payment Work Classification Employment/Work detail Work Load Employment/Work detail, and Disabilities: Ailment detail Suffixes and Titles should be entered in the Databank with a comma and a space and then the item in order to properly work with their corresponding document merge codes. 160 Modifying Lists in the Databank Follow these steps to modify any of the lists contained in the Prevail Databank: 1. 2. 3. 4. 5. Click on the Administration menu, then click Databank. In the Databank window, choose the list that you want to modify. To add an entry to the selected list, click Add at the top of the window, and enter a description of the new entry in the Description field. Then, click Save. To delete an entry from the selected list, highlight the entry that you want to delete, and click Delete at the top of the window. Confirm the deletion by clicking Delete again. To modify an entry in the selected list, highlight the entry that you want to modify. Then, enter the new description in the Description field, and click Save. Editing, or Deleting an item from the Databank WILL NOT affect the data already in Prevail. It will only apply to data entered after the change(s). To apply Databank changes, each user must logout and login. 161 Chapter 20: Questionnaire Setup If yours is a defense firm that gets cases assigned to you by an insurance company, feel free to move along because there’s probably nothing for you to see here. You probably don’t even need questionnaires because you KNOW you have the case already when you enter it into Prevail. If, on the other hand, yours is a plaintiff/claimant-oriented firm, read on. Prevail questionnaires will come in quite handy. They lead staff members through a series of question for the purpose of gathering pertinent information from potential clients. Responses are recorded and necessary information is gathered to help you determine whether or not to sign up the client. The most important thing about your intake process is that you gather the right information about a potential case in the proper order. If you’re a plaintiff’s lawyer and you spend a halfhour gathering information about what seems to be a pretty good case only to find out at the end of the process that the client has already signed up with another lawyer and they’re picking your brain to second-guess him, you’ve probably just wasted a half-hour of your life. Every plaintiff/claimant-oriented firm has a paper questionnaire of some sort. The key to translating that questionnaire to Prevail is to make sure the questions get asked in the right order. There are any number of “deal breaker” questions whose answers could potentially knock someone out of the box as a potential client. Make sure those questions get asked EARLY in the interview process. The intake person in a firm is usually someone who has a really good handle on what does and doesn’t make for a worthwhile case. If your Prevail questionnaires are thorough and properly-organized, you can allow just about anybody in your firm to do a client intake. Your key “in the know” person can then review all the pertinent information and make an informed decision. The Intake Questionnaire allows you to design a custom flow chart of questions and scripts for your employees to use while interviewing prospective new clients. You can create as many questionnaires as you want, so that all an employee needs to do to perform a client intake is select the appropriate questionnaire and follow the prompts on the screen. At the very least you should have one questionnaire for each law type. It is not unreasonable to have a different questionnaire for each CASE type – as there is information you would gather in, say, an auto accident case that you would not gather in a medical malpractice case and vice-versa. However, since you can create branches in your questionnaire, one properly structured questionnaire can work for all case types within each law type. When following an intake questionnaire, the employee conducting the interview is told by Prevail what questions to ask and is given appropriate places to record the prospective client’s responses. Upon completion, the questionnaire will automatically create new Rolodex entries as necessary for the prospective client and all related parties. It will also create a new Matter for the prospect so that you can immediately begin tracking documents, critical dates and other information on the prospect – even before he or she signs up with your firm and becomes an 162 actual client. To accomplish this Prevail uses a special category of matter called a “prospect” matter. A prospect matter looks and acts just like any other matter in Prevail. It has all the same pages and capabilities as an active matter. The only difference is that it doesn’t get assigned a case number or an intake date, and it shows up differently on reports and searches. Once you sign up the case, you can turn it into an active matter at any time by simply clicking on the Status button the toolbar and selecting “Activate Matter”. Then it gets assigned a case number and an intake date. Creating a New Intake Questionnaire Follow these steps to create a new questionnaire template: 1. Click on the Administration menu, then click Questionnaire Setup. 2. Click on Add in the upper left area of the window. 3. Select the appropriate law type and case type for which you will use the questionnaire from the drop-down list that appears. For each law type, you may create a separate questionnaire for each case type, or you may create one questionnaire for all case types. 4. Initial Questionnaire Question – This question is created automatically by the program for each new questionnaire. a. It includes the primary fields from a rolodex record, i.e. name, address, DOB, phone, etc. so you don’t need to add them yourself. b. It also allows you to include or omit the Incident Date from your initial question. c. And lastly, it allows you to map the initial question memo field (labeled Description of Incident) to one of the Matter memo fields if you wish. 5. Click on Add to Tree in the right side of the window, and select the appropriate question type from the drop-down list that appears. a. Contact – Use this type question type to automatically create a Rolodex entry from the answer to the question. The Rolodex entry will be attached to the matter tree, as the type you selected, at the conclusion of the questionnaire. For example, you would select the type Referral Source for a question like “How did you hear about us?” Or, you would select Medical Provider for a question like “Who is your primary care doctor.” b. Currency – Use this type question type to automatically format the response as currency. For example, you might ask a question like, "What is your average weekly wage?" c. Date – Use this question type when you want to capture a specific date, such as the Incident Date or Onset Date. d. Memo – Use this question type to allow for a text entry of unlimited length. For example, you might ask, "Describe your disabilities." or "Describe your injuries.” e. Pick – Use this question type in combination with multiple “Selected” entries (described below) to create a “pick one from the list” question. For example, you might ask, "What is your marital status?" as a Pick question with Selected choices including Married, Widowed, Single, and Divorced. 163 f. Script – This type isn’t really a question at all. Use the script type to enter a defined script that you would read after the answer to the question that precedes it. For example, suppose you ask “Are you currently being represented by someone else in this claim?” and the answer is “yes.” You would use a script to insure that the same response is given every time. Here’s how it might look in the setup: g. Selected – This isn’t really a question. It’s how create each choice in a list of answer options under a Pick question type. For example, underneath the Pick question, "What is your marital status?" you could enter several Selected question types, such as Married, Widowed, Single, and Divorced. The Selected question type is only available for insertion under a Pick question, and only one of the Selected questions may be chosen as the answer. The Selected options will appear in alphabetical order under the Pic question. You can user numbers or letters to control the display order if you wish. h. Text – Use this question type to prompt for a brief text response. For example, you might ask a question like, "What is the highest grade you completed in school?" or "What is your mother's maiden name?" i. j. We strongly recommend using Pic/Selected questions, rather than Text questions, wherever possible to promote faster, more consistent data entry. Terminate Questionnaire – Use this question type if the questionnaire should be terminated without further processing, based on a certain response. For example, you might want to terminate a questionnaire if a prospective client replied, "Yes," when asked "Have you been treated for alcohol and/or drug abuse within the past three years?" We do not recommend using the Terminate option. After all, what’s the point of having a database if you’re not going to save the information once you’ve collected it? Create Prospect or Create Matter – You must use this question type to prompt the Intake Questionnaire to automatically create a matter. You would typically select the Create Prospect as the final question in the Intake Questionnaire. This creates a Prospect Matter which you would either activate or close, based on whether or not this prospect becomes your client. You must select one of the following question types for the final question in your questionnaire: Create Prospect, Create Matter, or Terminate Questionnaire. Like the Script these types aren’t actually questions either. They’re triggers that tell the questionnaire you’re finished. 164 6. Enter the question you would like to ask in the Prompt field in the lower-left section of the window. 7. For each question, you may choose to save the response in a pre-determined field on the Matter tab for the matter that will be created in Prevail. For example, if you ask, "What is the onset date of your disability?" you might choose to save the response to this question in the Onset Date field on the Matter tab. If you wish to save the response in a Matter, Related, or Rolodex field, click the Save Type drop-down list and pick one of the following: "Matter Fields," "Related Fields," or "Rolodex Fields" and Select the appropriate field from the “Save Field” drop-down list. If no fields appear in the drop-down for the Matter/Related/Rolodex option you’ve selected it’s because there is no corresponding data field for the question type you’ve used in this instance, e.g., you can only map a Date question to a Date field; a Text question to a Text field, and so on. 8. Click Save in the upper right area of the window when you have finished setting up the Intake Questionnaire. 9. To insert a new question within an existing questionnaire, click once on the question which will precede the question you wish to insert. Then follow the steps above. Intake Questionnaire Example Below is a screen shot of an example Personal Injury Intake Questionnaire. Here are a few things to notice in the example above: The initial questionnaire question This question is created automatically by the program for each new questionnaire. It includes the primary fields from a rolodex record, i.e. name, address, DOB, phone, etc. so you don’t need to add them yourself. 165 Initial questionnaire question Settings You can map the memo field of the initial questionnaire question to one of the Matter memo fields. It is labeled Description of Incident in the initial questionnaire screen, but it can be mapped to a different field. For example, in a Social Security questionnaire it is usually mapped to the Disabilities field on the matter screen. The Incident Date checkbox lets you include or exclude the Incident Date field from your initial question. Below is an example of how you can create branching within your questionnaire using a combination of Pick and Selected questions. The 1st Pick question, “What type of case is this?” is followed by the Selected to present the choices of Auto Accident, Dog Bite, Medical Malpractice, Other, Products Liability, Slip and Fall. Therefore, unless “Auto Accident” is the selected answer to the 1st Pick question, the subsequent Pick questions, “Were you at fault?”, and “Did the atfault driver have insurance?” wouldn’t show up in the questionnaire. Also note that the Selected options following a Pick question will always appear in alphabetical order unless you use a sequence of numbers or letters to override it, such as in the example below: If you create a complex questionnaire with one or more branches, each of which might be enough information to conclude the questionnaire and create the matter, then be sure to place a Create Prospect type question at the end of each branch. 166 Chapter 21: Creating Merge Document Templates – the Document Designer How many documents do you use over and over again in your practice? How often do you cut, copy, and paste case-specific data within other text which is mostly (or all) boilerplate? Most practices do a LOT of this and it takes a lot of time for your staff to manually do a task that Prevail could do MUCH faster and MUCH more accurately. The Merge Document feature, more than any other in Prevail, will leverage your staff time and allow you get more done in less time. The beauty of merge documents is that once those document templates are set up, everyone can crank them out in prodigious quantities without needing to know how to set them up or even why they need to be sent. Take this piece of advice: Put some real gray matter into setting up your merge documents, and have a LOT of them. Truly efficient practices have merge documents for just about every conceivable purpose and crank them out regularly. Your clients tend to base their opinion of your firm’s work on the degree to which you communicate with them and let them know what’s going on. There’s almost nothing that you tell clients over and over “RE-actively” (when they call you) that you couldn’t tell them just as easily “PRO-actively” in a merge document that was created in a matter of seconds by a staff member who isn’t you. Proactive communication is almost always valued at a higher level by clients than reactive communication. Think of it this way: every “what’s the status of my case” call you can eliminate leaves room for a call from a potential new client! If you want your client satisfaction level to go through the roof, set up lots and lots of PROactive merge documents and make sure they get used ALL THE TIME! Prevail 7 is compatible with Microsoft Word 2013 and older versions all the way back to 2003, and Corel Word Perfect Suites X6 (2014) and older versions back to version 10. Before you can start merging documents, one of these word processors must be installed on the machine that is running Prevail. This chapter will help guide you through modifying existing forms and letters, creating new forms and letters and merging documents with matters. For optimum results, you should run the same word processor version, with all the current service packs, on all work stations. Running different versions of the same word processor with different service packs on various machines can cause issues with merge document production. Also creating merge templates with special fonts is not advisable unless those fonts are properly installed on all work stations. Inserting merge field codes into document templates is easy, but can be fairly tedious work. However, Prevail helps you leverage your setup time by allowing you take any existing document template (with field codes already inserted) and clone it to create the starting point 167 for a new merge document template. Once you’ve set up a few document templates it’s almost always faster to start with a similar document and clone it than it would be to set up that document from scratch. This is especially true of pleadings and form documents which have extensive formatting and field codes. Documents in Prevail are categorized by law type. If you’re in a workers’ compensation case you’ll obviously use a whole different set of merge documents than you would in a criminal defense case. If you’re in a bankruptcy case you don’t want to see documents created for a workers’ comp case. Therefore, as you move from matter to matter in your system, the list of available merge templates will be determined by the law type of the case. There is an exception to that rule, however. Let’s say you want a letter that can be merged for ANY kind of case. Prevail gives you that ability with “generic” merge templates. They can be used for any type of case, but are limited in what merge fields are available since they can only merge pieces of information that are common to ALL law types. A good example for using a generic document might be a “Request for Medical Records”, or a “Thank You Letter to Referral Source”. The Document Designer All Prevail document template setup is done through the Prevail Document Designer. You access this tool from anywhere in Prevail by clicking on the Administration menu at the top of the screen, then choosing Document Designer. If you don’t have access to the Administration menu, or the Document Designer, it’s because of your security settings. Once you’ve launched the Prevail Document Designer, the following window will be displayed: 168 This window will show a list of all document templates currently in the system. They are organized by law type with generic documents first, followed by documents for specific law types. In addition to a wide variety of Social Security and VA forms, Prevail comes with a few basic letter templates which have field codes in them but no text. A field code is simply a code placed in a document template which tells Prevail, at the time the document is merged within a Matter, to replace the code with the corresponding piece of information from the current Matter or from one of the Rolodex entries attached to that Matter. Nearly every single piece of information (data field) in Prevail can be merged into documents. There are literally thousands of field codes you can use in your documents. The best part is the field codes in Prevail are “plain language” and therefore are rather obvious. Creating merge templates in Prevail is a fairly straight forward, and simple process. Here’s an example of how a merge works: Let’s say you want to send a letter to your client. If you wanted Prevail to automatically insert the name and address of the client at the beginning of the letter, you would set up a Prevail document template that included the following code: [Client-Name/Address Block] You could use the following, but why work that hard?: [Client-Salutation] [Client-First Name] [Client-Middle Name] [Client-Last Name] [Client-Address Line One] 169 [Client-Address Line Two] [Client-City], [Client-State] [Client-Postal Code] If you were then to merge that document template in the John C. Smith Matter, and John C. Smith happened to live at 650 North Orange Avenue, apartment 9, in Orlando, here’s how the merged document would look: Mr. John C. Smith 650 North Orange Avenue Apartment 9 Orlando, FL 32801 Notice that the field codes are simply replaced with the appropriate data from the client’s Rolodex record. The document template is not changed in any way by this process – it still exists in its original form with the field codes in it. The merged document you see is a SEPARATE document which is a copy of the original template, except that the codes have been replaced with data from Prevail. Each time you merge a document it is automatically saved on the History page of the Matter you were in when you merged it. This example was rather simple but you can, if you choose, make your documents quite complex with fields from the matter and dozens of different Rolodex entries. Just about anything you can do in a regular document in your word processor you can also do in a Prevail document template, because all they are is word processor documents. They are created in your word processor and, aside from the field codes, they work exactly like any other document you would use on a day-to-day basis. All the Prevail Document Designer does is provide you with a link between Prevail and the word processor that shows you a list of all of the available fields in Prevail and allows you to drop them into your word processor by double-clicking on them. When setting up documents you will have your word processor AND the Prevail Document Designer open at the same time (in separate windows). At any point in the document template you want to insert a field code from Prevail, you simply switch to the Document Designer window and double-click on the Prevail field you want to insert. The field code will be automatically inserted into your document template at the insertion point (cursor location) in your word processor. Creating a New Merge Document Template from Scratch 1. Click on the Administration menu, then click on Document Designer. 2. Click the Create button at the top of the Document Designer window. 3. A drop-down menu will appear which allows you to choose the law type for the document template you want to add. Keep in mind that if you create a document template for a particular law type you will need to be in a case of that law type in order to merge (or even see) that document template. If want to create a document that can be merged across a number of different law types, for example, if the document will be used in both workers' compensation and personal injury matters, choose Add Generic Document. 170 4. Give your document template a descriptive name, then click the Create Document button. The exact document name will show up not only on the merge document list, but also on the History page of every matter in which this document is merged, so don’t be cryptic. A good rule of thumb for naming documents is to name them in such a way that it would be intuitively obvious for a new hire to figure out what’s what. “Letter to Defendant Insurance Re: Client Representation” is an example of a pretty good descriptive name. “Inscltrep.ltr” is NOT! 5. After you click Create Document a new Word Processor window will be opened. It will be a blank document named whatever name you gave it in the previous step. You are now ready to start dropping field codes into the document. Prevail has nothing to do with the any of the format settings in this new document, i.e. margins, font, headers or footers, etc. That is controlled by your word processor’s default settings. So if you find you’re changing those settings every time you create a new template, change your default settings once, and be done with it. 6. The document designer window will still be open, but will now display a list of field code categories. Each general category will have a triangle to the left of it. You can expand any section by clicking on the triangle or double-clicking on the category name. When you do, all available field codes in that category will be displayed. When using Rolodex fields, keep in mind that there is a whole set of field codes available for EACH Rolodex type, so you will need to click two levels deep to get to the individual field names. 7. Insert any desired fields into your document by double-clicking on the field names in the Document Designer window. Each time you do, that field code will be inserted at the location of the cursor in your document template, which will be open in a separate window in your word processor. You can also type or cut-and paste any desired text into the document at this point. You can also do any formatting you want. All normal functions of your word processor still work the way they always did so you are free to do whatever you need to do in order to get the document to look exactly the way you want it to look. When you’re done it should look just like any normal document, except that the case-specific and Rolodex-specific information will have been replaced by field codes. The data will assume the formatting you’ve applied to its field code. If you applied Bold, Italic, Underline formatting to a field code, that’s how the data will look when the document is merged. Since you are clicking in the Document Designer window to insert fields into a word processor document in a completely separate program, the easiest way to do this is to position the two windows (Document Designer and your word processor) side-by-side so you can see them both at once. Keep in mind that field codes inserted into your document template are just plain text – which means they can be moved, formatted or cut-and-pasted just like any other text. The highlighting is only there to help you see the field codes in your document more clearly for editing. When the document is merged the highlighting is removed – it is completely unnecessary to the merge process. Once the document is created you don’t even have 171 to click in the designer window to insert fields. You could just as easily cut-and-paste the field codes from other places or simply type them in manually. Unlike MS Word and Word Perfect, which each use their own proprietary embedded field codes for document merging, Prevail field codes are plain text. Prevail doesn’t care how they got there as long as the field code text and structure is correct. 8. When you’re done inserting fields and text into your document and you have it formatted the way you want it, you are ready to set up category, task, time, and cost settings for this document. Prevail merge documents have the ability to automatically make time and cost entries, as well as set automatic reminders for follow up. Now is the point in the process where you set those things up. Your screen in the Document Designer window should look something like this: 9. Notice at the bottom of the screen that there are three page tabs in this window: Ledger Cost, Ledger Time and Task. Each of those pages has parameters which can be set to perform automatic data entry in the appropriate places each time this document template is merged in any matter. Tab between those three pages and make your selections. Fields to be filled out are as follows: a. Category – how the document will be classified on the History tab when merged for a matter. This list comes from the Databank list: History. b. Header/Footer Codes -- Choose whether the document template has merge fields in headers only, footers only, headers and footers, or neither headers nor footers. By default, the program assumes the document does not have merge field codes in the header or footer. It won’t even look there unless you pick one of the options above. 172 c. Timekeeper – If this time is billable, WHO on your staff will the time be billed for each time the document is merged. d. Time and Time Category – If this time is billable, the amount and the time category will be entered on the ledger page each time this document is merged. Time is entered in decimal fractions of an hour. In other words, .1 Hours = 6 minutes; .25 Hours = 15 minutes. Even if you don’t bill for time, you should consider tracking it here since it is automatic. e. Cost and Cost Category – Enter the cost that your firm will incur each time this document is merged for a matter. Costs are usually entered either for postage or certified mail costs if applicable. If not, leave the amount blank and no cost entry will be made. Even if you don’t bill for these costs, you should consider tracking them here because it’s automatic. f. Task Start – Prevail will automatically enter a task on the selected user’s task list each time this document is merged for a matter. For example, if you select 30 for this field, Prevail will begin showing a task on the selected user’s task list 30 days after the merge document is generated for the matter. g. Task Due – the due date for the task that Prevail will automatically generate when the merge document is generated for a matter. h. Task Assigned – select a user, role, or employee type to have the task assigned to. i. Task Subject – enter instructions for the task that will automatically appear on the selected user’s task list. For example, if you generate a request for medical records, you might make the subject of the task, “Did we receive requested medical records?” You should always assign default values where it makes sense to do so. Each time you merge a document, you can change any or all of these values to allow for exceptions. 10. The drop-down lists for Timekeeper, and Task Assigned look the same and work the same way. 11. The individual selected as the Timekeeper, or as the Task Assigned will be as follows: a. Case Manager, Lead Attorney, and Hearing Attorney - each refers to the person showing on the Matter screen for the corresponding field. b. Current User - refers to the current user merging the particular document. c. Prompt for User - will force you to select the billable Timekeeper, or the recipient of the task each time the document is merged. d. [Associate Type], [Attorney Type] - or any “Type” selected from the list will assign the person(s) of that type from the matters security group. When the step is initiated in a matter, you will be presented with a list of all the tasks where the “Task Assigned” is an employee type. You will need to double click on the task, and then select any or all of the members of that group to receive the task. e. Also, each Prevail user will appear in the drop-down list as an option for Timekeeper or Task Assigned. If you select a specific user, then each time the document is merged, that individual will be assigned accordingly. 173 12. After you have filled out all of the automatic data entry parameters on the three tabs at the bottom of the Document Designer window, click the Save button at the top of the Document Designer window and the document will be added to your list of available merge documents. PREVAIL SAVES THE TEMPLATE FOR YOU AUTOMATICALLY WHEN YOU CLICK THE SAVE BUTTON IN THE DOCUMENT DESIGNER! Document Designer Quick Tip: Unless a merge document is fairly simple, it’s unusual to get it formatted and set up exactly right on your first try. After setting up a merge document template, you should always test merge it to see how it looks when merged. Since any data not present in a Rolodex entry or a Matter will simply show up blank in a merged document, it’s a good idea to have a “Dummy” case of each law type set up with every conceivable field filled out and every conceivable Rolodex entry attached to it. The logic behind this is simple: If you know all the data is filled out completely in the Matter and all available Rolodex entries are attached, you then know anything that doesn’t show up properly in your merged document is a problem with the template setup. This simplifies document troubleshooting. It also keeps you from having to delete all sorts of extraneous history records from your real cases. Editing an Existing Merge Document Template Once a Prevail merge document template has been created, you can always get back to it by clicking Administration > Document Designer and choosing the name of the document you want to modify from the displayed list. Double-click on the document name and the merge template will be opened in your word processor in a separate window. At this point you can either add more field codes to the document (as previously described under “Setting Up Merge Document Templates”), modify the document text and/or formatting, or change the automatic entry parameters (time, cost, task, etc.) on the three tabs at the bottom of the Document Designer Window. When all desired changes have been completed, click the Save button at the top of the Document Designer Window and your changes will be recorded. The modified merge document template will be saved for you automatically. DO NOT SAVE THE DOCUMENT TEMPLATE IN YOUR WORD PROCESSOR OR YOU MAY SEVER THE LINK WITH PREVAIL. Cloning a Merge Document Template If you’ve already set up a complex merge document template from scratch, you’ve already done a lot of work. Fortunately, it’s work that need not be repeated too often. If you already have a merge document in Prevail that includes more or less the same fields and formatting as one you’d like to create, you’ll find that it’s a WHOLE lot easier to start from an existing document than it is to start from scratch. Say, for example, you already have a Motion of some sort set up as a merge document template in Prevail. Setting that document up from scratch probably required lots of formatting, table creation, tab-setting and margin-tweaking before you even got to a point where you could put field codes in it. Fortunately, pretty much any pleading within a given jurisdiction has exactly the same header. To avoid doing all that tedious work again, simply CLONE the existing document (that’s an option on the Document Designer Toolbar). That will leave the original document template intact but create an exact copy of it, which you can then rename and modify as you see fit. Rather than recreating that complicated 174 header from scratch, you’d simply clone your Motion that already has the header and field codes where they need to be. Then you can easily get rid of the old body text and cut-andpaste in the new body text from another document. Here are step-by-step instructions for cloning a document: 1. Click on the Administration menu, then click on Document Designer. 2. Select the document you wish to clone and click Clone in the upper-right corner of the Document Designer window. A duplicate copy will appear in the list of available documents (with the word “Clone” at the end of the document title), just above the original document. 3. Single-click on the duplicate copy (the one that ends in the word Clone). Enter a new name for the new (cloned) document in the Document Name field below the list. You may also modify any of the document property fields (category, cost, task, etc.) on the three tabs at the bottom of the page. 4. Click Save. 5. Your cloned document has now been created and named. Simply double-click on the document to open it and edit as desired. You can insert fields as necessary by doubleclicking on them in the Document Designer. After the document has been edited as desired, click Save in the Document Designer. Transferring Your Existing Form Letters into Prevail It's likely that you already have a number of form letters that you've been using before purchasing Prevail. If so, you may transfer these letters into your Prevail document folder, and then insert field codes into them using the steps outlined in the procedure above. Follow these steps to transfer an existing form letter into your Prevail documents folder: 1. Save the document(s) into the following location: X:\PREVAIL_SERVER\docs\(Law Type for Document), where”X” represents the drive on which your Prevail server is installed. (Law Type for Document) means choose the law type folder (e.g., Social Security) or the "Generic" folder for the document to be saved in. If the folder for the desired law type doesn’t exist, you may create it. It must be named exactly as the law type is named in the Law Type/Case Type/Rolodex Type Setup. If your documents are in the “.docx” format (Microsoft Word, 2007 or newer), you’ll need to open them and use the “Save As” command. Change the “Save as type” to Word 97-2003 (.doc format). 2. Close your existing Word or WordPerfect document, and return to Prevail. 3. Your documents should now show up on the Prevail merge document list. You can now modify them to put field codes into them as described above. Creating Merge Document Templates from Adobe PDF Files PDF is a proprietary file format. And, now more than ever, government agencies are creating their PDF forms with various security protocols and/or 175 encryption, and we have absolutely no control over that. Therefore, the easiest way to create a merge template from a PDF is to print the blank PDF form, scan it, and then create your template using the scanned copy. That’s the only sure way to completely eliminate any security that was built into the original PDF. Because PDF is a proprietary file format, only users with one of these versions of Adobe Acrobat installed on their computer can merge with PDF’s: Acrobat v.9 Standard (or newer) or v.6 Pro (or newer). Adobe Acrobat DC is not compatible with Prevail’s document merge feature. Unlike templates created using Word or Word Perfect, templates created using Acrobat cannot auto-generate Cost, Time, or Task entries. One final comment regarding working with PDF’s. We’ve used several of the various converter programs that claim to be able to convert PDF’s to Word docs. In our opinion, NONE of them do a very good job producing a Word document that works well as a merge template. That’s because they usually aren’t able to fully remove all of the proprietary hidden formatting codes that were embedded in the original PDF document. In Prevail 7, if you have one of the versions listed above of Adobe Acrobat installed on your computer, you'll be able to create Prevail merge document templates directly from Adobe PDF files. This feature is particularly helpful when you obtain forms from a government agency's website (e.g., state workers' compensation office, the Veterans Administration, or Immigration Services). Such forms are usually only available in PDF format. Follow these steps to create a Prevail merge document template from an Adobe PDF file: 1. Open the Adobe PDF file that you want to use as a Prevail merge document template. 2. Click on File>Properties>Security. If all options in the Document Restrictions Summary are set to “Allowed” save the document in the preferred law type folder within the Prevail_Server/Docs folder. If you’re not sure how to get to your Prevail_Server folder, go to the Help menu in Prevail, select About, and look for the line labeled Prevail Server Folder. There you’ll see the path to the Prevail_Server folder. 3. If they are not set to “Allowed”, go to File>Print, select Adobe PDF as your printer, select your output location as Prevail_Server/Docs/(select the Law Type folder that this document is for). This will remove the security restrictions from the document. Open the document and continue to step 3. Prevail CAN NOT merge data into a document with security restrictions. 4. Click on Forms, and select Add or Edit Fields from the drop-down list. 5. If you see the following prompt, “Currently there are no form fields in this PDF. Do you want Acrobat to detect them for you?” Click No. 176 6. Click Add New Field in the upper left area of the Adobe window, and select Text Field from the drop-down list. 7. Use your mouse to drag the new text field into the appropriate position in the form. 8. Double-click on the text field to open the Text Field Properties window. 9. On the General tab within the Text Field Properties window, type the merge field label exactly as it appears when inserted into a document from the Prevail Document Designer, including the brackets (e.g., [SS Claimant-First Name]) in the Name field. 10. Click on the Appearance tab within the Text Field Properties window. 11. Select the desired font and font size. 12. If the merged information will occupy multiple lines (for example, if you are inserting a name/address block field), go to the Options tab within the Text Field Properties window, and check the box labeled "Multi-line". 13. Click Close. 14. Repeat steps 6 – 13 of this procedure for each merge field that you need to add to this form. 15. Click Close Form Editing in the upper right area of the Adobe window. 16. If prompted to save changes, when closing the PDF document, select Yes. 17. Close Adobe Acrobat. Deleting a Merge Document Template If there is a document template in the Document Designer that you do not need, you may delete it. For example, if a form becomes obsolete and you replace it with an updated version, you may need to delete the old one (if the new one is saved with a different filename). Follow these steps to delete a merge document template from the Document Designer: 1. Click on Administration, and then click on Document Designer. The Document Designer window appears. 2. Highlight the merge document that you want to delete. 3. Click the Delete Document button at the top-right of the document designer window. 4. Click Delete to confirm that you want to delete the merge document template. Due to their proprietary nature, PDF merge templates are not accessible via the Document Designer. Therefore to delete them, you’ll need to go the Prevail_Server\Docs\(law type) folder to delete them. Document Designer Fields The table below provides an explanation and/or examples of the fields listed in the Document Designer: Field Group Explanation/Examples Matter Fields These fields display on the right side of the Matter tab when you have selected the matter title (top line) in the matter tree. Field: Case Number Merged Example: 10-00001 177 Title Status Case Type Intake Date Incident Date Onset Date Statute Date Date Last Insured Rate Last Review Reviewed By Chandler (William) v. Smith (Joseph) Litigation Auto Accident 1/28/2010 12/20/2009 6/10/2007 8/15/2012 12/29/2011 $250.00 7/15/2009 JOHN Some of the above Matter Fields do not apply for all law types. Certain law types (such as Personal Injury) have custom fields (such as "Description of Incident") that will also display if you are creating a document specific to that law type. Also, if we have created any custom Matter fields for you, these fields will be listed under "Matter Fields" for the relevant law type. 178 Field Group Explanation/Examples Rolodex Type Fields These fields contain information (e.g., names, addresses, phone numbers) about the parties you have attached in your matters from the Rolodex. Note that the Rolodex Type Fields refer to the role in which the party is attached to a matter (the Add As Type), which is not necessarily the same as that party's Rolodex Type you chose when you entered the party in the Rolodex. Field: Merged Example: Full Name John Thomas Simpson, Jr., Esq. Note: in Full Name, as well as Name/Address Block, the Salutation will be omitted if the Title field is populated. Whole Name John Thomas Simpson Name/Address Block Mr. John Thomas Simpson, Jr., Esq. Simpson & Johnson, PLC 1415 Oaklawn Place, Suite 815 Orlando, FL 32828 Full Address Block 1415 Oaklawn Place, Suite 815 Orlando, FL 32828 Full Address List 1415 Oaklawn Place, Suite 815, Orlando, FL 32828 Pronouns (The Pronouns field will merge the pronoun appropriate to the party's gender entered in the Rolodex) Note: the default form is [his/her/a]. You simply change the pronouns to suite your needs. You must have all 3: male/female/blank. Office/Company/Firm Simpson & Johnson, PLC Salutation Mr. First Name John Middle Name Thomas Last Name Simpson Suffix Jr. Title Esq. Nickname Johnny Social Security 145-78-8899 Date of Birth 8/15/1937 Age 73 Gender F Professional Title Chief Executive Officer Specialty Rheumatology Language English Deceased True if checked, False if not 179 Date of Death Address Line One Address Line Two City State Postal Code Email Address Web URL Contact Field: Phone 1-4 Note: You can customize the merge values for any logical field by adding your own text in the following fomat: [Client-Deceased(print this text if True/print this text if False or Null)] 1/16/2004 1415 Oaklawn Place Suite 815 Orlando FL 32828 [email protected] www.simpsonjohnson.com Mary Witherspoon Merged Example: (Phone number fields will be labeled as you have labeled them for the party type in Rolodex Type Setup. Examples include Home Phone, Office Phone, Work Phone, and Cell Phone.) The above fields apply to Rolodex Type fields for all rolodex types. Certain rolodex types, such as Insurance Company, have custom fields, such as "Insured", “Policy Number”, “Claim Number”) that will also display if you are creating a document specific to that rolodex type. If we have created any custom fields for you, these fields will be listed under "Rolodex Type” fields for the relevant rolodex type(s). 180 Field Group Explanation/Examples Employee Fields These fields refer to the user (i.e., employee) who is generating the merge document in a specific matter. Prevail gets the information to merge into the fields from the employee settings, in the Administration > Employees menu (Employee Setup window). Field: Full Name Whole Name Salutation First Name Middle Name Last Name Suffix Initials Nickname Date of Birth Professional Title Bar Number Social Security Email Address Home Phone Business Phone Business Extension Cell Phone Pager Fax Merged Example: John Thomas Simpson, Jr., Esq. John Thomas Simpson Mr. John Thomas Simpson Jr. JTS Johnny 8/15/1968 Attorney at Law 013595 445-59-8837 [email protected] (869) 443-8193 (869) 483-4928 4995 (869) 442-3891 (869) 442-3892 (869) 483-4929 181 Field Group Explanation/Examples Lead Attorney Fields These fields refer to the Lead Attorney assigned to the matter in which the document is being merged. Prevail finds the information to merge into the fields in the Administration > Employees menu (Employee Setup window). Field: Full Name Whole Name Salutation First Name Middle Name Last Name Suffix Initials Nickname Date of Birth Professional Title Bar Number Social Security Email Address Home Phone Business Phone Business Extension Cell Phone Pager Fax Merged Example: John Thomas Simpson, Jr., Esq. John Thomas Simpson Mr. John Thomas Simpson Jr. JTS Johnny 8/15/1968 Attorney at Law 013595 445-59-8837 [email protected] (869) 443-8193 (869) 483-4928 4995 (869) 442-3891 (869) 442-3892 (869) 483-4929 182 Field Group Explanation/Examples Hearing Attorney Fields These fields refer to the Lead Attorney assigned to the matter in which the document is being merged. Prevail finds the information to merge into the fields in the Administration > Employees menu (Employee Setup window). Field: Full Name Whole Name Salutation First Name Middle Name Last Name Suffix Initials Nickname Date of Birth Professional Title Bar Number Social Security Email Address Home Phone Business Phone Business Extension Cell Phone Pager Fax Merged Example: John Thomas Simpson, Jr., Esq. John Thomas Simpson Mr. John Thomas Simpson Jr. JTS Johnny 8/15/1968 Attorney at Law 013595 445-59-8837 [email protected] (869) 443-8193 (869) 483-4928 4995 (869) 442-3891 (869) 442-3892 (869) 483-4929 183 Field Group Explanation/Examples Case Manager Fields These fields refer to the Case Manager assigned to the matter in which the document is being merged. Prevail finds the information to merge into the fields in the Administration > Employees menu (Employee Setup window). Field: Full Name Whole Name Salutation First Name Middle Name Last Name Suffix Initials Nickname Date of Birth Professional Title Bar Number Social Security Email Address Home Phone Business Phone Business Extension Cell Phone Pager Fax Merged Example: John Thomas Simpson, Jr., Esq. John Thomas Simpson Mr. John Thomas Simpson Jr. JTS Johnny 8/15/1968 Attorney at Law 013595 445-59-8837 [email protected] (869) 443-8193 (869) 483-4928 4995 (869) 442-3891 (869) 442-3892 (869) 483-4929 184 Field Group Explanation/Examples Appointment Fields Appointment fields are used to merge appointment information from the calendar into a document. When you use an appointment field in a template, replace the phrase "Enter Appointment Type" with the type of appointment that Prevail should search for within that matter (such as Hearing, Pre-Hearing Conference, Meeting, etc.). These appointment types must be in your Databank, and must be assigned appropriately to appointments. Insert Codes When you merge the document in a matter, if there are multiple appointments of that type scheduled within that matter, Prevail will display a grid listing those matching appointments, and you will choose one of the appointments from the list. Field: Field displays as… Change to… (EXAMPLES ONLY) Subject/Enter [Subject/Enter Appointment [Subject/Hearing] Appointment Type] Type Date/Enter [Date/Enter Appointment [Date/Hearing] Appointment Type] Type Time/Enter [Subject/Enter Appointment [Time/Hearing] Appointment Type] Type Location/Enter [Location/Enter [Location/Hearing] Appointment Appointment Type] Type The majority of the Insert Codes allow you to set up a keyboard prompt (i.e., pop-up window) for a piece of information that you need to enter each time you merge the document. For example, in a letter notifying the client of the total advanced costs paid to date, you might want to set up a prompt for you to enter the total cost to date as you are merging the document. The insert codes appear as [Insert Currency-DESCRIPTION] in your template. It is important that you change the word "DESCRIPTION" to a reminder of what you need to enter in that place in the document. For example, you would change [Insert Currency-DESCRIPTION] to [Insert Currency-Enter total costs paid to date.] to create a prompt to enter the costs. The "Merge Date" insert code is the only insert code that does not create a prompt. It will automatically stamp the current date into the document each time the letter is merged. Thereafter, the date in that copy of the document will remain the same as the date it was merged. 185 Insert Codes (continued) Field: Field displays as… Currency [Insert CurrencyDESCRIPTION] [Insert Date-DESCRIPTION] Date Number Text [Insert NumberDESCRIPTION] [Insert Text-DESCRIPTION] File [Insert File-FILENAME] The "Insert File" command is used to link a source document to your template. It is primarily used to insert your letterhead file, so that if you update the source document at any time, it will automatically update all documents that are linked to it. 186 Change to… (EXAMPLES ONLY) [Insert Currency-Total costs incurred by firm] [Insert Date-Hearing date] [Insert Number-# of pages in fax] [Insert Text-Time of hearing] [Insert FileC:\Letterhead.doc] Field Group Explanation/Examples Grid Codes These fields merge the grids (i.e., lists) contained in various tabs within Prevail. Field: Damages Explanation: This field inserts a list of all damages appearing on the matter's Damages tab. The list includes the provider's name and amount for each damage. The data is grouped by damage category and includes a subtotal for each damage category, and a grand total of all damages. DamageBalance This field inserts a list of all damages listed on the matter's Damages tab. The list includes the provider's name and balance due (i.e., the original damage amount, minus any payments that you have applied against the damage) for each damage. DamagesAddress This field inserts a list of all damages listed on the matter's Damages tab. The list includes the provider's name, address, phone, and amount for each damage. It also includes a subtotal for each damage category, and a grand total of all damages. LedgerTime This field inserts a list of all time entries from the matter's Ledger tab. The data is grouped by category and includes a subtotal for each category and a grand total. LedgerCost This field inserts a list of all cost entries from the matter's Ledger tab. The data is grouped by category and includes a subtotal for each category and a grand total. LedgerFee This field inserts a list of all fee entries from the matter's Ledger tab. The data is grouped by category and includes a subtotal for each category and a grand total. Note: Each of the grid codes above presents you with a list of its respective categories on the 2nd page of the merge process. You can exclude any categories you don’t want, for that particular copy of the document, by unchecking them. Disabilities This field inserts a list of all ailments from the matter's Disabilities tab. 187 Chapter 22: Query Manager The Query Manager allows you to create custom queries to use with the “Merge Across Query” feature, or to use with the Matter Search function. A query is simply a set of selection criteria to find a specific subset of your data. The reality is database queries are quite geeky and will probably require assistance from Prevail tech support to create. However, once a query has been created, you can use it as often as you like. Here are a couple of examples of how you might use a query: Your firm is moving to a new location and you want to send a letter to all your clients (open & closed) to inform them of the big event. You want to send a letter to all your Social Security clients, for whom you’ve recently filed an action, so you can let them know it will be several months before you get an answer and it’s OK if they don’t call you every day/week to get a status update. 188 Chapter 23: Process Builder A huge part of establishing effective quality control, in any law practice, is the creation and enforcement of standards and milestones – that is, certain things that need to be done at certain points in the life cycle of a case. The more homogenous your practice is, the more use you will get from the process builder. For example, an administrative practice area like Social Security disability always follows the same basic steps. Prevail will lead you through that process, automatically calculating deadlines and always telling you what should happen next. Prevail allows you to create as many processes as you want. And, you can have any number of processes running concurrently within the same matter. A process can be an all-encompassing roadmap of how to handle a certain kind of case from start to finish, or it can be a simple checklist that reminds you of a few things that you need to get done. A well-crafted Prevail process is one that not only includes the official steps of the process, but your firm’s internal procedures for things that happen or should happen along the way. The Process Builder is a powerful tracking feature which allows you to pre-program an expected sequence of events based on a set of rules which you define. Prevail comes with a pre-defined claims process for Social Security matters, and you may create processes for other law types (e.g., Personal Injury, Workers’ Compensation, etc.). The Process Builder not only tracks the steps of a claim on the Claims tab (also known as the Processes tab, when you're working in matters other than Social Security), but also encompasses document generation, history tracking, and automatic calendaring features. Prevail comes with the entire Social Security administrative process pre-loaded. You can use that process as a guide to some of the Process Builder’s capabilities. Here are some examples of other situations in which you might want to create and implement a process: An administrative process, such as a Scheduling Order, with multiple deadlines and critical dates preceding the actual trial date, each by a fixed number of days. Once you create and define the steps of this process, it would allow you to input the trial date, and back-fill all of the other dates and set automatic reminders for them. A checklist of tasks that always need to be completed in the processing of a particular type of case, where you want Prevail to track specific tasks for different staff members and track when the tasks are completed. The Process Builder is based on the understanding that there are certain repeated patterns that occur in any type of law or administrative process based on pre-determined rules. As you consider the steps and levels that you need to include in a process you’re building, ask yourself these questions: What happens next? 189 Does a document need to be generated as a result of this step? Do one or more appointments need to be scheduled as a result of this step? Does the step represent a statute or deadline which must be tracked? Do one or more tasks need to be created as a result of this step? Do other parts of the data in the matter, such as Status or Case Manager, need to be changed when this step is reached? The Process Builder has the ability to handle all of these things – it just needs to be told what to do each step of the way! Standard vs. Auto-Fill Processes There are two different types of processes in Prevail. A "Standard" process is one that allows you to work through a series of steps that do not all revolve around the same date. For example, the Social Security process that’s included with Prevail is a Standard process. The statute dates that apply to each step are calculated based on the date entered in the step that represents the statutory event, which in turn creates the statute warning task. For instance, the SOL (Statute Of Limation) date for filing a hearing request will depend on when the request for reconsideration was denied; later, in the same claim, the SOL date for filing an appeal depends on the date the hearing was denied. An “Auto-fill” process is what you would use when all of the steps in your process center around one specific date (the "anchor date" in Prevail terminology). For example, you could set up a hearing preparation process to use when you learn the hearing date for a matter. (In this example, the hearing date would be the anchor date.) The process would automatically schedule tasks (such as requesting updated medical records, or scheduling a pre-hearing conference with your client) for the case manager to complete prior to the hearing. You could use an auto-fill process to post all the deadlines in a scheduling order from the court, based on the trial date. You can also use the auto-fill process to create a simple checklist for just about any purpose within a case. 190 Creating a Standard Process Follow these steps to create a Standard process: 1. Click on the Administration menu, then click Process Builder. 2. Click on Add (the green plus sign) at the top left corner of the window, and choose Standard Process. 3. Enter a name for the process in the Process Subject field. 4. Select the law type in which you'll use the process from the Process Law Type drop-down list. 5. Click Save. 6. Click on the new process in the list of processes in the top half of the window. 191 7. Click Add in the bottom half of the window (under Steps). 8. In the Step Information section, enter a description of the step (for example, "Application Sent") in the Subject field. 9. Enter a name for the level in which the step belongs in the Level field. (A “Level” is a group of related steps. For example, in Social Security, levels might be Application, Reconsideration, Hearing, etc.) 10. If appropriate, click on the Outcome drop-down and pick the outcome this step represents as final. This list can be modified in the Databank/Step Outcome. 11. Check the Default Step Date box if you want the step entry date to default to the current date when you are adding this step to the matter on the Claims/Processes tab. 12. If you want the step entry date to default to blank (forcing the user to make an entry), uncheck the Default Step Date box. 13. If you want this step to create one or more tasks, repeat the following for each task: a) In the Step Appointments/Tasks section, click the Add Task button. 192 b) c) d) e) 14. 15. 16. 17. 18. Enter the task subject (e.g., "Check status of application") in the Subject field. Select the task type from the Type drop-down. Select a default Responsible Type to receive this task. In the Create Task Due field, enter the number of days before (-) or after (+) the step date that this task should be due. f) In the Set Task Start Date field, enter the number of days prior to the due date that you want the task to start appearing in the task list. i. Check the Display as Statute box if you want the task to appear in the Statute Warning List section on the Home tab, rather than in the Upcoming Tasks section on the Home tab. ii. If a task might be “conditional” based on certain circumstances in the case, check the Popup Task box. Then, when you add this step, all associated tasks with this box checked will pop up on the screen. Based on the circumstances, you may then adjust the task(s) as needed and save it, or dismiss it altogether. Click the Save button. If there is a definite next step that will always take place after this step, choose the Level and Step in the Next Step Information section. a) This can only be done after you’ve created the Level and Step that you’ll want to select here. If there is a definite next level, but not necessarily the specific next step, choose only the next level in the Next Step Information section. If there is neither a definite next level, nor next step, do not enter any information in the Next Step Information section. If you want this step to create one or more appointments, repeat the following for each appointment: a) Click the Add Appointment button. b) c) d) Enter the appointment Subject. Select the appointment Type. Select the Responsible Type. i. All of these appointments will default to the Entry Date of the step that created them. 193 19. 20. 21. 22. ii. They will pop up on the screen when the step is saved. You may then edit each them based on the circumstances, and save them. If you would like for a merge document to be automatically generated for the matter when you enter this step, choose the appropriate merge document from the Merge Document drop-down list. You may set certain fields on the Matter tab to automatically update when you enter this step on the Claims/Processes tab. (For example, you may want to have the "Status" field or the "Case Manager" field change to a different value when you enter a step on the Claims/Processes tab.) The matter fields you can update are: a) Active (True=Open; False=Closed) b) Case Manager c) Case Type d) Hearing Attorney e) Last Reviewed f) Lead Attorney g) Prospect (True=Prospect matter; False=Client matter) h) Status To set an Action Field to automatically update, do the following: a) Choose the appropriate field from the Action Field drop-down list. b) Choose the updated information that should display from the Action Values drop-down list. Click Save. Creating an Auto-Fill Process Follow these steps to create an Auto-fill process: 1. Click Administration, then Process Builder. 194 2. Click Add at the top of the window, and choose Auto-Fill Process. 3. Enter a name for the process in the Process Subject field. 4. Select the law type in which you'll use the process from the Process Law Type drop-down list. 5. Click Save. 6. Click on the new process in the list of processes in the top half of the window. 7. Click Add in the bottom half of the window (under Steps). 8. Enter a description of the step (for example, "Request updated medical records") in the Process Subject field. 9. Leave the Level field blank. This field is not used in auto-fill processes. 10. Enter the number of days, prior to or after the anchor date (for example, the hearing date) that this task would be due, in the Create Task field. If the reminder should appear prior to the anchor date (as with preparing for a hearing), enter the number of days as a negative number. If the reminder should appear after the anchor date (as with a new file setup checklist in which the anchor date is the intake date), enter the number of days as a positive number. 11. Enter the number of days prior to the due date that you want the task to start appearing in the task list in the Set Task Warning field. 12. Choose a default Responsible Type to receive the task for this step. 195 13. If you would like for a merge document to be automatically generated for the matter when you check this step (i.e., task) as completed, choose the appropriate merge document from the Merge Document drop-down list. 14. You may set certain fields on the Matter tab to automatically update when you complete this step on the Claims/Processes tab. (For example, you may want to have the Status field, or the Case Manager field change to a different value when you complete a step on the Claims/Processes tab.) To set an Action Field to automatically update, do the following: a) Choose the appropriate field from the Action Field drop-down list. b) Choose the updated information that should display from the Action Values drop-down list. 15. Click Save. 196 Chapter 24: Trust Account Setup Prevail recognizes that rules of professional conduct requires attorneys to deposit funds received or held for the benefit of clients in a trust account separate from the attorney's own funds. Therefore, we added a separate Trust Ledger in Prevail. You can setup up multiple trust accounts, IOLTA and non-IOLTA, and you can track an unlimited number of deposits and payments simultaneously on the Trust Ledger tab. Furthermore, you can use the Trust Balance report in Prevail to see the complete trust account activity and balance for each matter, as well as a Grand Total trust balance. This is a great tool to provide secondary documentation to reconcile your trust account(s). First, however, you have to setup a Trust Account(s) in Prevail. Adding a Trust Account Follow these steps to modify the settings for a Trust Ledger: 1. Click on the Administration menu, then click Trust Account Setup. 2. On the left-hand side, under Account List, you can add your trust account(s) by simply clicking the Add button. 3. Next enter the account number associated with this account if you wish. You must put something in the Description field, usually the bank name. 4. If you would like to add any notes, you may do so in the Detail field. 5. Repeat Steps 2-4 to add multiple trust accounts. 6. Click Save in the Account Settings section of the window. 197 Setting up Payment and Deposit types In the Databank for Trust Accounts Follow these steps to set up your Trust Deposit and Trust Payment types in the Databank: 1. Click on the Administration menu, then click Databank. 2. Click on Trust Deposits and click the Add button to add a new trust deposit type. For example, Award, Judgment, Settlement, etc. 3. Click on Trust Payment and click the Add button to add a new trust payment type. For example, To Client, To Firm, To Lien Holder, etc. 4. Click Save and exit out of the Databank. 198 Chapter 25: Report Designer Prevail ships with over 100 standard reports built into the program. The Report Builder gives you the ability to edit reports or even build your own. Now the simple truth about Report Builder is there’s nothing simple about creating database reports. Even if you have previous experience with database report writing tools, unless you know the tables and fields that hold the data you want, and the relationships between those tables, you won’t be able to create your own reports. So, you probably shouldn’t waste your time here. The good news is you get 5 custom reports with your Premium Support, and we have report writing experts on staff. To request a custom report, or a modification of an existing report, just email your detailed request to [email protected]. 199 Chapter 26: Firm Log One of the benefits of having everything recorded in one place is accountability. You can simply look in Prevail and see who did what. When you assign tasks you can track exactly when they were completed. We all like to assume that our employees are always motivated, honorable and ethical. Unfortunately, some of them are not. Therefore, sooner or later you’re going to set a task for someone and instead of actually doing the assigned work and marking the task completed, they’re going to simply DELETE from their list (and yours) and pretend it never happened. That being said, there’s no hiding from the Firm Log! The Firm Log displays a list of items that users have deleted from your database. This list contains the following information about the deleted item(s): date & time of deletion name of user who deleted the item IP address of computer from which deletion occurred computer name from which deletion occurred category (e.g., deleted appointment, deleted task, deleted History) of deleted item description (e.g., Subject) of the deleted item matter title, if any, with which the deleted item was associated The Firm Log cannot be modified by anyone. You can grant “View Only” or “No Access” to the Firm Log for each employee through the Employee Setup. 200 Chapter 27: Prevail Control Panel You'll want to always ensure that your Prevail software is running the latest update to the program. Otherwise, you may miss out on new features that are constantly being added. This is where the Prevail Control Panel comes into play! You'll also use the Control Panel to maintain your database files. Some features in the Prevail Control Panel (such as downloading updates) require that all Prevail users in your firm be logged out of Prevail. Updating Your Version of Prevail When a Prevail update is available, you'll see a message on the Prevail login screen telling you so. If you see this message, make sure all users (including yourself) are logged out of Prevail. Then, follow these steps to download the update. You may download Prevail updates from any workstation, whenever you wish. You do not have to run the update from your Prevail server. The update will apply to all workstations, regardless of which PC you use to download the update. Keep in mind this process could take several minutes to complete based on a variety of variables over which Prevail has no control. Follow these steps to update your Prevail database: 1. On your Windows desktop, click on Start > All Programs > Prevail > Control Panel. 2. When the Prevail Control Panel login screen appears, use your regular Prevail login and password. 3. You’ll see a list of all the active database connections. When all users are logged out of Prevail, the Update option will become available. You have options, by clicking the “Force All Users Out” button, to do exactly that. Based on which option you select, all users will receive an obvious warning of the impending shutdown so they have time to save their work. 4. Click once on Update at the top left of the Control Panel window. The download will start automatically. 5. When the download is complete, you will see a message at the bottom of the Control Panel window indicating that your Prevail database is locked. At this point, click on the Unlock Database button. 6. Close the Prevail Control Panel window. All users may now log into Prevail. As each user logs in, the database will automatically update the Prevail Client application on their local workstation. 201 Chapter 28: Control Panel Tools Control Panel - Tools Increase Field Size This will increase the field sizes for salutations, phone number extensions, check numbers and several other regularly requested fields. You will be notified whether or not each field has been successfully increased. If you click the Increase Field Size button, you will not be able to undo this action. When it has finished, you’ll see this screen: Rebuild Search Lookup Should the need ever arise; we have included a tool that can help optimize your searches in Prevail. There are a few special tables and numerous fields in the database designed specifically to improve your ability to search for things in Prevail. The Rebuild Search Lookup tool rebuilds those tables to make sure you’re getting the optimum performance when you run any search routine in Prevail. Rolodex Consolidation This tool can only be accessed by a Prevail Technical Support Specialist. Should the need ever arise; we have included a tool that can help consolidate two (or more) identical Rolodex entries into one. Often times, you will find that a person (or party) has been entered into your Rolodex more than one time. It is also common, for these people or parties to have more than one Matter associated with them. This tool will search through your Rolodex for these duplicates, and compare specific Rolodex information fields between the two. It will than 202 pick the first entry it finds, and remove the other matching Rolodex entries. Any Matters that were associated with the other matching Rolodex entries will now be associated with just the one solo entry. The following is a list of the fields that are compared, and must all match exactly, to determine duplicate Rolodex entries: Office/Company/Firm First Name and Last Name Address City, State, Zip Code Date of Birth Social Security Number It is important to understand that you have no control over which Rolodex Entry is preserved and which matching entries are removed. Other than the list of fields above; be sure to document any other important Rolodex information elsewhere, prior to running the Rolodex Consolidation Tool. To clarify, let’s say you have three John Doe rolodex records and each of them is attached to two matters, for a total of six different matters. And, all the comparison fields listed above match exactly. Let’s further assume the John Doe #1 has some detail in the Alternate Contact section, and John Doe #2 has some detail in the Notes section. Now suppose that John Doe #3 doesn’t have any detail in either the Alternate Contact or the Notes section of the Rolodex, but it’s the one the program selects to consolidate the others with. What you’ll end up with is John Doe #3 attached to all six matters, but he won’t have the Alternate Contact or Notes details from the other John Doe records. Therefore, be sure to document any such important Rolodex information elsewhere (NOT in the rolodex), prior to running the Rolodex Consolidation Tool. 203 Chapter 29: Server Tools The Prevail Server tools centralize the calendar synchronization and lead import routines on your server. It’s been designed so that you can “set it and forget it” without worrying about leaving your workstation logged on or having to periodically run the Prevail Control Panel to manually sync your calendar or receive your leads. It also has the ability to perform scheduled maintenance automatically to eliminate production down-time. The Server Tools include settings for the following: 1. Calendar Sync 2. Lead Import 3. Maintenance Options a. Pack & Reindex b. Update Options i. Do Nothing ii. Download Only c. Archive Options i. Do Nothing ii. Archive Matters that have been closed for more than “x” year(s), where “x” is a number from1 to 10. The Server Tools can only be activated by calling Prevail Tech Support at (407) 228-4400, Option 3. See Appendix A - Server Tools for more details. Preparation: The Prevail Server Tools will be operating on the same server as the Advantage Database Server. This may or may not be the same server as your email (Microsoft Exchange Server). You will need domain administrator level permissions on your Prevail server and your Exchange server. The following should be performed by an experienced domain/Exchange server administrator. Contact your IT consultant for further assistance. 1. Login (either directly on the server or via remote desktop) onto the server with a domain administrator level account. 2. Launch Active Directory Users and Computers (Start> Run > dsa.msc) 3. You will need to create a Prevail Service account (we recommend “pvservice”). For convenience you can (subject to your internal IT policies) copy an existing domain account (right click on an existing user account within Active Directory and select Copy). o Please ensure that the pvservice account has the attributes “User cannot change password” and “Password never expires” checked on. Should the password for 204 the pvservice account expire or change then the Prevail Server tools will cease to operate. o Ensure that the pvservice account has “logon as a batch job” permissions: On Windows, this privilege is granted through the Local or Domain Security Policy. To do this using the Local Security Policy, follow these steps: In the Control Panel, open Administrative Tools, then Local Security Policy. Beneath Security Settings, open Local Policies and highlight User Rights Assignment. Locate Log on as a batch job. Open the properties and add any users that need this right. When finished, save your changes and close the Local Security Settings window. To make changes to the Domain Security Policy on a domain controller, use the Domain Security Policy utility in the Control Panel. o Document the password in a secure location, since this account may have access to employee mailboxes please ensure that the credentials are kept away from user level employees. 4. Logout of your server from your existing Administrator account and login as your newly created pvservice account. 5. Ensure that Prevail operates (fully opens) while logged in as your “pvservice” account. o If Prevail has not been installed please install the client by running the ClientSetup.exe file (located in your Prevail data folder) o After installation, please ensure that the “Data Config” utility has been run (c:\prevail_client\dataconfig.exe) – the data path should point to the server using a UNC (fully qualified path) to the server, we do not recommend a mapped drive to access your Prevail data. 205 Calendar Sync Selecting this option will continually sync appointments between Prevail and Microsoft Exchange Server. Each user will need to have their Exchange settings entered in the Employee Setup option in Prevail. Prevail IS NOT RESPONSIBLE for setting up or supporting syncing between Microsoft Exchange Server and the end user’s mobile device(s). For clients Microsoft Outlook, buy not using Microsoft Exchange Server, there is a local sync option in Prevail User Settings to allow a user to sync their Prevail calendar with their Outlook calendar. Prevail IS NOT RESPONSIBLE for setting up or supporting syncing between Microsoft Outlook and the end user’s mobile device(s). Technical Requirements: For calendar synchronization you will need Microsoft Exchange 2007, 2010 or 2013. It can be a local Exchange server (i.e.: on the local network) or hosted (in the cloud) but administrative access to Microsoft Exchange (including access to the Exchange Management Console) is required for the initial and ongoing user account maintenance. Your IT consultant (or Cloud Vendor support department) will have to be involved with this process. You will need domain administrator level access as well as permissions to active directory. We will need a Prevail Service domain account created (we prefer “pvservice” but you can name it as you wish). You can set the password – but please don’t forget it! The Prevail Server tools, collectively, utilize one Advantage Database Server (ADS) license. Please ensure that you have a spare ADS license to accommodate the new server tools. o In Prevail click on Help|About to confirm your ADS license count. The Prevail Server Tools have to be installed on the Prevail data server, the server where the Advantage Database Server has been installed. Considerations for the Calendar Sync: You will need a full list of usernames that will be synchronizing their Outlook calendar with Prevail. o Each user needs an account within Prevail o Each user needs a mailbox within your Microsoft Exchange configuration 206 Each user should be made aware in advance that their Outlook calendar will be synchronizing in a bidirectional fashion. All appointments that they currently have in their Outlook calendar will be posted to Prevail and may be accessible by other employees. Installing and Configuring Calendar Synchronization 1. Login to the Prevail data server as the “Prevail Service” account. 2. Download and run the Microsoft MAPI CDO communication layer: http://userfiles.prevail.net/Prevail%20User%20Files/7.x/Outlook-Server-SideSync/Dependencies/ExchangeMapiCdo.EXE o o This installation can usually be done without a server reboot; no Prevail outage or Exchange outage is expected. The MAPI CDO layer is NOT required if you have Microsoft Outlook (32 bit) installed on your Windows server. 3. Login to your Microsoft Exchange server (if applicable) with a domain administrator (or Exchange Administrator) account. If you have a hosted Exchange solution you will need to contact your service provider to perform the following tasks. 4. Launch the Exchange Management Console. Directions listed are for Microsoft Exchange 2010, and may vary slightly depending on the version of Exchange installed. 5. Beneath “Recipient Configuration” select “Mailbox”. 6. For each Exchange Account, right click each required user in turn – select “Manage Full Access Permission”. 7. Press the Add button. 207 8. Within “Select user or group” window please locate the “pvservice” (Prevail Service) account and click OK. Click Manage to apply and finish to exit (ensure that the process succeeded). 9. Repeat this process for each Exchange user account that will be synchronized. Please note that should new employees require this functionality at a later date that you will have to revisit these steps. If you are familiar with the Exchange Command Shell you can grant the pvservice account global mailbox access using one simple command: Get-Mailbox | Add-MailboxPermission -User pvservice -AccessRights Fullaccess -InheritanceType all 10. Now – back on the Prevail Server (if it’s a different server than Exchange) ensure that you are logged in as the “pvservice” account. 11. Download the mfcmapi.exe utility from the Prevail file repository (for convenience it is recommended to download the utility to your desktop): http://userfiles.prevail.net/Prevail%20User%20Files/7.x/Outlook-Server-SideSync/Dependencies/mfcmapi.exe 12. For each employee that you need to synchronize with Prevail you will need to follow these steps. a. Open the mfcmapi.exe utility, select Session > Logon. 208 b. The next screen should be prompting you to create or choose an email profile. i. If it does not then the mapi layer is inaccessible on your Prevail Server. Ensure that the MAPI CDO object layer (see step 2) has been installed and that you have rebooted your server. c. Create a New email profile, the Outlook Setup Wizard window should be displayed. d. Select ”manually configure information services.” e. Click next. Title the profile name exactly as it appears in the Exchange Address book, e.g.: William Smith. Ensure the capitalization matches. f. Configure the details accordingly, Exchange username, mailbox name, etc. g. Once the user email profile has been created you should be able to logon into the email profile (via mfcmapi). It should display a default store (the users mailbox) with a display name: h. Please note the Display Name. e.g.: Mailbox – Rob Chapman. i. You should be able to double click the mailbox (default store) to view mailbox objects (as per the screen shot below): 209 13. Repeat this process for each mailbox account 14. You should now have multiple email profiles, one for each to-be-synchronized user. 15. Locate the Prevail Control Panel, browse out to the c:\prevail_client folder. You will need to run the ControlPanel.exe as administrator, please right click on the executable file and select Run as administrator. Lead Import Settings Once configured, the Activate Lead Imports option will continually download leads from one or more of our lead import partners. There are separate lead import settings for each law type in Prevail. You must first establish an account with one or more of our lead import partners, and they must contact us to complete the import setup. For more information on Prevail lead import partners, visit www.Prevail.net/Partners. 1. Locate the Prevail Control Panel, browse out to the c:\prevail_client folder. You will need to run the ControlPanel.exe as administrator, please right click on the executable file and select Run as administrator. 2. Login to the Prevail Control Panel. You must have Control Panel Security access in your Prevail user settings. 3. Within the Prevail Control Panel select Server Tools (located towards the top of the Control Panel) 4. Within the Server Tools please ensure that the Domain and User name is specified within the Prevail Service Account field (e.g.: domain\pvservice) – please enter the pvservice domain account password in the appropriate field. 5. Check off the Active Lead Imports check box: Lead Import Options 6. Click on the tab for the law type for which you are importing leads. Set the following settings as you wish for each law type for which you are importing leads. a. Check the Import Leads check box. 210 b. c. d. e. f. Specify the Security Group for the imported leads. You may select the lead attorney for the imported leads. You may select a Case Manager for the imported prospect. Select one or more recipients under Assign Task (for follow up notifications) i. If you select multiple users, the leads will be distributed in a randomized rotational order among the selected users. Select either Client or Prospect (typically prospect) to set how the matter will be created for the leads. 7. When you click save Prevail will attempt to create a number of scheduled events in Windows (via Task Scheduler). Update Options If the Download Only option is selected, Prevail will automatically check for and download published updates. This will speed up the process of running the Prevail update, as the file will already have been downloaded. Updating will still require all users to be logged out of Prevail. Maintenance Options Once activated by Prevail Tech Support, the maintenance options, such as pack & reindex, and downloading updates will run automatically every night after midnight. Users do not have to be logged out of Prevail; they can continue to use Prevail normally. Updates will only be installed if that option has been selected. Archiving Options Once activated by Prevail Tech Support, you select the archive option you prefer and those closed matters will slowly be archived throughout the day according to the options selected. Archived matters will remain accessible directly through the Prevail search functions. They will display a unique icon in the search results that looks like a small safe. When you attempt to open an archived matter you will be notified that it is being retrieved from the archive and might take a bit longer than usual to open. When you’re finished with that matter, it will automatically be returned to the archive. 211