1
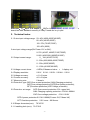
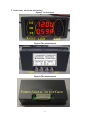
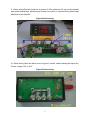
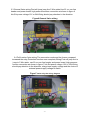
VAM Series Voltage Ammeter User Manual 2012-05-04 -1- VAM Series voltage ammeter is a can in voltage,current,power,charging capacity,time and so on many kinds of physical measurement at the same time, also can set parameters realize over-voltage protection, over current protection,power protection, charging capacity protection, limited protection and voltage protection and so on many kinds of protection function in one of the powerful measurement and control instruments. The instrument used fluctuation two group LED digital display tube and the test data, and can be used in flexible switch show different physical quantities. So the meter is very suitable for need to output voltage current monitor, as well as the battery and discharge applications. 1. Feature: According to the measuring current size can choose different models Voltage current double shows, at the same time also can switch display power, charging capacity and time Voltage current double shows, at the same time also can switch display power, charging capacity and time With P series end with output shut off function keys, flexible open or shut off output Very flexible online calibration function, the user may itself calibration voltage current value Four LED digital tube, three measured values a unit instructions With pressure, owe pressure, flow, a power, charging and exceeds the protection function This series of voltage ammeter 10 optional model,The user can choose according to different needs,pecific meaning as below: 1)VAM4020:40V20A,Don't protect 2)VAM9020:90V20A,Don't protect 3)VAM4010P:40V10A,Have protection 4)VAM7510P:75V10A,Have protection 5)VAM4020P:40V20A,Have protection 6)VAM7520P:75V20A,Have protection 7)VAM4050P:40V50A,Have protection 8)VAM9050P:90V50A,Have protection 9)VAM40100P:40V100A,Have protection 10)VAM90100P:90V100A,Have protection -2- Attention : 1) ~ 6)for a in shape,7)~ 10)For his part in shape.With an expansion board,And with standard unworthy to relay,If need can buy in part. 2. Technical index: 2.1 2 wire input voltage range: 5V~40V (4020,4050P,40100P) 8V~40V (4010P,4020P) 10V~75V (7510P,7520P) 10V~90V (9020) 3 wire input voltage range(Ext Power 12V or 24V): 0~75V (4010P ,4020P,7510P,7520P) 0~90V (4020,9020,9050P,90100P) 2.2 Output current range: 0~10A (4010P,7510P) 0~20A (4020,9020,4020P,7520P) 0~50A (4050P,9050P) 0~100A (40100P,90100P) 2.3 Voltage current show: 4 LEDs,3 Measured value + 1 display unit 2.4 Display resolution: 0.01V,0.01A,0.01W,0.01AH,0.01H 2.5 Voltage accuracy: ±1%+2 bytes 2.6 Current accuracy: ±2%+5 bytes 2.7 Measuring rate: 5 times/s 2.8 Protection type: OCP(Over-current protection),OAH(Charging protection), OVP(Over-voltage protection),OPP(Over power protection), OFT(Overtime protection),LOP(Voltage protection) 2.9 Protection set range: OCP Over-current protection:0.01~upper limit OAH Charging capacity protection: 0.01AH~999AH OVP Over-voltage protection: 0.01V~99.9V OPP A power protection:0.01W~9.99kW(P mean W ,P. Mean kW) OFT Overtime protection: 0.01 hours~99.9hours 2.10 Shape dimension(mm): 79*43*25 2.11. Installing hole (mm):76.5*39.2 -3- 3. Instrument structure and wiring Figure1 The front panel Figure2 The behind panel Figure3 The behind panel -4- 3.1 2wire wiring:First will jump line to jump to 2 Wire state,Use 20 cm row line header and power board,High pressure part board connection in figure4,Wiring should pay attention to the direction. Figure4 2wire wiring 3.2 3wire wiring:Open the back cover,In figure 5 shows, solder welding will open,Ext Power voltage 12V or 24V. Figure5 3wire wiring -5- 3.3 General 3wire wiring:First will jump jump line 3 Wire state,Use 20 cm row line header and power board, high pressure section connection as shown in figure 6 link,Ext power voltage 12V or 24VWiring should pay attention to the direction. Figure6 General 3wire wiring 3.4 Full function 3wire wiring:The connection mode and the former compared, increased the relay,Protection function more complete,Wiring,First will jump line to jump to 3 Wire state, use 20 cm row line header and power board, high pressure section connection as shown in figure 7 link,Ext power voltage 12V or 24V,Wiring should pay attention to the direction, relay power supply voltage and the choice of external power supply voltage to match. Figure7 3wire relay the wiring diagram -6- 4. Operating instructions: 4.1 Properly connected to input and output lines, note connection can reverse connect. 4.2 Ensure that the input voltage in the instrument to withstand voltage range, after electrify, above a row of digital tube default display voltage value, the following a row of digital tube default display current value(Take off with the function model,below default display -OFF,default shut off,voltage not output,press<OUT>key,voltage output. 4.3 If does not have shut off the model, the signal voltage current directly display; To take off, the make and model of the default is shut off, make sure that the voltage normal,press<OUT>key output voltage,voltage to load. 4.4 press key Choose the above digital pipe display project,press key choose the digital pipe display project. 4.5 Have one of following cases, you can enter debug mode Settings: This machine is the default is shut off the boot, if need to set to boot the default open. Need to enable overvoltage protection (OVP), owe voltage protection (LoP), over current protection OCP), a power protection (OPP), charging capacity protection (OAH), timed protection (OFT) the concrete value. When measuring voltage or current value has a certain error, the calibration needs. When you the wrong voltage current parameters, need to get to the factory Settings. Enter debug mode method, on state,long press<OUT>key,when The above digital pipe display"0-U",Enter debug mode,Short according to<OUT>key,The above digital pipe display :0 to 10 change. 4.5.1 "0-U"Voltage measurement value of calibration,below led display The current measuring voltage value,As long as the calibrated high low 2 point voltage value is OK,High point voltage 30V,Low point voltage10V,Top and bottom the boundary of the standard is 20V,above 20VHigh point voltage,below 20VLow point voltage,Can be compared to standard voltmeter,Press may The high voltage measurement value,Press Can reduce voltage measurement value,Two points are sometimes will influence each other,through 2-3times is OK. 4.5.2 "1-C"Current of measurement value of calibration,below display is the current measurement result,Calibration high and low end 2 point of current value is OK,High current point is 3A,Low current point is 0.1A,Top and bottom the boundary of the standard is 2A,above 2Ais Calibration high current,below 2ACalibration low current,can be compared to standard ammeter,press Increase the current measured values,press Reduce the current measured values,Two points are sometimes will influence each other,through2-3times is OK. 4.5.3 If after adjustment,Need to save parameters,Adjust to"2-ES",below LED display"-n-",mean don't save,press or display"-y-",press<OUT>Automatic exit debug mode the save parameters. 4.5.4 "3-r"Is fully recovered to factory Settings,This function in the main user confusion voltage and current value,Want to return to the initial value,press or display"-y-", after press<OUT>,You can resume set out of the -7- factory. The following set with P model for effective: 4.5.6 "4-ON" Set the boot is on,Default shows"-n-",mean don't ON,press or display"-y-",after, According to 4.3 operation. 4.5.7 "5-OV"to"10-L"Means different is the protection setting,default are 0,mean don't ON,set not 0 Open function,press Increase the set value,press Reduce the set value, It can regulate the long press,after,According to 4.3 operation. Table1Is the function of each position table: long press is able to regulate the: Table1 5-OV 6-OP 7-OC 8-AH 9-Hr 10-L OVP OPP OCP OAH OFT LoP overvoltage over-power Over current overcharge overtime undervoltage 4.6 According to various protection use, below again detailed introduced: If set OCP value of 1.00 A, then the output current more than 1 A, the machine will automatically be cut off output, and screen protection type for OCP, press any buttons returned to normal. If you have OAH value of 4.00 AH, the power output of more than four AH, the machine will automatically be cut off output, and screen protection type for OAH, need special attention is, the value is a cumulative value, more than once, can't again output, at this point, can according to reset the magnitude and the long time value may be to output. If set a value of 10.0 V OVP, the output voltage more than 10 V, the machine will automatically be cut off output, and report to the police. If set a value of 10.0 V LoP, the output voltage less than 10 V, the machine will automatically be cut off output, at the same time, the police, the function is suitable for the instrument as a battery put the instrument, and the specific operation see below a special case. If set a value of 15.0 W OPP, the output power more than 15 W, the machine will automatically be cut off output, and report to the police. If set for 1.00 H OFT value, the output time more than 1 hour, the machine will automatically be cut off output, at the same time, the police, the need to output, need long press reset timers. 4.7 If the machine made some protection setting, now want to right back to the default not enabled (0 state), can be in normal mode can be long press button. 5. Attention: 5.1 Can't more than instrument voltage current range use, or it will damage instrument 5.2 Anode can't answer the wrong, not at the correct measurement -8-