1
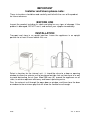
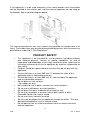
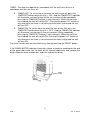
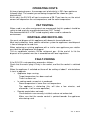
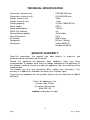
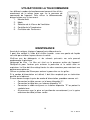
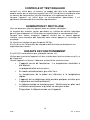
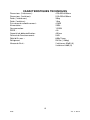
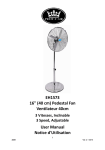
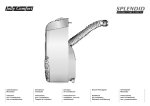
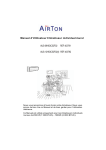
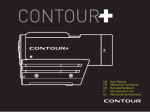
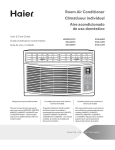
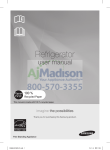
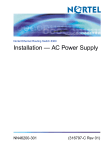
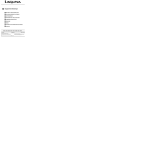
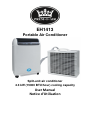
EH1413
Portable Air Conditioner
Split-unit air conditioner
4.3 kW (15000 BTU/hour) cooling capacity
User Manual
Notice d'Utilisation
IMPORTANT
Installer and Users please note:
These instructions should be read carefully and left with the user of the product
for future reference.
BEFORE USE
Inspect the product including its cable and plug for any signs of damage. If the
product is damaged, DO NOT use it, and contact your supplier immediately.
INSTALLATION
Transport and store in an upright position. Leave the appliance in an upright
position for at least 3 hours before first use.
Select a location for the internal unit - it should be close to a door or opening
window to allow the exterior unit to be placed outside, but not too close to a wall
to avoid obstructing the air flow. Allow 300 mm (8") around the appliance on all
sides, to achieve optimum efficiency and lowest operating noise.
Pass the external unit through the open door or window, and then close the door
or window to the minimum gap that will allow the flexible hose through.
2
2836
Ver. 2 - 04/14
If the appliance is to be used frequently in the same location, then the bracket
can be attached to the exterior wall, and the external appliance can be hung on
the bracket. See installation diagram below.
The internal and external units must remain connected by the flexible hose at all
times. The flexible hose may only be disconnected by persons with the necessary
qualifications under the "F Gas Regulations".
PRODUCT SAFETY
•
•
•
•
•
•
•
•
•
•
•
•
This appliance is not intended for use by persons (including children)
with reduced physical, sensory or mental capabilities, or lack of
experience and knowledge, unless they have been given supervision or
instruction concerning use of the appliance by a person responsible for
their safety.
Children should be supervised to ensure that they do not play with the
appliance
Ensure that there is at least 300 mm (1') between the sides of the
appliance and any flammable materials
Ensure that there is at least 900 mm (3') from the top of the appliance
and any flammable materials.
Do not place on soft surfaces.
• For indoor use only
Not suitable for use in boats, caravans or similar locations.
Do not use in bathrooms, or in wet locations.
Do not place the mains lead beneath a carpet or rug.
Do not use the product in locations where paint, petrol or other
flammable liquids are used or stored.
Do not use unless correctly installed
Do no insert any object into the appliance through the grilles. This may
damage the product or result in electric shock.
Do not obstruct the air intake and exhaust vents on either internal or
external appliance.
3
2836
Ver. 2 - 04/14
GENERAL SAFETY REQUIREMENTS
Domestic wiring must be tested periodically by a qualified electrician at least
once every 10 years or at every change of occupancy. For office and retail
premises, and buildings such as village halls, the wiring must be inspected at
least once every 5 years.
It is recommended that all building be fitted with smoke alarms (it is mandatory
for new buildings).
INSTALLATION AND OPERATION
If the remote control is to be used, install two AAA batteries into the battery
compartment, ensuring the correct polarity.
Plug the mains lead into a 13 Amp mains socket.
If connecting via an extension lead, make sure that the lead is rated at 13 Amps
or more, and that it is fully unwound.
Switch the appliance on at the mains socket.
Remote
Sensor
Swing
On/Off
Timer
Set Buttons
LED
Display
Window
Temperature
Controls
Mode
Button
On/Off
Button
Press the "1/0" button to start the appliance
Select the mode by pressing the "MODE" button. The available modes are:
•
AUTO: Automatic mode: selects the optimum fan speed to maintain the
selected room temperature.
•
HI/MED/LO: Selects high, medium or Low fan speed.
o Set the required room temperature using the THERMO
CONTROL buttons. The set temperature is displayed on the
LED display. Cooling modes only.
•
DEHUM: Dehumidifier setting; in this mode there is no cooling and the
fan speed is selected automatically.
•
FAN: Fan only mode with no cooling.
AUTO SWING: Selects up and down movement of the louvers.
THERMO CONTROL: The default temperature setting is 25°C, use these buttons
to select the desired room temperature (16°C - 30°C). When the temperature
reaches the desired figure the compressor will stop and the unit will operate as
fan only till the temperature rises sufficiently for the compressor to restart.
4
2836
Ver. 2 - 04/14
TIMER: The timer can operate as countdown until the unit turns off or as a
countdown until the unit turns on.
•
TIMING OFF: To set the hour you want the unit to turn off, press the
TIMER SET button when the unit is “ON”. And the TIMING OFF indicator
will illuminate, set the the time till the unit switches off by repeatedly
pressing the TIMER SET button (1 hour intervals). When the set time
has elapsed the unit will switch OFF. Pressing the power “I/O” button at
any time whilst the timer is set will cancel the timer setting and the unit
will turn OFF.
TIMING ON: To set the hour you want the unit to turn ON, press the
TIMER SET button when the unit is “OFF”. And the TIMING ON indicator
will illuminate, set the time till the unit switches ON by repeatedly
pressing the TIMER SET button (1 hour intervals). When the set time
has elapsed the unit will switch ON. Pressing the power “I/O” button at
any time whilst the timer is set will cancel the timer setting and the unit
will turn ON.
The timer function can be cancelled at any time by pressing the RESET button.
•
If the DRAIN WATER indicator illuminates, place a container underneath the end
of the water drain tube (on the back of the internal appliance) and remove the
bung. Allow the water to drain out, and then replace the bung.
Drain
Tube
5
2836
Ver. 2 - 04/14
USING THE REMOTE CONTROL
The operating modes are selected in exactly the same way
as using the control panel on the main appliance. To operate
the remote control, make sure that it control is pointed at the
window in the front panel labelled "REMOTE".
1. ON/OFF Button
2. MODE Button
3. FAN Speed Button
4. TEMPERATURE CONTROL Button
5. TIMER Setting Button
6. AUTO SWING Button
MAINTENANCE
Before cleaning, turn the appliance off using the button on the control panel
(NEVER switch off the power at the mains socket whilst the appliance is running).
Wait until the appliance stop and then disconnect from the mains supply. The
case may then be cleaned using a damp cloth with a drop of washing-up liquid to
remove any dust or dirt from the case. Do no use stronger detergents or solvents
as these may damage the plastic.
Using a dry 1" (25 mm) paint-brush, remove any dust from the grilles.
Every two weeks, clean the air filter; the filter is located at the back of the
appliance towards the top. Remove the filter, and wash with hand-hot water with
a drop of detergent. Dry thoroughly before replacing.
Using the EH1413 with a blocked filter will severely reduce its efficiency, and
using without the filter may lead to a build-up of a dust on the heat exchangers,
which may constitute a fire hazard.
If the mains lead is damaged, it must be replaced by the manufacturer or an
authorised service centre. If the mains plug needs to be replaced, proceed as
follows:
•
•
•
•
positioned correctly (over the
tightened.
Connect the brown wire to the
terminal labelled "L".
Connect the blue wire to the terminal
labelled "N"
Connect the green/yellow wire to the
terminal labelled with the earth symbol
or "E".
Make sure that the cord-grip is
outer sheath of the cable) and it fully
6
2836
Ver. 2 - 04/14
OPERATING COSTS
At time of going to press, the average cost of electricity is £0.14 per appliance
(kilowatt-hour). The amount you are being charged will be shown on your
electricity bill.
At this cost, the EH1413 will cost a maximum of £0.17 per hour to run; the actual
amount will depend on the set temperature, and the room temperature.
PAT TESTING.
When used in an office environment we recommend that this product should be
safety-tested yearly by a qualified electrician (PAT Tested).
We recommend that it is PAT tested regularly when used in a domestic
environment.
DISPOSAL AND RECYCLING
You must not dispose of this appliance with domestic household waste.
Most local authorities have specific collection system for appliances and disposal
is free of charge to the end-user.
When replacing an existing appliance with a similar new appliance your retailer
may take the old appliance for disposal.
This air conditioner contains R410a refrigerant gas. At the end of its life the
disposal of this product must be in accordance with local regulations.
FAULT-FINDING
If the EH1413 is not operating, proceed as follows:
Check that the mains plug is firmly in the socket, and that the socket is switched
ON.
When the appliance if switched on there will be a delay of about 1 minute before
it starts to operate.
• Appliance stops running:
Target temperature has been reached.
Timer has been set.
• In cooling mode, no cool air is produced:
Room temperature is lower than set temperature
The appliance is defrosting (this will take a few minutes, and
afterwards, it will resume operation)
• Remote control does not work:
Check batteries are correctly installed, and are not exhausted.
Make sure that the remote control is pointed towards the appliance
when being used.
7
2836
Ver. 2 - 04/14
TECHNICAL SPECIFICATION
Dimensions (internal unit):
Dimensions (external unit):
Weight (internal unit):
Weight (external unit):
Cooling capacity:
Power supply:
Power consumption:
SEER (For Cooling)
Dehumidifying capacity:
Operating current:
Air volume:
Refrigerant:
Noise(max)
470×335×695 mm
510×230×490 mm
36 kg
14 kg
4.3 kW (15000 BTU/h)
230 V~
1310 W
4.6
45 litres/day
5.8 A
3
600 m /hour
R410a (1.08 kg)
Indoor 59 dB (A)
Outdoor 64 dB (A)
SERVICE WARRANTY
Prem-i-Air guarantees the product free from defects in materials and
workmanship for a period of twelve months.
Should this appliance be operated under conditions other than those
recommended, at voltages other than the voltage indicated on the appliance, or
any attempts made to service or modify the appliance, then the warranty will be
rendered void.
The product you buy may sometimes differ slightly from illustrations. This
warranty is in addition to, and does not affect, your statutory rights.
If you have any problems with this product, please call our Help Desk on (0845)
459 4816.
Prem-i-Air Appliances Ltd.,
Lancots Lane, Sutton,
St. Helens, Merseyside.
WA9 3EX, UK
website: www.prem-i-air.com
8
2836
Ver. 2 - 04/14
IMPORTANT
Installateurs et Utilisateurs, veuillez noter:
Ces instructions doivent être lues attentivement et conservées pour une
éventuelle future consultation.
AVANT UTILISATION
Inspectez le produit y compris le câble et la prise. Si le produit est endommagé,
NE L’UTILISEZ PAS, et contactez immédiatement votre revendeur.
INSTALLATION
Transportez et stockez l'appareil en position verticale. Laissez l'appareil en
position verticale pendant 3 heures minimum avant la première utilisation.
Choisissez un endroit pour l'unité interne – il doit se situer près d'une porte ou
une fenêtre ouverte pour permettre à l'unité extérieure d'être installée à
l'extérieur, mais pas trop près d'un mur afin de ne pas entraver la circulation de
l'air. Laissez un espace libre de 300mm tout autour de l'appareil, pour obtenir
une efficacité optimum et un fonctionnement le plus silencieux possible. Passez
l'unité externe par la fenêtre ou porte ouverte puis fermez la porte ou la fenêtre
en laissant juste un entrebâillement pour le tuyau souple.
Si vous utilisez fréquemment l'appareil au même endroit, vous pouvez fixer le
support au mur extérieur afin d'y accrocher l'unité externe.
9
2836
Ver. 2 - 04/14
Voir schéma d'installation ci-dessous.
CONSIGNES DE SECURITE
•
•
•
•
•
•
•
•
•
•
•
•
•
Cet appareil peut être utilisé par des enfants âgés de 8 ans et plus et
par des personnes dont les capacités physiques, sensorielles ou
mentales sont diminuées ou manquant d'expérience ou de
connaissances uniquement sous la surveillance d'un adulte qui leur
aura appris à utiliser l'appareil et leur aura expliqué les risques
encourus.
Les enfants ne doivent pas jouer avec l'appareil.
Placez le EH0468 sur une surface plate et stable.
Respectez une distance minimum de 300mm entre les côtés du
radiateur et tout matériau inflammable.
Respectez une distance minimum de 900mm entre le haut de l’appareil
et tout matériau inflammable.
Ne le placez pas sur une surface molle.
Ne le couvrez pas. Un symbole situé sur le radiateur vous le rappelle.
Pour utilisation à l’intérieur uniquement.
Ne convient pas à une utilisation dans les bateaux, les caravanes ou
endroits similaires.
N’utilisez pas l’appareil dans une salle de bains ou une pièce humide.
Ne passez pas le cordon d’alimentation sous une moquette ou un tapis.
N’utilisez pas le radiateur dans des endroits où de la peinture, de
l’essence ou d’autres liquides inflammables sont utilisés ou stockés.
N’utilisez pas l’appareil sans les pieds fournis.
10
2836
Ver. 2 - 04/14
CONSIGNES GENERALES DE SECURITE
Le câblage doit être testé périodiquement par un électricien qualifié
au moins une fois tous les 10 ans ou à chaque changement d’occupation.
Pour les bureaux et les locaux de vente au détail ainsi que les bâtiments publics,
le câblage doit être inspecté au moins une fois tous les 5 ans.
Il est conseillé d’équiper tous les bâtiments avec un détecteur de fumée (il est
obligatoire pour les nouveaux bâtiments).
INSTALLATION ET FONCTIONNEMENT
Si vous utilisez la télécommande, insérez deux piles AAA dans le compartiment
de piles en respectant la polarité. Branchez le cordon d'alimentation dans une
prise secteur. Si vous utilisez une rallonge, vérifiez que le câble est bien calibré à
13 ampères ou plus et que la rallonge est complètement déroulée. Allumez
l'appareil.
Remote
Sensor
Swing
On/Off
Timer
Set Buttons
LED
Display
Window
Temperature
Controls
Mode
Button
On/Off
Button
Appuyez sur le bouton ''I/O'' pour allumer l'appareil. Choisissez le mode en
appuyant sur le bouton 'MODE''. Les différents modes disponibles sont :
•
AUTO : mode automatique : sélectionne la vitesse optimum du
ventilateur pour maintenir la température souhaitée dans la pièce.
•
HI/MED/LO : Permet de sélectionner la vitesse élevée, moyenne ou
faible.
o Réglez la température désirée à l'aide des boutons THERMO
CONTROL. La température s'affiche sur l'écran à LED. Mode
refroidissement uniquement.
•
DEHUM : Déshumidificateur : dans ce mode, il n'y a pas de possibilité
de rafraîchir l'air et la vitesse du ventilateur se règle automatiquement.
•
FAN : Mode ventilation uniquement sans refroidissement.
•
AUTO SWING : Actionne les persiennes de haut en bas.
•
THERMO CONTROL : La température de réglage par défaut est de
25°C, utilisez les boutons pour régler la température désirée dans la
pièce (16°C-30°C).Quand la température réglée est atteinte, le
compresseur s'arrête et l'appareil fonctionne comme un ventilateur
jusqu'à ce que la température s'élève suffisamment et que le
compresseur redémarre.
11
2836
Ver. 2 - 04/14
•
TIMER : Le programmateur peut fonctionner comme un compte à
rebours jusqu'à ce que l'appareil démarre ou s'éteigne.
o TIMING OFF : Pour régler l'heure à laquelle vous souhaitez
que l'appareil s'éteigne, appuyez sur le bouton TIMER SET
quand l'appareil est en fonctionnement.
Le témoin lumineux TIMING OFF s'allumera, réglez la durée en
appuyant de façon répétitive sur le bouton TIMER SET
(intervalles d'une heure). Quand le temps programmé s'est
écoulé, l'appareil s'éteint. En appuyant sur le bouton ''I/O'' à
n'importe quel moment quand la programmation est en cours,
vous pourrez annuler la programmation et l'appareil s'éteindra.
o TIMING ON : Pour régler l'heure à laquelle vous souhaitez que
l'appareil démarre, appuyez sur le bouton TIMER SET quand
l'appareil est sur OFF, le témoin lumineux s'allumera, réglez la
durée en appuyant de façon répétitive sur le bouton TIMER
SET (intervalles d'une heure). Quand le temps est écoulé,
l'appareil démarre. En appuyant sur le bouton ''I/O'' à n'importe
quel moment quand la programmation est en cours, vous
pourrez annuler la programmation et l'appareil démarrera. La
fonction TIMER peut être annulée à n'importe quel moment en
appuyant sur le bouton RESET.
Si le témoin lumineux DRAIN WATER s'allume, placez un récipient sous
l'extrémité du tuyau de vidange (à l'arrière de l'unité interne) et retirez la bonde.
Laissez l'eau s'écouler puis replacez la bonde
Drain
Tube
12
2836
Ver. 2 - 04/14
UTILISATION DE LA TELECOMMANDE
Les différents modes de fonctionnement peuvent être utilisés
exactement de la même façon que sur le panneau de
commande de l'appareil. Pour utiliser la télécommande,
dirigez-la bien vers la face avant.
1. Marche/Arrêt
2. Mode
3. Sélection de la Vitesse de Ventilation
4. Contrôle de la Température
5. Oscillation des Persiennes
MAINTENANCE
Avant de le nettoyer, éteignez l’appareil puis débranchez-le.
Il peut être nettoyé à l’aide d’un chiffon humide avec une goutte de liquide
vaisselle pour enlever la poussière ou la saleté.
N’utilisez pas de détergents ni de solvants puissants car cela pourrait
endommager le plastique.
Nettoyage du filtre : Le filtre est situé sur le panneau arrière de l'appareil.
Déclipsez-le pour l'enlever puis enlevez la poussière et la saleté avec un
aspirateur. Le filtre doit être nettoyé toutes les deux semaines pour maintenir une
performance optimum.
Utilisez un pinceau de 25mm pour enlever la poussière sur les grilles.
Si le cordon d’alimentation est abîmé, il doit être remplacé par un technicien
qualifié ou le fabricant.
Si vous devez changer la prise du cordon d’alimentation, procédez comme suit :
•
Connectez la câble marron sur la borne étiquetée "L".
•
Connectez le câble bleu sur la borne étiquetée "N".
•
Connectez le câble vert/jaune sur la borne étiquetée "E" ou portant le
symbole terre.
•
Assurez-vous que la prise est positionnée correctement (sur la gaine
extérieure du câble) et bien serrée.
13
2836
Ver. 2 - 04/14
CONTROLE ET TEST REGULIER
Lorsqu'il est utilisé dans un bureau, ce produit doit être testé régulièrement
chaque année par un électricien qualifié (test PAT) afin d’être en conformité avec
les normes de conformité et sécurité électriques et le règlement de travail.
Lorsque l’appareil est utilisé dans un environnement domestique, il est
également recommandé de le contrôler régulièrement.
ELIMINATION ET RECYCLAGE
Vous ne devez pas jeter cet appareil avec les ordures ménagères.
La majorité des autorités locales possèdent un système de collecte spécifique
pour ce type d’appareils et l’élimination est gratuite pour le consommateur final.
Lorsque vous voulez remplacer l’appareil existant par un nouvel appareil
similaire, votre revendeur doit reprendre votre ancien appareil et se charger du
recyclage.
Ce climatiseur contient du gaz réfrigérant R410a.
À la fin de sa vie, l'élimination de ce produit doit être faite conformément aux
réglementations locales.
DEFAUTS DE FONCTIONNEMENT
Si le EH1413 ne fonctionne pas, procédez comme suit :
Vérifiez que la prise de l'appareil est bien insérée dans la prise secteur et qu'il y a
de l'électricité.
Quand l'appareil est allumé, il démarre au bout d'une minute environ.
•
•
•
•
L'appareil cesse de fonctionner : La température souhaitée a
été atteinte.
La programmation est en cours.
En mode refroidissement, pas d'air frais :
La température de la pièce est inférieure à la température
réglée.
L'appareil est en dégivrage (cela prendra quelques minutes puis
il reprendra son fonctionnement).
La télécommande ne fonctionne pas : Vérifiez que les piles sont
installées correctement et qu'elles ne sont pas usées.
Dirigez bien la télécommande vers l'appareil
14
2836
Ver. 2 - 04/14
CARACTERISTIQUES TECHNIQUES
Dimensions (l’intérieures):
Dimensions (l’extérieur):
Poids (l’intérieures):
Poids (l’extérieur):
Puissance de refroidissement :
Alimentation :
Consommation :
SEER :
Capacité de déhumidification:
Courant de Fonctionnement :
Débit d’Air max ::
Refrigerant:
Niveau de Bruit :
470×335×695mm
510×230×490mm
36kg
14kg
4.3kW
230V~
1310W
4.6
45l/jour
5.8A
3
600m /hour
R410a (1.08kg)
l’intérieures 59dB (A)
l’extérieur 64dB (A)
15
2836
Ver. 2 - 04/14
GARANTIE
Prem-i-Air garantit le produit contre tout défaut de matériaux et de fabrication
pour une période de douze mois.
Lorsque l'appareil fonctionne dans des conditions autres que celles qui sont
recommandées, à des tensions autres que la tension indiquée sur l'appareil, ou
toute tentative faite pour réparer ou modifier l'appareil conduiront à l’annulation la
garantie.
Le produit que vous avez acheté peut légèrement différer de l’illustration.
Cette garantie est un plus et n’affecte pas vos droits légaux.
Si vous rencontrez des problèmes sur cet appareil, veuillez contacter notre
service technique au 01.30.34.48.60.
Prem-I-Air Appliances Ltd
Z.A. du Bel Air
17 D rue de Creil
95340 BERNES-SUR-OISE
Site Internet : www.prem-i-air.eu
16
2836
Ver. 2 - 04/14