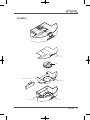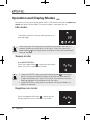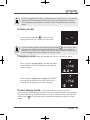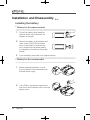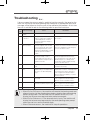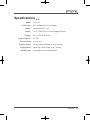
1
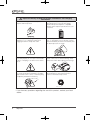
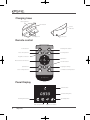
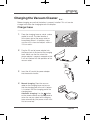
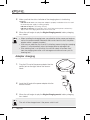
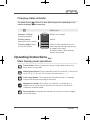
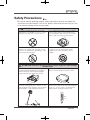
Safety Precautions Be sure to read the following product safety precautions carefully and follow the instructions to avoid hazards such as fire, electric shock and personal injury as well as to prevent damage to the vacuum robot. WARNING: Incorrect use of this product may result in serious injury Do⽕ℶџ䷙ not disassemble this product䳏∴Ⳍ䮰џ䷙ other than ⊼ᛣџ䷙ replacing the consumables so as not to cause damage or hazards such as electric shock. ☿♑ǃ䳏ॅ䱾 Ҏવফڋ Do not subject this product to excessive weight. Exercise extra caution if used in the presence of young children or pets at home; do not allow them to step or sit on the vacuum cleaner. 5RERW⭄ᐌ᪡᧡າ 䳏∴ᬙ䱰 ⽕ℶ∈⋫ This product is not⠽储᧡າ waterproof! Users are advised not to employ it in areas that are wet, ᡇ⽕ℶ῭⼎ ᡇ⽕ℶ῭⼎ humid, or oily. Refrain from attempting to clean the main unit with any liquid. This product is for indoor use only. To prevent its infrared sensor from being affected by ⫼এວURERWϞ䚼⽕ℶ῭⼎ ⫼এວURERWϞ䚼⽕ℶ῭⼎ sunlight, do not expose the unit to direct sunlight. ⫼এວURERWϞ䚼⽕ℶ῭⼎ ⫼এວURERWϞ䚼⽕ℶ῭⼎ ⫼এວURERWϞ䚼⽕ℶ῭⼎ ⫼এວURERWϞ䚼⽕ℶ῭⼎ ᡇ⽕ℶ῭⼎ ᡇ⽕ℶ῭⼎ ᡇ⽕ℶ῭⼎ ᡇ⽕ℶ῭⼎ Incorrect use may result in serious injury or cause damage ATTENTION: ∈Ⓢ⽕ℶ῭⼎ 䱑⽕ℶ῭⼎ ∈Ⓢ⽕ℶ῭⼎ 䱑⽕ℶ῭⼎ ⽕ℶџ䷙ ☿♑ǃ䳏ॅ䱾 ⊼ᛣџ䷙ 䳏∴Ⳍ䮰џ䷙ to other items Before using this product, please ensure that ∈Ⓢ⽕ℶ῭⼎ ∈Ⓢ⽕ℶ῭⼎ the filter is properly installed in the dustbin so ∈Ⓢ⽕ℶ῭⼎ ∈Ⓢ⽕ℶ῭⼎ that the blower fan will not be damaged by foreign objects bodies drawn into the unit. Ҏવফڋ 䱑⽕ℶ῭⼎ 5RERW⭄ᐌ᪡᧡າ ◒㎆䲚้Ⲧ ◒㎆䲚้Ⲧ 䳏∴ᬙ䱰 For best cleaning results, prevent foreign 䱑⽕ℶ῭⼎ objects from䱑⽕ℶ῭⼎ blocking 䱑⽕ℶ῭⼎ the exhaust outlet. ⠽储᧡າ This product ⽕ℶ∈⋫ will move by itself and perform ◒㎆䲚้Ⲧ automatic cleaning. Be sure to remove or clear ◒㎆䲚้Ⲧ ◒㎆䲚้Ⲧ ◒㎆䲚้Ⲧ away any power cords, extension cords, and items that are fragile or could easily be knocked over. ߎ乼ষࡴㆁ丁῭⼎ ߎ乼ষࡴㆁ丁῭⼎ This product employs a rechargeable lithium ion ߎ乼ষࡴㆁ丁῭⼎ battery. Please operate the unit in the temperate ߎ乼ষࡴㆁ丁῭⼎ ߎ乼ষࡴㆁ丁῭⼎ ߎ乼ষࡴㆁ丁῭⼎ range of 0 – 45°C in order to ensure that the battery remains in proper working order. 45°C 45°C 45°C 0°C 0°C 0°C 45°C 45°C 0°C 0°C 45°C 0°C 45°C 0°C ゟ➜ञצ䳏㎮ ゟ➜ञצ䳏㎮ ⑿ᑺ㿜῭ߎᑺ ⑿ᑺ㿜῭ߎᑺ ゟ➜ञצ䳏㎮ ゟ➜ञצ䳏㎮ ゟ➜ञצ䳏㎮ ゟ➜ञצ䳏㎮ Tulip100 1 ⑿ᑺ㿜῭ߎᑺ ⑿ᑺ㿜῭ߎᑺ ⑿ᑺ㿜῭ߎᑺ ⑿ᑺ㿜῭ߎᑺ OFF OFF OFF OFF OFF OFF OFF ᡇ⽕ℶ῭⼎ ∈Ⓢ⽕ℶ῭⼎ 䱑⽕ℶ῭⼎ ◒㎆䲚้Ⲧ ߎ乼ষࡴㆁ丁῭⼎ ◒㎆䲚้Ⲧ ߎ乼ষࡴㆁ丁῭⼎ ◒㎆䲚้Ⲧ ߎ乼ষࡴㆁ丁῭⼎ ⫼এວURERWϞ䚼⽕ℶ῭⼎ 45°C 45°C 45°C 0°C 0°C ◒㎆䲚้Ⲧ ◒㎆䲚้Ⲧ ◒㎆䲚้Ⲧ ∈Ⓢ⽕ℶ῭⼎ ⽕ℶџ䷙ ⊼ᛣџ䷙ ߎ乼ষࡴㆁ丁῭⼎ ߎ乼ষࡴㆁ丁῭⼎ 0°C ߎ乼ষࡴㆁ丁῭⼎ 䱑⽕ℶ῭⼎ information: Prohibitions and charging Important battery-related instructions 䳏∴Ⳍ䮰џ䷙ ゟ➜ञצ䳏㎮ Do not use non-original batteries or power ゟ➜ञצ䳏㎮ adapters with this product. ゟ➜ञצ䳏㎮ ゟ➜ञצ䳏㎮ ☿♑ǃ䳏ॅ䱾 Ҏવফڋ 0°C 45°C 5RERW⭄ᐌ᪡᧡າ Charge the battery to⑿ᑺ㿜῭ߎᑺ full capacity before using this⑿ᑺ㿜῭ߎᑺ product for the first time. Make ⑿ᑺ㿜῭ߎᑺ sure that ⑿ᑺ㿜῭ߎᑺ the power adapter is compatible 45°C 45°C with the electrical power specifications 45°C in your 0°C 0°C household. OFF 0°C OFF OFF ◒㎆䲚้Ⲧ 䳏∴ᬙ䱰 ⠽储᧡າ ߎ乼ষࡴㆁ丁῭⼎ ⽕ℶ∈⋫ ゟ➜ञצ䳏㎮ ゟ➜ञצ䳏㎮ 䳏∴/2*2 If the power ゟ➜ञצ䳏㎮ jack or the plug of the power 䳏∴/2*2 adapter is loose䳏∴/2*2 or damaged, refrain from 䳏∴/2*2 plugging the unit into the power outlet. ⑿ᑺ㿜῭ߎᑺ ⑿ᑺ㿜῭ߎᑺ 䳏∴ᆍ䞣೪䭗䳏⢔ If the battery comes into contact with water, ⑿ᑺ㿜῭ߎᑺ 䳏∴ᆍ䞣೪䭗䳏⢔ juice, or other liquids,䳏∴ᆍ䞣೪䭗䳏⢔ turn off the unit's power 䳏∴ᆍ䞣೪䭗䳏⢔ switch immediately and remove the battery that has been exposed to moisture. OFF 45°C 0°C ゟ➜ञצ䳏㎮ 䳏∴/2*2 䳏∴ᆍ䞣೪䭗䳏⢔ 䳏∴/2*2 䳏∴ᆍ䞣೪䭗䳏⢔ 䳏∴/2*2 䳏∴ᆍ䞣೪䭗䳏⢔ 䳏∴∈┥◎ Use the adapter in a㿌䳏೪ safe environment and plug If the product will not be used for an extended ⑿ᑺ㿜῭ߎᑺ in the unit properly. Do not expose the metallic period of time,䳏∴∈┥◎ we recommend turning off the 㿌䳏೪ 䳏∴∈┥◎ portions㿌䳏೪ of the plug㿌䳏೪ to avoid the risk of electric main power switch before䳏∴∈┥◎ placing it in storage. shock. OFF 䳏∴/2*2 properly to Do not remove and replace the battery unit. For Please recycle used batteries ೪⼎䄺ਞ῭⼎ 䱯ಲᬊLFRQ 㿌䳏೪ 䳏∴∈┥◎ 㿌䳏೪ 䳏∴∈┥◎ prevent pollution to the environment and the criteria under which the battery should be ೪⼎䄺ਞ῭⼎ 䱯ಲᬊLFRQ 䳏∴ᆍ䞣೪䭗䳏⢔ 䳏∴∈┥◎ 䱯ಲᬊLFRQ violation of the䱯ಲᬊLFRQ Waste Disposal Act. replaced ೪⼎䄺ਞ῭⼎ and how it㿌䳏೪ is done, consult the [FAQ] ೪⼎䄺ਞ῭⼎ and [Battery installation instructions]. ೪⼎䄺ਞ῭⼎ ೪⼎䄺ਞ῭⼎ ೪⼎䄺ਞ῭⼎ 㿌䳏೪ OFF 䱯ಲᬊLFRQ 䱯ಲᬊLFRQ 䱯ಲᬊLFRQ * If you have any questions regarding the use of this product, contact your local dealer. 䳏∴∈┥◎ ೪⼎䄺ਞ῭⼎ 2 Tulip100 䱯ಲᬊLFRQ OFF OFF Package Contents Vacuum cleaner unit (with battery) Charging base Power adapter Cleaning brush Filter Side brush Remote control User Manual Tulip100 3 Names of Structures Vacuum cleaner unit Power button Display panel Charging base sensor Obstacle sensor Remote sensor Charging pad Multi-direction wheel Side brush Ground sensor Suction inlet Battery bay Wheels Power jack Power switch Exhaust outlet 4 Tulip100 Dustbin Dustbin cover Filter Dustbin attachment Dustbin inner Dustbin base Press switch Tulip100 5 Charging base Status indicator IR window Status indicator Charging pad Power jack Remote control Power Time Power button Working-time button Sweep Negative Ion Dock Docking button Auto sweep button Negative-ion button OK button Direction/Selection button Vacuum button Spiral button Language settings Spiral Vacuum Language Clock settings button Scheduled cleaning button Clock Schedule Panel Display Power button Clock/working time Working-time button Docking button Auto sweep button 6 Tulip100 Negative-ion button Charging the Vacuum Cleaner Before charging, ensure that the battery is properly installed. This unit can be charged with either the charging base or the adapter: Charger base 1. 0cm >15 Place the charging base on a level surface parallel to a wall. The ideal location is at the lower right of the power outlet or immediately below it. In addition, make sure the unit is clear of all objects within a 150 cm radius. 2. Plug the DC end of power adapter into the power jack at the back of the charging base. Make sure that the wire of the power adapter is properly wrapped so that it will not interfere with the operation of the vacuum robot. 3. Insert the AC end of the power adapter into the electrical outlet. 4. Manual charging: Place the vacuum 2/Qpxfs!po0pggbase and ensure robot on the charging that the charging pad at the unit's bottom 3/Txffq!Ujnf is in contact with 4/Bvupthe charging pad of the charging base.5/Ofhbujwf!Jpot 0cm >15 >1 50 cm 6/Epdljoh Automatic charging: Use the button on the remote control and display panel to 2/Vq return the vacuum robot to the charging 3/Epxo base automatically (the power switch must first be turned4/Mfgu on). 5/Sjhiu 6/Foufs 7/Tqsjbm 8/Dmpdl 9/Tdifevmjoh :/Wbdvvn 21/Mbohvbhf Tulip100 7 5. Make sure that the status indicator of the charging base is functioning correctly. Indicator is off: Make sure the power adapter is properly installed and check to see if the external power supply is working properly. Indicator is fully lit: Functioning correctly. Indicator is flashing: This indicates short-circuit. Remove the power cord and any objects near the charging base and reconnect the cord. 6. When the unit begins to play the Begin Charging music, battery charging has started. • When installing the charging base, pay attention to the scope and angle as well as the recommended clearance radius and check to see if the power adapter cable is properly bundled. • If the vacuum robot has less than 30% of battery power during the sweeping process, it will automatically return to charging base to recharge itself. • If the working time is set to infinite, the vacuum robot will remove itself from the charging base after a full recharge and continue to carry out its cleaning task. Adapter charging 1. Plug the DC end of the power adapter into the power jack on the right side of the vacuum robot. 2. Insert the AC end of the power adapter into the electrical outlet. 3. When the unit begins to play the Begin Charging music, battery charging has started. The unit will be charged even if the power switch is off. 8 Tulip100 Charging status indicator will flash in three differ frequencies depending on the The power2/Qpxfs!po0pgg button amount of3/Txffq!Ujnf battery power remaining: 4/Bvup 2/Qpxfs!po0pgg 5/Ofhbujwf!Jpot 3/Txffq!Ujnf 6/Epdljoh Indicator 2/Vq is fully lit: Charging complete 3/Epxo 4/Bvup Battery level 100% Battery fully charged 5/Ofhbujwf!Jpot 4/Mfgu Flashing slowly: About once every second 5/Sjhiu 2/Vq 6/Epdljoh Flashing rapidly: About 7/Tqsjbm 4 times per second 3/Epxo 6/Foufs 4/Mfgu 5/Sjhiu 6/Foufs 7/Tqsjbm 8/Dmpdl Normal 50% 30% 10% 8/Dmpdl 9/Tdifevmjoh :/Wbdvvn Power is nearly depleted; vacuum robot entering homing mode except for negative-ion mode Insufficient power; robot entering power-saving mode. 21/Mbohvbhf Operating Instructions 9/Tdifevmjoh :/Wbdvvn Main display panel operations 21/Mbohvbhf 2/Qpxfs!po0pgg 2/Qpxfs!po0pgg 3/Txffq!Ujnf 2/Qpxfs!po0pgg 3/Txffq!Ujnf 2/Qpxfs!po0pgg 4/Bvup 3/Txffq!Ujnf 4/Bvup 2/Qpxfs!po0pgg 3/Txffq!Ujnf 5/Ofhbujwf!Jpot 4/Bvup 5/Ofhbujwf!Jpot 3/Txffq!Ujnf 4/Bvup 6/Epdljoh 5/Ofhbujwf!Jpot 6/Epdljoh 4/Bvup 5/Ofhbujwf!Jpot 6/Epdljoh 2/Vq 5/Ofhbujwf!Jpot 6/Epdljoh 2/Vq 3/Epxo 2/Vq 6/Epdljoh 3/Epxo 2/Vq 4/Mfgu 3/Epxo 4/Mfgu 2/Vq 3/Epxo 5/Sjhiu 4/Mfgu 5/Sjhiu 3/Epxo 4/Mfgu 6/Foufs 5/Sjhiu 6/Foufs 4/Mfgu 5/Sjhiu 7/Tqsjbm 6/Foufs 7/Tqsjbm 5/Sjhiu 6/Foufs 8/Dmpdl 7/Tqsjbm 8/Dmpdl 6/Foufs 7/Tqsjbm 9/Tdifevmjoh 8/Dmpdl 9/Tdifevmjoh 7/Tqsjbm 8/Dmpdl :/Wbdvvn 9/Tdifevmjoh :/Wbdvvn Power button: Wake up robot from power-saving mode or cause it to enter power-saving mode. Working-time button: Set the cleaning time of the machine. Time can be set to 15, 30, 45, 60, 80, 100 minutes, and continuous (— —). Auto sweep button: The machine will automatically alter its sweeping manner and direction according to the terrain. Negative-ion button: At this point, the machine is functioning as a negative-ion air purifier and will continue to clean the air and remove unpleasant or tobacco odor. Docking button: Automatically searches for and returns to the charging base to recharge. Tulip100 9 s!po0pgg 2/Qpxfs!po0pgg s!po0pgg 2/Qpxfs!po0pgg 3/Txffq!Ujnf q!Ujnf s!po0pgg s!po0pgg q!Ujnf s!po0pgg 2/Qpxfs!po0pgg 3/Txffq!Ujnf 4/Bvup s!po0pgg q!Ujnf q!Ujnf s!po0pgg q!Ujnf 2/Qpxfs!po0pgg 3/Txffq!Ujnf 4/Bvup5/Ofhbujwf!Jpot s!po0pgg ujwf!Jpot q!Ujnf q!Ujnf ujwf!Jpot s!po0pgg 3/Txffq!Ujnf 6/Epdljoh q!Ujnf Refer to [Main display panel operations] for instructions. joh 4/Bvup5/Ofhbujwf!Jpot ujwf!Jpot ujwf!Jpot joh Up button: In the settings mode, this button increases the time ujwf!Jpot q!Ujnf 4/Bvup 5/Ofhbujwf!Jpot 6/Epdljoh ujwf!Jpot (hour/minute). Under other modes, this button allows the machine to 2/Vq joh joh ujwf!Jpot joh 6/Epdljoh proceed forward. 5/Ofhbujwf!Jpot ujwf!Jpot s!po0pgg 2/Vq 3/Epxo joh s!po0pgg Down button: In the settings mode, this button decreases the time joh ujwf!Jpot 6/Epdljoh joh (hour/minute). Under other modes, this button allows the machine to q!Ujnf 2/Vq 3/Epxo4/Mfgu q!Ujnf proceed backward. joh Left button: In settings mode, this button changes (minute) to (hour). 3/Epxo4/Mfgu5/Sjhiu 2/Vq u Remote control operations uujwf!Jpot 6/Foufs 4/Mfgu5/Sjhiu 3/Epxo sujwf!Jpot uu sjoh u 7/Tqsjbm 6/Foufs 5/Sjhiu 4/Mfgu bm usjoh s ubm 8/Dmpdl 7/Tqsjbm 6/Foufs 5/Sjhiu uls sbm bm sbm 7/Tqsjbm 9/Tdifevmjoh 8/Dmpdl 6/Foufs ulsevmjoh lbm l bm l :/Wbdvvn 9/Tdifevmjoh 8/Dmpdl 7/Tqsjbm sevmjoh bm vn l evmjoh evmjoh lvn :/Wbdvvn 9/Tdifevmjoh 8/Dmpdl bm levmjoh 21/Mbohvbhf hvbhf u evmjoh vn vn u evmjoh vn :/Wbdvvn hvbhf 9/Tdifevmjoh levmjoh 21/Mbohvbhf s vn hvbhf s hvbhf vn :/Wbdvvn evmjoh vn hvbhf21/Mbohvbhf bm hvbhf bm hvbhf vn 21/Mbohvbhf hvbhf l l hvbhf evmjoh evmjoh vn vn Under other modes, this button allows the machine to rotate toward the left. 2/Qpxfs!po0pgg Right button: Under other modes, this button changes (hour) to (minute). 3/Txffq!Ujnf 2/Qpxfs!po0pgg Under other modes, this button allows the machine to rotate toward the 4/Bvup 3/Txffq!Ujnf 2/Qpxfs!po0pgg right. 4/Bvup5/Ofhbujwf!Jpot 3/Txffq!Ujnf 2/Qpxfs!po0pgg 2/Qpxfs!po0pgg OK button: Confirm the time that has been set, pre-sweep time or working 6/Epdljoh 4/Bvup5/Ofhbujwf!Jpot 3/Txffq!Ujnf 3/Txffq!Ujnf 2/Qpxfs!po0pgg time. 6/Epdljoh 4/Bvup5/Ofhbujwf!Jpot 4/Bvup 2/Vq Spiral button: The vacuum robot 2/Qpxfs!po0pgg will3/Txffq!Ujnf sweep the area in concentric circles 2/Qpxfs!po0pgg 6/Epdljoh 5/Ofhbujwf!Jpot 5/Ofhbujwf!Jpot 4/Bvup 3/Txffq!Ujnf 2/Qpxfs!po0pgg 3/Epxo 2/Vq from the inside out. 3/Txffq!Ujnf 2/Qpxfs!po0pgg 6/Epdljoh 6/Epdljoh 4/Bvup5/Ofhbujwf!Jpot 3/Txffq!Ujnf 2/Qpxfs!po0pgg 4/Mfgu 2/Vq 3/Epxo Vacuum button: Activate or disable the2/Qpxfs!po0pgg vacuum 4/Bvupaction and side brush 3/Txffq!Ujnf 6/Epdljoh 4/Bvup5/Ofhbujwf!Jpot 5/Sjhiu 4/Mfgu 2/Vq 3/Epxo buttons to move the vacuum motors. Users can use the 3/Txffq!Ujnf 3/Txffq!Ujnf 2/Qpxfs!po0pgg 2/Vq4/Bvup5/Ofhbujwf!Jpot robot around to sweep a specific area. 6/Epdljoh 6/Foufs 4/Bvup5/Ofhbujwf!Jpot 3/Epxo4/Mfgu5/Sjhiu 6/Epdljoh 4/Bvup5/Ofhbujwf!Jpot 3/Txffq!Ujnf 2/Qpxfs!po0pgg 2/Vq 3/Epxo 6/Epdljoh 7/Tqsjbm 5/Ofhbujwf!Jpot 6/Foufs 5/Sjhiu Language4/Mfgu settings button: Configure the user's preferred language. 6/Epdljoh 5/Ofhbujwf!Jpot 3/Txffq!Ujnf 4/Mfgu 3/Epxo 2/Vq4/Bvup 2/Vq 8/Dmpdl 7/Tqsjbm 6/Epdljoh 6/Foufs Default is English; multiple languages are supported. 5/Sjhiu 2/Qpxfs!po0pgg 6/Epdljoh 5/Ofhbujwf!Jpot 4/Bvup 5/Sjhiu 4/Mfgu 3/Epxo 2/Vq 2/Vq 3/Epxo 9/Tdifevmjoh 8/Dmpdl 7/Tqsjbm 6/Foufs 6/Epdljoh 5/Ofhbujwf!Jpot 6/Foufs 5/Sjhiu 4/Mfgu 2/Vq 3/Epxo 2/Vq 3/Epxo4/Mfgu :/Wbdvvn 9/Tdifevmjoh 8/Dmpdl 7/Tqsjbm 4/Bvup 6/Epdljoh 7/Tqsjbm 6/Foufs 5/Sjhiu 3/Epxo4/Mfgu 2/Vq 3/Epxo4/Mfgu5/Sjhiu :/Wbdvvn 9/Tdifevmjoh 21/Mbohvbhf 5/Ofhbujwf!Jpot 8/Dmpdl 8/Dmpdl 7/Tqsjbm 6/Foufs 4/Mfgu5/Sjhiu 6/Foufs 2/Vq 3/Epxo4/Mfgu5/Sjhiu :/Wbdvvn 9/Tdifevmjoh 21/Mbohvbhf 6/Epdljoh 9/Tdifevmjoh 8/Dmpdl 7/Tqsjbm 6/Foufs 5/Sjhiu 7/Tqsjbm 6/Foufs 3/Epxo4/Mfgu5/Sjhiu :/Wbdvvn 21/Mbohvbhf :/Wbdvvn 9/Tdifevmjoh 8/Dmpdl 7/Tqsjbm 6/Foufs 2/Vq 8/Dmpdl 7/Tqsjbm 6/Foufs 4/Mfgu5/Sjhiu 21/Mbohvbhf :/Wbdvvn 9/Tdifevmjoh 8/Dmpdl 7/Tqsjbm 21/Mbohvbhf 3/Epxo 9/Tdifevmjoh 8/Dmpdl 7/Tqsjbm 6/Foufs 5/Sjhiu Clock settings button: Users can use the the clock. 3/Txffq!Ujnf Scheduled cleaning button: Users can use the to schedule the desired time for sweeping. buttons to set buttons When pressing the button, pay special attention to the conditions of the :/Wbdvvn 9/Tdifevmjoh 8/Dmpdl 21/Mbohvbhf floor behind the unit. Due to the lack of a 8/Dmpdl sensor in the back of the machine, 4/Mfgu :/Wbdvvn 9/Tdifevmjoh 7/Tqsjbm 6/Foufs :/Wbdvvn 9/Tdifevmjoh pressing and holding this button will subject thee unit from the risk of falling 21/Mbohvbhf 5/Sjhiu :/Wbdvvn 9/Tdifevmjoh 8/Dmpdl 7/Tqsjbm 21/Mbohvbhf (stairs, etc.). :/Wbdvvn 21/Mbohvbhf 6/Foufs :/Wbdvvn hvbhf hvbhf 9/Tdifevmjoh21/Mbohvbhf 8/Dmpdl 7/Tqsjbm 8/Dmpdl 9/Tdifevmjoh :/Wbdvvn 21/Mbohvbhf 10 Tulip100 21/Mbohvbhf :/Wbdvvn 9/Tdifevmjoh 21/Mbohvbhf :/Wbdvvn 21/Mbohvbhf 21/Mbohvbhf 2/Qpxfs!po0pgg 3/Txffq!Ujnf 4/Bvup 5/Ofhbujwf!Jpot 6/Epdljoh 2/Vq 3/Epxo 2/Qpxfs!po0pgg Setting the time and scheduled cleaning 4/Mfgu 2/Qpxfs!po0pgg 3/Txffq!Ujnf 3/Txffq!Ujnf 5/Sjhiu 2/Qpxfs!po0pgg 6/Foufs ■■ 4/Bvup 3/Txffq!Ujnf 2/Qpxfs!po0pgg 7/Tqsjbm 5/Ofhbujwf!Jpot 4/Bvup 3/Txffq!Ujnf 2/Qpxfs!po0pgg 8/Dmpdl 6/Epdljoh 5/Ofhbujwf!Jpot 3/Txffq!Ujnf 4/Bvup 9/Tdifevmjoh 6/Epdljoh 2/Vq 4/Bvup 5/Ofhbujwf!Jpot :/Wbdvvn 3/Epxo 5/Ofhbujwf!Jpot 6/Epdljoh 2/Vq 21/Mbohvbhf 4/Mfgu 6/Epdljoh 3/Epxo 2/Vq 5/Sjhiu 4/Mfgu 2/Vq 3/Epxo 6/Foufs 5/Sjhiu 3/Epxo 4/Mfgu 7/Tqsjbm 6/Foufs 4/Mfgu 5/Sjhiu 8/Dmpdl 7/Tqsjbm 5/Sjhiu 6/Foufs 9/Tdifevmjoh 2/Qpxfs!po0pgg ■■ 8/Dmpdl 6/Foufs 7/Tqsjbm :/Wbdvvn 3/Txffq!Ujnf 9/Tdifevmjoh 7/Tqsjbm 8/Dmpdl 21/Mbohvbhf 4/Bvup :/Wbdvvn 9/Tdifevmjoh 8/Dmpdl 4/Bvup Setting the clock 1. 2. 3. 2/Qpxfs!po0pgg 5/Ofhbujwf!Jpot 6/Epdljoh Press the button on the remote control. The time display on the panel will 2/Vq 4/Bvup the user whether it is the number of hours or minutes that is blink to inform 3/Epxo being set. 5/Ofhbujwf!Jpot 3/Txffq!Ujnf 4/Mfgu 6/Epdljoh 5/Sjhiu Press the button to set the hour and press the button to set the 2/Vq and hold the minute. Press button 6/Foufs to increase the number rapidly, or press the 3/Epxobutton to decrease it7/Tqsjbm in quick succession. Press the 4/Mfgu 8/Dmpdl 5/Sjhiu 9/Tdifevmjoh button to complete the clock's settings. Set the scheduled cleaning time: 7/Tqsjbm 6/Foufs :/Wbdvvn 21/Mbohvbhf * First set the start time of the sweep and then set the desired length of the task. 1. 5/Ofhbujwf!Jpot 21/Mbohvbhf 9/Tdifevmjoh :/Wbdvvn 6/Epdljoh :/Wbdvvn 21/Mbohvbhf 2/Qpxfs!po0pgg 2/Vq 21/Mbohvbhf 8/Dmpdl 9/Tdifevmjoh Press the :/Wbdvvn button on the remote control. The time display on the panel will blink to inform the user whether it is the number of hours or minutes that is 2/Qpxfs!po0pgg 21/Mbohvbhf being set. 3/Txffq!Ujnf 3/Txffq!Ujnf 3/Epxo 2/Qpxfs!po0pgg 2. 4/Bvup 3/Txffq!Ujnf Set the desired point in time for the machine to begin sweeping. Refer to 5/Ofhbujwf!Jpot 4/Bvup Step 2 in [Setting the clock] for instructions. 5/Ofhbujwf!Jpot 4/Bvup 4/Mfgu 5/Sjhiu 3. 6/Epdljoh 6/Foufs 6/Epdljoh 5/Ofhbujwf!Jpot Press the button to complete the setting of the pre-sweep time. 6/Epdljoh 2/Vq 7/Tqsjbm 2/Vq 4. 3/Epxo 2/Vqclean. Then decide how long you would like the machine to Use the or button to select the length of working time. Options are 15, 30, 45, 60, 80 4/Mfgu 3/Epxo 9/Tdifevmjoh 4/Mfgu and 100 minutes. 5/Sjhiu 4/Mfgu 8/Dmpdl 3/Epxo :/Wbdvvn 5/Sjhiu 5. 6/Foufs 21/Mbohvbhf Press the 7/Tqsjbm 8/Dmpdl 5/Sjhiu 6/Foufs 6/Foufs 7/Tqsjbm 7/Tqsjbm 8/Dmpdl button complete the setting of working time. In the following scenarios, the scheduled cleaning time that9/Tdifevmjoh has been 8/Dmpdl configured will not take effect: :/Wbdvvn 9/Tdifevmjoh :/Wbdvvn • The user happens to be operating the vacuum robot at the scheduled time. :/Wbdvvn 21/Mbohvbhf 21/Mbohvbhf • The unit is currently being charged with the adapter. 9/Tdifevmjoh 21/Mbohvbhf Tulip100 11 Operation and Display Modes Turn on the unit by pressing the power switch. The machine will play the power-on music and enter the idle mode. The vacuum robot is now ready for use. Idle mode: The display panel will show the working time or an error message. Under idle mode, the display panel will become completely dark after 10 seconds without any action taken. At this point, if the user presses the 2/Qpxfs!po0pgg power button on the display panel, the panel will illuminate and become ready3/Txffq!Ujnf for input. Sweep mode: 4/Bvup 5/Ofhbujwf!Jpot 6/Epdljoh 2/Qpxfs!po0pgg 3/Txffq!Ujnf 2/Vq Auto SWEEP/SPIRAL: 4/Bvup If only 3/Epxo the sweep button is shown on the display panel, 4/Mfgu the unit is currently in this mode. 5/Ofhbujwf!Jpot 6/Epdljoh 5/Sjhiu 6/Foufs 2/Vq 7/Tqsjbm 2/Qpxfs!po0pgg • Under button on the display 3/Epxothe SWEEP mode, pressing the power 8/Dmpdl panel will cause the machine to cease all activities 3/Txffq!Ujnffor three seconds 4/Mfgu 9/Tdifevmjoh in order to facilitate user's input. At this point, the machine will resume 4/Bvup 5/Sjhiu cleaning operation in the absence of any user input. :/Wbdvvn 5/Ofhbujwf!Jpot 6/Foufs • Under the SPIRAL sweep state, the machine will stop immediately if it 21/Mbohvbhf 6/Epdljoh 7/Tqsjbm detects an obstacle. 8/Dmpdl 2/Vq Negative-ion mode: 9/Tdifevmjoh 3/Epxo :/Wbdvvn 2/Qpxfs!po0pgg 4/Mfgu 3/Txffq!Ujnf 21/Mbohvbhf 4/Bvup 5/Sjhiu 6/Foufs 5/Ofhbujwf!Jpot button If only the negative-ion is shown on the 7/Tqsjbm display panel,6/Epdljoh the unit is currently in this mode. 8/Dmpdl 12 Tulip100 2/Vq 9/Tdifevmjoh 3/Epxo :/Wbdvvn 4/Mfgu 21/Mbohvbhf 5/Sjhiu 6/Foufs 7/Tqsjbm 8/Dmpdl 9/Tdifevmjoh Under the negative-ion mode, if the battery level is down to 30%, the homing mode will not be executed; the machine will continue to operate until only 10% of battery power remains, at which time it will enter the power-saving mode. Homing mode: 2/Qpxfs!po0pgg 3/Txffq!Ujnf 4/Bvup 5/Ofhbujwf!Jpot If only the6/Epdljoh docking button is shown on the display panel, the unit is currently in this mode. 2/Vq 3/Epxo 4/Mfgu 5/Sjhiu 2/Qpxfs!po0pgg Under the homing mode, pressing the power button on the display panel 6/Foufs will cause the machine to cease all activities3/Txffq!Ujnf for three seconds in order to facilitate7/Tqsjbm user's input. At this point, the machine 4/Bvup will continue its journey back to the charging base in the absence of any user input. 8/Dmpdl 5/Ofhbujwf!Jpot Charging mode: Refer to [Charging the Vacuum Cleaner] for details. 9/Tdifevmjoh 6/Epdljoh :/Wbdvvn 2/Vq 21/Mbohvbhf 3/Epxo 4/Mfgu When using the charging base, the docking button on the display panel will automatically dim and5/Sjhiu be non-functional. 6/Foufs 7/Tqsjbm 8/Dmpdl 9/Tdifevmjoh :/Wbdvvn When using the adapter for charging, the SWEEP 21/Mbohvbhf and docking button on the display panel will be automatically dimmed and be non-functional. Power-saving mode: Under idle mode, the machine will enter power-saving mode automatically if one minute has elapsed without any operations, and the display panel will be completely dark. At this point, the user can press the power button on the display panel to wake the machine and return it to idle 2/Qpxfs!po0pgg mode. 3/Txffq!Ujnf 4/Bvup 5/Ofhbujwf!Jpot 6/Epdljoh 2/Vq 3/Epxo 4/Mfgu 5/Sjhiu 6/Foufs Tulip100 13 ℶ῭⼎ 䱑⽕ℶ῭⼎ Installation and Disassembly Installing the battery ■■ 䲚้Ⲧ 䳏㎮ Battery for the remote control ߎ乼ষࡴㆁ丁῭⼎ 1. Pull out the battery cover along the direction of the arrow shown on the diagram to the right. 2. Remove the battery to be replaced and insert a new CR2025 lithium button 45°C cell or its equivalent. Ensure that the cell is placed with the correct polarity, 0°C as indicated by the label on the remote control. 3. Push the battery cover back to its original position. ■■ ⑿ᑺ㿜῭ߎᑺ Battery for the vacuum robot 1. Before replacing the battery, turn off the main power switch and remove the external power supply. /2*2 䳏∴ᆍ䞣೪䭗䳏⢔ 2. Use a Phillips screwdriver to loosen the two screws on the battery cover. Open the battery cover. ೪ 䳏∴∈┥◎ 14 Tulip100 OFF 3. Gently pull the battery removal strap and carefully remove the cable connecting the battery to the main unit; then remove the old battery. 4. Connect the cable of the new battery to the connector on the main unit. Pull the battery removal strap gently and insert the new battery. 5. Make sure that the battery is placed securely in its location and replace the battery cover before tightening the two screws previously loosened. • Before replacing the battery read [Battery and charging instructions] in [Safety Precautions] carefully. • The replaced battery should be safely disposed of at a designated recycling center in accordance with the provisions of the Waste Disposal Act. ■■ Installing the side brush 1. Place the side brush onto the brush holder on the vacuum robot unit. 2. Use a Phillips screwdriver to tighten the screw to fix the side brush in place. 3. If it is necessary to remove the side brush, please repeat the above procedure in reverse order. • During cleaning operation, if the machine encounters an obstacle or too much resistance while sweeping an area, the side brush motor will halt automatically. If the resistance decreases, the side brush motor will start again automatically. • To prevent the side brush from being entangled, the machine will activate the side brush motor to rotate the brush from time to time during its journey back to the charging base. The phenomenon described above is not a defect; it is not necessary to replace the side brush. Tulip100 15 ■■ Filter installation 1. As shown in the diagram to the right, press the dustbin button to release the dustbin. 2. Remove the dustbin and open the transparent dustbin cover (simply pull it up gently). 3. Place the filter on the filter holder and gently rotate it clockwise to lock it into a fixed bolt inside. If it is necessary to remove the filter, gently rotate it in the counterclockwise direction to detach it from the fixed bolt, and then put it up. 4. Align the two corners of the transparent dustbin cover with the two corners of the dustbin itself, and press gently to close the dustbin cover. 5. Press the dustbin button and push the dustbin back to the vacuum robot. Confirm that it has returned to its original position. a b b a If it is necessary to replace any other consumables, be sure to halt charging and turn off the power switch. 16 Tulip100 Cleaning and Maintenance Cleaning the dustbin and filter 1. Remove the dustbin (refer to Steps 1 and 2 in [Filter installation]). 2. Empty the dust and debris inside the dustbin into a garbage can. A cleaning brush can be used to remove any dirt remaining in the dustbin/filter. 3. Refer to Step 3 of [Filter installation] and remove the filter. Remove the dust around the filter by gently tapping it. 4. Remove the dustbin inner for cleaning; use water to rinse it if necessary. 5. After cleaning, following the above instructions in reverse order to reassemble the dustbin and place it back into the vacuum robot. • If the filter is too soiled to be clean properly, replace it with a new one. Refrain from using water or detergent to clean the filter; failing to do so will cause damage to the filter. • It is also prohibited from using water or detergent to clean the dustbin base; failing to do so will cause the vacuum motor to fail. • Please replace the filter regularly according to the frequency of operating the vacuum robot in order to maintain the best cleaning quality. Tulip100 17 Cleaning the sensors If the vacuum robot moves in an anomalous or unusual manner or is unable to execute the homing mode to return to the charging base, clean its sensors with a dry cotton swab. Ground sensors (3 units) Obstacle sensor (front) Charging base sensors (2 locations) Cleaning the charging pad If the vacuum robot is unable to return automatically to the charging base, or if the unit is unable to charge with the power adapter plugged in, use a piece of dry cloth to wipe the metal domes on the charging base and/or the vacuum robot as well as the power jack. Charging base metal dome Charging base power jack Vacuum robot metal dome Vacuum robot power jack • Do not use water to clean or wipe the metallic parts to prevent them from rusting. • Refrain from using metal or sharp objects to clean the charging base or the power jack on the vacuum robot. 18 Tulip100 Troubleshooting If for any reason the vacuum robot is unable to function normally, the panel on the main unit will display the corresponding error code and an appropriate voice error message will be played so that the user will be notified of the problem. At this time the user is advised to refer to the following table for possible resolutions. Error Voice message code Err1 Please reinstall dustbin Err2 Please place robot on the floor Err3 Please change robot's position Cause Resolution Dustbin is not installed. Install the dustbin. Raising the machine to a specific height or suspend it in midair for an extended period of time for any reason under the sweep or homing modes. The robot has determined that it has been trapped and is unable to move forward. An object may have entangled the unit, or the machine is trapped within a small confined space and unable to escape. The vacuum motor cannot be activated normally or fails to operate during the execution of a task under the sweep mode or negative-ion mode. Place the unit on the floor or put it on a new location. Check whether there are entangled wires or objects and remove them if necessary. If the unit is trapped in a narrow region, move it to another location. Check for foreign objects that may have been trapped inside the motor and caused the fan to fail; remove the offending objects accordingly. If the vacuum motor itself is malfunctioning, contact customer service. Err5 Please check filter The filter is too dirty or the dustbin Clean the dustbin and filter (or replace is full. the latter if necessary). It is possible for the battery's Err6 Battery temperature The battery is too old, is error malfunctioning or its temperature temperature to return to normal by itself. Turn off the power switch and turn it has risen to an abnormally high back on again. If the situation fails to range. improve, replace the battery or contact customer service. Err7 Sensor error A sensor or sensors on the unit Turn off the power switch and turn it have failed. back on again. If the situation fails to improve, contact customer service. Err8 Other error Malfunctions or anomalies that Turn off the power switch and turn it cannot be troubleshot by the user. back on again. If the situation fails to improve, contact customer service. Low Battery Only 10% power remains. Please recharge the unit. Err4 Please check filter • When Err4 or Err5 occurs, the machine will execute the homing mode and attempt to return to the charging base before stopping there and entering power-saving mode. The next time the user powers on the unit, it will display the last error message and voice prompt once again. • When Err3 or Err6 occurs, in the absence of any inputs, the machine will display the last error message and play the corresponding voice prompt when the user turns on the machine again. • When Other error occurs, the machine will stop all operations. Tulip100 19 FAQ • For problems other than those described in the [Troubleshooting] section, turn off the main power switch and then turn it back on. • After turning off the main power, all settings will revert to the original factory settings. The vacuum robot fails to function properly or suffers from poor performance 1. Confirm that the power switch of the vacuum robot is indeed turned on. 2. Check display panel for any error messages. 3. Check the dustbin, filter, suction inlet and exhaust outlet for possible blockage or obstacles, or contamination with excessive dust. 4. Clean the sensor(s). 5. Check battery level. 6. Recharge of the vacuum robot. 7. Please contact customer service. Remote control fails to work 1. Confirm that the power switch of the vacuum robot is indeed turned on. 2. Confirm that a button cell is properly installed in the remote control. 3. Aim the remote control at the display panel of the vacuum robot at an appropriate distance and repeat the operations. 4. Make sure that the button cell in the remote control has not depleted, and if so, replace it. 5. Please contact customer service. Unable to charge the machine or unable to charge to full capacity 1. Make sure that the power cord of the charging base is properly connected to the power adapter (when in charge base charging mode). 2. Make sure that the power cord of the adapter is properly plugged into the power jack (when in adapter charging mode). 3. Replace the battery. 4. Please contact customer service. The vacuum robot is often unable to return to the charging base automatically to recharge 1. Check to see if that the sensors on the vacuum robot are dirty, and if so, clean them. 2. Relocate the charging base so that the infrared signal receptacle is within the 7-meter detection range of the vacuum robot. Refer to [Charging the Vacuum Cleaner] for details. 20 Tulip100 Specifications Model Dimensions Tulip 100 35 cm (diameter) × 9 cm (height) Weight Approximately 2.7 kg Battery 14.4V / 2200mAh Li-ion rechargeable battery Charger Dustbin capacity Moving speed Remote control Charging base Sweep mode AC 110-240V, 50/60Hz 0.5 liter 14 cm/sec. Infrared receiving range of up to 3 meters Receiving sensor range up to 7 meters Automatic environment detection Tulip100 21