1
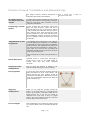
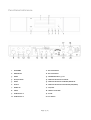
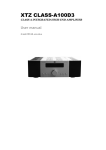
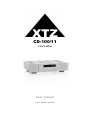
CD-100/11
CD-PLAYER
User manual
© 2011 XTZ AB , www.xtz.se
Table of contents
PAGE:
Contents
3
About XTZ
4
Technical presentation
5
Preparations
6
Practice of sound / Installation and placement tips
7
Functional reference
9
Technical specifications
13
Service & Support
14
Contents
Contents
Congratulations of your purchase of the XTZ CD100/11.
CD-100/11 provides many possibilities, in order to
utilize this product in the best way, please read the
manual carefully before using the unit. If you have
any problems with the installation, please feel free
to contact our free support.
Support info on the last page of the user manual.
Read the manual before using the product and use
all possibilities carefully.
Page: 3 / 14
About XTZ
Philosophy
Our reference and starting point is to recreate a
natural sound, taking into account that acoustics
always is a matter of taste.
XTZ Goal
Our main goal is to provide the best value
for money.
Our concept:
- Cut down the numbers of middlemen.
- Put more money on product quality
and less on advertising.
- Manufacture cost-effective in large volume.
- Provide perfect technical solutions.
Contact
Website: www.xtz.se
E-mail: [email protected]
Page: 4 / 14
Technical presentation
CD Player
XTZ CD-100/11 is our new upgraded CD-player.
We have chosen a platform to go with our design.
A CD player should not make any noise, so we put a
lot of energy to find a silent drive that could fill our
demands and wishes.
We believe a good CD player should not cost a
small fortune. It should be something that every
person can buy.
A stable chassis and reliable technology is the base
for good quality. To adapt the CD player for coming
products we have put balanced XLR-output
connections.
If the CD player doesn’t get any signal, it goes into
the standby mode after 30 minutes.
Cabinet
The Cabinet, which has the same smooth shapes as
the A100 D3 amplifier, is mostly made in
aluminium. This gives a genuine quality impression
and a rock solid construction.
Outer disturbance is effectively shielded by the
aluminium which also leads away the heat
effectively. This is a way of integrate an effective
cooling and a matching design.
Remote control
CD-100/11 has a newly developed remote control,
to adapt to new functions and making the
management easier and better. The design of the
remote control is the same as for the amplifier XTZ
Class A100 D3.
Page: 5 / 14
Preparations
Unpacking
Carefully unpack the product, and pay attention so
you don't break anything. If possible, save the
packing box for future transportations. If there
should be damage on the product, please contact
your retailer.
Check that the mains voltage marking on the back
panel matches your local mains voltage.
If the product is cold, wait to connect the power
cable till it reaches room temperature. If you don’t
do this you can cause damage of the product.
Accessories
Main power cable
Remote control
User manual
Page: 6 / 14
Practice of sound / Installation and placement tips
This chapter contains common information on This is general rules, so there are
exceptions of some rules.
loudspeaker placement and installation.
In which room do
you achieve the best
sound?
No matter how good the equipment is, in the wrong
listening environment it will inevitably sound bad.
There are some basic rules concerning a proper
loudspeaker installation:
Furnishings / Sound
quality
Carpets, curtains and soft furniture absorb midrange and high frequency sound, and this is
preferable. Big empty area, on the contrary, reflects
it and produces hard reflections that may lead to
blurry dialogue. Apart from colouring the sound,
also the perspective of the sound will deteriorate.
More furnishings attenuate unwanted resonances
and act as diffusers, which can improve the sound
dramatically.
Amplification of bass A loudspeaker that is placed near a wall, ceiling or
floor will amplify lower frequencies in a sometimes
frequencies
not desirable way (since it may lead to an indistinct
sound recreation). This amplification becomes even
more obvious if the loudspeaker is placed near a
corner. Thus, for a sound as clear as possible, the
loudspeaker should be placed at least 30 cm (about
12 inch) away from the wall.
Some constructions are made to be placed close to
a wall.
Room dimension
Quadratic rooms or rooms where the length is
exactly twice as long as the width should be
avoided, since they may create unwanted
resonance.
Placement of the
loudspeakers
How you place the speakers in relation to the
audience is important to get a good soundstage.
Front speakers
To get the best result the front speakers should be
placed symmetrical in front of the listener. The
distance between the front speakers should be
around 80% of the distance to the listener. In other
words, the recommended angle between the front
speakers should be 45°.
Angle the
loudspeakers
Either you can angle the speakers toward the
listener, or let them stand in a straight-forward
position. Some speaker sound better when they are
angled inward, but it can also be caused by
reflections from side walls. If they are angled
reduces glare and reflections from the walls and
thereby enhances the stereo image.
Correct height
If the loudspeakers are small they should be placed
on a stand or tilted so the sound will level with the
ears.
Page: 7 / 14
Cables
Try to keep them as short as possible. By its
electrical parameters, a long conductor will have a
bigger influence on the sound than a short one. It
may also work as an antenna and thus receive
various signals that may become a constant noise in
an active subwoofer.
Make sure that all connections are clean and not
oxidized. All connections should be mechanically
stable, both power, signal and loudspeaker cables.
Signal cables should be separated from other
cables.
Finally
Please remember that good sound is a matter of
taste, so you have to experiment to obtain your
favourite one. We wish you best of luck!
Page: 8 / 14
Functional reference
1.
STANDBY
11. RCA OUTPUT 2
2.
PREVIOUS
12. RCA OUTPUT 1
3.
NEXT
13. TRIGGER INPUT 5~12v
4.
PLAY/PAUSE
14. DIGITAL OUTPUT COAXIAL
5.
STOP
15. DIGITAL OUTPUT TOSLINK/OPTICAL
6.
EJECT
16. DIGITAL OUTPUT BALANCED (AES/EBU)
7.
DISPLAY
17. ON/OFF
8. TRAY
18. INPUT VOLTAGE
9.
19. FUSE
XLR OUTPUT
10. XLR OUTPUT
20. AC INPUT
Page: 9 / 14
Remote control
21. STANDBY
22. DISPLAY
23. EJECT
24. TRACK
25. PREVIOUS
26. NEXT
27. FAST REWIND
28. FAST FORWARD
29. STOP
30. PLAY/PAUSE
31. REPEAT
32. SINGLE/RDM (RANDOM)
33. A-B
34. DIM (DIMMER)
Page: 10 / 14
1 STANDBY
To set the product in standby mode, without
turning it off.
2 PREVIOUS
Step to previous track
3 NEXT
Step to next track
4 PLAY/PAUSE
To start or to pause the track
5 STOP
To stop the track
6 EJECT
To open the tray or close it
7 DISPLAY
Where the information is shown
8 TRAY
Where to put the disc
9 XLR
XLR Output - Right
10 XLR
XLR Output - Left
11 RCA
RCA Output - 2
Left is placed over the Right output
12 RCA
RCA Output - 1
Left is placed over the Right output
13 12V TRIGGER
12v Trigger input 5-12v DC
It is for other equipment to trigger the
CD-100 on/off (>20mA)
14 COAX
Digital output, Coax
75 Ohm
15 OPTICAL
Digital output, Toslink/Optical
16 AES/EBU
Digital output, Balanced
17 ON/OFF
ON / OFF
18 INPUT VOLTAGE
The input voltage that is used
EU ~220-240V & USA ~110-130V
19 FUSE
Glass fuse
230V: 500mA, 115V: 1A
20 AC INPUT
To put the power chord
110 Ohm
Page: 11 / 14
Remote control
21 STANDBY
To set the product in standby mode, without
turning it off.
22 DISPLAY
Possibility to get different kind of information.
23 EJECT
To open or close the tray
24 TRACK
Chose of track
25 PREVIOUS
Step back to previous track
26 NEXT
Step to next track
27 FAST REWIND
Fast rewind
28 FAST FORWARD
Fast forward
29 STOP
To stop the track
30 PLAY/PAUSE
To start the track or to put it in pause mode
31 REPEAT
Repeat the album
32 SINGLE/RDM
Repeat the track and Random play
Press once, single track playing
Press again, enters random playing
Press once again, back to normal playing
33 A-B
Repetition between A & B
A is start. B is stop
34 DIM
Lower the light in the display
ON /DIM /OFF is the alternative
Track over ”10”. To get to track “17”. Press
”10+” and then ”7”
Page: 12 / 14
Technical specifications
Construction type
CD Player
Dimensions
112 x 445 x 375 mm (HxWxD)
Inc Feet & Terminals
Weight
9 kg
13 kg with cardboard box
Frequency response
20 Hz- 20kHz (+/- 0.5dB)
Channel separation
>= 95dB @ 1kHz
THD with noise
<=0.01% (1kHz)
Distortion
< 0.03% (1kHz, 10W)
SNR Ratio
>=100dB (A Weighted)
DAC
Analog Devices AD1955, Upsampling to 384Khz
Power
~220-240V & ~110-130V
Terminals
Gold plated RCA, XLR
Page: 13 / 14
Service & support
Safety
Read the manual and all safety instructions
before using the product.
Do not expose the product for high temperatures.
Avoid putting the product in a closed rack or
drawer.
Be careful with moisture, fluids and dust.
Do not open the product when the power chord is
connected.
Do not use the ON/OFF button many times in a
row.
House the product, so that small objects can not
fall in to it.
At longer absence, make sure to unplug the power
chord.
Connection:
Perform all connections before the power is switch
on. Never connect cables to amplifiers or DACs
while the power is on.
Service
If you need service contact your local dealer.
You are always welcome to contact us if you have
problems
with
product
by
e-mail:
[email protected]
Webpage: www.xtz.se
Support
Please contact our “free-of-charge” support if you
need installation advice, or if any problems occur
during the installation.
Contact us by e-mail [email protected] and include
your phone number if you require help, and we will
call you back.
Warranty
This product is supplied with ONE year warranty
against manufacturing faults or defects that might
alter the performance of the unit. Refer to your
supplier for full sales and warranty terms.
Page: 14 / 14
ALWAYS pack the product / part very
carefully. Unfortunately damages during
transportation are very common. If the
package is weak, the transporting
company does not compensate damages.
Always enclose a copy of the receipt and a
description of the defect.