1
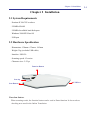
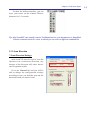
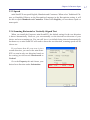
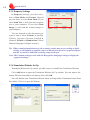
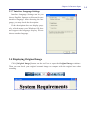
mini ScanEYE
User Manual
Version: V3.0
Edition: Released in June 2009
Penpower Technology Ltd.
Software User License Agreement
You are licensed to legally use this software program (“the Software”) by Penpower
Technology Ltd (“Penpower”) under this license agreement (“The Agreement”). If you do
not agree with any of the provisions in this Agreement, please do not install, copy or use the
Software. By using the Software, you are deemed to fully understand and accept the provisions of this Agreement.
1. Intellectual Property
All intellectual property rights in the Software, together with all information and documents included in the packaging for the Software (including but not limited to copyrights), are property of Penpower, and are protected by relevant laws and regulations.
2. License to Use
You are authorized to use the Software on one (1) single computer only. You may not use
the Software on any other machines other than the said single computer.
3. Authority to Copy
The Software and all documents included with the Software, and copyright thereof, are
property of Penpower. You are licensed to make one (1) copy of the Software for your
personal backup purposes. All other acts of copying are strictly prohibited.
You may not sell, lease, dissemble, reverse engineer, copy, translate, adapt or derive the
Software, or obtain the source code of the Software by any other means. You may not use
the Software for any purposes other than those permitted under this Agreement.
4. Business Users
If you need to install or use the Software on more than one (1) computer, please contact
Penpower or our local distributor to purchase a license for the additional use.
5. Liability
You agree to indemnify Penpower against all losses, costs, debts, settlement payments or
other expenses (including but not limited to attorneys fees) arising from your breach of
this Agreement, and you agree to compensate Penpower for all of the abovementioned
damages.
6. No Warranty
Effectiveness of a packaged software in handling information is closely related to its
software and hardware environment. The Software is published following careful development and product testing by Penpower, but Penpower is not able to conduct tests
based on all possible combinations of software and hardware environment. Therefore,
Penpower is unable to promise nor warrant that there will be absolutely no risk of loss or
damage of information, or any other kind of loss, during installation and/or execution of
the Software. You must be fully aware of your risks in using the Software.
Penpower will provide you with the Software and support services in respect of the Software to the maximum extent permitted by law. However, Penpower does not warrant that
the Software and information included in the package of the Software contain no defects
or errors. Penpower is not liable for any indirect, special or incidental loss arising from
the Software, including but not limited to loss of profits, damage to business reputation,
cessation of work, hardware malfunction or damage, or any other commercial damage or
loss arising from commercial use of the Software.
7. Limitation of Liability and Damages
The maximum amount of compensation payable by Penpower, in respect of any damage
incurred by you for any reason under this Agreement, is limited to the amount you have
already paid to Penpower in respect of the Software.
Under no circumstances will Penpower be held liable for the possibility of loss, notwithstanding Penpower may be aware of the possibility of such loss.
8. Prohibition Against Sublicense
You are prohibited to assign the license in respect of the Software granted to you under
this Agreement, or to grant a sublicense to another person.
9. Jurisdiction
With regards to any disputes arising from this Agreement, Penpower and you agree that
the court having jurisdiction over the business location of Penpower will be the court in
the first instance.
10. Miscellaneous
In the event that any provision of this Agreement is found to be invalid at law, such
invalidity will not affect the validity of any other provisions, or the legal enforceability of
such other provisions.
In the event that the Software cannot be executed under conditions of normal use, due to
any damage to the original disk/s, Penpower will replace the disk/s free of charge.
Contents
Chapter 1 Product Features................................................................................ 1 - 1
·
·
·
·
Recognize multiple languages............................................................................1 - 1
Ergonomic design..............................................................................................1 - 1
Seamless scanning..............................................................................................1 - 1
A great language learning tool............................................................................1 - 1
Chapter 2 Installation......................................................................................... 2 - 1
2.1 System Requirements..............................................................................................2 - 1
2.2 Hardware Specification...........................................................................................2 - 1
2.3 Software Installation................................................................................................2 - 2
2.4 Hardware Installation..............................................................................................2 - 4
Chapter 3 Character Input................................................................................ 3 - 1
3.1 Open Penpower mini ScanEYE..............................................................................3 - 1
3.1.1 Toolbar..........................................................................................................3 - 1
3.2 Scan to Computer....................................................................................................3 - 3
3.2.1 Scan & Recognize.........................................................................................3 - 3
3.2.2 Send Image...................................................................................................3 - 3
3.3 Settings and Scan Tips.............................................................................................3 - 4
3.3.1 Language Settings.........................................................................................3 - 4
3.3.2 Scan Direction...............................................................................................3 - 5
3.3.3 Speech...........................................................................................................3 - 7
3.3.4 Scanning Horizontal or Vertically Aligned Text...........................................3 - 7
3.3.5 Property Settings...........................................................................................3 - 8
3.3.6 Translation Website Set Up...........................................................................3 - 8
3.3.7 Interface Language Settings..........................................................................3 - 9
3.4 Displaying Original Image......................................................................................3 - 9
3.5 Penpower Voice Reader.........................................................................................3-10
3.5.1 Open Penpower Voice Reader....................................................................3-10
3.5.2 Voice Reader Setting...................................................................................3-10
3.5.3 Turn off Penpower Voice Reader................................................................3-11
3.6 Online Translation.................................................................................................3-11
The software application may have a newer version at the time when this product was being
manufactured and/or packaged. If the content on your application screen differs from your
User Manual, please follow the latest application screen upon installation.
Chapter 1 Product Features
Chapter 1 Product Features
· Minimize your typing efforts
Scans words, sentences, and excerpts from printed materials and converts them into editable texts with a high accuracy rate for applications such as Words, Excel, Outlook, and
text editors.
· Recognize multiple languages
Recognizes English, Traditional Chinese, Simplified Chinese, Japanese, Korean, Spanish,
French, German and Italian languages.
· Ergonomic design
The light and ergonomic design fits all right and left-handed users and makes you hold
with comfort even long-time scan. Scan away effortlessly with the transparent scan tip.
Where you see, where you scan.
· Seamless scanning
Users do not have to pause and wait for the recognition to be done to continue with another scan. They can just keep scanning and focus their attention to scanning properly their
interested excerpts
· A great language learning tool
No worry about typing and learning unfamiliar languages, by scanning words or sentences
directly to the language translation websites and instantly see their translations by one
click. You will find mini ScanEYE is a wonderful companion for learning languages.
· Penpower Voice Reader
Penpower Voice Reader utilizes a state of the art text-to-speech technology, it will read in
fluent Mandarin or Cantonese of any articles. You can use it as a tool for fast proofreading
or in teaching the correct Mandarin/Cantonese pronunciation.
1-1
1-2
mini ScanEYE
Chapter 2 Installation
Chapter 2 Installation
2.1 System Requirements
· Pentium II 300 CPU or above
· 256MB of RAM
· 250MB of available hard disk space
· Windows 2000/XP/Vista OS
· USB port
2.2 Hardware Specification
· Dimensions: 130mm x 37mm x 18.5mm
· Weight: 30g (excludes USB cable)
· Interface: USB 2.0
· Scanning speed: 15 cm/sec
· Character size: 5~22 pt
Function Button
Scan tip
Scan Button
USB Port
Function button:
When scanning words, the function button can be used as Enter function. It also works as
checking next word in the Online Translation.
2-1
2-2
mini ScanEYE
2.3 Software Installation
1. Insert the mini ScanEYE installation CD
into your CD-Rom drive. System will
run installation program automatically.
Please select an installation language and
click Next to install.
2. Click on Next to continue.
3. Please read the License Agreement,
select I accept the terms of the license
agreement and click Next to continue.
Chapter 2 Installation
4. Check HK Character Set if you want
to installtion the Hong Kong characters,
then click Next to continue.
5. Choose the destination folder to install
the software. This is usually left as default. Click Next to continue.
6. Choose the folder that you want to install
mini ScanEYE to in Program Files. This
is usually left as default. Click Next to
continue.
2-3
2-4
mini ScanEYE
7. After the software is installed, a register
reminder window will pop up to remind
you registering your product at www.
penpower.net/reg.html for ensuring the
warranty service. Click Register now to
register. If you click Register later, you
may go to About/Register when you
need.
8. Click Finish to restart your computer.
2.4 Hardware Installation
1. Plug in the mini ScanEYE into your
computer’s USB port and a window will
appear, welcoming you to the hardware
installation wizard. Select [No, not this
time] and click Next to continue.
Note: Some computers may shut down
accidentally after connection. This
is due to lack of power to support
several USB devices. To avoid this
problem, connect your mini ScanEYE and other USB devices to an
extra-powered USB hub.
Chapter 2 Installation
2. Select [Install the software automatically] and click Next to continue.
3. Click on Finish to end the installation.
Note: When connecting mini ScanEYE to another USB port, you may follow the Hardware installation steps to install the Found New Hardware Wizard.
2-5
2-6
mini ScanEYE
Chapter 3 Character Input
Chapter 3 Character Input
3.1 Open Penpower mini ScanEYE
Go to [Start/All Programs/Penpower miniScanEYE 3/Penpower miniScanEYE 3] or
double click the button
on the desktop to start miniScanEYE tool bar.
Note: When running the miniScanEYE
first time, the Scanning Guide's window will apper. Please use the miniScanEYE as the Guide show you.
3.1.1 Toolbar
To Tray icon
Help
Settings
Online Translation
Penpower
Voice Reader
Original Image
Recognition
Language
Scan Mode
About
1. Scan Mode: Provide [Scan & Recognize] and [Send Image], click to select scan
mode. If you select Scan & Recognize mode, it will scan and recognize text to your computer. If you select Send Image mode, it will send the scanned image to your computer.
Scan & Recognize
Send Image
Note: When you use Send Image mode, you need to run the software which supports image format such as MS Word.
3-1
3-2
mini ScanEYE
2. Recognition Language: mini ScanEYE can recognize English, Traditional Chinese,
Simplified Chinese, Japanese, Korean, French, German, Italian and Spanish languages.
Click to select the language you desire to recognize.
3. Original Image: display the scanned image. See 3.4 Displaying Original Image.
4. Penpower Voice Reader: read aloud Chinese articles in Mandarin or Cantonese. See
Chapter 4 Penpower Voice Reader.
5. Online Translation: Open the dictionary website for inputting and translating words.
6. Settings: provide Recognition Setting, General, Property, Translation Website Set up and
Interface Language settings. See 3.3 Settings and Scan Tips.
7. Click
to minimize the toolbar to Taskbar.
8. Click to minimize the toolbar to tray icon. Double-click the tray icon will open the
toolbar. Right click on to open the function menu.
Chapter 3 Character Input
3.2 Scan to Computer
3.2.1 Scan & Recognize
1. Select [Scan & Recognize] from [Scan Mode] .
2. Select the language you desire to recognize from [Recognition Language].
3. Open any word processor (i.e Microsoft Word or Wordpad) and place your cursor in there
as usual before you start typing.
4. Place a document on the table and place scanner head at the starting word position and
aim the arrowhead at the word, then press and drag mini ScanEYE lightly. During the
scanning, please make sure the white auxiliary light is on.
5. The characters that the pen has passed through will be recognized to your desired word
processor as following:
3.2.2 Send Image
1. Select [Send Image] from [Scan Mode] .
2. Open a word processor which can contain images (i.e Microsoft Word) and place your
cursor in there as usual before you start typing.
3. Place a document on the table and place scanner head at the starting word or picture position and aim the arrowhead at the word, the press and drag mini ScanEYE lightly. During
the scanning, please make sure the white auxiliary light is on.
4. The words or pictures that the pen has passed through will be scanned to your desired
word processor as following:
3-3
3-4
mini ScanEYE
3.3 Settings and Scan Tips
3.3.1 Language Settings
Besides selecting recognition language from the tool bar, you can also click [Settings]
from the tool bar to select recognition language and recognition results. Different settings
will get different recognition results.
In [Recognition Setting], you will find
Recognition Language setting.
* Recognition Language
Accord with your document to choose
a recognition language.
* Recognition Results
If you select Traditional Chinese or
Simplified Chinese, you can find the setting of Recognition results on the right
side, select the one you wish to input to
your computer.
Select the type of Chinese for the inputting Chinese characters.
* Recognize HK Character
If you select Traditional Chinese recognition language, you can check Check this option to recognize Hongkong characters. You can connect to http://www.microsoft.com/
hk/hkscs/default.aspx to check the Hong Kong characters list.
* After Scanning Insert Space
If you select English recognition language, you can check After Scanning Insert
Space. When scanning English words, the system will automatically add a space in the
end.
* Balloon Interface
If you select Traditional Chinese or Simplified Chinese recognition language, you can
check Open balloon interface for the following functions: correct the certain character, preemptive linking, character combination, character split, phrase correction, displaying original image, punctuation, online translation.
Chapter 3 Character Input
To show the balloon interface, you can
leave your cursor on the scanned Chinese
character for 1-2 seconds.
Tip: mini ScanEYE can actually convert Traditional text on your document to a Simplified
Chinese oriented result vice versa, in which you can select a different combination.
3.3.2 Scan Direction
* Scan Direction Settings
mini ScanEYE must be used to scan the
characters in a consistent direction, any
changes to the direction will cause inaccurate recognition results.
Go to the General tab and you will be
able to change the configuration settings
according to how you hold the pen and the
direction which you want to scan.
3-5
3-6
mini ScanEYE
* Scanning Vertically Aligned Text
When scanning vertically aligned text, please scan the text in top to bottom fashion and
have the characters centered at the middle of your pen as indicated by the centre marker line.
* Scanning Horizontal Text
When scanning horizontal text, you can choose the left-hand or right-hand option and
please the pen on the text, moving from left to right or right to left depending on the option
you have set previously.
Right hand: Scan from left to right or from right to left
Left hand: Scan from right to left or from left to right
Note: mini ScanEYE is able to scan and recognize one row of characters at a time, please
place the pen in such a way that the centre marker is at the centre of the character.
Chapter 3 Character Input
3.3.3 Speech
mini ScanEYE can speak English, Mandarin and Cantonese. When select Traditional Chinese or Simplified Chinese as the Recognition Language in the Recognition setting, it will
be able to speak Mandarin and Cantonese. When select English, you can choose speak or
none speak.
3.3.4 Scanning Horizontal or Vertically Aligned Text
When you install the Penpower mini ScanEYE, the default setting for the text direction
is detect automatically. However, you can manually set the desired text direction of your
choice and start scanning too. You can still leave it at default being detected automatically
but however, as mini ScanEYE will need to detect the text direction, scanning speed will be
slower too.
If you know that all your text is in a
certain direction, you can set the mini ScanEYE to scan in only one direction based on
the setting just discussed: Horizontal or
Vertical.
Go to the Property tab and choose your
desired text direction under Orientation.
3-7
3-8
mini ScanEYE
3.3.5 Property Settings
In Property Settings, provides selection of Scan Mode and Content. Depend
on your desire to select Scan Mode. If you
select Send Text, it will scan and recognize
text to your computer. If you select Send
Image, it will send the scanned image to
your computer.
You can depend on the document you
want to scan to select Content. It provides
Chinese, Japanese, Korean, English &
Numeral, Printed or Handwritten. Select
identical language for higher accuracy.
Tip: When scanning handwritten text, the scanning results may vary according to handwriting, so the optimal recognition can be achieved when the text is properly aligned
and the size must be within the scanning range of the pen.
Note: The Content setting accords with the Recognition Language setting to display the
supported settings.
3.3.6 Translation Website Set Up
Translation Website Set Up can let you add, remove or modify the Translation Websites.
Click Add button to open the Translation Website Set Up window. You can input a dictionary Website name and its url address, then click OK.
You will find the new Translation Website when clicking Online Translation button from
the toolbar. Click it to open the Website.
Chapter 3 Character Input
3.3.7 Interface Language Settings
Interface Language Settings can let you
choose English, Japanese or Korean for user
interface language. After choosing the language, you may check the description.
If the description does not display properly, which means your Windows OS does
not support the language display. Please
choose another language.
3.4 Displaying Original Image
Click [Original Image] button on the tool bar to open the Original Image windows.
Then you can check your original scanned image to compare with the original text when
scanning.
3-9
3-10
mini ScanEYE
3.5 Penpower Voice Reader
Penpower Voice Reader utilizes a state of the art text-to-speech technology, it reads in
fluent Mandarin or Cantonese of any articles. You can use it as a tool for fast proofreading or
in teaching the correct Mandarin/Cantonese pronunciation.
3.5.1 Open Penpower Voice Reader
1. Click [Voice Reader] button from the toolbar or [Penpower Voice Reader] from the tray
icon menu to run Penpower Voice Reader.
2. When it starts up, there will be an icon
on/off button
on the top right corner
of your application, such as Word. You
can click the icon to select Mandarin
Speech or Cantonese Speech.
3. Choose a paragraph, click
and select [Start/Stop Text to Speech], the selected paragraph will be read out. Check your speaker if there’s no sound.
4. During reading, click
, and selecting [Start/Stop Text to Speech], it will stop reading.
3.5.2 Voice Reader Setting
Click , select [Setting] , the [Setting]
window will appear.
Speech Speed: Adjust speak speed.
Speech Tone: Adjust tone level.
Speech Volume: Adjust speak volume.
Chapter 3 Character Input
3.5.3 Turn off Penpower Voice Reader
1. Click
, select [Exit].
2. When you see the following image, the Penpower VoiceReader is turned off and the icon
on the upper right corner disappears.
3.6 Online Translation
1. Click [Online Translation] and select a translation Website from the toolbar. It will
open the Internet Explorer, browse the translation Website and open the mini ScanEYE
Translator window.
Tip: You can set the Website links from the Translation Settings. Please refer to 3.3.6
Translation Website Set Up.
2. Place a document on the table, place scan head at the starting word position and aim the
Scan Tip at the word, the press and drag mini ScanEYE hardware smoothly. During the
scanning, please make sure the white auxiliary light is on.
Note: Before scanning , please select the Recognition Language which match the scanning words.
3. The translation result of the first word that the mini ScanEYE hardware has passed
through will be displayed in the Website. The scanned image will also be shown in the
mini ScanEYE Translator window as well.
Note: If the Website does not support Enter function, please click translate button manually.
3-11
3-12
mini ScanEYE
4. If you have scanned more than one word, you can press the hardware button to see the
translation of the next word.
Note: If the Website does not support Enter function, it also cannot support hardware button.
5. Click [Translation] Scan Mode.
or close the mini ScanEYE Translator window to go back to the
mini ScanEYE V3.0 User Manual
Edition: Released in June, 2009
Penpower Technology Ltd.