1
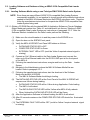
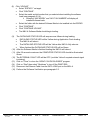
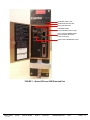
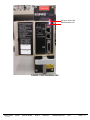
TITLE SHEET APPLICATION DASH NO. NEXT ASSY INDEX SHEET NO. TITLE SHEET (INCLUDES REVISION DESCRIPTION) 1 TABLE OF CONTENTS 3 DOCUMENT 4 USED ON 69000940 69000941 69000942 REVISIONS - ALL SHEETS ARE SAME REVISION STATUS SH REV DESCRIPTION DATE APPROVED PRODUCTION - Release - 06 Mar 2014 13:19:21 MST - Printed on 10 Mar 2014 Initial Document Release per ECO 214151 This document is an unpublished work. Copyright 2014 Honeywell International Inc. All rights reserved This document and all information and expression contained herein are the property of Honeywell International Inc., and is provided to the recipient in confidence on a “need to know” basis. Your use of this document is strictly limited to a legitimate business purpose requiring the information contained therein. Your use of this document constitutes acceptance of these terms. ENGINEERING REFERENCE DOCUMENT Typed signatures constitute approval. Actual signatures on file at Honeywell in Redmond WA. CONTRACT NO. ----------------- DRAWN CHECK ENGR MFG QA APVD APVD B. McAnulty S. Johnson B. McAnulty K. Allen PRECIOUS METAL INDICATOR CODE: NA CAD Prepared Drawing Using MSWord Software. Not to be manually altered. Honeywell International Inc. Redmond, WA 98073-9701 03/04/2014 03/04/2014 03/04/2014 03/04/2014 Software and Databases Media Loading Procedure for MKV-A EGPWS SIZE CAGE CODE A 97896 SCALE: NONE DWG NO. REV. - PDS69000940-301 SHEET 1 OF 17 REVISIONS CONT - ALL SHEETS ARE SAME REVISION STATUS SH REV CAGE CODE: HIF-1472R5 DESCRIPTION 97896 SCALE: NONE SIZE: A DWG NO. DATE PDA69000940-301 REV: APPROVED - SHEET 2 Table of Contents 1.0 PURPOSE ............................................................................................................................................. 4 2.0 Reference Drawings/Documents ........................................................................................................ 4 3.0 General Information ............................................................................................................................. 4 3.1. USB Flash Drive ................................................................................................................................... 4 3.2. CD ROM ARINC 615A Data Loader System Object Media ................................................................. 5 4.0 Application Software and Databases Media....................................................................................... 6 4.2. Application Software and Databases Media Base Part Numbers ..................................................... 6 5.0 Software and Databases Loading Procedures................................................................................... 7 5.1. Loading Software and Databases on the Aircraft Using a USB Flash Drive ............................. 7 5.2. Loading Software and Databases Using a ARINC 615A Compatible Data Loader System ..... 8 5.3. MKV-A Software Media Installation Verification .......................................................................... 14 CAGE CODE: HIF-1472R5 97896 SCALE: NONE SIZE: A DWG NO. PDA69000940-301 REV: - SHEET 3 1.0 PURPOSE This procedure provides generic instructions for loading Application Software, Terrain, Reloadable Customer Definitions (RCDs) and Aircraft Personality Databases into the MKV-A EGPWS using a USB FLASH Drive (with Software Media loaded) or ARINC 615A compatible Data Loader System. This procedure assumes that software and databases will be loaded into the MKV-A on the aircraft. 2.0 Reference Drawings/Documents Reference Document Number 2.1.1 2.1.2 2.1.3 2.1.4 69000940 69000941 69000942 SWM69000940-803 2.1.5 SYS69000940-700 2.1.6 SWM69000940-000 2.1.7 DM69001801-0000 2.1.8 SWM69900070-000 2.1.9 SWM69002464-000 3.0 Document/Drawing Nomenclature End Item EGPWS, 115 VAC End Item EGPWS, 28 VDC End Item EGPWS, 115 VAC User Manual for the APD Tool of the MKV-A Enhanced Ground Proximity Warning System MKV-A Enhanced Ground Proximity Warning System Interface Control Document Version Description Document for the Application Software of the MKV-A Enhanced Ground Proximity Warning System Version Description Document for the MKV-A Terrain, Obstacle and Runway Database Version Description Document for the Reloadable Customer Definitions (RCD) Production Builds Version Description Document for the Aircraft Personality Database (APD) Production Builds of the MKV-A Enhanced Ground Proximity Warning System General Information 3.1. USB Flash Drive The software media listed in Table 4-1 comes pre-loaded on a USB Flash Drive device. This media may be copied onto a different USB Flash Drive. The USB Flash Drive should have a capacity of at least 1 Gbyte. The formatting of the Drive is important. Be sure to follow the procedure of paragraph 3.1.2. 3.1.1. The USB Flash Drive must have ONLY ONE of the software object media versions loaded into the root directory at a time. For example, if the operator wishes to load both Application Software and the Terrain Database into the MKV-A, load one of these software media part numbers into the root directory of the Flash Drive. Follow the procedure for loading software media into the MKV-A using USB Flash Drive (see paragraph 5.1). After loading is complete, delete the Application Software from the root directory and load the Terrain Database in its place and repeat the downloading procedure. CAGE CODE: HIF-1472R5 97896 SCALE: NONE SIZE: A DWG NO. PDA69000940-301 REV: - SHEET 4 3.1.2. Copying USB Flash Drive Media Onto a Different USB Flash Drive It is permissible to copy the contents of a USB Flash Drive with pre-installed MKV-A Application Software part number SWM69000940-5XX into a different USB Flash Drive as long as the following instructions are observed. MKV-A supports FAT16 USB Flash Drive devices less than 2 Gbytes and FAT32 USB Flash Drive devices greater than 2 Gbytes. Formatting USB Flash Drive as exFAT file (also known as FAT64 files), will make the device incompatible with the MKV-A operating system. USB Flash Drive that are less than 32 Gbytes in size may be formatted, using Windows Explorer with no special instructions. When formatting USB Flash Drive that are 32 Gbytes or greater, precautions must be taken. When formatting these devices using the Windows Explorer Format utility, if “FAT32” is not an available selection, then format the device by doing the following: Using Windows, go to Start then select “Run” which will bring up a command line. At the command line type “format <drive letter>: /FS:FAT32” (where drive letter is the USB Flash Drive). Click OK to begin formatting. After completion of formatting the USB Flash Drive is now ready for use. 3.2. CD ROM ARINC 615A Data Loader System Object Media Application Software and Terrain Database Software object media listed in Table 4-1 comes pre-loaded on CD ROM and is used when loading software media into a ARINC 665A compatible Data Loader System, then from the Data Loader System into the MKV-A. It is permissible to copy the contents of a CD ROM onto a different CD ROM. CAGE CODE: HIF-1472R5 97896 SCALE: NONE SIZE: A DWG NO. PDA69000940-301 REV: - SHEET 5 4.0 Application Software and Databases Media For the purposes of the following procedures the term “Software Media” will refer to either MKV-A Application Software, Terrain Database, Reloadable Customer Definitions (RCD) Database or Aircraft Personality Database (APD). Table 4-1 shows the Software Object Media base part numbers and the type of media available for each. 4.1.1. Application Software and Terrain Database software object media can be obtained pre-loaded on a CD ROM for downloading onto an ARNIC 665A compatible Data Loader System. 4.1.2. Aircraft Personality Database (APD) Special Information Table 4-1 lists the base Object Media part number to be used to create a unique customer APD number. Reference document 2.1.3 (SWM69000940-803 “User Manual for the APD Tool of the MKV-A Enhanced Ground Proximity Warning System”) gives the procedure for creating a unique APD. The completed APD created will be loaded onto a USB Flash Drive then downloaded into the MKV-A EGPWS. 4.2. Application Software and Databases Media Base Part Numbers Table 4-1 Application Software and Databases Media Base Part Numbers Description Object Media USB Object Media Flash Drive ARINC 665A CD ROM Application Software SWM69000940-5XX HNR5B-1094-05XX Terrain, Obstacle, Runway and Envelope Modulation Database DO69001801-05XX HNRyy-1801-05XX Reloadable Customer Definitions (RCD) SWM69900070-XXX N/A Airplane Personality Database (APD) SWT69000940-5XX See paragraph 4.1.2 for instructions N/A Note: The MKV-A APD file is designed to be created by customers utilizing the Honeywell ADP tool. As such the part number for the APD file will be customer unique. The file will be copied to a USB flash drive for loading into the MKV-A. Refer to paragraph 4.1.2 for details. CAGE CODE: HIF-1472R5 97896 SCALE: NONE SIZE: A DWG NO. PDA69000940-301 REV: - SHEET 6 5.0 Software and Databases Loading Procedures For the following procedures, the term “Software Media” refers to either MKV-A Application Software or one of the Databases listed in Table 4-1. 5.1. Loading Software and Databases on the Aircraft Using a USB Flash Drive 5.1.1. Obtain a USB Flash Drive with the Application Software or Database object media listed in Table 4-1. 5.1.1.1. Refer to Figures 1 and 2 to do the work in this section. (1) Make sure the circuit breaker is in and the power to the EGPWS is on. (2) Open the door on the EGPWS front panel. (3) Verify the LED status as follows: DATALOAD STATUS LED is OFF. COMPUTER STATUS LED is Green. EXTERNAL FAULT LED is OFF (could be Yellow if a required external signal is missing). (4) Put the USB Flash Drive with the Software Media into the USB DATA LOAD Port on the Front Panel of the MKV-A EGPWS. (5) The DATALOAD STATUS LED will sequence as follows during loading. LED will be Yellow during Application Code loading. The MKV-A will reboot. The DATALOAD STATUS LED will be Yellow after MKV-A fully reboots. When finished the DATALOAD STATUS LED will be Green. (6) After the Software Media is finished loading, remove the USB Flash Drive. (7) The MKV-A will reboot. (8) After 25 seconds maximum the “Computer Status” LED should be illuminated Green. (9) The EXTERNAL FAULT LED will be OFF (could be Yellow if required external signal is missing). (10) Perform the Software Verification per paragraph 5.3. CAGE CODE: HIF-1472R5 97896 SCALE: NONE SIZE: A DWG NO. PDA69000940-301 REV: - SHEET 7 5.2. Loading Software and Databases Using a ARINC 615A Compatible Data Loader System 5.2.1. Loading Software Media using a non-Teledyne PMAT 2000 Data Loader System NOTE: Since there are many different ARINC 615A compatible Data Loader Systems commercially available, it is not practical to try and provide all the different instructions needed to load MKV-A Software Media into the EGPWS using these units. Therefore follow the manufactures instructions for the particular ARINC 615A compatible Data Loader System being used. 5.2.1.1. Obtain a CD ROM Disc with the desired MKV-A Application Software or Terrain Database Object Media part number from Table 4-1 and download it into the non-Teledyne A RINC 615A compatible Data Loader System per instructions of paragraph 5.2.3. After the Software Media is installed into the Data Loader perform the following. (1) Make sure the circuit breaker is in and the power to the EGPWS is on. (2) Open the door on the EGPWS front panel. (3) Verify the MKV-A EGPWS Front Panel LED status as follows: (4) (5) (6) (7) (8) (9) (10) (11) CAGE CODE: HIF-1472R5 DATALOAD STATUS LED is OFF. COMPUTER STATUS LED is Green. EXTERNAL FAULT LED is OFF (could be Yellow if required external signal is missing). Connect an Cat 5 Ethernet cable to the Data Loader System and connect the other end of the Ethernet cable into the DATA LOAD port at the front panel of the MKV-A. Following the manufactures instructions, energize and boot-up the Data Loader System. Navigate to the folder/directory where the MKV-A Software Media files are located. Refer to paragraph 5.2.3. Following the manufactures instructions, start the download of the Software Media into the MKV-A EGPWS. The MKV-A Software Media should begin loading. The DATALOAD STATUS LED at the Front Panel of the MKV-A EGPWS will sequence as follows during loading. DATALOAD STATUS LED will be Yellow during Application Code loading. The MKV-A will reboot. The DATALOAD STATUS LED will be Yellow after MKV-A fully reboots. When finished the DATALOAD STATUS LED will be Green. After the Application Software is finished loading the MKV-A will reboot. After 25 seconds maximum the COMPUTER STATUS LED should be illuminated Green. The EXTERNAL FAULT LED will be OFF (could be Yellow if required external signal is missing). 97896 SCALE: NONE SIZE: A DWG NO. PDA69000940-301 REV: - SHEET 8 (12) (13) (14) (15) The MKV-A Application Software downloading is complete. Using manufactures instructions, stop/close the Data Loader program. Disconnect the Ethernet Cable from the DATA LOAD port on the MKV-A. Perform the Software Verification per paragraph 5.3. 5.2.2. Loading Software Media using a Teledyne PMAT 2000 Data Loader System NOTE: This section gives an example of down-loading the Software Media from a Teledyne PMAT 2000 ARINC 615A Data Loader System into the MKV-A EGPWS. The instructions found in this section are correct as of the date of the writing of this procedure, but may be subject to change in the future due to software updates to the Data Loader System. When following this procedure always refer to the manufactures instructions which take precedence over these instructions. 5.2.2.1. Obtain a CD ROM Disc with the desired MKV-A Application Software or Terrain Database Object Media part number from Table 4-1 and download it into the Teledyne ARINC 615A compatible Data Loader System per instructions of paragraph 5.2.4. After the Software Media is installed into the Data Loader perform the following. (1) Connect the PMAT 2000 Data Ethernet Adaptor Cable to the PMAT 2000 at the rear panel of the unit (refer to Table 4-1). (2) Open the door on the EGPWS front panel. (3) Referring to Figure 1, connect a Cat 5 Ethernet cable to the end of the Adaptor Cable and connect the other end into the DATA LOAD port at the front panel of the MKV-A. (4) Energize the PMAT 2000 and start the DEMO Systems PMAT 2000 program. (5) Make sure the circuit breaker is in and the power to the EGPWS is on. (6) Verify the MKV-A EGPWS Front Panel LED status as follows: DATALOAD STATUS LED is OFF. COMPUTER STATUS” LED is Green. EXTERNAL FAULT” LED is OFF (could be Yellow if required external signal is missing). (7) At the PMT 2000 DEMO Systems program main menu, double click on the “ARINC 615A DATALOADER” Icon to start the application. Put your initials in the USER NAME. Select the Aircraft Tail Number or chose 200 as the Tail Number. Select “615A LOADER STANDARD” (IP Address = 172.24.90.12) for the connection type. Click “CONTINUE”. CAGE CODE: HIF-1472R5 97896 SCALE: NONE SIZE: A DWG NO. PDA69000940-301 REV: - SHEET 9 (8) (9) (10) (11) (12) (13) (14) (15) (16) CAGE CODE: HIF-1472R5 Click “UPLOAD” Select “EGPWS 1” as target. Click “CONTINUE”. Select the model and tail number that you selected when installing the software Load (see paragraph 5.2.4). Selecting “ANY MODEL” and “ANY TAIL NUMBER” will display all installed software loads. Select the folder with the desired Software Media to be installed into the EGPWS. Click “CONTINUE”. Click “CONTINUE UPLOAD”. The MKV-A Software Media should begin loading. The DATALOAD STATUS LED will sequence as follows during loading. DATALOAD STATUS LED will be Yellow during Application Code loading. The MKV-A will reboot. The DATALOAD STATUS LED will be Yellow after MKV-A fully reboots. When finished the DATALOAD STATUS LED will be Green. After the Software Media is finished loading the MKV-A will reboot. After 25 seconds maximum the COMPUTER STATUS LED should be illuminated Green. The EXTERNAL FAULT LED will be OFF (could be Yellow if required external signal is missing). Click on “Close” to close the “ARINC 615A DATALOADER” program. Click on “Start” then select “Shutdown” to turn off the PMAT 2000. Disconnect the Ethernet Cable from the DATA LOAD port on the MKV-A. Perform the Software Verification per paragraph 5.3. 97896 SCALE: NONE SIZE: A DWG NO. PDA69000940-301 REV: - SHEET 10 5.2.3. Installing Software Object Media Into a Non-Teledyne PMAT 2000 Data Loader System NOTE: Since there are many different ARINC 615A compatible Data Loader Systems commercially available, it is not practical to try and provide all the different instructions needed to load MKV-A Software Media into these units. Therefore follow the manufactures instructions for the particular ARINC 615A compatible Data Loader System being used. 5.2.3.1. This procedure assumes that the ARINC 615A compatible Data Loader System has been properly configured and has all required software installed per manufactures instructions. 5.2.3.2. Obtain the CD ROM Disc with desired Software Object Media of Table 4-1. 5.2.3.3. Following the ARINC 615A compatible Data Loader System manufactures instructions do the following: (1) Energize and start the Data Loader System. (2) Insert the CD ROM Disc with the Software Object Media into the Data Loader System CD ROM Drive. (3) If not done so already, create a directory for the Software Media and load the Software Media on the CD ROM Disc into that directory. (4) Remove the CD ROM Disc from the Data Loader System CD ROM Drive. CAGE CODE: HIF-1472R5 97896 SCALE: NONE SIZE: A DWG NO. PDA69000940-301 REV: - SHEET 11 5.2.4. Installing Software Media Into a Teledyne PMAT 2000 Data Loader System NOTE: This section gives an example of loading the HNR5E-1094-0504 Application Software into a Teledyne PMAT 2000 ARINC 615A Data Loader System. The instructions found in this section are correct as of the date of the publication of this service bulletin, but may be subject to change in the future due to software updates to the Data Loader System. When following this procedure always refer to the manufactures instructions which take precedence over these instructions. 5.2.4.1. Table 5-1 lists the Teledyne PMAT 2000 Data Loader System hardware and software used with the following instructions. The items in the table are for reference only, and are subject to change from the manufacture without notice. When following this procedure always refer to the manufactures instructions which take precedence over these instructions. Table 5--1: Teledyne PMAT 2000 Data Loader System Teledyne Controls Nomenclature Qty CAGE PN 80000-05 PMAT 2000 1 98571 80030-4 Cable Assembly 1 98571 OBAWO 80079-1 Adaptor Cable PMAT 2000 to 1 98571 Ethernet 80719-2 PMAT 2000 80000-05 1 98571 Windows XP Standard SW With 615A and Loadstar SW Media PN 2238162- PMAT 2000 USB Boot Floppy 1 98571 01 SW PN 80385-1 SW PN 80425-9 PMAT 2000 Installation Boot 1 98571 Disc Media PN 82155-03 PC Card Emulator EGPWS 1 98571 SW PNs Loader Engine Installer 82184 Ver C 82186 Ver C 82199 Ver A Media PN 82160-03 PC Card Emulator EGPWS 1 98571 SW PN 82183 Ver C Reader Installer 5.2.4.2. Obtain MKV-A the desired Software Object Media CD ROM from Table 5-1. 5.2.4.3. Download the CD ROM Disc contents into the Data Loader System using the following steps: (1) Energize and boot-up the PMAT 2000 ARNIC 615A Data Loader System following manufactures instructions, and start the DEMO Systems PMAT 2000 program. (2) If not done so already create the directory C:\datafiles\NEWLOADS on the PMAT 2000. (3) Insert the CD ROM Disc with Software Media files into the CD ROM drive of the PMAT 2000. (4) Copy the folder with the Software Media to be installed on the CD ROM to the C:\datafiles\NEWLOADS directory. (5) At the DEMO Systems PMAT 2000 program menu, double click the “LOADSTAR” application program Icon to start the application. CAGE CODE: HIF-1472R5 97896 SCALE: NONE SIZE: A DWG NO. PDA69000940-301 REV: - SHEET 12 (6) (7) (8) (9) (10) (11) (12) (13) (14) CAGE CODE: HIF-1472R5 Navigate to the “LIBRARY” tab. Click “INSTALL SOFTWARE”. Choose to get Loads from “NEWLOADS” directory. Check the box next to the Software Media Load previously copied that need to be installed and click NEXT. Check the box next to the load in the SOFTWARE LOAD PART NUMBER column. Select the MODEL and AIRPLANE TAIL NUMBER if necessary and applicable. Click NEXT – The installation should complete at this point. Click “OK” on the Installation Complete dialog box. Click LOGOFF LOADSTAR and then CLOSE on the following screen. 97896 SCALE: NONE SIZE: A DWG NO. PDA69000940-301 REV: - SHEET 13 5.3. MKV-A Software Media Installation Verification 5.3.1. A verification of the Software Media installation is done with the self-test (ST) function. The ST function cannot be started if the EGPWS does not identify that the aircraft is on the ground. 5.3.1.1. The operation and characteristics of the ST function are given below. (1) The ST function can be started from the two possible locations. The aircraft cockpit with the EGPWS test switch. NOTE: Use of the cockpit ST function can be different from one aircraft to another. For example, the ST function can be started when the GPWS PULL-UP indicator is pushed or when a separate ST switch is pushed. The ST button behind the front panel door of the EGPWS. (2) The ST button is used to start the ST function from the aircraft cockpit or the EGPWS front panel. The EGPWS ST function has six levels that identify the data given below: Condition and configuration of the EGPWS. Fault and Warning history. Condition of the different inputs. (3) To help go through the different levels, there are two cancel functions: Short cancel (push and hold the ST button for more than 0.5 second but less than 2 seconds). Long cancel (push and hold the ST button more than 2 seconds but less than 8 seconds). (4) The short cancel and long cancel functions operate differently when the ST is in different levels. To start the ST sequence or to continue from one level to another use the short cancel. When the instruction "push the ST button" is given in this paragraph, use the short cancel sequence. (5) The procedure given below moves the operator directly to the Level 3 ST (system configuration). Most of the Level 1 and Level 2 STs are not done. (6) Push and release the ST button to start the Level 1 ST. (7) After the Level 1 ST message starts, push and hold the ST button for more than 0.5 second but less than 2 seconds (short cancel) . This cancels the Level 1 ST and starts the Level 2 ST. (8) After the Level 2 ST “CURRENT FAULTS” message starts, the Level 2 ST can be canceled by either a short cancel or long cancel. For short cancel press and hold the ST button for more than 0.5 seconds but less than 2 seconds. (9) Press and release the ST button within 3 seconds of hearing the message “PRESS TO CONTINUE”. This starts the Level 3 ST (system configuration). (10) Verify that the correct Application Software or Database version installed is heard. (11) When the Level 3 ST is complete, the message PRESS TO CONTINUE comes on. If the ST button is not pushed within 3 seconds, the ST sequence stops. CAGE CODE: HIF-1472R5 97896 SCALE: NONE SIZE: A DWG NO. PDA69000940-301 REV: - SHEET 14 EXTERNAL FAULT LED COMPUTER STATUS LED SELF TEST BUTTON USB MEDIA PORT (insert USB Media into this port) DATA LOAD ETHERNET PORT (Connect ARINC 615A Data Loader to this port) 600 Ω AUDIO HEADPHONE JACK FIGURE 1: Status LEDs and USB Data load Port CAGE CODE: HIF-1472R5 97896 SCALE: NONE SIZE: A DWG NO. PDA69000940-301 REV: - SHEET 15 Computer Status LED Dataload Status LED USB Media Computer Status LED FIGURE 2: Data load In Progress CAGE CODE: HIF-1472R5 97896 SCALE: NONE SIZE: A DWG NO. PDA69000940-301 REV: - SHEET 16 Computer Status LED Dataload Status LED FIGURE 3: Data load Status LED CAGE CODE: HIF-1472R5 97896 SCALE: NONE SIZE: A DWG NO. PDA69000940-301 REV: - SHEET 17