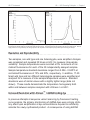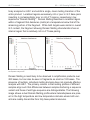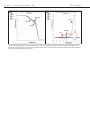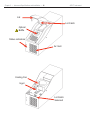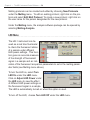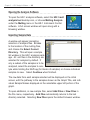
1
Lid
Optical
Baffle
Lid Catch
Air Vent
Status
Indicators
HR-1™ Instrument
© 2003 Idaho Technology, Inc., All rights reserved.
1 ::: Introduction
Part# HR01-PRT-0008
HR-1™ Technical Users Manual, Rev - 01
Information in this document is subject to change without notice. No part of this document may be reproduced or transmitted in any form or by any
means, electronic or mechanical, for any purpose, without the express written permission of Idaho Technology, Inc.
HR-1 Instrument Control software, HR-1 Data Analysis software modules © 2003 Idaho Technology, Inc.
RapidCycler, and R.A.P.I.D. are registered trademarks, and LCGreen, HR-1 are trademarks of Idaho Technology, Inc. LightCycler is a trademark owned
by a member of the Roche group. U.S. Patent Number 6,174,670, foreign counterparts, and pending patents
This product is for research use only.
Printed in the United States of America
Idaho Technology makes no warranty of any kind with regard to this material, including, but not limited to the implied warranties of merchantability and
fitness for a particular purpose. Idaho Technology shall not be liable for errors contained herein or for incidental consequential damages in connection
with the furnishing, performance or use of this material.
Safety and Regulatory Information
This symbol warns the user to operate the machine according to the
instructions provided in this manual. If used otherwise, a potentially
hazardous situation could result.
This symbol is used to label potentially hot instruments surfaces.
Caution Hot
This symbol highlights user tips to operate The HR-1 instrument
more efficiently.
Note: Always maintain The HR-1 instrument in good working order. If the instrument experiences an extreme environmental event, return it to Idaho Technology for
a complete service inspection. See Appendix A for return instructions. If The HR-1
instrument is used in a manner other than described in this manual, it may impair
equipment protection and performance.
Introduction ::: 2
HR-1™ Instrument
Customer and Technical Support
Reach Us On the Web
Idaho Technology’s Web site is http://www.idahotech.com
Order LCGreen I Reagent Kits at http://www.itbiochem.com
We encourage users to visit our Web site for answers to frequently asked
questions. The HR-1 instrument manuals, parts and accessories are available online.
Reach Us By E-mail
Contact Idaho Technology by e-mail in the following areas:
[email protected] - Technical Support
[email protected] - General Support
Reach Us By Phone
Technical support is available during the following times.
8 a.m. to 5: 30 p.m. - Mountain Standard Time
For technical support call:
1-800-735-6544 - United States and Canada
1-801-736-6354 - Utah
IDD Prefix-1-801-736-6354 - International
Reach Us By Fax
To contact Idaho Technology by fax, use the following numbers:
1-801-588-0507 - United States and Canada
IDD Prefix-1-801-588-0507 - International
HR-1™ Instrument
3 ::: Introduction
Table of Contents
Introduction..........................................................................................................5
Chapter 1 - Principles of Mutation Scanning and Genotyping
Introduction .....................................................................................................7
Heteroduplex detection ...................................................................................7
Resolution and Reproducibility .......................................................................9
Increased Resolution with LCGreen I dsDNA binding dye .............................9
Genotyping with HR-1 and LCGreen I ..........................................................10
Product Size and Domain Melting ................................................................10
Chapter 2 - Instrument Specifications and Installation
Introduction ...................................................................................................13
The HR-1 Instrument ....................................................................................15
Reagent Recommendations..........................................................................16
HR-1 Specifications.......................................................................................17
Setting-Up the HR-1 Instrument....................................................................17
Software Installation ......................................................................................19
Chapter 3 - HR-1 General Operating Instructions
Introduction ...................................................................................................21
General Considerations ................................................................................21
Preparation of a DNA Sample ......................................................................22
Amplification ..................................................................................................22
Loading and Unloading a Sample ................................................................23
Chapter 4 - HR-1 Instrument Control Software
Introduction ...................................................................................................25
Menu Bar Overview ......................................................................................26
Setting Experimental Conditions ...................................................................29
Starting the HR-1 Instrument control Software. .....................................29
Setting User Name/Profile ......................................................................29
Serial Port Selection ...............................................................................30
View menu ..............................................................................................30
Melting menu ..........................................................................................31
Edit Melting Protocols.............................................................................33
Multiple Sample Experiments .................................................................33
Introduction ::: 4
HR-1™ Instrument
Table of Contents
LED menu ..............................................................................................34
Tools menu .............................................................................................35
Help menu ..............................................................................................36
Data Organization ..................................................................................36
Melting a Sample....................................................................................38
Suggestions for Higher Throughput .......................................................39
Chapter 5- HR-1 Analysis Software
Introduction ...................................................................................................41
Analysis Software Overview .........................................................................41
Additional Sample and Graph Editing Options .............................................45
Data Analysis Introduction ............................................................................45
Opening the Analysis software ...............................................................46
Importing Sample Data...........................................................................46
Normalizing Data ....................................................................................47
X-axis Temperature adjustment..............................................................48
Additional Data Display options .............................................................49
Difference Plot ........................................................................................49
Derivative Plot ........................................................................................51
Cutting and Pasting Graphics ................................................................51
Final Note on Analysis Software ............................................................51
Chapter 6- Troubleshooting
Introduction ...................................................................................................53
Hardware
Cleaning the Ingot if a Capillary Breaks .................................................53
Lid will not unlock after run ....................................................................55
Instrument does not respond to computer prompts ...............................55
Instrument does not respond when power is turned on .........................56
Software
LED Seek Warnings or Failures .............................................................57
Appendix A
Equipment Return Procedure .......................................................................59
Return Materials Authorization Fax ...............................................................62
Return & Decontamination Labels ................................................................64
Index ................................................................................................................67
HR-1™ Instrument
5 ::: Introduction
Introduction
Idaho Technology, the creators of melting curve analysis, introduces the
new, powerful, and affordable platform for post-amplification genotyping,
gene scanning, and SNP/mutation detection. Utilizing a closed tube DNA
amplification reaction with our new LCGreen™ I Dye and the HR-1 High
Resolution Melter, users are able to detect different DNA species by observing subtle differences in fluorescent signal over temperature changes. The
system can reduce sequencing efforts and cost by greater than 90% by
bringing scanning efforts to the bench.
The HR-1 System utilizes Roche LightCycler® glass capillary tubes in an
aluminum thermal cylinder using single peak excitation (440-470nm) and
Introduction ::: 6
HR-1™ Instrument
emission (470-520nm) spectra. The fluorescent dye - LCGreen I - is included in the amplification reaction and analysis is performed in a closed tube
system. HR-1, in combination with LCGreen I, generates melting curves
that exploit the subtle differences between heteroduplex and fully based
paired wild type species. The instrument can run 40-45 samples per hour
(post amplification) with a 0.3°C/sec ramp rate. Up to 32 samples may be
viewed concurrently with the analysis software. The HR-1 system is the only
commercially available closed tube homogenous reaction platform to scan
for heteroduplexes.
HR-1™ Instrument
7 ::: HR-1 Scanning Principles ::: Chapter 1
CHAPTER
Principles of Mutation
Scanning and Genotyping
1
Introduction
This chapter explains general concepts of mutation scanning and
genotyping. This includes consideration of heteroduplex DNA molecules,
characteristics that facilitate them being distinguished from fully base-paired
DNA molecules, and how LCGreen™ I and HR-1 are used to detect heteroduplexes. Genotyping of different homoduplexes by melting temperature is
also considered.
Heteroduplex Detection
A gene which is heterozygous at a particular locus will, upon amplification,
create two unique double stranded DNA molecules. If the two molecules
differ at a single site within
the sequence the products
can schematically be shown
as in the following image.
The heterozygous site may
involve one or more nucleotide substitutions, insertions
or deletions. If these products are heat denatured and
Chapter 1 ::: HR-1 Scanning Principles ::: 8
HR-1™ Instrument
then allowed to re-anneal, four DNA duplex species are formed. The double
strand molecules with non-Watson/Crick base pairing mismatches are
described as heteroduplexes. The perfectly matched duplexes are considered fully base paired.
Mismatch base pairing results
in heteroduplex molecules
that have unique physical
properties. The differing
physical properties of heteroduplexes include the temperature at which the strands disassociate, or melt. Differing
physical properties between
heteroduplex molecules and those having fully complimentary base pairing is the basis by which the different species are distinguished to identify
heterozygous polymorphisms or mutations. During slow, controlled heating
of a heteroduplex, mismatch base pairing causes the strands to disassociate at a lower temperature than fully base paired molecules. LC Green I, a
fluorescent double stranded DNA (dsDNA) binding dye, facilitates the observation of this melting process seen as an early loss of fluorescence compared to a sample containing only fully base paired molecules.
In the past, distinguishing heteroduplex DNA molecules from fully base
paired molecules using fluorescent melting curve analysis met with limited success. Two factors contributed to the inability to effectively detect
heteroduplex molecules: 1) Inadequate thermal control of the instrumentation, and 2) shortcomings of dsDNA binding dyes. With the development of
LCGreen I, and the improved temperature control and resolution of the HR1 instrument, these issues are resolved in a single, cost effective and simple
to use platform.
HR-1™ Instrument
9 ::: HR-1 Scanning Principles ::: Chapter 1
The left panel shows the melting curves of a wild type (dark line) and a heterozygous (light line) sample. Note the lower temperature inflection point in
the heterozygous sample relative to the fully base paired wild type sample. The right panel shows the derivative plots from the melting curves. Note the
single peak in the curve generated by the wild type specimen as compared to the dual-phase peak generated by the heterozygous sample.
Resolution and Reproducibility
Two samples, one wild type and one heterozygote, were amplified. Analysis
was completed and repeated 30 times on HR-1 to measure intra-sample
variability. Sample temperatures were recorded at 5% increments of normalized fluorescence for each of the 30 independently assayed samples.
Sample temperature standard deviations ranged from 0.006 - 0.045ºC at
normalized fluorescence of 10% and 90%, respectively. In addition, 17 different wild type and ten different heterozygote samples were amplified and
analyzed for a measure of inter-sample temperature variance. Standard
deviations were of similar values with a slightly tighter range (data not
shown). These results demonstrate the temperature homogeneity both
within and between samples analyzed with LCGreen I on HR-1.
Increased Resolution with LCGreen™ I dsDNA binding dye
In previous attempts at sequence variant scanning by fluorescent melting
curve analysis, the primary shortcoming of dsDNA dyes was a strong inhibitory effect upon amplification at dye concentrations required to sufficiently
saturate the newly synthesized product. A consequence of using dsDNA
Chapter 1 ::: HR-1 Scanning Principles ::: 10
HR-1™ Instrument
binding dyes below a saturating concentration is that the dye molecules
redistribute from regions undergoing thermal denaturation to regions that
remain double stranded. Dye redistribution effectively eliminates the ability to detect the subtle fluorescence differences characteristic of heteroduplexes via thermal denaturation. LCGreen I can be used at concentrations
high enough to saturate the available double stranded binding sites without
inhibiting amplification. This characteristic assures product saturation and
eliminates the potential for dye redistribution during the melt. The ability to
use saturating levels of LCGreen I and the tightly controlled temperature
capabilities of HR-1 allow differentiation of the subtle fluorescence changes
during the melting transition that occur in a sample containing heteroduplex
species.
Genotyping with HR-1 and LCGreen™ I
HR-1 and LCGreen I were designed to scan for heteroduplexes within
amplification products. The high-resolution of the system allows different heterozygotes to be distinguished from each other. That is, different
heterozygotes can be genotyped if the controls are available. For example,
hemoglobin (Hgb) AS, AC, AE and AS were all distinguishable from each
other and the wild type (AA) in a 110 bp fragment of ß-globin (Clinical
Chemistry 2003, 49:853-860). Furthermore, it is often possible to distinguish different homozygote base pair changes, for example Hgb AA, SS,
and CC. However, some homozygous differences are difficult to detect (A
to T and G to C SNPs). When the differences between homozygous genotypes is small, the detection rate will increase when smaller products are
analyzed.
Product Size and Domain Melting
The size of an amplification product that can be successfully analyzed on
HR-1 is a variable whose upper limit has not been resolved and may not be
governed by a defined set of rules. When products up to 600 bases were
systematically studied, all heteroduplexes were detectable when oil was
used. Amplification products in the range of 100-250 bases can be rou-
HR-1™ Instrument
11 ::: HR-1 Scanning Principles ::: Chapter 1
tinely analyzed on HR-1 and exhibit a single, clean melting transition of the
entire product. Localized regions excessively rich or poor in G:C base pairs
(resulting in correspondingly poor or rich A:T regions, respectively) may
experience "Domain Melting". Domain Melting describes a localized region
within a fragment that denatures (melts) at a temperature below that of the
remaining portion of the fragment. While both targets were similar in overall
G:C content, the fragment showing Domain Melting characteristics has an
internal region that is relatively rich in A:T base pairing.
The figures above show melting profiles from different target sequences with a single melting domain and a fragment containing high temperature and
low temperature melting domains.
Domain Melting is most likely to be observed in amplification products over
200 bases, but can also be seen in fragments as small as 100 bases. The
presence of multiple, individual melting domains does not preclude effective
analysis with HR-1. The primary concern is that melting profiles of different
samples align such that differences between samples harboring a sequence
variant and those of wild type sequence are distinguishable. The following
image shows a dual Domain Melting profile where heteroduplexes are present in the high temperature and low temperature domains where both variants are readily discernible from fully base-paired molecules.
HR-1™ Instrument
Chapter 1 ::: HR-1 Scanning Principles ::: 12
Wild Type
Het 2
Het 1
Het 2
Wild Type
Het 1
Domain Melting profiles from a fragment with a unique sequence variant in both domains. Three samples (WT, Het1, and Het2) were analyzed in duplicate. Het1 contained a sequence variant in the low temperature domain, while Het2 harbored a sequence variant in the higher temperature domain.
Because the melting profiles were grouped so tightly, the variants were observed quite easily with a preliminary indication that each sample contained a
unique variant in different portions of the fragment.
HR-1™ Instrument
13 ::: Instrument Specifications and Installation ::: Chapter 2
CHAPTER
2
Instrument Specifications
and Installation
Introduction
This chapter contains general and technical information about the HR-1
instrument, including specifications, installation requirements, and installation instructions. It is included for those who will install and perform routine
maintenance on the
HR-1 instrument.
Using the system improperly may
compromise
performance
or permanently
damage the
instrument.
HR-1™ Instrument
Chapter 2 ::: Instrument Specifications and Installation ::: 14
Lid
Lid Catch
Caution Hot
Optical
Baffle
Status indicators
Air Vent
Cooling Fan
Ingot
Lid Catch
Solenoid
HR-1™ Instrument
15 ::: Instrument Specifications and Installation ::: Chapter 2
The HR-1 Instrument
The HR-1 instrument consists of a single heat controlled ingot (machined
aluminum cylinder) positioned above an optics block that functions as an
excitation and data collection source. Sample analysis is performed in a
Roche LightCycler™ capillary tube. While there is a clear advantage to performing amplification in a capillary tube, amplification may be performed in
other containers and subsequently transferred to a Roche capillary for analysis. The fluorescent dye LCGreen™ I is included in the amplification reaction. The HR-1 platform is the only homogenous system to scan for heteroduplexes. A single sample may be scanned in 30-120 seconds (dependent
on ramp rate and temperature range), and up to 32 samples may be viewed
concurrently with the analysis software.
There are three indicator lights on the front of the instrument. All three
lights come on when the instrument is turned on. During instrument operation, the lights function as follows:
Steady Green light - indicates instrument power
is on.
Flashing Red light - indicates instrument is melting a sample and the lid is locked shut
Flashing Amber light - indicates instrument is
unlocked and ready to analyze another sample
HR-1™ Instrument
Chapter 2 ::: Instrument Specifications and Installation ::: 16
Components of the HR-1 System
HR-1 Instrument Package
Laptop computer (pre-loaded with HR-1 Instrument Control and Data Analysis software)
Software installation CD
HR-1 Startup Kit, includes Manual and Cables
HR-1 Tool Kit
Power Kit
1 Box Roche LightCycler capillaries (96 capillaries)
HR-1/LC Green I Chemistry Kit
(only available with HR-1 instrument purchase)
100 µl of LCGreen I 10x dye
1 ml 10X Buffer with BSA 10 mM MgCl2
1 ml 10X Buffer with BSA 20 mM MgCl2
1 ml 10X Buffer with BSA 30 mM MgCl2
1 ml of Enzyme diluent
1 ml of 10X BSA - 2.5 mg/ml
400, 1,000 and 10,000 LCGreen I Reaction Kits are available from Idaho Technology.
Reagent Recommendations
LCGreen™ I dye is to be used at 1X final concentration.
BSA is to be used at 1/10 concentration (0.25 mg/ml). This is to help
avoid adsorption of nucleic acids to glass capillaries. It is not necessary to add this to the sample if the sample already contains buffer
with BSA.
Buffered MgCl2 solutions for amplification is to be used at 1/10 concentration (supplied as 10X, includes BSA).
Enzyme diluent is to be used to dilute enzyme (includes BSA).
HR-1™ Instrument
17 ::: Instrument Specifications and Installation ::: Chapter 2
HR-1 Specifications
Temperature sensing is acquired using a platinum resistive thermal device
(RTD) embedded inside the machined cylinder. Fluorescence detection
is initiated with an excitation source that is compensated for temperature
drift and stability. Intensity of the excitation source is controlled by a 12-bit
digital to analog converter that varies the current to the excitation source.
Fluorescence detection is achieved using a single wavelength, siliconbased, hybrid photodiode and amplifier. Ramp rates of 0.01ºC to 1.0ºC are
attainable from ambient temperature to 100ºC. Control of the HR-1 instrument is serial based to a laptop computer.
- Instrument requires 100-240 VAC 50-60 HZ and consumes approximately 40 Watts of power
- 12W max single sample heater with 12-bit control
- 28mA max LED excitation with 12-bit control
- 24-bit temperature and fluorescence detection
- Optics include single color excitation and single color detection
- Temperature ramp rates from .01 to 1ºC per second
- Temperature ramp range from ambient to 100ºC
Setting-Up the HR-1 Instrument
1. Unpack the instrument by carefully removing it from the sealed box.
Refer to the packing list to ensure that all of the components are
included.
2. Place the instrument on a clean, well ventilated lab bench. Make sure
there is 10 cm of space behind the instrument to ensure adequate
airflow for cooling of electronic components.
Transport the instrument by placing one hand underneath and one hand
on top or on the side of the instrument. Do not carry the instrument by the
hinged lid.
Chapter 2 ::: Instrument Specifications and Installation ::: 18
HR-1™ Instrument
Placing the instrument in a room that is kept at a relatively cool temperature
will facilitate more efficient cooling of the heated ingot upon completion of a
melt (20-25ºC).
3. Connect the USB to serial converter to the laptop and then connect
the serial cable between the converter and the HR-1's
serial port.
It is not recommended to connect or disconnect the USB/serial cables while
the laptop is running.
4. Make sure the power switch located on the back of the instrument is
in the OFF position before you plug in the power cord. Connect the
HR-1 and laptop power cord to a grounded power supply.
5. The instrument is now ready to be turned on.
Serial
Port
Power
Switch
Power Cord
receptor
HR-1™ Instrument
19 ::: Instrument Specifications and Installation ::: Chapter 2
Software Installation
The HR-1 Software Package is designed specifically for Microsoft Windows
2000 or XP Operating Systems. Administrative rights to the computer are
required to install and run the software package on other computers. The
software installation will require up to 19 MB of disk space. All HR-1 software must be run at a screen resolution of 1024 x 768.
HR-1 software package - All software for running the HR-1 and analyzing data
is pre-installed on the HR-1 laptop. The software is located under the Idaho
Technology folder in the Programs directory. An installation CD is provided
for re-installation or installation of the analysis software package on multiple
computers. Be sure to back-up data before re-installation of software.
To Install the Software
Insert the HR-1 CD into the CD drive. The installation wizard will automatically start up. If the installation wizard does not prompt, browse to the CD
drive, select the HR-1 software file and choose the setup.exe file.
After selecting the installation location, the Installer will present three
options: Typical, Compact, and Custom.
Typical Installation - This will install all the software needed to run
the HR-1 Instrument and analyze the data it produces.
Compact Installation - This option will only install the HR-1 Instrument
Control software. This option is for users where HR-1 data analysis is
to take place on a different computer than the one controlling the HR1 Instrument.
Custom Installation - Allows the user to choose individual components
of the HR-1 software to install on the system.
Chapter 2 ::: Instrument Specifications and Installation ::: 20
HR-1™ Instrument
HR-1™ Instrument
21 ::: HR-1 Instrument Operating Instructions
::: Chapter 3
CHAPTER
HR-1 General
Operating Instructions
3
Introduction
This chapter details the steps for preparing samples and loading them into
the HR-1 for analysis.
General Considerations
The HR-1/LCGreen™ platform directly analyzes the melting behavior
of double-stranded DNA. LCGreen I dye binds to any dsDNA present.
Therefore, care in preparation of the DNA sample to be assayed is critical
for generating optimal results. Factors that influence results, obtained using
the HR-1, include the nature of the DNA specimens being analyzed and factors influencing thermal denaturation of a DNA fragment. Analysis on the
HR-1 requires that defined DNA fragments are present, usually produced
by amplification. The buffer and ionic strength are especially important and
must be controlled from sample to sample.
The HR-1 analyzes specimens in Roche LightCycler® capillary tubes.
These tubes are designed for the LightCycler instrument and are also com-
Chapter 3 ::: HR-1 Instrument Operating Instructions ::: 22
HR-1™ Instrument
patible with the Idaho Technology RapidCycler® 2 and R.A.P.I.D.® systems.
A clear benefit of amplification in Roche LightCycler™ capillaries is that after
amplification the tube may be transferred directly to the HR-1 for analysis.
Additionally, when using the LightCycler, amplification may be monitored in
real-time using fluorescence Channel 1. Amplification may be performed
in other reaction vessels, however, the specimen must be transferred to a
Roche LightCycler capillary prior to analysis in HR-1. Amplification reactions of 10 µl are effectively analyzed by HR-1 and this volume is recommended, however, reaction volumes of 5-20 µl can also be used. A small
volume oil overlay may provide even greater precision when added prior to
amplification.
Preparation of a DNA Sample
Numerous methods exist to prepare DNA from a variety of sources. Any
variation in salt concentration between samples will adversely affect precision of the melting curve. To a lesser extent, variation in the DNA concentration can also affect melting profiles. When assaying groups of samples
it is advisable that they be adjusted to a uniform concentration in the same
buffer. Variable results have been observed with samples that have been
archived for significant periods of time. It is strongly recommended that
archived DNA samples be re-purified, eluded in a standard buffer, and quantified before use with the HR-1 system. Following re-purification archival
specimens perform as well as newly prepared specimens.
Amplification
Amplification can be performed any number of ways in the presence of LC
Green™ I dye. It must be robust and performed prior to analysis on the HR1. Amplification may be done in Roche capillaries or transferred to them
post amplification for analysis on the HR-1. It is possible to use an oil overlay with the amplification and leave it in place for the analysis on the HR1. Oil overlay has been shown to be beneficial with repetitive melts on the
HR-1™ Instrument
23 ::: HR-1 Instrument Operating Instructions
::: Chapter 3
same sample.
Melting profile similarity between like samples is critical to the ability to distinguish differing melting profiles of samples harboring a sequence variant.
If the melting profiles of different samples show more variation than is desirable, it may be useful to add a mineral oil overlay (2-5 µl). The mineral oil
should be applied prior to amplification. Because of the exceptional resolution of HR-1, small irregularities between samples related to evaporation/
condensation during amplification or during a melt on HR-1 may have an
effect on the salt or dsDNA concentration, post-amplification, between samples. This may cause "artificial" differences between melting curves of perfectly homologous samples. A small volume mineral oil overlay will prevent
this from occurring, and has the effect of "tightening" up the melting profiles
to a degree that it is sometimes even possible to distinguish a homozygous
base change between samples.
Loading and Unloading a Sample
All melting curves must be performed in Roche LightCycler capillaries. The
heated ingot in the HR-1 instrument is designed so that the capillaries fit
firmly into the slot. Care must be taken when inserting and especially when
removing a sample as the capillaries become more fragile when they are
heated.
Loading a Sample
1. To load a sample into HR-1,
simply place the end of the capillary into the hole on the top of
the ingot and allow the capillary
to "seat" itself.
Manufacturer tolerances for the
capillaries and heated ingots
cause some capillaries to be
loaded quite easily, while others
Chapter 3 ::: HR-1 Instrument Operating Instructions ::: 24
HR-1™ Instrument
will need some amount of delicate pressure to be positioned correctly
within the ingot. Make sure the capillary is completely seated down
in the ingot before the lid is shut.
2. Shut the lid and use the software to begin melting.
Removing a Sample
1. When removing a capillary, use two fingers to slide/twist the capillary
up and out of the ingot.
Take special care not to place excessive side-to-side directional force
on the capillary as it is pulled out of the ingot (as more of the capillary
is removed from the ingot, the less pressure is required to break the
capillary with a sideways directional force).
HR-1™ Instrument
25 ::: The HR-1 Instrument Control Software ::: Chapter 4
CHAPTER
HR-1 Instrument
Control Software
Introduction
This chapter contains instructions on how to operate the HR1 instrument through the Control Software.
1. To open the software, locate the software icon on the
Desktop.
2. Using the mouse,
double-click on the
icon which will take
you to the main
screen.
4
Chapter 4 ::: The HR-1 Instrument Control Software ::: 26
HR-1™ Instrument
Menu Bar Overview
File - Options access basic user interface functions
Serial Port- Designates computer serial interface to the HR-1.
Com1, Com2, etc.
Set User Name - Accesses Enter Users menu for different operators.
Pull Down Selection menu - Allows user to select user name
and add new user names.
OK - Accepts pull-down menu selection.
Cancel - Cancels out of Set User Name window.
Remove User - Removes selected user from pull down menu.
Exit - Exits from HR-1 instrument control software.
View - Alternates between view panes and data streaming options
Real Time Graph - Checkable option to monitor HR-1 in real-time.
Melting Graph - Checkable option to monitor HR-1 recorded experimental fluorescent trace.
Pause Data - Pauses and re-starts real-time graphing updates.
Fluorescence and temperature data is continuously displayed in the
upper left status bar.
Clear Data - Clears stored temperature and fluorescence data on both
graphs. Accessible when instrument is not melting.
Melting - Accesses melting experiment conditions and controls
Start Melting - Opens Start Melting window.
Start - Begins selected melting protocol. The instruments lid
must be closed for this to operate.
New Protocol - Opens the Edit Melting Protocol dialogue window.
Allows the user to create a new protocol.
Edit Protocol - Opens the edit Melting Protocol Dialogue window.
HR-1™ Instrument
27 ::: The HR-1 Instrument Control Software ::: Chapter 4
Allows the user to view and edit an existing protocols.
Cancel - Closes Start Melting dialog window.
Melting Analysis - Launches the HR-1 analysis software (if
installed).
Abort Melting - Stops the current melting experiment. Existing
data is saved under the experiment name. It will also abort a hold.
Melting Protocols - Opens melting protocol directory. Protocols can be
examined and edited (right mouse click).
LED - Accesses the LED controller options
Adjust LED Power - Accesses the LED power dialog window.
Power Slide Bar - Use to manually adjust LED power setting. Power
output will be indicated by percentage in the dialog window.
Close - Exits Adjust LED Power dialog window.
Save - Saves adjustments made to the LED power level to the current
melting protocol.
Turn LED on - Turns LED on when not in an active melting protocol.
Turn LED off - Turns LED off when not in an active melting protocol.
Tools - Accesses HR-1 Hardware/Firmware controls
Set Hold Temperature - Opens the Set Hold Temperature dialog window. User can then select from 20 to 70º C. Selecting the OK
button instructs the instrument to heat or cool and then hold the ingot
at the desired temperature. Only available when the instrument is
not melting.
Chapter 4 ::: The HR-1 Instrument Control Software ::: 28
HR-1™ Instrument
Instrument cannot hold a temperature lower than ambient - setting a hold
temperature lower than ambient will cause the cooling fan to run resulting in
an error prompt reading Unable to reach xx degrees, cooling aborted. xx is
the selected cool temperature The instrument will not accept hold temperature greater than 70º C for safety reasons.
Reset Instrument - Re-initializes the firmware and internal hardware
components. Accessible when instrument is not melting.
Instrument Name - Records a unique name for the instrument.
Instrument name is logged in data files.
Update Firmware - Opens the Update Firmware Dialog. Accessible
when instrument is not melting. Used only when new firmware is provided by Idaho Technology.
Done - Closes the Update Firmware Dialog.
Browse - Opens an Open File dialog to find the firmware .HEX file.
Refresh - Refreshes the displayed instrument version.
Update - Updates the instrument with the selected firmware .HEX
file.
Remove File - Removes the currently selected file from the drop
down list.
Help - Accesses the User Help Functions
About HR-1 - Opens the About Dialog.
OK - Closes the About Dialog.
Reset - Re-initializes the firmware and internal hardware components.
Accessible when instrument is not melting.
User Manual - Accesses the electronic version of the User's Manual.
Idaho Technology Technical Support - Links Users to the Idaho
Technology Technical Support by email (compatible with Mozilla and
Outlook, not compatible with Outlook Express).
HR-1™ Instrument
29 ::: The HR-1 Instrument Control Software ::: Chapter 4
Setting Experimental Conditions
Starting the HR-1 Instrument Control Software
Confirm the HR-1 instrument control software is loaded onto the hard drive,
the instrument is connected by the serial cable, and the power on the HR-1
instrument is on. If any of these items are not in place, refer to Chapter 2.
1. To start the HR-1 Instrument Control software by double-clicking on the HR-1 Instrument Control icon on
the desktop.
2. The Enter Username dialog
window will appear. Use the
pull down menu to select the
User Name. This will allow
the user to access any preset
protocols stored under the
User Name.
Setting User Name/Profile
To change the User Name without shutting down the instrument or software,
select Set User Name from the File menu, and change the user on the pull
down menu. To Create a new user, simply type the new User Name in the
Set User Name window. To delete a User Name, select the User Name to
be deleted from the pull down menu and choose Remove User. Deleting
a User Name results in all protocols saved under that User Name also
being deleted. Protocols saved as Global will remain even if all users are
removed.
Chapter 4 ::: The HR-1 Instrument Control Software ::: 30
HR-1™ Instrument
Serial Port Selection
Select the correct Serial Port from
the File menu. The information bar
at the bottom of the software window
will give information about the HR-1
instrument communication with the
PC. The information bar will display
connection status (PC Com port),
machine ID, current user, melting protocol being used, and the status of the machine (melting, holding, cooling,
etc.). Select the proper Com port that is attached to the HR-1 instrument.
View Menu
Under the View menu, there are two
options for display status. The Real
Time Graph will display a split screen
where the user can observe, in "real
time", the temperature of the heated
ingot and the continuous fluorescent status of the sample in the top
screen. The corresponding melting
curve data (fluorescence vs. temperature) will appear in the lower screen.
The Melting Graph option will display only the melting curve of the sample
(the lower screen from the Real Time Graph option) in the full screen of the
software window, but will not display the temperature or fluorescence over
time. A digital display of the temperature and fluorescent signal is always
present in the information bar just below the menu bar at the top of the software window. Pause Data and Clear Data are also options in this window
(refer to definitions at the beginning of this chapter).
HR-1™ Instrument
31 ::: The HR-1 Instrument Control Software ::: Chapter 4
Melting Menu
To start a melting curve, select
Start Melting from the Melting
menu. The Start Melting window
will appear with the currently selected melting protocol and the default
file name for the sample to be melted. The default file name is a DateTime stamp, but can be changed by
typing in the desired file name. If the currently selected file name is appropriate, load a sample, shut the lid, and choose Start to begin the melting
curve. To edit or verify that the currently selected melting protocol is correct
select the Edit Protocol button.
To select a different melting protocol, use the pull down menu to choose the
correct protocol.
A new Melting Protocol can be created
by choosing the New Protocol button
(Note: It is recommended to melt the first
sample of a new experiment in order to
verify the pathway to which the file will be
saved). The Edit Protocol button opens
a dialog window with the parameters for
the currently selected melting protocol
displayed in the melting parameter fields.
Melting parameters can be modified in
this window or the pull down menu can
be used to select a preset melting protocol saved under the current user's name.
Chapter 4 ::: The HR-1 Instrument Control Software ::: 32
HR-1™ Instrument
Melting Protocol Name - Defines protocol name which must be unique
to the User and Global list.
Repeat Melting - Automatically prompts the Start Melting window with a
previous protocol for repetitive runs.
Ramp Rate - Rate of temperature change for the melting profile (0.01
- 1.0º C per second).
Final Temperature - Ending High temperature melting curve (100º C
max).
Cool Temperature - Temperature the HR-1 will cool to after the Final
Temperature is reached.
Hold Cool Temp - Selectable feature to hold HR-1 at a staging temperature for repeated melts to aid in throughput (20-70º C programmable
range).
Acquisition Start Temperature - Temperature when the HR-1 melting
profile begins acquiring fluorescent data.
Directory - Location where melting data files are stored. Data files have
a .vs2 extension.
Excitation Power - LED power setting for the melt protocol.
Auto Set - The HR-1 automatically determines the optimal starting LED
power setting based on the target fluorescence.
Target Fluorescence (%) - Target scale setting for Auto Set fluorescence (99% max).
HR-1™ Instrument
33 ::: The HR-1 Instrument Control Software ::: Chapter 4
Edit Melting Protocols
The Melting Protocol Name, Temperature transition rate (Ramp
Rate), beginning (Cool Temperature) and ending temperatures (Final
Temperature), the location to which the melting file is saved (.vs2 extension), and the Target Fluorescence (%) can be modified in this menu.
Multiple Sample Experiments
If several samples are to be melted during the same session, check the
Repeat Melting and Hold Cool Temp boxes. This will automatically bring
up the Start Melting window with the file name highlighted following each
melting protocol, and will hold the ingot at the specified cool down temperature until the next melting protocol is started. A new sample name can be
entered while the previous sample and ingot are being cooled.
When editing or creating a new melting protocol, it is recommended that
the Cool Temperature be set at least 10 degrees below the Acquisition Start
Temperature to allow the instrument time to gain sufficient control of the
heated ingot prior to the initial acquisition of data.
If the Auto Set check box is checked, the instrument will automatically
adjust LED power to acquire the desired fluorescence target level from each
sample. If the Auto Set box is unchecked, the user specifies a standard
LED power that will be used on each sample. Checking the Auto Set box
is advisable when the assay conditions have been optimized and the user
wishes to perform the final analysis on each sample. Leaving the Auto Set
box unchecked may be useful when determining how much fluorescence
is present in individual samples relative to each other or compared to other
experimental conditions.
Melting acquisition can be stopped at any time by selecting Abort Melting
from the Melting menu. Data is continuously logged during a melting protocol, and any data that has been logged will be saved under the file name.
Chapter 4 ::: The HR-1 Instrument Control Software ::: 34
HR-1™ Instrument
Melting protocols can be created and edited by choosing New Protocols
under the Melting menu. To edit an existing protocol, right click on the protocol and select Edit Melt Protocol. To create a new protocol, right click on
the user name for the person designated for the new protocol.
Under the Melting menu, the analysis software package can be opened by
selecting Melting Analysis.
LED Menu
The HR-1 instrument can be
used as a real time fluorimeter
to check the fluorescent status
of a sample under different
LED power settings. This function gives an accurate measure
of the strength of fluorescent
signal in a sample and an indication of the fluorescent acquisition parameters to set in the melting parameter fields (see Melting menu above).
To turn the LED on, select Turn
LED On under the LED menu.
Click on Adjust LED Power under
the LED menu to view the effect
of different LED power settings on
the fluorescent signal in a sample.
The LED is automatically turned on when this option is used.
To turn off the LED, choose Turn LED Off under the LED menu.
HR-1™ Instrument
35 ::: The HR-1 Instrument Control Software ::: Chapter 4
Tools Menu
The Tools menu
accesses functions
related to sample
fluorescent excitation.
After the HR-1 instrument
is turned on, the instrument may be pre-warmed
by choosing Set Hold
Temperature under the
Tools menu. A limit of
70ºC has been set for
safety.
If the instrument stops
responding during a melting acquisition or at any
other time, the instrument
may be "rebooted" without
power cycling or shutting
down the software. To
complete this, choose
Reset Instrument under the Tools menu. If the Reset Instrument function
does not correct the problem, turn the instrument off, shut down the software, and restart software and/or computer.
The name of the instrument can be edited or changed by selecting
Instrument Name in the Tools menu.
Chapter 4 ::: The HR-1 Instrument Control Software ::: 36
HR-1™ Instrument
The Update Firmware option in
Tools is available should Idaho
Technology release firmware
upgrades. Further instructions for
use of these functions will follow
through new product and upgrade
announcements to HR-1 customers.
Help Menu
The HR-1 User’s manual can be
accessed in Adobe Acrobat PDF format by selecting the User Manual
option under the Help menu.
Selecting the About HR-1... menu
selection will bring up the about window describing the software version.
There are two selectable options OK
and Reset. Selecting OK will return
to the main screen. Selecting Reset performs the same function as the
Reset Instrument selection in the Tools menu.
If the problem is not resolved with the instrument or software, please call
Idaho Technology's customer service.
Data Organization
It is important to organize the data you will collect with the HR-1 instrument.
Setting-up a main folder for all of the data that will be collected is recommended, with separate folders within the main folder that identify different
targets, experimental conditions, users, etc. All fluorescence and temperature data for each sample is stored in a single file (.vs2 extension). Based
on the software characteristics, an example is included of how to organize
and name different folders and files for efficient data retrieval.
HR-1™ Instrument
37 ::: The HR-1 Instrument Control Software ::: Chapter 4
This method of data organization will allow the selection of individual samples for analysis, or multiple samples from different experimental conditions
to compare all at once. The analysis
software will automatically display
the differences in the pathways to the
samples in the sample names column,
allowing easy identification of which
samples you are analyzing and what
the different experimental conditions
were for each sample.
For example, to analyze Sample 1 and
2 from both experimental conditions
in Exon 1, the sample name list would
look like:
/Condition
/Condition
/Condition
/Condition
1/Sample
1/Sample
2/Sample
2/Sample
1
2
1
2
Once the optimal experimental and
melting conditions have been determined, a Final Results folder can be
created to perform the definitive analysis on all samples, allowing easy analysis for all samples under the same
final conditions, and keeping data well
organized in a standard format.
Melting a Sample
After the capillary is properly seated
in the ingot, (Chapter 2 - loading and
unloading a sample) close the lid,
Chapter 4 ::: The HR-1 Instrument Control Software ::: 38
HR-1™ Instrument
and select Start Melting in the Melting menu. Use the pull down menu to
select the protocol.
Select Edit Protocol to examine that all melt parameter fields are correctly filled. To melt more than one sample under the same conditions,
check the Repeat Melting box. By checking the Repeat Melting box,
the Start Melting window will automatically open after the a melting
protocol is completed and the ingot has been cooled to the specified
temperature.
Check the Hold Cool Temp box for the instrument to maintain the
cool down temperature between melting acquisitions.
There are two options for fluorescence acquisition in the Edit Protocol window.
Select the Auto Set box to automatically adjust the LED power to
achieve a specified level of fluorescence from the sample.
Uncheck the Auto Set box to use a standard LED power level on all
samples.
Confirm the path where the sample file will be saved ( choose the Browse
button to change the path and Save when the desired path is found). The
Start Melting window will return, upon completion of Protocol editing
(choose OK or cancel).
HR-1™ Instrument
39 ::: The HR-1 Instrument Control Software ::: Chapter 4
Name the sample in the file name text area, load the sample capillary in the
instrument, close the lid, and select Start Melting. The lid will lock at this
time, and cannot be opened until the ingot is cooled to the specified Cool
Temperature (maximum cool down temperature is 70ºC).
During melting acquisition it is possible to change the display window to display the Real Time Graph or the Melting Graph.
When the melting curve is finished, the file is automatically saved and the
HR-1 instrument runs the cool down fan until the ingot reaches the specified
Cool Temperature. When the cool down is complete, the lid will unlock.
The lid may be opened and the sample removed at this point.
Follow the procedure to melt additional samples. It will not be necessary to
check all of the melt parameter fields if several samples are melting under
the same conditions. Type in the name of each new sample in the Start
Melting window and select Start Melting for subsequent samples.
Suggestions for Higher Throughput
The process of melting samples can be expedited by performing a test run
through a temperature range of 70ºC up to 96ºC. Following this protocol,
analyze the melting transition that occurs and choose a temperature range
that will provide adequate data prior to and following the primary melting
transition. It may be helpful to use the derivative plot function to help pinpoint the maximal melting transition point, indicated by the Tm of the resulting peak. To determine the temperature range prior to and following the
melt, use the following calculation based on ramp rate (15 x Ramp Rate =
# of ºC to set the acquisition temp prior to the initial melting transition of the
fragment). An example: 15 x 0.3º ramp rate = 5. Set acquisition temperature 5º prior to the melting transition and end melt 5º post transition.
Following this procedure, it is possible to collect the relevant data within a
smaller temperature range minimizing the amount of time required per sample.
Chapter 4 ::: The HR-1 Instrument Control Software ::: 40
HR-1™ Instrument
Use caution in setting the lower temperature as some heteroduplex transitions can occur 5-10ºC below the primary melting transition.
HR-1™ Instrument
41 ::: HR-1 Analysis Software ::: Chapter 5
CHAPTER
HR-1 Instrument
Analysis Software
5
Introduction
This chapter describes the basic concepts about the HR-1 Data Analysis
software package. Chapter 5 is a step by step guide to the analysis process.
Analysis Software Overview
Menu Bar
File
New Files - Import new .vs2 files for analysis.
Add Files - Add .vs2 files to current analysis.
Sample Names
As Input - default setting, displays sample names as they
Chapter 5 ::: HR-1 Analysis Software ::: 42
HR-1™ Instrument
were originally entered.
Unique Characters - displays only the unique characters in the sample names list, all common characters in the sample names will be
displayed in the graph title.
Change - Changes sample names.
Export Graph Data - Creates a tab/space delimited text file for use in
external database or spreadsheet applications.
Print
Print Window - Opens the systems default printer window.
Page Setup - Change print parameters and layout.
Exit - Close analysis software.
Edit - Edit functions are operable only if graph tools have been used in
the analysis.
Undo Move - Undoes movement caused by use of the graph tools.
Redo Move - Redoes graph movement after use of Undo Move.
Select
Original Data - Default setting, uses all time/temp/fluorescence data
logged by HR-1.
Limit by Time/Temp - Allows user to define the time/temperature ranges to analyze.
Melting Curves - Default setting, shows data as a fluorescence vs.
temperature plot.
Kinetics - Shows data as a fluorescence vs. time plot.
Time/Temp - Plots the temperature vs. time, gives an indication of temperature control.
HR-1™ Instrument
43 ::: HR-1 Analysis Software ::: Chapter 5
Analyze
Normalize - Normalizes fluorescence data before and after the melting
transition.
Temp Shift - Force all samples to overlay over a defined temperature/
fluorescence range.
Difference Plot - Graphical plot of the difference between samples at
each data point.
Derivative Plot - Graphical plot of the rate of fluorescence change.
Derivative peaks give an approximation of the melting temperature
(Tm) of a sample.
Display
Show Cursors - Displays vertical and horizontal adjustable cursors.
Show Run Data - Displays information about the melting parameters
that were used on the samples.
Show Graph Tools - Displays some basic graph tools on the chart
allowing the user to manipulate the appearance of the graph.
Graph Title
File Name - Default setting, displays the graph title as the pathway to
the files that are being analyzed.
Rename - Allows the alteration of the name of the graph.
Show S/N - Displays the Signal to Noise ratio for each sample in a
tabular format.
Plots
All - Default setting, displays the melting curves of all the samples.
Chapter 5 ::: HR-1 Analysis Software ::: 44
HR-1™ Instrument
None - Clears the display area of all melting curves.
Every
2nd - displays every 2nd sample
3rd - displays every 3rd sample
4th - displays every 4th sample
Subset
1st half - displays the first half of the sample list
2nd half - displays the second half of the sample list
1st third - displays the first third of the sample list
2nd third - displays the second third of the sample list
3rd third - displays the last third of the sample list
Invert - Clears the samples that are currently displayed and displays all
other samples on the list.
Style
Color - Default setting, sample curves are displayed in different colors
with various line and point styles for easier discrimination
between samples.
Black and White - Displays samples as a spectrum of thin to thick,
gray to black lines.
User - Select a previously saved User Style (see Save User Style
below).
Replicates
Duplicates - Displays samples as duplicates of each other.
(Sample 1 and 2, Sample 3 and 4, etc.)
Triplicates - Displays samples as triplicates of each other.
Quadruplicates - Displays samples as quadruplicates of each other.
By Last Alphanumeric - Uses the last alphanumeric character to
identify sample replicates.
HR-1™ Instrument
45 ::: HR-1 Analysis Software ::: Chapter 5
Save User Style - Saves sample editing changes for the current analysis.
About
HR-1 v1.1 - Shows the current version of analysis software.
Additional Sample and Graph Editing Options
Right click on any sample color line to change color, line style, line
width, point style, etc.
Select the first or last number on either the X or Y axis to change the
scale of the axis.
Select a Graph Tools icon from the Graph Tools palette (located just
off the lower left corner of the graph) and and drag within the graph.
This also activates the Edit functions.
Data Analysis Introduction
The approach to analysis of data from the HR-1 will be based on the specific application. Whole amplicon melting curve analysis most commonly is
used to scan for heteroduplex formation. It can be used for genotyping as
well. When scanning for heteroduplex formation, heteroduplexes are identified by a change in shape of the melting curve from fully base paired wild
type samples. Distinguishing factors include the slope of the primary melting transition, the lowest temperature at which heteroduplex samples deviate from wild type samples, and the temperature at a given fluorescence
level.
Although quantitative measures can be devised, observation of the entire
curve and comparison to wild type is the best method for identifying heteroduplexes.
Chapter 5 ::: HR-1 Analysis Software ::: 46
HR-1™ Instrument
Opening the Analysis Software
To open the HR-1 analysis software, select the HR-1 melt
analysis tool desktop icon, or choose Melting Analysis
under the Melting menu in the HR-1 Instrument Control
software. A full screen window will open along with a
browsing window.
Importing Sample Data
A window will appear prompting
selection of analysis files. Browse
to the location of the melting files,
and choose the Select Current
Directory. This will open a sample
list window in the HR-1 analysis package. All .vs2 files in the directory are
selected for analysis by default. If
only a subset of the samples is to be
analyzed, select the samples to analyze while holding the Shift key (for blocks of samples) or choose individual
samples to view. Select Continue when finished.
The raw data from each sample selected will be displayed on the initial
screen, with the pathway to the samples shown as the Graph Title, and individual Sample Names displayed on the selectable upper left portion of the
graph.
To open additional, or new sample files, select Add Files or New Files in
the File menu, respectively. Add Files automatically returns to the last
directory selected. Selecting New Files opens the default browser window.
HR-1™ Instrument
47 ::: HR-1 Analysis Software ::: Chapter 5
Normalizing Data
The first step in analyzing the samples is to normalize the fluorescence
data by selecting Normalize in the
Analyze menu. This opens a window
that shows 4 vertical cursors numbered 1-4.
Cursors 1 and 2 should be moved
(select and hold with mouse to move)
to identify a linear region of the melting curves prior to the major melting
transition of the sample(s). Cursors
3 and 4 should be moved to identify
a linear region of the melting curve(s) following the melting transition of the
sample(s). The cursors must be kept in the same numeric order, relative to
each other, from left to right.
When normalizing the melting curves, the original data will appear in the
upper panel of the screen, while the lower panel of the screen will show
a preview of the final curves after normalization. The cursors are initially
placed at default positions, although it is often necessary to adjust them. All
of the curves should appear in the lower panel preview area. Positioning
of the cursors during the normalization process is critical to further analysis
of the samples. If samples did not amplify, or "no template" controls were
present, these samples will not normalize properly. Eliminate these samples
from consideration by selecting "Delete Some Bad Samples" or "Delete All
Bad Samples". It is possible to exclude "bad" samples by simply not selecting them for the final analysis. There are no set rules for positioning the
cursors. Brief experimentation of different cursor placements will display the
functioning of the cursors and the different effects . As a general rule, it is
advisable to include a larger temperature range between each set of cursors
as ramp rate increases. At a ramp rate of 0.3ºC per second, a temperature
range of at least 0.5ºC between cursors is desirable. After the data has
Chapter 5 ::: HR-1 Analysis Software ::: 48
HR-1™ Instrument
been normalized, all samples will have a "flat" slope before and after the
melt. This makes further analysis of the melting portion of the curves easier
to interpret.
X-axis Temperature Adjustment
The most common application on the
HR-1 is scanning amplified products
for heteroduplexes. For this application X-axis temperature adjust of data
is necessary following normalization. Temperature adjust the curves
by choosing Temp Shift under the
Analyze menu. A window will open
displaying the normalized curves in
the top panel, and a preview of the
temperature adjusted curves in the
lower panel. Temperature adjustment forces each curve through the
same temperature range as defined by the placement of the horizontal
cursors. This is useful for heteroduplex analysis in that differential melting
curve shapes are more easily distinguished, allowing for positive identification of a sample harboring a sequence variant. The default placement of the
horizontal cursors shown in the middle graph is adequate in most cases. If
the cursors need adjustment, left click the mouse and hold on the cursors
to move them. It is recommended that the cursors be kept as close to the
bottom, and as close to each other as possible, thus ensuring the curves
will be adjusted and forced through the highest temperature point of the
melting transition. Use the bottom graph to judge the effect of cursor adjustments. A list of sample names is shown, with a graphical representation of
the data points included in the current range defined by cursor placement
for each sample in the middle panel. Select from this list the sample to represent the "reference" curve. All other curves will be "fit" to this reference
sample curve. Choosing a different reference sample for this analysis has
little effect on the outcome, but is provided as a standardization tool when a
HR-1™ Instrument
49 ::: HR-1 Analysis Software ::: Chapter 5
true standard sample has been run for comparison purposes. As with normalization, there are no set rules for cursor placement but experimentation
will quickly provide the necessary experience to become proficient in X-axis
temperature adjustment.
Additional Data Display Options
While Normalizing and X-axis temperature shifting are the only steps
required for most analysis, there are
two additional options for viewing
data in different formats which are
useful in making the determination
of whether or not a sample contains
a sequence variant, or whether
the sequence variant observed in
one sample is the same as that
observed in another sample.
Difference Plot
The Difference Plot function provides
a graphical method of looking at the
temperature difference between two,
or several, samples throughout the
selected temperature range. Under
the Analyze menu, select Difference
Plot. A window will open with the
samples listed in the upper left portion. Select a reference sample
- It is represented by the horizontal
line in the graph area. The difference between each sample and the
reference sample is calculated and
Melting curves of 2 heterozygous samples with different mutations in the
same target sequence. Some differences are observed in the melting
curves, but they are still quite similar.
HR-1™ Instrument
Chapter 5 ::: HR-1 Analysis Software ::: 50
displayed for each data point in the comparison. The Y-axis is auto scaled
based on the largest difference between samples. The Difference Plot may
be a useful tool to determine whether or not a suspected sequence variant
in one sample is potentially a different sequence variant than that observed
in another sample. It can be difficult to make this determination by looking only at the melting curves. The Difference Plot and Derivative Plot
(described below) provide displays that may allow distinction between 2 different sequence variants. Essentially, subtle differences between variant
sample melting curves are magnified and easily observed using these two
graphical display options.
Wild Type
Heteroduplex
Heteroduplex
Wild Type
Melting curves (left panel) and Difference Plots (right panel) of 3 different Heterozygous samples with the same mutation. Note how the heteroduplex
curves are identical in both graphs, as are the curves of the WT samples.
HR-1™ Instrument
51 ::: HR-1 Analysis Software ::: Chapter 5
Derivative Plot
To display the Derivative Plot, choose Derivative Plot under the Analyze
menu. The negative derivative of fluorescence is plotted on the Y-axis with
Temperature on the X-axis. Melting "peaks" are displayed, allowing easy
visualization of differences between the samples. The peak of the curves is
known as the Tm (Melting Temperature). Tm is the temperature at which
the DNA duplexes are denaturing at their greatest rate. The Derivative Plot
may be useful for identifying differences in the type of mutation present in
individual samples. The Derivative Plot analysis option is the only analysis
option available if the melting curves have not been normalized.
Cutting and Pasting Graphics
To cut graphics from the analysis
software, hold the CTRL key while
simultaneously selecting the PRINT
SCRN key on the computer keyboard
(CTRL+Print Scrn). Paste the image
into an appropriate graphics handling
program as a Bitmap (.BMP) using
the CTRL+V function.
Final Note on Analysis Software
There is much data analysis functionality within the software that can be
found by experimentation. The instructions provided in this User's Manual
are sufficient for familiarization required to perform practical and functional
analysis of data and give the basics for further analysis.
Chapter 5 ::: HR-1 Analysis Software ::: 52
HR-1™ Instrument
The Derivative Plot and the Difference Plot of two heterozygous samples with different mutations from previous figures. Note the differences between
the two heterozygous samples.
HR-1™ Instrument
53 ::: Troubleshooting ::: Chapter 6
CHAPTER
6
Troubleshooting
Introduction
This chapter details some problems that may arise with the instrument or
software, and steps you can take to resolve these issues. It is a simple
trouble shooting guide. If a problem persists with the instrument or software, please contact Idaho Technology’s customer support at 1-(800)-7356544.
Hardware
Before attempting any manipulation of the hardware described in this chapter, turn off and unplug the instrument from any power source and disconnect the serial cable from the computer.
Cleaning the Ingot after Breaking a Capillary
Caution Hot
Before attempting to clean the heated ingot, cool the ingot to a temperature
that is safe to handle (40ºC or below).
Wear gloves before attempting to clean the ingot with a broken capillary
tube. Change gloves often during the procedure to reduce the risk of contamination.
Chapter 6 ::: Troubleshooting ::: 54
Solution
1. Turn off the instrument and unplug it
from the electrical outlet before beginning the procedure for cleaning the ingot.
2. Use the small Phillips head screwdriver
supplied in the HR-1 Tool Kit to remove
the two small screws that hold the plastic
cover on and carefully remove the cover
to expose the ingot.
3. Carefully, and thoroughly clean the ingot
and the area around the ingot with a
swab and 10% bleach solution.
4. Detach the connector running from the
ingot to the interior of the HR-1 instrument.
5. Remove the two small hex head screws
with the hex head driver tool supplied
in the HR-1 Tool Kit and carefully lift the
ingot off the two positioning posts that
protrude through the ingot's circuit board.
6. Clean the conical portion of the bottom
of the ingot with the diluted bleach solution. Clean the interior of the ingot with
the small wire brush and diluted bleach
solution. Repeat as necessary.
7. Using a lens cleaning cloth, clean the
lens under the ingot with a diluted bleach
solution followed by water.
HR-1™ Instrument
HR-1™ Instrument
55 ::: Troubleshooting ::: Chapter 6
8. Place the ingot over the positioning
posts and re-seat the assembly.
9.Re-attach the connector to the ingot.
10. Replace the two small hex head screws
but do not tighten either of them down
until both screws have been started in
their respective holes. Care should be taken NOT to over tighten
these screws.
11. Replace the plastic cover and the two small Phillips head screws.
Lid will not Unlock after Run
Solution
Tap gently on the top of the instrument. Listen for the latch to release
and open the lid. Do not attempt to open the lid with any force if the
latch is stuck. This can bend the latch and cause it to become inoperable.
Instrument does not Respond to Computer Prompts
Solution 1
Check the Com Port selection to verify the right com port has been
chosen. Incorrect com port selection results in an inability of the computer to communicate with the HR-1.
Solution 2
If the instrument stops responding during melting acquisition or at any
other time, it is possible to "reboot" the instrument without turning the
instrument off and on or shutting down the software. To “reboot” the
HR-1, select Reset Instrument under the Tools menu. If the Reset
Instrument function does not correct the problem, turn the instrument
HR-1™ Instrument
Chapter 6 ::: Troubleshooting ::: 56
off, shut down the software, and re-initialize the software and/or reboot
the computer.
Power Light does not Light up when Power is Turned on
Solution
Unplug the HR-1 from the wall socket. Disconnect the Serial cable
from the back of the panel. Check fuses on the back panel of the
instrument. If a fuse is blown, replace with 1amp 250 volt 3AG fuses
(this information is also located on the back serial plate) using the following diagram and description.
The fuse assembly is located next to the power switch.
1. Place a flathead screwdriver in the small slot to pop the fuse assembly
out of the mounting hole. The fuse assembly will pop up when the plastic latch is released.
2. Replace with properly rated fuses. Insert assembly into mounting and
snap it in place.
Fuse Access
Serial Plate
HR-1™ Instrument
57 ::: Troubleshooting ::: Chapter 6
Software
LED Seek Warnings or Failures
Solutions
1. Re-melt sample.
2. The sample is not giving enough fluorescence to reach the required
levels specified in the melting protocol. Adjust target fluorescence
percentage or re-optimize amplification protocol to obtain higher fluorescence.
If Auto Set Fluorescence is used, all samples should be analyzed
using the same target fluorescence level.
Chapter 6 ::: Troubleshooting ::: 58
HR-1™ Instrument
HR-1™ Instrument
59 ::: Return & Decontamination Forms ::: Appendix A
Appendix
Return &
Decontamination Forms
A
To return a machine or product for replacement or repair, follow the basic
guidelines for decontaminating and returning the machine or product.
Once the forms have been filled out and the appropriate steps have been
taken, fax or e-mail the forms to Idaho Technology at (801) 588-0507 or
[email protected].
The following forms have been provided:
•
•
•
•
Equipment Return Procedure
RMA Return Fax
Return & Repair Form
Decontamination Labels
For more information please visit our Web site at www.idahotech.com
or by phone: 1-800-735-6544 or 1-801-736-6354.
Appendix A ::: Return & Decontamination Forms ::: 60
HR-1™ Instrument
Equipment Return Procedure
Obtain an RMA Number
The first step in returning an instrument to Idaho Technology is to obtain an
RMA number from our Service Department. Fill out the supplied fax forms
(2 pages) and fax them to Idaho Technology at (801) 588-0507. Our Service
Representative will contact you with an RMA number and further instructions. If your machine is still under warranty, please supply the purchase
date and serial number, if your machine is out of warranty, please supply a
blank PO# for the repair charges.
Decontamination all Returned Equipment
Equipment returned to Idaho Technology for repair and other reasons must
be handled in a manner which will ensure minimal risk to the personnel
involved in packing the unit for return; and those responsible for receipt,
unpacking and processing at Idaho Technology Inc.
To ensure there is no loss of data any computers being retuned must be
backed up prior to shipment. Idaho Technology is not responsible for any lost
data.
Decontamination
The person responsible for the return must thoroughly decontaminate the
unit wiping it down with 0.5% NaOCl (chlorine bleach diluted 1 part bleach
to 9 parts water). Use care not to mix with other chemicals (mixture with
acid will liberate chlorine gas). Since the solution is somewhat caustic,
gloves and a face shield are recommended when preparing and using the
solution. When corrosion by NaOCl may be a problem, a flush with water
is permissible after the NaOCl has remained in contact for a minimum of 10
minutes.
HR-1™ Instrument
61 ::: Return & Decontamination Forms ::: Appendix A
Decontamination Labels
After the above steps have been completed, the person responsible for the
return must complete and sign two Decontamination Labels and attach one
to the instrument and the other to the exterior of the shipping container.
Complete and sign the Decontamination Form; a photocopy should be
made for your records and the original must be returned with the instrument.
A Return Materials Authorization Number (RMA#) must be obtained from
Idaho Technology prior to shipment and the RMA# and Decontamination
Labels must be visible on the exterior of the shipping container.
Idaho Technology reserves the right to return and or refuse receipt of any
materials at the customer’s expense, that do not meet these requirements.
Packaging and Shipping
The HR-1 case is to be wrapped in a plastic bag before it is inserted into the
box. There is to be at least 2” inches of foam or packaging material on the
bottom of the heavy weight box (recommended box size 24” x 20” x 12”.)
Place the wrapped HR-1 back side down with the start up kit directly next
to the machine. Place 2” or more inches of foam or packaging material all
around the instrument.
International Shipping
If a HR-1 instrument is shipping internationally it MUST have a license and
is to be shipped via an Idaho Technology preferred carrier. To find a preferred carrier for your region, contact our shipping department at 801-7366354.
A Return Materials Authorization Number (RMA#) must be obtained from
Idaho Technology prior to shipment and the RMA# and Decontamination
Labels must be visible on the exterior of the shipping container.
Idaho Technology reserves the right to return and or refuse receipt of any
materials at the customer’s expense, that do not meet these requirements.
HR-1™ Instrument
Appendix A ::: Return & Decontamination Forms ::: 62
Return Materials Authorization Fax
From: ____________________________________
pg. 1 of 2
Pages: _____ _____________
Attn: _____________________________________
Ship to:
Idaho Technology Inc.
390 Wakara Way
Salt Lake City, UT 84108, USA
(801) 736-6354
Warranty:___________
Non-Warranty:_______
Date: ____________________________________
RMA#: __________________________________
(Return Materials Authorization*)
Company: ________________________________
Department: _______________________________
PO#: ____________________
Phone: ___________________________________
Fax: _____________________
Model: ___________________________________
Serial No. ________________
Notes: ________________________________________________________________
_____________________________________________________________________
_____________________________________________________________________
Please read and completely fill out the Return Machine Packet found on the Internet
at http://www.idahotech.com/product_sup/forms.htm. The decontamination form and
labels must be completed before the machine is returned to Idaho Technology. In
the event the unit is returned without documentation it will be shipped back to you
at your expense. Non-warranty charges are $70/hr. with a 2 hr. minimum charge plus
parts and shipping charges. In the event the unit cannot be repaired, it will either be
returned to you or disposed of upon your request. Thank you for your business and
support of the health and well being of our employees.
Signature: ________________________________
Date: ____________________
*User must contact Idaho Technology prior to returning the instrument to receive an RMA#
HR-1™ Instrument
63 ::: Return & Decontamination Forms ::: Appendix A
Return Materials Authorization Fax
pg. 2 of 2
If your machine is still under warranty, please supply the purchase date and machine serial number,
if your machine is out of warranty, please supply a blank PO# for the repair and shipping charges. Please note that your item must be returned with an Idaho Technology assigned RMA# and
Decontamination documentation.
Prior to returning the item you must contact Idaho Technology for an RMA number and also fax copies
of all necessary Decontamination Forms to: Fax (801) 588-0507, Attn: Technical Support.
All returns should be sent to the following address:
Idaho Technology, Inc.
390 Wakara Way
Salt Lake City, UT 84108, USA
(801) 736-6354
Declaration of Decontamination
This instrument has be decontaminated in accordance with an established government regulation or
equivalent, rendering it free from radioactive, biological, or chemical contamination.
Which Method was Used? __________________________________________
What chemical, infectious, toxic or radioactive substances have been in contact with this
product? (Also indicate if flammable or corrosive.)
---Authorization Notice
By accepting this authorization to return this product, the user assumes all responsibility for decontamination and cleaning. Idaho Technology Inc. reserves the right to refuse the delivery of products,
which do not appear to have been properly decontaminated. If the equipment was used with or
around radioactive material, the signature of the safety officer is also required.
Signature: ________________________________
Date: ____________________
_________________________________________________________________________
Customer Address: _________________________________________________________
Customer Name: ___________________________________________________________
Idaho Technology Return Authorization (RMA#): ___________________________________
This Product has been decontaminated per Return Equipment policy: _________________
Decontamination Notice:
Appendix A ::: Return & Decontamination Forms ::: 64
Fill out the decontamination Labels and affix one to the product and the other to the
exterior of the shipping carton. Failure to decontaminate before shipping to Idaho
Technology Inc. will result in the immediate return of the unit at your expense.
Decontamination Labels
HR-1™ Instrument
Pg. 1 of 2
_________________________________________________________________________
Customer Address: _________________________________________________________
Customer Name: ___________________________________________________________
Idaho Technology Return Authorization (RMA#): ___________________________________
This Product has been decontaminated per Return Equipment policy: _________________
Decontamination Notice:
HR-1™ Instrument
65 ::: Return & Decontamination Forms ::: Appendix A
Fill out the decontamination Labels and affix one to the product and the other to the
exterior of the shipping carton. Failure to decontaminate before shipping to Idaho
Technology Inc. will result in the immediate return of the unit at your expense.
Decontamination Labels
Pg. 2 of 2
Appendix A ::: Return & Decontamination Forms ::: 66
HR-1™ Instrument
HR-1™ Instrument
67 ::: Index
Index
H
A
Heteroduplex ........................8
Heteroduplex detection .........7
Heterozygous ........................7
Higher Throughput ..............39
Amplification .......................22
Analysis Software ...............46
Auto Set Fluorescence .......57
C
Cleaning the Ingot ..............53
Clear Data ...........................26
Com Port .............................55
Control Software .................25
Customer Support .................2
I
Importing Sample Data .......46
Installation ...........................13
Introduction ...........................5
K
D
Kinetics ...............................42
Data Display Options ..........49
Data Organization ...............36
Decontamination .......... 58, 59
Derivative Plot .............. 43, 51
Difference Plot ............. 43, 49
Domain Melting ...................10
L
LCGreen™ I dsDNA binding
dye ........................................9
Loading a Sample ...............23
M
F
Fuses ..................................56
G
Genotyping .........................10
Graph Editing Options ........45
Melting Graph .....................26
Melting Protocols ......... 27, 33
Multiple Sample Experiments .
.............................................33
Mutation Scanning and
Genotyping ...........................7
HR-1™ Instrument
Index ::: 68
U
N
User Name/Profile ..............29
Normalizing Data ................47
W
O
Wild type ...............................9
Operating Instructions .........21
X
P
Packaging and Shipping .....60
Pause Data .........................26
Preparation of a DNA Sample
.............................................22
Product Size .......................10
R
Reagent Recommendations 16
Removing a Sample ...........24
Reset Instrument ................28
Resolution and Reproducibility
...............................................9
RMA Number ......................59
S
Serial Port ...........................30
Set Hold Temperature .........27
Set User Name ...................26
Setting-Up ...........................17
Software Installation ...........19
T
Table of Contents ..................3
Technical Support .................2
Temp Shift ...........................43
Troubleshooting ..................53
X-axis Temperature Adjustment
48
HR-1 Instrument Specifications
Linear Ramp Rate
0.01°C to 1°C per second
Temperature Range
Ambient to 100°C
Data Acquisition
24 bit temperature and fluorescence analog to digital conversion
Sample Volume
5-20 µl using Roche LightCycler capillary tubes.
Capacity/Throughput
Single sample capillary melter. Typical 40-45 samples
per hour with a 0.3°C ramp rate
Laptop Computer
Dell Notebook Computer with Ethernet capabilities
Software
Windows based software includes control and analysis modules
Size
4 x 5.5 x 12 inch / 10.2 x 14 x 30.5 cm (w x h x d)
Weight
5.8 lbs. / 2.65 kg
Power Supply
100 to 240 VAC, 1.3 Amp, 50/60 Hz universal power