1
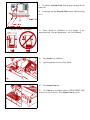
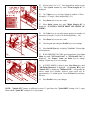
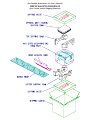
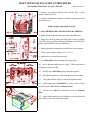
QUIET OPTION QUICK START UP PROCEDURE
(For Detailed Instructions - See User's Manual)
BBF-104793 Rev.*
1. Remove top packing material and acoustic door.
acoustic door to the side.
Place
2. Using the midpoints as indicated, carefully lift printer from box
and remove bag.
Printer Weighs Approximately 45 lbs.
3. SAVE SHIPPING BOX AND PACKING MATERIALS!
4. Install ribbon using instructions provided with ribbon box.
5. Align lower front of printer with table edge or place on printer
stand. (For improved forms loading and feeding, use the TG-DOC
printer stand available from your distributor).
6. Attach appropriate communication cable from your computer.
7. Verify correct voltage setting (U.S.A. = 115v).
8. Attach power cord and turn power on.
9. Load Main Path before attaching the Acoustic door.
10. Move alternate path tractors to center. Unlock right tractor
and position for form width.
11.
Equally space Main Path paper guides and supports.
12.
Open both tractor doors, load form, and close tractor doors.
13.
Verify that left form edge is in line with alignment mark.
14. Adjust right tractor SLIGHTLY to remove slack in form
and lock tractor. (Do Not Over-Tension Form!)
15. Acoustic door MUST be attached to load the Alternate
Path.
16. Attach front acoustic door by hooking over pivot points and
leave open to rest on the table top or stand.
17. To load the Alternate Path, feed the paper through the slot
in the door.
18. Load paper into the Alternate Path tractors following steps
10-14.
19. Forms should be positioned to feed straight, if not,
reposition forms. (For dual path printers - see User's Manual).
20.
Press Load key to load form.
21.
Open keypad door to access Setup Mode.
22.
Press Adjust Form key.
23. Use Value keys to position bottom of FIRST PRINT LINE
to the rear of top exit cover. Press Adjust Form key again.
24. (If your form is 9.5" x 11", close keypad door and go to step
31). Press Quick Access key until "Form Length 66" is
displayed.
25. Use Value keys to set form length in number of lines.
(Example: 3.5" long x 6 lines/inch[default] = 21).
26.
Press Enter key to save new value.
27. Press Quick Access key until "Right Margin 80" is
displayed. (CAUTION: NEVER PRINT OFF EDGES OF
FORM!)
28. Use Value keys to set right margin position in number of
characters. (Example: 6" wide x 10 char/inch[default] = 60).
29.
Press Enter key to save new value.
30.
Close keypad door and press Profile key to save settings.
31. Press On/Off Line key to display "On Line" (Green light
will remain on).
32. IF NO PRINTING OCCURS, open keypad door, press Next
Menu key until "M5 Serial Cntrl" or "M6 Parallel Ctrl" is
displayed. Use Feature, Value, and Enter keys to change
settings. Repeat step 30 to save settings.
33. If QUIET MODE is desired, press Next Menu key until
"M8 Forms Thickness" is displayed. Use Feature ! key until
"Quiet/LOW" is displayed. "Whisper/LOW" will provide the
lowest sound level possible; however print speed will be
approximately 1/4 normal speed. Press the Enter key and close
the door.
34.
Press Profile to save your changes.
NOTE: "Quiet/LOW" impact is sufficient for most 1-2 part forms, the "Quiet/MED" setting is for 3-4 part
forms and the "Quiet/HI" setting is for 5-9 part forms.
(For Detailed Instructions - See User's Manual)
REPACKAGING DIAGRAM
(Save Carton And All Shipping Materials)