1
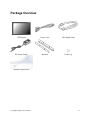
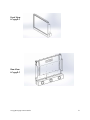
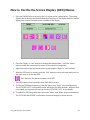
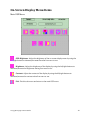
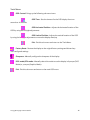
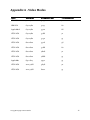
LC1503R/LC1503R‐C USER’SGUIDE www.planar.com The information contained in this document is subject to change without notice. This document contains proprietary information that is protected by copyright. All rights are reserved. No part of this document may be reproduced, translated to another language or stored in a retrieval system, or transmitted by any means, electronic, mechanical, photocopying, recording, or otherwise, without prior written permission. Windows is a registered trademark of Microsoft, Inc. Other brands or product names are trademarks of their respective holders. European Union 2002/95/EC Directive on the Restriction of Hazardous Substances (RoHS) In February 2003, the European Union issued Directive 2002/95/EC on the Restriction of Hazardous Substances, commonly known as RoHS, in certain electrical and electronic equipment. It restricts the use of six hazardous substances, including lead (Pb). The Directive states that all new products within its scope, placed on the European market after July 1, 2006 must be compliant with its requirements. Planar Systems Inc. is fully in support of and compliant with EU Directive 2002/95/EC for applicable products within its scope. A Planar part number will be modified with an “LF” suffix designation to indicate RoHS compliance, as shown on the part number label affixed to the display and on the box containing the display. Important Recycle Instruction: LCD Lamp(s) inside this product contain mercury. This product may contain other electronic waste that can be hazardous if not disposed of properly. Recycle or dispose in accordance with local, state, or federal Laws. For more information, contact the Electronic Industries Alliance at WWW.EIAE.ORG. For lamp specific disposal information check WWW.LAMPRECYCLE.ORG. Revision Control DATE: DESCRIPTION: September 2011 Document release LC1503R/LC1503R‐C User’s Guide 2 Table of Contents Usage Notice Precautions ............................................................................... 4 Introduction About Planar’s LC1503R .............................................................. 5 Package Overview ..................................................................... 6 Installation Product Overview ....................................................................... 7 Mounting the Display ................................................................ 9 Installing the Optional Cooling Kit ............................................ 10 Connecting the Display ............................................................. 11 User Controls User Controls ............................................................................ 12 How To Use On Screen Display (OSD) Menus ........................... 13 On‐Screen Display Menu Items ................................................. 14 Appendices Appendix A – Video Modes ....................................................... 17 Appendix B – Troubleshooting .................................................. 18 Appendix C – Warning Signals .................................................. 19 Appendix D – Product Dimensions ........................................... 20 Product Registration .............................................................. 26 Support and Service ............................................................... 26 LC1503R/LC1503R‐C User’s Guide 3 UsageNotice Precautions WARNING – To prevent the risk of fire or shock hazards, do not expose this product to rain or moisture. WARNING – Please do not open or disassemble the product as this may cause electric shock. Follow all warnings, precautions and maintenance as recommended in this user’s guide to maximize the life of your unit. Do: Turn off the product before cleaning. LCD front surface may be cleaned using a soft clean cloth moistened with mild window glass commercial cleaners or 50/50 mixture of water and isopropyl alcohol. Use only high quality and safety approved AC/DC power adapter that comes with your monitor. Disconnect the power plug from AC outlet if the product is not used for an extended period of time. Don’t: Do not touch the LCD display screen surface with sharp or hard objects. Do not use abrasive cleaners, waxes or solvents for cleaning. Do not operate the product under the following conditions: o Extremely hot, cold or humid environment. o Areas susceptible to excessive dust and dirt. o Near any appliance generating a strong magnetic field. o In direct sunlight. LC1503R/LC1503R‐C User’s Guide 4 Introduction About Planar’s LC1503R LC1503R is a smart panel design which is composed of an active matrix, thin‐film transistor (TFT) liquid crystal display (LCD). It has a 15" diagonally measured active display area with XGA resolution (1024 x 768). Features include: 1,600 nits Long Lifetime LED Backlight Powered by Durapixel™ Technology Wide viewing angle Broad operating temperature range Fast response time: 8ms (typ.) High contrast ratio: 600:1 (typ.) XGA (1024 x 768 pixels) resolution LVDS interface (6 bit + FRC) High Performance Edge‐lit type backlight PSWG standard RoHs compliance TCO’ 03 compliance Applications include: Display Outdoor Digital Signage Quick Service Restaurant Display Product Transportation Gas Station Forecourt Displays LC1503R/LC1503R‐C User’s Guide 5 Package Overview LCD Display Power Cord VGA Signal Cable DC Power Supply Brackets Screws (4) Ambient Light Sensor LC1503R/LC1503R‐C User’s Guide 6 Installation ProductOverview Front View LC1503R Rear View LC1503R LC1503R/LC1503R‐C User’s Guide 7 Front View LC1503R‐C Rear View LC1503R‐C LC1503R/LC1503R‐C User’s Guide 8 MountingtheDisplay IMPORTANT! The mounting instructions are for the qualified installation person only! The Planar LC1503R can be mounted three different ways. The rear of the display is compatible with a VESA 75 mounting interface, the sides of the display support side‐oriented mounting, or the enclosed mounting brackets can be attached to the side of the display for rear/front‐oriented mounting. VESA 75 Mounting 1. Choose a VESA 75 compatible bracket that can support a minimum of 13.2 lbs. 2. Follow the manufacturers instructions for connecting the mounting bracket to the display unit. 3. Make sure to use all four screws to securely mount the display to the bracket and secure the bracket to a stable mounting surface. Side‐Oriented Mounting 1. Choose a mounting location that can support a minimum of 13.2 lbs. 2. Align the display in the mounting location and verify the screw holes are correctly positioned on both sides of the mounting location and the display. 3. Choose screws of appropriate length to traverse the thickness of the mounting surface and securely attach to the display. 4. Connect all four screws to the display and tighten firmly. Rear/Front‐Oriented Mounting 1. Choose a mounting location that can support a minimum of 13.2 lbs. 2. Determine whether you want a rear or front oriented mount, and position the mounting brackets accordingly. 3. Attach the mounting brackets to the side of the display using the enclosed screws and tighten firmly. 4. Connect the mounting brackets to the mounting surface securely. LC1503R/LC1503R‐C User’s Guide 9 InstallingtheOptionalCoolingKit IMPORTANT! The optional cooling kit should only be installed by qualified personnel. The Planar LC1503R can be fitted with an optional cooling kit to expand the temperature range of the display for specific applications. The optional cooling kit is typically installed by Planar personnel at assembly time but can be installed in the field under some circumstances. Take all necessary precautions when installing the LC1503R cooling kit as damage to the display can occur without proper care. For best results, the cooling kit should be used with a cover glass placed inside the frame (not provided). 1. Disconnect the power cord from the LC1503R. 2. Unpack the Cooling Kit from the packaging. 3. Lay the cooling kit face down on a sturdy surface (fan vents pointing up). 4. Position the LC1503R such the bottom of the display is resting on the frame of the cooling kit . 5. Carefully angle the base of the display into the frame of the cooling kit being sure not to press the sharp edges of the cooling kit into the LCD front surface. When completely inserted, the cooling kit frame will securely encompass the left, right, and bottom sides of the display. 6. Secure the cooling kit to the left and right sides using the four screws provided. 7. Connect the power cord from the cooling kit to the display unit. 8. Connect the VGA cable from the host computer to the display unit. 9. Connect the power cable to the wall outlet and the cooling kit power connector. 10. Power on the display and the host computer. LC1503R/LC1503R‐C User’s Guide 10 ConnectingtheDisplay(Figure 1.1) To set up this display, please refer to the following figure and procedures. 1. Be sure all equipment is off. 2. Connect the DC adapter to the power connector on the monitor and the other end to the power cord and the power cord into an electrical outlet. 3. Connect the VGA signal cable from the display’s VGA input connector to the VGA port connector of your host computer and tighten the thumb‐screws (1.1). 4. Power on the display and then power on your host computer. Notice: To ensure the LCD display works well with your computer, configure the display mode of your graphic card, less than or equal to 1024 x 768 resolution and make sure the timing of the display mode is compatible with the LCD panel. “Video Modes” of this LCD panel are listed in the appendices for your reference. Figure 1.1 LC1503R/LC1503R‐C User’s Guide 11 UserControls PanelControls Button Number 1 2 3 4 Button Name Power On/Off Left/Decrease Menu/Select Right/Increase Button Function Turns the display on or off Moves selection left/Decreases selected value Brings up the menu/Selects item Moves selection right/Increases selected value LC1503R/LC1503R‐C User’s Guide 12 HowtoUsetheOn‐ScreenDisplay(OSD)Menus 1. Press the “MENU” button to pop up the “on‐screen menu” shown below. The timing displays the resolution and horizontal/vertical frequency of the display while the version displays the current firmware version installed on the display. 2. Press the “Right” or “Left” buttons to change the selected item. Press the “Menu” button to open the associated sub‐menu or the control to be adjusted. 3. Adjust the value of the adjustment items by pressing the “Right” or “Left” buttons. 4. With the OSD menu on screen, press the “Exit” option to exit a sub‐menu and return to the main menu or to exit the OSD. Exit: Return to the previous screen or exit OSD. 5. The OSD menu will automatically close if left idle for a time. 6. To lock the OSD/Keypad buttons, press the “Menu” and “Right” keys simultaneously. The “KEYPAD LOCK” confirmation screen will display for three seconds. While the lock is activated, any keypress will result in showing “KEYPAD LOCK” on the display. 7. To unlock the OSD/Keypad buttons, press the “Menu” and “Right” keys simultaneously. The “KEYPAD UNLOCKED” confirmation screen will display for three seconds. LC1503R/LC1503R‐C User’s Guide 13 On‐ScreenDisplayMenuItems Main OSD Menu: OSD Brightness: Adjust the brightness of the on‐screen display menu by using the left/right buttons to decrease/increase the value from zero to 100. Brightness: Adjust the brightness of the display by using the left/right buttons to decrease/increase the brightness setting from zero to 100. Contrast: Adjust the contrast of the display by using the left/right buttons to decrease/increase the contrast value from zero to 100. Exit: Exit this sub‐menu and return to the main OSD menu. LC1503R/LC1503R‐C User’s Guide 14 Color Menu: Auto‐Color: Configure the display to maintain optimal color configuration automatically. Standard RGB: Configure the display using the sRGB color space standards. Color Temperature: Brings up the following sub‐menu items. User Mode (Default): User configurable RGB settings. Color Temperature 6500K: A standard “warm” color scheme. Color Temperature 9300K: A standard “cold” color scheme. Exit: Exit this sub‐menu and return to the Color Menu. Exit: Exit this sub‐menu and return to the main OSD menu. Image Menu: Auto‐Adjust: Configure the display to automatically determine the optimal horizontal/vertical frequencies. Clock: Manually adjust the clock/pitch controls to eliminate vertical banding. (Note: The display will be ‘wider’ when using this function.) Phase: Manually adjust the phase controls to eliminate horizontal streaking. Horizontal Position: Adjust the horizontal location of the image on the display by using the left/right adjustments. Vertical Position: Adjust the vertical location of the image on the display by using the left/right adjustments to move the image down/up. Exit: Exit this sub‐menu and return to the main OSD menu. LC1503R/LC1503R‐C User’s Guide 15 Tools Menu: OSD Control: Brings up the following sub‐menu items. OSD Time: Sets the timeout for the OSD display from two seconds to 16 seconds. OSD Horizontal Position: Adjusts the horizontal location of the OSD by using the left/right adjustments. OSD Vertical Position: Adjusts the vertical location of the OSD by using the left/right adjustments to move the display down/up. Exit: Exit this sub‐menu and return to the Tools Menu. Factory Reset: Restore the display to the original factory settings and discard any user‐configured settings. Sharpness: Manually configure the sharpness of the display. DOS‐mode/GFX‐mode: Manually select this mode to use the display in 640x400 (DOS Mode) or 720x400 (Graphics Mode). Exit: Exit this sub‐menu and return to the main OSD menu. LC1503R/LC1503R‐C User’s Guide 16 AppendixA‐VideoModes Mode Resolution H-Frequency (khz) V-Frequency (hz) IBM VGA 720 x 400 31.47 70 IBM VGA 640 x 480 31.47 60 Apple MacII 640 x 480 35.00 66 VESA VGA 640 x 480 37.86 72 VESA VGA 640 x 480 37.50 75 VESA VGA 800 x 600 35.16 56 VESA VGA 800 x 600 37.88 60 VESA VGA 800 x 600 48.08 72 VESA VGA 800 x 600 46.88 75 Apple Mac 832 x 624 49.72 75 VESA XGA 1024 x 768 56.48 70 VESA XGA 1024 x 768 60.02 75 LC1503R/LC1503R‐C User’s Guide 17 AppendixB‐Troubleshooting If you are experiencing trouble with the LCD display, refer to the following. If the problem persists, please contact your local dealer or visit Planar Support at www.planar.com/support. See support contact information on rear cover. Problem: No image appears on screen. Check that all the I/O and power connectors are installed correctly and well connected as described in the “Installation” section. Make sure the pins of the connectors are not crooked or broken. Reconfigure the resolution of your computer to make it less than or equal to 1024x768. Problem: Partial image or incorrectly displayed image. Check to see if the resolution of your computer is higher than that of the LCD display. Reconfigure the resolution of your computer to make it less than or equal to 1024x768. Problem: Image has flickering vertical line bars. Use “HORIZONTAL SIZE” to make an adjustment. Check and reconfigure the display mode of the vertical refresh rate of your graphic card to make it compatible with the LCD display. Problem: Image is unstable and flickering Use “FINE” to make an adjustment. Problem: Image is scrolling Check and make sure the VGA signal cable (or adapter) is well connected. Check and reconfigure the display mode of the vertical refresh rate of your graphic card to make it compatible with the LCD display. Problem: Vague image (characters and graphics) Use “HORIZONTAL SIZE” to make an adjustment. If the problem persists, use “FINE” to make an adjustment. LC1503R/LC1503R‐C User’s Guide 18 AppendixC‐WarningSignals If you see warning messages on your LCD screen, this means that the LCD display cannot receive a clean signal from the computer graphics card. There may be three sources for this problem. Please check the cable connections or contact your local dealer or our service center for more information. No Signal This message means that the LCD display has been powered on but it cannot receive any signal from the computer graphic card. Check all the power switches, power cables, and VGA signal cable. Going to Sleep This message means that the LCD display is entering the power saving mode. In addition, the LCD display will enter sleep mode when experiencing a sudden signal disconnection problem. The monitor can be re‐activated by pressing the keyboard, triggering the mouse or touching the screen. Out of Range This message means that the signal of the computer graphic card is not compatible with the LCD display. When the signal is not included in the “Video Modes” list we have listed in the Appendices of this manual, the LCD display will display this message. LC1503R/LC1503R‐C User’s Guide 19 AppendixD‐ProductDimensions LC1503R ‐ Front View: LC1503R/LC1503R‐C User’s Guide 20 LC1503R ‐ Rear View: LC1503R/LC1503R‐C User’s Guide 21 LC1503R ‐ Side View: LC1503R/LC1503R‐C User’s Guide 22 LC1503R‐C ‐ Front View With Cooling Kit: LC1503R/LC1503R‐C User’s Guide 23 Front View LC1503R‐C – Rear View with Cooling Kit: LC1503R/LC1503R‐C User’s Guide 24 LC1503R‐C – Side View with Cooling Kit: LC1503R/LC1503R‐C User’s Guide 25 ProductRegistration Register your Planar products today. Thank you for choosing Planar. To assure you receive all the benefits of your Planar product and services, register your Planar product today. Visit our website to register your product at www.planar.com/support/product_registration.html. Cables, Replacement Lamps and Accessories. To find cables, replacement lamps and accessories for your Planar projector, LCD monitor or touchscreen or other Planar products, visit our online store at www.planaronline.com or find other stores who carry Planar products at www.planar.com/howtobuy. SupportandService Planar is a US company based in Beaverton, Oregon and Espoo, Finland with a worldwide sales distribution network. Visit Planar at http://www.planar.com/support for product registration, operations manuals, line drawings, touch screen drivers, warranty information and access to Planar’s Technical Library for online troubleshooting. To speak with Planar Customer Support please have your model and serial number available and dial one of these numbers: Americas Support Tel: 1‐866‐PLANAR1 (866‐752‐6271) or +1 503‐748‐1100 Hours: M‐F, 8am ‐ 8pm Eastern Time | M‐F, 5am ‐ 5pm Pacific Time Europe and Asia‐Pacific Support Tel: +358‐9‐420‐01 Hours: M‐F, 7:00am ‐ 4pm CET Toll or long distance charges may apply. LC1503R/LC1503R‐C User’s Guide 26 Planar Systems, Inc. Customer Service 24x7 Online Technical Support: http://www.planar.com/support Americas Support Tel: 1‐866‐PLANAR1 (866‐752‐6271) or +1 503‐748‐1100 Hours: M‐F, 8am ‐ 8pm Eastern Time | M‐F, 5am ‐ 5pm Pacific Time Europe and Asia‐Pacific Support Tel: +358‐9‐420‐01 Hours: M‐F, 7:00am ‐ 4pm CET © 2012 Planar Systems, Inc. 04/12 Planar is a registered trademark of Planar Systems, Inc. Other brands and names are the property of their respective owners. Technical information in this document is subject to change without notice. 020‐1124‐00A LC1503R/LC1503R‐C User’s Guide 27