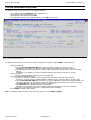
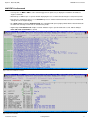
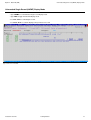
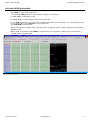
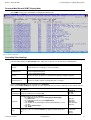
1
Compute (Bridgend) Ltd Training Manual SELCOPY/i Release 3.10 8 Merthyr Mawr Road, Bridgend, Wales UK CF31 3NH Tel: +44 (1656) 65 2222 Fax: +44 (1656) 65 2227 CBL Web Site - http://www.cbl.com This document may be downloaded from http://www.cbl.com/cblidoc.html Training Manual Contents Documentation Notes.........................................................................................................................................................................1 Summary of Changes..........................................................................................................................................................................2 First Edition (2012/12/14)........................................................................................................................................................2 Second Edition (2013/01/31)...................................................................................................................................................2 Third Edition (2013/02/27).......................................................................................................................................................2 Setup Training Material.......................................................................................................................................................................4 Option 2 - Data Edit (SDE)..................................................................................................................................................................5 The SDE Edit/Browse Entry Panel..........................................................................................................................................6 Editing Sample Dataset 1................................................................................................................................................7 Display Modes.........................................................................................................................................................................8 Display HEX Data............................................................................................................................................................8 Formatted Single-Record (MAP/FMT) Display Mode......................................................................................................9 Unformatted Multi-Record (CHAR) Display Mode.........................................................................................................10 MAP/FMT Line-Command.............................................................................................................................................11 Unformatted Single-Record (UNFMT) Display Mode.....................................................................................................12 Hex Dump (HEXD) Display Mode..................................................................................................................................13 Formatted Multi-Record (VFMT) Display Mode.............................................................................................................14 Controlling Table Headings............................................................................................................................................14 LAYOUT Command..............................................................................................................................................................15 Scrolling the Display to a specific field/record.......................................................................................................................16 Locating a Field..............................................................................................................................................................16 Locating a Record..........................................................................................................................................................17 Selecting/Ordering Visible Fields..........................................................................................................................................18 Preventing Fields from Scrolling Off-screen (HOLD).....................................................................................................19 Adding All Previously Unselected Fields to the Display.................................................................................................20 Adjusting Field Display Column-widths.................................................................................................................................21 Using FIND, EXCLUDE and ONLY commands....................................................................................................................22 Searching for Data (FIND/F)..........................................................................................................................................22 Restricting the Search to a Specific Field......................................................................................................................23 Restricting the Search to a List of Fields.......................................................................................................................24 Restricting the Search to a Range of Fields..................................................................................................................24 Excluding Records Based on Field Content (EXCLUDE/X)...........................................................................................25 Excluding Records Based on Field Content (ONLY/O).................................................................................................26 Searching Numeric Data-Type Fields............................................................................................................................27 Using a Relational Operator (EQ/NE/GT/GE/LT/LE).....................................................................................................28 Searching for INVALID Data..........................................................................................................................................29 Using CHANGE commands..................................................................................................................................................30 UNDO / REDO...............................................................................................................................................................30 Selecting only records affected by CHANGE.................................................................................................................31 Restricting the CHANGE to Specific Fields...................................................................................................................32 CHANGEing Numeric Data-Type Fields........................................................................................................................33 Filtering records using ALL(WHERE)/MORE/LESS commands...........................................................................................34 Using Multiple Selection Criteria....................................................................................................................................35 Increasing the size of the Command Input Area............................................................................................................36 Using a FILTER to Select Records on Load.........................................................................................................................37 Specifying Simple FILTER Selection Criteria.................................................................................................................38 Activating/Deactivating a FILTER..................................................................................................................................39 Working with Multiple Record-Types.....................................................................................................................................40 Automatic Record-Type Association (for Direct Copybook Overlay).............................................................................41 Record-Identification Criteria (for Direct Copybook Overlay).........................................................................................42 Locating NEXT/PREV record by Record-Type..............................................................................................................43 Selecting Visible Record-Types.....................................................................................................................................44 Creating a Structured Data Object (SDO).............................................................................................................................45 Specifying Copybook Libraries......................................................................................................................................46 Specifying Record-Type Details.....................................................................................................................................47 Specifying Record-Type Identification Criteria...............................................................................................................48 Specifying Additional Record-Types..............................................................................................................................49 Generating the SDO......................................................................................................................................................50 Browse/Edit using a generated SDO.............................................................................................................................51 Modifying Data......................................................................................................................................................................52 Modifying Record Lengths.............................................................................................................................................52 Working with Segmented Records........................................................................................................................................53 Creating an SDO defining Segmented Record-Types...................................................................................................54 Browse/Edit using a Segmented SDO...........................................................................................................................55 Navigating Segmented Datasets...................................................................................................................................56 Modifying Segmented Datasets.....................................................................................................................................57 Inserting/Deleting Primary (Base) Segments.................................................................................................................57 Modifying Segment Lengths..........................................................................................................................................57 Option 5 - File Copy/Reformat (FCOPY)..........................................................................................................................................58 The File Copy/Reformat (FCOPY) Panel..............................................................................................................................59 Copying a Standard Sequential Dataset........................................................................................................................59 Choose New Output File Access Method......................................................................................................................60 Allocate New Output File...............................................................................................................................................61 2013/02/27 15:07:40 i Training Manual Contents Option 5 - File Copy/Reformat (FCOPY) Copying PDS/PDSE Library members...........................................................................................................................62 Select Input Datasets List..............................................................................................................................................63 Select input Members....................................................................................................................................................64 Allocate New Output Library..........................................................................................................................................65 PDS Copy Statistics.......................................................................................................................................................66 Record Selection...................................................................................................................................................................67 Browse Input File...........................................................................................................................................................68 Specifying Start Record / Number of Records to Copy..................................................................................................69 Choose New Output File Access Method......................................................................................................................70 Define New VSAM Output File.......................................................................................................................................71 Copy Summary Message...............................................................................................................................................72 Browse the Output File (PF11)......................................................................................................................................73 Using a FILTER to Select Records for Copy.................................................................................................................74 Specifying Simple FILTER Selection Criteria.................................................................................................................75 Filtered Copy Summary Message..................................................................................................................................76 Browse Output File........................................................................................................................................................77 Specifying brackets in the FILTER expression..............................................................................................................78 Generate FCOPY primary command.............................................................................................................................79 Modify/Execute Generated FCOPY primary command.................................................................................................80 Browse Output from Generated Command Window......................................................................................................81 Reformat...............................................................................................................................................................................82 Specify Input Copybook.................................................................................................................................................83 Use Input Copybook as Model.......................................................................................................................................84 Create Output Copybook...............................................................................................................................................85 Specify Output Copybook..............................................................................................................................................86 Execute Reformat..........................................................................................................................................................87 Updating the Output Copybook (1)................................................................................................................................88 Updating the Output Copybook (2)................................................................................................................................89 Force Recompile of Updated Output Copybook (1).......................................................................................................90 Force Recompile of Updated Output Copybook (2).......................................................................................................91 Running File Copy/Reformat in Batch............................................................................................................................92 Option 6 - File Search/Update/Copy/Reformat (FSU).....................................................................................................................93 The File Search/Update (FSU) Panel...................................................................................................................................94 Searching a PDS/PDSE Library.....................................................................................................................................94 Search Report Output (Standard 80-column Screen Width)..........................................................................................95 Displaying Additional Hit Information Fields...................................................................................................................96 Using PF6 to edit the Hit File/Record.............................................................................................................................97 Adjusting Report Table View..........................................................................................................................................98 Selecting Library Members for Search/Update..............................................................................................................99 Condensing Selected Members by Timestamp/Size/Userid........................................................................................100 Condensing Selected Members using FIND................................................................................................................101 Condensed Member Selection List..............................................................................................................................102 Condensed Member Search Results...........................................................................................................................103 2013/02/27 15:07:40 ii Documentation Notes First Edition, November 2012 Information in this document details general features and functionality of the SELCOPY Product Suite 3.10 component, SELCOPYi. This document replaces any previous edition of SELCOPYi Training Material which are now obsolete. Copyright in the whole and every part of this document and of the SELCOPY Products Suite system and programs, is owned by Compute (Bridgend) Ltd (hereinafter referred to as CBL), whose registered office is located at 8 Merthyr Mawr Road, Bridgend, Wales, UK, CF31 3NH, and who reserve the right to alter, at their convenience, the whole or any part of this document and/or the SELCOPY Product Suite system and programs. SELCOPY Product Suite for z/OS, z/VM (CMS) and z/VSE operating systems, which includes SELCOPY, SELCOPY/i and CBLVCAT, is available for download and install from http://www.cbl.com/selcdl.html. The following publications for SELCOPY Product Suite and its component products are available in Adobe Acrobat PDF format at CBL web page http://www.cbl.com/selcdoc.html: • SELCOPY Product Suite Customisation Guide • SELCOPY User Manual • CBLVCAT User Manual • SELCOPYi Reference and User Guide • SELCOPYi Text Editor (CBLe) Manual • SELCOPYi Structured Data Editor Manual • SELCOPYi Training Material Manual No reproduction of the whole or any part of the SELCOPY Product Suite system and programs, or of this document, is to be made without prior written authority from Compute (Bridgend) Ltd. At the time of publication, this document is believed to be correct. Where the program product differs from that stated herein, Compute (Bridgend) Ltd reserve the right to revise either the program or its documentation at their discretion. CBL do not warrant that upward compatibility will be maintained for any use made of this program product to perform any operation in a manner not documented within the user manual. The following generic terms are used throughout this document to indicate all available versions and releases of IBM mainframe operating systems: MVS - z/OS, OS/390, MVS/ESA, MVS/XA, MVS/SP, OS. VSE - z/VSE, VSE/ESA, VSE/SP, DOS. CMS - z/VM, VM/ESA, VM/XA, VM/SP. All - All MVS, VSE and CMS operating systems. 2013/02/27 15:07:40 Training Manual 1 Summary of Changes The SELCOPYi Training material and documentation were introduced for Release 3.10 in PTF RS00021. First Edition (2012/12/14) Option 2 - Data Edit ◊ The SDE Edit/Browse Entry Panel ◊ Display Modes ◊ LAYOUT Command ◊ Scrolling the Display to a specific field/record ◊ Selecting/Ordering Visible Fields ◊ Adjusting Field Display Column-widths ◊ Using FIND, EXCLUDE and ONLY commands ◊ Using CHANGE commands ◊ Filtering records using ALL(WHERE)/MORE/LESS commands ◊ Using a FILTER to Select Records on Load ◊ Working with Multiple Record-Types ◊ Creating a Structured Data Object (SDO) ◊ Modifying Data ◊ Working with Segmented Records Second Edition (2013/01/31) Option 5 - File Copy/Reformat ◊ The File Copy/Reformat (FCOPY) Panel ◊ Copying a Standard Sequential Dataset ◊ Copying PDS/PDSE Library members ◊ Record Selection ◊ Specifying Start Record / Number of Records to Copy ◊ Browse the Output File (PF11) ◊ Using a FILTER to Select Records for Copy ◊ Browse Output File ◊ Specifying brackets in the FILTER expression. ◊ Generate FCOPY primary command ◊ Modify/Execute Generated FCOPY primary command ◊ Reformat ◊ Create Output Copybook ◊ Updating the Output Copybook ◊ Force Recompile of Updated Output Copybook ◊ Running File Copy Reformat in Batch Third Edition (2013/02/27) Option 6 - File Search/Update ◊ The File Search/update (FSU) Panel ◊ Searching a PDS/PDSE Library ◊ Search Report Output (Standard 80-column Screen Width) ◊ Displaying Additional Hit Information Fields ◊ Using PF6 to edit the Hit File/Record ◊ Adjusting Report Table View ◊ Selecting Library Members for Search/Update ◊ Condensing Selected Members by Timestamp/Size/Userid ◊ Condensing Selected Members using FIND ◊ Condensed Member Selection List ◊ Condensed Member Search Results 2013/02/27 15:07:40 Training Manual 2 Summary of Changes 2013/02/27 15:07:40 Third Edition (2013/02/27) Training Manual 3 Setup Training Material Sample data files and COBOL/PL1 copybooks are supplied with the SELCOPYi program. To create your own personal copies of these datasets, allowing you to follow the training manual in real time, select option T from the SELCOPYi Primary Option Menu. Figure 1. SELCOPYi - Setup SELCOPY/i Training Material. 2013/02/27 15:07:40 Training Manual 4 Option 2 - Data Edit (SDE) Data set records may have an associated file structure that maps field information (position, length and data type) for all data within each data set record. These structures often exist as a PL/1 or COBOL copybook. The SELCOPYi Structured Data Environment ( SDE) allows users to display and process structured data sets using a pre-defined SDE structure so that record data is formatted and arranged in field columns. An SDE structure may be generated from a copybook or using SDE's Create Structure internal syntax, and can contain a number of mappings, one for each different type of data set record. During this section you will learn how to: • Change Display Modes • Use the LAYOUT command to display the active structure • Scroll the display to an invidual Field • Select/Order visible Fields • Adjust Field display column-widths • Use the FIND, EXCLUDE and ONLY commands • Use the CHANGE command • Use UNDO/REDO • Filter records using ALL/MORE/LESS commands • Work with Multiple Record Types with different Layouts • Modify record data/length • Work with Segmented Records 2013/02/27 15:07:40 Training Manual 5 Option 2 - Data Edit (SDE) The SDE Edit/Browse Entry Panel The SDE Edit/Browse Entry Panel The SDE panel may be started using any of the following methods: • Select option 2 from the SELCOPYi Primary Option Menu (=). • At any primary command prompt type =2. • At any primary command prompt type SDE. • From any dataset, library or HFS path list window, use the SD line-command. Figure 2. SELCOPYi - Data Edit (SDE) Panel (=2). To follow the demonstration use the panel to edit the sample dataset using the supplied COBOL or PL1 copybook. • Specify the Data File: ♦ Type userpfx.SELCTRN.ZZST1DAT in the Name field, where userpfx is your own user prefix. If wildcards are specified then a dataset list will be displayed from which you can make a selection. ♦ The Member field may be left blank, but regardless will be ignored when the Name field refers to a non-PDS dataset. If wildcards are specified then a member list will be displayed from which you can make a selection. • Specify the Action: ♦ Activate option Edit Full by entering a / in the left margin field. • Specify the Structure/Copybook overlay: ♦ Activate the option by entering a / in the left margin field. This option is provided so that you may deactivate / reactivate structure formatting without needing to remove / retype the dataset / member name. ♦ Type userpfx.SELCTRN.SAM1 in the Dsn field, to specify the PDS library containing the supplied COBOL / PL1 copybook. If wildcards are specified then a dataset list will be displayed from which you can make a selection. ♦ Type ZZST1CPC in the Member field (for COBOL installations). Type ZZST1CPP in the Member field (for PL1 installations). If wildcards are specified then a member list will be displayed from which you can make a selection. ♦ Check the Type option for Cobol or PL1 as appropriate for your installation. • Press ENTER to edit the sample dataset. Note: The following sample commands and screen-shots depict use of the COBOL copybook. 2013/02/27 15:07:40 Training Manual 6 Option 2 - Data Edit (SDE) Editing Sample Dataset 1 Editing Sample Dataset 1 • The first sample dataset represents a music collection, with each "Track" described by a separate logical record. • The initial view of the data is presented in formatted multi-record (table) display mode. • Use PF10 / PF11 to scroll the display left/right in order to view further data fields. Figure 3. SELCOPYi - SDE Table View. 2013/02/27 15:07:40 Training Manual 7 Option 2 - Data Edit (SDE) Display Modes Display Modes Display HEX Data • Type HEX ON to set hexadecimal display on. • Type HEX OFF to set hexadecimal display off. • Type HEX to toggle hexadecimal display on/off. • Type Help HEX for full information. Notes: 1. Where sample commands are provided, uppercase denotes the minimum abbreviation. 2. To use any SDE command from a non-SDE browse / edit command prompt you must prefix the command with SD . e.g. SD Help HEX 3. From an SDE browse/edit command prompt the SD prefix is unnecessary. e.g. Help HEX Figure 4. SELCOPYi - SDE HEX ON. 2013/02/27 15:07:40 Training Manual 8 Option 2 - Data Edit (SDE) Formatted Single-Record (MAP/FMT) Display Mode Formatted Single-Record (MAP/FMT) Display Mode • Type MAP or FMT to set formatted single-record display mode. • Use PF7 / PF8 to scroll the display up/down in order to view further fields within the same record. • Use PF10 / PF11 to scroll the display to the previous/next record. • Use the SHOW (S) command to control various aspects of the display. Type Help Show for full information. • Use the OFFSET (OFST) command to control the format of the field offset column. Type Help OFST for full information. • Use the GROUP (G) command to control display of group fields. Type Help Group for full information. • Type HEX to toggle hexadecimal display on/off. Figure 5. SELCOPYi - SDE MAP/FMT. 2013/02/27 15:07:40 Training Manual 9 Option 2 - Data Edit (SDE) Unformatted Multi-Record (CHAR) Display Mode Unformatted Multi-Record (CHAR) Display Mode • Type CHAR to set unformatted multi-record display mode. • For non-segmented structures, this display is the equivalent of removing the structure. • For segmented structures, each line represents an individual segment in its raw state, with the prefix area indicating the physcial record to which it belongs. • Type HEX to toggle hexadecimal display on/off. Figure 6. SELCOPYi - SDE CHAR. 2013/02/27 15:07:40 Training Manual 10 Option 2 - Data Edit (SDE) MAP/FMT Line-Command MAP/FMT Line-Command • You may also use MAP or FMT as a line-command (typed in the prefix area) to display the marked line in formatted single-record mode. • Alternatively use PF2 to open a separate window displaying the focus record in formatted single-record (zoomed) mode. • Note that on a standard 80-column screen SELCOPYi operates in window-maximised mode so that the new window will entirely obscure the original display. • On a wide screen operating in windowed mode, the new window will open top-right justified, with the intention that both the table view and single record view are simultaneously visible. • Significantly for windowed mode, multiple "zoomed" windows may be opened for different records, with the ability to move and resize each window as desired. Figure 7. SELCOPYi - SDE MAP Line-Command. Figure 8. SELCOPYi - SDE ZOOM. 2013/02/27 15:07:40 Training Manual 11 Option 2 - Data Edit (SDE) Unformatted Single-Record (UNFMT) Display Mode Unformatted Single-Record (UNFMT) Display Mode • Type UNFMT to set unformatted single-record display mode. • Type HEX to toggle hexadecimal display on/off. • Use PF7 / PF8 to scroll along the record. • Use PF10 / PF11 to scroll the display to the previous/next record. Figure 9. SELCOPYi - SDE UNFMT. 2013/02/27 15:07:40 Training Manual 12 Option 2 - Data Edit (SDE) Hex Dump (HEXD) Display Mode Hex Dump (HEXD) Display Mode • Type HEXD to set hex-dump display mode. You may add the NEW parameter in order to open the display in a new window. • Use PF7 / PF8 to scroll along the record. • Use PF10 / PF11 to scroll the display to the previous/next record. • Use the SPM command to show a popup menu providing display options for the hex-dump screen. The popup menu may also be displayed by pressing PF4 with the cursor in data area. Type Help HEXD for full information. • The offset field on the first displayed line of data may also be overtyped in order to scroll the display to the specified offset within the record. • While in multi-record (table) view the HEXD line-command may also be typed into record the prefix area to show the selected record in hex-dump format. Figure 10. SELCOPYi - SDE HEXD. 2013/02/27 15:07:40 Training Manual 13 Option 2 - Data Edit (SDE) Formatted Multi-Record (VFMT) Display Mode Formatted Multi-Record (VFMT) Display Mode • Type VFMT to return to the default multi-record formatted display mode. Figure 11. SELCOPYi - SDE VFMT. Controlling Table Headings • A fixed heading displays the Record Type name. Other items on this line are described in the following table. Item Description Fixed(n) Displayed when the record-type is of a fixed length n. Variable(n1,n2) Displayed when the record-type may vary in length. Its lower length limit being n1. Its upper length limit being n2. Offset=n Indicates the offset (n) into the record at which record-type mapping is applied. Data Elements=n Indicates the number of fields (n) mapped by this record-type. • The first column heading is fixed and displays the Field Name. • Subsequent column headings are optional. The table below indicates the primary commands used to control each one. Item Primary Commands Description Field Number Displays the field reference number (#n). REF ON REF OFF Data Type Optionally displays one of the following: 1. A combination field of the format data-type position:length. e.g. AN 111:30 2. A combination field of the format length/format. e.g. 30/CHAR 3. The position or offset defining the field's location within the record. e.g. 111 4. The field's picture string. e.g. X(30) TYPE ON TYPE OFF TYPE FMT TYPE OFFSET TYPE PIC Scale Displays the scale. Use command OFST X to display a hexadecimal offset scale. SCALE ON SCALE OFF OFST P OFST X 2013/02/27 15:07:40 Training Manual 14 Option 2 - Data Edit (SDE) Controlling Table Headings LAYOUT Command • Type LAYout to display the current structure details in a separate list-window. • Select the Text menu-bar item or type TEXT to place the information in a text-edit document window, which may be saved in the usual fashion. • From the LAYOUT window, use PF3 to return to the edit/browse view. Figure 12. SELCOPYi - SDE VFMT. 2013/02/27 15:07:40 Training Manual 15 Option 2 - Data Edit (SDE) LAYOUT Command Scrolling the Display to a specific field/record. Locating a Field • Use the LOCATE command to scroll a formatted (either multi- or single-record) display to a specific field. LOCATE may be abbreviated to L. • Field names may be abbreviated. • The field may be referred to either by its name or by its field reference number, e.g. using the supplied sample COBOL copybook the following commands are functionally equivalent. ♦ L SAMP ♦ L #11 The result of issuing either of these commands from a VFMT display is shown below. • The parameters FIRST, LAST, NEXT or PREV may optionally be added to the command, with NEXT being the default. Figure 13. SELCOPYi - SDE LOCATE field. 2013/02/27 15:07:40 Training Manual 16 Option 2 - Data Edit (SDE) Locating a Record Locating a Record • Use the LOCATE nnn command to scroll to a specific record number nnn. • Alternatively you may use :nnn e.g. the following commands are functionally equivalent. ♦ L 1001 ♦ :1001 The result of issuing either of these commands from a VFMT display is shown below. • The LOCATE command may also be used to ♦ scroll a VSAM ESDS to the record at a specific RBA. ♦ scroll a VSAM KSDS to the record at a specific key, partial key or RBA. • Type Help Locate for full information. Figure 14. SELCOPYi - SDE LOCATE record. 2013/02/27 15:07:40 Training Manual 17 Option 2 - Data Edit (SDE) Selecting/Ordering Visible Fields Selecting/Ordering Visible Fields • Type SELect followed by a comma separated list of fields in order to restrict the display to those fields of particular interest. • Fields may be referred to either by their name or by their field reference number. • Type either of the following commands to produce the results displayed below. ♦ SEL TRACK-NUM,ALBUM,ARTIST,NAME ♦ SEL #3,#7,ARTIST,NAME Figure 15. SELCOPYi - SDE SELECT 1. • The following results will be displayed after scrolling right once. Figure 16. SELCOPYi - SDE SELECT 2. • Type SELect * to reset the display to show all fields in their default order 2013/02/27 15:07:40 Training Manual 18 Option 2 - Data Edit (SDE) Preventing Fields from Scrolling Off-screen (HOLD) Preventing Fields from Scrolling Off-screen (HOLD) • By adding the Hold keyword following the field-name/ref, that field may be prevented from scrolling off the screen. • HOLD need only be specified once i.e. for the last (right-most) of a sequence of held fields. • Type the following command to produce the results displayed below. SEL #3 HOLD,#5,ALBUM,ARTIST • Held fields are hilighted in a different colour. Type Help COLour for full information. Figure 17. SELCOPYi - SDE SELECT 3. 2013/02/27 15:07:40 Training Manual 19 Option 2 - Data Edit (SDE) Adding All Previously Unselected Fields to the Display Adding All Previously Unselected Fields to the Display • By adding the pseudo-field asterisk (*) to the end of the SELECT command, all previously unselected fields will be included in their default order. • Type the following command then scroll right to produce the results displayed below. SEL #3 H,#5,ALBUM,ARTIST,* Figure 18. SELCOPYi - SDE SELECT 4. 2013/02/27 15:07:40 Training Manual 20 Option 2 - Data Edit (SDE) Adjusting Field Display Column-widths Adjusting Field Display Column-widths • Use COLWidth command to control the number of characters occupied by any particular field. • Type the following sequence of commands to produce the results below. ♦ SEL #3,#5 H,ALBUM,ARTIST,* ♦ COLW NAME 20 ♦ COLW #7 20 ♦ COLW #6 18 Figure 19. SELCOPYi - SDE VFMT. After pressing PF11 the display will be updated as follows. Figure 20. SELCOPYi - SDE VFMT. 2013/02/27 15:07:40 Training Manual 21 Option 2 - Data Edit (SDE) Using FIND, EXCLUDE and ONLY commands Using FIND, EXCLUDE and ONLY commands Searching for Data (FIND/F) Type the following commands to produce the results displayed below. • SEL * •L1 • F HEART Press PF5 (RFIND) to search for the next occurrence. Figure 21. SELCOPYi - SDE FIND 1. 2013/02/27 15:07:40 Training Manual 22 Option 2 - Data Edit (SDE) Restricting the Search to a Specific Field Restricting the Search to a Specific Field The search may be restricted to a specific field e.g. • F ALABAMA #5 If fields are to be referred to by name, then they must be specified in brackets e.g. • F ALABAMA (NAME) If none are specified then the search will be restricted to those fields specified by the most recent SELECT command, provided one has been issued. Otherwise all fields will be searched in their default order. Figure 22. SELCOPYi - SDE FIND 2. 2013/02/27 15:07:40 Training Manual 23 Option 2 - Data Edit (SDE) Restricting the Search to a List of Fields Restricting the Search to a List of Fields • The search may be restricted to a list of comma separated fields e.g. ♦ F ALABAMA #5,#6 • Again, if fields are to be referred to by name, then they must be specified in brackets e.g. ♦ F ALABAMA (NAME,ARTIST) Figure 23. SELCOPYi - SDE FIND 3. Restricting the Search to a Range of Fields • A range of fields may also be specified by separating the start and end field with a colon e.g. ♦ F ALABAMA #2:#6 • Again, if any field is to be referred to by name, then they must be specified in brackets e.g. ♦ F ALABAMA (#2:ARTIST) • Type Help Change for full information. 2013/02/27 15:07:40 Training Manual 24 Option 2 - Data Edit (SDE) Excluding Records Based on Field Content (EXCLUDE/X) Excluding Records Based on Field Content (EXCLUDE/X) • The EXCLUDE command takes the same parameters as FIND e.g. ♦ X ALL ALABAMA #5,#6 Figure 24. SELCOPYi - SDE EXCLUDE. 2013/02/27 15:07:40 Training Manual 25 Option 2 - Data Edit (SDE) Excluding Records Based on Field Content (ONLY/O) Excluding Records Based on Field Content (ONLY/O) • The ONLY command may be used to display only the matching records and also takes the same parameters as FIND e.g. ♦ ONLY ALABAMA #5,#6 • ONLY may be abbreviated to O. • Use the ALL command to redisplay any excluded records. Figure 25. SELCOPYi - SDE ONLY 1. 2013/02/27 15:07:40 Training Manual 26 Option 2 - Data Edit (SDE) Searching Numeric Data-Type Fields Searching Numeric Data-Type Fields • Numeric fields may also be searched without needing to be concerned about the underlying data-type (i.e. zoned-decimal, packed-decimal, binary or floating-point). e.g. ♦ ONLY 1 (TRACK-NUM) • Type HIDE to suppress display of shadow records. • Type RES HIDE or SHAD ON resume display of shadow records. Figure 26. SELCOPYi - SDE ONLY 2. 2013/02/27 15:07:40 Training Manual 27 Option 2 - Data Edit (SDE) Using a Relational Operator (EQ/NE/GT/GE/LT/LE) Using a Relational Operator (EQ/NE/GT/GE/LT/LE) • A relational operator (defaulting to EQ) may also be specified before the search value. Supported operators are as follow: Operator EQ NE GT GE LT LE Description Data must be equal to value. (Default) Data must be not equal to value. Data must be greater than value. Data must be greater than or equal to value. Data must be less than value. Data must be less than or equal to value. • Type the following commands to produce the results displayed below, illustrating record selection based on the content of the binary numeric field BIT-RATE. ♦ SEL BIT-RATE,* ♦ ONLY GT 300 (BIT-RATE) Figure 27. SELCOPYi - SDE ONLY 3. 2013/02/27 15:07:40 Training Manual 28 Option 2 - Data Edit (SDE) Searching for INVALID Data Searching for INVALID Data • The keyword INVALID may also be specified to search for fields containing data that is invalid according to its defined data-type. e.g. X'ABCD' in a packed-decimal field. • Type the following commands to produce the results displayed below. ♦ SEL #11,#13 H,* ♦ HEX ON ♦ ONLY INVALID #11,#13 Figure 28. SELCOPYi - SDE ONLY 4. 2013/02/27 15:07:40 Training Manual 29 Option 2 - Data Edit (SDE) Using CHANGE commands Using CHANGE commands • Type the following commands to produce the results displayed below. ♦ SEL TRACK-NUM,NAME HOLD,ALBUM,ARTIST,* ♦ ;C '&' '&' • Note: Semi-colon (;) is the default command-separator character. In order to use the separator character as a legitimate part of a command string we must suspend its normal handling. This can be done by either 1. Updating the separator character in the Settings panel, issuing the command, then resetting the separator character. This is cumbersome and upsetting! 2. As in the above example, let SELCOPYi automatically suspend separator handling for the duration of a single command, simply by prefixing that command with semi-colon (i.e. the prevailing separator character). • Press PF5 (RFIND) to search for the next occurrence. • Press PF6 (RCHANGE) to change it. • Or add the ALL parameter to the CHANGE command to change all occurrences. • Type Help Change for full information. Figure 29. SELCOPYi - SDE CHANGE 1. UNDO / REDO Note that all modifications may be individually undone/redone using PF22 / PF23 (normally Shift-PF10 / PF11) which are set to execute the UNDO/REDO primary commands. • Consecutive modifications may be undone by pressing PF22 repeatedly. • Consecutive modifications may be redone by pressing PF23 repeatedly. • The UNDOING primary command controls the following aspects: 1. Whether the UNDO/REDO facility is activated. 2. The number of modification levels maintained. 3. The maximum amount of storage allocated. • Type Query UNDOING to determine your current settings. 2013/02/27 15:07:40 Training Manual 30 Option 2 - Data Edit (SDE) Selecting only records affected by CHANGE Selecting only records affected by CHANGE After applying the above CHANGE to all records, you may wish to display only the changed records. To do this type • ALL Changed • Type Help ALL for full information. Figure 30. SELCOPYi - SDE ALL CHANGED. 2013/02/27 15:07:40 Training Manual 31 Option 2 - Data Edit (SDE) Restricting the CHANGE to Specific Fields Restricting the CHANGE to Specific Fields Just like FIND, EXCLUDE and ONLY, the CHANGE command may be restricted to one or more specific fields. e.g. • C ALL '21' 'Twenty-One' (NAME) Figure 31. SELCOPYi - SDE CHANGE 2. 2013/02/27 15:07:40 Training Manual 32 Option 2 - Data Edit (SDE) CHANGEing Numeric Data-Type Fields CHANGEing Numeric Data-Type Fields Next we'll demonstrate CHANGE of a numeric data-type field, using a relational operator. Type the following command to change all values greater than or equal to 10, in the TRACK-NUM field only, to 999. • C ALL GE 10 999 #3 Figure 32. SELCOPYi - SDE CHANGE 3. 2013/02/27 15:07:40 Training Manual 33 Option 2 - Data Edit (SDE) Filtering records using ALL(WHERE)/MORE/LESS commands Filtering records using ALL(WHERE)/MORE/LESS commands As an alternative to using the ONLY, FIND and EXCLUDE commands, records may be 'filtered' by (a potentially complex) SQL-style expression using the ALL, MORE and LESS commands. • ALL excludes all records except those that match the selection criteria. • MORE adds to the included records any excluded records that match the selection criteria. • LESS excludes any included records that match the selection criteria. • WHere is a synonym for ALL. Type the following commands to produce the results below. • SELECT #10,#3,#5 H,#7,#6,* • ALL BIT-RATE > 300 Figure 33. SELCOPYi - SDE ALL 1. 2013/02/27 15:07:40 Training Manual 34 Option 2 - Data Edit (SDE) Using Multiple Selection Criteria Using Multiple Selection Criteria Selection criteria expressions may specify multiple conditions. • ALL BIT-RATE > 300 OR #10 < 100 Figure 34. SELCOPYi - SDE ALL 2. 2013/02/27 15:07:40 Training Manual 35 Option 2 - Data Edit (SDE) Increasing the size of the Command Input Area Increasing the size of the Command Input Area Complex expressions may require more space to type than is available on a single commmand line. Type CLN to show an options dialog, allowing you increase the number of command lines visible for the current display window. Figure 35. SELCOPYi - SDE Command Line Options. Figure 36. SELCOPYi - SDE ALL 3. 2013/02/27 15:07:40 Training Manual 36 Option 2 - Data Edit (SDE) Using a FILTER to Select Records on Load Using a FILTER to Select Records on Load You may wish to select records based on specific criteria during initial load of the file into the SELCOPYi Structured Data Editor. For example, to load only the first 20 records that contain a value in position 348 (the year component of RELEASE-DATE) • that is greater than '0000' • but less than '1980' Choose the Quick Filter feature from the SDE Edit / Browse Entry Panel (=2). • Activate the Filter option by entering a / in the left margin field. • Enter Q to select Quick filter. • Press PF6 to define or modify the filter selection-criteria. Figure 37. SELCOPYi - SDE Quick FIlter 1. 2013/02/27 15:07:40 Training Manual 37 Option 2 - Data Edit (SDE) Specifying Simple FILTER Selection Criteria Specifying Simple FILTER Selection Criteria • Enter 20 in the Limit> field to restrict the number of records selected. • Enter I in the Type> field to specify that selected records should be included in the load. • Enter 348 into the Position column of table row 1. • Enter 4 into the Length column. • Enter > (greater-than) into the ROp (Relational Operator) column. Alternatively enter blank to get a list of available operators from which you may make your selection (by placing the cursor and pressing ENTER). • Enter '0000' into the Value column. ♦ For simple case-insensitive character strings there is no need to add quotes (this will be done automatically). ♦ You may specify the string using C'ABCD' notation if case-sensitivity is required. ♦ Hex strings may be specified using X'1234' notation. • Replicate table entry line 1 by typing R into the table prefix area (000001). The AND/OR column will automatically set to AND. • Enter < (less-than) into the ROp (Relational Operator) column of inserted table row 2. • Enter '1980' into the Value column. Figure 38. SELCOPYi - SDE Quick Filter 2. 2013/02/27 15:07:40 Training Manual 38 Option 2 - Data Edit (SDE) Activating/Deactivating a FILTER Activating/Deactivating a FILTER • Press PF3 to return to the SDE Edit/Browse Entry Panel. • Press ENTER to edit the sample file using the active filter. • To activate/deactivate the filter simply check/uncheck the Filter option. • A saved filter may be activated by specifying filter type F and entering the saved filter dataset / member name. • To define a saved filter either: 1. Select the Filter option (=10) from the SELCOPYi Primary Option Menu. 2. At the SDE Edit / Browse Entry Panel, specifying filter type F, enter the saved filter dataset/member name then press PF6. • A saved filter may define selection criteria referring to the values of named (formatted) fields. • Formatted selection criteria are individually specified for each defined record-type. Figure 39. SELCOPYi - SDE Quick Filter 3. 2013/02/27 15:07:40 Training Manual 39 Option 2 - Data Edit (SDE) Working with Multiple Record-Types Working with Multiple Record-Types Files with multiple record-types may be mapped by: 1. Multiple (COBOL or PL1) copybooks. 2. A single copybook with multiple 01-LEVEL entries, each defining a separate record-type. 3. A SELCOPYi Structured Data Object (SDO) which may be generated from one or more copybooks, using the Structure option from the Primary Option Menu (=9). The second sample dataset contains the same information as the first, but is comprised of three distinct record-types: 1. ARTIST 2. ALBUM 3. TRACK To reproduce the following screen-shot browse the sample dataset in its raw state, i.e. without applying a copybook / structure overlay. Use the Data Edit (=2) panel to: • Specify the Data File: ♦ Type userpfx.SELCTRN.ZZST2DAT in the Name field, where userpfx is your own user prefix. If wildcards are specified then a dataset list will be displayed from which you can make a selection. • Specify the Action: ♦ Activate option Browse Data by entering a /. • Deactivate the Structure/Copybook overlay: ♦ Uncheck the option by removing the a /. This option is provided so that you may deactivate / reactivate structure formatting without needing to remove / retype the dataset / member name. • Press ENTER to edit the sample dataset. • Type RECLEN to switch on/off the display of record length column, which displays each individual record's length in front of the data. You will notice that: • Record 1 is length=71 and contains '1' in position 1 indicating it is an ARTIST record. • Record 2 is also length=71 but contains '2' in position 1 indicating it is an ALBUM record. • Records 3 - 15 are length=268 and contain '3' in position 1 indicating they are TRACK records. Figure 40. SELCOPYi - SDE Sample Dataset 2. 2013/02/27 15:07:40 Training Manual 40 Option 2 - Data Edit (SDE) Automatic Record-Type Association (for Direct Copybook Overlay) Automatic Record-Type Association (for Direct Copybook Overlay) Exit unformatted browse of Sample Dataset 2, then re-edit specifying Structure / Copybook overlay using sample copybook #2, which contains 01-LEVEL entries for each of the 3 record-types. • Specify the Structure/Copybook overlay: ♦ Activate the option by entering a / in the left margin field. ♦ Type userpfx.SELCTRN.SAM1 in the Dsn field, to specify the PDS library containing the supplied COBOL / PL1 copybook. This dataset name should already be in place (same as previous sample). ♦ Type ZZST2CPC in the Member field (for COBOL installations). Type ZZST2CPP in the Member field (for PL1 installations). ♦ Check the Type option for Cobol or PL1 as appropriate for your installation. • Press ENTER to edit the sample dataset. Unlike some other products, SELCOPYi is able to display files with multiple record-types in Formatted Multi-Record (VFMT) Display Mode with all record-types simultaneously visible, a set of record-type column headings being displayed for each new group of one or more consecutive records of the same type. You will notice that SELCOPYi has attempted to automatically assign record-types, by matching between the individual record-length to the length defined by the copybook for each record-type. Where this process is unable to uniquely identify a record-types, the first matching record-type is assigned. The initial view of the sample dataset shows that: • ARTIST record #1 has been assigned the correct record-type. (unique match on fixed record length=268). • ALBUM record #2 has automatically been assigned the incorrect record-type (ARTIST). (first match on fixed record length=71). • TRACK record #3 has been assigned the correct record-type. (first match on fixed record length=71). Figure 41. SELCOPYi - SDE Automatic Record-Type Id. 2013/02/27 15:07:40 Training Manual 41 Option 2 - Data Edit (SDE) Record-Identification Criteria (for Direct Copybook Overlay) Record-Identification Criteria (for Direct Copybook Overlay) Where it is not possible to automatically infer the correct record-type assocation from the record-length, record-identification must be explicitly specified. As formatting is provided directly by our sample COBOL or PL1 copybook, then in order to specify record-identification we must use either of the following methods. • Press PF4 to display the Utilities Menu then: 1. Select option 6 - Modify record-type Identification criteria. 2. In the Use When column for the ALBUM table entry, type any of following equally valid expressions: ◊ RT='2' ◊ substr(record,1,1)='2' ◊ left(record,1)='2' 3. Press ENTER to register the update.. 4. Press PF3 repeatedly to return to the browse/edit view.. • Type any of the following primary commands: 1. USE ALBUM WHEN RT='2' 2. USE ALBUM SUBSTR(RECORD,1,1)='2' 3. USE ALBUM LEFT(RECORD,1)='2' Figure 42. SELCOPYi - SDE Explicit Record-Identification. Record-Identification criteria defined for direct copybook overlay will persist throughout the SELCOPYi session, but will need to be restablished beyond that. A SELCOPYi Structured Data Object (SDO) permanebtly consolidates the information defined by one or more copybooks, potentially defining multiple record-types, along with the Record-Identification criteria for each. An SDO is stored in a dataset (typically a library member), and provides significant performance improvement over direct copybook overlay for all SELCOPYi Structured Data components that are capabale of record formatting e.g. Browse / Edit, File-Search, File-Reformat, File-Compare. 2013/02/27 15:07:40 Training Manual 42 Option 2 - Data Edit (SDE) Locating NEXT/PREV record by Record-Type Locating NEXT/PREV record by Record-Type • In both formatted multiple-record (VFMT) and formatted single-record (FMT / MAP) display modes, the NEXT (N) and PREV (P) primary commands may be used to navigate to records, based on their record-type. • Type NEXT ARTIST to scroll to the next record of the type ARTIST. • Type N / to scroll to the next record of the same type as the focus record. • Type N ? to scroll to the next record of a different type from focus record. • Type Help NEXT for full information. • It's often handy to set a PF key temporarily for the browse/edit session. e.g. to set PF5 / PF6 to jump to the previous/next ARTIST record, type the following primary commands. • PF 5 PREV ARTIST • PF 6 NEXT ARTIST 2013/02/27 15:07:40 Training Manual 43 Option 2 - Data Edit (SDE) Selecting Visible Record-Types Selecting Visible Record-Types Since SELCOPYi is capable of displaying multiple record-types simultaneously in Formatted Multi-Record (VFMT) Display Mode, it is handy to be able to select precisely which record-types are visible at any given time. Records of any unselected record-type are represented by "shadow" lines (just like excluded records). This feature is controlled by the SHADOW primary command. Record-types may be selected / deselected using either: 1. The VIEW (V/V+/V-) primary command. e.g. ♦ To select only TRACK records type: ◊ V TRACK ♦ To reselect all record-types type: ◊V* ♦ To select only ARTIST and ALBUM records type: ◊ V ARTIST,ALBUM ♦ To deselect ARTIST and ALBUM records type: ◊ V- ARTIST,ALBUM ♦ To additionally select ALBUM and TRACK records type: ◊ V+ ALBUM,TRACK 2. The V, V+ or V-line-commands. ♦ Use V to select only records of the focus record-type. ♦ Use V+ to additionally select records of the focus (shadow line)record-type. ♦ Use V- to deselect records of the focus record-type. Figure 43. SELCOPYi - SDE Select Visible Record-Types. Note: In Formatted (VFMT/FMT) Display Modes, some primary commands are record-type specific (i.e. they act on records of one type only), and are sensitive to the focus record-type i.e. the record-type of the record at the cursor (or at the top of screen if the cursor is on the command line). e.g. the following commands are record-type sensitive: • FIND, CHANGE, EXCLUDE and ONLY • LOCATE, ALL(WHERE), MORE and LESS To avoid ambiguity when issuing any of these commands you may wish to either: 1. Select a single record-type using the VIEW command. 2. Temporarily suspend record-type formatting using the CHAR command. 2013/02/27 15:07:40 Training Manual 44 Option 2 - Data Edit (SDE) Creating a Structured Data Object (SDO) Creating a Structured Data Object (SDO) An SDO may be generated from COBOL/PL1 copybooks using any of the following methods: • Select option 9 - Structure from the SELCOPYi Primary Option Menu, then select option 1 - Copybook. • At any primary command prompt type =9.1. • At any primary command prompt type SDO. The following example will use the panel to generate an SDO from the ZZST2CPC (sample #2) COBOL copybook, containing three record-types along with their respective record-identification criteria. • Specify the Structure File to Create: ♦ Type userpfx.SELCTRN.SDO in the Dsn field, where userpfx is your own user prefix. ♦ Type ZZST2 in the Member field. • Optionally Specify a Title: ♦ Activate the option by entering a / in the left margin field. ♦ Type a short (up to 30 characters) title e.g. SELCOPYi Training - Sample 2 • Optionally Specify a Description: ♦ Activate the option by entering a / in the left margin field. ♦ Type a longer (up to 124 characters) description e.g. Training Material: Sample Record Collection Structure Multiple Record-Types (ARTIST,ALBUM,TRACK) Figure 44. SELCOPYi - SDE Main Panel 1. 2013/02/27 15:07:40 Training Manual 45 Option 2 - Data Edit (SDE) Specifying Copybook Libraries Specifying Copybook Libraries Select option 1 to specify the dataset name(s) of the libraries containing your COBOL / PL1 copybooks using an editable table. • Insert a new line into the Copybook Library table by typing I into the table prefix area (000001). • Type userpfx.SELCTRN.SAM1 into inserted table row 1. • Press PF3 to return to the SDO main panel. Figure 45. SELCOPYi - SDE Copybook Libraries Panel. 2013/02/27 15:07:40 Training Manual 46 Option 2 - Data Edit (SDE) Specifying Record-Type Details Specifying Record-Type Details Select option 2 to specify the source (copybook member name), identification criteria and other optional details for each record-type. • Define the ARTIST record-type as follows: 1. Insert a new line into the table by typing I into the table prefix area (000001). 2. Type ZZST2CPC (ZZST2CPP for PL1 installations) into the Copybook Library Member field of inserted table row 1. 3. The Type field will automatically be set to PRI indicating a primary record-type (requiring explicit record-type identification criteria). You may accept this default. Press PF1 with cursor in this field for additional information. 4. The Start Level field will automatically be set to 1 indicating the record-type is defined at LEVEL 01. You may accept this default also. Press PF1 with cursor in this field for additional information. 5. Type ARTIST into the Record-Type Name field of inserted table row 1. 6. The Record Offset field will automatically be set to 0 indicating the layout describes data from the begining of the record. You may accept this default also. Press PF1 with cursor in this field for additional information. 7. The Lang field will automatically be set to COBOL. Update this to PL1 if necessary. Figure 46. SELCOPYi - SDE Define Record-Types 1. 2013/02/27 15:07:40 Training Manual 47 Option 2 - Data Edit (SDE) Specifying Record-Type Identification Criteria Specifying Record-Type Identification Criteria • Define the identification criteria for the ARTIST record-type as follows: 1. With the cursor anywhere on inserted table row 1, press PF2 to access a screen where details may be added / updated using a form. 2. In the Id field, type any of following equally valid expressions: ◊ RT='1' ◊ substr(record,1,1)='1' ◊ left(record,1)='1' Longer expressions may be entered via a text-edit window by pressing PF2. 3. Press PF3 to return to the record-types definition table panel. Figure 47. SELCOPYi - SDE Define Record-Type Identification Criteria. 2013/02/27 15:07:40 Training Manual 48 Option 2 - Data Edit (SDE) Specifying Additional Record-Types Specifying Additional Record-Types • Define the ALBUM record-type as follows: 1. Replicate table entry line 1 by typing R into the table prefix area (000001). 2. The Copybook Library Member field will already be correct as all of our sample record-types are defined by the same copybook. 3. The Type field will already be correct. 4. The Start Level field will already be correct. 5. Type ALBUM into the Record-Type Name field table row 2. 6. The Record Offset field will already be correct. 7. The Lang field will already be correct. 8. Press PF2 to access the form screen. 9. In the Id field, type any of following equally valid expressions: ◊ RT='2' ◊ substr(record,1,1)='2' ◊ left(record,1)='2' 10. Press PF3 to return to the record-types definition table panel. • Define the TRACK record-type as follows: 1. Replicate table entry line 2 by typing R into the table prefix area (000002). 2. Type TRACK into the Record-Type Name field table row 2. 3. Press PF2 to access the form screen. 4. In the Id field, type any of following equally valid expressions: ◊ RT='3' ◊ substr(record,1,1)='3' ◊ left(record,1)='3' Figure 48. SELCOPYi - SDO Define Record-Types 2. 2013/02/27 15:07:40 Training Manual 49 Option 2 - Data Edit (SDE) Generating the SDO Generating the SDO • Press PF3 to return to the record-types definition table panel. • Press PF3 again to return to SDO main panel. • Select option 3 should you wish to supply any COBOL Replacing Options (not necessary for our sample). • Select either: ♦ Option 4 to Create the SDO in the foreground. ♦ Option 5 to Create a Batch Job to generate your SDO. Note: To specify a //JOB statement that will be automatically inserted at the start of any z/OS batch job generated using SELCOPYi, select option 6 Batch from the Settings panel (=0.6). • If created in the foreground, a message similar to the following should appear on completion: ZZSD145I Structure USER123.SELCTRN.SDO(ZZST2) created with 3 record type(s). Maximum record length 268, minimum record length 71. Figure 49. SELCOPYi - SDO Generated Batch Job. 2013/02/27 15:07:40 Training Manual 50 Option 2 - Data Edit (SDE) Browse/Edit using a generated SDO Browse/Edit using a generated SDO • Specify the Data File: ♦ Type userpfx.SELCTRN.ZZST2DAT in the Name field, where userpfx is your own user prefix. • Specify the Structure/Copybook overlay: ♦ Activate the option by entering a / in the left margin field. ♦ Type userpfx.SELCTRN.SDO in the Dsn field, to specify the PDS library containing the generated Structured Data Object (SDO). ♦ Type ZZST2 in the Member field. ♦ Check the Type option for SDO. • Press ENTER to edit the sample dataset. Figure 50. SELCOPYi - SDO Browse/Edit using an SDO. 2013/02/27 15:07:40 Training Manual 51 Option 2 - Data Edit (SDE) Modifying Data Modifying Data • In Edit mode individual record data may be modified by ♦ Overtyping, inserting or deleting data in character or hex. ♦ Executing a CHANGE command. • In Full Edit mode, records may be inserted and deleted by ♦ Typing the INSERT primary-command. e.g. to insert a new ALBUM record: ◊ Type I ALBUM ◊ The new record will be inserted following the focus record. In multi-record (VFMT / CHAR) display modes focus is defined by the cursor position. ♦ Using the DELETE primary-command. • Additionally, in formatted (VFMT) or unformatted (CHAR) multi-record display modes, records may be inserted and deleted using the standard line-commands ♦ Inn to insert records. ♦ Dnn, DD-DD to delete records. ♦ Mnn, MM-MM to move records. • Modifications may be individually undone/redone using PF22 / PF23 (normally Shift-PF10 / PF11) which are set to execute the UNDO/REDO primary commands. ♦ Consecutive modifications may be undone by pressing PF22 repeatedly. ♦ Consecutive modifications may be redone by pressing PF23 repeatedly. ♦ The UNDOING primary command controls the following aspects: 1. Whether the UNDO/REDO facility is activated. 2. The number of modification levels maintained. 3. The maximum amount of storage allocated. ♦ Type Query UNDOING to determine your current settings. ♦ Type Help UNDOING for full information. Modifying Record Lengths • In Full Edit mode, the length of a variable length record may be altered in the following ways: ♦ In multi-record (VFMT / CHAR) modes, 1. Type RECLEN ON to display the Length record prefix column. 2. Overtype the current Length value for any individual record. ♦ In single-record (FMT / MAP /UNFMT / HEXD) modes, ◊ Overtype the current Length value. ♦ Using the shift-left / right line-commands: ◊ (nn or ((nn-(( to shift-left. ◊ )nn or ))nn-)) to shift-right. Note: Record-length modification may occur only where the right BOUNDS setting is higher than the individual record's length. ♦ Using the SHIFT primary-command. Type Help SHIft for full information. ♦ Using the CHANGE primary-command, in particular when the DATA parameter is specified with different length search and replace values. Type Help Change for full information. 2013/02/27 15:07:40 Training Manual 52 Option 2 - Data Edit (SDE) Modifying Record Lengths Working with Segmented Records Records may be organised in such a way that they are split into a number of logical segments, each segment being mapped by a unique structure (COBOL group or PL1 major/minor structure). Segmented records begin with a single primary (base) segment immediately followed by any number of non-overlapping, secondary segments. A secondary segment may have the same or different segment record-type (RTO) mapping as other secondary segments in the record. e.g. Record: 1 +-----------+--------------+--------------+--------------+--------------+ | Primary_1 | Secondary_1 | Secondary_1 | Secondary_1 | Secondary_1 | +-----------+--------------+--------------+--------------+--------------+ Record: 2 +-----------+--------------+-----------------+-----------------+ | Primary_1 | Secondary_1 | Secondary_2 | Secondary_2 | +-----------+--------------+-----------------+-----------------+ Record: 3 +----------------+--------------+------------------------------------------+ | Primary_2 | Secondary_1 | Secondary_4 | +----------------+--------------+------------------------------------------+ Record: 4 +-----------+--------------+-----------------+-----------------------+ | Primary_1 | Secondary_1 | Secondary_2 | Secondary_3 | +-----------+--------------+-----------------+-----------------------+ The record data must contain ID fields that identify which segment mapping is to be used to format individual segments of the record. ID fields that identify a primary segment mapping must exist within the primary segment data. ID fields that identify a secondary segment mapping may exist within the secondary segment data, within the data of any previously mapped segment belonging to the same record, or, specifically, within the primary segment data. The third sample dataset contains the same information as the second, but each physical record is comprised of three distinct segment-types: • A single PRIMARY (BASE) (ARTIST) segment followed by.... • a number of SECONDARY (ALBUM) segments, each one followed by... • a number of SECONDARY (TRACK) segments To reproduce the following screen-shot browse the sample dataset in its raw state, Use the Data Edit (=2) panel to: • Specify the Data File: ♦ Type userpfx.SELCTRN.ZZST3DAT in the Name field, where userpfx is your own user prefix. • Deactivate the Structure/Copybook overlay: ♦ Uncheck the option by removing the /. Figure 51. SELCOPYi - SDE Sample Dataset 3. 2013/02/27 15:07:40 Training Manual 53 Option 2 - Data Edit (SDE) Creating an SDO defining Segmented Record-Types Creating an SDO defining Segmented Record-Types Files with segmented record-types should be mapped by a SELCOPYi Structured Data Object (SDO) generated from one or more copybooks. The sample #3 segmented SDO (member name ZZST3) should be created using the (=9.1) panel in exactly the same way as for (non-segmented) sample #2, except that: 1. The ARTIST record-type is defined as Type DEF. DEF record-types must be specified without identification criteria. 2. The ALBUM record-type is defined as Type SEC. Identification criteria is required. 3. The TRACK record-type is defined as Type SEC. Identification criteria is required. Figure 52. SELCOPYi - SDO Create Segmented Structure. If created in the foreground, a message similar to the following should appear on completion: ZZSD403I Segmented Structure USER123.SELCTRN.SDO(ZZST3) created with 1 primary (base) segment type(s) and 2 secondary type(s). Maximum segment length 268, minimum segment length 71. 2013/02/27 15:07:40 Training Manual 54 Option 2 - Data Edit (SDE) Browse/Edit using a Segmented SDO Browse/Edit using a Segmented SDO At the SDE Browse / Edit panel: • Specify the Data File: ♦ Type userpfx.SELCTRN.ZZST3DAT in the Name field, where userpfx is your own user prefix. • Specify the Structure/Copybook overlay: ♦ Activate the option by entering a / in the left margin field. ♦ Type userpfx.SELCTRN.SDO in the Dsn field, to specify the PDS library containing the generated Structured Data Object (SDO). ♦ Type ZZST3 in the Member field. ♦ Check the Type option for SDO. • Press ENTER to edit the sample dataset. Figure 53. SELCOPYi - SDO Browse/Edit using a Segmented SDO. Notes: • By default, the prefix area indicates the physical record number to which each segment is attached. • Type PREFix LOGical to display indiviudal segment numbers in the prefix area. • Type PREFix Physical to reset the prefix to display physical record numbers. • Type Help PREFix for full information. • The LOCATE command is sensitive to the PREFIX setting (PHYSICAL|LOGICAL) when used to locate an absolute record / segment number. 2013/02/27 15:07:40 Training Manual 55 Option 2 - Data Edit (SDE) Navigating Segmented Datasets Navigating Segmented Datasets • Whether in formatted (VFMT / FMT) or unformatted (CHAR / UNFMT / HEXD) display modes, all logical segments are displayed individually. To display the data in its raw state you must edit / browse the dataset with the structure (SDO) deactivated. • For efficiency reasons the process of separating each physical record into its logical segment is performed once only, at initial load. • In single-record modes, display is sensitive to the PREFIX setting (PHYSICAL|LOGICAL). PREFIX Mode PHYSICAL LOGICAL Display Segment> pppppppp / llllll ♦ "pppppppp" denotes the physical record number. ♦ "llllll" denotes the logical segment number within that physical record. Segment> ssssssss ♦ "ssssssss" indicates the logical segment number within the whole file. Figure 54. SELCOPYi - SDE Formatted Single-Segment Dsiplay Mode (FMT/MAP). • In formatted (FMT / MAP) or unformatted (UNFMT / HEXD) single-record modes, the scrolling keys PF10 / PF11 will navigate to the next/prev visible segment, regardless of its type (PRIMARY/SECONDARY). • In both formatted multiple- (VFMT) and single-record (FMT / MAP) display, the NEXT (N) and PREV (P) primary commands may be used to navigate more specifically to segments, based on their segment-type. ♦ Type N B to scroll to the next base (primary) segment. ♦ Type N ALBUM to scroll to the next segment of the type ALBUM. ♦ Type N / to scroll to the next segment of the same type as the focus segment. ♦ Type N ? to scroll to the next segment of a different type from focus segment. ♦ Type Help NEXT for full information. 2013/02/27 15:07:40 Training Manual 56 Option 2 - Data Edit (SDE) Modifying Segmented Datasets Modifying Segmented Datasets • Individual segment data may be modified by ♦ Overtyping, inserting or deleting data in character or hex. ♦ Executing a CHANGE command. • Segments may be inserted and deleted by ♦ Typing the INSERT primary-command. e.g. to insert a new ALBUM segment: ◊ Type I ALBUM ◊ The new segment will be inserted following the focus segment. In multi-segment (VFMT / CHAR) display modes focus is defined by the cursor position. ♦ Using the DELETE primary-command. • Additionally, in formatted (VFMT) or unformatted (CHAR) multi-segment display modes, both PRIMARY and SECONDARY segments may be inserted, deleted and moved using the standard line-commands ♦ Inn to insert segments. ♦ Dnn, DD-DD to delete segments. ♦ Mnn, MM-MM to move segments. Note that secondary segments may be detached and reattached to different primary segments using move operations. • Modifications may be individually undone/redone using PF22 / PF23 (normally Shift-PF10 / PF11) which are set to execute the UNDO/REDO primary commands. ♦ Consecutive modifications may be undone by pressing PF22 repeatedly. ♦ Consecutive modifications may be redone by pressing PF23 repeatedly. ♦ The UNDOING primary command controls the following aspects: 1. Whether the UNDO/REDO facility is activated. 2. The number of modification levels maintained. 3. The maximum amount of storage allocated. ♦ Type Query UNDOING to determine your current settings. • Modifications to fields referenced by segment identification criteria will result in the segment prefix area being flagged with ==ID>. This indicates that the modification will potentially cause the segment-type to re-assigned. Immediate re-assignment does not take place automatically. This is deliberate, since the user may be in the midst of several changes. Re-assignment of segment-type may be explicitly requested using: ♦ The ID line-command. ♦ The IDentify primary-command. Type Help IDentify for full information. • The status of a segment being either PRIMARY or SECONDARY will not be altered by an IDENTIFY process. To alter an individual segment's PRIMARY / SECONDARY status use: ♦ The STP line-command to make the selected record a PRIMARY segment. ♦ The STS line-command to make the selected record a SECONDARY segment. Inserting/Deleting Primary (Base) Segments • Insert of a primary (base) segment will cause a new physical record to be created in the file. • Delete of a primary (base) segment will cause all its secondary segments to become attached to the previous primary segment. Beware that this may result in the creation of a physical record that exceeds the file's defined maximum Modifying Segment Lengths • The length of a segment may be altered in the following ways: ♦ In multi-segment (VFMT / CHAR) modes, 1. Type RECLEN ON to display the Length segment prefix column. 2. Overtype the current Length value for any individual segment. ♦ In single-segment (FMT / MAP / UNFMT / HEXD) modes, ◊ Overtype the current Length value. ♦ Using the shift-left / right line-commands: ◊ (nn or ((nn-(( to shift-left. ◊ )nn or ))nn-)) to shift-right. ♦ Using the SHIFT primary-command. ♦ Using the CHANGE primary-command. 2013/02/27 15:07:40 Training Manual 57 Option 5 - File Copy/Reformat (FCOPY) The SELCOPY/i File Copy/Reformat utility (FCOPY) copies records from one or more input file to a single output file, or to one or more members of a (PDS/PDSE) library. Input and output access methods, record-format and geometry may be mixed without restriction, and the copy process may be executed either online or in batch. The output may be specified as: • a single PDS/PDSE library member • a PDS/PDSE library DSN (multiple member names implied by the input) • a flat sequential datset • a VSAM KSDS, ESDS, RRDS/VRDS HFS files. The input may similary be specified, with multiple input files defined using wildcards within each of the following file name components: • Dataset name • HFS path file-name (not directory) • PDS/PDSE Member name • Volume name Access method, record-format and geometry for multiple input file may also be mixed without restriction. Records may be selectively copied by specifying any combination of the following, which are applied to each input file: • Start record number • Start record key, or partial key (VSAM KSDS files only) • Start relative-byte address (RBA) (VSAM KSDS files) • Number of records to process • Record selection criteria (FILTER) Records may be reformatted as they are copied by specifying an input and output structure/copybook. Specification of an input structure also enables record selection based on record-type and/or the content of fields defined by the structure. Additionally, although not recommended for high volume output, copy to a VSAM KSDS may optionally be performed for records out of key sequence. A handly aspect of the File Copy/Reformat utility is the ability to peek at the relevant files directly from the panel. • PF10 to browse the Input Data file • PF11 to browse the Output Data file • PF22 to browse the Input Copybook • PF23 to browse the Output Copybook 2013/02/27 15:07:40 Training Manual 58 Option 5 - File Copy/Reformat (FCOPY) The File Copy/Reformat (FCOPY) Panel The File Copy/Reformat (FCOPY) Panel The FCOPY panel may be started using any of the following methods: • Select option 5 from the SELCOPYi Primary Option Menu (=). • At any primary command prompt type =5. • At any primary command prompt type FCOPY (FC). • From any dataset, library or HFS path list window, use the C line-command. Copying a Standard Sequential Dataset Figure 55. SELCOPYi - File Copy/Reformat (FCOPY) Panel (=5). To follow the demonstration use the panel to make a complete copy of supplied sample dataset 1. • Specify the Input File: ♦ Type userpfx.SELCTRN.ZZST1DAT in the DSN/Path Mask field, where userpfx is your own user prefix. If wildcards are specified then a dataset list will be displayed from which you can select one or more files for processing. Inititially ALL files are selected, but you may use PF6 to toggle back and forth between all files being selected or deselected. Further selection/deselection may be made by manually overtyping the Sel column for each individual entry. Where PDS/PDSE datasets are to be processed a futher member selection list may be accessed by placing the cursor on the library name and pressing ENTER. Within the dataset list, the member mask field may be overtyped to refine member selection invidually for each library. Press PF3 to return to the FCOPY panel once all input selections have been confirmed. ♦ The Member Mask field should be left blank in this case, otherwise the dataset list will be restricted to PDS/PDSE libraries only. ♦ The Volume Mask field should be left blank in this case, otherwise the dataset list will be restricted to files residing on matching volumes only. • Specify the Output File: ♦ Type userpfx.SELCTRN.ZZST1DAT.FCOPY1 in the DSN/Path field. If wildcards are specified then a dataset list will be displayed from which you can make a selection. ♦ If the name name entered is for a dataset that does not yet exist, then you will be prompted to create it. ♦ The Member field should be left blank. otherwise the dataset list will be restricted to PDS/PDSE libraries only. ♦ The Volume field should be left blank. • Press ENTER to continue. 2013/02/27 15:07:40 Training Manual 59 Option 5 - File Copy/Reformat (FCOPY) Choose New Output File Access Method Choose New Output File Access Method • If the output file does not yet exist, you will be prompted to create it and given the choice of the access method to be used. • The Dataset Organisation input field will automatically be primed to match the input file, N for a Non-VSAM standard sequential file in this case. • Permitted options are: Option Description L To allocate a new PDS/PDSE library. N To allocate a new standard sequential (Non-VSAM) file. K To define a new VSAM KSDS. E To define a new VSAM ESDS. R To define a new VSAM RRDS. • Press ENTER or select the OK button to continue. Figure 56. SELCOPYi - Choose new Output file Access Method. 2013/02/27 15:07:40 Training Manual 60 Option 5 - File Copy/Reformat (FCOPY) Allocate New Output File Allocate New Output File • The allocation dialog will be displayed next allowing you to enter various details for your new file. • Initial values will be primed using the input file as a model, provided it is of a compatible type. • You may overtype any of the values displayed in green, and/or enter an alternative model dataset then press ENTER to call up its details. • Select the Allocate button to create the file (note that pressing ENTER will place the cursor on the Allocate button). • A message box will appear confirming the new file has been created. • Press PF3 to continue with the copy process. • For large file copies a progress window will be displayed, indicating how many records have so far been read, selected etc. • You may use the 3270 Attention key to interrupt the copy process. But remember to first unlock the keyboard by pressing the 3270 Reset key. Please consult your 3270 emulator's keyboard settings/help if you're unsure of which physical keys are mapped to these 3270 functions. • A summary message (detailing the number of records copied etc), will be displayed once the copy process has completed. Figure 57. SELCOPYi - Allocate new Non-VSAM file. 2013/02/27 15:07:40 Training Manual 61 Option 5 - File Copy/Reformat (FCOPY) Copying PDS/PDSE Library members Copying PDS/PDSE Library members • Specify the Input File: ♦ Type userpfx.SELCTRN.ZZST5DAT in the DSN/Path Mask field, where userpfx is your own user prefix. ♦ Type TRACK02* in the Member Mask field. • Specify the Output File: ♦ Type userpfx.SELCTRN.ZZST5DAT.FCOPY1 in the DSN/Path field. • Press ENTER to continue. Figure 58. SELCOPYi - COPY Library Members. 2013/02/27 15:07:40 Training Manual 62 Option 5 - File Copy/Reformat (FCOPY) Select Input Datasets List Select Input Datasets List • If the input file mask matches more than one dataset, or matches a PDS/PDSE library then a file selection list will be displayed. • Within the dataset list, the member mask field may be overtyped to refine member selection invidually for each selected library. • Place your cursor on the library dataset then press ENTER to access the member selection panel if required. If the member selection panel is not accessed then all members matching the mask will be included in the copy process. Figure 59. SELCOPYi - Select Input Library. 2013/02/27 15:07:40 Training Manual 63 Option 5 - File Copy/Reformat (FCOPY) Select input Members Select input Members • Individual members may be selected/deselected for copy from this screen. • Inititially ALL members are selected, but you may use PF6 to toggle back and forth between all files being selected or deselected. • Further selection/deselection may be made by manually overtyping the Sel column for each individual entry. • The sample screen shot below shows members TRACK020 and TRACK023 only selected for copy. Figure 60. SELCOPYi - Select Input Members. 2013/02/27 15:07:40 Training Manual 64 Option 5 - File Copy/Reformat (FCOPY) Allocate New Output Library Allocate New Output Library • Press PF3 to return to the File Copy panel once all selections have been made, then press ENTER to continue with the copy. • You will then be prompted to allocate your new output library. Figure 61. SELCOPYi - Allocate New Output Library. 2013/02/27 15:07:40 Training Manual 65 Option 5 - File Copy/Reformat (FCOPY) PDS Copy Statistics PDS Copy Statistics • A summary message and the PDS Copy Statistics list are displayed once the copy process has completed. • For each member processed the Action column will contain one of the following: Action Meaning Copied The member was copied to the output library. Replaced The member replaced an existing version in the output library. member already existed in the output library, and the Replace *NoRepl The existing members option was not selected. • You may type the TEXT primary command or select the "Text" menu bar item to create a temporary text-edit document containing the statistics information. Figure 62. SELCOPYi - PDS Copy Statistics. 2013/02/27 15:07:40 Training Manual 66 Option 5 - File Copy/Reformat (FCOPY) Record Selection Record Selection • Specify the Input File: ♦ Type userpfx.SELCTRN.ZZST2DAT in the DSN/Path Mask field, where userpfx is your own user prefix. • Specify the Output File: ♦ Type userpfx.SELCTRN.ZZST2DAT.ESDS1 in the DSN/Path field. Figure 63. SELCOPYi - Record Selection Intro. 2013/02/27 15:07:40 Training Manual 67 Option 5 - File Copy/Reformat (FCOPY) Browse Input File Browse Input File • In order to assist with record selection its very helpful to peek at the file you wish to select from. • From the File Copy panel press PF10 to browse the input file. • We will initially select to copy records 16 to 20. Figure 64. SELCOPYi - Browse Input File. 2013/02/27 15:07:40 Training Manual 68 Option 5 - File Copy/Reformat (FCOPY) Specifying Start Record / Number of Records to Copy Specifying Start Record / Number of Records to Copy • Press PF3 to return to the File Copy panel. • In the Record Selection section, activate the Start option by entering a / in the left margin field. • Enter the start record number 16 in the Start field. • Ensure that the Record/Key/RBA selectable option to the right is set to Record. This switch indicates the type of Start value provided. Option Meaning Record Start value is a record number. Value may be specified using 1234 or X'1234' notation. Key RBA Start value is a VSAM KSDS key or partial key. Value may be specified using xxxx, 'xxxx', C'xxx' or X'1234' notation. Start value is a VSAM ESDS/KSDS realative byte address (RBA). Value may be specified using 1234 or X'1234' notation. • Activate the For option by entering a / in the left margin field. • Enter the number of records to copy 5 in the For field. • Press ENTER to continue. Figure 65. SELCOPYi - Start Record/For. 2013/02/27 15:07:40 Training Manual 69 Option 5 - File Copy/Reformat (FCOPY) Choose New Output File Access Method Choose New Output File Access Method • The Dataset Organisation input field will automatically be primed to match the input file, N for a Non-VSAM standard sequential file in this case. • But we wish to create a VSAM ESDS, so enter E instead. • Press ENTER to continue. Figure 66. SELCOPYi - SDE LOCATE field. 2013/02/27 15:07:40 Training Manual 70 Option 5 - File Copy/Reformat (FCOPY) Define New VSAM Output File Define New VSAM Output File • The Define ESDS dialog will be displayed next allowing you to enter various details for your new file. • Initial values will NOT be primed using the input file as a model since, in this case, it is not of a compatible type. • You may overtype any of the values displayed in green, and/or enter an alternative model dataset then press ENTER to call up its details. • Enter the value 268 in the Avg rec len field. • Enter the value 268 in the Max rec len field. • Select the Define button to create the file (note that pressing ENTER will place the cursor on the Define button). • A message box will appear confirming the new file has been created. Figure 67. SELCOPYi - Define ESDS. 2013/02/27 15:07:40 Training Manual 71 Option 5 - File Copy/Reformat (FCOPY) Copy Summary Message Copy Summary Message • Press PF3 to return to the File Copy dialog. • Press ENTER to continue with the copy process. • For large file copies a progress window will be displayed, indicating how many records have so far been read, selected etc. • You may use the 3270 Attention key to interrupt the copy process. But remember to first unlock the keyboard by pressing the 3270 Reset key. Please consult your 3270 emulator's keyboard settings/help if you're unsure of which physical keys are mapped to these 3270 functions. • A summary message (detailing the number of records copied etc), will be displayed once the copy process has completed. Figure 68. SELCOPYi - Summary message. 2013/02/27 15:07:40 Training Manual 72 Option 5 - File Copy/Reformat (FCOPY) Browse the Output File (PF11) Browse the Output File (PF11) • From the File Copy panel you may press PF11 to browse the output file. Figure 69. SELCOPYi - Browse Output File (PF11). 2013/02/27 15:07:40 Training Manual 73 Option 5 - File Copy/Reformat (FCOPY) Using a FILTER to Select Records for Copy Using a FILTER to Select Records for Copy You may wish to select records for copy based on specific selection criteria. For example, to copy only the first 7 records that contain '3' in record position 1, and the string 'BLUES' anywhere in the record, • Update the Output File: ♦ Type userpfx.SELCTRN.ZZST2DAT.ESDS2 in the DSN/Path field. • In the Record Selection section, activate the Filter option by entering a / in the left margin field. • Enter Q (Quick Filter) in the Filter field. • The Start and For fields may be used to restrict records eligible for selection by the filter, but for our example these options should be deactivated. Figure 70. SELCOPYi - Specify Quick FIlter. 2013/02/27 15:07:40 Training Manual 74 Option 5 - File Copy/Reformat (FCOPY) Specifying Simple FILTER Selection Criteria Specifying Simple FILTER Selection Criteria • Enter 7 in the Limit field to restrict the number of records selected. • Enter I in the Type field to specify that selected records should be included in the copy process. • Enter 1 into the Position column of table row 1 (this is the default). • Enter 1 into the Length column. • Enter = (equals) into the ROp (Relational Operator) column (this is the default). Alternatively enter blank to get a list of available operators from which you may make your selection (by placing the cursor and pressing ENTER). • Enter 3 into the Value column. • Replicate table entry line 1 by typing R into the table prefix area (000001). The AND/OR column will automatically set to AND. • Enter 1 into the Position column of inserted table row 2 (this is the default). • Enter 0 into the Length column of inserted table row 2 (this is the default). A length value of zero has a special meaning indicating the length of data from the start position to end of the record. • Enter << (contains) into the ROp (Relational Operator) column of inserted table row 2. • Enter blues into the Value column. ♦ For simple case-insensitive character strings there is no need to add quotes (this will be done automatically). ♦ You may specify the string using C'ABCD' notation if case-sensitivity is required. ♦ Hex strings may be specified using X'1234' notation. Figure 71. SELCOPYi - Quick Filter. 2013/02/27 15:07:40 Training Manual 75 Option 5 - File Copy/Reformat (FCOPY) Filtered Copy Summary Message Filtered Copy Summary Message • Press PF3 to return to the File Copy dialog. • Press PF6 should you wish to review/modify your filter selection criteria. • Press ENTER to continue with the copy process. You will be prompted to create your new output file once again. You should choose to create another ESDS, entering the name of the ESDS created in the previous example as a model. • Press PF3 to return to the File Copy dialog again, then press ENTER to continue with the copy process. • A summary message (detailing the number of records selected etc), will be displayed once the copy process has completed. Figure 72. SELCOPYi - Filtered Copy Summary Message. 2013/02/27 15:07:40 Training Manual 76 Option 5 - File Copy/Reformat (FCOPY) Browse Output File Browse Output File When you press PF11 to browse the output file you should expect to see the following. Figure 73. SELCOPYi - Browse Output File. 2013/02/27 15:07:40 Training Manual 77 Option 5 - File Copy/Reformat (FCOPY) Specifying brackets in the FILTER expression. Specifying brackets in the FILTER expression. Multiple AND/OR conditions may be defined through the filter definition panel, but complex bracketed expressions may only be specified by manually modifying the FCOPY command generated by the panel. For example, to select records based on the following complex filter criteria: where position 1 = '3' and ( record contains "BLUES" anywhere or record contains "ROCK 'N' ROLL" anywhere or record contains "SOUL" anywhere ) • Update the Output File: ♦ Type userpfx.SELCTRN.ZZST2DAT.ESDS3 in the DSN/Path field. • Press PF6 to enter the filter definition panel. • Type in the conditions as depicted in the following screen shot. Figure 74. SELCOPYi - Filter: Multiple Selection Criteria. 2013/02/27 15:07:40 Training Manual 78 Option 5 - File Copy/Reformat (FCOPY) Generate FCOPY primary command Generate FCOPY primary command Press PF3 to return to the File Copy panel, then select item Command from the top menu bar. You will be prompted once again to define your new output file (you should use the previous sample as the model dataset), following which the generated FCOPY primary command will be displayed in a text edit window (in a format suitable for point-and-shoot execution using PF4). Figure 75. SELCOPYi - Generated Command. 2013/02/27 15:07:40 Training Manual 79 Option 5 - File Copy/Reformat (FCOPY) Modify/Execute Generated FCOPY primary command Modify/Execute Generated FCOPY primary command Brackets may now be added to the filter expression as required. Although the filter expression is fairly free format, care must be taked to maintain a backslash (\) character in the right-most position of any newly added lines (the backslash character indicates that the command is continued on the following line). This is typically achieved by replicating, then modifying, existing lines rather than inserting new ones. The modified FCOPY command may then be executed simply by placing your cursor on the first line of the command (beginning with the less-than (<) sign), then pressing PF4. You may also want to consider copying the generated command into your HOME file, saving it there for future repeat executions. Figure 76. SELCOPYi - Modified Command. 2013/02/27 15:07:40 Training Manual 80 Option 5 - File Copy/Reformat (FCOPY) Browse Output from Generated Command Window Browse Output from Generated Command Window You may wish to browse your output file before exiting (and discarding precious changes to) your generated FCOPY command. One handy way to do this is to: 1. Type the command DSN B on the command line (but do not press ENTER). 2. Place your cursor on the name of the dataset that you wish to browse, within the generated FCOPY command. 3. Press ENTER. Alternatively, type the command DSN (without the Browse option) to get a drop-down list of available utility functions including edit, delete and rename. Figure 77. SELCOPYi - Browse Filtered Output File. 2013/02/27 15:07:40 Training Manual 81 Option 5 - File Copy/Reformat (FCOPY) Reformat Reformat The FCOPY utility may also be used to reformat records as they are copied to the output file. Reformat requires use of two, similar but not identical, structures that define the layout of the input and output records, with each output field being sourced from the corresponding input field of the same name (within the same record-type). Input and output fields for any given record-type may (but need not necessarily) be: • in a different order • a different length • a different data-type Additionally fields may exist in either input or output without existing in the other. • Specify the Input File: ♦ Type userpfx.SELCTRN.ZZST1DAT in the DSN/Path Mask field, where userpfx is your own user prefix. • Specify the Output File: ♦ Type userpfx.SELCTRN.ZZST1DAT.FCOPY2 in the DSN/Path field. • Select Reformat using structure/copybook layouts from the Options section of the FCOPY panel. Figure 78. SELCOPYi - Reformat 1. 2013/02/27 15:07:40 Training Manual 82 Option 5 - File Copy/Reformat (FCOPY) Specify Input Copybook Specify Input Copybook • Press ENTER to proceed to the File Reformat panel. • Specify the Input Structure/Copybook File: ♦ Type userpfx.SELCTRN.SAM1 in the Dsn field, to specify the PDS library containing the supplied COBOL/PL1 copybook. If wildcards are specified then a dataset list will be displayed from which you can make a selection. ♦ Type ZZST1CPC in the Member field (for COBOL installations). Type ZZST1CPP in the Member field (for PL1 installations). If wildcards are specified then a member list will be displayed from which you can make a selection. ♦ Check the Type option for Cobol or PL1 as appropriate for your installation. Figure 79. SELCOPYi - Input Copybook. 2013/02/27 15:07:40 Training Manual 83 Option 5 - File Copy/Reformat (FCOPY) Use Input Copybook as Model Use Input Copybook as Model We'll now create an output copybook using a selection of the fields from the input copybook, but in a different order, and with some of the fields shortened. • Press PF22 to browse the input copybook. You should see that it has 18 records as below (assuming COBOL installation). • Type GO E to switch from browse mode to text-edit. Figure 80. SELCOPYi - Browse Input Copybook. 2013/02/27 15:07:40 Training Manual 84 Option 5 - File Copy/Reformat (FCOPY) Create Output Copybook Create Output Copybook • Move 05 field ARTIST following 01 TRACK, and change PIC X(070) to PIC X(020). • Move 05 field ALBUM following 05 ARTIST, and change PIC X(070) to PIC X(024). • Move 05 field TRACK-NUM following 05 ALBUM. • Move 05 field NAME following 05 TRACK-NUM. • Delete all other lines following 05 NAME. • Type CREATE ZZSP1CPC on the command line, but do NOT press ENTER. • Make a mental note that total record length defined by the copybook is 167 (i.e. the sum of all the field lengths 20+24+3+120). • Type C* in the prefix area of line 1 of the file, then press ENTER. to create the new member. Figure 81. SELCOPYi - Create Output Copybook. 2013/02/27 15:07:40 Training Manual 85 Option 5 - File Copy/Reformat (FCOPY) Specify Output Copybook Specify Output Copybook • Type CANCEL to discard changes to the input copybook and return to the File Reformat panel. • Specify the Output Structure/Copybook File: ♦ Type userpfx.SELCTRN.SAM1 in the Dsn field. ♦ Type ZZSP1CPC in the Member field (assuming COBOL installation). ♦ Check the Type option for Cobol or PL1 as appropriate for your installation. Figure 82. SELCOPYi - Specify Output Copybook. 2013/02/27 15:07:40 Training Manual 86 Option 5 - File Copy/Reformat (FCOPY) Execute Reformat Execute Reformat • Press ENTER to execute the reformat. • You will be prompted to create you new output file, which should be allocated as record length 167 (fixed). • A summary message will be displayed on completion. • Press PF11 to browse the output file in formatted mode. Figure 83. SELCOPYi - Browse Formatted Output. 2013/02/27 15:07:40 Training Manual 87 Option 5 - File Copy/Reformat (FCOPY) Updating the Output Copybook (1) Updating the Output Copybook (1) • Press PF3 to return to the File Reformat panel. • Press PF23 to browse the output copybook. • Type GO E to switch from browse mode to text-edit. Figure 84. SELCOPYi - Browse Output Copybook. 2013/02/27 15:07:40 Training Manual 88 Option 5 - File Copy/Reformat (FCOPY) Updating the Output Copybook (2) Updating the Output Copybook (2) • Update 05 field ARTIST changing PIC X(020) to PIC X(010). • Update 05 field ALBUM changing PIC X(024) to PIC X(010). • Update 05 field NAME changing PIC X(120) to PIC X(050). • Make a mental note that total record length defined by the copybook is now73 (i.e. the sum of all the field lengths 10+10+3+50). • Press PF3 and save your changes before returning to the File Reformat panel. Figure 85. SELCOPYi - Update Output Copybook. 2013/02/27 15:07:40 Training Manual 89 Option 5 - File Copy/Reformat (FCOPY) Force Recompile of Updated Output Copybook (1) Force Recompile of Updated Output Copybook (1) If your structure/copybook file-id refers to a COBOL, PL1 or ADATA source file (not an SDO) then a compile step must be performed in order to turn the source copybook into SELCOPYi's own internal structure (SDO) format. A temporary SDO will be created, lasting the duration of the SELCOPYi session, making subsequent reference to the same copybook during the session much faster by bypassing the compile stage. If, however as in our case, the output copybook (or any of its included components) should be modified during the session, then a recompile of the source will normally be required. For performance reasons Recompile> N (meaning no recompile should occur) is the default. Specify Recompile> Y to force a copybook recompile each time the reformat process is executed. Alternatively type the primary command: SD DROP copybook_name • Enter Y in the Recompile field for the Output Copybook. • Press ENTER to repeat the reformat, using the updated copybook. Figure 86. SELCOPYi - Recompile=YES. 2013/02/27 15:07:40 Training Manual 90 Option 5 - File Copy/Reformat (FCOPY) Force Recompile of Updated Output Copybook (2) Force Recompile of Updated Output Copybook (2) • Press PF11 to browse the output file in formatted mode. • Note that the =LGTH> flag appears in the prefix area for each record. This is expected, alerting you that the output record (the original fixed length=167) does not match the new version of the mapped record-type (length=73). Figure 87. SELCOPYi - Browse Formatted Output 2. 2013/02/27 15:07:40 Training Manual 91 Option 5 - File Copy/Reformat (FCOPY) Running File Copy/Reformat in Batch Running File Copy/Reformat in Batch • The File Copy/Reformat utility may also be run in batch, by selecting JCL from the panel menu bar. • After typing the SUB primary command to submit the generated JCL deck, you will have the option to allow SELCOPYi to automatically guide you into SDSF (starting a new ISPF split screen) in order to view the output. Figure 88. SELCOPYi - Generated Batch Job. 2013/02/27 15:07:40 Training Manual 92 Option 6 - File Search/Update/Copy/Reformat (FSU) The File Search/Update/Copy/Reformat utility allows you to: • Globally search and optionally update multiple sequential, PDS/PDSE, GDG, HFS and/or VSAM data sets. • Restrict PDS/PDSE library search/update/copy: ♦ to members with names that match a member name mask ♦ to members satistying directory element selection criteria (e.g. select on timestamp, size, userid etc combinations) ♦ to members selected by one or more previous searches. • Specify an output file to which all input records will be copied regardless of whether record data has been changed. • Apply a filter in order to restrict search/update/copy to records matching specific selction criteria. • Search and optionally update uncataloged data sets by generic volume id. • Specify the start record for search/update/copy operations. • Restrict the number of records read for search/update/copy operations. • Restrict the search/update operation to specific columns within the file records. • Apply a structure (copybook) overlay to format input file records. • Optionally restrict search/update to records assigned to specific record types, and specific fields withing those record-types. • For Formatted File Search/Update, optionally specify an output file and output structure (copybook) to reformat input record fields (i.e. alter field data type, re-order and/or delete fields). • Update character data using different length search and update CHANGE strings. • Control use of blank padding or blank absorption when character search and update CHANGE strings are of different length. Note that the CHANGE operation will fail if the length of the updated record is greater than the file's maximum record length. Following File Search/Update/Copy/Remap execution, report output is generated in a structured format suitable for presentation to the user in an SDE window view. During execution, a progress window is displayed which allows the user to interrupt processing at any point using the Attention key. 2013/02/27 15:07:40 Training Manual 93 Option 6 - File Search/Update/Copy/Reformat (FSU) The File Search/Update (FSU) Panel The File Search/Update (FSU) Panel The FSU panel may be started using any of the following methods: • Select option 6 from the SELCOPYi Primary Option Menu (=). • At any primary command prompt type =6. • At any primary command prompt type FSU. • From any dataset, library or HFS path list window, use the F line-command. Searching a PDS/PDSE Library Figure 89. FSU - File Search/Update (FSU) Panel (=5) To follow the demonstration use the panel to search the supplied sample library for a the character string "blues" (case-insensitive). • Specify the Input Library: ♦ Type userpfx.SELCTRN.ZZST5DAT in the DSN/Path Mask field, where userpfx is your own user prefix. ♦ The Member Mask field may be left blank in order to search all members of the input library. Alternatively type "*" or a member mask of your choice. ♦ The Volume Mask field should be left blank in this case, otherwise the input dataset list will be restricted to files residing on matching volumes only. • Specify the Search Options: ♦ Enter EQ in the Relational Operator (Op) field. ♦ Type blues in the String field. ◊ For simple case-insensitive character strings there is no need to add quotes (this will be done automatically). ◊ You may specify the string using C'ABCD' notation if case-sensitivity is required. ◊ Hex strings may be specified using X'1234' notation. ♦ Enter 0 in the Limit field in order to display all hits in each member. Alternatively, enter 1 to display the first hit only. • Press ENTER to run the search. For operations lasting more than a second, a progress window will be displayed with the report in the background, (continually updating at one second intervals). • Long running processes may interrupted by pressing the Attention key. 2013/02/27 15:07:40 Training Manual 94 Option 6 - File Search/Update/Copy/Reformat (FSU) Search Report Output (Standard 80-column Screen Width) Search Report Output (Standard 80-column Screen Width) Following execution, the structured report output file is displayed as a formatted table view, with search matches displayed under the heading: Record type: Hit • The first record (Record type: Command) displays the following fields: Field Description Timestamp The date/time of execution. Command The FSU primary command generated by the panel. • The second record (Record type: Summary) among other fields displays the following: Field Description RecordsTot The number of records processed. FilesTot The number of files/members processed. Hits The number of occurrences of the search value encountered. number of records encountered with at least once RecordsHit The occurrence of the search value. FilesHit The number of files/members encountered with at least once occurrence of the search value. • For library searches on standard 80-column screens, view of the Hit records is restricted to two columns: Field Description The name of the hit library member. zMember is a held field, zMember meaning it will remain visible when the display is scrolled right. zRecord The contents of the hit record. Figure 90. FSU - Search Report 2013/02/27 15:07:40 Training Manual 95 Option 6 - File Search/Update/Copy/Reformat (FSU) Displaying Additional Hit Information Fields Displaying Additional Hit Information Fields To view additional information fields that are normally suppressed from view on a narrow screen, place the cursor on the hit record of interest then press PF2. The chosen hit record will be displayed individually, in a separate single-record (zoomed) format window with the following additional fields made visible. Field Description zDsn The library dataset name. zRecNo The hit record number. zHitNo The hit record number within the file/member. zLrecl The logical record length of the hit record. zHits The number search value occurrences within this hit record. Press PF3 to return to the table view. Figure 91. FSU - Search Report (Zoomed) 2013/02/27 15:07:40 Training Manual 96 Option 6 - File Search/Update/Copy/Reformat (FSU) Using PF6 to edit the Hit File/Record Using PF6 to edit the Hit File/Record From the report table-view, you may place your cursor on any Hit record, then press PF6 to edit the hit file. The edit view will be automatically scrolled in order to place the hit record at the top of the screen. This feature may be adjusted using the Settings->List (=0.5) panel to select the required action: Option Action Edit Text Editor (Edit) View Text Editor (Read-only) Browse Data Editor (read-only) SDE Data Editor (Full Edit) SDEU Data Editor (Update-in-place) None No Action The screen below shows the display after pressing PF6 from the table view with the cursor on the first hit from member TRACK008 Figure 92. FSU - Edit Hit Member 2013/02/27 15:07:40 Training Manual 97 Option 6 - File Search/Update/Copy/Reformat (FSU) Adjusting Report Table View Adjusting Report Table View If you wish to display suppressed fields while in table view, you may use the SELECT primary command as depicted below. Note that, by default, the SELECT command operates on the focus record-type (i.e. the record at the top of the screen, or at the cursor if it is placed in the file-area). To avoid this complication add "FROM HIT" to your usual SELECT primary command. e.g. select zMember,zRecNo hold, zRecord from Hit Figure 93. FSU - Report with Tailored SELECT 2013/02/27 15:07:40 Training Manual 98 Option 6 - File Search/Update/Copy/Reformat (FSU) Selecting Library Members for Search/Update Selecting Library Members for Search/Update At the Search/Update front panel, if input refers to a library and the Member Mask field is either left blank, or includes wildcard charcaters, then by default all member mask matches will be processed, without the need to confirm via a member selection list. However, you may press PF5 to access the member selection list, when required. Initially all members matching the mask will be selected. Manual selection for individual members is made by removing/adding "S" in the Sel column. Figure 94. FSU - Member Selection List 2013/02/27 15:07:40 Training Manual 99 Option 6 - File Search/Update/Copy/Reformat (FSU) Condensing Selected Members by Timestamp/Size/Userid Condensing Selected Members by Timestamp/Size/Userid Listed members will be active in the Search/Update process provided both of the following are true. 1. The list entry is selected. 2. The list entry is not excluded. List entries may be selected/deselected as follows: 1. Individually, by entering or removing "S" from the Sel column. 2. On mass, by pressing PF6, which will alternately select, or deselect, all entries. Note: Excluded entries are not affected by pressing PF6. List entries may be included/excluded as follows: 1. By entering "X" and other related "line-commands" into the numeric area at the right-hand side, as if working in an edit environment. 2. Using the ALL, MORE and LESS primary commands with an associated selection criteria expression. Option ALL MORE LESS Action Includes only entries satisfying the expression. Additionally includes entries satisfying the expression. Excludes entries satisfying the expression. • ALL with no parameters will re-include all list entries. LESS with no parameters will exclude all list entries. Excluded entries are represented in the display by shadow-lines. Type primary command HIDE to suppress display of shadow-lines, and RESET HIDE (RES H) to redisplay them. Examples: • To include only members whose last modified date is in the range 2010/05/01 to 2010/12/12, type: all LastMod >= 2010/05/01 & LastMod < 2011 • To exclude all members whose current size is zero records, type: less CurSize=0 • To reinclude all excluded members whose last modified userid is USER123 or begins with USER321, type: more user=user123 | user >> user321 Figure 95. FSU - Member Selection (ALL/MORE/LESS) 2013/02/27 15:07:40 Training Manual 100 Option 6 - File Search/Update/Copy/Reformat (FSU) Condensing Selected Members using FIND Condensing Selected Members using FIND The FIND panel is displayed when primary command FIND (F) is executed from a member selection list and may be used to condense the list of selected members. Only those members that contain at least one record which satisfies the find operation are selected for subsequent processing. Following execution of the find operation, the FIND panel remains open to allow further find/condense operations on the list of remaining members. To follow the demonstration use the panel to pre-select members containing the string "soul" (case-insensitive). • Type soul in the Find string field. ♦ For simple case-insensitive character strings there is no need to add quotes (this will be done automatically). ♦ You may specify the string using C'ABCD' notation if case-sensitivity is required. ♦ Hex strings may be specified using X'1234' notation. • Enter 1 in the Limit field in order to display the first hit only. Since the purpose of running the FIND is only to condense the member selection list for a subsequent search, then establishing the presence of more than one hit would be wasteful. • Enter Yes in the View report field in order to display the FIND report. This will allow us to use the PF6 facility from the report to edit the hit member. Set this option to No if you are not interested in the detail. • Enter Yes in the Condense member list field so that, for subsequent FSU operations, any member without at least one search match will be deleted from the selection list. Press ENTER to execute the search. Figure 96. FSU - Member Selection (FIND) 2013/02/27 15:07:40 Training Manual 101 Option 6 - File Search/Update/Copy/Reformat (FSU) Condensed Member Selection List Condensed Member Selection List Figure 97. FSU - FIND Report with LIMIT=1 Exit (PF3) from the report (if requested) will return to the FIND panel where you may execute further search operations to progressively condense the member list. Exit (PF3) from the FIND panel will return to the condensed member selection list. Should you wish to reset the condensed list, then just overtype the Member Mask input field and press ENTER. Figure 98. FSU - Condensed Member Selection List 2013/02/27 15:07:40 Training Manual 102 Option 6 - File Search/Update/Copy/Reformat (FSU) Condensed Member Search Results Condensed Member Search Results Exit (PF3) will retrun to the main FSU panel, where you can run the original search for the string "blues" using your condensed member list. Expected results are displayed below. Figure 99. FSU - Condensed Member Search Results" 2013/02/27 15:07:40 Training Manual 103