1
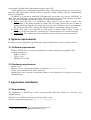
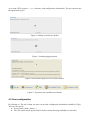
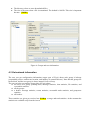
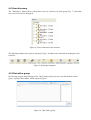
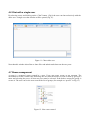
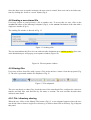
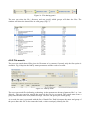
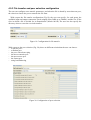
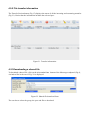
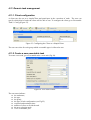
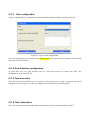
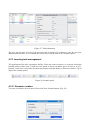
The P2P OVERLAY application
User's manual
Table of Contents
1. Introduction......................................................................................................................................1
2. System requirements........................................................................................................................2
2.1 Software requirements...............................................................................................................2
2.2 Hardware requirements..............................................................................................................2
3. Application installation ....................................................................................................................2
3.1 Downloading..............................................................................................................................2
3.2 Broker installation and configuration........................................................................................3
3.3 Client installation and configuration .........................................................................................3
3.4 Peer discovery............................................................................................................................3
4. Client use cases.................................................................................................................................3
4.1 User login...................................................................................................................................3
4.2 User configuration ....................................................................................................................4
4.3 Get network information ...........................................................................................................5
4.4 User discovery...........................................................................................................................6
4.5 Chat with a group.......................................................................................................................6
4.6 Chat with a single user...............................................................................................................7
4.7 Room management....................................................................................................................7
4.8 Sending a non-shared file .........................................................................................................8
4.9 Sharing files ..............................................................................................................................8
4.9.1 File / directory sharing.......................................................................................................8
4.9.2 File search..........................................................................................................................9
4.9.3 File transfer and peer selection configuration .................................................................10
4.9.5 File transfer information ..................................................................................................11
4.10 Downloading a shared file ....................................................................................................11
4.11. Remote task management.....................................................................................................12
4.11.1 Client configuration .......................................................................................................12
4.11.2 Create a new executable task.........................................................................................12
4.11.3 Task configuration .......................................................................................................13
4.11.4 Peer selection configuration...........................................................................................13
4.11.5 Task execution................................................................................................................13
4.11.6 Task information ............................................................................................................13
4.12. Learning task management...................................................................................................14
4.12.1 Scenario creation ...........................................................................................................14
4.12.2 Creating a new learning task .........................................................................................15
4.12.3 Learning task reassignment (TODO).............................................................................15
4.12.4 Changing the state of a task (TODO).............................................................................15
1. Introduction
This manual explains how to install and use OVERLAY, a peer-to-peer (P2P) application carried
out by Raul Fernandez in his final engineer degree at the UOC.
A P2P application is a distributed application where each participant shares its own resources
with the other participants. Shared resources typically include storage capacity, computational
power, or media files.
OVERLAY is a centralized, structured P2P application. At present, users can use OVERLAY to
share files, send messages, create room chats, and execute its own Java tasks remotely in parallel.
The peers involved in this application can play one of the following roles:
● Broker: Peer that acts as a coordinator. There must be one or more of them. The
functionality of the broker includes to control the user login, locate peers, the creation of
groups and rooms, find the best simpleclients to run a task, find the best peer to download a
file, locate the shared files, manage the internal database, and manage a groupware tool.
● Client: Peer with a user front-end. A client needs to interact with a broker in order to
function. Clients may share files, send messages, and send tasks to be executed remotely.
● Simpleclient: Peer without user front-end, that is used exclusively to execute user tasks.
2. System requirements
In order to use this application, the following software and hardware resources will be needed:
2.1 Software requirements
Because OVERLAY is a Java-based application, it can be installed in any platform. The
required packages are:
– JDK1.5 or above
– JXTA1 2.4.1b
– MSSQL Server 2005
2.2 Hardware requirements
–
–
–
–
Broker server
Database server: currently the database is installed in einfnt2.uoc.es.
Clients: run in terminals with a user front-end.
SimpleClients: they can run in terminals without a user front-end. For testing it was used the
PlanedLab grid.
3. Application installation
3.1 Downloading
The application is distributed as three autoexecutable JAR files: Broker.jar, Client.jar, and
SimpleClient.jar
These files are available from http://lacolla.uoc.edu/~overlay
To start a component simply type: java -jar <component.jar>
1
JXTA is a P2P middleware. This version can be downloaded from
http://download.jxta.org/build/release/2.4.1b/
3.2 Broker installation and configuration
command: java -jar Broker.jar
With this broker packaged distribution no configuration is needed.
3.3 Client installation and configuration
command: java -jar Client.jar
With this client packaged distribution no configuration is needed.
3.4 Peer discovery
The discovery process is transparent to the user. For a peer to discover a broker, or a broker to
discover another broker, a web file containing a list of brokers is read. In the current distribution
the URL of this file is hard coded, and points to:
http://www.lsi.upc.es/~rfernandez/rendez.dat
The contents of this file is as follows:
...
tcp://lacolla.uoc.edu:9701
http://lacolla.uoc.edu:9700
To avoid these ports be closed by a firewall, JXTA uses a tunneling configuration.
4. Client use cases
4.1 User login
Note: This manual assumes that the information about the user login and the groups it belongs has
already been entered in the broker's database. See the administrator's manual for details.
Once launched, the client prompts to enter the login information:
Figure 1. Sign up screen.
After that, the application tries to locate a broker (Fig 2.), sends the logging information (Fig. 3),
and if successful, the user receives a connection confirmation (Fig.4). The first time this process it
may take a while due to JXTA internals. Otherwise, after 60 seconds without response the client
gets finished.
As a result, JXTA creates a .jxta directory with configuration information. The user can then use
the application (Fig.5).
Figure 2. Finding a rendezvous broker.
Figure 3. Sending logging request.
Figure 4. Successful response received from a broker.
Figure 5. Top panel with available user buttons.
4.2 User configuration
By clicking on “The net” button, the user can provide configuration information (middle of Fig.6).
The user can specify:
● Its own state (online, absent,...)
● The CPU and network speed (used for brokers when choosing candidates to run tasks)
●
●
The directory where to store downloaded files.
The size of the parts when a file is transmitted. The default is 100 Kb. This size is important
because.. (TODO)
Figure 6. Groups and user information.
4.3 Get network information
The user can get configuration information (upper part of Fig.6) about each group it belongs
(responsible person, rendezvous location, and number of connected users). Note that the groups are
hierarchical, and the root group is always named NetPeerGroup.
The user can also get statistics (lower part of Fig.6) about:
● the user's of a group: pending tasks, message statistics, chat statistics, file statistics, and
executable statistics.
● all the groups.
● a broker: message statistics, rooms statistics, executable tasks statistics, and groupware
statistics.
● all brokers.
These statistics are given per session, last (TODO), average and total statistics. At the moment the
statistics are available only from the screen.
4.4 User discovery
The “Messenger” button shows which other users are connected to each group (Fig. 7). Note that
your own user won't be displayed.
Figure 8. Users connected to the network.
The Messenger button also opens a sub panel (Fig.9). Its buttons are activated according the user's
selection.
Figure 9. Messenger subpanel.
4.5 Chat with a group
By selecting a group and clicking on the “Chat” button (Fig.9) the user can chat with the whole
group. A group chat window will be opened (Fig.10).
Figure 10. Chat with a group.
4.6 Chat with a single user
By selecting a user and clicking on the “Chat” button (Fig.9) the user can chat exclusively with the
other user. A single user chat window will be opened (Fig.11).
Figure 11. Chat with a user.
Note that this window also allow to share files and submit tasks between the two peers.
4.7 Room management
A room is a temporal group created by a user. Users can create rooms at any moment. The
mechanism to create a room is the following: the user asks the broker to create a room by giving it a
name and selecting the peers. Al least one peer must be selected. If the broker accepts the group, it
creates it. The user can see the new room in the list of groups (for example as “prova2” in Fig.12)
Figure 12. New room created.
Once the other users accept the invitation, the new room is created. New users can be invited at any
time by clicking the “Invite to a room” button (Fig.9).
4.8 Sending a non-shared file
Users may require to send privately a file to another user. To access this use case, click on the
SendFile button of the Messenger subpanel (Fig.9), or the SendFile button of the chat with a
single user window (Fig.11).
The sending file window is showed in Fig. 13.
Figure 13. Sending a file.
The use must indicate the file to be sent, and select the destination peer (and the group?). Once sent,
at the destination peer will pop up an acceptance window (Figure 14).
Figure 14. File acceptance window.
4.9 Sharing files
Users may wish to share files with a group. Click on the Files button from the top panel (Fig.
5). The user is presented with the file subpanel of Fig.15.
Figure 15. File subpannel.
The user can choose to share files, check the state of the transferred files, configure the criteria to
transfer and find files, and find files by file name or content. The next sections describe these
actions in more detail.
4.9.1 File / directory sharing
When the user clicks on the Shared Files button (Fig.15), a new subpanel appears where the user
can decide either to share a single file or directory, or delete a shared file or directory. Fig.16 depicts
this panel.
Figure 16. File sharing panel.
The user can select the file / directory and can specify which groups will share the files. The
window will show the shared files in each group (Fig.17).
Figure 17. Shared files.
4.9.2 File search
The user can search shared files given its file name or by content. Currently only the first option is
available. Fig.18 depicts the find by name parameters and the result of a seach.
Figure 18. Find by name.
The user can search files indicating a substring. At the moment no advanced patterns like ? or * are
allowed. The user can also specify the range of the file size to search. The search starts from a
group and finished at the root (NetPeerGroup). The user cab specify the initial group.
As a result, the user is presented with the list of found files. Each hit returns the name and group of
the peers share this file. It also return the hash, a value to uniquely identify the file.
4.9.3 File transfer and peer selection configuration
The user can configure some transfer parameters, and when the file is shared by more than one peer,
the criteria to choose the peer to transfer the file from.
With respect the file transfer configuration (Fig.19), the user can specify, for each group, the
available input and output connection speed (ranging from 56Kb up to 20Mbs), and the size of the
slice in which a file is divided for its transmission (default 100 kb) The user can also specify the
directory where to store the received transfers.
Figure 19. Configuration for file transfer.
With respect to the peer selection (Fig. 20), there are different criteria that the user can choose:
– a specific peer
– a random peer
– the peer with a better ping
– the most economic peer
– the most secure peer
– the fastest peer
– using load balancing
Figure 20. Configuration of peer selection.
4.9.5 File transfer information
The Transfer Session button (Fig.15) displays the status of all the incoming and outcoming transfers
(Fig.21). Notice that the information includes the selected peer.
Figure 21. Transfer information.
4.10 Downloading a shared file
To download a shared file, click on the SharedFiles button of the Messenger subpanel (Fig.9),
A window like in the one of Fig. 22 is displayed.
Figure 22. Shared file download form.
The user has to select the group, the peer and file to download.
4.11. Remote task management
4.11.1 Client configuration
A client can also act as a simpleClient and participate in the execution of tasks. The user can
specify which kind of tasks the client will be able to run. To configure the client go to Executable
Tasks > Config (Figure 23).
Figure 23. Configuring the Client as a SimpleClient.
The user can select for each group which executable types is allowed to run.
4.11.2 Create a new executable task
To create a new task, go to Executable tasks > new task (Fig.24).
Figure 24. New task creation.
The user must indicate:
● the task name,
● the type,
● the group,
● the type of task configuration (see Fig.25)
● expected and maximum time
● number of slices to divide the task
● the peer selection mode
● if it is a candidate peer.
4.11.3 Task configuration
A type of task needs to be configured to indicate which task specifically to perform (Fig.24)
Figure 25. Type of task configuration.
The user must indicate de execution mode (Demo, User), the specific task to perform, and the JARs
necessary for the execution.
4.11.4 Peer selection configuration
As with files, the user can configure how to select the peer(s) to execute the tasks. The
configuration is the as in Fig. 20.
4.11.5 Task execution
Once the broker has selected a peer to execute a part of the task, it sends a request to the client
asking to accept it (Fig.26). In case of a SimpleClient will always accept the request.
4.11.6 Task information
The user can get at any moment the state of the tasks the client is involved which (Fig.27).
Figure 27. Task information
The user gets the state of each of the parts the task is divided. By selecting a part, the user gets
additional information, as for example the selected peer and the state in the execution queue.
4.12. Learning task management
The application offers also a groupware facility. Users can create scenarios (i.e. projects) and assign
learning tasks to other users. A task here isn't meant to be an executable piece of code as in 4.11.
Instead, a task here is any kind of human-performed work that helps to finish an scenario. Fig.28
depicts the scenario panel.
Figure 28. Scenario panel.
4.12.1 Scenario creation
To create an scenario, the user must click on the New Scenario button. (Fig. 29).
Figure 29. Scenario creation.
The user indicates the scenario name, a description, the group involved, and the due to date. As a
result, the broker creates the scenario and the user can see its initial state (Fig.30).
Figure 30. Initial scenario status.
4.12.2 Creating a new learning task
Now the owner of the scenario can create new learning tasks, and assign them to users. (Fig.31).
Figure 31. Learning task creation.
Once the broker creates the learning task, the user can see the new task in the scenario.
4.12.3 Learning task reassignment (TODO)
4.12.4 Changing the state of a task (TODO)