1
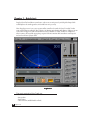
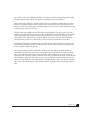
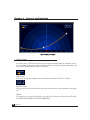
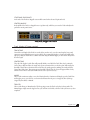
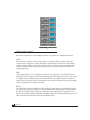
Table of Contents
Chapter 1 ............................................... Quickstart .... 2
Chapter 2 .............................. General Introduction .... 4
Chapter 3 ........................................ Example of Use .... 5
Chapter 4 ............................ Controls and Interface .... 8
Chapter 5 ................................. Preset Descriptions .. 12
Doppler Manual
1
Chapter 1 - Quickstart
Doppler is the effect heard when a sound source, such as a car or train, passes by, and the pitch changes. Pitch
sounds higher as the sound approaches, and sounds lower as it goes away.
Waves Doppler processor is very easy to operate and has a small set of controls. It is based “on reality” in that
some controls behave according the laws of physics (air damping, gain changing with distance). However you can
set the values of Doppler to work well outside those laws; it is said there is “reality”, and there is “Hollywood”,
when it comes to effects and the appropriate perception of them. Sometimes what an audience would expect is
not based on the laws of physics at all!
Doppler GUI
The main controls of the Track are:
• Start position
• End position
• Curve of the line (middle handle on Track)
2
Doppler Manual
The interface shows a rectangular space in front of “you, the listener”. Imagine that you are standing at the
bottom center of the space (indicated by the red dot) and the object will pass in front of you.
Basic Operation
• Select the audio segment you wish to preview, noting the length in seconds.
• Select the Doppler plug-in from your plug-in menu.
• Set the Track Time (in seconds) to the length of your audio segment.
• Preview the sound to start the Doppler effect.
• Adjust the curve of the Track by dragging the center handle.
QuickTips
The Center Time control will adjust when the peak of the Doppler effect occurs. By default it is always one-half
the value of the Track Time, but you may need for the effect to peak at a different time in the Track. Note that the
Curve Handle does not reflect this Center Time, but the speed of the Travel Cursor does reflect the relationship of
the Center Time.
The controls on the right side of the interface allow you to adjust the “reality” parameters, such as gain, air
damping, and so forth. You may reduce them to zero or increase them to exaggerated levels. For all of these
controls, setting the value to 100% represents a realistic behavior in moderate air temperature at sea level. Values
of 0% will turn that control off; each has a range up to 200% for exaggerated effects.
Doppler Manual
3
Chapter 2 - General introduction
A little history
The Doppler effect was named for an Austrian physicist, Christian Doppler (1803-1853), who theorized that
sound waves from a moving source would be closer together as the sound came closer, and further apart as the
sound went further away. The frequency that would be heard would change. Closer-spaced waves would have a
higher pitch, and waves further apart would have a lower pitch. This is due to the fact that the speed of sound is
relatively constant (although a relative one, depending on altitude, temperature, and humidity).
Mr. Doppler proved his theory in 1842 by having trumpet players standing on a train pass by at varying speeds.
He also had a musician stand with him who could take careful note of the changes in pitch of the trumpets as the
train passed by. This proved his theory very well, and he also theorized that this would apply to light, but he
couldn’t create a proof for this.
Later, a scientist named Fizeau generalized Doppler’s theorem and did indeed find that the Doppler Effect was
applicable to light and to other propagations of waves through mediums. For example, this is how the police can
track the speed of a moving car, and how it has been theorized that the universe is expanding (by observing the
“red-shift”, or lowered frequencies of stars moving away from our perspective). OK, that’s probably enough
history. There will not be a test.
4
Doppler Manual
Chapter 3 - Example of use
Most important controls
To begin adjusting a Doppler effect, may we suggest that you work primarily with these controls:
• Start point
• End point
• Curve of Track
• Center Time
• Pitch
These 5 controls are the most critical to the timing of the effect, the depth of the pitch change, and the rate of
change in the effect. After these 5 controls are adjusted for proper timing and pitch shift, then the Air Damping,
Gain, Pan, and other controls be tweaked for more precision in the effect.
Spaceship example
Suppose you have a space ship sound that needs to go by at some medium speed. The soundfile does not change
pitch at all (it sustains a steady relative pitch or sound). The perspective on the screen is of a ship that starting
from the far left part of the screen, coming toward you (the viewer), then passing by on the right.
Of course there are several non-realistic issues to deal with. There is no sound in space, there are no spaceships
like this yet, and Doppler doesn’t have light-years as part of its calibration.
However, it is the perception of the effect that is the only important thing. It is the rate of change in position and
the proximity to the listening position that produces the effect. Greater effect can be achieved by having the
sound simply pass closer to the listener’s position; therefore, the effect of extended distance Doppler can be made
within any distance measurement.
We need a strong effect, and the strongest ones are made when a sound changes quickly between coming toward
you and going away from you. Therefore, we’ll start the sound at a far left position, and end it at a far right
position.
• Set the Track Time for the length of the desired effect (equal to or less than the selected region). Set the
Trigger for Energy (so it will trigger with the first onset of audio).
• Set the direction to go from left to right (arrow will point to the right).
• Drag the left Handle (start point) to the left corner (but slightly above the baseline).
• Drag the right Handle (end point) to the right side, higher up than the start point (further away).
• Drag the Center Handle down toward the listener’s position (the red dot).
Doppler Manual
5
• Listen to the effect by playing or previewing, depending on if you have a real-time application or a preview/
process [file-based] application.
• Now, to make the sound approach with a faster speed, set the Center Time to less than half the Track Time.
• Adjust the Start, End and Center points to tweak the pitch shift. Changing the Center Time will make the
peak of the effect happen at the indicated time after the trigger occurs.
• Use the Gain to achieve the expected volume shift (or you can do it with automation for precise control).
• Using the Pitch can help you tweak the intensity of the pitch shift for a better match to the screen action.
Finally, if the effect still isn’t strong enough, make the Start and End points closer to the center line so that the
curve is sharper. Warp the path toward you very strongly. Then the sound will be making literally a U-turn in
front of you, producing the strongest possible pitch shift effect. The fact that this doesn’t actually match the
movement on the screen has nothing to do with it: powerful effects are purely subjective. If they match the
observed action, then they are correct, from the listeners perceptual viewpoint.
Tweaking the effect
Now that you have the pitch shift and timing adjusted, enhance the effect by changing the “amount of reality”, or
by exaggerating one or more aspects of reality.
In real life, a doppler-effect sound will be softer when it is farther away, and will have some loss of high frequencies due to damping of those frequencies by the air (“Air Damping”). Low frequencies are actually transmitted
very well at long distances. In addition, reflections from the surroundings, such as buildings, hills, trees, and other
objects produce a reverberation. Of course, if the object is passing from left to right, then the panning (spatial
placement) also changes with pitch.
Each of these controls is provided with a range from 0% (off) to 200% (exaggerated), with 100% representing a
reasonable form of realistic behavior according to the observed laws of nature. Each control also has a Bypass
button.
The 4 secondary controls:
1. Gain
2. Pan
3. Air Damp
4. Reverb (amount, time, brightness)
6
Doppler Manual
Gain (volume of the sound) will change with distance. To exaggerate the effect, setting the Gain value to higher
than 100% will make distant sounds even softer. For no gain change at all, set the Gain to 0%.
Many sound designers will prefer to perform a Doppler effect on a sound with no panning whatsoever, as they
want the re-recording mix engineers to have control over the exact placement of the sound when they mix to
picture. This is also true for many game-sound design engineers. In this case, they would set the Pan value to 0%
so that the output of the processor is mono.
The Pitch control was included in one of the five major controls, although it is grouped as part of the “reality
controls” on the right edge of the processor. In practice you will find that you adjust the Pitch control both in the
initial “rough settings” of the effect and in the secondary tweaking of the “reality” of the sound process. The
actual doppler effect is defined as the perceived pitch shift due to movement of the object that is making the
sound, and this effect can also be easily made “hyper-real” by increasing the Pitch value to above 100%.
Air Damping is simply the loss of high frequencies as sound travels through the air (and is very obvious on jets
and other high-speed doppler sounds). It is subjectively more effective on the sound as it travels away from the
listener, but applies equally to the approach.
Waves Doppler contains a simple but effective Reverb tail generator that emulates the reflections from the
surroundings. The gain of the reverb is inverse to the position of the sound, relative to the listener. This means
that as the sound is closer, the reverb level is lower, and as the sound is further away, the reverb level increases.
The amount of this level change (and the overall level of the reverb) is controlled by the Reverb value. It may take
a bit of tweaking to get this part of the effect correctly set because of the interaction between Reverb Time and
Reverb (level). The Bright value controls the damping of the high frequencies of the reverb tail and nearly always
will be set to a value significantly lower than 1.00, say around 0.5. The Bright control is scaled with an arbitrary
value.
Doppler Manual
7
Chapter 4 - Controls and Interface
Space Display of Doppler
Space Display
This window shows a “field” in front of the listener, who is always located at the 0,0 point (indicated by the red
dot). A sound that is moving from the Start to End point will be shown in this space display, along with the start/
end points, and the Moving Cursor will travel on the Track.
DIRECTION
In the upper left of the Space Display are two arrows which control direction of Travel on the Track.
ELAPSED TIME
n the upper right of the Space Display is the elapsed time counter which resets at the beginning of each Doppler
cycle.
TRACK
The orange line as seen in the Space Display shows the path of the sound source as if it were moving. The Track
has START AND END POINTS, and the CENTER HANDLE.
8
Doppler Manual
START AND END POINTS
At the ends of the Track are draggable cursors which control where the travel begins and ends.
CENTER HANDLE
In the middle of the Track is a draggable cursor (up/down only) which lets you curve the Track and adjust the
path of the moving sound source.
Track, Mode, & Trigger control section
Track, Mode, & Trigger controls
TRACK TIME
Controls the total length of the Track, in seconds. It does not have to be set to the same length of your sound
segment or region, although in most cases it would be. If you wanted the Doppler to begin in the middle of the
region, by setting the Track Time to a smaller value and using the Manual Trigger, you can control exactly where
the effect begins.
CENTER TIME
The peak of the doppler’s pitch effects will generally default to one-half of the Track Time, but by setting the
Center Time to different values, the sound can be given acceleration before or after the point. With settings less
than half of Track Time, acceleration will be achieved as the sound approaches, making the sound peak at the
Center Time. With Center Time settings greater than half of Track Time, the object will approach more slowly
until the Center Time is reached, then will accelerate as the object moves away.
MODE
Choose either continuous cycling or one-shot behavioral modes. Continuous will simply repeat the Track Time
and Doppler process over and over; one-shot mode will start when the process is triggered, either by Energy
(triggered by threshold) or Manual.
TRIGGER
Choose either Energy or Manual modes. The Energy trigger starts the Track cycle when it detects audio. The
Manual trigger simply starts the doppler effect cycle each time it is clicked, even if the Track cycle has not yet been
completed.
Doppler Manual
9
Master Reality control section
Master reality controls
Each of these controls have an associated Bypass button for easy comparison or elimination of that effect.
GAIN
When sounds are at a distance, their level is lower. However, for doppler effects, you may not want to have
“normal” nature or real physics in control. When Distance Attenuator value is at 0%, there is no gain change;
sounds at a distance will have the same level as when they are close. As the value approaches 100%, the more
realistic the actual level will be for the distance of the sound source. The gain can be increased to 200% for
exaggerated gain drop.
PAN
Waves Doppler produces a stereo output based on the travel of the sound source on the Track. However, you
may want to reduce or increase this effect. For example, many sound effect editors prefer to have a mono output
on a dopplered sound so that the panning can be controlled by the re-recording mix engineer. To reduce the
output to mono, set Pan to 0%. When set to 100%, Pan is more realistic. The Pan can be increased up to 200% to
increase the panning effect for any given track path.
PITCH
The actual Doppler effect was primarily observed by Mr. Doppler for the changes in pitch. However for proper
perceived effect, you may need to increase or reduce the actual pitch shift to get what you need. Setting Pitch to
0% will have no Doppler effect at all; when set to 100%, Pitch is more realistic, and of course can be set up to
200% for stronger effect. Usually you’ll find that careful balancing between Pitch, Start, and End points, Curve of
Track, and Center Time will give the motion and pitch shifting desired.
10 Doppler Manual
AIR DAMP
With increasing distance, sound travelling through air has progressively less high frequencies reaching the
listener. When set to 0%, there is no air damping effect (the sound will be flat in frequency response, with no high
frequencies removed with distance). When set to 100%, the more realistically the sound will be damped (reduced
in high frequencies, starting about 10kHz). Setting the Air Damp value higher than 100% will increase the effect
by further decreasing the amount of high frequencies.
REVERB
Controls the amount of reverb in the output mix. This is not a wet/dry control, but instead is a gain control to
mix reverb into the output.
REVERB TIME
Total time of the reverb tail, in seconds.
REVERB BRIGHTNESS
Controls the high frequency characterof the reverb tail, from 0.0 to 1.0, where 1.0 is the brightest sound.
Doppler Manual
11
Chapter 5 - Preset Descriptions
All of the factory presets for the Doppler are just suggestions and examples, as you’ll nearly always have to
customize all the settings for the effect you need. Doppler is a very context-sensitive type of process, and it would
be rare that a preset would satisfy the need, but may serve as a starting place.
Some of the presets have specified default times, which of course can be changed, but to achieve the proper effect
the total track time and distance of the object passing by are interactive. Therefore, if you shorten the track time,
the effect will be stronger (because the object will move faster); to compensate you would need to move the entire
line away from the central listening point. If you lengthen the track time, the effect will be weaker and you’d need
to move the entire line closer to the central listening point in order to keep the pitch shift the same.
Doppler Reset (default)
This setting is also the default when you first insert or open the Doppler on a track. A basic right-to-left effect,
passing close by, with some exaggeration of the pitch and pan effects. The little touch of reverb adds a sense of
space and enhances the distance.
Superfast flyby, 1.9sec
The very short time and very close distance at the center, plus the curved track, make the effect strong. Such
settings would be good for rockets, spacecraft, andobjects coming very close to the “viewing position”.
Long, passing close, 16sec
Classic “reality”, with nearly all parameters set to emulate natural behavior. It is just a basic long track. Works well
with steady sounds such as trains, helicopters, engines, car and truck sounds.
Long approach and away, 20sec
Another classic long track, still very “reality-based”, but this time with a longer approach and gentle pitch shift,
made even gentler by the slight curve away from the listener. Note that the Pan control is set to only 30% to avoid
extreme panning. The Reverb adds a blurring effect that can emulate subway tunnels or nearby buildings.
Medium in/out, 5.5sec
Moderate effect (medium refers to the amount of the effect, not the length of the track) to be used with car
passing scenes, for example.
Medium, passing fast, 10sec
A faster and longer version of the previous preset, but with very sharp curves to greatly increase the gain and
pitch changes.
Short in, long away, 10sec
One of the most classic effects is to have a short time for the approach (when the pitch is higher than reality) and
a long time for the object to travel away (as would be done in a classic “long shot” of film).
High speed passby, 4sec C
lose proximity to the central point and the short track time make the effect very strong, and gives the impression
of very significant speed. (For a stronger and faster effect, try the Rocket flyby setups).
12 Doppler Manual
Fast in/out U-turn
Not something that too many rocketships do in real life, but they certainly do it on-screen. By having the sound
approach the listener, then make a very sharp turn and go away from the listener, the effect becomes extreme.
That’s what Hollywood is all about: non-reality, or “bigger than life”.
Right approach, away center, 10sec
One example of a completely off-center effect, with the entire line being to the right of the center line (both in
acoustic space and in the user interface). The fact that the Center time and the actual center of the track occur
before the signal actually pans is a non-realistic aspect of the effect. A great advantage of the WaveSystem is that
you can select the entire line and drag it around while keeping the exact shape of the line, making it easy to put
the line anywhere desired in the stereo field.
Rocket flyby, 5sec
A variation on the high speed passby, but for a very strong effect in pitch shift.
Rocket flyby, 3sec
Faster faster faster version of the above.
Straight away, 15sec
Although the pitch shift is constant, the effect is still strong, although most of the effect dependson the gain
change (drop) as the object moves away.
Straight in, 15sec
Same as the previous, except that the pitch is higher than reality and the gain will increase as the object approaches.
The following setups are purely for effect
These setups are examples of how to use the Doppler for non-traditional processing. Some do not even use the
Doppler effect at all —such as the Pannerizer, while others use the effect to the extreme, -such as Jerky Tape
machine. The Physics anomaly setups are possibly a function of a “feature” in the code, as the track looks as if to
pass thru the listener and behind them, although that is not what the processor actually produces. There are
probably many more little corners to this processor such as these that are well worth exploring.
Percussion spinner
Pannerizer
Jerky Tape machine
Physics anomaly
Physics anomaly 2
Doppler Manual
13