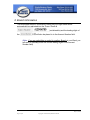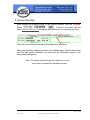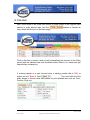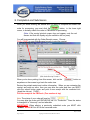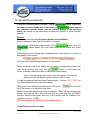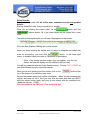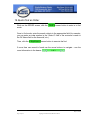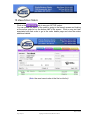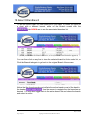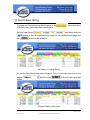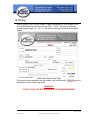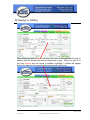
1
User Manual
Document Version 1.6
PBChecks.com Database
Prepared for:
Priority Business Checks
7225 Bermuda Rd. Suite B
Las Vegas, NV 89119
June 13, 2006
Prepared by:
NexTech
DJ Layland
1736 Charleston Blvd. Ste 344
Las Vegas, NV 89104
Phone: (702)768-7597
Email: [email protected]
Table of Contents
1.
Introduction................................................................................................................ 3
2.
User Types .................................................................................................................. 4
2.1. User................................................................................................................................... 4
2.2. Manager ............................................................................................................................ 4
2.3. Administrator .................................................................................................................... 4
3.
Log In Procedure ....................................................................................................... 5
4.
Create a New Order................................................................................................... 6
5.
Enter Customer Data ................................................................................................ 7
6.
Branch Information................................................................................................... 8
7.
Account Number........................................................................................................ 9
8.
Pick Item................................................................................................................... 10
9.
Completion and Submission ................................................................................... 11
10. Reorder/Quick Reorder .......................................................................................... 12
11. Canceling Orders..................................................................................................... 14
12. Saving Pending Orders ........................................................................................... 15
13. Continue or Change an Order ............................................................................... 16
14. Quick Find an Order............................................................................................... 17
15. View Active Orders ................................................................................................. 18
16. Select Other Branch ................................................................................................ 19
17. Search Bank History ............................................................................................... 20
18. View Product List.................................................................................................... 21
19. Printing..................................................................................................................... 22
20. Viewing vs. Editing.................................................................................................. 23
21. Getting Help............................................................................................................. 24
22. Glossary.................................................................................................................... 25
PBChecks.com User Manual
May 17, 2006
Page 2 of 25
Copyright © 2005 Priority Business Checks
1. Introduction
This document provides instructions for using the web-based database for PBChecks.com. In the
following document, I will briefly describe each of the following topics:
•
•
•
Supported Users – who will be using the system
Completing Tasks – description of how to complete tasks in the database
Glossary – words used in this document with their definitions
Please be aware that this software is in the implementation stage of
development, we encourage your feedback and request you report
any glitches you encounter.
Thank you for your patience as we work together toward success.
PBChecks.com User Manual
May 17, 2006
Page 3 of 25
Copyright © 2005 Priority Business Checks
2. User Types
This section describes the types of users who will use the database.
2.1. User
The standard User has access to read-only functionality of the database in that they can view data,
but not change them. They have access to all primary sections of the database.
2.2. Manager
The Manager-level user has access to the full functionality of the database in that they can view
and edit data. They have access all sections of the database.
2.3. Administrator
The Administrator-level user has access to the full functionality of the website in that they can
view and edit data, administer user accounts and privileges, and edit layouts. They have access to
all sections of the database.
PBChecks.com User Manual
May 17, 2006
Page 4 of 25
Copyright © 2005 Priority Business Checks
3. Log In Procedure
Open Internet Explorer
and go to www.pbchecks.com
Click on the LOG IN button
Type in your Login information provided by PBChecks
Name
and click Log In
WARNING : Do NOT
share your login name
and password with
anyone! You can and
will be held personally
responsible for any
changes made under your
name in the system.
Note: This system uses Cascading Style Sheets (CSS)
PC users : Must use Internet Explorer version 6 or above
Macintosh user : Please use the latest version of Safari
We do not support Firefox at this time or IE on Macs
(The Welcome screen will appear)
PBChecks.com User Manual
May 17, 2006
Page 5 of 25
Copyright © 2005 Priority Business Checks
4. Create a New Order
On the
screen, click the
banner button.
PBChecks.com User Manual
May 17, 2006
Page 6 of 25
Copyright © 2005 Priority Business Checks
5. Enter Customer Data
Once the cursor starts blinking in the “CK Name” field, begin to type the check
name. Using the TAB key to move to the next field and continue to enter all the
applicable information.
(Note: Refrain from hitting the “return” key on your keyboard, if
you do, simply use the backspace key to move back up within
the field)
Once all of the contact information is fully entered into the appropriate fields, you
may click the
button to auto-fill the “Ship To” address if the it is the
same as the CK address or the
button to auto-fill the Branch contact
information.
To fill the “Bill To” address fields, click the button that corresponds to where the
bill should be sent.
For example, click “Customer”
and the fields will auto-fill with the contact information in the fields above; if you
click “Bank,” then the bank’s contact info will auto-fill into those fields.
(Note: After you select the “Bill To” recipient and the information
automatically fills the fields, the header next to the “Bill To” field shows the
type of recipient)
PBChecks.com User Manual
May 17, 2006
Page 7 of 25
Copyright © 2005 Priority Business Checks
6. Branch Information
The associated Branch’s information, based on your login name will be
automatically be replicated into the Trans / Route #
(not alterable) and the leading digits of
the
will also be placed in to the Account Number field.
(Note: If you are submitting an order for another Branch in your Bank, you
will need to manually enter the correct leading digits in the Account
Number field)
PBChecks.com User Manual
May 17, 2006
Page 8 of 25
Copyright © 2005 Priority Business Checks
7. Account Number
After entering the remaining digits of the Account Number, click the “Validate”
button
. If there is a problem with the
data, a banner with red text will appear with instructions for correcting the issue.
(Note the red-text banner indicating the problem with Validation)
Make any necessary changes and then click Validate again. Repeat these steps
until the data passes validation, you will know the information passes if the
banner does not appear.
Note: The system will not accept the submission of your
order unless it passes the Validation process.
PBChecks.com User Manual
May 17, 2006
Page 9 of 25
Copyright © 2005 Priority Business Checks
8. Pick Item
Next, move down to the Order Item section to order checks or the Deposit Slips
section to order deposit slips. Use the
item, which will take you to the Items page:
buttons to choose an
Click on the item to select it and you will automatically be returned to the Order
screen with the selected item and its default values filled in (ie: starter sets get
deposit slips, a stamp etc.)
If ordering checks on a new Account enter a starting number that is 1001 or
You must click the little
higher into the “Start #” field.
down arrows to choose other valid values for your selected item such as: Color,
Position, Style, etc.
PBChecks.com User Manual
May 17, 2006
Page 10 of 25
Copyright © 2005 Priority Business Checks
9. Completion and Submission
When you finish entering the details and you want to complete and submit the
order for processing, you must click the
button in the lower right
corner, to actually submit the order to PBChecks for processing.
(Note: If the receipt printout screen does not appear, note the red
banner text that will display why the validation did not pass)
You will be presented with the Order Receipt screen, Choose
FILE > PRINT on your Web Browser’s menu to print the receipt.
(Web Order Receipt View)
When you’re done printing from this screen, click on the
anywhere on the screen to go back the order view.
button or
Review the printed receipt and confirm information. When you are reviewing the
receipt, and catch an error, then you may alter the order and then you MUST
click the submit button again and print a new receipt with the corrected info.
(shred the old one) THEN….
FAX the receipt to the PBCheck (Fax number at top)
Note: The status of your order will now be
You may alter the order until PBCHECKS set it to “Production.” Once the status
is changed it is “View-only” and not alterable.
IMPORTANT! When altering a previously submitted order you MUST click
“Submit” AGAIN & Print & Fax the corrected order.
PBChecks.com User Manual
May 17, 2006
Page 11 of 25
Copyright © 2005 Priority Business Checks
10. Reorder/Quick Reorder
There are 2 ways to place a reorder – either
(which copies the
customer account details into a new order) or
(which copies
the customer account details and the product details of the previous
order). See below for the instructions for using the Reorder or Quick Reorder
features.
Reorder:
To create a new order with all of the customer account details –
Start by finding the order that you would like to reorder.
Once you are viewing the correct order, On the
screen, click the
banner button. All of the order details will be copied into a new
order.
The customer account details will be duplicated into a new order & you will see a
flag appear on the screen:
Fill in the product and billing information for this reorder.
When you finish entering the details and you want to complete and submit the
order for processing, you must click the
button in the lower right
corner, to actually submit the order to PBChecks for processing.
(Note: If the receipt printout screen does not appear, note the red
banner text that will display why the validation did not pass)
You will be presented with the Order Receipt screen, Choose FILE > PRINT on
your Web Browser’s menu to print the receipt.
When you’re done printing from this screen, click on the
top of the screen to go back the order view.
button at the
Review the printed receipt and confirm information. When you are reviewing the
receipt, and catch an error, then you may alter the order and then you MUST
click the submit button again and print a new receipt with the corrected info.
(shred the old one) THEN….
FAX the receipt to the PBCheck (Fax number at top)
Quick Reorder on the next page:
PBChecks.com User Manual
May 17, 2006
Page 12 of 25
Copyright © 2005 Priority Business Checks
Quick Reorder:
To create a new order with all of the same customer account and product
details –
Start by finding the order that you would like to reorder.
Once you are viewing the correct order, On the
screen, click the
banner button. All of the order details will be copied into a new
order.
The order will be duplicated & you will see a flag appear on the screen:
Fill in the Start Number & Billing info for this reorder.
When you finish entering the details and you want to complete and submit the
order for processing, you must click the
button in the lower right
corner, to actually submit the order to PBChecks for processing.
(Note: If the receipt printout screen does not appear, note the red
banner text that will display why the validation did not pass)
You will be presented with the Order Receipt screen, Choose FILE > PRINT on
your Web Browser’s menu to print the receipt.
When you’re done printing from this screen, click on the
top of the screen to go back the order view.
button at the
Review the printed receipt and confirm information. When you are reviewing the
receipt, and catch an error, then you may alter the order and then you MUST
click the submit button again and print a new receipt with the corrected info.
(shred the old one) THEN….
FAX the receipt to the PBCheck (Fax number at top)
PBChecks.com User Manual
May 17, 2006
Page 13 of 25
Copyright © 2005 Priority Business Checks
11.Canceling Orders
You may cancel an order up to the point it is in Production by clicking the
button at the bottom right corner. This will clear all the entered
information and stop the order process.
(NOTE: We can NOT undo a canceled order, all info is cleared)
PBChecks.com User Manual
May 17, 2006
Page 14 of 25
Copyright © 2005 Priority Business Checks
12.Saving Pending Orders
Use the
to hold an open order in the case of additional information
requirements (DO NOT SUBMIT) simply leave it as a “Web Order” to complete
later. Follow the next section to find, complete and Submit a saved order.
PBChecks.com User Manual
May 17, 2006
Page 15 of 25
Copyright © 2005 Priority Business Checks
13.Continue or Change an Order
You may alter an order as long as the Status is not “Production.” Once the status
is changed by PBChecks it is view-only, and cannot be altered.
To Edit an order, first find the appropriate order thru the branch’s active orders
list or use the quick find method. (see next section) If the Order Status is not
listed as “Production,” you can edit the order. Just click in the field that you wish
to change and make the corrections. Remember, if the order has been previously
submitted you must click
AGAIN to print a new receipt and Fax to
PBCHECKS to resubmit a corrected order.
Note: If you need to make a change to an active order after the status has
changed to “Production,”
there is a possibility (but no
guarantee) that the order can be changed before it goes to print, if you call
Priority Business Checks IMMEDIATELY at the contact number listed at the
beginning of this document. A staff person may be able to make the changes for
you, or change the status of the order so that you can go in and make the
required changes.
PBChecks.com User Manual
May 17, 2006
Page 16 of 25
Copyright © 2005 Priority Business Checks
14.Quick Find an Order
While on the ORDER screen, click the
mode.
banner button to enter in to find
Once in find mode, enter the search criteria in the appropriate field (for example,
you can enter an order number in the “Order #” field or the customer’s name in
the CK Name field or the Account#, etc.).
Then, click the
banner button to execute the find.
If more than one record is found use the arrow buttons to navigate - see the
count information in the banner
.
PBChecks.com User Manual
May 17, 2006
Page 17 of 25
Copyright © 2005 Priority Business Checks
15.View Active Orders
Click on the
tab to see your ACTIVE orders.
You can review the status of the order by going to the branch screen and looking
at the active order list on the bottom half of the screen. Click on any text item
associated with that order to go to the order details page and view the orders
additional details.
(Note: the most recent order is the first on the list.)
PBChecks.com User Manual
May 17, 2006
Page 18 of 25
Copyright © 2005 Priority Business Checks
16.Select Other Branch
To see the active orders for other Branches in your bank, or orders you input for
a client with a different branch, while on the Branch screen click the
tab AGAIN see to see the associated branches list.
(When you click on the Branch tab twice, a list of all associated branches appears)
You can then click on any line to view the selected branch’s Active order list, or
Click the Branch tab again to go back to the original Branch View screen.
Notice that the found record count reflects the active branch count of the bank in
Use the arrows to navigate thru the branches as
the header.
desired. You may also toggle back to the active branch list and chose the branch
and select to return.
PBChecks.com User Manual
May 17, 2006
Page 19 of 25
Copyright © 2005 Priority Business Checks
17.Search Bank History
You may also find archived orders by going to the
of BANK orders, filtered by their current status.
tab to view a list
and simply click the
Set the Date Range
button to see all orders with any status for the selected date range and
the
button to see all active.
(All orders or varying Status)
Or, set the Date Range and select a specific Status in the drop-down box on the
banner
status.
and then click
to find all orders with that
(Shipped Status orders only)
PBChecks.com User Manual
May 17, 2006
Page 20 of 25
Copyright © 2005 Priority Business Checks
18.View Product List
To View a list of available products, click on the
tab. On this
screen, you can choose a category of products to view by picking the Category
in the drop down field and then
clicking “Submit”
.
PBChecks.com User Manual
May 17, 2006
Page 21 of 25
Copyright © 2005 Priority Business Checks
19.Printing
After Clicking PRINT on any screen, a report will appear on your screen. Go to
your Web Browser’s menu and choose “File” > “Print.” Be sure to enter the
printable page length i.e.: 1 of 1 on the History report or it will print many blank
pages.
(Web Order Report Print View)
When you’re done printing from this screen, click on the small
anywhere on the screen to get back.
button or
WARNING!!
DO NOT CLICK THE BACK ARROW IN YOUR WEB BROWSER!
PBChecks.com User Manual
May 17, 2006
Page 22 of 25
Copyright © 2005 Priority Business Checks
20.Viewing vs. Editing
When viewing a record (above) note how there are not lines between the ship to
address and the special instructions background is grey. When you click in to
any field (below) and the record is editable, highlights / outlines will appear
around the fields and the special notes background is white, etc.
PBChecks.com User Manual
May 17, 2006
Page 23 of 25
Copyright © 2005 Priority Business Checks
21. Getting Help
If you’re not sure what a certain button does, hover the mouse over the button
and within 2 seconds a small pop-up note will specify what that button will do.
If you need help with your order call 702-263-2435 or 800-240-0305. If you need
technical support regarding the online ordering system, call 702-425-8592.
PBChecks.com User Manual
May 17, 2006
Page 24 of 25
Copyright © 2005 Priority Business Checks
22.Glossary
tab
banner
(Banner and Tab color match indicates the
current screen/ module you are viewing.)
Tabs: Use top tabs to navigate through the different modules. It will automatically
select the related records from the current record you are coming from.
Banner Buttons: Use banner buttons to perform actions that affect the display
data.
Fields: store data; headers for the field are above or beside the field.
Record Navigation Buttons: First – Previous – Next – Last
Portal List: Banner color of the portal list indicates the module that the related
records are being displayed from. For example, in this screen (below) you can
see that the data in the portal list is green, therefore that information is coming
from the Order module (the Order tab is also green.)
PBChecks.com User Manual
May 17, 2006
Page 25 of 25
Copyright © 2005 Priority Business Checks