1
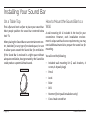
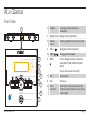
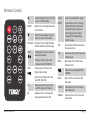
42” Sound Bar with Bluetooth®
NHS-7008
Instruction Manual
Please read carefully before use and keep for future reference.
Table of Contents
Thank You...................................................................... 3
Manual Station Preset................................................................. 14
In the Box....................................................................... 3
Using Bluetooth® Mode................................................14
Installing Your Sound Bar............................................. 4
On a Table Top..................................................................................4
How to Mount the Sound Bar to a Wall.......................................4
At a Glance......................................................................7
Front View.........................................................................................7
Remote Control............................................................................... 9
Using the Remote Control................................................... 10
Replacing the Battery.......................................................... 10
Connect Power.............................................................. 11
Getting Started.............................................................12
Turning the Unit On and Off ........................................................12
Setting the Time.............................................................................12
Setting the Source Mode..............................................................12
Adjusting the Volume....................................................................13
Pairing a Bluetooth® Device........................................................ 14
NFC One-Touch Setup...................................................................15
Bluetooth® Controls......................................................................15
Using AUX 1 Mode.........................................................16
Using AUX 2 Mode.........................................................16
Using OPT 1 Mode.......................................................... 17
Using USB & SD Modes.................................................. 17
Warnings and Precautions...........................................18
Troubleshooting Guide................................................ 22
Specifications.............................................................. 23
Support........................................................................ 23
Using FM Radio Mode...................................................13
FM Radio Controls.........................................................................13
Optimizing FM Radio Reception..................................................13
Automatic Station Scan................................................................13
Page 2
Naxa Electronics
Thank You
In the Box
We know you have many choices when it comes to
technology; thank you for choosing us here at Naxa
Electronics. Established in 2001 in Los Angeles, California, we are dedicated to delivering products that entertain and delight.
Please take a moment to make sure that you have everything in the list below. Although we make every effort to ensure that each Naxa device is securely packed
and sealed, we know a lot can happen in between us
and you. If anything is missing, check back with your
local retailer to get immediate assistance. If they canWe trust that you will be happy with your purchase. not help you, please contact our Naxa Support team at
Please read this manual carefully and save it for refer- www.naxa.com/naxa_support.
ence. You may also find the latest FAQ, documentation,
and other product material at our website. Come visit •• NHS-7008
us on the web at www.naxa.com and see all that we •• AC power adapter
have to offer!
•• Wall mount kit
•• Remote control
•• RCA audio cable
•• AUX audio cable
•• User manual
www.naxa.com
Page 3
Installing Your Sound Bar
On a Table Top
How to Mount the Sound Bar to a
Wall
Find a flat and level surface to place your sound bar.
Most people position the sound bar centered below A wall mounting kit is included in the box for your
their TV.
convenience. However, each installation environWhen placing the Sound Bar on an entertainment cen- ment is unique and has its own requirements; you may
ter, bookshelf, or any type of enclosed space, be sure need additional material to prepare the sound bar for
to allow space around the Sound Bar for ventilation. mounting.
If the Sound Bar is enclosed in a tight space without You will need the following:
adequate ventilation, heat generated by the Sound Bar
•• Included wall mounting kit (2 wall brackets, 4
could produce a potential heat hazard.
screws, 4 drywall plugs)
•• Pencil
•• Level
•• Ruler
•• Drill
•• Hammer (for drywall installations only)
•• Cross-head screwdriver
Page 4
Naxa Electronics
Naxa Electronics recommends that wall mounting be 2. Use the wall brackets as a template to mark a secperformed by a qualified professional installer. Naxa
ond set of points on the wall. Make sure the bracket
is not liable for any accidents or damage to property
is level before marking the wall, and that the points
or the sound bar due to incorrect installation.
are level with each other.
1. Using a level and ruler, use a pencil to mark 2 points 3. Use the drill to drill a hole at each of the 4 marked
points on the wall. Select a drill bit that is appropriate
on the wall that are 33.4 inches apart. Use the level
for your wall’s construction. If you are using the dryto ensure that the points are on the same horizonwall plugs as directed in step 4, make sure the diamtal plane.
eter of the drill bit matches the diameter of the plugs.
4. For drywall installations only; for wood, skip to
step 5: using a hammer, gently insert the drywall
plugs in each of the holes. The plugs should fit
completely into the hole, with the tops of the plug
flush with the wall.
1.Screws
2.Wall bracket
3.Drywall plugs
(optional)
www.naxa.com
(For installations in brick or concrete walls, please
obtain masonry plugs from your local hardware
store.)
1
2
3
5. Use a screwdriver and two screws to affix the left
bracket to the wall, then do the same for the right
bracket. Hand-tighten the screws; do not overtighten them! Note the orientation of the hooks
on the bracket in the illustration.
Page 5
6. Make sure that the brackets are stable and firmly
attached to the wall. Locate the mount points on
the rear of the sound bar, then hook the sound bar
onto the brackets.
⚠⚠
The wall that the brackets are mounted on
should be of sufficient strength to support
the weight of the sound bar, and the brackets should be perpendicular to the floor.
Page 6
Naxa Electronics
At a Glance
Front View
1
Speakers
2
Display screen Displays status information.
3
Remote
sensor
Detects signals from the remote control.
4
TUN– /
Tuning down, Previous/Reverse
5
TUN+ /
Tuning up, Next/Forward
6
MODE
3
Press to change the active connection
mode (FM, BT, USB, CARD, OPTI, AUX 1,
AUX 2).
4
Press to turn the unit on and off.
1
2
6
5
7
8
AUX 1
Full-range drivers and built-in
subwoofers.
7
VOL–
Volume down
8
VOL+
Volume up
9
AUX 1
connector
AUX 1 mode. 3.5mm stereo connection
for devices with 3.5mm line-out or headphone output.
9
www.naxa.com
Page 7
10
Power
socket
Connector for the included power adapter.
14
CARD
11
AUX 2
connector
AUX 2 mode. RCA stereo connection for
devices with red and white RCA left/right
audio output.
CARD mode. Load memory cards here.
Refer to the specifications for a list of supported memory card types.
15
ANT
12
OPTI
connector
OPTI mode. Digital optical audio connection for devices with optical audio output.
Antenna lead. Extend and position the
antenna wire for optimal radio signal
reception.
13
USB port
USB mode. Load USB memory sticks here.
The USB port is designed for media playback from flash memory devices. It is not
designed to charge high-power devices.
Page 8
Naxa Electronics
Remote Control
Power/standby. Press to turn the
unit on or off (standby).
MODE
MODE
TUN-
Clock. Press and hold to adjust.
MO/ST
Mono/Stereo. Press to change
between FM mono and stereo
reception mode. Using mono
mode will give you the best
change of receiving stations
from far away.
Mode. Press to change the active
source mode.
Mute. Press to temporarily disable or to restore the sound.
TUN+
FM SCAN
FM scan. Press to find FM radio
stations within reception range.
VOL–
Volume down. Press to decrease
the volume level.
TUN–
Tuning down. Press to tune to a
lower radio station.
VOL+
Volume up. Press to increase the
volume level.
Previous. Press to skip to the
previous track (BT, USB, SD).
BASS–
Bass down. Press to decrease
the bass level.
TUN+
www.naxa.com
CLOCK
Tuning up. Press to tune to a
higher radio station.
Pause or resume playback (BT,
USB, SD).
Next. Press to skip to the next
track (BT, USB, SD).
BASS+
M+
Memory up. Press to go to the
next FM radio preset station.
Bass up. Press to increase the
bass level.
TREBLE–
EQ
Equalizer. Press to change the
audio equalizer preset stat
Treble down. Press to increase
the treble level.
TREBLE+
Treble up. Press to increase the
treble level.
Page 9
Using the Remote Control
Before using the remote for the first
time, remove and discard the plastic
insulation tab as shown.
Aim the IR emitter of the remote control at the remote
sensor and then press a key.
working. Direct sunlight, incandescent or
fluorescent lamps, or any other strong
light shining on the remote sensor of the
unit may prevent the remote control from
working properly.
Replacing the Battery
The remote control will work within 16 feet of the re- The remote control is powered by one (1) “CR2025”mote sensor and within 30 degrees from center.
type battery.
1. Squeeze the tab of the battery compartment to the right while drawing
the battery tray out.
2. Take note of the orientation of the
existing battery. Replace it with a new
“CR2025” lithium battery, making
sure to match the polarity of the old
battery (as well as the +/- markings
on the remote control.
3. Push the tray back into place.
LL
Obstacles between the unit and transmitter may prevent the remote control from
Page 10
LL
The battery in the remote will
last for approximately 1 year. Replace the
battery if the remote control does not
Naxa Electronics
work. Always dispose of batteries according to your local municipal regulations.
⚠⚠
The batteries used in the remote control
may present a fire or chemical burn if
mistreated. Do not recharge, disassemble,
incinerate, or heat the battery (~212°F). Do
not mix old with new batteries, or different
types of batteries. Remove the batteries
from the remote if it will not be used for a
long period of time. Keep batteries away
from children.
Do not spill water on the remote control.
Do not use the remote control for other
equipment at the same time.
Battery Precaution
Heed the following when handling the battery used in this device.
1. Use only the size and type of battery specified.
2. Be sure to install the battery properly by matching the polarities indicated in the battery compartment. Installing a battery with reversed
poles may cause damage to the device.
3. Remove the battery from the device if it is empty or will not be used
for a long time to prevent damage or injury from leakage.
4. Do not charge a battery that is not designed for charging.
www.naxa.com
Connecting Power
Use the included AC power adapter to connect the unit
to AC household power.
•• Connect the two-pronged end of the adapter to a
household power outlet.
•• Connect the barrel plug end of the adapter to the
Power socket [10] of the unit.
⚠⚠
The adapter supports AC 100-240V power
only. Do not connect the power adapter to
a power outlet other than that which is indicated here and on the rating label of the
power adapter as this may result in the risk
of fire or electric shock.
Disconnect the unit from power if it will not
be used for a long time.
Do not handle the power plug with wet
hands. Doing so may cause electric shock.
Do not use the adapter with any other power
source.
Page 11
Getting Started
Turning the Unit On and Off
To turn the unit on, press the
screen [2] will light up.
button [6]. The display
3. Press the TUN- or TUN+ button [4, 5] to adjust the
minutes while it is blinking. Press CLOCK/MO/ST to
save the minutes. The time is now set,
Setting the Source Mode
Press MODE [6] to set the active source mode. This
controls which connection is being used.
To place the unit in Standby mode, press the button on the remote until the display screen [2] shows the The display screen [2] will indicate which mode has
time.
been selected when MODE [6] is pressed.
To turn the unit off completely, disconnect the unit
from power.
Setting the Time
The time is shown on the display screen [2] when the
unit is in Standby mode. To set the time:
1. Press and hold the CLOCK/MO/ST button on remote control. The hour digit will blink.
Display Screen
Connection Mode
FM
FM radio
BT
Bluetooth®
USB
USB [13]
CARD
SD/SDHC card reader [14]
OPT1
Optical audio input [12]
AUX1
3.5mm audio input [9]
AUX2
RCA stereo input [11]
2. Press the TUN- or TUN+ button [4, 5] to adjust the
hour while it is blinking. Press CLOCK/MO/ST to
save the hour; the minutes will blink.
Page 12
Naxa Electronics
Adjusting the Volume
To do this...
•• Use the VOL– and VOL+ keys [7, 8] to decrease or
increase the volume level, respectively.
•• Press the MUTE key on the remote to disable sound
output completely. Press the MUTE key again to
restore sound output.
Using FM Radio Mode
Press MODE [6] to set the active mode to FM.
FM Radio Controls
To do this...
...do this
Tune to a higher frequency
Press TUN+
Tune to a lower frequency
Press TUN–
Auto-tune to a higher station
Press and hold TUN+
Auto-tune to a lower station
Press and hold TUN–
Tune to the next preset station
Press M+
Toggle between Mono and Stereo
reception modes
Press CLOCK/MO/ST
www.naxa.com
...do this
Save a station to preset memory
Press FM SCAN
Scan for stations and auto save
them to preset memory
Press and hold FM
SCAN
Optimizing FM Radio Reception
•• Fully extend the FM antenna wire [15] and position
it for best radio reception.
•• Use FM mono mode if a radio station is far away
and its signal is weak. Press the CLOCK/MO/ST button on the remote to change between Mono and
Stereo modes.
Automatic Station Scan
Use the station scan feature to find stations within
broadcast reception range and save them to preset
memory.
1. Press and hold the FM SCAN button on the remote.
The sound bar will search for and store stations automatically.
Page 13
Manual Station Preset
To save a station as a preset:
1. Press TUN– or TUN+ to tune to the station you want
to save.
Using Bluetooth® Mode
Press MODE [6] to set the active mode to BT.
Pairing a Bluetooth® Device
2. Press the FM SCAN button the remote. The display
You will need to pair your Bluetooth device with the
screen [2] will flash “CH00”.
sound bar the first time you use them together.
3. Press M+ on the remote to change the preset sta1. Turn the sound bar on and press MODE [6] to set
tion (e.g., CH01, CH02).
the active mode to BT. The sound bar will now be
4. Press FM SCAN to save the station to the selected
ready to pair with a device.
preset station.
2. Use your Bluetooth device to search for available devices. The sound bar will announce itself as
“NHS-7008.”
3. Select NHS-7008. Use the pairing code “0000” if
your device asks for one.
LL
Make sure Bluetooth® is enabled on your
device. Please refer to the instructions that
came with your device to learn more about
how to connect it to other Bluetooth devices.
Only one device can be paired with the sound
Page 14
Naxa Electronics
bar at a time. Disable Bluetooth on other
devices to prevent interference.
Bluetooth® Controls
To do this...
...do this
NFC One-Touch Setup
Pause or resume playback on a connected device.
Press
If you have a device that is equipped with NFC and
Bluetooth, you can pair the device to the sound bar
with a single tap. It’s just that easy!
Skip to the next track on a connected Bluetooth device.
Press
.
Skip to the previous track on a connected Bluetooth device.
Press
.
1. Place the sound bar in Bluetooth® mode (press the
MODE button [6] until “BT” appears on screen.
.
2. Locate the NFC sensor on the “NFC” sticker on the
sound bar. Touch the back of your device to the sound
bar sensor. The sound bar will detects your device.
3. Your device may ask you for permission to pair with
the sound bar. Select “yes” and pairing is complete!
LL
Before attempting to use NFC to set up your
Bluetooth connection, make sure that Bluetooth and NFC are enabled on your device.
For devices running Android™ OS, you can
find the NFC option in the “Settings > Wireless & Networks > More...” menu screen.
www.naxa.com
Page 15
Using AUX 1 Mode
Using AUX 2 Mode
Press MODE [6] to set the active mode to AUX 1.
Press MODE [6] to set the active mode to AUX 2.
Use a 3.5mm AUX cable to connect devices with head- Use an RCA stereo patch cable to connect devices with
phone out or line out connectors (e.g., smartphones, white and red RCA stereo out connectors (e.g., TVs,
MP3 players, portable audio devices).
DVD players, camcorders, Hi-Fi stereo and home theater components).
DC 16V
AUX 2
USB
Operate the external device as directed by its manufacturer to control playback.
SD/MMC
OPTICAL IN
Operate the external device as directed by its manufacturer to control playback.
Page 16
Naxa Electronics
Using OPT 1 Mode
Using USB & SD Modes
Press MODE [6] to set the active mode to OPT 1.
Install a USB drive or SD memory card and then press
MODE [6] to set the active mode to USB or SD.
Use a optical audio patch cable to connect devices with
a optical audio out connector (e.g., TVs, DVRs, Hi-Fi
stereo and home theater components).
Install a compatible USB drive or memory card with
music files on it. Please refer to the Specifications section to learn more about compatibility.
LL
Operate the external device as directed by its manufacturer to control playback.
LL
This optical connection only supports the
uncompressed PCM signal format.
www.naxa.com
Music files must be saved to the root directory. The sound bar will not play files that
are saved in a folder.
To do this...
...do this
Pause or resume playback.
Press
.
Skip to the next track.
Press
.
Skip to the previous track.
Press
.
Page 17
Warnings and Precautions
Important Safety Information
The lightning flash with arrowhead symbol within an equilateral
triangle is intended to alert the user to the presence of uninsulated “dangerous voltage” within the product’s enclosure that
may be of significant magnitude to constitute risk of electric
shock
The exclamation point within an equilateral triangle is intended
to alert the user to the presence of important operation and servicing instructions in the literature accompanying the appliance.
CAUTION
• Do not block the ventilation openings or holes.
• Do not place any naked flames (such as lighted candles) on the apparatus.
• When discarding batteries, follow all local rules and laws governing the
disposal of batteries. Consider the environmental impact of your actions!
• To prevent fire or shock hazard, do not expose this appliance to rain
or moisture.
Page 18
1. Read Instructions: All the safety and operating instructions should be
read before the product is operated.
2. Retain Instructions: The safety and operating instruction should be
retained for future reference.
3. Heed Warnings: All warnings on the product and in the operating instructions should be adhered to.
4. Follow Instructions: All operating and usage instructions should be
followed.
5. Cleaning: Unplug this product from the wall outlet before cleaning.
Do not use liquid cleaners or aerosol cleaners. Use a damp cloth for
cleaning.
6. Attachments: Use only attachments recommended by the manufacturer. Use of other attachments may be hazardous.
7. Water and Moisture: Do not use this product near water (e.g., near a
bathtub, washbowl, kitchen sink, laundry tub, in wet basements, or
near a swimming pool and the like).
8. Accessories: Do not place this product on an unstable cart, stand, tripod, bracket, or table. Use only with carts, stands, tripods, brackets,
or tables recommended by the manufacturer or sold with the product.
Any mounting of the product should follow the manufacturer’s instructions and should use a mounting accessory recommended by the
manufacturer. A product and cart combination should be moved with
care. Quick stops, excessive force, and uneven surfaces may cause the
product and cart combination to overturn.
9. Ventilation: Slots and openings in the cabinet are provided for ventilation to ensure reliable operation of the product and to protect it
Naxa Electronics
from overheating. These openings should never be blocked by placing
the product on a bed, sofa, rug, or other similar surface. This product
should not be placed in a built-in installation such as a bookcase or
rack unless proper ventilation is provided or the manufacturer instructions have been adhered to.
10. Power Sources: This product should be operated only from the type of
power source indicated on the rating label. If you are not sure of the
type of power supply to your home, consult your product dealer or
local power company. For products intended to operate from battery
power or other sources, refer to the operating instructions.
11. Grounding or Polarization: This product may be equipped with a polarized alternating-current line plug that has one blade wider than
the other. This plug will only fit into the power outlet in one direction.
This is a safety feature. If you are unable to insert the plug fully into
the outlet, try reversing the direction of the plug. If the plug should
still fail to fit, contact an electrician to replace the obsolete outlet. Do
not defeat the safety purpose of the polarized plug.
12. Power-Cord Protection: Power supply cords should be routed so that
they are not likely to be walked on or pinched by items placed upon
or against them, paying particular attention to cords at plugs, convenience receptacles, and at the point which they exit
from the product.
13. Protective Attachment Plug: The product may be
equipped with an attachment plug with overload
protection. This is a safety feature. See the operating instructions for replacement or directions to reset the protective device. If replacement of the plug is
required, be sure the service technician has used a replacement plug that has the same overload protection as the original plug as
specified by the manufacturer.
www.naxa.com
14. Outdoor Antenna Grounding: If an outside antenna is connected to
the product, be sure the antenna system is grounded so as to provide
some protection against voltage surges and built-up static charges.
Article 810 of the National Electrical Code, ANS/NFPA 70 provides information with regard to proper grounding of the mast and supporting structure,grounding of the lead-in wire to an antenna-discharge
unit, size of grounding conductors, location of antenna-discharge
unit, connection to grounding electrodes, and requirements for the
grounding electrode (see figure).
15. Lightning: For added protection for this product, unplug it from the
wall outlet and disconnect the antenna or cable system during a
lightning storm or when it is left unattended and unused for long periods of time. This will prevent damage to the product due to lightning
or power-line surges.
16. Power Lines: An outside antenna system should not be located in the
vicinity of overhead power lines or other electric light or power circuits, or where it can fall into such power lines or circuits. When in-
Page 19
stalling an outside antenna system, extreme care should be taken to
keep from touching such power lines or circuits, as contact with them
might be fatal.
17. Overloading: Do not overload wall outlets, extension cords, or integral convenience receptacles as this can result in a risk of fire or electric shock.
18. Object and Liquid Entry: Never push objects of any kind into this product through openings as they may touch dangerous voltage points or
short-out parts that could result in a fire or electric shock. Never spill
liquid of any kind on the product.
19. Servicing: Do not attempt to service this product yourself as opening or removing covers may expose you to dangerous voltage or other
hazards. Refer all servicing to qualified service personnel.
20.Damage Requiring Service: Unplug this product from the wall outlet
and refer servicing to qualified service personnel under the following conditions: a) when the power-supply or plug is damaged; b) if
liquid has been spilled or if objects have fallen into the product; c) if
the product has been exposed to rain or water; d) if the product does
not operate normally by following the operating instructions. Adjust
only those controls that are covered by the operating instructions as
improper adjustment of other controls may result in damage and will
often require extensive work by a qualified technician to restore the
product to its normal operation; e) if the product has been dropped or
damaged in any way; f) when the product exhibits a distinct change in
performance—this indicates a need for service.
21. Replacement Parts: When replacement parts are required, be sure
that your service technician has used replacement parts specified
by the manufacturer or have the same characteristics as the original
part. Unauthorized substitutions may result in fire, electric shock, or
other hazards.
Page 20
22.Safety Check: Upon completion of any service or repairs to this
product,ask the service technician to perform safety checks to ensure
that the product is in proper operating condition.
23.Wall or Ceiling Mounting: The product should be mounted to a wall or
ceiling only as recommended by the manufacturer.
24.Heat: The product should be situated away from heat sources such as
radiators,heat registers, stoves, or other products (including amplifiers) that produce heat.
WARNING:
This product contains lead, a chemical known to the State of California to
cause cancer and birth defects or other reproductive harm. Wash hands
after handling.
FCC NOTICE
This device complies with Part 15 of the FCC Rules. Operation is subject
to the following two conditions: (1) this device may not cause harmful
interference, and (2) this device must accept any interference received,
including interference that may cause undesired operation.
Note: This equipment has been tested and found to comply with the limits for a Class B digital device, pursuant to Part 15 of the FCC Rules. These
limits are designed to provide reasonable protection against harmful interference in a residential installation. This equipment generates, uses
and can radiate radio frequency energy and, if not installed and used in
accordance with the instructions, may cause harmful interference to radio communications. However, there is no guarantee that interference
will not occur in a particular installation. If this equipment does cause
harmful interference to radio or television reception, which can be determined by turning the equipment off and on, the user is encouraged to
try to correct the interference by one or more of the following measures:
Naxa Electronics
• Reorient or relocate the receiving antenna.
• Increase the separation between the equipment and receiver.
• Connect the equipment into an outlet on a circuit different from that
to which the receiver is connected.
• Consult the dealer or an experienced radio/TV technician for help.
CAUTION ON MODIFICATIONS
Any changes or modifications not expressly approved by the grantee of
this device may void the authority granted by the FCC to operate the
equipment.
www.naxa.com
Page 21
Troubleshooting Guide
This guide lists common problems and their solutions.
Please refer to this guide before requesting service.
If you need further assistance, please contact Naxa
Technical Support (www.naxa.com/naxa_support/).
Symptom
There is no
power.
There is no
sound.
Page 22
Possible Cause
Symptom
Possible Cause
Possible Solution
The sound is
distorted.
The bass level of
the connected device is too high.
Reduce the bass level of
the connected device.
The volume level is
too high.
Press VOL– to reduce
the volume level.
Possible Solution
The power adapter
is not connected.
Connect the AC/DC
power adapter.
The unit is in
Standby mode.
Press
on.
The volume is set
to the minimum
level.
Pres VOL+ to increase
the volume level.
The connected
device is not in
playback mode.
Start playback on the
connected device and
make its volume is set
to a high level.
The input source is
incorrect.
Check which connection
your device is using and
then press MODE to set
the active mode.
to turn the unit
Press the BASS– button
to reduce the bass level
on the sound bar.
The remote
control is not
working.
The battery is dead. Replace the battery in
the remote control with
a new one.
The Bluetooth® connection is not
working.
The Bluetooth® de- Reduce the distance bevice is too far from tween the Bluetooth®
the sound bar.
device and the sound
bar.
The Bluetooth®
Pair the Bluetooth® dedevice has not been vice with the sound bar.
paired.
Naxa Electronics
Specifications
Speaker Output
Total 50W RMS
2 x 10W (drivers) + 30W (subwoofer)
Display type
LCD (blue)
Removable Media
Support
USB, SD, SDHC (max 32 GB)
Playable Formats
MP3, WMA
Radio Tuner Type
Digital FM
Radio Preset
Memory
20 FM
Input
Bluetooth® version 2.1+EDR with A2DP
Optical digital audio
Support
If you have problems with your device, please consult
the instructions in this manual. Please also visit us
on the web at www.naxa.com to get up to the minute
news, alerts, and documentation for your device. For
additional assistance, please contact Naxa Technical
Support.
NAXA Technical Support
2320 East 49th St.
Vernon, CA 90058
http://www.naxa.com/naxa_support/
RCA stereo audio
3.5mm AUX audio
Additional Features NFC (one touch setup)
Power Source
AC 100-240V (DC 16V, 3.5A)
Operating Power /
Standby Power
50W/0.6W
Note: Product are improved continuously. We reserve the right to modify
the product and specifications without prior notice.
www.naxa.com
Page 23