1
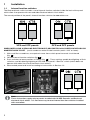
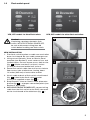
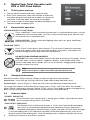
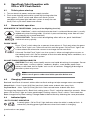
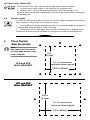
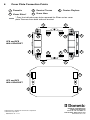
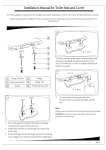
EN
Electronic flush switches
installation and operation manual
VFS, VFP models for VacuFlush toilets
DFS, DFP models for other SeaLand toilets
SeaLand® Electronic Flush Switches
IN STA L L AT I O N
•
O PER AT I O N
VFS, VFP flush switches
for VacuFlush electric-flush toilets
DFS, DFP flush switches
for MasterFlush and RushFlush
electric-flush toilets
CE approved
1
1Installation
1.1
Internal function switches
The SeaLand flush switch includes a set of internal function switches inside the back of the panel
which allow it to operate with new and older SeaLand electric-flush toilets.
The normal position of the panel’s internal function switches for new toilets are:
VFS and VFP panels
DFS and DFP panels
WHEN INSTALLING A SEALAND ELECTRONIC FLUSH SWITCH with OLDER VACUFLUSH OR
MASTERFLUSH TOILET (serial number on toilet ID label contains prefix “223” or lower)
1. With small flat screwdriver, unsnap back cover from switch panel to reveal circuit board
(fig. 1 ).
2. Locate internal function switches (fig. 2 ).
3. Push switches to lower position as shown (fig. 3 ). These settings enable backlighting of flush
switches, and disable backlighting of VFS and VFP panel’s “Service” switch (which does not
operate with older VacuFlush electronic-flush toilets).
4. Reassemble panel and install according to instructions in Section 1.2.
1
2
3
Note
These instructions apply only to panels installed with OLDER Dometic and SeaLand
electronic-flush toilets. It is not necessary to reset internal function switches installed
with new toilets.
2
1.2
Flush switch panel
VFS, VFP models for VacuFlush toilets
DFS, DFP models for other SeaLand toilets
Caution!
If replacing a previous electronic flush
switch, WITH ELECTRICAL POWER OFF,
be sure to disconnect wiring from old
switch before installing new flush switch.
NEW INSTALLATION
1. Plan flush switch location so cable can reach toilet
base circuit board. Be sure cable cannot get wet.
2. Using correct Dometic, Vimar or Gewiss panel
template (see Section 5), mark center access and
fastener holes. Cut out square access hole to size
(fig. 4 ). Make sure there is at least 2 inches
(51 mm) of clearance behind wall surface.
3. Route flush switch cable from wall access hole to
floor access hole at toilet base, leaving about
12 inches (305 mm) of extra cable at toilet.
4. Attach cable to back of flush switch circuit board
(fig. 4 ), then fasten flush switch bracket
to wall with supplied screws (fig. 5 ).
5. Snap Dometic, Vimar or Gewiss cover plate onto
bracket (fig. 5 ) at proper connection points (see
Section 6, back page).
6. WITH ELECTRICAL POWER OFF, connect wiring
cable from the flush switch to the RJ45 connector
on the circuit board of the toilet base (fig. 6 ).
4
5
6
3
2
MasterFlush Toilet Operation with
DFS or DFP Flush Switch
2.1
Toilet system start-up
1. Turn on electrical power and water supply to toilet.
2. Press Flush switch once. After nine seconds of water flow,
macerator pump will start and run for about six seconds to
clear bowl. It will take about five seconds to refill bowl.
3. Toss several sheets of toilet paper into bowl and repeat cycle.
The bowl should completely clear.
2.2
Normal toilet operation
ADDING WATER TO TOILET BOWL
Press “Add Water” switch until desired water level is achieved. More water is usually
added only when flushing solids. (If switch is pressed too long, water flow will shut
off automatically to avoid overflow.)
BACKLIGHTING: To turn switch backlighting effect off or on, push “Add Water”
switch twice very quickly.
FLUSHING TOILET
Press “Flush” switch down, then release it. This activates a powerful macerator
pump that siphons water and waste from the bowl, macerates, and propels the
effluent through the discharge line to the holding tank.
DO NOT FLUSH FOREIGN OBJECTS
CAUTION! Flush only water, bodily wastes and rapid-dissolving tissue paper. Do not
flush wet wipes, sanitary napkins, condoms, diapers, razor blades paper cups,
cotton swabs food, hair or liquids such as oils or solvents. Clogging or damage to
the toilet system may occur.
Note
Make sure all guests understand toilet operation before use.
2.3
Changing flush modes
MasterFlush toilets offer two flush settings to help manage water consumption:
Normal flush – Uses 0.85 gal. (3.2 liters) per flush. Adds water to bowl after every flush.
Dry Bowl flush – Uses 0.45 gal. (1.7 liters) per flush. Does not add water to bowl after flush.
To change from Normal to Dry Bowl flush setting, press “Flush” switch for about five seconds.
When “Power” light begins flashing, release “Flush” switch. Flush mode has been changed to Dry
Bowl setting. Change mode to Normal flush by following the same procedure.
2.4
Indicator lights
“POWER” INDICATOR
On the Dometic flush switch panel, a steady green “Power” light indicates when
electrical power to the toilet is activated.
“TANK LEVEL” INDICATOR
The Dometic flush switch panel includes a “Tank Level” light to indicate holding
tank status (if connected to appropriate tank monitoring system) and when it
should be pumped out. When the light is yellow, the tank is 3/4 full. When the light
is red, the holding tank is full and electrical power to the toilet automatically shuts off to
prevent overfill of the holding tank. After the holding tank is emptied, the light will turn off
and electrical power to the toilet is restored.
4
3
RushFlush Toilet Operation with
DFS, DFP Flush Switch
3.1
Toilet system start-up
1. Turn on eletrical power and water supply to toilet system.
2. Press “Flush” switch once.
3. Toss several sheets of toilet paper into bowl and repeat
cycle. The bowl should completely clear.
4. If tissue paper does not completely discharge from toilet
bowl, flow times for the rim and lower water jets may need to
be increased.
On RushFlush toilet’s water flow control module
(fig. 7 ), adjust water flow times to higher setting.
Repeat flush test after each adjustment to assure
tissue paper discharges from toilet bowl.
3.2
7
Normal toilet operation
ADDING WATER TO TOILET BOWL
Press “Add Water” switch until desired water level is achieved. More water is usually
added only when flushing solids. (If switch is pressed too long, water flow will shut
off automatically to avoid overflow.)
BACKLIGHTING: To turn switch backlighting effect off or on, push “Add Water”
switch twice very quickly.
FLUSHING TOILET
Press “Flush” switch, then release it. This activates a powerful water jet action that
breaks up and discharges effluent from the bowl, through the discharge loop and to
the holding tank.
DO NOT FLUSH FOREIGN OBJECTS
CAUTION! Flush only water, bodily wastes and rapid-dissolving tissue paper. Do not
flush wet wipes, sanitary napkins, condoms, diapers, razor blades paper cups,
cotton swabs food, hair or liquids such as oils or solvents. Clogging or damage to
the toilet system may occur.
Note
Make sure all guests understand toilet operation before use.
3.3
Indicator lights
“POWER” INDICATOR
On the Dometic flush switch panel, a steady green “Power” light indicates when
electrical power to the toilet is activated.
“TANK LEVEL” INDICATOR
The Dometic flush switch panel includes a “Tank Level” light to indicate holding
tank status (if connected to appropriate tank monitoring system) and when it
should be pumped out. When the light is yellow, the tank is 3/4 full. When the light
is red, the holding tank is full and electrical power to the toilet automatically shuts off to prevent
overfill of the holding tank. After the holding tank is emptied, the light will turn off and electrical
power to the toilet is restored.
5
4
VacuFlush Toilet Operation with
VFS or VFP Flush Switch
4.1
Toilet system start-up
1. Turn on electrical power and water supply to toilet.
2. Flush water through entire toilet system by flushing toilet five
times (press “Flush” switch and allow each flush cycle to
complete until green light indicates system is ready for next
flush). Each cycle takes about one minute.
4.2
Normal toilet operation
Add Water to Toilet Bowl (and panel backlighting function)
Press “Add Water” switch until desired water level is achieved. More water is usually
added only when flushing solids. (If switch is pressed too long, water flow will shut
off automatically to avoid overflow.)
BACKLIGHTING: To turn switch backlighting effect off or on, push “Add Water”
switch twice very quickly.
FLUSH TOILET
Press “Flush” switch down for a moment, then release it. Flush only when the green
“OK to Flush” light is on. Toilet will not flush until the green “OK to Flush” light is on.
It takes about one minute for vacuum to recharge for the next flush.
If the red “Do Not Flush” light is on, the system is either recharging the vacuum, or
the holding tank is full. Do not attempt to flush the toilet during these conditions, or a
clog may occur in the toilet system.
DO NOT FLUSH FOREIGN OBJECTS
CAUTION! Flush only water, bodily wastes and rapid-dissolving tissue paper. Do not
flush wet wipes, sanitary napkins, condoms, diapers, razor blades paper cups,
cotton swabs food, hair or liquids such as oils or solvents. Clogging or damage to
the toilet system may occur.
Note
Make sure all guests understand toilet operation before use.
4.3
Changing flush modes
SeaLand VacuFlush all-ceramic toilets offer two flush settings to help manage water consumption:
Normal flush – Uses 1 quart (0.95 liter) per flush. Adds water to bowl after every flush.
Dry Bowl flush – Uses 1 pint (0.5 liter) per flush. Does not add water to bowl after flush.
To change from Normal to Dry Bowl flush setting, press “Flush” switch for about five seconds. When
green “OK to Flush” light on status panel begins flashing, release “Flush” switch. Flush mode has
been changed to Dry Bowl setting. Change mode to Normal flush by following the same procedure.
4.4
Indicator lights
“OK TO FLUSH” INDICATOR
A steady green “OK to Flush” light indicates when the toilet is ready to flush. A
momentary flashing green light indicates when flush mode is changing.
(continued on next page)
6
“DO NOT FLUSH” INDICATOR
A red “Do Not Flush” light indicate two possible toilet system conditions:
1. vacuum level in toilet system is not sufficient for complete flush.
2. holding tank is full and should be pumped out. When the red light is on,
electrical power to the toilet automatically shuts off to prevent possible overfilling of
the holding tank.
4.5
Service mode
To clean the toilet bowl or perform other service that requires keeping the flush ball
open without running water, use the Service switch.
1. Push the Service button for three seconds. The steady backlight will change to
a flashing light while the toilet is in Service mode.
2. Perform the service operation. After the Service operation is complete, press
the Service buttom for three seconds to change back to normal toilet operation.
5
Flush Switch
Wall Templates
Note
See important information
on back page before using
either template.
2 in.
(51 mm)
2 in. (51 mm) clearance
behind wall surface required
VFS and DFS
WALL BRACKET
1.875 in. (64 mm)
VFP and DFP
WALL BRACKET
2.25 in.
(57 mm)
2 in. (51 mm) clearance
behind wall surface required
2.5 in. (64 mm)
7
6
Cover Plate Connection Points
1
Dometic
3
Gewiss Chorus
2
Vimar Eikon*
4
Vimar Idea
5
Gewiss Playbus
* Gray line indicates area to be removed for Eikon series cover
plate. Remove from both sides of bracket.
1
4
3
4
3
1
2
2
2
2
3
4
3
4
VFS and DFS
WALL BRACKET
1
1
5
5
5
5
VFP and DFP
WALL BRACKET
® Registered; ™ Trademark of Dometic Corporation
© Dometic Corporation
600346829 02 1112
8
DOMETIC CORPORATION
SANITATION DIVISION
13128 SR 226 | PO BOX 38
BIG PRAIRIE, OHIO 44611 USA
www.dometic.com