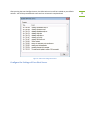
1
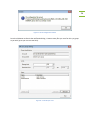
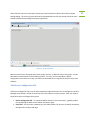
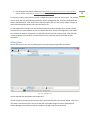
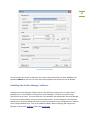
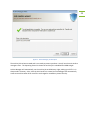
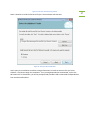
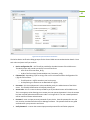
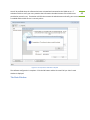
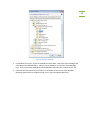
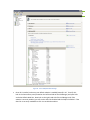
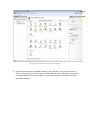
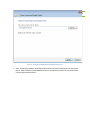
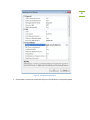
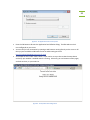
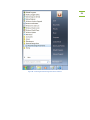
Personal Online Storage Host User Guide
Version 2.60
2
Contents
What is Personal Online Storage Host (POSH) ............................................................................................ 4
Quick-Start Links ......................................................................................................................................... 4
Terms and Definitions ................................................................................................................................. 4
Pricing ......................................................................................................................................................... 4
About the POSH Software ........................................................................................................................... 5
POSH Supported Platforms ..................................................................................................................... 5
POSH Operating System Requirements .................................................................................................. 5
Software Requirements .......................................................................................................................... 5
About Archive Manager Software Client .................................................................................................... 5
Supported Platforms ............................................................................................................................... 6
Operating System Requirements ............................................................................................................ 6
Software Requirements .......................................................................................................................... 6
About Personal File Sync Software Client ................................................................................................... 6
Supported Platforms ............................................................................................................................... 6
Operating System Requirements ............................................................................................................ 6
Software Requirements .......................................................................................................................... 7
Installing the POSH software ...................................................................................................................... 7
Installing the Personal Storage Host ....................................................................................................... 7
First Time Startup ................................................................................................................................. 12
Automatically Install the POSH Web Service ......................................................................................... 13
Configure the Settings of Your Host Server ........................................................................................... 15
First Run ................................................................................................................................................ 17
Creating a New Archive User ................................................................................................................ 18
Creating a New File Sync Group and Sync User..................................................................................... 22
The Device Configuration File ............................................................................................................... 27
Editing Users ......................................................................................................................................... 29
Deleting Users ....................................................................................................................................... 30
Installing the Archive Manager software .................................................................................................. 32
Initial Setup ........................................................................................................................................... 33
Importing the User Configuration File .................................................................................................. 38
Building your First Archive .................................................................................................................... 44
Installing the Personal File Sync client software ....................................................................................... 55
Initial Setup ........................................................................................................................................... 55
Importing the User Configuration File .................................................................................................. 60
The Main Window................................................................................................................................. 62
The Tray Icon ........................................................................................................................................ 65
The Synchronization Folder .................................................................................................................. 65
Appendix A: Manually Configuring the Web-service and IIS ..................................................................... 66
3
What is Personal Online Storage Host (POSH)
The Personal Online Storage Host (POSH) is a software package which allows you to host your own
personal and private online storage. You can backup, archive, or synchronize files from any internet
connected PC to your host server. You host the software on a Windows-based server or PC using your
own storage. POSH is an excellent data protection and file synchronization solution for home users,
home businesses, micro businesses, and businesses with remote workers who wish to save money and
host their own remote data storage.
Quick-Start Links
If you are interested in quick-setup, follow these links:
•
•
•
Installing Personal Storage Host on WHS/SBS 2011 (Integrated WSS Dashboard client)
Installing Personal Storage Host on Windows Sever or PC (Stand-alone Windows client)
Our Support blog with general product installation, usage, and maintenance tips
Terms and Definitions
•
•
•
•
POSH Server – the personal online storage service hosted by you, the administrator, running the
Personal Online Storage Host software. This is the server or pc which will store the online
hosted data and provide the management tools for you to configure user-access to the online
storage pool. This Windows-based server or PC can be located in your home, business, or in a
co-lo hosted solution such as Microsoft Azure.
Archive Manager – An archive and backup software solution for protecting Windows-based PC’s
to the POSH Server. This application should be installed on all PC’s you want to protect files to
the POSH Server
Personal File Sync – A file synchronization software solution used for synchronizing a set of
folders and files between multiple devices
Client seat – a single client PC running the Archive Manager client software or the Personal File
Sync client software and stores data on your POSH Server for archive or file sync purposes
respectively
Pricing
The POSH software offers a complimentary full-featured version which is free to use up to three client
seats. Additional clients seats can be purchased directly through the POSH software (select Options |
4
Activate order ID | Browse store) or from our website. If you wish to backup and archive Windowsbased PC’s to your private server then review our Archive Manager software offering. A free version of
Archive Manager is available to use with your active POSH server. If you wish to synchronize files across
multiple Windows-based PC’s then review our Personal File Sync software. This software is also
available free of charge with your POSH server. You can download the free versions of these software
clients directly from our website.
About the POSH Software
As the administrator, you install the POSH software package on your Windows server or pc. This server
or pc should always be connected to the internet and powered-on for client connectivity.
POSH Supported Platforms
The POSH software supports all Microsoft Server and Desktop operating systems with Microsoft IIS7 or
IIS8 web services installed. Note, IIS 7 and IIS 8 are included in most versions of Windows Server and
Desktop.
POSH Operating System Requirements
•
•
•
•
•
Windows Server 2012, 2008
Windows Home Server 2011
Windows Small Business Server 2011
Windows Storage Server 2008 R2
Windows Vista, 7, 8 (64-bit only)
Software Requirements
•
•
Microsoft IIS 7 or IIS8 (included on all OS’s noted above)
Microsoft .NET 4.0
About Archive Manager Software Client
Archive Manager is software which archives and backs-up your data. The software supports virtually all
Windows-based operating systems. You will install a copy of Archive Manager on each client PC you
5
want to back-up to your POSH server. The Archive Manger software connects each client PC to your
host POSH server allowing each client to protect their PC on-demand or on a set automated schedule.
Supported Platforms
Archive Manager supports virtually every Microsoft Server and Desktop operating system currently on
the market.
Operating System Requirements
•
•
•
•
Windows Server 2012, 2008
Windows Home Server 2011
Windows Small Business Server 2011 Essentials
Windows XP, Vista, 7, 8
Software Requirements
•
Microsoft .NET 4.0
About Personal File Sync Software Client
The Personal File Sync client is software which integrates directly into the Windows Explorer. A new
volume named “personal file sync” will be located in the root of Windows Explorer. All files and folders
in this volume will automatically be synchronized across all of the devices in your file sync group as
created on the POSH host. This service is similar to the well-known Dropbox and Sugarsync services
except your data is kept private and personal hosted by you on your own server. The software supports
virtually all Windows-based operating systems. You can install a copy of Personal File Sync on as many
PC’s as you have user-seats available. The File Sync software connects each client PC to your host POSH
server allowing each client to synchronize their files easily and securely through your personal server.
File data is always secured with 256-bit AES encryption. Files are encrypted on the client PC before
entering the internet, remain encrypted when stored on your personal POSH server, and only decrypted
on the target client PC after being downloaded over the internet from the POSH server.
Supported Platforms
Personal File Sync supports virtually every Microsoft Server and Desktop operating system currently on
the market.
Operating System Requirements
•
•
•
•
Windows Server 2012, 2008
Windows Home Server 2011
Windows Small Business Server 2011 Essentials
Windows XP, Vista, 7, 8
6
Software Requirements
•
Microsoft .NET 4.0
Installing the POSH software
The POSH software is comprised of two parts: a web service and a user-interface administration control.
The web service, named OBHWebConnect, is built on Microsoft .NET technology and requires Microsoft
Internet Information Services. The user-interface, named Personal Storage Host Viewer, is a Windows
application built with Window Presentation Foundation (WPF) technologies and requires Microsoft .NET
4.0.
Installation of the software is accomplished by a simple wizard-based Windows software package. After
the product installation is complete, the POSH service will be automatically configured for you. If you
would prefer to manually install the web service then see Appendix A.
Installing the Personal Storage Host
Download the installation file named PersonalStorageHostForWindows.msi to your server or PC which
will be used to host the web service. Double-click the PersonalStorageHostForWindows.msi file to begin
installation.
Server Users: If you’re installing the Personal Storage Host on Windows Home Server 2011 or Windows
Server 2012 Essentials and want direct integration with the server Dashboard then install the
personalstoragehost.wssx package instead of PersonalStorageHostForWindows.msi. Product usage and
features remain the same.
7
8
Figure 1 – Locate the PersonalStorageHostForWindows.msi installation package
A simple installation wizard will guide you through the installation process. Press Next to continue
9
Figure 2 - Installer wizard
Enter the name of the folder where you want to install the POSH software. Click Next to continue
10
Figure 3 - Installer folder location
The installation wizard has gathered enough information to complete the installation process. If any
missing dependencies are detected, such as the Microsoft .NET 4.0 Framework, you will be prompted
and provided a URL to download the dependences from the Microsoft website.
Click Next to begin
11
Figure 4 - Installer ready to copy files
The primary installation of the POSH software is complete. Click on the Close button to dismiss the
installation wizard and begin the one-time web-service configuration phase
12
Figure 5 - Installer complete
First Time Startup
On first run, the Personal Storage Host Viewer application will prompt for your registration information.
Enter your email address and order id as provided via email after your online purchase. Alternately,
click the Exit button to use the Courtesy version of the software for as long as you like. The Courtesy
version is a fully-featured version of the software which supports a maximum of three user-seats. You
may purchase the software at any time within the software by selecting Options | Activate Order ID |
Browse Store).
Note the email address and order id are case sensitive
13
Figure 6 - Product registration
Automatically Install the POSH Web Service
If you see any red X's then you'll need to either resolve the issue before proceeding or you can close the dialog or
manually configure the web service as described in appendix A of the user’s manual. Here are some tips on
resolving errors marked with a red ex:
14
Figure 7 - automatically configure web service
1.
IIS Service active - from the Windows Start menu, type "iis" in the search box to run the IIS Manager. In
the Actions pane in the upper-right select Server Manager | Start to start the IIS service on your server.
TIP: If you are running a Windows PC, such as Windows 7, with UAC (User Account Control) enabled
then the Personal Storage Host Viewer will not have access to the IIS service api and you will see a red
ex. To resolve this issue you can either:
temporarily disable UAC and re-run the software or …
close the software, run Personal Storage Host View as Administrator (right click on Personal Host
Viewer | Properties | Compatibility | and select Run this program as an administrator). Note: you
can re-enable UAC and/or disable the administrator setting after the web service has been
configured.
Installed version - there should never be an error noted here. This is simply helpful information letting
you know which version of the web service you currently have installed if you're upgrading the Personal
Storage Host software. If this is a first-time install then this version will be 0
Latest version - there should never be an error noted here. This is simply helpful information letting you
know which version of the web service you are currently installing
Automation components - the Microsoft.Web.Administration .NET components must be installed for the
automated configuration to proceed. These are typically installed as part of the base operating system so
this error should rarely occur. But, if you uninstalled these components from your system then you will
need to configure the web service manually as described in appendix A of the user’s manual
•
•
2.
3.
4.
After pressing the Auto Configure button, the POSH web service will be installed on your default
website. You will be presented with status and can review each completed task.
Figure 8 - web service configuration status
Configure the Settings of Your Host Server
15
16
Figure 9 - One-time product configuration
Enter the three configurable settings described below:
•
•
•
•
Host Id – a randomly generated globally unique ID configured for you
Host name – domain name of your server (this is the domain name you assigned to access the
remote access features of your server over the internet. For example, Microsoft offers free
domain forwarding services via their homeserver.com domain name)
Host Name – any unique name you would like to be recognized as your web-service. This name
will be visible to all clients of your service
Storage Path – path to the folder that will contain all user archive and synchronization data
uploaded to the server
Press the Verify button to verify you entered the host URL correctly. If the setting is correct then a web
page will open and display “PASS” for the Personal online host status web page
17
Figure 10 - Verifying the POSH server connection
Finally, press the Continue button to complete the one-time configuration. The POSH software is now
setup and ready for use
First Run
Now that the software is configured, you should see the status screen. You can now create archive
users, file sync users, review user status, and adjust settings
Figure 11 - First run
Creating a New Archive User
You must create an archive user for each user that you want to give access to your storage server via the
Archive Manager software. To create a new archive user, select the Archive Users tab on the top tabbar
Figure 12 – archive user viewer
Click the Create User button on the bottom tab bar to display the Create User dialog
18
19
Figure 13 - new user creator
Enter each field to describe the new user. You can define the users: name, description, storage limits,
storage folder, and final location of the users Device Configuration File
20
Figure 14 - new user creation
Enter the fields as described below:
•
•
•
•
•
•
User Id – a randomly generated globally unique ID. This is configured for you
User description – a friendly description used for you to identify the user. This will only be
displayed within the Personal Storage Host Viewer software; not displayed in the user’s client
software
User name – the users name which you will be required to provide to the user to log into your
server (alpha-numeric characters only)
Access Id – A temporary five digit numeric value which you provide to the user to create their
account in their client software. The user will replace this temporary access id with their own
password when they create their account
Storage limit – maximum amount of data the user can store on your server
Storage folder – location of this users data stored on your server (default from one-time setup)
•
Device configuration file – the target folder to contain this users Device Configuration File. This
file will be provided to the user to configure access to your server
Press the Save button create the new user. A Device configuration file will be created and stored in the
specified folder
Figure 15 - Device configuration creation
Press the OK button to dismiss the notification dialog. The new user will now be displayed under the
Users tab of the main window of the Personal Storage Host Viewer application
Figure 16 – archive user list
21
Return to the Archive Users tab at any time to edit, monitor, or import data for this user. You will find
details on these actions in the following sections. For now, you must provide the device configuration
file to the user so they can connect to the POSH server
Creating a New File Sync Group and Sync User
You must create a file sync group and two or more users for each file sync group you want to give access
to your storage server via the Personal File Sync client. To create a new file sync group, select the File
Sync Groups button on the top tab-bar
Figure 17 – file sync group viewer
Click the Create Group button to display the Create Group dialog
22
23
Figure 18 - new user creator
Enter each field to describe the new group. You can define the groups: name, storage limits, and
storage folder. Leave the Storage Limit empty if you do not want to place a limit on the amount of
storage used for this sync group. All users added to this sync group will share these settings. Press the
Create button to create the new group and add sync users
24
Figure 19 – edit sync group
Now you must create two or more sync users for the sync group. Press the Add User button to add a
new sync user.
25
Figure 20 - create new file sync user
Enter the fields as described below:
•
•
•
•
•
•
User Id – a randomly generated globally unique ID. This is configured for you
User description – a friendly description used for you to identify the user
User name – the users name which you will be required to provide to the user to log into your
server (alpha-numeric characters only)
Access Id – A temporary five digit numeric value which you provide to the user to create their
account in their client software. The user will replace this temporary access id with their own
password when they create their account
Storage folder – location of this users data stored on your server (default from one-time setup)
Device configuration file – the target folder to contain this users Device Configuration File. This
file will be provided to the user to configure access to your server
Press the Save button create the new user. A Device configuration file will be created and stored in the
specified folder
26
Figure 21 - Device configuration creation
Press the OK button to dismiss the notification dialog. Create as many file sync users for this sync group
as you wish (up to your current seat-limit).
Figure 22 - create file sync users
After all the file sync users have been created, press the Exit button to dismiss the Edit Sync Group
Settings dialog. The new sync group will now be displayed under the File Sync Groups tab of the main
window of the Personal Storage Host Viewer application
Figure 23 – file sync group list
Return to the File Sync Group tab at any time to edit, monitor, or add new users to this group. You will
find details on these actions in the following sections. For now, you must provide the device
configuration file to the user so they can connect to the POSH server using the Personal File Sync client
software
The Device Configuration File
The device configuration file is one of three components required for each user to configure the Archive
Manager client software and/or Personal File Sync client software on their systems. Each user requires
these three items to configure their system:
1. Device configuration file – an encrypted 1KB file with the name <username>_<globally unique
ID>.cfg defining the POSH server location and access rights
2. Username – the username created by you, the administrator, for the user to identify themselves
during account creation and login
27
3. Access ID – a temporary password allowing the user to create their account. During account
creation the user will create a new personal password which will replace the Access ID. After an
account is created the Access ID will never be used again
Figure 24 - Location of device configuration file
The user is now ready to configure their system. You will need to provide the following to the user so
they can activate the client software on their system.
When installing the Archive Manager client software for backup and archive features you must provide
to the user:
1. Device configuration file, username, and access id as created in the Creating a New User section
above
2. URL to download the Archive Manager software
3. this document with specific reference to the Installing the Archive Manager Software section
and/or a link to the Archive Manager support blog
When installing the Personal File Sync client software for file synchronization features you must provide
to the user:
1. Device configuration file, username, and access id as created in the Creating a New User section
above
2. URL to download the Personal File Sync client
28
3. this document with specific reference to the Installing the Personal File Sync Client Software
section and/or a link to the Personal File Sync support blog
For security reasons, you should not send all configuration items to the user at all at once. For example,
you can email the user the following information: device configuration file, username, download URL,
and this documentation. After they receive that information then you can phone, instant message, or
send a second email and let the user know their Access ID.
For the highest level of security the user should activate the Archive Manager client software and/or
Personal File Sync client software as soon as possible after they receive the configuration information.
This will limit the amount of potential time that the Access ID could be compromised. After the users
account is activated, the account is protected by the user’s personal password and 256-bit AES
encryption.
Editing Users
You can edit a user at any time by selecting the Users tab and pressing the Edit User button
Figure 25 - Editing a user
You can edit the user description and storage limit.
If a user needs to reset their password then select the check-box next to the Access ID field. Note, once
you create a new Access ID for a user then they will not be able to login until they reactivate their
Archive Manager client software with the new Access ID and create a new password
29
30
Figure 26 - archive user edit dialog
Deleting Users
You can delete a user by selecting the Users tab and pressing the Edit User button
31
Figure 27 - archive user list
While viewing the Edit User dialog simultaneously hold down the Shift, Control, and ALT buttons. A
Delete User button will become visible in the lower-left corner of the dialog
32
Figure 28 - Delete user option
Press the Delete User button to delete the user account and all associated user data. WARNING: this
operation CANNOT be reversed. All of the users data uploaded to the POSH server will be deleted.
Installing the Archive Manager software
Installation of Archive Manager software client on your Windows-based system is a simple wizardguided process. The complexity of configuration Archive Manager is based on the specific usage
requirements of the client. The steps below focus on installation and configuration of Archive Manager
for the most common backup, archive and restore requirements. Archive Manager is a full-featured
backup/archive software package which can be used to protect data to local storage devices in addition
to the configured POSH server. You can find additional details about configuring and using Archive
Manager on the product website as well as the support blog
Initial Setup
Locate the installation package named ArchiveManagerPOSH.exe. Double-click the file to launch the
installation wizard. Note you can download the installation package from the website.
Figure 29 - Archive Manager download package
The installation wizard will automatically evaluate the system and gather requirements
Figure 30 - Archive Manager install prep
Read and accept the license agreement and click Next to continue
33
34
Figure 31 - Archive Manager license agreement
Select a location to install the Archive Manager software and click Next
35
Figure 32 - Archive Manager installation folder
At this point, the installation wizard has enough information to install the Archive Manager software.
Click Next to begin the installation. If any missing dependencies are detected, such as the Microsoft
.NET 4.0 Framework, you will be prompted and provided a URL to download the dependences from the
Microsoft website.
36
Figure 33 - Archive Manager installation information gathered and ready
The installation proceeds
37
Figure 34 - Archive Manager installation progress
You are notified once installation is complete. Press the Close button to finalize the process. The
Archive Manager software will automatically launch after installation is complete.
38
Figure 35 - Archive Manager installation complete
Importing the User Configuration File
39
Figure 36 - Archive Manager OBH device verification
The Online Device Verification dialog prompts for the clients POSH account authentication details. Enter
each value and press Verify to continue.
•
•
•
•
Device configuration file – this file will be provided by the administrator of the POSH server.
The administrator will provide you the file in one of two forms:
o A file of the form username_id.cfg
o A URL of the form http://www.awebsite.com/ username_id.cfg
Filename/Url – depending if you are using a file or a url to locate the Device Configuration File
(.cfg) this will be either:
o The full path to a .cfg file stored on your local system
o A URL pointing to a web server to download the .cfg file
Username – this is an alphanumeric value provided to you by the administrator of the POSH
server. This friendly identification will uniquely identify you
Access code – this is a numeric value provided to you by the administrator of the POSH server.
This is a temporary value allowing you to create your own personal password. Once the account
has been verified and activated the access code is no longer valid. The user created password
will be used for all future authentication
•
•
Password – enter a unique personal password of your choice. Save this password in case you
ever need to re-authenticate the Archive Manager software. This password will be encrypted
and hashed for your protection at all times
Verify Password – re-enter the same unique personal password for verification purposes
You will be notified when the software has been activated. If activation fails then verify your entry
matches the information the administrator of the POSH server provided to you and re-try. If activation
still fails then contact the administrator and verify your account is enabled and the POSH server is
currently online
Figure 37 - Archive Manager device verification complete
Click the OK button and Archive Manager’s one-time configuration wizard is launched
40
41
Figure 38 - Archive Manager one-time software configuration
Since this is a first-time installation of Archive Manager, select “No, I do not have existing archive sets”
and press the Next button where you will create an encryption key to protect your data. Setting an
encryption key protects your data as it is transmitted over the internet and stored on the POSH server.
An encryption key must be between 8 and 32 characters in length. The longer the encryption key, the
more secure your data will be. Make sure you remember your encryption key. If you ever re-install the
Archive Manager software then you must re-enter your encryption key to recover and reattach existing
archives.
Enter a personal encryption key and click the Set key button
42
Figure 39 - Archive Manager encryption key configuration
Re-enter your personal encryption key and press Verify. If the keys do not match then you will be
prompted to re-enter the encryption key otherwise you will proceed to the next wizard page
Figure 40 - Archive Manager encryption key validation
A list of devices that can be used to store your archived data is displayed. This list will include the POSH
server device already configured as well as any local storage devices compatible with Archive Manager.
A list of auto-detected storage devices will also be displayed. You can use any of these devices with
Archive Manager to protect your archived data
Note if you have additional local storage devices not displayed in the list then power-on the device and
press the Scan button to automatically detect the device. If you want to configure a local server UNC
path (e.g. \\myserver\myshare) as a storage device then press the Add button and specify the UNC Path,
Username, and Password.
Press the Next key to continue
Figure 41 - Archive Manager device list
Archive Manager’s one-time configuration wizard is now completed. Check the box “Launch the job
creation wizard now” and press the Finish button to create an archive job
43
44
Figure 42 - Archive Manager one-time configuration complete
Now it’s time to create an archive job. The archive job will be used to create one or more archives; each
archive will contain your protected data
Select the Create New Job radio-button and press the Next button
Building your First Archive
45
Figure 43 - Archive Manager job creation wizard
A list of all storage devices is displayed. Select the POSH server device and press the Next button
46
Figure 44 - Archive Manager device selection
Optional: Archive Manager allows archiving data to a proxy device. This is a useful feature when large
quantities of data will be archived to a relatively slow storage device. For example, when creating a new
archive job which will initially process many hundreds of gigabytes or more it might be reasonable to use
a proxy device based on the speed of the internet connection between your system and the POSH
server. The first archive would be created on a local storage device such as a USB key or removable USB
hard-drive. Once the archive is complete then that local storage device can be sent to the administrator
of the POSH server to be imported. Future archives, which would be smaller in size since only new and
changed files would be processed, would be archived directly to the POSH server without the use of a
proxy device. If you want to enable a proxy device then visit http://www.thearchivemanager.com for
advanced details on configuring a proxy device, sending the proxy device to the POSH administrator, and
resetting a proxy device for an existing archive job.
Select None from the device list and press Next to continue
47
Figure 45 - Archive Manager 'proxy' device selection
Select one or more folders to be archived whenever this archive job is activated
48
Figure 46 - Archive Manager select folders to protect
Press the Browse button to browse for folders. If you need to select more than one folder then press
the Browse button again for each folder to be added
49
Figure 47 - Archive Manager folder selection
After selecting the folders to be archived then press the Next button to continue
50
Figure 48 - Archive Manager folder selection view
Select the following options:
•
•
•
•
•
•
Encrypt – to secure files with AES 256bit encryption
Compress – to make files smaller before transmitting
Verify after – to verify files have been archived successfully
Only Archive new and changed files – archive the smallest sets possible
Status reporting: Basic – only log warning and errors
Queue processing: Normal
Press the Next button to continue
51
Figure 49 - Archive Manager general settings
Select the following options:
•
•
•
•
Set a schedule
Daily
Daily start time 10:00 PM
File count change equal to or greater than 20
This will create an archive job which will protect all files each evening at 10PM or whenever 20 or more
new or changed files have been added to your system. This is a good all-purpose archive job since it
provides a minimum daily archive as well as versioning of your files if they are altered during the day. If
you want dedicated versioning of each file change then you could change the “File count change equal
to or greater than” value to 1. A setting of 1 would archive every version of your files in real-time as
they are changed or created.
Press the Next button to continue
52
Figure 50 - Archive Manager schedule settings
Enter a description of the archive job to remind you what it contains then press the Finish button to
continue
53
Figure 51 - Archive Manager job description
The archive job has been created and is now ready to protect your data. You will see the main Archive
manager screen. The Upcoming Events list shows the archive job is scheduled for 10PM tonight.
Archive Manager will automatically run the archive job at 10PM every night, waking your PC if it is in
sleep mode if necessary. Also, after the initial archive is created, Archive Manager will automatically
create new archives when 20 or more files are changed or created any time of the day.
54
Figure 52 - Archive Manager status view
If you want to create the initial archive immediately then:
•
•
•
Select the Jobs tab from the tab bar located on the top of the main screen
Select the archive job from the list
Press the Run button in the lower-right corner of the main screen
The Status tab will automatically be selected an you will see progress of the archive being created
55
Figure 53 - Archive Manager progress during operation
Installing the Personal File Sync client software
Installation of the Personal File Sync client software on your Windows-based system is a simple wizardguided process. The Personal File Sync client is a simple Windows Explorer add-in allowing you to
synchronize a group of files and folders across multiple devices. You can find additional details about
configuring and using the client on the product website as well as the support blog
Initial Setup
Locate the installation package named PersonalFileSyncForWindows.exe. Double-click the file to launch
the installation wizard. Note you can download the installation package for free from the website.
56
Figure 54 - File Sync Client download package
The installation wizard will automatically evaluate the system and gather requirements
Figure 55 - File Sync Client license agreement
Select a location to install the Personal File Sync client software and click Next
Figure 56 - File Sync Client install folder
At this point, the installation wizard has enough information to install the Personal File Sync client
software. Click Next to begin the installation. If any missing dependencies are detected, such as the
Microsoft .NET 4.0 Framework, you will be prompted and provided a URL to download the dependences
from the Microsoft website.
57
58
Figure 57 - File Sync Client information gathered and ready
The installation proceeds
59
Figure 58 - File Sync Client installation progress
You are notified once installation is complete. Press the Close button to finalize the process. The
Personal File Sync client software will automatically launch after installation is complete. If the software
does not automatically launch then you can launch it manually from the Windows Start menu.
60
Figure 59 - File Sync Client installation complete
Importing the User Configuration File
One first run you will be prompted to connect to the POSH server. You should have the device
configuration file, username, and access code available. This information will be provided to you by the
administrator of the POSH server.
61
Figure 60 - File Sync Client device verification
The Online Device Verification dialog prompts for the clients POSH account authentication details. Enter
each value and press Verify to continue.
•
•
•
•
•
•
Device configuration file – this file will be provided by the administrator of the POSH server.
The administrator will provide you the file in one of two forms:
o A file of the form username_id.cfg
o A URL of the form http://www.awebsite.com/ username_id.cfg
Filename/Url – depending if you are using a file or a url to locate the Device Configuration File
(.cfg) this will be either:
o The full path to a .cfg file stored on your local system
o A URL pointing to a web server to download the .cfg file
Username – this is an alphanumeric value provided to you by the administrator of the POSH
server. This friendly identification will uniquely identify you
Access code – this is a numeric value provided to you by the administrator of the POSH server.
This is a temporary value allowing you to create your own personal password. Once the account
has been verified and activated the access code is no longer valid. The user created password
will be used for all future authentication
Password – enter a unique personal password of your choice. Save this password in case you
ever need to re-authenticate the Archive Manager software. This password will be encrypted
and hashed for your protection at all times
Verify Password – re-enter the same unique personal password for verification purposes
You will be notified when the software has been activated and connected to the POSH server. If
activation fails then verify your entry matches the information the administrator of the POSH server
provided to you and re-try. If activation still fails then contact the administrator and verify your account
is enabled and the POSH server is currently online
Figure 61 - File Sync Client verification complete
The software configuration is complete. Click the OK button and the Personal File Sync client’s main
window is displayed
The Main Window
62
63
Figure 62 - File Sync Client main screen
The main screen provides status and information about the state of the software and file
synchronization.
•
•
•
•
•
•
•
Status – press the Status button to view this status page
Options – press the Options button to view the options and features page
History view – the main list view displays information about the software such as startup time,
shutdown time, conflicted files, and whether the product is paused
Clear All Items – clears all the history events from the history view
Clear Selected Items – clear only the currently selected items from the history view
Copy To Clipboard – copy all or the history event items to the Windows clipboard to save into
other Windows applications
Task bar – located at the bottom of the main window; displays the most recently synchronized
file name and date
The Options page provides features allowing you to customize the software as well as deal with
potential file conflicts
64
Figure 63- File Sync client options page
The options available are:
•
•
•
•
•
•
•
Pause/Resume Operation – pause all synchronization operations. This feature can be used if
you want to temporarily disable new files from being downloaded and uploaded to/from your
PC. Once operation is resumed, all files that were synchronized to the POSH server from other
users in your sync group will be downloaded to your PC
Enable Diagnostic Logging – when directed by support personnel this option will gather
diagnostic information for tracking and locating bugs in the software
Remote Content Server Polling – specify how often you want your PC to query the POSH server
for new files to be downloaded and synchronized on your PC.
Copy Diagnostic Logs - when directed by support personnel this option will copy the current
diagnostic information to a file on your desktop; useful to email support personnel
About – view the version of the software
Resolve File Conflicts – view a list of files which have not been able to be synchronized to/from
the POSH server; probably due to busy/locked files. Here you can locate and fix busy files as
well as elect to ignore selected files from being synchronized
Force Re-sync with server – force a query of all files on the POSH server and automatically
synchronize any files not currently on your system. This option should only be used if you
believe a file was not synchronized down to your PC (a very rare case).
The Tray Icon
When you close the Personal File Sync client main window it still runs in the background waiting for new
and changed files to synchronize to/from your PC and the POSH server. You can easily re-open the main
window to view status by clicking on the task bar
Figure 64 - File Sync Client in the task bar
The Synchronization Folder
The Personal File Sync client integrates directly into Windows Explorer. A new system folder named
“Personal File Sync” will be created at the root of the Explorer. All files and folders within this volume
will be synchronized to all devices in your synchronization group. You can also access this
synchronization folder directly in the Windows Public User’s share (e.g. Users\Public\Personal File Sync).
Tip: If you do not see the synchronization folder within Explorer then try re-registering the explorer addin. Browse to the folder “C:\Program Files\electrongoo\Personal File Sync Client for
Windows\NamespaceExtension\” then right-click on the file named ManuallyRegisterExplorerAddIn.bat
and select “Run As Administrator” and follow the prompts.
65
66
Figure 65 - location of synchronization folder
Appendix A: Manually Configuring the Web-service and IIS
Normally Personal Storage Host can configure the web service on your server or PC. If for some reason
the service cannot be automatically configured or you simply elect to manually configure the service
then follow these steps.
•
Open Microsoft’s IIS Manager. You can easily locate the IIS Manger application by selecting the
Windows Start button and typing “IIS Manager” in the Search field
67
Figure 66 - Searching for IIS Manager
•
If you don’t see IIS Manager then make sure IIS is installed. On Windows Desktop OS’s (such as
Vista, 7, and 8) IIS is an optional feature. To enable the feature select Windows Start | Control
Panel | Programs | Turn windows Feature on or off. Select “Internet Information Services”
68
Figure 67 - Windows IIS Installation
•
Also, make sure the “ASP .NET” sub-feature is selected. Drill-down under the World Wide Web
Services | Application Development Features and ensure the ASP.NET option is selected
69
Figure 68 - Windows IIS Options
•
•
For Windows Server OS’s, IIS can be installed as a Server Role. Launch the Server Manager and
select Roles (click Windows Start | and type “Server Manager” and click the Server Manager
icon). If IIS is not already installed then select Add Roles and select the “web-Server IIS” role
If the Internet Information Services feature is not listed then the version of the Windows
Operating System does not support IIS and, in turn, does not support OBH Server
70
Figure 69 - Server 2008/2012 Role Manager
•
Once IIS is installed, make sure your default website is enabled (started) in IIS. To verify this,
look in the Connections pane (located on the left-hand side of the IIS Manager) and open Sites
and select Default Web Site. Now look on the right-hand side of the IIS Manger and, if the
website is currently enabled, you will see the Start link disabled and the Stop link enabled. If the
Start link is currently enabled then click it to enable the website.
71
Figure 70 - Default Web Site Activated and .NET Installed
•
Explore to the location of your default website on your hard drive. You can easily locate this
folder by going to the Connections pane on the left-hand side of the IIS Manager and right-click
on the Default Web Site and select Explore. This will open an Explorer window to the root of
your default website.
72
Figure 71 - Explore Website Location
•
•
•
Now you must copy the OBH website onto your server. The website is delivered within a zip file
located in the Online Backup Host installation folder.
Unzip the contents of OBHWebConnect.zip (by default this is located in the folder “C:\Program
Files\electrongoo\Online Backup Host\OBHWebConnect.zip”) into a folder named
OBHWebConnect to the root of your website (e.g. c:\inetpub\wwwroot\OBHWebConnect).
You can unzip the OBHWebConnect.zip file by selecting the zip file, right-clicking, and selecting
Extract All. Finally enter the path to the root of your website as found above (e.g.
c:\inetpub\wwwroot) and click Extract
73
Figure 72 - Unzipping the OBHWebConnect Website to the Server
•
After unzipping the website, the default website folder structure should appear like the picture
below. Note the folder named OBHWebConnect is located directly under the root of the folder
containing the default website
74
Figure 73 - Website Located on Local Server with new OBHWebConnect Installed
•
Now, create a new application pool for the OBH web-service. In the Connections pane located
on the left-hand side of the IIS Manager right-click “Application Pools” and select “Add
application pool...”
75
Figure 74 - Application Pools
76
Figure 75 - Add New Application Pool
•
•
•
•
•
In the Name field, enter “OBHWebConnect”
Set .NET Framework version to .NET Framework v2.0.50727
Set Managed pipeline mode to Integrated
Check the option Start Application Pool Immediately
Press OK to dismiss the dialog and create the new application pool
77
Figure 76 - Create Application Pool Configuration
•
In the left-hand side Connections pane, select Sites | Default Web Site and right-click the
OBHWebConnect folder and select “Convert To Application…” if the OBHWebConnect folder is
not visible then refresh the pane view by selecting F5 or select View | Refresh from the main
menu
78
Figure 77 - Convert Website to .NET Application
•
press the “Select…” button when the Add Application dialog is displayed
79
Figure 78 - Add Application Pool
•
on the Select Application Pool dialog select “OBHWebConnect” as the application pool and
select the OK button. Finally, select the OK button on the Add Application dialog to complete
the process
Figure 79 - Select Application Pool Name
•
In the left-hand side Connections pane select Application Pools. In the middle-pane named
Application Pools, select and right-click OBHWebConnect and select “Set Application Pool
Defaults…”
80
Figure 80 - Application Pool Defaults
•
Locate the Process Model group and select the ellipsis (…) button to the right of Identity
81
Figure 81 - Set Application Pool Identity
•
Set the Build-in account to LocalSystem and press the OK button to accept the update
82
Figure 82 - Set Application Pool to Local System
•
•
•
Press the OK button to dismiss the Application Pool Defaults dialog. The OBH web-service is
now configured on your server
You can verify a local connection by opening a web browser running directly on the server or PC
that you just installed the OBH web-service on and browsing to the url
http://localhost/OBHWebConnect/verify.aspx
You should see two “PASS” status values. If you receive an error then review the steps above
and verify your website is enabled and IIS is running. Also verify you can browse to other pages,
and web-services, on your web-site.
Figure 83 - Verify Online Host Configuration
•
•
•
The final verification can be done on any computer, other than the computer just installed with
OBH web-service, which has internet access. Open a web browser and type the url
http://<your-url.com>/OBHWebConnect/verify.aspx. Where you replace <your-url.com> with
the friendly domain name of your server or PC. You could also use an IP address (e.g. of the
form 192.122.100.100) if you are guaranteed a static IP address by your internet provider. But,
it is recommended that you use a domain name just in case the underlying IP address changes
so you can forward the domain easily to an IP address currently assigned to your server or PC
hosting the OBH web-service.
Note if you are not guaranteed a static IP address then there are plenty of free services where
you can forward your dynamic IP address to a domain name and provide updates whenever
your IP address changes (google the term “free dynamic domain name service” to locate
preferred dynamic DNS providers).
Once the web-service is installed, you can launch the Online Backup Host Viewer from the
Windows Start menu. Select Start | All Programs | Online Backup Host | Online Backup Host
Viewer.
83
84
Figure 84 - Launching Personal Storage Host Viewer software