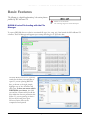
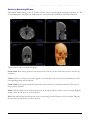
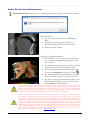
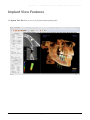
1
I N V I V O 5 . 2 ® – P I O N E E R I N G T H E N E W D I M E N S I O N O F P A T I E N T C A R E ™ Invivo5.2 Reference Manual Anatomage, Inc. 111 North Market Street Suite 800, San Jose, CA 95113 U.S.A. Tel) 408.885.1474 Fax) 408.295.9786 www.anatomage.com ANA003 Rev A. 18 Sept 2012 Page 1 of 107 UM-INV-ENG-52A I N V I V O 5 . 2 ® – P I O N E E R I N G T H E N E W D I M E N S I O N O F P A T I E N T C A R E ™ Warranty Statement There are no warranties, express or implied, with respect to the contents of this document, and all information provided herein is provided “as is.” Anatomage reserves the right to periodically change the information that is contained in this document; however, Anatomage makes no commitment to provide any such changes in a timely manner or at all. Limitation of Liability In no event shall Anatomage or its affiliates be liable to any party for any direct, indirect, special, or consequential damages in connection with your use of this document, including, without limitation, loss of business revenue or earnings, lost data, damages caused by delays, lost profits, or a failure to realize expected savings, even if Anatomage was expressly advised of the possibility of such damages. End of Life Statement InVivoDental 5.2 software is dependent on its hardware requirements. The life-cycle is limited only by the availability of the required hardware. Trademarks Anatomage and related marks, images, and symbols are the exclusive properties of, and trademarks of, Anatomage Inc. All other brands and marks are the properties of their respective owners. Copyright Documentation for InVivoDental 5.2 and the operating software are copyrighted with all rights reserved. Under the copyright laws, this documentation may not be reproduced, transmitted, transcribed, or translated into any human or computer language in whole or part without the prior written permission of the copyright holder. About Anatomage and InVivoDental 5.2 Software The InVivoDental 5.2 software was released in 2011 as an update to the InVivoDental software from Anatomage, Inc. In this document, InVivoDental 5.2 refers to the latest version of the Anatomage InVivoDental software and is synonymous with the terms “Invivo” and “Invivo5.2”. To learn more about Anatomage, access the Anatomage website (www.Anatomage.com). Intended User InVivoDental 5.2 is designed to be used by medical and dental professionals who have been appropriately trained to use 3D CT imaging devices and read the image data generated by the devices. Language The original language of this manual is English. Other versions are available in French, Italian, German, Spanish, Portuguese and Japanese. Please contact Anatomage for other language versions. Caution: Federal law restricts this device to sale by or on the order of medical and dental clinicians. ANA003 Rev A. 18 Sept 2012 Page 2 of 107 UM-INV-ENG-52A I N V I V O 5 . 2 ® – P I O N E E R I N G T H E N E W D I M E N S I O N O F P A T I E N T C A R E ™ Indications for Use InVivoDental is intended for use as a front-end software interface for the transfer of imaging information from a medical scanner such as a CT scanner. It is also intended for use as a planning and simulation software in the placement of dental implants, orthodontics, and surgical treatment ANA003 Rev A. 18 Sept 2012 Page 3 of 107 UM-INV-ENG-52A I N V I V O 5 . 2 ® – P I O N E E R I N G T H E N E W D I M E N S I O N O F P A T I E N T C A R E ™ Table of Contents Table of Contents ................................................................................................................................. 4 Introduction.......................................................................................................................................... 8 System Requirements ........................................................................................................................... 9 Installing InVivoDental 5.2 ................................................................................................................. 11 Website Installation Instructions ....................................................................................................................... 11 InVivoDental Setup Wizard ............................................................................................................................... 11 Validating the Installer File ................................................................................................................................. 12 Feature List.......................................................................................................................................... 13 Software Layout ................................................................................................................................... 14 InVivoDental 5.2 Preferences .............................................................................................................. 15 Display Preferences ...................................................................................................................................................... 15 Volume Rendering Preferences................................................................................................................................... 17 File Manager Settings ................................................................................................................................................... 18 Basic Features ..................................................................................................................................... 19 DICOM & Invivo File Loading with the File Manager .......................................................................................... 19 Invivo/DICOM File Saving ........................................................................................................................................ 21 Invivo..................................................................................................................................................................... 21 DICOM................................................................................................................................................................. 21 Custom Saving Dialog.................................................................................................................................................. 22 Saving As an Invivo Project File................................................................................................................................. 22 Lay Egg .......................................................................................................................................................................... 22 Export to CD ................................................................................................................................................................ 22 Case Information Display............................................................................................................................................ 23 Image Capture to File................................................................................................................................................... 23 Image Capture to Gallery ............................................................................................................................................ 24 Image Capture to an Email ......................................................................................................................................... 24 Image Navigation ...............................................................................................................................25 Slider Bar Scroll ....................................................................................................................................................... 25 Zoom In/Out ..................................................................................................................................................... 25 Pan (Shift) ............................................................................................................................................................ 25 Free Rotate ........................................................................................................................................................... 26 Free Rolling ......................................................................................................................................................... 26 Increment Rotate .................................................................................................................................................... 26 ANA003 Rev A. 18 Sept 2012 Page 4 of 107 UM-INV-ENG-52A I N V I V O 5 . 2 ® – P I O N E E R I N G T H E N E W D I M E N S I O N O F P A T I E N T C A R E ™ Increment Roll ......................................................................................................................................................... 26 Anatomical Plane Clipping .................................................................................................................................... 27 Scroll Slice ................................................................................................................................................................ 27 Move/Rotation Widget ........................................................................................................................................... 27 Full Screen Mode and Keyboard Shortcuts ........................................................................................28 Switching to Full Screen Mode ................................................................................................................................... 28 Keyboard Shortcuts at Volume Rendering View ..................................................................................................... 28 The View Tabs: ....................................................................................................................................29 Section View Features .........................................................................................................................29 Section: Toolbar ............................................................................................................................................................ 30 Sections: Control Panel ............................................................................................................................................... 31 Sections: Rendering Window ...................................................................................................................................... 32 Section: Light Box ........................................................................................................................................................ 33 Volume Render View Features ............................................................................................................34 Volume Render: Toolbar ............................................................................................................................................. 35 Volume Render: Control Panel ................................................................................................................................... 37 Volume Render: Render Window............................................................................................................................... 38 Volume Render: Volume Measurements ................................................................................................................... 39 Volume Render: Airway Measurement ...................................................................................................................... 40 Volume Render: Movie Capturing and Customized View Sequences .................................................................. 41 Arch Section View Features ................................................................................................................42 Arch Section: Toolbar .................................................................................................................................................. 43 Arch Section: Control Panel ........................................................................................................................................ 45 Arch Section: Rendering Window .............................................................................................................................. 47 Implant View Features ........................................................................................................................48 Implant: Toolbar ........................................................................................................................................................... 49 Implant: Control Panel................................................................................................................................................. 51 Implant: Rendering Window ....................................................................................................................................... 53 Implant: 3D Implant Planning.................................................................................................................................... 54 Implant: Pano Implant Planning ................................................................................................................................ 55 Implant: Restoration Planning .................................................................................................................................... 55 Implant: Abutment Planning ...................................................................................................................................... 56 Implant: Check Sleeve .................................................................................................................................................. 57 Implant: Settings and Preferences .............................................................................................................................. 58 Detailed Implant Settings ................................................................................................................................... 59 Preferred Implants Settings ................................................................................................................................ 59 Density Profile Control....................................................................................................................................... 60 ANA003 Rev A. 18 Sept 2012 Page 5 of 107 UM-INV-ENG-52A I N V I V O 5 . 2 ® – P I O N E E R I N G T H E N E W D I M E N S I O N O F P A T I E N T C A R E ™ TMJ View Features.............................................................................................................................. 61 TMJ: Toolbar ................................................................................................................................................................. 62 TMJ: Control Panel ....................................................................................................................................................... 64 TMJ: Rendering Window ............................................................................................................................................. 65 Arch Spline (Focal Trough) Navigation ........................................................................................................... 65 TMJ: Layout ................................................................................................................................................................... 66 Super Pano View Features...................................................................................................................67 Super Pano: Toolbar ..................................................................................................................................................... 68 Super Pano: Control Panel .......................................................................................................................................... 69 Super Pano: Rendering Window ................................................................................................................................. 70 How to make a good Pano? ............................................................................................................................... 70 Super Ceph View Features .................................................................................................................. 71 Super Ceph: Toolbar .................................................................................................................................................... 72 Super Ceph: Control Panel .......................................................................................................................................... 73 Super Ceph: Rendering Window ................................................................................................................................ 74 Superimposition View Features ..........................................................................................................75 Superimposition: Toolbar ............................................................................................................................................ 76 Superimposition: Control Panel.................................................................................................................................. 78 Superimposition: How to Superimpose Two Volumes ........................................................................................... 80 Superimposition: Using Superimposition Aligner for Fine Adjustments............................................................. 82 Superimposition: Using Volume Registration for Fine Adjustments .................................................................... 83 Superimposition: Difference Between .vdata Files and .odata Files ..................................................................... 85 Gallery View Features .........................................................................................................................86 Gallery: Toolbar ............................................................................................................................................................ 87 Gallery: Control Panel .................................................................................................................................................. 87 Gallery: Rendering Window ........................................................................................................................................ 88 Gallery: Adding Images to the Gallery ...................................................................................................................... 89 Gallery: 2D Image Options ......................................................................................................................................... 91 Model View Features ...........................................................................................................................92 Model: Toolbar .............................................................................................................................................................. 93 Model: Control Panel ................................................................................................................................................... 95 Model: Rendering Window.......................................................................................................................................... 97 Common How To Tasks .....................................................................................................................98 How to Trace A Nerve ................................................................................................................................................ 98 How to Create Reports In Life Size........................................................................................................................... 99 Other View Tabs with Life-Size Printing ......................................................................................................... 99 How to Create a Positive Airway View .................................................................................................................... 100 ANA003 Rev A. 18 Sept 2012 Page 6 of 107 UM-INV-ENG-52A I N V I V O 5 . 2 ® – P I O N E E R I N G T H E N E W D I M E N S I O N O F P A T I E N T C A R E ™ How to Create an AnatoModel Simulation and Video ......................................................................................... 101 InVivoDental 5.2 Software Troubleshooting ..................................................................................... 103 Index .................................................................................................................................................. 105 ANA003 Rev A. 18 Sept 2012 Page 7 of 107 UM-INV-ENG-52A I N V I V O 5 . 2 ® – P I O N E E R I N G T H E N E W D I M E N S I O N O F P A T I E N T C A R E ™ Introduction InVivoDental 5.2 Imaging Software A natomage, Inc. is a medical imaging company composed of a cross functional team consisting of the most elite researchers, mathematicians, engineers, software developers, business analysts, industry leaders, academic faculty, and dental specialists. We believe that InVivoDental 5.2 software will enable the profession to initiate a revolution of unimaginable scope and magnitude. Ultimately, our mission is dedicated to developing software specially designed for dentists to be simple and refined, yet utilizing the most advanced cutting edge software and technology to better serve their patients. With InVivoDental 5.2 software, doctors can create 3D volume renderings on their own computers, get crosssections, trace nerves, place implants, print images, save images, and many more functions. The software is designed to reconstruct these 3D volume renderings from DICOM files generated by CBCT, Medical CT, and MRI radiography machines. InVivoDental 5.2 is intended for use as a planning and simulation software in the placement of dental implants, orthodontics and surgical treatment. T his manual is intended to provide supplementary information to your direct training with the Anatomage support team. For correct and safe use, training is available to all InVivoDental 5.2 users and is highly recommended. In this document, InVivoDental 5.2 refers to the latest version of the Anatomage InVivoDental software and is synonymous with the terms “Invivo” and “Invivo5.2”. Previously released versions of this manual are available. For more information on how to access previous versions of the InVivoDental Reference Manual, please contact the Anatomage customer support team at (408)-885-1474 or email [email protected] ANA003 Rev A. 18 Sept 2012 Page 8 of 107 UM-INV-ENG-52A I N V I V O 5 . 2 ® – P I O N E E R I N G T H E N E W D I M E N S I O N O F P A T I E N T C A R E ™ System Requirements Below are the minimal and recommended system configurations. H aving an adequate computer system is essential to using InVivoDental 5.2 efficiently and generating the highest quality images possible for enhanced analysis and presentation for your patients and colleagues. The most important element is the video card (3d graphics chip or GPU). If your system does not have an appropriate video card, you can purchase and install video cards for desktop computers. InVivoDental 5.2 has minimal system requirements; however, Anatomage recommends the following configurations to fully utilize all the features within the InVivoDental 5.2 Software. The following recommendations have been updated in August 2012: PC Users Minimum Recommended Intel Core i7 3000 series or comparable multi-core processor 4GB CPU Pentium 3 RAM 1GB GPU / Graphics Card ATI Radeon HD 4650, Nvidia Geforce 9800 GT ATI Radeon HD 7850 Hard Disk OS 100 GB Windows XP 32bit 500GB Windows7 64bit OS Graphics Cards / GPU Brand Model Series Low Profile Option Recommendations ATI Radeon HD 4600 – 7900 7970 (Highest Performance) 4650, 5550, 5570, 5750, 6450 7770 (Affordable with Performance) 6670 (Most Affordable, Good Performance) Nvidia GeForce GT 430 – 680 9800GT, GT-430, GTS-450 GTX-680 (Highest Performance), GTX-560 (Affordable with Performance) Mac Users OS Hardware Not Compatible Apple OS X, Parallels MacBook Air, Mac Mini Fully Compatible Apple Bootcamp iMac, MacBook Pro, Mac Pro, Notebook Recommendations Dell Sizes 11, 14, 17, 18 ANA003 Rev A. 18 Sept 2012 Model Graphics Processor Options Weight Alienware M series All options compatible 4.4 lbs – 11.7 lbs Page 9 of 107 UM-INV-ENG-52A I N V I V O 5 . 2 ® – P I O N E E R I N G T H E N E W D I M E N S I O N O F P A T I E N T C A R E ™ 15, 17 Inspiron R ATI Radeon HD 7730M and Nvidia Geforce GT 650M 6.1 – 7.3 lbs 15, 17 Studio XPS series Nvidia Geforce GT 630 or GT 640 5.8 – 7.4 lbs HP (Warning: HP brand laptops have a known issue with switchable graphics. A BIOS update from the HP website may be necessary to run Invivo5 with the intended graphics hardware.) Sizes Model Graphics Processor Options Weight 15, 17 Envy series ATI Radeon HD 7750M, 7850M 5.6 lbs – 7.5 lbs 15, 17 Pavilion series ATI Radeon HD 7670M or Nvidia Geforce GT 630M, 650M 5.5 – 6.6 lbs 15, 17 Probook series ATI Radeon HD 6490M 5.2 – 6.4 lbs 14, 17 Elitebook series ATI Radeon HD 6470M or 7570M 5.5 – 6.9 lbs For additional information, recommendations or assistance, please contact the Anatomage Tech Support Department (408)-885-1474 or email [email protected] ANA003 Rev A. 18 Sept 2012 Page 10 of 107 UM-INV-ENG-52A I N V I V O 5 . 2 ® – P I O N E E R I N G T H E N E W D I M E N S I O N O F P A T I E N T C A R E ™ Installing InVivoDental 5.2 Website Installation Instructions 1. Go to www.Anatomage.com 2. Select “Dr. Login” Username: download Password: support 1. Click InVivoDental 5.2 Installer 2. Click Save File 3. Run File InVivoDental Setup Wizard Prerequisite Component Checklist: InVivoDental Setup will check for certain components that are important to the performance of the software. A result of Pass or Fail will be provided as the components for that computer are compared to a list of the most compatible components. A “Fail” result will not prevent the installation from completing and is only intended as a warning of the possibility of less than optimal software performance as a result. OpenGL Vendor: Associated with the manufacturer of the graphics processor OpenGL Version: Associated with the driver version of the graphics hardware component Memory: The quantity of RAM installed on the motherboard Click Next to continue. Enter the numerical Authorization code. If you have an alphanumeric license key, click Advance and put in the key in the blank provided. Click Next to continue. Installation Preferences: The user can specify the folder for software installation as well as the level of ANA003 Rev A. 18 Sept 2012 Page 11 of 107 UM-INV-ENG-52A I N V I V O 5 . 2 ® – P I O N E E R I N G T H E N E W D I M E N S I O N O F P A T I E N T C A R E ™ functionality with which the software initially opens. Full Functionality Mode: Selecting this function will have all view tabs enabled after the installation is completed. Unchecking this function will install the software with only Section, ArchSection, Volume Render, Implant, Gallery, and Model tabs visible. The missing tabs can be enabled in the Preferences dialog of the File menu. Click Next to continue. The program will proceed with installation until completed. Clicking Finish will close the wizard. Validating the Installer File 1. Right-click the Installer file and select “Properties” to open the Properties Window 2. Open the “Digital Signatures” Tab 3. Select “Anatomage, Inc.” and press Details 4. Verify that the Digital Signature Information is “OK” The following pictures are for example purposes only. The name of the installer and Digital Signature Information is dependent on the release version and may change accordingly. ANA003 Rev A. 18 Sept 2012 Page 12 of 107 UM-INV-ENG-52A I N V I V O 5 . 2 ® – P I O N E E R I N G T H E N E W D I M E N S I O N O F P A T I E N T C A R E ™ Feature List An overview of the various features provided by InVivoDental 5.2. Directly opens DICOM data from any CT machine Invivo File Compression Section and Multislice View Operations Volume Rendering of scan data Linear, Angular, Circumferential, Area and Volumetric Measurements* Image Capture and Export AVI (Movie) Capture and Export Implant, Abutment and Restoration Treatment Planning Bone Density Evaluation Quick Airway Volume Measurement and Evaluation Automatic Superimposition and Mirroring Platform for the AnatoModel service *All measurements are performed with the metric system. ANA003 Rev A. 18 Sept 2012 Page 13 of 107 UM-INV-ENG-52A I N V I V O 5 . 2 ® – P I O N E E R I N G T H E N E W D I M E N S I O N O F P A T I E N T C A R E ™ Software Layout The following is a description of how InVivoDental 5.2 is organized by Menu Bar, Tool Bar, View Tabs, View Controls, and Rendering Window. Menu Bar The Menu Bar allows you to perform application operations such as open, save, close, print, capture, etc. Toolbar Tools can be accessed to perform certain functions on patient images. Sets of tools are associated with a specific View Tab. View Control Rendering Window View Control is the region where patient images can be manipulated and controlled. The View Control is associated with a specific View Tab. ANA003 Rev A. 18 Sept 2012 View Tabs The View Tabs allow you to perform specific tasks or look at specific subjects of interest by adjusting the Toolbar and View Controls Rendering Window is the region where patient images are displayed. This window can be customized within many of the View Tabs by using the Toolbar. Page 14 of 107 UM-INV-ENG-52A I N V I V O 5 . 2 ® – P I O N E E R I N G T H E N E W D I M E N S I O N O F P A T I E N T C A R E ™ InVivoDental 5.2 Preferences This section will explain the different options within the Preference window of InVivoDental 5.2. The InVivoDental 5.2 Preferences includes options for Display settings, Volume Rendering settings, as well as File Manager settings. Accessing the InVivoDental 5.2 Preferences: In the Menu bar of the InVivoDental 5.2, select “File”. Select “Preference…” from the “File” dropdown. Display Preferences GUI Settings Background: Sets the background color for the Rendering Window Measurement Font Size: Sets the measurement font size to a size preset: small, medium, or large Measurement Text Color: Sets the text color for measurement notations Tag Text: Provides an additional label to the right hand corner of the rendering window Date Format: Current date format for case information display Continuous View: o Checked – Switching between view presets for volume renderings will show intermediate volume positions o Unchecked – Switching between view presets will not show intermediate positions – the volume will “jump” to the final position Make Text Annotations Global: when checked, previously placed or new text annotations added to any 2D slice view except group slices (TMJ, ArchSection) will be visible when scrolling past the slice the measurement was placed on Cycle 2D Distance Measurement Color: Measurement colors will cycle with every measurement that is added Enable Multiple Distance Measurement Mode: Distance Measurement will become a toggle on/off button for measurement mode. Toggling “on” this mode will continue to pick beginning and end points for linear measurements with each click after the first measurement has been created Default Image Sharpening This dropdown menu features three settings: No Sharpening, Mild Sharpening, and Hard Sharpening. This setting determines the amount of sharpening applied to 2D grayscale and 2D X-ray (pano and ANA003 Rev A. 18 Sept 2012 Page 15 of 107 UM-INV-ENG-52A I N V I V O 5 . 2 ® – P I O N E E R I N G T H E N E W D I M E N S I O N O F P A T I E N T C A R E ™ ceph) images universally. Changes will occur immediately without restarting the program and the specific setting can still be changed manually in each individual tab. Tabs This section determines which View tabs are seen by the user when the program is running. Checked boxes will be available while unchecked boxes will hide those View tabs. Changes are made after restarting the program. ANA003 Rev A. 18 Sept 2012 Page 16 of 107 UM-INV-ENG-52A I N V I V O 5 . 2 ® – P I O N E E R I N G T H E N E W D I M E N S I O N O F P A T I E N T C A R E ™ Volume Rendering Preferences Volume Rendering View Settings Quality Resolution: Sets the limit for the resolution of the image. This can be set to either a user-defined number or set to Unlimited. Init (Initial) Rendering: Sets the rendering quality upon opening InVivoDental 5.2. Shaded Slice Sampling Rate: When checked, InVivoDental 5.2 will automatically adjust the sampling rate to a setting appropriate for low level graphics cards. Use lower resolution while moving volume: positional changes of the volume will be rendered at a low quality resolution while maintaining the quality resolution setting in the final position. Volume Rendering Range The user can define the range of Hounsfield Units that will be rendered. This cannot be set when “Use Automatic H.U. Range” is checked. Checking “Non-CT Modality Use Scalar for Min-Max” will allow the user to define the Min and Max Scalar units that will be rendered. Material Various properties can be adjusted to change the appearance of a volume rendering. Ambient, Diffuse, and Specular effects can be rendered in different colors. Shininess is set to a number – higher numbers denote less shininess. ANA003 Rev A. 18 Sept 2012 Page 17 of 107 UM-INV-ENG-52A I N V I V O 5 . 2 ® – P I O N E E R I N G T H E N E W D I M E N S I O N O F P A T I E N T C A R E ™ File Manager Settings File Type-Associated Folder Paths Folder paths can be set for each of the Invivo and DICOM file type options. When one mode is selected, the program will use the file paths associated with that file type mode, but the user may still save or open either file type at any time. File Path Preferences for Different Users In the situation that there are multiple users on a single computer with Invivo5 installed across multiple user accounts, the file paths for all new accounts will initially take on the preferences defined by the user administrator account. Non-admin accounts may redefine their file path settings but they will be overwritten the next time the settings are changed on a user administrator account. File Paths Anatomage Case Path: Starting the program will open a window showing a list of cases within this location o Can also serve as a backup folder for all opened cases Default Open Path: This is the starting location for attempting to open a case through File > Open in the Menu bar Default Save Path: This is the starting location for saving a case file in InVivoDental 5.2 Copy Files to Anatomage Case Folder Before Open This section allows the user to save a copy of a case that is to be opened in the Anatomage Case Folder if it is in any location besides this folder, such as on a different location on a network, on a CD-ROM, or in a different folder on the local hard drive. ANA003 Rev A. 18 Sept 2012 Page 18 of 107 UM-INV-ENG-52A I N V I V O 5 . 2 ® – P I O N E E R I N G T H E N E W D I M E N S I O N O F P A T I E N T C A R E ™ Basic Features The following is a detailed explanation of the various features provided by InVivoDental 5.2. DICOM & Invivo File Loading with the File Manager I C O N K E Y Valuable tool or information Ask Anatomage Support for further description To open a DICOM data set or Invivo-associated file type (.inv, .amg, apj), first launch the InVivoDental 5.2 software. The File Manager will appear upon startup allowing you to open the data. Click the Browse File box to manually search for the data you would like to open. If you are opening DICOM data, as shown to the right, simply highlight one of the .dcm files and click open. It does not matter which DICOM file you choose, just click one and the software will open all the files within the data set present in that folder. If you are opening an Invivo file just click it and press open. However, Invivo files can be compressed and opened. ANA003 Rev A. 18 Sept 2012 Page 19 of 107 UM-INV-ENG-52A I N V I V O 5 . 2 ® – P I O N E E R I N G T H E N E W D I M E N S I O N O F P A T I E N T C A R E ™ The File Manager allows you to automatically store and reopen recently viewed cases. This allows for quicker access to current cases. The automatic saving of the files is placed in a folder in your “My Documents” folder called “Anatomage_Cases”. This location can be changed or turned off completely in the following location of the software: Menu Bar/File/Preferences/File Manager. InVivoDental 5.2 allows you to quickly search through your recent cases by typing in the Patient Name or Scan Date in the search fields (shown right). You can also remove the selected Recent Cases from your Recent Case List by selecting the Options... box and using the additional boxes (shown below). This will also allow you to completely clear your Recent Case List. If you close a case and want to reopen another one, click on Menu Bar/File/Open and the File Manager will appear again. . ANA003 Rev A. 18 Sept 2012 Page 20 of 107 UM-INV-ENG-52A I N V I V O 5 . 2 ® – P I O N E E R I N G T H E N E W D I M E N S I O N O F P A T I E N T C A R E ™ Invivo/DICOM File Saving Invivo The following work can be saved as an Invivo file (.inv) . † Case Information & Patient Orientation Traced Nerve Pathways Implants & Implant Measurements Volume Measurements, Landmarks and Annotations Images captured within the Gallery Sculpting Operations † Models imported from MDStudio † Tracings performed in 3DAnalysis These functions require the installation and activation of additional software modules Click “File” → “Save As...”, browse to the area you would like to save, name the file (default is the patient’s name) then click “Save.” The user may also specify the file type of the file they would like to save. The following save dialog box will show up. Select the default “Full” option for saving everything without losing any information. DICOM When the DICOM file type is chosen, the output files will be a single lossless DICOM accompanied with an Invivo workup file containing workup data and a folder of exported Gallery images in DCM format. Click “File” → “Save As...”, browse to the area you would like to save, name the file (default is the patient’s name) then click “Save.” The user may also specify the file type of the file they would like to save. The following save dialog box will show up. Select the default “Uncompressed” option for saving everything without losing any information. ANA003 Rev A. 18 Sept 2012 Page 21 of 107 UM-INV-ENG-52A I N V I V O 5 . 2 ® – P I O N E E R I N G T H E N E W D I M E N S I O N O F P A T I E N T C A R E ™ Custom Saving Dialog Available for Invivo file saving: By selecting “Customize” option, the custom saving dialog shows up. In the dialog box, one can compress the data. For the main volumetric image, you can select to save it as “LossLess” or “Lossy” compression. With LossLess compression, the volume is compressed to about 1/3rd – 1/4th of the original size. With the Lossy compression option, the file size can be dramatically reduced but the image is altered. Resampling the data will reduce its size very dramatically by combining voxels to reduce the overall voxel count. Rescaling the image will reduce the number of shades of gray in the image. You can also choose to selectively compress images in the gallery, the clinical content (such as implants and nerve tracings), and the models. Saving As an Invivo Project File Click “File”, “Save As Project...” to save the case as an APJ, Invivo Project file. This file will save only changes made to the original scan data. It requires a reference data (.dcm scan data or .inv file) when opening. If InVivoDental 5.2 cannot locate the reference data, it will ask you to locate the data again. Because it is saving only the changes to the original, APJ files save much faster than full INV files. Lay Egg This function will create an executable file containing the 3D volume data from the scan that is currently open as well as an 2D Invivo viewer program. This function is designed to allow the sharing of scan data from an Invivo user to a non-Invivo user on shareable media such as a CD, DVD, or flash drive. Note that some antivirus programs may detect the file as a virus due to its executable format. EggViewer: Running this file will initialize the viewer program and then load the embedded scan data. The EggViewer contains Section, ArchSection, and Gallery functionality Export to CD This function will export the currently opened scan as a compressed or uncompressed DICOM or a full, compressed, or customized setting Invivo file. The exported image file will be placed in the temporary burn location in the computer. ANA003 Rev A. 18 Sept 2012 Page 22 of 107 UM-INV-ENG-52A I N V I V O 5 . 2 ® – P I O N E E R I N G T H E N E W D I M E N S I O N O F P A T I E N T C A R E ™ Case Information Display To display or hide the Case Information for a specific patient, go to the “File Menu,” click “Case Info.” Click “Anonymize” then Click “OK” to save the changes. For safety, only the patient's name or anonymous can be displayed and cannot be manually edited. Image Capture to File To capture an image to file of the active display click “view,” then “Capture to File.” Browse to the location where you want to save the image, type the name of the file, choose the file “Save as type”, and click “save”. The file can be saved as bmp, jpg, or png format. Jpg is the most popular file format for images but there is a small amount of color degradation. Bmp preserves the image, but the file size is big. The .png is an effective lossless format that does not degrade the color. ANA003 Rev A. 18 Sept 2012 Page 23 of 107 UM-INV-ENG-52A I N V I V O 5 . 2 ® – P I O N E E R I N G T H E N E W D I M E N S I O N O F P A T I E N T C A R E ™ Image Capture to Gallery Selecting “Capture To Gallery” will capture an image of the Rendering Window and save it to the Image List (see Gallery View Features for additional information). Image Capture to an Email Selecting “Capture To Email” will capture an image of the Rendering Window and attach it to an email ready to send. This will require the setup of an emailing client (ex: Microsoft Outlook, Mozilla Thunderbird). ANA003 Rev A. 18 Sept 2012 Page 24 of 107 UM-INV-ENG-52A I N V I V O 5 . 2 ® – P I O N E E R I N G T H E N E W D I M E N S I O N O F P A T I E N T C A R E ™ Image Navigation Below is an explanation showing how to manipulate images in the Rendering window with the keyboard and mouse. I C O N K E Y Keyboard navigation required Mouse navigation required Slider Bar Scroll Click the mouse cursor over any slider bar (e.g. axial slice, brightness, etc.) and move it to adjust the image. Keep the mouse cursor over the slider bar, “scroll the mouse wheel” forward or backward to achieve the image adjustment you like. Zoom In/Out Place the mouse cursor in the center of the image you want to zoom. Hold down the “Control + left-button” on the mouse. While holding down the buttons indicated above, move the mouse up and down on the screen. This shrinks/enlarges the image: Down vertically , Zooms Out. Up vertically, Zooms In. Pan (Shift) Place the mouse cursor in the center of the image you want to shift. Hold down the “Shift + left-button” on the mouse. While holding down the buttons indicated above, move the mouse any direction to achieve the desired image displacement. ANA003 Rev A. 18 Sept 2012 Page 25 of 107 UM-INV-ENG-52A I N V I V O 5 . 2 ® – P I O N E E R I N G T H E N E W D I M E N S I O N O F P A T I E N T C A R E ™ Free Rotate Applicable only for 3D Images. Place the mouse cursor in the center of the image you want to shift. Hold down the “left-button” on the mouse. While holding down the “left-button”, move the mouse in any direction to achieve the desired rotational position. Free Rolling Hold down the “Space + left-button” on the mouse. While holding down the buttons indicated above, move the mouse up and down to achieve the desired image orientation. Increment Rotate Only applicable for 3D Images. Use the keyboard arrows to rotate the 3D Model 1 degree up, down, right, or left., perpendicular to the computer screen. Increment Roll Only applicable for 3D Images. Hold down “Control” and use the keyboard arrows to rotate the 3D Model 1 degree rolling up, down, right, or left, perpendicular to the computer screen. ANA003 Rev A. 18 Sept 2012 Page 26 of 107 UM-INV-ENG-52A I N V I V O 5 . 2 ® – P I O N E E R I N G T H E N E W D I M E N S I O N O F P A T I E N T C A R E ™ Anatomical Plane Clipping Applicable only for 3D Images. Place the mouse cursor over the center of the image, then scroll the mouse wheel forward or backward (“roll the wheel”) to clip the anatomic plane as you like. Scroll Slice Use when you would like to move through the series of sections when in either the Section, Arch Section, or Pano views. Place the mouse cursor in the center of the image then “scroll the mouse wheel” forward or backward to move one section at a time as you advance through the data slices. Note: In the Arch Section View, you must first create an Arch Spline to activate this feature. Move/Rotation Widget Volume Render View: Click on either the ring or the arrows circling the patient and move it in the direction you want the patient to be oriented. (See Volume Render View Features for more details.) Implant View: Use to move an implant through a portion of the volume for fine-tuning implant treatment planning. Click on either the ring or the arrows circling the implant and move it in the direction you want the implant to move. ANA003 Rev A. 18 Sept 2012 Page 27 of 107 UM-INV-ENG-52A I N V I V O 5 . 2 ® – P I O N E E R I N G T H E N E W D I M E N S I O N O F P A T I E N T C A R E ™ Full Screen Mode and Keyboard Shortcuts Below is an explanation pertaining to running the software in full screen mode without toolbars and controls. Switching to Full Screen Mode From the software menu, select “View” → “Full Screen”. “Full screen stereo” is only applicable for the stereo display system. To return back to the normal screen mode, press “Esc” key on the keyboard. Full screen is not applicable to Arch Section view and Implant view. Keyboard Shortcuts at Volume Rendering View The following keyboard short cuts are available in Volume Render view: Category View Preset Clipping Control Copy/Paste Delete ANA003 Rev A. 18 Sept 2012 Keyboard Shortcut Description 1 Inverse Volume Rendering 2 Soft-Tissue 1 3 Soft-Tissue 2 4 Soft-Tissue + Bone 1 5 Soft-Tissue + Bone 2 6 Teeth 7 Bone 8 (unassigned) 9 (unassigned) 0 Gray Scale P Toggles Clipping-Plane on/off A Axial clipping set S Sagittal clipping set C Coronal clipping set F Flip the clipping direction Page Up / Page Down Move the clipping plane Q Open Free-Sculpt Tool W Open Point-to-Point Sculpt Tool Ctrl+C/Ctrl+V Text/Circle/Arrow notations can be copy and pasted Del After selecting a measurement, comment marker, notation, airway volume, or nerve, pressing this key will delete Page 28 of 107 UM-INV-ENG-52A I N V I V O 5 . 2 ® – P I O N E E R I N G T H E N E W D I M E N S I O N O F P A T I E N T C A R E ™ The View Tabs: Section View Features The Section View Tab gives the ability to view the X, Y, and Z sections (Axial, Coronal, Sagittal) and User-Created, Custom Sections simultaneously for 2D visualization, measurements, and the utilization of several image enhancement features. InVivoDental 5.2 also integrates 3D functions in the Section View Tab. ANA003 Rev A. 18 Sept 2012 Page 29 of 107 UM-INV-ENG-52A I N V I V O 5 . 2 ® – P I O N E E R I N G T H E N E W D I M E N S I O N O F P A T I E N T C A R E ™ Section: Toolbar Shown below is the Tool Bar and tools that are loaded with the Section View Tab: Reset View: Resets the Rendering Window to the original view size. Distance Measurement: After selecting this tool, click one point and move the mouse over the end of the other point you would like to measure and click again. Angle Measurement: After selecting this tool, “click” your first point, then move the mouse over your second point and click it, and finally click the last point. A number in degrees will automatically display. Area Measurement: After Selecting this tool, click multiple points along the boundary of the desired area. Double click or right click to end the measurement. A number in millimeters squared will be automatically display. Reorientation: Click this button to re-orient the image. A circle will show up in each section. Grab the circle and rotate the image to the desired orientation. Layout: Creates a different layout to your preference. After clicking on the layout icon, a list of various layout options will appear. Click on the layout of your preference to apply it. Toggle Cursor Visibility: Turns cursor on and off. Information Display: Displays or hides case information embedded in the data. Arrow Notation: Allows an arrow to be drawn on the image. Circle Notation: Allows a circle to be drawn on the image. Text Notation: Allows text to be written and edited on the image. Select Region: Allows for a calculation of the HU value of an area within a bounding box. The measurement values will display alongside the rectangle and can also be repositioned independently of the measurement rectangle by dragging. View Sequence: Allows for the creation of custom camera sequences and AVI file movie capturing. Refer to the Volume Render View Sequence (p. 41) section for additional information and description. Warning: Any measurement that is incorrect can lead to surgical complications if diagnosis, treatment plans and/or actual treatment is based on the incorrect measurements. It is critical for the end user to learn how to perform measurements correctly and employ proper usage of all measurement tools. Measurement accuracy depends on the image data and the hardware scanner that generated the image data. The measurement cannot be more precise than the resolution of the image. Software reports the value based on user-picked points. Due to the nature of the medical imaging, the boundary is not always well defined. The appeared boundary depends on the current brightness and contrast setting. The boundary may shift as the user makes adjustments to brightness and contrast. The user must understand the limitation of the measurement value before applying to the patient. If you notice any inconsistencies or software problems with measurements, or have further questions or concerns about using measurement tools correctly, please contact us at (408)-885-1474 or email us at [email protected] ANA003 Rev A. 18 Sept 2012 Page 30 of 107 UM-INV-ENG-52A I N V I V O 5 . 2 ® – P I O N E E R I N G T H E N E W D I M E N S I O N O F P A T I E N T C A R E ™ Sections: Control Panel Layout: Default: Go back to original layout. Change Layout: Click to choose custom layout. Slice Thickness: Select the cumulative thickness of the slices in view. View Control: Brightness & Contrast: Can be adjusted for each of the presets to enhance your image. Sharpening Filter: Applies the selected sharpening filter from the dropdown menu to the 2D slice renderers Color Presets: Allows better visualization of certain anatomic structures, soft tissue profiles, airway, etc. The color rendering is only for visualization. The colors are based on densities but DO NOT represent the density value of the bone. Additional View: 3D Volume: This option allows 3D volume rendering in the fourth corner of the window. Custom Section: By clicking two points, a customized section can be created on any cross section to better visualize anatomy along that axis. The custom section can be navigated by clicking and dragging the arrows to rotate, the endpoints to lengthen, or the center point to free drag the entire section. Delete Custom Section: Removes a custom cross section made in the Rendering Window. 3D Volume Clipping: When 3D volume is enabled, this option allows you to clip the volume to see the internal anatomy. The clipping plane will be synchronized with section cursors. Image Info: Dimension, resolution, and field of view size are summarized. Pointer Coordinates: IJK or XYZ: coordinates give the user the ability to examine the coordinate of the cursor upon the absolute coordinate system. Scalar Value is the gray scale value of the voxel pointed by the cursor pointer. H.U. or Hounsfield unit, is an approximate value of the voxel calculated by “Rescale Slope” and “Rescale Intercept” in DICOM information. H.U. value approximations may be not as accurate if your CT hardware calibration is off. Contact your hardware manufacturer for more about H.U. Accuracy. ANA003 Rev A. 18 Sept 2012 Page 31 of 107 UM-INV-ENG-52A I N V I V O 5 . 2 ® – P I O N E E R I N G T H E N E W D I M E N S I O N O F P A T I E N T C A R E ™ Sections: Rendering Window This window allows viewing of the X, Y, and Z sections (Axial, Coronal, Sagittal) and Custom Sections or a 3D view simultaneously. This allows the clinician to have very accurate 2D visualization and 2D measurements. There are three ways to navigate the image: Scroll wheel: Move mouse pointer to the desired cross section. Use the scroll wheel to move the slice up and down. Cursor: Grab one of the cursors (axial, sagittal or coronal). Move the cursor in the desired direction. The corresponding image will be updated. Center Circle: Pick a point inside the center circle. Move the circle in the desired direction. The other 2 images will be updated. Zoom: Click and hold the left-click mouse button on the image and the Ctrl key on the keyboard. Drag the mouse cursor up and down to zoom in and out. Pan: Click and hold the left-click mouse button on the image and the Shift key on the keyboard. Drag the mouse cursor up and down to zoom in and out. ANA003 Rev A. 18 Sept 2012 Page 32 of 107 UM-INV-ENG-52A I N V I V O 5 . 2 ® – P I O N E E R I N G T H E N E W D I M E N S I O N O F P A T I E N T C A R E ™ Section: Light Box Change Layout has the option to change the Section view format to a “Light Box” style. The Light Box is composed of 4-32 sections of either Axial, Sagittal, or Coronal views. The user may also define the Slice Interval by selecting a dropdown option between 0.1-20.0mm or by manually entering a number within that interval on the keyboard. ANA003 Rev A. 18 Sept 2012 Page 33 of 107 UM-INV-ENG-52A I N V I V O 5 . 2 ® – P I O N E E R I N G T H E N E W D I M E N S I O N O F P A T I E N T C A R E ™ Volume Render View Features The Volume Render Tab shows the patient in three dimensionally reconstructed views and allows you to explore the internal structures and never before seen anatomy of the patient. ANA003 Rev A. 18 Sept 2012 Page 34 of 107 UM-INV-ENG-52A I N V I V O 5 . 2 ® – P I O N E E R I N G T H E N E W D I M E N S I O N O F P A T I E N T C A R E ™ Volume Render: Toolbar Shown below is the Tool Bar and tools that are loaded with the Volume Render View Tab: Reset View: Resets the Rendering Window to the original view size. Left View: Automatically orients the volume so the patient is facing left sagittal. Left ¾ View: Automatically orients the volume so the patient is facing 45° left sagittal. Front View: Automatically orients the volume so the patient is facing the front. Right ¾ View: Automatically orients the volume so the patient is facing 45° right sagittal. Right View: Automatically orients the volume so the patient is facing right sagittal. Top View: Automatically orients the volume to the superior view. Bottom View: Automatically orients the volume to the inferior view. Back View: Automatically orients the volume to the posterior view. Quick Zoom: Click the zoom icon, then the point on the volume to zoom in. Use Reset icon to go back to normal size. Quick Slice: Once activated, clicking on a point on the volume will open a 2D zoom window in that location. The zoom window can be scrolled through using the mouse wheel. Freehand Sculpture: Allows you to freely outline an area that you want to remove from the volume in a “cookie cutter” manner. You may remove areas inside or outside the selection by clicking the scissors inside or outside of the area that has been outlined. Polygon Sculpture: Allows you to outline an area (by selecting a series of points) for removal from the volume in a “cookie cutter” manner. You may remove areas inside or outside the selection by clicking the scissors inside or outside of the area that has been outlined. Note: “right click” your mouse to indicate that you have marked your last point. Marker: When selected you may mark a point on the volume and X,Y,Z coordinates (Transverse, Sagittal, Vertical) will appear. Clicking on the point and moving the cursor can modify points. Clicking on the point and pressing, “delete”, can delete it. View Control features allow the values to be hidden or exported to a report. Distance Measurement: When selected you may mark 2 points on the volume and distance will appear. Clicking on the point and moving the cursor can modify points. Clicking on the point and pressing, “delete”, can delete them. View Control features allow the values to be projected to 2D, hidden, or exported to a report. Angle Measurement: When selected you may mark 3 points on the volume and the angle between them will appear. Clicking on their control points and moving the cursor can modify measurements. Clicking on the point or line and pressing, “delete”, will delete them. View Control features allow the values to be projected to 2D, hidden, or exported to a report. ANA003 Rev A. 18 Sept 2012 Page 35 of 107 UM-INV-ENG-52A I N V I V O 5 . 2 ® – P I O N E E R I N G T H E N E W D I M E N S I O N O F P A T I E N T C A R E ™ Polygonal Measurement: When selected you may mark an unlimited number of points on the volume and the total between the first point and the last point will appear. Clicking on the point and moving the cursor can modify points. Clicking on a point and pressing, “delete”, will delete the measurement. View Control features allow the values to be projected to 2D, hidden, or exported to a report. Note: “Right click” your mouse to indicate that you have marked your last point. Volume Measurement: This button will open the volumetric measurement window. Airway Measurement: This button will open the airway volumetric measurement interface. More details can be found in the Airway Measurement section of this document. Comment Marker: You can enter a point in the volume and enter comments. After you pick a point in the volume enter the text you would like to appear in the Insert Comment window and press OK. Quick Measurement: click to activate a ruler at the tip of the cursor. Click again to turn off. Grid: Toggles between 4 different grid layouts for simple assessment of size, measurement, and spatial location. Patient Orientation: click to change patient orientation. Information Display: Displays or hides case information embedded in the data. Setup View: Allows option to view either parallel or perspective views in 3D. For Airway Measurement, you can set the threshold and displayed color range. View Sequence: Allows for the creation of custom camera sequences and AVI file movie capturing. Refer to the View Sequence description in the Volume Render View section (p. 41) Warning: Any measurement that is incorrect can lead to surgical complications if diagnosis, treatment plans and/or actual treatment is based on the incorrect measurements. It is critical for the end user to learn how to perform measurements correctly and employ proper usage of all measurement tools. Measurement accuracy depends on the image data and the hardware scanner that generated the image data. The measurement cannot be more precise than the resolution of the image. Software reports the value based on user-picked points. Due to the nature of the medical imaging, the boundary is not always well defined. The appeared boundary depends on the current brightness and contrast setting. The boundary may shift as the user makes adjustments to brightness and contrast. The user must understand the limitation of the measurement value before applying to the patient. If you notice any inconsistencies or software problems with measurements, or have further questions or concerns about using measurement tools correctly, please contact us at (408)-885-1474 or email us at [email protected] ANA003 Rev A. 18 Sept 2012 Page 36 of 107 UM-INV-ENG-52A I N V I V O 5 . 2 ® – P I O N E E R I N G T H E N E W D I M E N S I O N O F P A T I E N T C A R E ™ Volume Render: Control Panel Rendering: You can select different methods of rendering to suit your needs. Method: “Performance” is fast but there are some rendering artifacts. “Quality” gives the highest level of detail, but response is slower. “Default” is in between. Reconstruction: There are three possible reconstruction methods: Volume Rendering, Maximum Intensity Projection, and X-ray. View Control: Color Presets: Gray Scale, Inverse, Soft Tissue 1, etc. allow better visualizations of certain anatomic structures, soft tissue profiles, airway, etc. This is achieved by displaying specific densities with specific colors. Opacity: Allows for the translucency/opacity to be adjusted. Brightness & Contrast: Can be adjusted for each of the presets to enhance your image. Clipping: Click the Enable Clipping box to slice the image along the predefined Anatomical Planes (Sagittal, Axial, Coronal, and Arch). Scrolling the mouse wheel or slider bar will move the clipping plane. To switch a view to the opposite side, click “Flip.” Control the clipping with the scroll mouse or the slider bar. Measurement: Once landmarks or measurements are defined, the text can be edited in the edit box. Measurements can be projected as 2D values or hidden by clicking the appropriate box. Delete All will delete all measurements within the rendering window Report: Exports the values and annotations to a .CSV file for viewing and/or performing computations as a spreadsheet Annotation: Edits selected comment/annotation in the text field You can toggle added comments on/off by selecting “Visible”. Layout: Sorts all added comments in the Rendering Window based on selected setting (Horizontal, Stick to Point, User Dragged, Vertical, Vertical Even Distributed, Vertical Round Distributed). ANA003 Rev A. 18 Sept 2012 Page 37 of 107 UM-INV-ENG-52A I N V I V O 5 . 2 ® – P I O N E E R I N G T H E N E W D I M E N S I O N O F P A T I E N T C A R E ™ Volume Render: Render Window One of the most powerful features of InVivoDental 5.2 is the remarkable rendering quality and speed at which the software works. The simplicity of this window is that it only displays the volume, Patient Info (if desired), and the opacity, brightness and contrast values. Please refer to Image Navigation (p. 25) for information about controlling and adjusting these images. Warning: Any measurement that is incorrect can lead to surgical complications if diagnosis, treatment plans and/or actual treatment is based on the incorrect measurements. It is critical for the end user to learn how to perform measurements correctly and employ proper usage of all measurement tools. Measurement accuracy depends on the image data and the hardware scanner that generated the image data. The measurement cannot be more precise than the resolution of the image. Software reports the value based on user-picked points. Due to the nature of the medical imaging, the boundary is not always well defined. The appeared boundary depends on the current brightness and contrast setting. The boundary may shift as the user makes adjustments to brightness and contrast. The user must understand the limitation of the measurement value before applying to the patient. If you notice any inconsistencies or software problems with measurements, or have further questions or concerns about using measurement tools correctly, please contact us at (408)-885-1474 or email us at [email protected] ANA003 Rev A. 18 Sept 2012 Page 38 of 107 UM-INV-ENG-52A I N V I V O 5 . 2 ® – P I O N E E R I N G T H E N E W D I M E N S I O N O F P A T I E N T C A R E ™ Volume Render: Volume Measurements The Volume Measurement interface allows you to estimate displaced volume (cc or cubic millimeters) of a specific anatomical structure. You must first perform sculpting operations to isolate the desired anatomical structure. Then, press the Volume Measurement button. The new window will open and the volumetric measurement value will be displayed. Finally, you can adjust the threshold values to obtain desired measurements. The volume measurement function is linked to rendering; the Inverse rendering preset can be used to take volumetric measurements of air. Important: the measurement values may not be true anatomical volumetric measurements. Due to the nature of the imaging, there are imaging artifacts such as white noise, scattering, beam hardening, ring noise or off scale H.U. The software measurement tool cannot distinguish the imaging artifact from the true anatomy. Furthermore, the measurement values depends on threshold values, thus, user must set proper thresholds to get the best estimate of the desired structure. The measurements value must not be used as the sole metric for any treatment. Warning: Any measurement that is incorrect can lead to surgical complications if diagnosis, treatment plans and/or actual treatment is based on the incorrect measurements. It is critical for the end user to learn how to perform measurements correctly and employ proper usage of all measurement tools. Measurement accuracy depends on the image data and the hardware scanner that generated the image data. The measurement cannot be more precise than the resolution of the image. Software reports the value based on user-picked points. Due to the nature of the medical imaging, the boundary is not always well defined. The appeared boundary depends on the current brightness and contrast setting. The boundary may shift as the user makes adjustments to brightness and contrast. The user must understand the limitation of the measurement value before applying to the patient. If you notice any inconsistencies or software problems with measurements, or have further questions or concerns about using measurement tools correctly, please contact us at (408)-885-1474 or email us at [email protected] ANA003 Rev A. 18 Sept 2012 Page 39 of 107 UM-INV-ENG-52A I N V I V O 5 . 2 ® – P I O N E E R I N G T H E N E W D I M E N S I O N O F P A T I E N T C A R E ™ Volume Render: Airway Measurement Airway Measurement: Selecting the icon will prompt the dialog box (below). Select OK to continue. Tracing the Profile: Use the scroll-wheel to locate the Mid-Sagittal Plane Pick points along the airway to define your measurement path with the Left-click button Right-click when finished Viewing the Volume Measurement: InVivoDental 5.2 will convert your profile tracing into a volume rendering and superimpose it onto the scan data. The minimum cross-sectional area and total volume are displayed next to the airway measurement The color range and threshold can be adjusted by selecting the Setup View icon in the Toolbar: The measurement data can be hidden by checking the box for Hide All Values in the control panel. The airway volume and measurement values can be deleted by left-clicking once on the volume, then clicking Delete on the keyboard. Important: the measurement values may not be true anatomical volumetric measurements. Due to the nature of the imaging, there are imaging artifacts such as white noise, scattering, beam hardening, ring noise or off scale H.U. The software measurement tool cannot distinguish the imaging artifact from the true anatomy. Furthermore, the measurement values depends on threshold values, thus, user must set proper thresholds to get the best estimate of the desired structure. The measurements value must not be used as the sole metric for any treatment. Warning: Any measurement that is incorrect can lead to surgical complications if diagnosis, treatment plans and/or actual treatment is based on the incorrect measurements. It is critical for the end user to learn how to perform measurements correctly and employ proper usage of all measurement tools. Measurement accuracy depends on the image data and the hardware scanner that generated the image data. The measurement cannot be more precise than the resolution of the image. Software reports the value based on user-picked points. Due to the nature of the medical imaging, the boundary is not always well defined. The appeared boundary depends on the current brightness and contrast setting. The boundary may shift as the user makes adjustments to brightness and contrast. The user must understand the limitation of the measurement value before applying to the patient. If you notice any inconsistencies or software problems with measurements, or have further questions or concerns about using measurement tools correctly, please contact us at (408)-885-1474 or email us at [email protected] ANA003 Rev A. 18 Sept 2012 Page 40 of 107 UM-INV-ENG-52A I N V I V O 5 . 2 ® – P I O N E E R I N G T H E N E W D I M E N S I O N O F P A T I E N T C A R E ™ Volume Render: Movie Capturing and Customized View Sequences View Sequence: Allows you to create your own sequences by clicking on the Insert button to each step you want the volume to move in your sequence. o If you want a movie that spins left to right, and then turns up for a submental view, you would add a New Camera for each step and the video capture of it will connect the positions in a seamless movie. You can integrate multiple, different rendering presets so that it switches not only in sequence, but also in colorizations. Video sequences can be saved for future use and then loaded using the Load Sequence and Save Sequence buttons. Click on the VIDEO Capture button to open a dialog to customize and save the movie file. Movie Capture: The VIDEO Capture button allows you to customize, capture and export an AVI (movie) file of the volume rendering sequence. Select Change to determine the AVI file name and save location. Various codecs that are on your computer can be used to capture the movie at different qualities. If you experience any trouble with the video quality, a different codec may be better. Set your frames/view and frames/sec to desired value. o More frames/view will make the video smoother o More frames/sec will make the video run faster. Add an Ending Logo by selecting Browse and choosing an image file to display at the end of your video o Select “Add Logo” to add the ending image o Set your duration and background color Click Capture once everything is set up to automatically export the video to the specified location with the specified name. ANA003 Rev A. 18 Sept 2012 Page 41 of 107 UM-INV-ENG-52A I N V I V O 5 . 2 ® – P I O N E E R I N G T H E N E W D I M E N S I O N O F P A T I E N T C A R E ™ Arch Section View Features Arch Section View is a sectional image exploration view. Instead of conventional X-Y-Z sections, this view allows the user to review the image in dentally meaningful perspectives using multiple cross sections traversing the lengths of the dental arches. ANA003 Rev A. 18 Sept 2012 Page 42 of 107 UM-INV-ENG-52A I N V I V O 5 . 2 ® – P I O N E E R I N G T H E N E W D I M E N S I O N O F P A T I E N T C A R E ™ Arch Section: Toolbar Shown below is the Tool Bar and tools that are loaded with the Arch Section Tab: Reset View: Resets the window to the original view. Create Arch Spline (Focal Trough) : After selecting this tool, you can create a new Arch Spline or edit an existing Arch Spline. First, “left-click” on the point you would like to start and continue adding points by “left-clicking.” After you have marked your final point, “right-click” or double click to finalize the Arch Spline. When modifying an existing Arch Spline, drag the control points to the desired positions. Arch Spline (Focal Trough) Ruler: Places ruler along the Arch Spline for easy reference. Distance Measurement: After selecting this tool, click one point and move the mouse over the end of the other point you would like to measure and click again. Angle Measurement: When selected you may mark 3 points on the volume and the angle between them will appear. Clicking on their control points and moving the cursor can modify measurements. Clicking on the point or line and pressing, “delete”, will delete them. View Control features allow the values to be projected to 2D, hidden, or exported to a report. Area Measurement: After Selecting this tool, click multiple points along the boundary of the desired area. Double click or right click to end the measurement. A number in millimeters squared will be automatically display. Polygonal Measurement: When selected you may mark an unlimited number of points on the volume and the total between the first point and the last point will appear. Clicking on the point and moving the cursor can modify points. Clicking on a point and pressing, “delete”, will delete the measurement. Layout: Creates a different layout to your preference. After clicking on the layout icon, a list a various layout options will appear. Click on the layout of your preference to apply it. These options allow for different case workup images. Show/Hide Implant/Cursor/Nerve: Conceals or displays cursors. Information Display: Displays or hides case information embedded in the data. Arrow Notation: Allows an arrow to be drawn on the image. Circle Notation: Allows a circle to be drawn on the image. Text Notation: Allows text to be written and edited on the image. View Sequence: Allows for the creation of custom camera sequences and AVI file movie capturing. Refer to the Volume Render View Sequence (p. 41) section for additional information and description. Slice Capture Mode: Opens the Slice Capture Manager to enable the capture of slices or groups of slices from a series of cross sections. Requires the creation of a slice group in the Report view and an activated Report module. ANA003 Rev A. 18 Sept 2012 Page 43 of 107 UM-INV-ENG-52A I N V I V O 5 . 2 ® – P I O N E E R I N G T H E N E W D I M E N S I O N O F P A T I E N T C A R E ™ Select Region: Allows for a calculation of the HU value of an area within a bounding box. The measurement values will display alongside the rectangle and can also be repositioned independently of the measurement rectangle by dragging. Warning: Any measurement that is incorrect can lead to surgical complications if diagnosis, treatment plans and/or actual treatment is based on the incorrect measurements. It is critical for the end user to learn how to perform measurements correctly and employ proper usage of all measurement tools. Measurement accuracy depends on the image data and the hardware scanner that generated the image data. The measurement cannot be more precise than the resolution of the image. Software reports the value based on user-picked points. Due to the nature of the medical imaging, the boundary is not always well defined. The appeared boundary depends on the current brightness and contrast setting. The boundary may shift as the user makes adjustments to brightness and contrast. The user must understand the limitation of the measurement value before applying to the patient. If you notice any inconsistencies or software problems with measurements, or have further questions or concerns about using measurement tools correctly, please contact us at (408)-885-1474 or email us at [email protected] ANA003 Rev A. 18 Sept 2012 Page 44 of 107 UM-INV-ENG-52A I N V I V O 5 . 2 ® – P I O N E E R I N G T H E N E W D I M E N S I O N O F P A T I E N T C A R E ™ Arch Section: Control Panel Layout: Screen layout is optimized for viewing the image on the computer screen. Print Out layout is optimized for printing the image on paper. With Print Out layout, what you see on screen will be what you get on the paper in life-size. First capture to Gallery, then print from Gallery to ensure the image is life-size. Change Layout allows you to adjust the layout with different amounts of slices and orientations. Vertical Range and Orientation: Adjust Range and Orientation will switch to a mode allowing for the adjustment of the upper and lower limit of pano and cross section. You can also reorient the image in this view. Cross Section: Width: Cross Section Width Interval: Distance between the subsequent cross sections. Thickness: Allows for the cumulative thickness of the slices to be viewed in the cross sections. Auto R-L: This will allow the cross section to be oriented to a consistent R-L orientation on screen. If turned off, the cross section orientation will be consistent to arch spline. Panoramic Image: Slice mode will show you a single cross section along the panoramic curve (yellow). X-ray will show you the ray sum (reconstructed x-ray) in the focal trough. Slice mode is used for drawing the nerve. View Control: Brightness and Contrast allows you to adjust the image The All dropdown allows you to adjust brightness/contrast in different areas independently. Different Color Presets can be used to view the images in color. Sharpening Filter: Applies the selected sharpening filter from the dropdown menu to the 2D slice renderers Nerve Pathway: New Nerve: Starts a new nerve tracing. Node: Deletes the last placed node in the tracing Diameter: Selects the diameter of the nerve that has been traced Visibility: Controls the visibility of the nerve in the section and X-ray renderers ANA003 Rev A. 18 Sept 2012 Page 45 of 107 UM-INV-ENG-52A I N V I V O 5 . 2 ® – P I O N E E R I N G T H E N E W D I M E N S I O N O F P A T I E N T C A R E ™ Nerve Pathway: Creating a Nerve Pathway (e.g. Inferior Alveolar by following the mandibular canal to its exit). Click New Left click the mouse where you want the nerve to start Move the mouse to the next point along your path and left click again Repeat this procedure for the entire length of the nerve 2.0mm is the default diameter of the nerve pathway, but you may adjust it for your preference. Press Done to finish Deleting a Nerve Pathway The Delete tab can be used if a point was plotted in the wrong spot; it will delete the last point added. Picking the nerve and pressing the “delete” key will delete the nerve that was traced if you want to get rid of it. Visibility will turn the nerve on or off from view. Warning: Any nerve that is traced in a way that does not conform to the actual pathway of the nerve can lead to surgical complications if diagnosis, treatment plans and/or actual treatment is based off of the incorrect tracing. It is critical for the end user to learn how to properly perform nerve tracings correctly. If you notice any inconsistencies or software problem with nerve tracing or have further questions or concerns about nerve tracing, please contact Anatomage support at (408)-885-1474 or email us at [email protected] ANA003 Rev A. 18 Sept 2012 Page 46 of 107 UM-INV-ENG-52A I N V I V O 5 . 2 ® – P I O N E E R I N G T H E N E W D I M E N S I O N O F P A T I E N T C A R E ™ Arch Section: Rendering Window Arch Cursor: Notice the Green, Red, and Orange coordinate indicators. These Arch Section Coordinate Indicators show where you are spatially located within the Arch Section Modeling Window. Cross Section Indicator: The Green lines gives the location of the cross sections along the Arch Curve. Axial Slice Indicator: The Red line shows the axial coordinate position within the section. Arch Spline: The Orange spline in the center of the arch spline represents the current position where the Arch Section has moved. Cross Section: Mouse scrolling within any one of the three Sagittal frames advances the slices to the patient’s right or left and causes the Green Coordinate Indicator to move anteriorly or posteriorly in the Axial and Pano Section simultaneously. Axial Section: Mouse scrolling within the Axial section advances the sections superiorly or inferiorly and causes the Red Coordinate Indicator to move superiorly or inferiorly in the Cross or Pano sections simultaneously Pano Section: Mouse scrolling within the Coronal frame advances the slices buccal or lingual and causes the Orange Coordinate Indicator to move buccal and lingual in the Axial and Cross section simultaneously. ANA003 Rev A. 18 Sept 2012 Page 47 of 107 UM-INV-ENG-52A I N V I V O 5 . 2 ® – P I O N E E R I N G T H E N E W D I M E N S I O N O F P A T I E N T C A R E ™ Implant View Features The Implant View Tab allows you to access the full-featured implant planning module. ANA003 Rev A. 18 Sept 2012 Page 48 of 107 UM-INV-ENG-52A I N V I V O 5 . 2 ® – P I O N E E R I N G T H E N E W D I M E N S I O N O F P A T I E N T C A R E ™ Implant: Toolbar Shown below is the Tool Bar and tools that are loaded with the Implant View Tab: Reset Views: Resets the Rendering Window to the original view. Left View: Automatically orients the volume so the patient is facing left sagittal. Left ¾ View: Automatically orients the volume so the patient is facing 45° left sagittal. Front View: Automatically orients the volume so the patient is facing the front. Right ¾ View: Automatically orients the volume so the patient is facing 45° right sagittal. Right View: Automatically orients the volume so the patient is facing right sagittal. Top View: Automatically orients the volume so you are oriented above the patient Bottom View: Automatically orients the volume so you are oriented below the patient. Back View: Automatically orients the volume to the posterior view. Distance Measurement: When selected you may mark 2 points on the volume and distance will appear. Clicking on the point and moving the cursor can modify points. Clicking on the point and pressing, “delete”, can delete them. View Control features allow the values to be projected to 2D, hidden, or exported to a report. Angle Measurement: When selected you may mark 3 points on the volume and the angle between them will appear. Clicking on their control points and moving the cursor can modify measurements. Clicking on the point or line and pressing, “delete”, will delete them. View Control features allow the values to be projected to 2D, hidden, or exported to a report. Insert Implant: To place an implant, first click the Add Implant icon, then “left-click” the mouse on the spot that you want the implant to be placed. Note: specific manufacturers measure the implant from different points, so a measurement in the software might not be the same as the actual measurement of the specific implant design. Change Layout: To toggle the layout click on this icon. Create Summary: Creates an Implant summary of images that is added to the Gallery. Images contain ID(FDI), implant product, diameter, and length information in the lower right hand corner of the screenshot. Toggle Grid: Toggles between two different grid layouts for use in the upper two section frames allowing quick assessment of measurements and spatial location. Toggle Move Widget: Toggles the implant orientation widget on and off. Information Display: Displays or hides case information embedded in the data. ANA003 Rev A. 18 Sept 2012 Page 49 of 107 UM-INV-ENG-52A I N V I V O 5 . 2 ® – P I O N E E R I N G T H E N E W D I M E N S I O N O F P A T I E N T C A R E ™ Change Model Visibility: Allows various models to be turned on or off from view. Treatment Lock: Locks the implants in place so that they are not accidentally moved when viewing the 3D images. Preferences: Allows you to adjust the different rendering, color and visibility preferences. Density Profile Control: Adjust the settings for the displayed density profile around planned implants. Warning: Any measurement that is incorrect can lead to surgical complications if diagnosis, treatment plans and/or actual treatment is based on the incorrect measurements. It is critical for the end user to learn how to perform measurements correctly and employ proper usage of all measurement tools. Measurement accuracy depends on the image data and the hardware scanner that generated the image data. The measurement cannot be more precise than the resolution of the image. Software reports the value based on user-picked points. Due to the nature of the medical imaging, the boundary is not always well defined. The appeared boundary depends on the current brightness and contrast setting. The boundary may shift as the user makes adjustments to brightness and contrast. The user must understand the limitation of the measurement value before applying to the patient. If you notice any inconsistencies or software problems with measurements, or have further questions or concerns about using measurement tools correctly, please contact us at (408)-885-1474 or email us at [email protected] Warning: Any implant planning that is performed incorrectly in any aspect including but not limited to implant location, orientation, angle, diameter, length, and/or manufacture can lead to surgical complications if diagnosis, treatment plans and/or actual treatment is based off of the implant planning error(s) in question. It is critical for the end user to learn how to use the implant treatment planning tools correctly. If you notice any inconsistencies or software problem with implant planning or have further questions or concerns about correct utilization of implant planning, please contact Anatomage support at (408)-885-1474 or email us at [email protected] ANA003 Rev A. 18 Sept 2012 Page 50 of 107 UM-INV-ENG-52A I N V I V O 5 . 2 ® – P I O N E E R I N G T H E N E W D I M E N S I O N O F P A T I E N T C A R E ™ Implant: Control Panel Add Single Implant: Click to add single implant to the 3D volume Adjust the implant orientation and placement using the Move Widget that appears on the selected implant. Planning Layout: 3D Implant: Place and adjust individual implants on 3D volume Pano Implant: Add multiple implants using the Pano view; select “3D Implant” to exit Pano view and re-adjust individual implants. Restoration: After placing one or more implants, clicking restoration will place restorations and abutments on the implants. If it is the first time adding restorations to those implants or restorations have been removed, it will also switch to an occlusal inferior or superior view state for visualizing the restorations. Restoration: Lock to Implant: When selected, the implant and restoration will move as a single unit regardless of which model the move widget is on Remove All: Removes all restorations. View Control: View Presets: Different settings allow for better visualization of certain anatomic structures, soft tissue profiles, hard tissue, etc. This is achieved by displaying specific densities with specific colors. Brightness & Contrast: Can be adjusted for each of the presets to enhance your image. Visible: allows the 3D Volume Rendering to be turned on or off from view. Remove Crown: Only applicable with surgical guide related modeling service options. Sharpening Filter: Applies the selected sharpening filter from the dropdown menu to the 2D slice renderers Clipping: Click the Enable Clipping box to slice the image along the predefined Anatomical Planes (Sagittal, Axial, Coronal, and Arch). Scrolling the mouse wheel or moving the slider bar will move the clipping plane. To switch a view to the opposite side, click “Flip.” Implant: The implant section can be configured to only show specific implants as defined by the user. For more information, look information regarding Preferred Implant settings further in this section. ID: Use the drop-down menu to select an implant to manipulate. The active implant will appear ANA003 Rev A. 18 Sept 2012 Page 51 of 107 UM-INV-ENG-52A I N V I V O 5 . 2 ® – P I O N E E R I N G T H E N E W D I M E N S I O N O F P A T I E N T C A R E ™ lighter in color than the others. Manufacturer, Product Name, Diameter, and length: The default is generic, but you may select a specific implant manufacture, diameter and length. Check Sleeve: The program will search for collisions between the implant and restoration with the stone model and 3D image. See the section “Implant: Check Sleeve” in the Implant View section to learn more about this feature. Visibility: Hide/show various features in the Rendering Window. Notes about some Visibility features: Profile Only: Controls the visibility of the solid implant cross section in the 2D renderers. When activated, the currently selected implant will have a red profile and the unselected implants will have blue profiles. When not activated, the selected implant will show an opaque cross section of the implant and the unselected implants will show as blue profiles. Density: When selected, the lowest 2D slice renderer (view state is perpendicular to the A-B line) will be replaced by a real-time volume density indicator of the immediate surrounding area. Restoration: Controls the visibility of the 3D waxup models in the volume renderer and the colored profile in the 2D section renderer. The colored profile of the selected restoration or restoration associated with the selected implant will be red while the unselected restorations will be pink. Abutment: Controls the visibility of the 3D model in the volume renderer or the colored profile in the 2D slice renderers Surrounding: Displays the surrounding volume around an implant. The collision zone is determined by the Allowance defined in the Preferences Long Axis: Displays a colored rod running through the long axis of the implant in the volume render Nerve: Displays a 3D nerve in the volume render or a cross section of the nerve in the 2D section renderers Angles: Controls the visibility of the angle between the long axes of adjacent implants as well as the angles of the abutment for each implant. Sleeve: Controls the visibility of the profiles in the 2D renderers and 3D models on the volume. Option is only available if the mandibular and maxillary models are available as well as after the Check Sleeve action has been performed. Trajectory: Displays the simulated trajectory of the implant during surgical placement Mandibular/Maxillary Models and Waxups: Controls the visibility of the profiles in the 2D renderers and 3D models on the volume. Option is only available after they have been added by an Anatomage technician as part of a surgical guide case workup. ANA003 Rev A. 18 Sept 2012 Page 52 of 107 UM-INV-ENG-52A I N V I V O 5 . 2 ® – P I O N E E R I N G T H E N E W D I M E N S I O N O F P A T I E N T C A R E ™ Implant: Rendering Window Used for more precise control and final detailed touches to implant treatment planning. Using the navigation discussed below, you can visualize all aspects of the implant in the 3D volume. Once an implant is added, it will also appear in the Volume Render View. Axial Section: Top left window. This section is the view from the top of the implant. The yellow line passing through the axis creates the view seen in the Sagittal view. Scrolling the mouse wheel after clicking inside the Axial window, or clicking and dragging the line will change the cross-section seen in the Sagittal view as the line rotates about the axis of the implant. Sagittal Section: Middle left window. This section is the view from the side of the implant. The yellow line passing through the implant creates the cross-section view that appears in the Axial view. Scrolling the mouse wheel after clicking inside the Sagittal window, or clicking and dragging the line will change the cross-section seen in the Axial view. Density Profile: Lower left window. Displays a real-time visualization of the volume density immediately surrounding the implant Volume Rendering: Right window. This frame allows user to change the implant position and orientation with the orientation widget within the 3D volume rendering. Warning: Any implant planning that is performed incorrectly in any aspect including but not limited to implant location, orientation, angle, diameter, length, and/or manufacture can lead to surgical complications if diagnosis, treatment plans and/or actual treatment is based off of the implant planning error(s) in question. It is critical for the end user to learn how to use the implant treatment planning tools correctly. If you notice any inconsistencies or software problem with implant planning or have further questions or concerns about correct utilization of implant planning, please contact Anatomage support at (408)-885-1474 or email us at [email protected] ANA003 Rev A. 18 Sept 2012 Page 53 of 107 UM-INV-ENG-52A I N V I V O 5 . 2 ® – P I O N E E R I N G T H E N E W D I M E N S I O N O F P A T I E N T C A R E ™ Implant: 3D Implant Planning In the View Controls, click the Add Single Implant button . The implant ID dialog will show up (image below). Select implant ID to be inserted. Press OK, and a new implant will appear on the mouse pointer. Drag and drop the implant in 3D view onto the surgical site. (It helps to have the volume rotated so that the surgical site is centered). In Axial view, align the yellow line such that the below Cross Section view becomes the view along mesialdistal direction. In Cross Section view, re-orient and position implant so that its angle is as desired. In Axial view, align the yellow line such that the below Cross Section view becomes the view along buccal and lingual direction In Cross Section view, re-orient and position implant so that its angle is as desired. Review the final implant position in 3D view. o To delete an implant, select the desired implant in the 3D view and press the “delete” key on the keyboard. The implant will be removed. A similar procedure can be done to add anchor pins to your 3D volume. Select which anchor pin you would like to add and follow similar steps for adjusting its position. ANA003 Rev A. 18 Sept 2012 Page 54 of 107 UM-INV-ENG-52A I N V I V O 5 . 2 ® – P I O N E E R I N G T H E N E W D I M E N S I O N O F P A T I E N T C A R E ™ Implant: Pano Implant Planning Select Implant Planning: Pano under the View Controls in the Implant Tab. Rendering Window updates to Pano view (shown below) Adjust the Arch-Section focal trough such that the middle profile passes through the dentition Drag implant to its desired location and adjust the angle of the implant Repeat for all desired implants Select Implant Planning: 3D to exit PanoMode and adjust individual implants. Implant: Restoration Planning ANA003 Rev A. 18 Sept 2012 Page 55 of 107 Insert the necessary implants for your case. Select Restoration in the Planning Layout to open the Restoration Planning interface in InVivoDental 5.2. The Rendering Window will update to show you an occlusal view of the volume rendering. (Image shown, left) Using the Move-Widget, you can adjust the individual restorations independent of the implant. The View Control updates in the Restoration Planning Mode. Use Restoration Opacity to adjust the transparency of the restoration You can adjust the size of the restoration by adjusting the Width Scale and Height Scale. To exit the Restoration Mode, select the Implant Planning: 3D option in the View Controls. UM-INV-ENG-52A I N V I V O 5 . 2 ® – P I O N E E R I N G T H E N E W D I M E N S I O N O F P A T I E N T C A R E ™ Implant: Abutment Planning The abutment automatically connects the restoration model with the implant model in the Rendering Window. The abutment cannot be adjusted independently of the restoration and implant. It is recommended that you take into consideration the abutment angle and position when planning your implants and restorations. You can hide/show the abutment model under Implant View Controls: Visibility. ANA003 Rev A. 18 Sept 2012 Page 56 of 107 UM-INV-ENG-52A I N V I V O 5 . 2 ® – P I O N E E R I N G T H E N E W D I M E N S I O N O F P A T I E N T C A R E ™ Implant: Check Sleeve The Check Sleeve function can be performed to determine the position of where sleeves would be if a surgical guide was produced for implant placement. This function will simulate possible collisions that may occur between: Sleeves and other sleeves Sleeves and the instrument Sleeves and the stone model Instrument and the stone model Interference: Demonstrated visually by a dark red colored sphere. These interference indicators are not updated in real-time and will only be rechecked after each instance that Check Sleeve is performed. Check Sleeve Preferences: The user can change certain preferences to better simulate the actual procedure that will be performed, such as sleeve system, instrument, sleeve size, and drill. Solution options are to change implant planning, change sleeve preferences, or to allow a technician to try to resolve the interference. ANA003 Rev A. 18 Sept 2012 Page 57 of 107 UM-INV-ENG-52A I N V I V O 5 . 2 ® – P I O N E E R I N G T H E N E W D I M E N S I O N O F P A T I E N T C A R E ™ Implant: Settings and Preferences By selecting the Preferences icon you can open up a customization window within the Implant Tab: Tooth ID System: You can set the ID to either the Universal or FDI(International) standard Default Visibility Preference: Adjust the default visibility settings when InVivoDental 5.2 opens old and new cases. Clipping Preference: Options for which models to include in volume clipping. Show Collision Warning: You can define whether or not to display a proximity warning between implants at an allowed tolerance. Rendering Method: Choose which rendering method (Default, Performance, Quality) you would like to use in the Implant View Tab. Color Control: Set the various colors for the abutment, restoration, and collision colors. Detailed Implant Settings: Adjust default settings for individual implants. See more information below. Preferred Implants Settings: Used to modify which implants will be displayed in the dropdown menus in the control panel. See more information below. ANA003 Rev A. 18 Sept 2012 Page 58 of 107 UM-INV-ENG-52A I N V I V O 5 . 2 ® – P I O N E E R I N G T H E N E W D I M E N S I O N O F P A T I E N T C A R E ™ Detailed Implant Settings When you select Detailed Implant Settings, you are able to adjust the default settings for individual implants in the Implant Planning Preference Window. Clicking once anywhere in the region above will activate dropdown menus for the various implant characteristics. Options will not appear for implants not in the preferred list (see below). Click OK will save these preferences and the designated implant will be selected automatically when choosing a tooth in the Add Single Implant menu. Preferred Implants Settings The user can hide certain implants from populating the lists to simply the dropdown menus. By default, all implant manufacturers and types are selected as “preferred”. To remove an implant, select it in the list on the righthand side and use the left arrow button to remove it from the list. Settings will take effect in the dropdown menu options for Detailed Implant Settings as well as in the Implant section of the control panel. If there is a case open with implants that are not in the preferred list, the implant will still show up correctly in the renderers and the control panel. However, the specific settings for this implant cannot be changed and implants of the same type cannot be added. Adding implants to the preferred list can be accomplished by selecting the implant manufacturer on the list on the ANA003 Rev A. 18 Sept 2012 Page 59 of 107 UM-INV-ENG-52A I N V I V O 5 . 2 ® – P I O N E E R I N G T H E N E W D I M E N S I O N O F P A T I E N T C A R E ™ left-hand side, selecting the specific product in the middle column, and pushing the right arrow button to add. Density Profile Control By selecting the Density Profile Control icon you can adjust the settings for the Density Profile. H.U. shows the bone density in Hounsfield units Bone Density shows the density in Misch’s bone density units. Thickness: Changes the sampled volume located around the implant. Apical Space: Changes the sampled volume located at the apex of the implant. Cell Size: Changes how finely the voxels will be sampled and displayed in the volume around the implant. Warning: Any measurement that is incorrect can lead to surgical complications if diagnosis, treatment plans and/or actual treatment is based on the incorrect measurements. It is critical for the end user to learn how to perform measurements correctly and employ proper usage of all measurement tools. Measurement accuracy depends on the image data and the hardware scanner that generated the image data. The measurement cannot be more precise than the resolution of the image. Software reports the value based on user-picked points. Due to the nature of the medical imaging, the boundary is not always well defined. The appeared boundary depends on the current brightness and contrast setting. The boundary may shift as the user makes adjustments to brightness and contrast. The user must understand the limitation of the measurement value before applying to the patient. If you notice any inconsistencies or software problems with measurements, or have further questions or concerns about using measurement tools correctly, please contact us at (408)-885-1474 or email us at [email protected] Warning: Any implant planning that is performed incorrectly in any aspect including but not limited to implant location, orientation, angle, diameter, length, and/or manufacture can lead to surgical complications if diagnosis, treatment plans and/or actual treatment is based off of the implant planning error(s) in question. It is critical for the end user to learn how to use the implant treatment planning tools correctly. If you notice any inconsistencies or software problem with implant planning or have further questions or concerns about correct utilization of implant planning, please contact Anatomage support at (408)-885-1474 or email us at [email protected] ANA003 Rev A. 18 Sept 2012 Page 60 of 107 UM-INV-ENG-52A I N V I V O 5 . 2 ® – P I O N E E R I N G T H E N E W D I M E N S I O N O F P A T I E N T C A R E ™ TMJ View Features In the TMJ View Tab you can view the TMJ region with two independent focal troughs allowing you to get cross-sections of each TMJ in one view, along with corresponding coronal and axial views. The TMJ View Tab also lets you see the TMJ in 3D volume renderings with automatic segmentation. ANA003 Rev A. 18 Sept 2012 Page 61 of 107 UM-INV-ENG-52A I N V I V O 5 . 2 ® – P I O N E E R I N G T H E N E W D I M E N S I O N O F P A T I E N T C A R E ™ TMJ: Toolbar Shown below is the Tool Bar and tools that are loaded with the TMJ View Tab: Reset View: Resets the Rendering Window to the original view. Create Arch Spline (Focal Trough) : After selecting this tool, you can create a new Arch Spline or edit an existing Arch Spline. First, “left-click” on the point you would like to start and continue adding points by “left-clicking.” After you have marked your final point, “right-click” or double click to finalize the Arch Spline. When modifying an existing Arch Spline, drag the control points to the desired positions. Arch Spline (Focal Trough) Ruler: Places ruler along the Arch Spline for easy reference. Distance Measurement: After selecting this tool, click one point and move the mouse over the end of the other point you would like to measure and click again. Angle Measurement: After selecting this tool, “click” your first point, then move the mouse over your second point and click it, and finally click the last point. A number in degrees will automatically display. Area Measurement: After selecting this tool, click multiple points along the boundary of the desired area. Double click or right click to end the measurement. A number in millimeters squared will be automatically displayed. Layout: Creates a different layout to your preference. After clicking on the layout icon, a list of various layout options will appear. Click on the layout of your preference to apply it. These options allow for different case workup images. In this window, you can also choose how many millimeters you want the cross section interval to be. If you choose 1.0 mm, for example, there will be a space of 1.0 mm between each cross section. Show/Hide Cursor/Implant/Nerve: Conceals or displays cursors. Information Display: Displays or hides case information embedded in the data. Condyle Segment: Allows for automatic segmentation of the condyle in 3D. Fossa Segment: Allows for automatic segmentation of the mandibular fossa in 3D. Positioning #: Allows for a positioning grid to toggle on/off the cross-sections. Arrow Notation: Allows an arrow to be drawn on the image. Circle Notation: Allows a circle to be drawn on the image. Text Notation: Allows text to be written and edited on the image. View Sequence: Allows for the creation of custom camera sequences and AVI file movie capturing. Refer to the Volume Render View Sequence (p. 41) section for additional information and description. ANA003 Rev A. 18 Sept 2012 Page 62 of 107 UM-INV-ENG-52A I N V I V O 5 . 2 ® – P I O N E E R I N G T H E N E W D I M E N S I O N O F P A T I E N T C A R E ™ Slice Capture Mode: Opens the Slice Capture Manager to enable the capture of slices or groups of slices from a series of cross sections. Requires the creation of a slice group in the Report view. Requires an activated Report module. Select Region: Allows for a calculation of the HU value of an area within a bounding box. The measurement values will display alongside the rectangle and can also be repositioned independently of the measurement rectangle by dragging. Warning: Any measurement that is incorrect can lead to surgical complications if diagnosis, treatment plans and/or actual treatment is based on the incorrect measurements. It is critical for the end user to learn how to perform measurements correctly and employ proper usage of all measurement tools. Measurement accuracy depends on the image data and the hardware scanner that generated the image data. The measurement cannot be more precise than the resolution of the image. Software reports the value based on user-picked points. Due to the nature of the medical imaging, the boundary is not always well defined. The appeared boundary depends on the current brightness and contrast setting. The boundary may shift as the user makes adjustments to brightness and contrast. The user must understand the limitation of the measurement value before applying to the patient. If you notice any inconsistencies or software problems with measurements, or have further questions or concerns about using measurement tools correctly, please contact us at (408)-885-1474 or email us at [email protected] ANA003 Rev A. 18 Sept 2012 Page 63 of 107 UM-INV-ENG-52A I N V I V O 5 . 2 ® – P I O N E E R I N G T H E N E W D I M E N S I O N O F P A T I E N T C A R E ™ TMJ: Control Panel Layout Screen shows the Rendering Window in full size but not life size. Print Out mode shows the image in life size and allows you to capture and print in life size. Change Layout button lets you switch to different layout orientations. Vertical Range and Orientation Select Adjust to change the rendered volume range and orientation. Lateral Slices Width allows you to change the width of the slices. Interval allows you to change the interval between the cross-sectional slices. Thickness allows you to add multiple slices together for ray sum visualizations. Frontal This lets you adjust the view visualizations of the coronal slices of the TMJ o Slice – Gray Scale rendering o X-ray – X-ray rendering o Vol1 – Teeth rendering o Vol2 – Bone rendering Using the Thickness button, you can create a ray sum view. View Control: Brightness and Contrast allows you to adjust the image The All dropdown allows you to adjust brightness/contrast in different areas independently. Different Color Presets can be used to view the images in color. Sharpening Filter: Applies the selected sharpening filter from the dropdown menu to the 2D slice renderers Focal Trough Click on the Symmetry box to keep the focal trough angles symmetrical. ANA003 Rev A. 18 Sept 2012 Page 64 of 107 UM-INV-ENG-52A I N V I V O 5 . 2 ® – P I O N E E R I N G T H E N E W D I M E N S I O N O F P A T I E N T C A R E ™ TMJ: Rendering Window Please refer to Image Navigation (pg. 25) for information about controlling and adjusting these images. Arch Spline (Focal Trough) Navigation Endpoints: Clicking and dragging either endpoint of the focal trough can shorten/lengthen the focal Trough or rotate the focal trough, depending on the direction that it is dragged. Warning: Sequence direction depends on the focal trough direction. Medial and lateral may be flipped if the focal trough angle is in the opposite direction. Cross Section indicators: Clicking and dragging the stack of green lines will scroll the cross sections through the focal Trough in that direction. Focal trough Box: Clicking and dragging any one of the lines forming the shape of the focal trough will move the entire focal trough ANA003 Rev A. 18 Sept 2012 Page 65 of 107 UM-INV-ENG-52A I N V I V O 5 . 2 ® – P I O N E E R I N G T H E N E W D I M E N S I O N O F P A T I E N T C A R E ™ TMJ: Layout Many of the various layout options of the TMJ tab feature frontal views of the condyle. Some layout features include: Two frontal volume views for each condyle, as seen above Free rotation of the volumes after Vol1 or Vol2 have been activated Sculpting operations carry over from Volume Render: The condyles can be segmented out using sculpting tools in the Volume Render tab. These operations are carried over automatically to the TMJ view ANA003 Rev A. 18 Sept 2012 Page 66 of 107 UM-INV-ENG-52A I N V I V O 5 . 2 ® – P I O N E E R I N G T H E N E W D I M E N S I O N O F P A T I E N T C A R E ™ Super Pano View Features The Super Pano View Tab gives you the ability to construct and view an enhanced version of a panoramic radiograph, take measurements, and utilize several image enhancement features. It also has the ability to render a pano into a volumetric 3D image that can be rotated for greater visual advantages. ANA003 Rev A. 18 Sept 2012 Page 67 of 107 UM-INV-ENG-52A I N V I V O 5 . 2 ® – P I O N E E R I N G T H E N E W D I M E N S I O N O F P A T I E N T C A R E ™ Super Pano: Toolbar Shown below is the Tool Bar and tools that are loaded with the Super Pano View Tab: Reset View: Resets the Rendering Window to the original view. Create Focal Trough: Sets the boundaries of the Super Pano. A focal trough is automatically set but can be adjusted or recreated entirely. Use the yellow dots to stretch, widen, or reshape the focal trough. The focal trough selects only the objects you want to appear in the Super Pano and excludes others such as the spine, which traditionally appears in panoramic radiographs as background noise. Distance Measurement: After selecting this tool, click one point and move the mouse over the end of the other point you would like to measure and click again. Angle Measurement: After selecting this tool, “click” your first point, then move the mouse over your second point and click it, and finally click the last point. A number in degrees will automatically display. Grid: Toggles between two different grid layouts for use in the all of the section frames allowing quick assessment of measurements and spatial location. Information Display: Displays or hides case information embedded in the data. Warning: Any measurement that is incorrect can lead to surgical complications if diagnosis, treatment plans and/or actual treatment is based on the incorrect measurements. It is critical for the end user to learn how to perform measurements correctly and employ proper usage of all measurement tools. Measurement accuracy depends on the image data and the hardware scanner that generated the image data. The measurement cannot be more precise than the resolution of the image. Software reports the value based on user-picked points. Due to the nature of the medical imaging, the boundary is not always well defined. The appeared boundary depends on the current brightness and contrast setting. The boundary may shift as the user makes adjustments to brightness and contrast. The user must understand the limitation of the measurement value before applying to the patient. If you notice any inconsistencies or software problems with measurements, or have further questions or concerns about using measurement tools correctly, please contact us at (408)-885-1474 or email us at [email protected] ANA003 Rev A. 18 Sept 2012 Page 68 of 107 UM-INV-ENG-52A I N V I V O 5 . 2 ® – P I O N E E R I N G T H E N E W D I M E N S I O N O F P A T I E N T C A R E ™ Super Pano: Control Panel Create Pano The Lower-Upper Limit is adjusted by left-clicking on a green line and dragging with the mouse. It specifies the vertical dimension of the Pano that is being created. The Focal Trough is adjusted by left-clicking on the yellow points and dragging with the mouse. The length, width, and shape of the Focal Trough are adjusted to specify what will appear in the Pano. A preview is also shown in the Rendering Window. The Create Pano button should be pressed after the LowerUpper Limit and Focal Trough are first adjusted. Gray Scale Threshold This threshold sets the density limit in the pano. For noisy images, adjust the threshold so that the noise. does not contribute to the pano. Threshold is usually set slightly below bone density. View Controls Pano can be rendered in multiple visualizations. Enhanced Gray sharpens Gray Scale rendering. By default, Enhanced Gray is selected. Brightness & Contrast: Can be adjusted to enhance your image. Inverse: switches the background to white (switches coloring for Gray Scale Rendering). Sharpening Filter: Applies the selected sharpening filter from the dropdown menu to the 2D slice renderers. 3D Settings Enable 3D: select this feature to render the Pano as a volumetric 3D image. The Pano can be rotated, clipped, etc. like other volumes (see Image Navigation, p. 25). Quality: select this to give the highest level of detail for the generated Pano. A traced nerve or placed implant can be toggled on/off with the Nerve and Implant boxes. Clipping This option is only applicable when 3D Pano is available. Clipping hides some part of the image so that the internal structure can be visible. Axial Setup The slice mode box lets you choose how the focal trough will be shown. ANA003 Rev A. 18 Sept 2012 Page 69 of 107 UM-INV-ENG-52A I N V I V O 5 . 2 ® – P I O N E E R I N G T H E N E W D I M E N S I O N O F P A T I E N T C A R E ™ Super Pano: Rendering Window Upper-Lower Limit: The lower left box where the vertical parameter of the Super Pano is set. The green lines indicate the vertical limits. They can be dragged to set the desired Upper and Lower limit of the Super Pano. When Slice Mode is selected, the red line indicates where the focal trough plane is and can also be adjusted. Focal Trough: The focal trough is adjusted in the lower middle box. Whatever is contained within it will appear in the Super Pano allowing the construction of a panoramic x-ray with minimal background noise. The yellow dots can be left-clicked and dragged to adjust the length, width and shape of the focal trough. The focal trough can be adjusted by dragging the focal trough control points, or a new trough can be created by clicking the trough icon on the toolbar. Preview: A preview of the Super Pano will be displayed in the lower right box before actually creating it. This feature allows a Super Pano to be made more efficiently and with fewer or no adjustments needed afterwards. How to make a good Pano? Make a U-shaped, narrow focal trough encompassing the arches by adjusting points on the focal trough. Adjust Gray scale threshold to filter soft tissue, so that the image is not too dark or too light. Refer to Image Navigation (p. 25) for information about controlling and adjusting these images. ANA003 Rev A. 18 Sept 2012 Page 70 of 107 UM-INV-ENG-52A I N V I V O 5 . 2 ® – P I O N E E R I N G T H E N E W D I M E N S I O N O F P A T I E N T C A R E ™ Super Ceph View Features The Super Ceph View Tab gives the ability to construct and view an enhanced version of a cephalometric radiograph, take measurements, and utilize several image enhancement features, all of which dramatically increases its diagnostic value. ANA003 Rev A. 18 Sept 2012 Page 71 of 107 UM-INV-ENG-52A I N V I V O 5 . 2 ® – P I O N E E R I N G T H E N E W D I M E N S I O N O F P A T I E N T C A R E ™ Super Ceph: Toolbar Shown below is the Tool Bar and tools that are loaded with the Super Ceph View Tab: Reset View: Resets the Rendering Window to the original view. Left View: Automatically orients the volume so the patient is facing left sagittal. Front View: Automatically orients the volume so that the patient is facing the front. Right View: Automatically orients the volume so the patient is facing right sagittal. Distance Measurement: After selecting this tool, click one point and move the mouse over the end of the other point you would like to measure and click again. Angle Measurement: After selecting this tool, “click” your first point, then move the mouse over your second point and click it, and finally click the last point. A number in degrees will automatically display. Grid: Toggles between two different grid layouts for use in the all of the section frames allowing quick assessment of measurements and spatial location. Information Display: Displays or hides case information embedded in the data. Warning: Any measurement that is incorrect can lead to surgical complications if diagnosis, treatment plans and/or actual treatment is based on the incorrect measurements. It is critical for the end user to learn how to perform measurements correctly and employ proper usage of all measurement tools. Measurement accuracy depends on the image data and the hardware scanner that generated the image data. The measurement cannot be more precise than the resolution of the image. Software reports the value based on user-picked points. Due to the nature of the medical imaging, the boundary is not always well defined. The appeared boundary depends on the current brightness and contrast setting. The boundary may shift as the user makes adjustments to brightness and contrast. The user must understand the limitation of the measurement value before applying to the patient. If you notice any inconsistencies or software problems with measurements, or have further questions or concerns about using measurement tools correctly, please contact us at (408)-885-1474 or email us at [email protected] ANA003 Rev A. 18 Sept 2012 Page 72 of 107 UM-INV-ENG-52A I N V I V O 5 . 2 ® – P I O N E E R I N G T H E N E W D I M E N S I O N O F P A T I E N T C A R E ™ Super Ceph: Control Panel Create Ceph The Create Ceph button should only be left-clicked after the orientation of the patient’s volumetric image is adjusted in the rendering window. The Set Orientation box will reset the orientation if a Ceph was created incorrectly. Once the image is orientated correctly, press the Create Ceph button again. Traditional Gray Scale Ceph Brightness and Contrast can be adjusted to enhance your image. The Enhanced box can be left-clicked on or off to sharpen and enhance the quality of the image. Range Setup allows you to select which side of the patient’s head the Ceph will be created from. Thickness allows you to control how thick the range is. When you change the Range Setup, you must recreate the Ceph image using the Create Ceph button. Sharpening Filter: Applies the selected sharpening filter from the dropdown menu to the 2D slice renderers Volume Ceph Increase the Opacity slider bar to superimpose the volume rendering onto the generated Ceph. Various enhanced views of the Ceph can be added; each has different advantages: Bone highlights hard-tissue landmarks Soft+Bone emphasizes the soft-tissue on the Ceph Opacity, Brightness, and Contrast can all be adjusted for image enhancement. Inverse switches the background to white (Gray Scale coloring switches black/white) Range Setup allows you to select which side of the patient’s head the ceph will be created from. Projection allows you to switch from parallel views of the cephalometric images to perspective views which resemble the magnification found in traditional cephalometric radiographs. ANA003 Rev A. 18 Sept 2012 Page 73 of 107 UM-INV-ENG-52A I N V I V O 5 . 2 ® – P I O N E E R I N G T H E N E W D I M E N S I O N O F P A T I E N T C A R E ™ Super Ceph: Rendering Window This window is where the volumetric image of the patient is orientated to create a Ceph and where the Ceph will be viewed after creating it. Before clicking on the “Create Ceph” button in the View Controls, the patient’s volumetric image must be correctly orientated. The easiest way to do this is to line up the left and right angles of the mandible. If the Ceph is created with an improper orientation, it can be adjusted using the Set Orientation box in the view controls. Please refer to Image Navigation (pg. 25) for information about controlling and adjusting these images. ANA003 Rev A. 18 Sept 2012 Page 74 of 107 UM-INV-ENG-52A I N V I V O 5 . 2 ® – P I O N E E R I N G T H E N E W D I M E N S I O N O F P A T I E N T C A R E ™ Superimposition View Features In the Superimposition View Tab, you have the ability to open two different scans at once, view them side by side, and superimpose them. This is especially useful for assessing pre- and post-treatment scans. ANA003 Rev A. 18 Sept 2012 Page 75 of 107 UM-INV-ENG-52A I N V I V O 5 . 2 ® – P I O N E E R I N G T H E N E W D I M E N S I O N O F P A T I E N T C A R E ™ Superimposition: Toolbar Shown below is the Tool Bar and tools that are loaded with the Superimposition View Tab: Reset View: Resets the Rendering Window to the original view size. Left View: Automatically orients the volume so the patient is facing left sagittal. Left ¾ View: Automatically orients the volume so the patient is facing 67° left sagittal. Front View: Automatically orients the volume so the patient is facing the front. Right ¾ View: Automatically orients the volume so the patient is facing 67° right sagittal. Right View: Automatically orients the volume so the patient is facing right sagittal. Top View: Automatically orients the volume so you are oriented above the patient Bottom View: Automatically orients the volume so you are oriented below the patient. Back View: Automatically orients the volume to the posterior view. Distance Measurement: When selected you may mark 2 points on the volume and the distance will appear. Clicking on the point and moving the cursor can modify points. Clicking on the point and pressing, “delete”, can delete them. View Control features allow the values to be projected to 2D, hidden, or exported to a report. Angle Measurement: When selected you may mark 3 points on the volume and the angle between them will appear. Clicking on their control points and moving the cursor can modify measurements. Clicking on the point or line and pressing, “delete”, will delete them. View Control features allow the values to be projected to 2D, hidden, or exported to a report. Area Measurement: After selecting this tool, click multiple points along the boundary of the desired area. Double click or right click to end the measurement. A number in millimeters squared will automatically be displayed. Change Layout: Click on this icon to toggle the layout. Toggle Grid: Toggles between two different grid layouts for use in the upper two section frames allowing quick assessment of measurements and spatial location. Registration: This icon is used to register the original volume to the second volume. Four or more anatomical points are chosen from each scan to properly align both scans at common, stable landmarks. Volume Registration: This icon is used to open the Volume Registration interface for automatic superimposed volume registration. Users will define a VOI (Volume of Interest) Box as a reference for automated superimposition. Adjust: This icon is used to make adjustments to better align the two volumes that are superimposed. ANA003 Rev A. 18 Sept 2012 Page 76 of 107 UM-INV-ENG-52A I N V I V O 5 . 2 ® – P I O N E E R I N G T H E N E W D I M E N S I O N O F P A T I E N T C A R E ™ 3D Cursor: toggles on/off the cursor lines in the 3D volume rendering. Warning: Any measurement that is incorrect can lead to surgical complications if diagnosis, treatment plans and/or actual treatment is based on the incorrect measurements. It is critical for the end user to learn how to perform measurements correctly and employ proper usage of all measurement tools. Measurement accuracy depends on the image data and the hardware scanner that generated the image data. The measurement cannot be more precise than the resolution of the image. Software reports the value based on user-picked points. Due to the nature of the medical imaging, the boundary is not always well defined. The appeared boundary depends on the current brightness and contrast setting. The boundary may shift as the user makes adjustments to brightness and contrast. The user must understand the limitation of the measurement value before applying to the patient. If you notice any inconsistencies or software problems with measurements, or have further questions or concerns about using measurement tools correctly, please contact us at (408)-885-1474 or email us at [email protected] ANA003 Rev A. 18 Sept 2012 Page 77 of 107 UM-INV-ENG-52A I N V I V O 5 . 2 ® – P I O N E E R I N G T H E N E W D I M E N S I O N O F P A T I E N T C A R E ™ Superimposition: Control Panel Superimposition Target: Select Import New Volume to import a second volume. Superimpose either an Invivo file (.inv) or DICOM (.dcm) scan set Volumes will be registered to each other by selecting four (4) or more landmarks on each volume using the Landmark Selector. Select Mirror Own Volume to mirror the patient's anatomy to check for asymmetries. Original Volume and Superimposed: Visible turns on/off either volume independent of each other. Preset allows you to choose different visualization presets for the volume. Preset can also be selected independent of each other. The Brightness and Contrast in the volume renderings can be adjusted independently to adjust and improve image. Clipping: Select Enable to slice the image along predefined anatomical planes (Sagittal, Coronal, Axial). Select Flip to switch the view to the opposite side. Control Clipping with the scroll mouse or Slider Bar. 3D Volume Toggle: This slider allows you switch between the original volume and superimposed volume. Set the slider in the middle to visualize both volumes in equal opacity. Set the slider to one side to visualize only one image. 2D Gray Scale Toggle: This slider allows you switch between the original gray scale slice and superimposed one. Set the slider in the middle to visualize the both in equal opacity. Set the slider to one side to visualize only one image. The Image Color box allows you to change the slice color. Visible: Selectively control the visibility of the Implants, Nerves, and Models. In Model Visibility, you can hide/show individual models in the Rendering Window Save Superimposition: This allows you to save the settings of the Superimposition into an external file. In the dialog that appears, choose where and what filename to save. InVivoDental 5.2 will save two files: .vdata and .odata .vdata: stores the registration points and superimposed volume information ANA003 Rev A. 18 Sept 2012 Page 78 of 107 UM-INV-ENG-52A I N V I V O 5 . 2 ® – P I O N E E R I N G T H E N E W D I M E N S I O N O F P A T I E N T C A R E ™ .odata: stores the original scan's volume orientation information Load Superimposition: This allows you to restore saved Superimposition. Select Load Superimposition and choose the correct .vdata file. The Superimposition file will be reloaded with the saved volume. Registration: Limit Angle will set limitations within the software during its registration calculations. If you are experiencing inaccurate Superimpositions after registering your points due to volume inversions, selecting Limit Angle may resolve some of these issues. It is recommended that you attempt to use different or additional registration points if this does not resolve the volume inversions. ANA003 Rev A. 18 Sept 2012 Page 79 of 107 UM-INV-ENG-52A I N V I V O 5 . 2 ® – P I O N E E R I N G T H E N E W D I M E N S I O N O F P A T I E N T C A R E ™ Superimposition: How to Superimpose Two Volumes InVivoDental 5.2 provides easy to use tools for Superimposition. Although they are easy to use, Superimposition is a technique-sensitive procedure with the most critical step being the registration of the new scan via the selection of stable landmarks in both scans. The proceeding sections discuss how to superimpose two scans step by step. Step 1. Open First File. Open the first file that you want to start with. You do not have to open them in any order, but starting with the pre-treatment scan may be recommended for sake of organization. See DICOM and Invivo File Loading (p. 19) section if you are unsure how to open an Invivo file with the software. Step 2. Import Volume. Go to the Superimposition Tab and from the view controls to the left, click on the button labeled Import New Volume to select your second file to open. The File Manager will appear allowing you to open either a DICOM file or an Invivo file. Step 3. Press the Registration icon. It can be found in the Superimposition Toolbar. Step 4. Registering the Two Scans to Each Other. In order to superimpose the scans correctly and precisely as possible, strict attention must be placed in selecting at least four (4) matching and stable landmarks in both scans. To select landmarks on each volume: o Press down on the center scroll-wheel of the mouse o Or, position the mouse over the landmark and press the space bar on the keyboard Select the first stable landmark on one scan using either method above Select the matching stable landmark on the other scan using either method above o Each point shows up as either a blue or red dot o Points are numbered for easy-reference The volume can be rotated using the left-mouse button as before The volume can be clipped by selecting Clipping: Enable in the View Controls. The volume rendering presets can be adjusted using the Preset button(s) Use caution in setting your Brightness and Contrast settings o Be sure the Brightness and Contrast settings for the original and imported volumes are similar o Be sure to use the similar Preset settings when registering points ANA003 Rev A. 18 Sept 2012 Page 80 of 107 UM-INV-ENG-52A I N V I V O 5 . 2 ® – P I O N E E R I N G T H E N E W D I M E N S I O N O F P A T I E N T C A R E ™ The image above shows a registration point (Registration Point 1) located on the anterior point of the right zygomaticofrontal suture. The point has been added to both the original scan (white, left) and the new scan (blue, right). Step 4. Save Points and Finish Registration. Once all points are plotted one by one, click the right-mouse button to register the two scans. It is recommended to practice by opening the same scan twice before trying to superimpose two different scans. You can see how precise you are by how much overlap in the two registered scans there are. (a) (b) (a) The above image on the left is of two identical data sets that are registered to each other precisely. Notice there are no overlapping areas of different colors. (b) The image on the right is of two volumes not registered precisely. Notice the blue and white skeletal boundaries do not line up, and the presence of double images. ANA003 Rev A. 18 Sept 2012 Page 81 of 107 UM-INV-ENG-52A I N V I V O 5 . 2 ® – P I O N E E R I N G T H E N E W D I M E N S I O N O F P A T I E N T C A R E ™ Superimposition: Using Superimposition Aligner for Fine Adjustments After finishing the landmark registration, you can use the other tools provided in the Superimposition Toolbar to make final adjustments to your superimposition. To make the cross sections bigger, use the Change Layout icon from the Toolbar To move the volume manually, use the Adjust icon from the Toolbar to display the Move-Widget on the superimposed volume The above tools are available for use prior to using the Landmark Selector; however, it is strongly recommended that you first use the Registration tool before using the Adjust tool. Check the cross-sections for accuracy by adjusting the Layout (Change Layout icon) and the 2D Gray Scale Toggle slide bar (View Controls). The superimposition is shown in 3D as well as in the cross sections. Make the necessary adjustments. For example, notice in the sagittal section shown to the left that the superimposed volume is not totally overlapped. Using the Adjust tool, all you would need to do is move the volume in the anterior-posterior direction until the sections align. This is done by clicking on the yellow arrow in the Aligner Widget and dragging it forwards or backwards. One should go through each anatomical plane to check for precision. The cranial base should match up perfectly because it is stable, however the vertebrae will usually be off because the patient's head is always tilted somewhat differently in each scan. ANA003 Rev A. 18 Sept 2012 Page 82 of 107 UM-INV-ENG-52A I N V I V O 5 . 2 ® – P I O N E E R I N G T H E N E W D I M E N S I O N O F P A T I E N T C A R E ™ Superimposition: Using Volume Registration for Fine Adjustments After finishing the landmark registration, you can use the other tools provided in the Superimposition Toolbar to make final adjustments to your superimposition. To make the cross sections bigger, use the Change Layout icon from the Toolbar To fine-tune the registered volumes, use the Volume Registration icon from the Toolbar to open the Volume Registration interface The above tools are available for use prior to using the Landmark Selector; however, it is strongly recommended that you first use the Registration tool before using the Volume Registration tool. Select the Volume Registration icon in the toolbar to open the Volume Registration interface. Left-click on any of the 2D cross-sections to place the center of the VOI (Volume of Interest) Box. The VOI box can be moved at any time by clicking another location in one of the 2D cross-sections. Target Volume Size: R-L Size: defines the lateral width (mm) of the Volume of Interest (VOI) Box A-P Size: defines the anterior-posterior width (mm) of the Volume of Interest (VOI) Box H-F Size: defines the inferior-superior height (mm) of the Volume of Interest (VOI) Box Press Update Size to show the updated VOI Box size in the Rendering Window Select Perform Registration to run the automatic registration process for the VOI Box selected. The process time is based on your computer's hardware components; however, in general, the larger the VOI Box, the more time is required to complete the automatic registration. ANA003 Rev A. 18 Sept 2012 Page 83 of 107 UM-INV-ENG-52A I N V I V O 5 . 2 ® – P I O N E E R I N G T H E N E W D I M E N S I O N O F P A T I E N T C A R E ™ The following images show the VOI Box applied around the cranial base of a pre- and post-surgery superimposed scan (top image) and the results of the automatic registration process (bottom image). Notice that the two cranial base profiles line up exactly following the automatic registration process. The VOI Box used is the default (x, y, z) = 50mm x 50mm x 40mm. ANA003 Rev A. 18 Sept 2012 Page 84 of 107 UM-INV-ENG-52A I N V I V O 5 . 2 ® – P I O N E E R I N G T H E N E W D I M E N S I O N O F P A T I E N T C A R E ™ Superimposition: Difference Between .vdata Files and .odata Files After you have successfully registered a different scan to your original volume data, InVivoDental 5.2 allows you to save the Superimposition data using the Save Superimposition button. This section looks to further define the difference between the outputted files (.vdata and .odata) and how to use them. .vdata Information stored in the .vdata file includes the registration points and the path for finding your superimposed scan data. When you re-open your original scan, in the Superimposition Tab, press the Load Superimposition button and load the desired .vdata file. This will allow you to look at the Superimposed image without having to re-register your landmarks. .odata Information stored in the .odata file includes the orientation information of your original scan data (not your Superimposed scan). With this information, you can set specific orientations for other cases as well. To import a new orientation, go to File in the Menu Bar and select “Import New Orientation”. Choose your desired .odata file and your case will automatically reorient itself. ANA003 Rev A. 18 Sept 2012 Page 85 of 107 UM-INV-ENG-52A I N V I V O 5 . 2 ® – P I O N E E R I N G T H E N E W D I M E N S I O N O F P A T I E N T C A R E ™ Gallery View Features In the Gallery View Tab you can retrieve images that have been captured. Additionally, images can be imported or exported to the location of your choice. Comments or notes can be added to describe images that have been captured. ANA003 Rev A. 18 Sept 2012 Page 86 of 107 UM-INV-ENG-52A I N V I V O 5 . 2 ® – P I O N E E R I N G T H E N E W D I M E N S I O N O F P A T I E N T C A R E ™ Gallery: Toolbar Shown below is the Tool Bar and tools that are loaded with the Gallery View Tab: Crop Image: Allows you to crop and save the image that was captured. Gallery: Control Panel Gallery: Gives a list of all captured images. Each of these images has a “Name” and “Type” which can be renamed by double-clicking on the text. Remove Selected: deletes an image from the Gallery List. Crop Selected: allows you to crop the image within InVivoDental 5.2. Comments: Text box displays comments about the image displayed in the Rendering Window. Add or change comments by clicking Edit at the bottom of the Comment Box. 2D Image Options: Controls settings for 2D images. See more information in Gallery: 2D Image Options Import Image: Select to import images (.jpg, .bmp, .png) from an external source into the Gallery Tab. Using this, you can import patient photographs into the InVivoDental 5.2 software for storage within the Invivo file once saved. Export All Images: Allows you to export all the images in the Gallery List to a path specified in the dialog box that opens. Files can be saved as one of the following formats: .jpg, .bmp, or .png. Note: export as .jpeg file types for Life Size exporting. Email All Images: Capture all images to your email ready to send. ANA003 Rev A. 18 Sept 2012 Page 87 of 107 UM-INV-ENG-52A I N V I V O 5 . 2 ® – P I O N E E R I N G T H E N E W D I M E N S I O N O F P A T I E N T C A R E ™ Gallery: Rendering Window This window allows the viewing of captured and imported images. The Gallery is particularly useful for creating a workup of a particular case. Remember that the Gallery’s images will only be saved if you re-save the whole file, otherwise any images captured will be lost. Please refer to Image Navigation (pg. 25) for information about controlling and adjusting these images. ANA003 Rev A. 18 Sept 2012 Page 88 of 107 UM-INV-ENG-52A I N V I V O 5 . 2 ® – P I O N E E R I N G T H E N E W D I M E N S I O N O F P A T I E N T C A R E ™ Gallery: Adding Images to the Gallery Capture any single image to the Gallery. A single image within any view can be captured without including the other parts of the Rendering Window. When the Capture to Gallery function is used, a dialog will appear on the screen providing the user with options regarding which parts of the Rendering Window to capture. The options provided by each dialog will vary according to which InVivoDental 5.2 view is currently displayed; the following example is the dialog that appears within the ArchSection view: Capture to Gallery Dialog: Ex. Arch Section Capture to Gallery Whole View – Captures a screenshot of the Rendering Window Axial – Captures the Axial slice view and no other parts of the Rendering Window Pano – Captures the Pano view and no other parts of the Rendering Window Cross Sections – Captures a series of slices that are within the Rendering Window Options within each Image to Capture Dialog: Note: Some options will appear gray (disabled) in the Select Image to Capture dialog. The choices available are determined by the specific layout as well as the View Tab. Section Whole View Axial, Coronal, Sagittal Slices Cross (Displays Custom Cross Section or 3D Volume) Volume Rendering No Dialog ArchSection Whole View Axial Pano Cross Sections Implant Whole View Main Volume Axial Cross Density Para Arch Pano Arch Volume Front Volume TMJ Whole View Axial Left Pano Left Cross Section Right Pano Right Cross Sections Super Pano Whole View Axial ANA003 Rev A. 18 Sept 2012 Page 89 of 107 UM-INV-ENG-52A I N V I V O 5 . 2 ® Pano Front Volume Super Ceph No Dialog Superimposition Whole View Main Volume Axial Model Normal Layout – P I O N E E R I N G T H E N E W Preview Pano Coronal Sagittal Imposed Volume D I M E N S I O N O F P A T I E N T C A R E ™ No Dialog Occlusal Layout Whole View Lower Occlusional Upper Occlusional Composite Layout Whole View Composite 1-9 Capture to Gallery Dialog: Name: Image label Note: Image name must be unique from any other captured image in the Gallery Type: Image type – can be set from the pull down to Captured or Photo Comments: Additional comments about the image can be added in this section ANA003 Rev A. 18 Sept 2012 Page 90 of 107 UM-INV-ENG-52A I N V I V O 5 . 2 ® – P I O N E E R I N G T H E N E W D I M E N S I O N O F P A T I E N T C A R E ™ Gallery: 2D Image Options The Gallery tab is compatible with 2D DICOM images and has several features that allow it to better handle this image format. Opening 2D DICOM When instructed to open a 2D DICOM image, Invivo will automatically enter a mode that disables 3D functionality. Only the Gallery tab will be available within the software and the DICOM will appear as a Gallery image. If a 2D DICOM is associated with a 3D volume as a scout image, opening the volume will automatically import that scout image into the Gallery tab. Grayscale Image Options For grayscale images in the Gallery, the user has the option to adjust several settings such as Gray Scale Threshold, Brightness, Contrast, and Sharpening. The updates to these images are saved and always reflect the updated settings when the image is selected in the Gallery and also after it has been saved/exported and then opened/imported back into Invivo. Export to DCM/JPG/PNG/TIF/BMP An image in the Gallery can be exported into any of the above formats when using the Export All Images… button. When saving individual Gallery images to file, the following image formats will be available (JPG, PNG, BMP). ANA003 Rev A. 18 Sept 2012 Page 91 of 107 UM-INV-ENG-52A I N V I V O 5 . 2 ® – P I O N E E R I N G T H E N E W D I M E N S I O N O F P A T I E N T C A R E ™ Model View Features The Model View Tab is where you can view your patient's AnatoModel or 3D photograph and simulate surgical or orthodontic simulations, as well as 3D soft tissue predictions. An AnatoModel is a 3D digital study model that is created by Anatomage via a case-by-case service. The DICOM data of the patient is sent to Anatomage where it is modeled to create the most advanced digital study model available. This is so because the AnatoModel contains anatomy such as roots, developing teeth, impactions, alveolar bone, and so on, while other models just show the crowns of teeth. The 3D photograph service that Anatomage also offers is viewed here too. Anatomage developed the technology to combine one frontal photo of the patient and the patient's CT scan, to create a 3D model that overlays the scan data. Any nerve tracings, implant planning, or superimposition placing that has been done will also be visible in the Model View Tab. Each item can be turned on/off independently to see how all these systems come together with the volume data. For more in depth information about the Model view tab and the AnatoModel services, please refer to the AnatoModel Manual. ANA003 Rev A. 18 Sept 2012 Page 92 of 107 UM-INV-ENG-52A I N V I V O 5 . 2 ® – P I O N E E R I N G T H E N E W D I M E N S I O N O F P A T I E N T C A R E ™ Model: Toolbar Shown below is the Tool Bar and tools that are loaded with the Model View Tab: Reset View: Resets the Rendering Window to the original view size. Left View: Automatically orients the volume so the patient is facing left sagittal. Left ¾ View: Automatically orients the volume so the patient is facing 45° left sagittal. Frontal View: Automatically orients the volume so the patient is facing the front. Right ¾ View: Automatically orients the volume so the patient is facing 45° right sagittal. Right View: Automatically orients the volume so the patient is facing right sagittal. Top View: Automatically orients the volume so you are oriented above the patient Bottom View: Automatically orients the volume so you are oriented below the patient. Back View: Automatically orients the volume to the posterior view. Marker: When selected you may mark a point on the volume and X,Y,Z coordinates (Transverse, Sagittal, Vertical) will appear. Clicking on the point and moving the cursor can modify points. Clicking on the point and pressing, “delete”, can delete them. View Control features allow the values to be projected to 2D, hidden, or exported to a report. Distance Measurement: When selected you may mark 2 points on the volume and distance will appear. Clicking on the point and moving the cursor can modify points. Clicking on the point and pressing, “delete”, can delete them. Angle Measurement: When selected you may mark 3 points on the volume and angle between them will appear. Clicking on their control points and moving the cursor can modify measurements. Clicking on the point or line and pressing, “delete”, will delete them. Polygonal Measurement: When selected you may mark unlimited number of points on the volume and the total between the first point and the last point will appear. Clicking on the point and moving the cursor can modify points. Clicking on a point and pressing, “delete”, will delete the measurement. View Control features allow the values to be projected to 2D, hidden, or exported to a report. Note: “Right click” your mouse to indicate that you have marked your last point. Toggle Grid: Toggles between 4 different grid layouts for simple assessment of size, measurement, and spatial location Information Display: Displays or hides case information embedded in the data View Sequence: Allows for the creation of custom camera sequences for movie capturing. Refer to the Volume Render View Sequence (p. 41) section for additional information and description. Background: Allows for the background color to be easily changed. ANA003 Rev A. 18 Sept 2012 Page 93 of 107 UM-INV-ENG-52A I N V I V O 5 . 2 ® – P I O N E E R I N G T H E N E W D I M E N S I O N O F P A T I E N T C A R E ™ Setup View: Allows option to view either parallel or perspective views in 3D. You can change the annotation layout options under the Setup View. Show/Hide Annotation: Hide/show comments made to the volume in the Volume Render View Tab. You can change the annotation layout options under the Setup View. Warning: Any measurement that is incorrect can lead to surgical complications if diagnosis, treatment plans and/or actual treatment is based on the incorrect measurements. It is critical for the end user to learn how to perform measurements correctly and employ proper usage of all measurement tools. Measurement accuracy depends on the image data and the hardware scanner that generated the image data. The measurement cannot be more precise than the resolution of the image. Software reports the value based on user-picked points. Due to the nature of the medical imaging, the boundary is not always well defined. The appeared boundary depends on the current brightness and contrast setting. The boundary may shift as the user makes adjustments to brightness and contrast. The user must understand the limitation of the measurement value before applying to the patient. If you notice any inconsistencies or software problems with measurements, or have further questions or concerns about using measurement tools correctly, please contact us at (408)-885-1474 or email us at [email protected] ANA003 Rev A. 18 Sept 2012 Page 94 of 107 UM-INV-ENG-52A I N V I V O 5 . 2 ® – P I O N E E R I N G T H E N E W D I M E N S I O N O F P A T I E N T C A R E ™ Model: Control Panel Layout: Normal shows the digital models in the normal patient orientation along with the volume rendering if wanted. Occlusal shows both arches from the occlusal perspective. Composite shows a composite of multiple views of the model all at once. Models: Skin Opacity: Controls the opacity of the Skin model from the Anatomodel service or from 3DAnalysis Jaw Opacity: Controls the opacity of the Alveolar bone/ ABO base from the Anatomodel service Models: the individual, digital models (implants, nerves, teeth, superimposition) can be turned on or off in the Rendering Window Settings: Control settings for items in the Models list. A model must first be selected in this list before the button is pressed. Volume: Select Visible to toggle the volume rendering on or off with the digital models. The View Change box allows volume rendering options, such as “Soft Tissue” , “Teeth”, etc. The Brightness and Contrast of the images can be adjusted with the slide bar. Clipping: Select Enable to slice the image along the predefined anatomical planes (Sagittal, Axial, Coronal). Control the clipping with the scroll mouse or the slider bar. To switch a view to the opposite side, click Flip. Simulation: To create a new simulation: Select either the TeethMovement or JawMovement simulations, or press Edit to make your own name. Move the slide bar to the right to indicate your ending point. Click on a digital model to move it (either individual teeth or whole arches) with the Move-Widget. After the final position is reached using the 3D move widget, press Start button to go back to frame one Press Play to view your simulated movement. Press the Soft Tissue Prediction box to create a simulation of the soft-tissue prediction. This is ANA003 Rev A. 18 Sept 2012 Page 95 of 107 UM-INV-ENG-52A I N V I V O 5 . 2 ® – P I O N E E R I N G T H E N E W D I M E N S I O N O F P A T I E N T C A R E ™ only possible with the use of a 3D Photograph and Skin AnatoModel. Simulation: To create a new simulation: Select either the TeethMovement or JawMovement simulations, or press Edit to make your own name. Move the slide bar to the right to indicate your ending point Click on a digital model to move it (either individual teeth or whole arches) with the Move-Widget After the final position is reached using the 3D move widget, press Start button to go back to frame one Press Play to view your simulated movement. Press the Soft Tissue Prediction box to create a simulation of the soft-tissue prediction. This is only possible with the use of a 3D Photograph and Skin AnatoModel. Annotation: Controls the visibility of comment markers in the rendering window. ANA003 Rev A. 18 Sept 2012 Page 96 of 107 UM-INV-ENG-52A I N V I V O 5 . 2 ® – P I O N E E R I N G T H E N E W D I M E N S I O N O F P A T I E N T C A R E ™ Model: Rendering Window This window allows the viewing of AnatoModels, 3D photographs, and simulation, all of which are services that must be ordered per case for this feature to work. These services provide excellent diagnostic data and case presentation material. Please refer to Image Navigation (pg. 25) for information about controlling and adjusting these images. ANA003 Rev A. 18 Sept 2012 Page 97 of 107 UM-INV-ENG-52A I N V I V O 5 . 2 ® – P I O N E E R I N G T H E N E W D I M E N S I O N O F P A T I E N T C A R E ™ Common How To Tasks How to Trace A Nerve Go to Arch Section View Make sure Pano Image is in Section Mode (not X-ray mode). Adjust Focal Trough such that nerve pathway is visible in Pano Image Move pointer to Pano Image Review nerve pathway while using scroll wheel. If the nerve is not clearly visible, scroll mouse wheel. If the nerve is not clearly visible adjust focal trough. When the nerve was identified through the pano image, press “New Nerve” button in Nerve Pathway section of Control Panel. Starting from mandible foramen pick point by point. If nerve is not clearly visible, use scroll wheel to find the nerve and continue picking. If traced near mental foramen, move pointer to cross section view. Use scroll wheel to find the exit of the nerve. Pick points connecting the nerve exit Press “Done” button in Nerve Pathway section of Control Panel. Warning: Any nerve that is traced in a way that does not conform to the actual pathway of the nerve can lead to surgical complications if diagnosis, treatment plans and/or actual treatment is based off of the incorrect tracing. It is critical for the end user to learn how to properly perform nerve tracings correctly. If you notice any inconsistencies or software problem with nerve tracing or have further questions or concerns about nerve tracing, please contact Anatomage support at (408)-885-1474 or email us at [email protected] ANA003 Rev A. 18 Sept 2012 Page 98 of 107 UM-INV-ENG-52A I N V I V O 5 . 2 ® – P I O N E E R I N G T H E N E W D I M E N S I O N O F P A T I E N T C A R E ™ How to Create Reports In Life Size Go To Arch Section View Check Adjust button in Vertical Range and Orientation. Adjust Upper and Lower limit by dragging green lines and then Un-check Adjust Adjust Focal Trough (Arch Spline) or re-draw Arch Spline by Pressing Create Arch Spline Button. Change Layout Mode to Print Out Change to a desired Layout Choice using the Layout button Adjust Cross section width and interval Move cursor to set cross section in desired location. In Print Out mode, user cannot zoom the image since they are to be printed out in life size. If desired structure is not visible in cross section, adjust axial cursor or focal trough. Switch pano image to X-ray Mode and turn on Ruler Turn on Arch Spline Ruler and turn off Arch Spline Control Points Turn off cursor if necessary Go to View Menu and choose “Capture to Gallery” Go to Gallery Tab See Print Preview in File Menu and Print out a test page. If you want to change format, go to Print Layout Setting in File Menu If you want to put your own logo, replace “printLogo.bmp” file in installation folder. Installation folder is typically “C:\Program Files\Anatomage\InVivoDental 5.2” After Print Layout Setting is change, make sure you re-do “Print Out” mode switching and recapture image. Otherwise the image could be still in previous Print Layout Setting Other View Tabs with Life-Size Printing Non-Whole view full-screen Section render (double-click a renderer to make full-screen) TMJ in Print Layout mode (Axial slice will not be life-size) Pano in Super Pano Super Ceph in Print Layout mode Warning: Any measurement that is incorrect can lead to surgical complications if diagnosis, treatment plans and/or actual treatment is based on the incorrect measurements. It is critical for the end user to learn how to perform measurements correctly and employ proper usage of all measurement tools. Measurement accuracy depends on the image data and the hardware scanner that generated the image data. The measurement cannot be more precise than the resolution of the image. Software reports the value based on user-picked points. Due to the nature of the medical imaging, the boundary is not always well defined. The appeared boundary depends on the current brightness and contrast setting. The boundary may shift as the user makes adjustments to brightness and contrast. The user must understand the limitation of the measurement value before applying to the patient. If you notice any inconsistencies or software problems with measurements, or have further questions or concerns about using measurement tools correctly, please contact us at (408)-885-1474 or email us at [email protected] ANA003 Rev A. 18 Sept 2012 Page 99 of 107 UM-INV-ENG-52A I N V I V O 5 . 2 ® – P I O N E E R I N G T H E N E W D I M E N S I O N O F P A T I E N T C A R E ™ How to Create a Positive Airway View Go To Volume Rendering View Select “Inverse” Preset Reduce Opacity such that the internal structure starts to show up Change the view point to Top View (Press Top View button in tool bar) Use sculpting tool to remove undesired part Change the view point and repeat sculpting operations. After the desired airway is isolated, increase Opacity Adjust Brightness and Contrast to set the right visualization. (The new Airway measurement tool also shows a positive airway view that is color coded based on area. This Inverse method lets you see the airway without color coding) ANA003 Rev A. 18 Sept 2012 Page 100 of 107 UM-INV-ENG-52A I N V I V O 5 . 2 ® – P I O N E E R I N G T H E N E W D I M E N S I O N O F P A T I E N T C A R E ™ How to Create an AnatoModel Simulation and Video Simulations require the use of the AnatoModel service provided on a case-by-case basis from Anatomage. The AnatoModel service may include some or all of the following features: Individually segmented, digital models of patient dentition Segmented digital models of patient mandible and maxilla 3D photograph overlay on the patient soft-tissue profile For additional information about the AnatoModel service, please contact Anatomage at (408)-885-1474 or email us at [email protected]. Go to Model View Tab In the Model View Controls: Simulation, from the drop menu choose an existing Simulation (TeethMovement, JawArticulation) or create your own (select Edit). Move the Slide Bar to the very end (Frame 100) Select a model adjust and the Move-Widget should appear Use the Move-Widget to adjust the final position of the model Moving the Slide Bar (Frame 0 to 100) will move the model between the initial and final positions To adjust intermediate model positions, move the Slide Bar to an intermediate frame (between Frame 0 and 100). Use the Move-Widget to adjust the model position Moving the Slide Bar (Frame 0 to 100) will move the model from the initial position, through intermediate positions and to the final position. ANA003 Rev A. 18 Sept 2012 Page 101 of 107 UM-INV-ENG-52A I N V I V O 5 . 2 ® – P I O N E E R I N G T H E N E W D I M E N S I O N O F P A T I E N T C A R E ™ View Sequence: To create a video of your simulation, select the View Sequence button from the Model Toolbar to open the View Sequencer Window Much like the Volume Render View Tab (p. 41), you can insert scenes with various volume orientations, clippings, colorizations, etc. Adjust Rendering Window image to desired settings (orientation, volume colorization, etc.) and move the Simulation Slide Bar to Frame 0 Press Insert in View Sequencer Window Adjust Rendering Window image to desired settings (orientation, volume colorization, etc.) and move the Simulation Slide Bar to Frame 100 Press Insert in View Sequencer Window Test the video using the Start, Play/Pause and End buttons in the View Sequencer Window Movie Capture: If you are unsatisfied with the test video and View Sequence, make the necessary changes (Insert new Views or Modify/Delete existing Views). If you are satisfied with the test video and View Sequence, select VIDEO Capture to open the Movie Capture Window. Please refer to Volume Render View Tab View Sequence Section (p. 41) for additional descriptions Capture the View Sequence to save your simulation as an AVI movie file. ANA003 Rev A. 18 Sept 2012 Page 102 of 107 UM-INV-ENG-52A I N V I V O 5 . 2 ® – P I O N E E R I N G T H E N E W D I M E N S I O N O F P A T I E N T C A R E ™ InVivoDental 5.2 Software Troubleshooting Category Error Solution General 1. Error Message: 2. InVivoDental 5.2 Application has encountered a problem and needs to close. We are sorry for the inconvenience. Click “Don't Send” Button Check if there are old versions of optional plug-ins, remove them or upgrade them to be compatible with InVivoDental 5.2. Launch InVivoDental 5.2 application again. Warning: treatment information can only be manually saved. All information added after last saving will be lost. 3. 1. Cannot launch InVivoDental 5.2 2. 3. Computer failure Installation File Operations Launch InVivoDental 5.2 application again. Warning: treatment information can only be manually saved. All information added after last saving will be lost. 1. 2. Error Message: Server is not Responding Check Internet connection. If Internet is connected, try again later. Error Message: Please run as administrator to activate software Run the installer/application as administrator Error Message: Failed to verify the license code! Check license code and try again. (or) Check internet connection and try again. Error Message: Wrong License Code! Check license code and try again. Error Message: Invalid Authorization code Check license code and try again. Error Message: Actual size of the image can't fit to the paper size! Change printer setting or create an image with smaller size. Error Message: Failed to create process. Please close other applications and try again. 1. 2. Error Message: Error: Cannot read this file Close all the other applications. Launch InVivoDental 5.2 application again Check if this file is supported by InVivoDental 5.2 Message: Not enough memory Image Rendering Open Task Manager and check if multiple instances of InVivoDental 5.2 is already running Close other InVivoDental 5.2 processes Launch InVivoDental 5.2 application again. 1. 2. Close all the other applications. Launch InVivoDental 5.2 application again Error Message: Can't create temporary save file! Check if the remaining disk capacity for the temporary folder is big enough. Error Message: Failed to read DICOM file! Check if this file is supported by InVivoDental 5.2 Error Message: Can't read Dicot’s Image Data! Check if this file is supported by InVivoDental 5.2 Try to open a file but nothing showing up Check if this file is supported by InVivoDental 5.2 Error Message: Cannot save file! 1. 2. Check if the file is the correct type. Check if the file path is correct and folder is writable. Error Message: 1. Check if graphics card meets system requirements ANA003 Rev A. 18 Sept 2012 Page 103 of 107 UM-INV-ENG-52A I N V I V O 5 . 2 ® – P I O N E E R I N G Can't detect hardware acceleration for OpenGL support! T H E 2. Image is distorted N E W D I M E N S I O N O F P A T I E N T C A R E ™ Check if latest driver is installed for graphics card Switch to another view and switch back Grayscale image shows up for all rendering presets Warning Message: 3D reconstruction may not work! 1. 2. Check if graphics card meets system requirements Check if latest driver is installed for graphics card Check if the DICOM files are exported correctly. All other issues, please contact Anatomage Inc. Customer Support at (408) 885-1474. ANA003 Rev A. 18 Sept 2012 Page 104 of 107 UM-INV-ENG-52A I N V I V O 5 . 2 ® – P I O N E E R I N G T H E N E W D I M E N S I O N O F P A T I E N T C A R E ™ Index This comprehensive list below provides quick and easy way to find the relevant information that you would like to examine. 3/4 Left ......................................................................................................................................................................................... 35, 49, 76, 93 3/4 Right ....................................................................................................................................................................................... 35, 49, 76, 93 3D Landmark Point .................................................................................................................................................................................. 35, 93 3D Move Control View................................................................................................................................................................................... 53 Add Implant .................................................................................................................................................................................................... 49 Airway Measurement................................................................................................................................................................................ 36, 40 Anatomical Plane Clipping ............................................................................................................................................................................. 27 AnatoModel .................................................................................................................................................................................................. 101 Angle ...................................................................................................................................................................................... 30, 43, 62, 68, 72 Apical Space ................................................................................................................................................................................................... 60 Arch Section Tab ............................................................................................................................................................................................ 42 Axial Section ............................................................................................................................................................................................ 47, 53 Axial Slice ...................................................................................................................................................................................................... 45 Axial Slice Indicator ....................................................................................................................................................................................... 47 Bone Density .................................................................................................................................................................................................. 60 Brightness & Contrast................................................................................................................................................................... 31, 37, 51, 69 Calibration ................................................................................................................................................................................................ 45, 64 Case Information Display ............................................................................................................................................................................... 23 Cell Size ......................................................................................................................................................................................................... 60 Clipping ........................................................................................................................................................................................ 37, 51, 78, 95 Color Presets ................................................................................................................................................................................. 37, 45, 51, 64 Comment Marker ............................................................................................................................................................................................ 36 Comments ....................................................................................................................................................................................................... 87 Cross Section .................................................................................................................................................................................................. 47 Cross Section Indicator ................................................................................................................................................................................... 47 Custom Projection .......................................................................................................................................................................................... 31 Custom Section ............................................................................................................................................................................................... 31 Delete Custom Section ................................................................................................................................................................................... 31 Density Profile ................................................................................................................................................................................................ 53 DICOM ........................................................................................................................................................................................................... 19 DICOM & InVivo File Loading ..................................................................................................................................................................... 19 Distance .................................................................................................................................................................................. 30, 43, 62, 68, 72 Export All ....................................................................................................................................................................................................... 87 Focal Trough ............................................................................................................................................................................................. 69, 70 Free Rotate...................................................................................................................................................................................................... 26 Frontal .................................................................................................................................................................................... 35, 49, 72, 76, 93 Gallery .............................................................................................................................................................................. 78, 80, 85, 86, 87, 95 Grid ................................................................................................................................................................................... 36, 49, 68, 72, 76, 93 Hide / Show .............................................................................................................................................................................................. 43, 62 ID .................................................................................................................................................................................................................... 51 Image Capture .......................................................................................................................................................................................... 23, 24 Image Info ...................................................................................................................................................................................................... 31 Image List ................................................................................................................................................................................................. 24, 87 Implant............................................................................................................................................................................................................ 51 Implant Tab ..................................................................................................................................................................................................... 48 Import ............................................................................................................................................................................................................. 87 Increment Roll ................................................................................................................................................................................................ 26 Increment Rotate............................................................................................................................................................................................. 26 InVivo File Saving .......................................................................................................................................................................................... 21 Landmark Selector .......................................................................................................................................................................................... 76 Layout ........................................................................................................................................................................................... 30, 43, 62, 69 Left Lateral ............................................................................................................................................................................. 35, 49, 72, 76, 93 Life Size ......................................................................................................................................................................................................... 87 Manufacturer, Product Name, Diameter, and length ....................................................................................................................................... 51 Measure 3D Angles ...................................................................................................................................................................... 35, 49, 76, 93 ANA003 Rev A. 18 Sept 2012 Page 105 of 107 UM-INV-ENG-52A I N V I V O 5 . 2 ® – P I O N E E R I N G T H E N E W D I M E N S I O N O F P A T I E N T C A R E ™ Measure 3D Distance .................................................................................................................................................................... 35, 49, 76, 93 Measure 3D Distance-Multiple Points ................................................................................................................................................ 36, 43, 93 Measurement .................................................................................................................................................................................................. 37 Menu Bar ........................................................................................................................................................................................................ 14 Method............................................................................................................................................................................................................ 37 Misch’s bone density units.............................................................................................................................................................................. 60 Model View Tab.............................................................................................................................................................................................. 92 Nerve Pathway................................................................................................................................................................................................ 46 odata ......................................................................................................................................................................................................... 78, 85 Pano Cursor .................................................................................................................................................................................................... 47 Pano Section ................................................................................................................................................................................................... 47 Patient Info ................................................................................................................................................ 30, 36, 43, 44, 49, 62, 63, 68, 72, 93 Perform Registration ....................................................................................................................................................................................... 83 Pixel Values .................................................................................................................................................................................................... 31 Projection Curve ........................................................................................................................................................................... 43, 47, 62, 68 Projection Curve Indicator ........................................................................................................................................................................ 43, 62 Quick Measurement ........................................................................................................................................................................................ 36 Reconstruction ................................................................................................................................................................................................ 37 Remove ........................................................................................................................................................................................................... 87 Rendering ....................................................................................................................................................................................................... 37 Rendering Window ......................................................................................................................................................................................... 14 Reset ............................................................................................................................................................................30, 35, 49, 68, 72, 76, 93 Right Lateral ........................................................................................................................................................................... 35, 49, 72, 76, 93 Rotation Widget .............................................................................................................................................................................................. 27 Sagittal Section ............................................................................................................................................................................................... 53 Scroll Slice...................................................................................................................................................................................................... 27 Sculpt (Free Form).......................................................................................................................................................................................... 35 Sculpt (Point-to-Point) .................................................................................................................................................................................... 35 Section View Tab ............................................................................................................................................................................................ 29 Set Orientation .......................................................................................................................................................................................... 73, 74 Simulation..................................................................................................................................................................................................... 101 Slider Bar Scroll ............................................................................................................................................................................................. 25 Software Layout ............................................................................................................................................................................................. 14 Submandibular .............................................................................................................................................................................. 35, 49, 76, 93 Super Ceph ..................................................................................................................................................................71, 72, 73, 74, 76, 87, 93 Super Pano .................................................................................................................................................................................... 67, 68, 69, 70 Superimposition Aligner ................................................................................................................................................................................. 82 Superimposition View Tab .............................................................................................................................................................................. 75 Supramaxillary.............................................................................................................................................................................. 35, 49, 76, 93 Target Volume Size ......................................................................................................................................................................................... 83 Thickness ........................................................................................................................................................................................................ 60 TMJ View Tab ................................................................................................................................................................................................ 61 Tool Bar .......................................................................................................................................................................................................... 14 vdata ......................................................................................................................................................................................................... 78, 85 View Control ...................................................................................................................................................................................... 14, 31, 69 View Sequence ..........................................................................................................................................................30, 36, 41, 43, 62, 93, 102 View Setup...................................................................................................................................................................................................... 36 View Tabs ....................................................................................................................................................................................................... 14 Volume Measurement ..................................................................................................................................................................................... 39 Volume Registration ................................................................................................................................................................................. 76, 83 Volume Render Tab ........................................................................................................................................................................................ 34 Volumetric Measurement ................................................................................................................................................................................ 36 Window/Contrast Value .................................................................................................................................................................................. 38 ANA003 Rev A. 18 Sept 2012 Page 106 of 107 UM-INV-ENG-52A I N V I V O 5 . 2 ® – P I O N E E R I N G T H E N E W D I M E N S I O N O F P A T I E N T C A R E ™ 0473 Manufactured by: Authorized Representative: Anatomage PaloDEx Group Oy 111 North Market Street Nahkelantie 160, P.O. Box 64 Suite 800 FI - 04301 San Jose, CA 95113 U.S.A. Tuusula, Finland Tel: 1-408-885-1474 Tel: 358-10-270-2000 Fax 1-408-295-9786 Fax: 358-9-851-4048 www.anatomage.com www.palodexgroup.com ANA003 Rev A. 18 Sept 2012 Page 107 of 107 UM-INV-ENG-52A