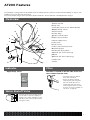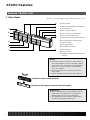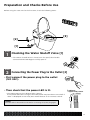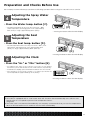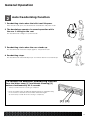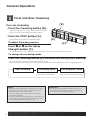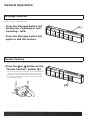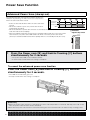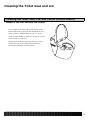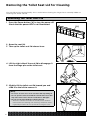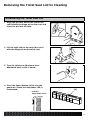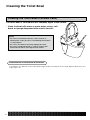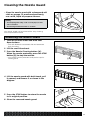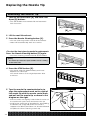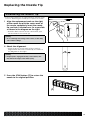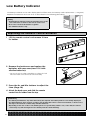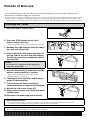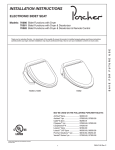
1
english
AT200
user manual
D29020CS416-XXX - Seat & Bowl Combination-CWH
D23020CS11S-XXX - Bowl-CWH
D28000AS416-XXX - Seat / BODY UNIT-CWH
Canvas White (415)
Thank you for purchasing this product.
After reading this manual, please keep it in a place where you can refer to it easily.
Be sure to follow the safety precautions.
Failure to follow the safety precautions may result in serious accidents in some circumstances.
Each of these items are extremely important for safety, and should be strictly observed.
In the event that an accident occurs as a result of improper usage, DXV by American Standard
will assume no responsibility for damages.
©2014 AS America Inc.
Contents
SATIS Features………………………………………………
2
Functions…………………………………………………………
5
Safety Precautions…………………………………………
7
DANGER…………………………………………………………………
WARNING………………………………………………………………
CAUTION………………………………………………………………
7
7
10
Handling Precautions……………………………………… 13
Operation
○○Preparation and Checks Before Use…………… 14
(1) Checking the Water Shutoff Valve [1] ………
(2) Connecting the Power Plug to the Outlet [2]………
(3) Checking the Rear Cleansing Feature [3]…
(4) Adjusting the Spray Water Temperature…
(5) Adjusting the Seat Temperature…………………
(6) Adjusting the Clock………………………………………
14
14
15
16
16
16
○○General Operation …………………………………………… 17
(1) Auto Seat Open Function……………………………… 17
(2) Auto Deodorizing Function………………………… 18
(3) Front and Rear Cleansing…………………………… 19
(4) Using the Dryer……………………………………………… 23
(5) Flushing the Toilet………………………………………… 24
(6) Auto Close Function……………………………………… 25
Useful Functions
○○Power Save Function…………………………………… 26
○○Deodorizing Function ………………………………… 28
○○Night Light Function……………………………………… 29
○○Comfort Features…………………………………………… 30
Preventing Low-temperature Burns
[Seat Heater Auto OFF]………………………………………
Lowering the Water Pressure……………………………
Adjusting the Auto Flush Function……………………
Muting the Signal Reception Sound…………………
Restoring the Default Settings…………………………
Storing the Settings……………………………………………
30
31
32
32
33
33
Other References…………………………………………… 34
Manual Toilet Flushing…………………………………… 37
1
Cleaning and Maintenance
○○Cleaning and Maintenance……………………………
○○Cleaning the Toilet Seat and Lid…………………
○○Removing the Toilet Seat Lid for Cleaning…
○○Cleaning the Toilet Bowl (Ceramic Parts)…
○○Cleaning the Nozzle Guard…………………………
○○Cleaning the Nozzle………………………………………
○○Replacing the Nozzle Tip………………………………
○○Removing the Side Covers……………………………
○○Low Water Pressure………………………………………
○○Low Battery Indicator……………………………………
○○Periods of Non-use…………………………………………
○○Preventing Freezing………………………………………
○○Connecting/Disconnecting the Water
Supply Hose……………………………………………………
38
40
41
43
44
46
49
51
52
53
54
55
58
Troubleshooting……………………………………………… 60
After-sales Service………………………………………… 66
Specifications………………………………………………… 67
Optional Parts………………………………………………… 68
AT200 Features
This product is designed so that people such as elderly persons, persons with limited mobility, or illness, and
children can use it without assistance.
To ensure proper usage of this product, please read this “User’s Manual” carefully before using it.
Overview
k
a
l
b
c
m
d
n
e
o
f
p
g
q
r
h
i
j
s
a Toilet seat lid
b Seat unit
c Indicator (refer to the details below)
d Upper body sensor
e Flush button
f Power plug
g Water shutoff valve
h Open/close handle
i Water supply hose
j Side cover
k Seat sensor
l Toilet seat lid release lever
m nozzle guard
n Warm-air drying duct
o Nozzle (for rear cleansing)
p Bowl
q Nozzle (for front cleansing)
r Toilet seat
s Toilet
Indicator
Filter
• Upper body sensor
The filter is located on the left side of the seat
when viewed from the front.
* The filter removes debris
from the tap water.
* Close the water shutoff
valve before removing the
filter. A small amount of
water may spill out when
removing the filter, so place
a piece of cloth or similar on
the floor. (Page 52)
Water Shutoff Valve
* Use the open/close handle shown
on the left to stop the supply of
water to the toilet. Always set the
handle to the open position when
using the toilet.
2
AT200 Features
Remote Control Unit
1.Main Panel
* Remote control backlight will be illuminated when in use.
h
a Transmitter
i
b Toilet seat OPEN/CLOSE button
a
j
c STOP button
b
k
c
l
m
e Rear cleansing - mild button
f Front cleansing button
g Water pressure adjustment button
h Flush buttons (Full/Partial)
d
i Power button
e
j Massage button
f
g
d Rear cleansing button
k Deodorizer button
n
l Dryer button
m Transmitter
n NOZZLE POSITION adjustment
button
[Note]
● When the remote control is removed from
the holder, buttons on the operation panel
cannot be used, except the [STOP] button.
Be sure to use the remote control while
set in the holder.
● Do not operate the remote control with
wet hands.
* Failure to observe this may cause failure.
(2) Reverse the remote control.
(1) Remove the remote control from the holder.
[Reference]
●When operating the sub-operation panel,
make sure the transmitter is facing the
upper body sensor on the indicator .
* The operation may not be accepted due
to failure of signal transmission.
3
AT200 Features
Remote Control Unit
2.Secondary Panel
a
a Hr/Min buttons
b
b Power save button
c Seat temperature button
c
d Water temperature button
d
e Auto flush button
f Nozzle cleaning button
g Battery LED
h Night light button
e
i Auto seat-open button
f
j Dryer temperature button
g
h
i
j
3.Secondary Panel LCD
n
k Auto flush
l Auto seat-open
m Time
k
o
l
p
n Water temperature indicator
o Seat temperature indicator
p Dryer temperature indicator
m
When power is off
[Reference]
•When the power button on the remote
control is turned off, “OFF” is displayed on
the LCD.
4
Functions
Front cleansing Rear cleansing/rear cleansing - mild
Cleansing
Rear cleansing
Page 19
Provides rear cleansing with a strong spray.
Rear cleansing Page 20
Provides rear cleansing with a gentle spray.
- mild
Oscillating
Page 19/20 Moves the nozzle back and forth to wash a wide range.
spray
Oscillating
Page 19/20 Moves the nozzle back and forth over a short span for a more thorough cleansing.
spray - narrow
Front cleansing
Oscillating
spray
Oscillating
spray - super
Nozzle position adjustment
Water pressure
Massage
Page 21
Provides front cleansing for women, through a separate nozzle.
Page 21
Moves the nozzle back and forth to wash a wide range.
Page 21
Washes an extended range.
Page 22
Moves the nozzle to the desired position.
Page 19 – 21 Adjusts the water pressure as desired.
Page 22
Alternates the water pressure between two levels.
Comfort Functions
Seat heating
–
Temperature
control
Page 16
Adjusts the water and seat temperature.
Warm air dryer
Page 23
Dries the user after front and/or rear cleansing.
Deodorizer
Page 18
Eliminates toilet bowl odors.
Deodorizer turbo
Page 28
Provides a more powerful deodorizing function.
Remote control
Seat sensor
Auto seat open
Auto flush
5
–
Page 34
Heats the seat to the user-defined setting.
Allows the user to operate the toilet from a comfortable position.
Detects the presence of a user and allows the cleansing function to operate.
Page 17/25 Automatically opens and closes the seat/lid.
Page 24
Automatically flushes the toilet after the user walks away.
Functions
○: Available
– : Not available
Comfort Functions
Night light
Page 29
Makes the toilet easy to find at night.
Seat heater auto
OFF
Page 30
Turns the seat heater off when a user sits on the seat. Turns the seat heater on
again when the user stands up.
Clock
Page 16
Displays the current time on the main panel LCD.
Reset function
Page 33
Resets the settings to the factory defaults.
Cleaning Functions
Easy-clean seat
–
No gaps on the toilet seat joints allow for easy cleaning.
Hyper Clean
Both the toilet bowl and the seat unit have antibacterial properties that allow for
–
easy cleaning.
surface
Automatic bowl
–
The toilet bowl is fully rinsed during each flush cycle.
rinse
Self-cleaning
Page 20 The nozzle tips are automatically washed before and after cleansing.
nozzle
Removable toilet Page 41/42
The toilet seat lid can be removed for easy cleaning.
seat lid
Removable
Page 49/50 Both nozzle tips can be manually removed for either cleaning or replacement.
nozzle tips
Removable
Page 44/45 The guard that covers the nozzles can be removed for easy cleaning.
nozzle guard
Power Saving Functions
Advanced power
save
One-touch power save
(8 hours)
Page 27
Power levels are increased to normal settings during regular usage and lowered
during periods of non-use.
Page 26
Power levels are reduced for an 8-hour period.
Power button
–
This product can be turned off during long periods of non-use.
ECO5
–
This product uses 1.3 gallons (5 liters) for a full flush and 0.92 gallons (3.5 liters)
for a partial flush.
6
Safety Precautions
When using electrical products, especially when children are present, basic safety
precautions should always be followed, including the following:
Please read the following Safety Precautions thoroughly before use.
Failure to heed these precautions may result in serious consequences under some circumstances.
Each of these items are extremely important for safety, and should be strictly observed.
This product should be used only as described in this manual.
Means “Be careful!” (This is used together with “WARNING” or “CAUTION” in order to draw users’
attention. Carefully read and strictly observe the description.)
DANGER
Indicates an imminently hazardous situation which, if not avoided, could result in death or serious injury.
WARNING
Indicates a potentially hazardous situation which, if not avoided, could result in death or serious injury.
CAUTION
Indicates a potentially hazardous situation which, if not avoided, could result in minor or moderate
injury or in damage to product or other property.
DANGER
To reduce the risk of electrocution:
Improper use of the grounding plug can result in a risk of electric shock.
Do not place or store product where it can fall or be pulled into a tub or sink.
When installing either the toilet or the remote control, avoid splashing water
directly onto these items. In addition, this product should not be installed in a
humid atmosphere (e.g. inside a shower room).
Do not pour/drop into the water or detergent inside/outside the power plug of the
product or remote control.
Do not reach for a product that has fallen into water. Unplug immediately.
Do not use while bathing.
WARNING
To reduce the risk of burns, electrocution, fire, or injury to persons:
Use this product only for its intended use as described in this manual. Do not use
attachments not recommended by the manufacturer.
Do not connect or disconnect the power plug with wet hands, as this may cause
electric shock.
Do not splash water or liquid cleaners directly onto the seat unit or power plug, as
this may cause electric shock or fire.
This product should only be connected to a 120 VAC, 60 Hz GFCI-protected outlet.
Do not connect too many power cords to a single electrical outlet, as this may result in fire.
Hold the power plug when connecting or disconnecting it.
* If the plug is connected or disconnected by holding the cord, the plug or cord may be damaged,
resulting in electric shock or fire.
7
Safety Precautions
WARNING
Disconnect the power plug periodically and clean it with a dry cloth, as dust
accumulated on the power plug may cause fire.
* Wait for about 10 seconds before inserting the power plug again.
Completely connect the power plug, as failure to do so may cause electric shock or fire.
Do not damage, bend excessively, twist, bind, or place heavy objects on the power cord.
* Doing so may result in electric shock or fire.
Do not use a loose outlet, as this may cause electric shock or fire.
Ensure the electrical outlet to which the power cord is connected is properly grounded, as
failure to do so may cause electric shock in the event of a seat unit failure or short circuit.
If water is leaking from the seat unit or the water supply system, disconnect the
power plug from the outlet and close the water shutoff valve.
* Failure to do so may cause electric shock, fire, or floor flooding.
Never operate this product if it has a damaged cord or plug, if it is not working
properly, if it has been dropped or damaged, or dropped into water. Return the
product to a service center for examination and repair.
If the seat unit, power plug, or power cord are damaged or not working properly (through
abnormal noise, odor, smoke, high temperature, cracking, or water leakage), or if the
plug is loose in the outlet, disconnect the power plug from the outlet immediately, close
the water shutoff valve, and contact our company for instructions on resolving any of the
above issues. Never use any defective devices, as this may result in electric shock or fire.
Low temperature burns
A low temperature burn may occur when the skin has been in contact for
some time, with an object at relatively low temperature (about 104°F [40°C]).
Susceptibility to burns also depends on an individual’s skin sensitivity and other factors.
In order to protect against the possibility of a low temperature burn, the toilet seat
temperature should be set to “Low” or “OFF”. Especially in case of the use for a
long period of time, set the seat temperature should be set to “OFF”.
* As low temperature burns can also occur when the user skin is contact with heated air, the dryer
temperature should also be set to “Low”.
These precautions should especially be observed when any of the following use the toilet:
-Children
- Elderly persons
- Persons with illnesses
- Persons with limited mobility
- Persons with sensitive skin
- Persons on medication that may cause drowsiness
- Persons who are under the influence of alcohol
- Persons who are suffering from exhaustion
* If the toilet seat is used for a long period of time without setting the seat temperature to “OFF”, the
user may suffer a low-temperature burn.
* If the dryer is used for a long period of time on a setting higher than “Low”, the user may suffer a low-temperature burn. For this reason, our company recommends setting the dryer temperature to “Low” during use.
8
Safety Precautions
WARNING
Please observe the following precautions when inserting batteries for the remote control:
● Place the battery in the correct direction, aligning the positive and negative terminals as
indicated inside the battery compartment.
● If the toilet will not be used for a long period of time, remove the batteries from the remote control.
● Remove any dead batteries from the remote control, immediately.
● Dispose of all dead batteries according to local regulations.
● Keep batteries out of the reach of children.
* In the case of batteries being swallowed, seek medical attention, immediately.
● Do not use old and new batteries together in the remote control.
Do not do any of the following while handling batteries:
● Do not let the batteries have contact with metal items such as necklaces, hair pins, and
do not store such items with the battery.
● Do not mix old and new batteries, or different types of batteries.
● Do not heat or disassemble the battery, or place it in water or fire, as the battery may
leak and cause fire.
If there is any possibility of the water freezing, be sure to activate the antifreeze function.
* Damage due to freezing may cause fire or flooding.
Do not install this product in a humid area such as a bathroom, as this may cause
electric shock or fire.
Do NOT disassemble or modify this product.
* Disassembly may result in electric shock, fire, and/or injuries. In addition, disassembly will invalidate
the product’s warranty.
This product should only be connected to a potable water supply line.
Failure to do so will cause problems in the operation.
Do not use outdoors or operate where aerosol (spray) products are being
used or where oxygen is being administered.
Connect this product to a properly grounded outlet only. See Grounding
Instructions in page 12.
If connection is made to a potable water system, the system should be
protected against backflow.
Keep the cord away from heated surfaces.
(Example: Panel Heater)
Never use this product while sleeping or drowsy.
Never drop or insert any object into any opening or hose.
Never block the air openings of the product. If lint or hair, etc. is stuck
in the air opening, remove it immediately.
When this product is used by children, the elders or persons with limited mobility, our
company recommends close supervision to avoid improper operation of the product.
9
Safety Precautions
CAUTION
For care of the plastic parts, our company recommends the use of a mild, liquid,
all-purpose cleaner.
Avoid using abrasive products (such as powdered cleansers) and chlorine-based
products (such as bleach), as these products can damage the anti-bacterial
properties of the plastic components.
Toilet
cleanser
Home
cleanser
Check that the clip ring is firmly attached to the water supply hose.
* If the clip ring is not firmly attached, the water supply hose may come off, resulting in water leakage.
When using the filter, please observe the following:
●Close the water shutoff valve when removing the filter.
●When installing the filter, tighten it fully so there is no gap.
●Check that the O-ring is free from any debris before attaching the filter.
* Failure to follow these instructions may result in water leakage and flooding.
Do not bend or crush the water supply hose, as this may result in water leakage and
flooding.
Do not climb on top of the toilet seat lid or seat unit as these may break,
resulting in injury.
* If the toilet seat or body cover becomes damaged, contact our company for repair instructions.
Do not place your weight on or climb on the water shutoff valve, as this may result in
water leakage and flooding.
Do not apply any impact to the clip ring or pull it when cleaning the toilet, as the clip
ring may break and the water supply hose may come off, resulting in flooding.
10
Safety Precautions
CAUTION
Only connect the toilet to tap water.
* Otherwise, this may cause corrosion inside this product, resulting in electric shock, fire, or inflammation of skin.
This product should be supplied with a cold water line only, as supplying it with a
hot water line may damage its internal components.
If cracks appear anywhere on the toilet bowl, do not touch the cracked areas.
Contact our company for instructions on how to replace the bowl.
Do not lean back against the toilet seat lid, as this may damage or break the lid.
Do not expose the toilet to any force or impact, as this may cause product damage,
injuries, and water leakage.
Regularly check the area around pipes for water leakage.
If you are not going to be using this product for a long period of time, close the water shutoff
valve and drain the water from the toilet. In addition, disconnect the power plug from the outlet.
(Page 55 for more information)
Disconnect the power plug from the outlet during cleaning.
* Failure to do so may cause electric shock.
(Ensure the power is turned on when using the nozzle cleaning function.)
If it is necessary to modify the electrical wiring or plumbing, our company
recommends that such work should be performed by a licensed contractor.
Take care that children, the elderly or persons with limited mobility do not fall when
using this product.
* They may be injured or damage the device.
When a small child is using the toilet, set the Auto Seat Open switch on the remote control to
the OFF position. On rare occasions, the seat sensor may not be able to detect the presence
of a small child. In such a case, the toilet lid may start to close when the toilet is in use.
Save These Safety Precautions
11
Safety Precautions
GROUNDING INSTRUCTIONS
The product is for use on a 120 V circuit, and has a grounding plug that looks like
the plug illustrated in sketch A in Figure 1. A temporary adapter, which looks like the
adapter illustrated in sketches B and C, may be used to connect this plug to a 2-pole
receptacle as shown in sketch B if a properly grounded outlet is not available. The
temporary adapter should be used only until a properly grounded outlet (Figure 1)
can be installed by a qualified electrician. The green colored rigid ear, lug, and the
like extending from the adapter must be connected to a permanent ground such as a
properly grounded outlet box cover.
Whenever the adapter is used, it must be held in place by the screw.
If it is necessary to use an extension cord, use only a three wire extension cord that
has a three-blade grounding plug, and a three-slot receptacle that will accept the
plug on the product. Replace or repair a damaged cord.
*If there is no electrical outlet in the bathroom, consult a licensed electrician for the installation of a
GFCIprotected outlet.
The product should be grounded. In the event of an electrical short circuit,
grounding reduces the risk of electric shock by providing an escape wire for the
electric current.
* This product is equipped with a cord having a grounding wire with a grounding plug.
* The plug must be plugged into an outlet that is properly installed and grounded.
DANGER
Improper use of the grounding plug can result in a risk of electric shock.
If repair or replacement of the cord or plug is necessary, do not connect the
grounding wire to either flat blade terminal. The wire with insulation having an outer
surface that is green with or without yellow stripes is the grounding wire.
Check with a qualified electrician or serviceman if the grounding instructions are not
completely understood, or if in doubt as to whether the product is properly grounded.
Figure 1
12
Handling Precautions
Do not expose the toilet to direct sunlight, as this may cause discoloration, or the
remote control or body sensor may malfunction.
Do not open or close the toilet seat or lid roughly, as this may result in damage
to either of these parts.
Do not splash water or cleanser onto the remote control, as this may cause it to fail.
Do not operate the remote control with wet hands, as this may cause damage.
Do not use toilet deodorizer on the plastic parts. If the plastic parts are splashed with the deodorizer, wipe it off immediately.
* Otherwise, gloss may be lost.
Do not block the warm air or heater outlets, as this may cause damage.
Do not place a heater near the seat unit, as this may cause discoloration of the
plastic or failure of the cleansing and drying functions.
Do not use any paper other than toilet paper. Be careful not to drop any foreign
substances in the bowl, as they may clog the drain pipe.
If the toilet becomes clogged, use a plunger to clear the blockage. Do not flush
the toilet until this has been cleared, as this may cause flooding.
Do not wipe the toilet’s body, seat, lid or other plastic parts with a dry cloth or toilet paper. Refer to page 38 for details of cleaning.
* The surface of plastic parts may become scratched and lose their gloss.
13
Preparation and Checks Before Use
Before using the seat unit for the first time, check the following items.
[2]
[3]
[1]
STEP
1
STEP
2
Checking the Water Shutoff Valve [1]
* If the water shutoff valve is closed, turn the open/close handle
counterclockwise 90 degrees to fully open it.
Connecting the Power Plug to the Outlet [2]
•First connect the power plug to the outlet
(120 VAC).
•Then check that the power LED is lit.
* The power LED on the indicator lights (green).
If the power LED does not light, the main power may have been turned off. If
“OFF” is displayed on the LCD, press Power button on the remote control.
止水栓開.eps
● Indicator
Upper body sensor
[Note]
●Please wait for about 10 seconds before connecting the power plug again.
14
Preparation and Checks Before Use
STEP
3
Checking the Rear Cleansing Feature [3]
•Cover the seat sensor with a piece of paper or cloth.
* If the paper or cloth is black, the occupied seat sensor may not function.
•Press the Cleansing button [A].
[A]
•Place a hand above the nozzle tip to block the sprayed water.
* At this time, water comes out from a point near the nozzle tips
in preparation for operation.
•Press the STOP button [B] to stop the shower.
•Remove the paper or cloth
covering the seat sensor.
[B]
* Check the other functions by referring to “General Operation” (from page 17 of this Manual).
* The toilet is equipped with a seat sensor, which detects when someone is sitting on the seat.
The functions for front and rear cleansing, as well as for drying, cannot be activated when there
is no one sitting on the seat.
WARNING
Ensure the electrical outlet to which the power cord is connected is properly grounded, as failure to do so may
cause electric shock or damage.
This product should only be connected to a 120 VAC, 60 Hz GFCI-protected outlet.
Do not connect additional power cords to the toilet’s electrical outlet, as this may result in fire.
15
Preparation and Checks Before Use
Our company recommends that you perform the following operations before using the seat unit for more comfort.
STEP
4
Adjusting the Spray Water
Temperature
•Press the Water temp. button [C].
* The water temperature can be set to any of six levels - “OFF”
(water temperature), and ranging from “Low” (approximately
90°F (32°C)) to “High” (approximately 104°F (40°C)).
STEP
5
[C]
* Pressing the buttons alters the LCD display.
Adjusting the Seat
Temperature
•Press the Seat temp. button [D].
* The seat temperature can be set to any of six levels - “OFF” (room
temperature), and ranging from “Low” (approximately 82°F
(28°C)) to “High” (approximately 98°F (36.5°C)).
[D]
* Pressing the buttons alters the LCD display.
STEP
6
Adjusting the Clock
•Press the “Hr.” or “Min.” button [E].
* To advance the time on the clock in one hour or one minute
increments, press and release the Hr. or Min. button, respectively.
* To advance it rapidly, press and hold the button for one second.
* The accuracy of the clock is within +/-1 minute per month at
room temperature (approximately 77°F (25°C)).
[E]
* Pressing the buttons alters the LCD display.
[Reference]
●This toilet is equipped with a “seat heater auto off” function that automatically turns off the seat
heater when it is occupied to prevent low-temperature burns.
(Page 30)
●The toilet seat is not warmed immediately. our company recommends that you set the temperature
10 to 15 minutes before use in order to use the toilet comfortably.
16
General Operation
STEP
1
Auto Seat Open Function
•Press the Auto Seat Open button [A] to
activate this feature.
* “AUTO SEAT-OPEN” button appears
on the LCD.
* The function is set to “ON” in the
default settings.
[A]
* If the seat sensor is not activated after the seat lid opens independently, the seat lid automatically closes after
approximately one minute.
* The upper body sensor detects the motion of a person and automatically opens the toilet seat lid.
•To open the toilet seat lid and toilet seat simultaneously
Press the STOP and Open/Close buttons simultaneously for 2 seconds.
* A short beep sounds when the setting is complete.
* The seat and seat lid close approximately 1 minute after the user leaves the toilet.
* Press the STOP and Open/Close buttons simultaneously for 2 seconds to reset.
A beep sounds when the setting is complete.
To manually open and close the toilet seat lid or seat
Press the Auto Seat Open button to deactivate this feature.
* The “AUTO SEAT-OPEN” display on the LCD disappears.
* When a small child uses the toilet, turn off the auto seat open function. The seat sensor may not be able
to detect a small child’s body, and, although rare, the toilet seat lid may start to close during use.
* The toilet lid will not open for 10 seconds after it is closed manually.
To open and close the toilet seat with the remote control
1 Press the Open/Close button [B] to
open the toilet seat.
2 Press the Open/Close button [B] again
to close the toilet seat.
[Note]
[B]
●Avoid direct sunlight, as this may cause the sensor to malfunction and the toilet seat lid to automatically open.
17
General Operation
STEP
2
Auto Deodorizing Function
1 Deodorizing starts when the toilet seat lid opens.
When the toilet seat opens, the deodorizer fan is activated in “full power mode”.
2 The deodorizer operates in normal operation while
the user is sitting on the seat.
The deodorizer fan changes to “power mode”.
3 Deodorizing starts when the user stands up.
The deodorizer fan increases output again to “full power mode”.
4 Deodorizing stops.
The deodorizer fan automatically stops one minute after the user stands up.
•To disable the automatic deodorizing function
Press the Water temp. [C] and Nozzle Cleaning [D]
buttons simultaneously for 2 seconds.
* A beep sounds when the setting is complete.
* Press the Water temp. and Nozzle Cleaning buttons simultaneously
for 2 seconds to activate the automatic deodorizer again.
(A short beep sounds when the setting is complete.)
[C] [D]
18
General Operation
STEP
3
Front and Rear Cleansing
[B]
For rear cleansing
•Press the Cleansing button [B].
*Water will drip from the nozzle. This washes the nozzle
before use. The nozzle extends and water sprays.
•Press the STOP button [A].
*The spray will stop and the nozzle will retract.
[A]
To adjust the water pressure
[C]
Press
or
on the Spray
Strength button [C].
*The water pressure can be adjusted to any of six levels. Select the water pressure as desired.
To change the cleansing mode
Press the Cleansing button [B] a second time during rear cleansing.
* Pressing Cleansing during rear cleansing alters the mode.
* Once the cleansing is stopped, the cleansing mode starts with rear cleansing when Cleansing [B] is pressed.
Rear cleansing
Oscillating spray
The nozzle moves back and
forth to wash a wide range.
[Note]
• When the water temperature is extremely low in winter
for instance, the water pressure may become weak.
• Sit further back on the toilet seat.
If you sit further back on the seat, there will be
less water splashing.
• The rear cleansing or rear cleansing - mild function
stops when the toilet is flushed. This function cannot be started while flushing the toilet.
19
[Reference]
Oscillating spray - narrow
The nozzle moves back and forth over a
short span for more thorough cleansing.
• The water pressure may be further lowered for
those who feel the water pressure is too strong
even at the lowest setting. (Page 31)
General Operation
For rear cleansing - mild
•Press the Cleansing button [B].
[B]
* Water will drip from the nozzle. This washes the nozzle
before use. The nozzle extends and water sprays.
•Press the STOP button [A].
* The spray will stop and the nozzle will retract.
To adjust the water pressure
[A]
Press
or
on the “Spray
Strength” button [C].
[C]
*The water pressure can be adjusted to any of six levels. Select the water pressure as desired.
To change the cleansing mode
Press the Cleansing button [B] a second time during rear cleansing
- mild.
* Pressing Cleansing during rear cleansing - mild alters the mode.
* Once the cleansing is stopped, the cleansing mode starts with rear cleansing mild when Cleansing [B] is pressed.
Rear cleansing - mild
Rear cleansing/rear cleansing - mild
Equipped with an auto-stop
function which terminates cleansing
after 2 minutes.
However, when the massage
function or oscillating spray is
activated while the rear cleansing
or rear cleansing - mild function is
performed, the cleansing time will
be lengthened by 2 minutes. This
will automatically stop after the
cleansing has been performed for
up to 6 minutes in total.
Oscillating spray
Oscillating spray - narrow
The nozzle moves back and
forth to wash a wide range.
The nozzle moves back and forth
over a short span for more thorough cleansing.
Self-cleaning nozzle
This function is provided to
automatically clean the nozzle
before and after the rear cleansing
or rear cleansing - mild function is
performed.
Water comes out from a point
near the nozzles.
When sitting on the toilet seat or
pressing any button for the shower,
water comes out from a point near
the nozzles in preparation to spray
warm water. It may take a short time
to warm the water in winter or in
cold regions.
Water comes out either immediately
after sitting down on the toilet seat,
or before and after cleansing. This
is a requirement to achieve the
function, and so the user should not
regard this as a problem. (Page 35)
20
General Operation
For front cleansing
This spray nozzle is designed for women’s use only.
•Press the Bidet button [B].
[B]
* Water will drip from the nozzle. This washes the nozzle before use.
The nozzle extends and water sprays.
•Press the STOP [A] button.
* The spray will stop and the nozzle will retract.
To adjust the water pressure
Press
or
on the “Spray
Strength” button [C].
[A]
*
The water pressure can be adjusted to any of six levels. Select
the water pressure as desired.
[C]
To change the cleansing mode
Press the Bidet button [B] a second time during front cleansing.
* Pressing Bidet during front cleansing alters the mode.
* Once the cleansing is stopped, the cleansing mode starts with front cleansing when Bidet is pressed.
Front cleansing
Oscillating spray
Oscillating spray - super
The nozzle moves back and
forth to wash a wide range.
The nozzle moves back and forth
over a short span for more thorough cleansing.
[Note]
• If the toilet is flushed while the front cleansing function is in use, then the front cleansing function will stop.
The front cleansing function cannot be started while flushing the toilet.
Front cleansing
Equipped with an auto-stop function which terminates cleansing after 2 minutes.
However, when the oscillating spray is activated while the front cleansing function is performed, the cleansing time will be
lengthened by 2 minutes. This will automatically stop after the cleansing has been performed for up to 6 minutes in total.
21
General Operation
Massage Function
During rear cleansing or rear cleansing - mild, the massage function alternates between a strong spray and a gentle
spray to provide a massage effect.
•Press the Massage button [A]
during rear cleansing or rear
cleansing - mild.
[A]
•Press the Massage button [A]
again to end this feature.
Nozzle Position
The nozzle position can be adjusted backwards and forwards during rear cleansing, rear cleansing-wild, or front cleansing.
•Press the
or
button on the
“Nozzle Position” button [B].
* The nozzle position can be adjusted to any of five different
settings. There are two settings in the front, a center position, which is also the initial position, and two in the rear.
* If the user stands up, the nozzle position will return
to the default setting.
[B]
22
General Operation
STEP
4
Using the Dryer
Dryer Function
Warm air is blown to dry the area washed by the shower.
•Press the Dryer button [B].
[B]
* The air temperature can be adjusted to any of three levels.
* The deodorizer temporarily stops when drying is performed.
* Set the remote control in the holder, and press the [Dryer] button.
•Press the STOP button [A] to
stop drying.
* Wipe away any excess water with toilet paper. The dryer
function has an auto-stop feature that will terminate
drying after 4 minutes of continuous use.
[A]
To change the air temperature
Press the Dryer Temp. button [C] again while drying.
* By pressing this button, the warm air temperature is changed. The temperature can be adjusted in a cycle from
“Low” to “Mid” and “High” as displayed on the LCD, and shown in the diagram below.
—
>
Low
—
>
Mid
High
[C]
[Reference]
• Use a small amount of toilet paper to wipe away excess water before using.
23
General Operation
STEP
5
Flushing the Toilet
Auto Flush Function
•Activate the Auto Clean button [A].
* The “AUTO CLEAN” button is displayed on the LCD.
* The toilet is automatically flushed when the user stands up.
To deactivate the full auto flushing function
Deactivate the Auto Clean button [A].
* The “AUTO CLEAN” button indicator on the LCD disappears.
[A]
Remote Control Flush Function
To flush the toilet using the remote control
Press the Flush/Full [B] and the Flush/
Partial [C] buttons accordingly.
[B] [C]
Full Flushing by Manual Operation
To flush the toilet manually
Press the flush button on the seat unit.
* A short beep sounds from the seat unit and the toilet is flushed.
[Note]
• In the event of a power failure, flush the toilet as described in “Flushing the Toilet Manually.” (Page 37)
• When too much toilet paper is used, it may not be flushed completely when the Flush/Partial button is used.
Use either the Flush/Full button on the remote control or the flush button on the seat unit.
Flush delay setting
In full auto flushing mode, flushing
begins approximately 6 seconds
after the user stands up. The
delay time can be changed to
approximately 2, 10, or 15 seconds.
(Page 33)
When the user is standing
When a user stands in front of the
toilet for 6 seconds or longer with the
seat opened, partial flushing begins 1
second after the user leaves the toilet.
If the user closes the toilet seat
lid before leaving, the auto flush
function will not operate.
Full flushing versus partial flushing
In AUTO CLEAN mode, full flushing is
performed when a user occupies the toilet
seat for 50 seconds or longer. Partial flushing
is performed when the user occupies the
toilet seat for less than 50 seconds.
If any of the cleansing functions are used,
full flushing is performed even if the seat
is occupied less than 50 seconds.
24
General Operation
STEP
6
Auto Close Function
* The toilet seat lid closes approximately 1 minute after the
user leaves the toilet. It does not close when the Auto
Seat Open button is turned off.
* The upper body sensor detects the motion of a person
and automatically opens and closes the toilet seat lid.
[Note]
• Do not manually obstruct, stop, or move in
opposite direction the toilet seat or lid. These
activities may damage or cause the auto close
function to malfunction.
To manually open and close the toilet seat lid
Press the Auto Seat Open button [A] to deactivate function.
* The “AUTO SEAT-OPEN” button on the LCD disappears.
[Note]
• Gently move the toilet seat lid when opening
or closing it manually, as excessive force may
damage or cause malfunction.
[A]
To open and close the toilet seat with the remote control
Press the Open/Close button [B].
* Pressing OPEN/CLOSE alternates opening and closing of the seat.
[B]
25
General Operation
The power save function includes two functions for saving power: one-touch power save (8 hours), and advanced power save (always
on). Using these functions together will save more power. The power saving functions are set to “OFF” in the default settings.
One-Touch Power Save (8 hours)
Set
Seat temperature
When the ONE-TOUCH POWER SAVE button is pressed,
the water and seat heaters are turned off for 8 hours.
This reduces power consumption during times when
the toilet is not used (e.g. during the night). The original
power settings will be restored after 8 hours.
Recovered
8:00 10:00 12:00 14:00 16:00 18:00 20:00
10:00
Set temperature
Temperature in
power-save mode
8 hours
Standby
OFF
* Once 8 hours have passed, and the heating function restarts, the seat unit goes into standby.
When in standby mode, the power save LED changes from “lit” to “single flashing”.
● Indicator
Upper body sensor
[Reference]
• The one-touch power save function is reset after a
power failure or when the power plug is disconnected.
Press the Power save button [A].
* The power save LED on the indicator lights up.
* A short beep sounds when the setting is complete.
To cancel the one-touch power save function
[A]
Press the Power save button [A].
* The LED on the indicator goes out.
* A beep sounds when the setting is complete.
26
Power Save Function
The advanced power save function reduces power consumption by lowering the water and seat temperatures
when the toilet seat lid is closed.
Seat temperature
Advanced Power Save (always on)
Set
Set temperature
Temperature in
* Power is saved at all times while the toilet seat lid is
power-save mode
closed.
OFF
* When the seat lid is open, the power save mode is
temporarily cancelled.
* When the advances power save function is activated, the power save LED on the
seat unit flashes twice rapidly.
* When the advanced power save function is activated along with the one-touch power
save function, the power save LED remains lit while one-touch power save mode
(8 hours) is activated and flashes twice rapidly while it is in standby mode (16 hours).
When used
Recovered
Power save
● Indicator
Upper body sensor
1 P
ress the Power save [B] and Nozzle Cleaning [C] buttons
simultaneously for 2 seconds.
* The power save LED on the indicator flashes.
* A short beep sounds when the setting is complete.
To cancel the advanced power save function
Press the Power save [B] and Nozzle Cleaning [C] buttons
simultaneously for 2 seconds.
* The LED on the indicator goes out.
* A beep sounds when the setting is complete.
[B]
[C]
[Reference]
●When the power save function is activated, the toilet seat temperature is lowered, and may feel cold. In this
case, the power save function can be cancelled.
●Even when the power save function is turned off, leaving the toilet seat lid closed is an effective way of saving power.
27
Deodorizing Function
Press the Deodorizer button on the remote control to enhance the deodorizing feature.
1 P
ress the Deodorizer
button [A] while the
automatic deodorizing
function is operating.
[A]
* A short beep sounds when the setting
is complete.
* The deodorizer fan goes into “turbo mode”,
which boosts the effect of removing odor in
the toilet bowl.
2 P
ress the Deodorizer
button [A] again to stop it.
* A beep sounds when the setting is complete.
* The deodorizing mode returns to normal
automatic mode.
* The deodorizer fan automatically stops 1 minute after the user stands up.
To change the default deodorizing setting to turbo mode
Press the Deodorizer [B] and Power
save [C] buttons simultaneously for
2 seconds.
[B]
* A short beep sounds when the setting is complete.
* The automatic deodorizer always operates in the turbo mode.
* To reset, press the Deodorizer and Power save buttons
simultaneously again for 2 seconds.
(A beep sounds when the setting is complete.)
[C]
28
Night Light Function
When the seat lid opens, a soft light illuminates the base of the toilet and the inside of the bowl.
When the user leaves the toilet, the light goes out automatically.
The default setting for this light is “ON”.
1 Press the Light button [A] to
deactivate the night light.
* A beep sounds when the setting is complete.
2Press the Light button [A]
again to turn on the night light.
* A short beep sounds when the setting is complete.
[Reference]
●While the night light is lit, shadows in the bottom of the toilet
bowl might make the toilet look as if it is dirty. In this case,
refer to “To deactivate the night light in the bowl” below.
[A]
To deactivate the night light in the bowl
Press the Seat temp. [B] button and Auto
Clean [C] buttons button simultaneously for
2 seconds.
* A short beep sounds when the setting is complete.
* To reset the setting, press the Seat temp. button and Auto Clean buttons
simultaneously again for 2 seconds.
A beep sounds when the setting is complete.
29
[C]
[B]
Comfort Features
Preventing Low-temperature Burns [Seat Heater Auto OFF]
This product is equipped with a safety feature (seat heater auto off) that prevents low temperature burns. When
the user sits on the seat, the seat heater is automatically deactivated. When the user stands up, the seat heater is
reactivated. The default setting for this safety feature is OFF. To activate this feature, follow the steps below.
Press the Seat temp. [A]
and Power save [B] buttons
simultaneously for 2 seconds.
* A short beep sounds when the setting is complete.
[A]
[B]
To cancel the seat heater auto off function
Press the Seat temp. [A] and Power save [B] buttons
simultaneously, again, for 2 seconds.
* A beep sounds when the setting is cancelled.
30
Comfort Features
Lowering the Water Pressure
For users who are sensitive to water pressure, the water pressure setting for the rear cleansing, rear cleansing - mild
and front cleansing can be adjusted below the normal range. The default setting for this feature is OFF. To activate
this feature, follow the steps below.
Press the Seat temp. [C] and Nozzle Cleaning [D] buttons
simultaneously for 2 seconds.
* A short beep sounds when the setting is complete.
[C]
* If the tap water
pressure is low, the
water sprayed from
the nozzle may not
reach the user at the
lowest setting.
To
return to the default
[D]
setting
Press the Nozzle Cleaning [E] and
Min. [F] buttons simultaneously,
again, for 2 seconds.
* A short beep sounds when the setting is complete.
31
[E]
[F]
Comfort Features
Adjusting the Auto Flush Function
The automatic flush function is factory set so that the flush cycle will begin 6 seconds after the user stands up from
the toilet. However, this flush delay setting can be changed. To adjust the flush delay setting, follow the steps below.
Press the Power save [A] and Hr. [B] buttons simultaneously
for 2 seconds.
* A short beep sounds when the setting is complete.
[B]
[A]
* Pressing the buttons changes the flush delay time. See the diagram below for the
different flush delay settings.
Default setting
6 seconds
10 seconds
15 seconds
2 seconds
* A beep sounds when the setting is returned to the default.
Muting the Signal Reception Sound
The remote control will emit a signal reception sound whenever a button is pressed. The factory default setting for
this feature is ON. To cancel the signal reception sound, follow the steps below.
[D]
Press the Seat temp. [C] and Deodorizer
[D] buttons simultaneously for 2 seconds.
[C]
To return to the default setting
Press the Seat temp. [C] and Deodorizer [D] buttons
simultaneously for 2 seconds.
* A short beep sounds when the setting is complete.
32
32
Comfort Features
Restoring the Default Settings
All of the product’s functions can be reset to their factory defaults even after the settings have been changed by the
user. To restore the factory default settings, follow the steps below.
Press the Water temp. button [A] and
Seat temp. [B] buttons simultaneously
for 2 seconds.
* A short beep sounds when the setting is complete.
[A]
[B]
•The factory default settings are summarized in the table below.
Functions
Default setting
Automatic deodorizing
ON
Deodorizer mode
Automatic switch between “turbo mode” and “
normal mode”
Power save
OFF
Seat heater auto off
Inactive
Water pressure
levels 2
Dryer temperature
Mid
Auto flush
ON
Flush delay setting
6 seconds
Night light illumination
Bowl base and bowl inside
Signal reception sound
ON
Antifreeze
OFF
Auto seat open
Automatically opens and closes only the toilet
seat lid.
Storing the Settings
The product’s user-defined settings are maintained, even when the power button is turned off or the power plug is
disconnected from the outlet. However, the one-touch power save function is reset when the power plug is disconnected. (Page 26)
33
Other References
Other References
The seat sensor prevents unintended operation.
This toilet is equipped with a seat sensor that will only allow the cleansing and frying
functions to operate when the toilet seat is occupied.
* The rear cleansing, rear cleansing - mild, front cleansing, and dryer features do not operate even if the button is
pressed, unless the toilet seat is occupied.
Since the seat sensor uses light reflection, it may not be able to detect a user. such cases are listed below, along
with solutions:
• If the user leans forward or sits on the front of the seat
* Sit further back on the seat.
• If the user wears dark clothes that do not reflect light easily
* Place a hand over the sensor, so that the sensor can detect the user.
• If the sensor is dirty or wet
* Clear the sensor with a soft cloth.
A low battery indicator is provided.
The battery indicator on the remote control flashes with the display on the diagram on the right, when the battery
charge
becomes low. When the display indicating low battery charge appears, replace the batteries in the remote control
as soon as possible. (Page 53)
* Such factors as the size of the room, decor, and color (particularly a dark color), may weaken the signal causing
the remote control to stop functioning before the indicator starts flashing.
* If a button on the remote control is pressed with the toilet room door open or with the battery indicator flashing, the signal may not reach the seat unit and the specified function may not be activated.
The toilet seat and seat lid close slowly.
To prevent the toilet seat and seat lid from closing forcefully, a “damping mechanism”
is provided.
* Note that the toilet seat or seat lid may be damaged if these are closed roughly or too forcefully.
* These close slowly only when the power is turned on.
34
Other References
The body sensor allows you to open the seat lid without using your
hands.
This toilet is equipped with an upper body sensor. This detects when a person enters
the toilet room, and opens and closes the toilet seat lid automatically.
The upper body sensor detects the motion of a person.
* The sensor cannot detect the user if they stand to the side in front of the toilet or away from the toilet.
* The body sensor may not function correctly if it is dirty. In this case, wipe the sensor with a soft, clean cloth.
* The sensor may malfunction, making the toilet seat lid automatically open due to heat from direct sunlight. Therfore, avoid direct sunlight.
Shower in winter
When water temperature is extremely low in winter, for example, the water pressure of the shower may become
weaker, or it may take longer than usual before the water is sprayed.
If You Have These Problems
Water comes out from a point near the nozzle tips.
Water comes out from a point near the nozzle tips immediately after the toilet seat is
occupied or before and after cleansing. This is normal operation. This is done to
prepare the nozzle for use.
* If water comes out under circumstances other than the above, or if the water does not stop, close the water
shutoff valve and disconnect the power plug from the wall outlet. Contact our company for repair instructions.
Warm air smells when the toilet is initially used.
When the toilet is new, it may smell a little, particularly when warm air is used. However this is not a malfunction,
and will disappear after a short time.
35
Other References
Interference with radio or television
If a radio or a TV is placed near this toilet, interference with the signals from remote
control unit may occur. If the interference occurs, move the radio or TV away from this
product.
Condensation forms.
Due to humidity and/or temperature differences between room and the seat unit or surface of the bowl,
condensation may form on the seat unit or bowl.
Ventilate the toilet room adequately to prevent condensation.
If condensation forms, wipe it off with a dry cloth.
* Condensation may stain or damage the floor.
* This toilet is designed to prevent condensation from forming. However, ambient conditions may still cause
condensation to form.
Energy saving tips
● Close the toilet seat lid after use.
●Lower the seat and water temperature.
● Adjust the seat and water temperature according to the season.
● Use the power save functions.
● Unplug this product when you are gone for long periods of time.
* If there is any possibility of water freezing, the power needs to be kept on.
Refer to “Preventing Freezing” (Page 55)
Suitable cleansers
Use a neutral cleanser or one suitable for plastics to clean the toilet seat and lid.
Do not use chlorinated cleansers, acidic cleansers, or disinfectants on ceramic parts.
Odors upon flushing
If there is insufficient ventilation in the room, for example, when a large kitchen range hood is used, odor may be
experienced temporarily when flushing the toilet. Ventilate the toilet room adequately.
36
Manual Toilet Flushing
In the event that water service to the toilet is interrupted, fill a bucket with water and carefully pour the contents
into the toilet bowl to manually flush the toilet. Repeat if necessary.
* When the waste is cleared from the bowl, pour water into the bowl to restore the bowl’s water level to its normal
height.
[Note]
•Be very careful not to spill water onto the
floor when carrying water in a bucket or
pouring it into the toilet.
•Do not allow water to splash on the outlet.
37
Cleaning and Maintenance
Below, our company offers some general guidelines as to the cleaning of this product. Please note that
there are some cleaning products which should not be used.
As a general rule, our company recommends the use of liquid, all-purpose cleansers for this product.
Cleaning tools
Item
Soft cloth
Sponge
Description
Use old towels, T-shirts, etc. cut to an
appropriate size.
Use a soft foam sponge.
Toilet brush
(non-abrasive)
Use a brush with soft bristles.
Rubber gloves
Use to prevent rough skin forming on hands.
Fold up the edges of gloves to prevent water
and cleanser entering.
Location
Toilet seat, lid
covers, toilet
Nozzle tips
Toilet bowl
─
Cleanser
Item
Neutral toilet cleanser
Non-abrasive cleanser
Description
Removes yellowish and/or blackish
contamination from the toilet bowl.
Location
Ceramic parts
The toilet bowl has an antibacterial surface finish called
Hyper Clean. This is an extra-fine grazing process that
creates a smooth, durable surface that is easier to clean than
conventional glaze. In order to maintain the surface finish, our
company recommends that the cleansers listed below should
not be used to clean this product.
●“Chlorinated type” alkali cleansers
●Abrasive cleansers (e.g. powdered cleansers)
●Abrasive brush
38
Cleaning and Maintenance
Places to be cleaned and types of contamination
Toilet seat, lid, and cover
Page 40
Dust, finger marks, and urine stains
Narrow gap between the toilet seat and lid
Page 41
Dust and urine stains
Nozzle guard
Page 44
Water residue and urine stains
Nozzle
Page 46
Water residue and urine stains
Toilet bowl
Page 43
Mold, bacteria, and mildew
[Note]
• Deactivate the AUTO CLEAN and AUTO SEAT-OPEN buttons during cleaning and maintenance.
* Otherwise, the sensor may detect a user and flush the toilet, or close the toilet seat or lid.
WARNING
Do not splash water or liquid cleaners directly onto the seat unit or power plug, as this
may cause electric shock or fire.
CAUTION
For care of the plastic parts, our company recommends the use of a mild, liquid,
all-purpose cleaner.
Avoid using abrasive products (such as powdered cleansers) and chlorine-based
products (such as bleach), as these products can damage the anti-bacterial properties
of the plastic components.
Toilet
cleanser
39
Home
cleanser
Cleaning the Toilet Seat and Lid
Cleaning the Toilet Seat, Lid, and Covers (Plastic Panels)
• Dampen a soft cloth and wipe the surfaces.
Our company recommends cleaning the toilet
bowl frequently to prevent dirt build up on the
toilet surfaces. Additionally, do not use a dry
cloth or toilet paper to wipe the surfaces, as this
could result in scratches.
Wiping with a damp cloth also prevents static
electricity, which can attract dust particles,
resulting in blackish contamination.
40
Removing the Toilet Seat Lid for Cleaning
The seat lid can be removed easily. This is useful when cleaning the hinge that is normally hidden or
cleansing the whole seat lid.
Removing the Toilet Seat Lid
1 Press the Power button [A] to turn the power off.
Check that the power LED is not illuminated.
2 Open the seat lid.
3 Turn up the toilet seat lid release lever.
4 Lift the right side of the seat lid to disengage it
from the hinge pin on the toilet seat.
5 Slightly tilt the toilet seat lid toward you and
slide it to the left to remove it.
[Note]
• Do not use excessive force on the seat lid, as this may damage it.
• Do not open the toilet seat with the seat lid removed, as this
may cause toilet seat to become scratched or damaged.
• Do not use the toilet with the seat lid removed.
* When the seat lid is lowered to the closed position and then
removed, the rear cleansing, rear cleansing - mild, front cleansing and dryer features do not operate when using the toilet.
41
[A]
Removing the Toilet Seat Lid for Cleaning
Assembling the Toilet Seat Lid
1 Align the pin hole on the left side of the
seat lid with the hinge pin on the seat, and
insert the pin into the hole.
2 Lift the right side of the seat lid to set it
with the hinge pin on the toilet seat.
3 Turn the toilet seat lid release lever
downward until a click is heard.
Click
4 Press the Power button [A] to turn the
power on. Check that the power LED is
illuminated.
[A]
•Indicator
Upper body sensor
42
Cleaning the Toilet Bowl
Cleaning the Toilet Bowl (Ceramic Parts)
The toilet bowl is finished with our company Hyper Clean surface.
• Clean the bowl with water or warm water, using a soft
brush or sponge dampened with neutral cleanser.
[Note]
• Do not use chlorinated cleansers, acidic cleansers or
disinfectants, as the gas vapor could damage this product
or cause failures.
• Do not use hot water, as this may damage the toilet.
• Do not use an abrasive brush or cleanser, as these will
deteriorate the effect of the Hyper Clean surface.
Contamination at the bottom of the bowl?
A shadow in the bottom of the toilet bowl might make the bottom of the toilet appear dirty when the
night light is lit.
43
Cleaning the Nozzle Guard
• Clean the nozzle guard with a dampened soft
cloth or sponge. As mentioned previously,
use a mild, liquid all-purpose cleanser.
[Note]
• Avoid wiping with a dry cloth or toilet paper, as this
cause scratches.
• Avoid using an abrasive brush or cleanser.
The nozzle guard can be removed for easy cleaning.
See the procedure below.
Removing the Nozzle Guard
1 Turn off the Auto Clean and Auto Seat
Open buttons.
* This will disable the automatic lid and automatic
flush functions.
2 Lift the seat lid and seat.
3 Press the Nozzle Cleaning button [A].
When the nozzle protrudes, press the STOP
button [B] to stop the motion.
* The shower nozzle protrudes and pushes up the
nozzle guard.
4 Lift the nozzle guard with both hands, pull
it upward, and remove it as shown in the
diagram.
[A]
[B]
5 Press the STOP button to return the nozzle
to its original position.
6 Clean the removed nozzle guard.
44
Cleaning the Nozzle Guard
Assembling the Nozzle Guard
1 While the nozzle is retracted, firmly
press the two tabs into the slots on the
base as shown in the diagram.
* Press the Stop button to retract the nozzle when
it is out.
[Note]
• Push the lugs until a click is heard. Check that the
guard is correctly assembled.
• The guard has a top and bottom, and must be
assembled in the correct way.
• Do not use excessive force, as this could damage the
guard.
45
Cleaning the Nozzle
The Spray nozzle can be cleaned using either of the methods listed below.
●The nozzle can be cleaned using the Nozzle cleaning button on the remote control unit.
●The nozzle can be cleaned manually.
Cleaning the Nozzle with the Remote Control Unit
•To clean the nozzle while using the toilet
(sitting on the seat) using the remote
control unit, follow the procedure below.
1 Press the Nozzle Cleaning button [A].
* The nozzle remains retracted inside the body and is
cleaned for approximately 15 seconds.
* This toilet is equipped with an auto cleaning
function, which cleans the nozzle and surroundings
automatically before and after the rear cleansing,
rear cleansing - mild or front cleansing function.
[A]
Cleaning the Nozzle Manually
•To clean the nozzle manually, follow
the procedure below.
1 Turn off the Auto Clean [B] and Auto Seat
Open [C] buttons.
* This will disable the automatic lid and automatic
flush functions.
2 Lift the seat lid and seat.
3 Press the Nozzle Cleaning button.
[B]
[C]
* Water comes out from a point near the nozzle tips
for approximately 5 seconds. The rear cleansing
nozzle extends and oscillates in a short stroke.
Water is not sprayed during this cleaning function.
[Note]
• The Nozzle Cleaning feature should be operated when
the toilet seat is raised.
* When the toilet seat is lowered, the nozzle does
not extend while it is being washed.
46
Cleaning the Nozzle
Cleaning the Nozzle Manually (Continued)
4 Clean the rear cleansing nozzle.
* Since the nozzle moves in a short stroke, the nozzle
can be cleaned by simply applying a sponge to it.
* The nozzle automatically retracts after
approximately one minute.
When the Nozzle Cleaning button is pressed again
after the nozzle retracts, the rear cleansing nozzle
extends again.
[Reference]
• If the nozzle guard comes off while cleaning the toilet,
refer to “Assembling the Nozzle Guard” (Page 46).
5 Press the Nozzle Cleaning button [D].
* The rear cleansing nozzle retracts and then the
front cleansing nozzle extends.
[D]
6 Clean the front cleansing nozzle.
* Since the nozzle moves in a short stroke, the nozzle
can be cleaned by simply applying a sponge to it.
* The nozzle automatically retracts after approximately
one minute.
When the Nozzle Cleaning button is pressed twice after
the nozzle retracts, the front cleansing nozzle extends
again.
08M046_シャワートイレパンプキン
7 Press the Nozzle Cleaning button.
* The front cleansing nozzle retracts and then the
dryer duct extends.
8 Clean the dryer duct.
* Wipe the dryer duct with a soft cloth or the similar.
* The dryer duct automatically retracts after approximately
5 minutes.
9 Press the Nozzle Cleaning button.
* The dryer duct retracts.
[Note]
• Be very careful not to press the STOP button on the remote
control when operating the Nozzle Cleaning button, as the
nozzle may stop or retract.
08M046_シャワートイレパンプキン
47
Cleaning the Nozzle
To Stop the Motion of the Nozzle
1 Press the STOP button [E].
* The nozzle stops.
* The nozzle stops for approximately 5 minutes and
then automatically retracts. In this case, when the
Nozzle Cleaning button is pressed again after the
nozzle retracts, the nozzle extends again.
[E]
2 Press the STOP button again.
* The nozzle retracts.
[Note]
• Do not apply excessive force to the nozzles, as this may
cause failure.
• Do not pull or push the nozzles.
* The nozzle will not be retracted and failure may occur.
When you pull or push the nozzles by mistake,
disconnect the power plug from the outlet, wait for
about 10 seconds, and connect the power plug to the
outlet again.
08M046_シャワートイレパンプキン
08M046_シャワートイレパンプキン
48
Replacing the Nozzle Tip
Removing the Nozzle Tip
1 Turn off the Auto Clean [A] and Auto Seat
Open [B] buttons.
* This will disable the automatic lid and automatic
flush functions.
[A]
[B]
2 Lift the seat lid and seat.
3 Press the Nozzle Cleaning button [C].
* The rear cleansing nozzle extends and oscillates.
* Water will automatically wash the nozzles.
[C]
<To select the front cleansing nozzle for replacement>
Press the Nozzle Cleaning button [D] again.
* The front cleansing nozzle extends and oscillates.
[Note]
• The nozzle tip cannot be replaced while a user is sitting
on the toilet seat.
[D]
4 Press the STOP button [E].
* The nozzle stops for approximately 5 minutes.
Replace the nozzle tip.
The nozzle retracts to its original position after
5 minutes.
[E]
5 Turn the nozzle tip counterclockwise to
align the replacement mark on the right of
the nozzle tip with the nozzle center mark,
and pull out the nozzle tip as shown in the
diagram on the right.
* Pull the nozzle out slightly, hold the back section of
the nozzle with your hand, and remove the tip.
* Install a new nozzle tip as described in “Assembling
the Nozzle Tip” (Page 50) while the nozzle is
stopped. The above procedure can also be followed
to replace the front cleansing nozzle tip.
49
①
②
Replacing the Nozzle Tip
Assembling the Nozzle Tip
* If the nozzle retracts to its original position, perform steps
2 to 5 in “Removing the nozzle tip” to expose the nozzle.
1 Align the replacement mark on the right
of the nozzle tip with the center mark of
the nozzle, completely insert the nozzle
tip, and turn it clockwise as far as possible
as shown in the diagram on the right.
②
①
* Hold the back section of the nozzle with your
hand to attach the nozzle tip.
[Note]
• Do not damage the O-ring of the nozzle, as this may
cause water leakage.
2 Check the alignment.
* Check that the center mark of the nozzle is
aligned with that of the nozzle tip, as shown in
the diagram on the right.
[Note]
●Inappropriate engagement may cause failure, and
may affect the angle of the water spray.
08M046_シャワートイレパンプキン
PAMPKIN_11
3 Press the STOP button [F] to return the
nozzle to its original position.
[F]
50
Removing the Side Covers
The side covers can be removed easily. Remove them when cleaning the rear side of the toilet, and hidden
areas on the floor.
Removing the Side Covers
1 Disconnect the power plug from the outlet.
2 Remove the cap. Remove the flat head
screw using a Phillips screwdriver.
3 Slowly pull the bottom of the side cover
toward you and disconnect the “clip” from
the “clip holder.”
4 Slowly pull the side cover downward and
disconnect the “lug” from the “slot” on the
seat unit.
Installing the Side Covers
To install the side covers, reverse the removing procedure, but check that the covers
are firmly assembled before connecting the power plug.
[Note]
• Do not apply excessive force when removing and installing the side covers, as this could cause damage.
51
皿ねじ
Low Water Pressure
If the toilet has been used for a long period of time and flushing or cleansing functions seem to be getting weak, clean
the filters as described in the following procedure. Generally, the filters should be cleaned once every two years.
Cleaning the Filter
1 Close the water shutoff valve.
2 Press the Flush/Full or the flush buttons
on the seat unit.
* Wait for about 20 seconds before performing the next step.
3 Disconnect the power plug from the outlet.
4 Remove the side cover on the left side of
the seat unit. (Page 51)
5 Place a piece of cloth under the filter on
the left side of the seat unit and remove
the filter to drain the seat unit.
1
2
止水栓開.eps
2
1
6 Thoroughly wash each component in
water to remove grime.
7 Fully reattach the filter as shown in the
diagram.
8 Attach the side cover. (Page 51)
9 Connect the power plug to the outlet.
10Open the water shutoff valve fully.
1
2
• When using the toilet again
Be sure to perform usage checks before use. (Page 14)
[Note]
• Be careful not to damage the water supply hose when removing the filter.
CAUTION
•Close the water shutoff valve when removing the filter.
•When installing the filter, tighten it fully so there is no gap.
•Check that the O-ring is free from foreign materials before attaching
do so could result in water leakage and flooding.
the filter, as failure to
52
Low Battery Indicator
The battery indicator on the main display panel will flash when the battery needs replacement. (→ Page 34)
Replace the batteries with new ones as described in the following procedure.
[Note]
• Install batteries with the positive and negative poles in the
correct direction as shown on the remote control case.
• Do not use new and old batteries together.
• Use alkaline batteries only.
Replacing the Remote Control Batteries
1 Lift the remote control and remove it from
its holder.
2 Remove the back cover and replace the
batteries with new ones (two 1.5-V AAA
alkaline batteries).
* Use a tool such as a flat screwdriver to release the lock
when the back cover cannot be removed easily.
3 Press the Hr. and Min. buttons to adjust the
time. (Page 16)
4 Attach the back cover, and slide the remote
control into its holder from the top.
[Reference]
• The battery mark flashes only when the battery has expired. The battery mark is not normally displayed.
• The initial batteries were used for operation checks when the remote control was installed, so their service
life may be shorter than commercially available batteries.
• Depending on the size of the room, finishing and color (particularly a dark color) of the wall, the remote
control may stop functioning before the battery indicator starts flashing.
53
Periods of Non-use
In the following cases, be sure to drain the toilet according to the procedures below and
disconnect the power plug from the outlet.
●When the toilet is not used for extended periods of time, such as when you are away, as the water could become dirty and cause clogging.
●If the toilet is installed in a vacation home that is not being used, drain the water from the toilet. The
temperature in an empty house can drop lower than expected, causing the water in the toilet to freeze.
Draining the Toilet
1 Close the water shutoff valve.
2 Press the STOP button or the flush
button on the seat unit.
* Wait for about 20 seconds before performing the next step.
3 Remove the side cover on the left side of
the seat unit. (Page 50)
4 Place a piece of cloth under the filter on
the left side of the seat unit and remove
the filter by turning it clockwise to drain
the seat unit.
[Note]
• Be careful not to damage the water supply hose
when removing the filter.
2
1
止水栓開.eps
2
1
5 Press the Auto Clean [A] and Power save [B]
buttons simultaneously for 2 seconds.
[B]
* Drain water remaining in the seat unit for
approximately 15 seconds.
6 Thoroughly wash the filter and O-ring in
water to remove grime.
7 Fully reattach the filter by turning it
counterclockwise as shown in the diagram.
8 Attach the side cover. (Page 51)
9 Check that no water leaks from the water
shutoff valve.
10Disconnect the power plug from the outlet.
[A]
1
2
• When water may freeze
●Use a container or pump to remove the water in the toilet bowl and pour antifreeze into the bowl.
* If water is simply removed, sewer gas will be emitted from the drain pipe.
• When using the toilet again
Be sure to perform usage checks before use. (Page 14)
54
Preventing Freezing
To prevent damage that may result from freezing water, follow the procedures described below. When
performing these procedures, the power save feature should be turned off.
General Anti-freeze Measures
1 Set the seat temperature to “high” and
close the seat lid.
2 Turn off the power save function. (Page 26)
3 Heat the toilet room.
* If the toilet room cannot be warmed, perform the
following antifreeze procedures.
The automatic antifreeze function includes an automatic drain method and an intermittent flushing
method.
Select either method according to the antifreeze method of the toilet.
*Antifreeze method of the toilet:Automatic drain method → Drains water whenever a user leaves the toilet seat.
Intermittent flushing method → Flushes the toilet periodically.
Automatic Drain Method
Water is drained whenever a user leaves the toilet seat to prevent water from freezing.
1 Press the Power save [A] and Auto Clean buttons [B]
simultaneously for 2 seconds.
* Water is drained (for 15 seconds) immediately after a user
leaves the toilet seat.
* A short beep sounds when the setting is complete.
[B]
[A]
To cancel the automatic drain function
Press the Power save button and Auto Clean buttons simultaneously for 2 seconds.
* A beep sounds when the setting is canceled.
CAUTION
If there is any possibility of the water freezing, be sure to activate the anti-freeze function,
as damage due to freezing may cause fire or flooding.
55
Preventing Freezing
Intermittent Flushing Method
Water in the seat unit is drained every 3 minutes to prevent
water in the seat unit from freezing. The toilet is flushed
every 6 minutes to prevent water in the toilet from freezing.
1 Press the Massage [C] and Nozzle Cleaning
[D] buttons simultaneously for 2 seconds.
[C]
* Water is drained from the seat unit every 3
minutes for approximately 1 minute to prevent
water from freezing while the toilet is not used.
* The toilet is flushed every 6 minutes.
* Water is not drained when the seat is occupied.
* Once the cleansing is stopped, the cleansing mode
starts with rear cleansing when SHOWER is pressed.
[D]
To cancel the intermittent flushing
Press the Massage and Auto Clean buttons simultaneously for 2 seconds.
* A beep sounds when the setting is canceled.
To prevent remaining water in the seat unit from freezing, drain water according to the procedure given below.
Draining the Seat Unit
1 Close the water shutoff valve to stop
water supply.
2 Press the Flush/Full button or the flush
button on the seat unit.
* Wait for about 20 seconds before performing
the next procedure.
3 Remove the side cover on the left side of
the seat unit. (Page 51)
止水栓開.eps
1
2
4 Place a piece of cloth under the filter on
the left side of the seat unit and remove
the filter to drain the seat unit.
[Note]
2
• Be careful not to damage the water supply hose
when removing the filter.
1
56
Preventing Freezing
5 Press the Power save [A] and Auto Clean
[B] buttons simultaneously for 2 seconds.
[A]
* Drain the remaining water in the seat unit for
approximately 15 seconds.
6 Thoroughly wash the filter and O-ring in
water to remove grime.
7 Fully reattach the filter.
8 Attach the side cover. (Page 51)
9 Check that no water leaks from the water
shutoff valve.
• When using the toilet again
Be sure to perform usage checks before use. (Page 14)
[B]
1
2
CAUTION
•Close
the water shutoff valve when removing the filter.
installing the filter, tighten it fully so there is no gap.
•Check that the O-ring is free from foreign materials before attaching the filter,
as failure to do so could result in water leakage and flooding.
•When
57
Connecting/Disconnecting the Water Supply Hose
Disconnecting the Water Supply Hose
Remove the clip ring before disconnecting
the water supply hose.
1 Insert a flat screwdriver into the gap.
* The clip ring is designed so that the locking tab
catches the other end of the ring.
2 Press the screwdriver down, as shown in
the diagram.
3 Push the screwdriver forward to release
the locking tab.
* Lightly twist the screwdriver to push it forward
easily.
58
Connecting/Disconnecting the Water Supply Hose
Connecting the Water Supply Hose
1 Connect the water supply hose with the
water shutoff valve.
2 Close the clip ring until it clicks as shown in
the diagram below.
* After the clip ring is attached, turn it to check that
it is firmly secured.
Click
本体ホース付け5.eps
59
Troubleshooting
In many cases, problems can be easily corrected. Please check the following items before placing a service call.
If a problem cannot be corrected after checking the items below, please contact our company for service.
All Functions
Symptom
No functions
operate (the
power LED is not
illuminated).
The remote
control unit does
not operate. (The
POWER LED is
illuminated.)
Cause
Solution
Page
Electricity is not supplied to
the outlet.
Check for a power failure
or tripped breaker, or other
probable cases.
—
The Power button is off
(POWER LED).
Press the Power button to turn
on the power LED on the seat
unit indicator.
14
The power plug is not
connected to the outlet.
Fully connect the power plug
to the outlet. Wait for about 10
seconds before connecting the
power plug again.
14
A short-circuit has occurred.
Disconnect the power plug
from the outlet and request
repairs.
—
A voltage other than 120 V is
applied.
Disconnect the power plug
from the outlet and request
repairs.
—
The toilet seat lid is not
attached
(in closed position).
Attach the toilet seat lid.
42
The batteries are dead (low
battery indicator flashes).
Replace the battery with a new
one.
53
The batteries are not inserted
correctly.
Insert the battery in the correct
direction.
53
The remote control’s
transmitter/receiver is dirty or
wet.
Remove dirt or water.
—
An fluorescent light with
inverter ballast is used.
Turn off the light and check the
operation.
—
The receiver of the remote
control is exposed to direct
sunlight.
Avoid direct sunlight.
—
The remote control unit is
turned off.
Press the Power button to turn
on the remote control.
—
*: When the remote control is installed on the wall opposite the receiver, the remote control may stop functioning
before the battery indicator starts flashing.
60
Troubleshooting
Rear Cleansing, Rear Cleansing - Mild, and Front Cleansing
Symptom
Water does not
spray out.
It takes longer
than usual until
water sprays out.
Water is not warm.
The water
pressure is too
low.
The nozzle guard
is unstable.
61
Cause
Solution
Page
The water shutoff valve is
closed.
Turn the open/close handle
counterclockwise 90°.
14
The filter is clogged.
Clean the filter.
52
The water supply pressure is
too low, or the water pressure
setting on the remote control
is set to its lowest level.
The seat sensor does not
detect a user.
Your clothes mean that
detection by the seat sensor is
difficult.
Press “+” on the Spray Strength
button.
19, 20, 21
Sit on the toilet seat.
34
Allow the sensor to detect your
skin.
34
This is not a problem. Priority
is given to flushing. Press the
The toilet is being flushed.
button for rear cleansing or front
cleansing again after the toilet
has been flushed.
This is not a problem. When
water temperature is extremely
The temperature of the water
low in winter, etc., it may take
supplied to the seat unit is too
longer than usual until water is
low.
sprayed due to preparation for
spraying warm water.
Press the Water temp. button
The water temperature is set at and adjust the temperature to
its lowest setting.
the
appropriate level.
This is not a problem. When
The temperature of the water
water
supplied to the seat unit is too temperature is low in winter,
low.
for example, the water pressure
may become slightly weaker.
This is not a problem. Priority
is given to flushing. Press the
The toilet is being flushed.
button for rear cleansing or front
cleansing again after the toilet
has been flushed.
The cleaning brush or other
tools touched the guard during Attach the nozzle guard
cleaning and the guard has
correctly.
fallen off.
19, 21
─
16
─
19, 21
44
Troubleshooting
Seat Heating
Symptom
The toilet seat is
not warm.
The toilet seat
temperature
drops when
occupied for long
periods.
Cause
Solution
Press the Seat temp. button and
The seat temperature is set too
adjust the temperature to the
low.
appropriate level.
The power save function is
Cancel the power save function.
activated.
The seat heater auto off
function is operating.
Cancel the toilet seat
temperature auto off function.
Page
16
26
30
Dryer
Symptom
The dryer does
not work.
The air is not
warm.
Warm air stops
suddenly before
finishing.
Cause
The seat sensor does not
detect a user.
Solution
Page
Change your sitting posture; for
example, sit further back on the
seat.
34
Your clothes mean that
Allow the sensor to detect your
detection by the occupied seat
skin.
sensor is difficult.
Press the Dryer button and
The warm air temperature is
adjust the temperature to the
set too low.
appropriate level.
Temperature may feel different according to conditions of use.
The warm-air temperature conforms to the IEC standard.
(IEC: International Electrotechnical Commission)
The drying function has been
used for 4 minutes.
Press the Dryer button again.
34
23
─
23
62
Troubleshooting
Deodorizer
Symptom
The deodorizer
fan runs
continuously.
The deodorizer
fan does not
operate.
Cause
Solution
Page
Something is covering the
occupied seat sensor.
Remove whatever is covering
the sensor.
15
The deodorizer function is
turned off.
Turn on the automatic
deodorizing function.
18
Auto Flush Function
Symptom
The toilet
does not flush
automatically.
63
Cause
Solution
Page
The Auto Clean button is
turned off.
Turn on the Auto Clean button.
24
Water flow is
weak or the toilet
is not flushed
completely.
The water shutoff valve is not
fully open.
Open the water shutoff valve
fully.
14
The filter is clogged.
Clean the filter.
52
The toilet flushes
by itself.
Intermittent flushing function
may be operating.
Turn off the intermittent flushing
function.
56
Troubleshooting
Auto Seat Open Function
Symptom
The seat and
lid closes too
quickly.
The lid does not
open or close
automatically.
The seat and lid
open and close
repeatedly even
though no one is
near the toilet.
The toilet seat
and seat lid
remain open.
Cause
Solution
Page
The seat and lid are pushed
during auto close.
Press the Open/Close button.
If the seat does not open or
close automatically, disconnect
the power plug from the outlet
and contact our company for
service.
—
The Auto Seat Open button is
turned off.
Turn on the Auto Seat Open
button.
17
The commercial toilet lid cover
Remove the toilet seat lid cover
and/or seat cover is too heavy
and/or seat cover.
or is caught somewhere.
—
The toilet seat lid is not
assembled correctly.
Assemble the toilet seat lid
correctly.
42
The toilet seat lid was closed
manually or with the remote
control.
The toilet seat lid does not open
automatically for approximately
10 seconds after it is closed
manually or with the remote
control.
—
The upper body sensor is
blocked or dirty.
Clean the sensor or remove any
item that may be blocking the
sensor.
34
The seat sensor is dirty.
Clean the sensor or remove any
item that may be blocking the
sensor.
34
The sensor is exposed to direct Do not expose the sensor to
sunlight.
direct sunlight.
The upper body sensor is
blocked or dirty.
Clean the sensor or remove any
item that may be blocking the
sensor.
—
34
64
Troubleshooting
Miscellaneous
Symptom
Cause
There are water
drops on the
underside of the
toilet and water
shutoff valve.
Humidity is high, forming
condensation.
A gurgling sound
is emitted from
the seat unit
When:
●The power plug is
connected to the outlet
●The Power button
is turned on
●The rear cleansing,
rear cleansing
- mild or front
cleansing stops
This is not a problem. It is the sound the motor generates when
the toilet is operating normally. There is no problem as long as
the water water pressure and/or nozzle position can be adjusted
correctly.
No water is supplied to the
seat unit. (Suspended water
supply, closed water shutoff
valve.)
The power LED is
flashing.
There is a problem with warm
water, toilet seat, drying
function, and/or cleansing
motor.
An antifreeze heater is
provided for pipes such as the
water supply hose.
65
Solution
Frequently wipe water drops.
Also, ventilate the toilet room
adequately.
After supplying water, open the
water shutoff valve and conduct
a trial operation. If the power
LED still flashes, disconnect the
power plug from the outlet and
contact our company for service.
If the power LED still flashes after
turning the Power button off,
there is a failure. Disconnect the
power plug from the outlet and
contact our company for service.
Turn off the antifreeze heater.
When the water temperature
exceeds 104°F[40°C], the safety
device is activated to stop
operation.
Page
─
─
14
─
─
The rear seat
bumper at the
back of the toilet
seat are not
attached to the
toilet.
This is not a problem. The toilet is designed so that the rear seat
bumper float free. Use the toilet as usual.
─
To reset all
settings to their
default settings.
All functions whose settings
were changed as described in
“Useful functions” are reset to
their default setting.
32
Press the Water temp. button
and Seat temp. buttons
simultaneously for 2 seconds.
After-sales Service
1. Before Requesting Professional Repairs
If problems can not be solved by following the steps on page 60, contact your local customer service
representative.
●If you have additional questions that are not addressed in the user’s manual.
●If the power cord is damaged or the power cord is loose in the outlet.
●The outlet or power cord is overheating.
If the above condition is left as it is, unexpected accidents may occur. Be sure to consult us.
Never disassemble or modify this product, as this may result in electric shock, fire, and/
or injuries. In addition, disassembly of the product will void the warranty.
If water is leaking from the seat unit or the water supply system, disconnect the power plug from the
outlet and close the water shutoff valve, as this may result in electric shock, fire, or floor flooding.
If the seat unit, power plug, or power cord are damaged (abnormal noise, odor, smoke,
high temperatures, cracking, or water leakage occurs), disconnect the power plug from
the outlet immediately, close the water shutoff valve, and have the part repaired. Never
use any defective parts, as this may result in electric shock or fire.
2. See Your Warranty Page
This product comes with a limited warranty. Be sure to thoroughly read the warranty statement, which
can be found on page 69 of this manual. Keep your proof of purchase (typically the sales receipt from
your DXV by AMerican Standard dealer) where it can be accessed easily.
The warranty period is 3 years from the date of purchase.
Read the warranty statement to clarify which items are covered under the warranty, and which items are
not covered under the warranty.
3. Requesting Repairs
STOP
IF YOU HAVE ANY QUESTIONS, OR PARTS ARE DAMAGED OR MISSING, PLEASE DO NOT CONTACT,
OR RETURN, THIS PRODUCT TO THE STORE.
PLEASE CONTACT your local CUSTOMER SERVICE representative
WE CAN TAKE CARE OF ANY QUESTION OR ISSUE YOU MAY HAVE.
■ Within the warranty period
When requesting warranty service, please have the following information available:
■ Outside the warranty period
If service is requested outside of the warranty period, the cost of service is responsibility of the product owner.
Service charges include a technical service fee, travel expenses, and parts costs.
■ Details you will be asked
1. Your contact information (e.g. name, address, phone)
2.Product model name/number and color
(See the product label on the side of the body.)
3.Date of installation
4.The reason for requesting service
66
Specifications
Grade
D28000AS416-XXX
Rated power
120 VAC, 60 Hz
Rated power consumption
1300 W
Power saving type
Suitable
tap water
pressure
range
Instant system
Minimum pressure
14.5 psi (0.10 MPa) or more (when water flow is 4.8 GPM (18 L/min) or more)
Maximum pressure
108.83 psi (0.75 MPa) (static water pressure)
Operating temperature range
Product dimensions
16 /8'' (415 mm) (W) x 25'' (635 mm) (D) x 21 7/8'' (555 mm) (H)
Product weight
Approx. 70.4 lb (32 kg) (Seat unit: Approx. 22 lb (10 kg), Toilet: Approx. 48.4 lb (22 kg)
Toilet
Power cord
Effective length: 3.28 ft (1.0 m) (with earth)
Flush Volume
1.32 gal (5 L) for full flush, 0.92 gal (3.5 L) for partial flush,
and 0.92 gal (3.5 L) for urination by male * (Floor drain or refitting)
Water supply method
Uses existing water supply line
Warm water supply system
Flow
Rates
Cleansing
Control unit
Drying
with
warm air
Rear cleansing: 0.10 - 0.13 GPM (0.36 - 0.50 L/min) (6 adjustable levels) when the water pressure is 29.02 psi (0.2 MPa)
Mild cleansing
Rear cleansing - mild: 0.10 - 0.13 GPM (0.36 - 0.50 L/min) (6 adjustable levels) when the water pressure is 29.02 psi (0.2 MPa)
Front cleansing
0.10 - 0.13 GPM (0.36 - 0.50 L/min) (6 adjustable levels) when the water pressure is 29.02 psi (0.2 MPa)
Remote control
Standard
remote
control
Water temperature: Approx. 90°F (32°C) – 104°F (40°C) (6 User-defined settings)
Heater capacity
1200 W
Safety device
Temperature fuse, thermostat, and flow rate sensor
Air flow rate
7.1 CFM (0.2 m3/min)
Air temperature range
Room temperature: Approx. 104°F (40°C) – 131°F (55°C) (3 User-defined settings)
Heater capacity
230 W
Safety device
Temperature fuse
Surface temperature
When used: Room temperature and in the range of approx. 82°F (28°C) – 98°F (36.5°C) (6 User-defined
settings)
When the advanced power save function is activated: Room temperature and in the range of approx. 81°F (27°C) –
86°F (30°C)
When the one-touch power save (8 hours) is activated: Room temperature
Heater capacity
48 W
Seat
heating
Deodorizing
function
Inline ceramic heater for continuous warm water
Power cleansing
Water temperature
67
32°F (0°C) – 104°F (40°C)
3
Safety device
Temperature fuse
Deodorizing method
Chemical absorption by deodorizer cartridge
Deodorizing capacity
Power deodorizing: 3.9 CFM (0.11 m3/min)
Full power deodorizing: 4.9 CFM (0.14 m3/min)
Turbo deodorizing: 6.0 CFM (0.17 m3/min)
Dimensions
9 1/2'' (238mm) (W) x 1 1/8''(29 mm) (D) x 1 3/4''(45 mm) (H)
Power source
2 AAA alkaline batteries
Optional Parts
Replacement Parts
The nozzle tips should be replaced if they can no longer be cleaned.
(Page 49)
Repair Part No.
7381438-201-0070A
7381439-201-0070A
7381440-201-0070A
7381441-201-0070A
7381442-201-0070A
7381443-201-0070
7381443-202-0070A
7381443-203-0070A
7381443-204-0070A
7381443-205.0070A
7381443-206-0070A
7381444-201-0070A
7381445-201-0070A
Description
Pressurized pump
Nozzle tip for shower
Nozzle tip for bidet
Preventing condensation cover for stop valve
Spare nozzle shutter
Water supply hose (200mm)
Water supply hose (400mm)
Water supply hose (580mm)
Water supply hose (680mm)
Water supply hose (900mm)
Water supply hose (1000mm)
Remote control
Deodorizer Cartridge
For additional components or to order replacement parts, contact your local customer service representative, or see the website at www.DXV.com
68
Limited Warranty
This toilet comes with a three year warranty on all parts of the toilet. If inspection of this DXV by American
Standard plumbing product, inclusive of the chinaware and all mechanical parts, confirms that it is defective
in materials or workmanship, DXV by American Standard will repair or, at its option, exchange the product
for the same or a similar model.
This limited warranty applies only to the original non-commercial purchaser and installation of the products.
In the event of a limited warranty claim, proof of purchase will be required—save sales receipts.
For this warranty to become effective, the warranty registration process must be completed via the internet
or telephone per the warranty registration instructions.
This limited warranty does not apply to commercial installations. The warranty for commercial installations is
two years on the toilet.
This warranty does not apply to local building code compliance. Since local building codes vary considerably,
the purchaser of the product should check with a local building or plumbing contractor to ensure local code
compliance before installation.
This warranty will be void if the product has been moved from its initial place of installation; if it has been
subjected to faulty maintenance, abuse, misuse, accident or other damage; if it was not installed in
accordance with DXV by American Standard’s instructions; or if it has been modified in a manner inconsistent
with the product as shipped by DXV by American Standard. The warranty will be void if the product has
failed as a result of worn-out of consumable parts such as packing, fuses, batteries.
WARNING: This warranty DOES NOT COVER any damages caused by the use of harsh cleaners. These
products can seriously corrode the product components. This damage can cause leakage and property
damage. DXV by American Standard will not be responsible or liable for any damage caused by the use
of in-tank cleaners.
DXV by American Standard’s option to repair or exchange the product under this warranty does not cover
any labor or other costs of removal or installation including any costs of any surrounding material such as tile
or marble. DXV by American Standard is not responsible for any other incidental or consequential damages
attributed to a product defect. (Some states or provinces do not allow the exclusion or limitation of implied
warranties, so this exclusion may not apply to you.)
This warranty gives you specific rights. You may have other statutory rights that may vary from state to state
or province to province, in which case this warranty does not affect such statutory rights.
69
©2014 AS America Inc.
ENGLISH
How to register the warranty:
PLEASE COMPLETE DXV BY AMERICAN STANDARD WARRANTY REGISTRATION AND SAVE THIS
WARRANTY INFORMATION.
IMPORTANT: R
egistration of the toilet must be completed for this warranty to become effective.
Your registration will make it easier to service your product.
INSTRUCTIONS: Register your toilet at www.DXV.com. Please save your point of purchase (sale receipt).
IF YOU HAVE ANY QUESTIONS, OR PARTS ARE DAMAGE OR MISSING, DO NOT CONTACT, OR RETURN,
THIS PRODUCT TO THE STORE. CONTACT CUSTOMER SERVICE AT [email protected]
OR TOOL FREE AT OUR GLOBAL HEADQUARTERS.
CUSTOMER SPARE COMPONENTS PAGE CAN BE FOUND AT www.DXV.com.
In the United States:
DXV by American Standard
One Centennial Avenue
Piscataway, New Jersey 08855
Attention: Director of Customer Care
For residents of the United States, warranty
information may also be obtained by calling
the following toll free number: (800) 227-2734
www.DXV.com
©2014 AS America Inc.
In Canada:
DXV by American Standard
5900 Avebury Road
Mississauga, Ontario
L5R 3M3
Canada
Toll Free: 1-800-387-0369
Local: 905-306-1093
Fax: 1-800-395-1498
www.DXV.ca
In Mexico:
DXV by American Standard
Via Morelos 330
Col. Santa Clara Coatitla
Ecatepec, Estado de México 55540
Toll Free: 01-800-8391200
www.DXV.mx
GCW-1333-US-ASB(14030)