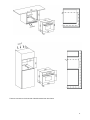
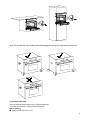
1
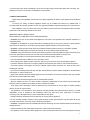
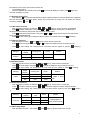
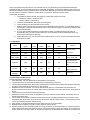
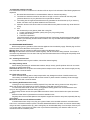
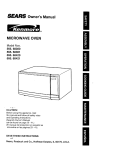
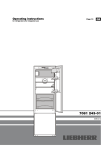
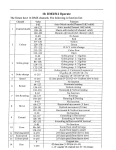
MICROWAVE OVEN
INSTRUCTION MANUAL
MODEL : MW35-IX03
1 PRECAUTIONS TO AVOID POSSIBLE EXPOSURE
TO EXCESSIVE MICROWAVE ENERGY
READ these instructions carefully before installing and operating the
microwave oven. Keep them for further reference.
1. Do not attempt to operate this Microwave Oven with the door open since open door
operation can result in harmful exposure to microwave energy. It is important not to defeat or
tamper with the safety interlocks.
2. Do not place any object between the front panel of Microwave Oven and the door or allow
soil or cleaner residue to accumulate on sealing surface.
3. Do not operate the Microwave Oven if it is damaged. It is particularly important that the
Microwave Oven door closed properly and that there is no damage to theMicrowave Oven.
a) Door (bent),
b) Hinges and latches (broken or loosened),
c) Door seal and sealing surface.
4. The Microwave Oven should not be adjusted or repaired by anyone except qualified service
person.
2 CONTENTS
PRECAUTIONS TO AVOID POSSIBLE EXPOSURE TO EXCESSIVE MICROWAVE ENERGY ............... 2 1.TECHNICAL SPECIFICATION............................................................................................................................. 4 2.PRECAUTIONS FOR USE ................................................................................................................................... 4 3.SAFETY PRECAUTIONS ..................................................................................................................................... 5 4.GET TO KNOW YOUR MICROWAVE OVEN ................................................................................................... 6 5.BEFORE INSTALLATION ..................................................................................................................................... 6 6.DESCRIPTION OF FRONT PANEL CONTROLS ............................................................................................. 7 7.USING THE MICROWAVE OVEN ....................................................................................................................... 7 8.FUNCTIONS............................................................................................................................................................ 7 9.RECOMMENDED BAKING MENU .................................................................................................................... 10 10.CLEANING AND MAINTENANCE ................................................................................................................... 13 11.SPECIAL MAINTENANCE ................................................................................................................................ 14 12.INSTALLING THE APPLIANCE ....................................................................................................................... 14 13.TROUBLE SHOOTING ..................................................................................................................................... 16 3 1.TECHNICAL SPECIFICATION
MODEL
CAPACITY(L)
MW35-IX03
35
VOLTAGE(V)/FREQUENCY(Hz)
240/50
MICROWAVE INPUT WAVE(W)
MICROWAVE OUTPUT POWER(W)
MICROWAVE WORKING FREQUENCY
(MHz)
PRODUCT DIMENSION(mm)
1600
1000
2450
W594×D486×H455
DIAMETER OF ROTATING PLATE(mm)
315
GROSS/NET WEIGHT(Kg)
32.5/29.5
2.PRECAUTIONS FOR USE
This manual is an integral part of the appliance. Take good care of it and keep it to hand throughout the oven’s
life cycle. We urge you to read this maunal and all the information carefully before using the appliance. Installation
should be carried out by qualified technician in compliance with the relevant regulations. This appliance is for
household use and complies with the EEC directives currently in force. The appliance is for cooking and heating
food.
The manufacturer declines all liability for other uses except for cooking food.
Keep the documentation of this product for future reference. Always keep the instruction manual handy. If you
lend the microwave to someone else, the manual as well.
Never use this appliance for heating rooms.
Never leave packaging residues unattended in home. Separate the various packaging materials on type
and consign them to the nearest separate disposal centre.
This manual contains the regulations of recycling decommissioned appliances.
Never obstruct vents provided for ventilation and heat dispersal.
Never use metal scouring pads or sharp scrapers which will damage the surface. Use ordinary nonabrasive products with the aid of wooden or plastic utensils if necessary. Rinse thoroughly and dry with a soft cloth
or chamois leather.
The nameplate with the technical data, serial number and mark is in a visible position on the oven door
frame. The nameplate should never be removed.
The appliance should be connected to earth in compliance with electrical system safety regulations.
If a permanent connection is used, the appliance’s power supply wire should be fitted with a polar breaking
device with contact gap of at least 3 mm, located in an easily accessible position close to the appliance itself.
If a socket and plug connection is used, check that they are of the same type. Do not use reducers, adapters
4 or junctions since they cause overheating or burns. the ac power supply must be 240V, 50Hz with a minimum 15A
distribution line fuse, or a minimum 15A distribution circuit breaker.
3.SAFETY PRECAUTIONS
Please refer to the installation instructions for the safety regulations for electric or gas appliance and ventilation
functions.
To ensure your safety, all electric appliance should only be installed and serviced by qualified staff, in
accordance with the relevant regulations in law. Our approved installation engineers guarantee you a good service.
After installation, carry out a quick test on the oven referring to the instructions if the appliance fails to operate,
disconnect it and contact the nearest service centre.
IMPORTANT SAFETY INSTRUCTIONS
READ CAREFULLY AND KEEP FOR FUTURE REFERENCE
– WARNING: If the door or door seals are damaged, the oven must not be operated until it has been repaired by a
competent person;
– WARNING: It is hazardous for anyone other than a competent person to carry out any service or repair operation
that involves the removal of a cover which gives protection against exposure to microwave energy;
– WARNING: Liquids and other foods must not be heated in sealed containers since they are liable to explode;
– WARNING: Accessible parts may become hot during use Young children should be kept away.
– WARNING: Only allow children to use the oven without supervision when adequate instructions have been given
so that the child is able to use the oven in a safe way and understands the hazards of improper use;
– the minimum height 4 mmof free space necessary above the top surface of the oven;
– only use utensils that are suitable for use in microwave ovens;
– when heating food in plastic or paper containers, keep an eye on the oven due to the possibility of ignition;
– if smoke is observed, switch off or unplug the appliance and keep the door closed in order to stifle any flames;
– microwave heating of beverages can result in delayed eruptive boiling, therefore care must be taken when
handling the container;
– the contents of feeding bottles and baby food jars shall be stirred or shaken and the temperature checked before
consumption, in order to avoid burns;
– eggs in their shell and whole hard-boiled eggs should not be heated in microwave ovens since they may explode,
even after microwave heating has ended;
– the oven should be cleaned regularly and any food deposits removed;
– failure to maintain the oven in a clean condition could lead to deterioration of the surface that could adversely
affect the life of the appliance and possibly result in a hazardous situation;
– If the supply cord is damaged, it must be replaced by the manufacturer, its service agent or similarly qualified
persons in order to avoid a hazard.
– This appliance is not intended for use by persons (including children) with reduced physical sensory or mental
capabilities, or lack of experience and knowledge, unless they have been given supervision or instruction
concerning use of the appliance by a person responsible for their safety.
– Children should be supervised to ensure that they do not play with the appliance.
– Do not use harsh abrasive cleaners or sharp metal scrapers to clean the Microwave oven door glass since they
can scratch the surface, which may result in shattering of the glass.
– WARNING: The appliance and its accessible parts become hot during use. Care should be taken to avoid touching
heating elements.
– Children less than 8 year of age shall be kept away unless continuously supervise.
– This appliance can be used by children aged form 8 years and above and persons with reduced physical, sensory
5 or mental capabilities or lack of experience and knowledge if they have been given supervision or instruction
concerning use of the appliance in a safe way and understand the hazards involved . Children shall not play with the
appliance . Cleaning and user maintenance shall not e made by children without supervision.
– WARNING: Accessible parts may become hot during use. Young children should be kept away.
Avoid damage the oven or other dangerous situation according to the following instructions:
● Do not cover or obstruct the ventilation openings.
● Do not keep any inflammable object inside the oven as it may burn if the oven is switched on.
● Do not use the oven as a pantry.
● Do not pour spirits (e.g. brandy, whisky, schnapps, etc.) over hot food. Danger of explosion!
● Accessories such as wire racks and trays, etc. get hot in the cooking space. Always wear protective gloves or use
oven clothes.
● To avoid being burnt, always use oven gloves for handling dishes and containers and touching the oven.
● Do not lean on the opened oven door. This may damage the oven, especially in the hinge zone. The door can bear
a maximum weight of 8 kg.
● The racks can bear a maximum load of 8 kg. To avoid damaging the oven, do not exceed this load.
4.GET TO KNOW YOUR MICROWAVE OVEN
1.- Door handle
2.- Door window glass
3.- Door seal
4.- Drive shaft
5.- Turntable ring
6.- Turntable plate
7.-Button
8.-Control panel
5.BEFOREINSTALLATION
The inside of the appliance should be cleaned to remove all manufacturing residues. For further information
about cleaning, see point ‘Cleaning and Maintenance’.
6 6.DESCRIPTIONOF FRONT PANEL CONTROLS
All the appliance’s control and monitoring device are placed together on the front panel. The table below
displays icons of different functions.
Buttons Definition
Standby Function (microwave、grill、defrost)
Cooking Time Setting(cooking time、delay start time)
Other Setting (Power、weight、choice of defrost)
Clock Setting
Child Lock
Increase(function、power、weight increase)
Decrease(function、power、weight decrease)
Start/Pause
Functions description.
Microwave
Popcorn
Potatoes
Hot Drinks
Defrost by Weight
Cooking Time
Defrost by Time
Clock
Delay Time
Microwave Power
Child Lock
End
Weight
INSTRUCTIONS FOR THE USER
7.USING THE MICROWAVE OVEN
In case too much condensation produced on the inner glass of the microwave door and inside the cavity, don’t
leave cooked food in the microwave for long.
8.FUNCTIONS
8.1 Time Setting
When power is on, display screen shows a flashing“0:00; time could be set,Press the button“
”or“ ”to
increase or decrease to set hour; After hour is set, Pressthe symbol of clock setting “ ”again to set the minutes.
Press “ ” or “
” to increase or decrease the minutes and press “ ” to set the current time. Press “ ” again,
time set is finished.
The range of Clock Setting is between 0:00 and 23:59
Change the current time
When the appliance is in standby mode and clock displays on screen, press“ ”for three seconds, the current
7 time flashes on the screen, and new time could be set.
Clock displays setting
When the appliance is in standby mode, press“ ”,and clock will displays on screen; press“
clock will not display on screen.
”again, and
8.2 Selecting TheFunctions
After pressing “ ”for 1 second under standby mode, the appliance will be on function select mode. Suggested
time and data (including microwave power, weight, etc) will be shown on screen. You can select your wanted
function by pressing “
” and “ ”.
8.2.1 Microwave Functions
After selecting this function, the indicator “ ”,“ ” and “ ” light up. Screen shows 01:00 and 800W.
Press“ ”to setthe cooking time,then press “ ” or “ ” to adjust the cooking time. The MAX time is
90:00(The first 30 minutes is 100% power, and the rest 60 minutes is 80%
Press“ ”to set the microwave power. Then press “ ” or “
” to adjust the microwave power. Microwave
power:1000/800/600/400/200/0W
Press“ ”to start cooking, and cooking time will count down. The symbol of microwave“ ” is flashing.
8.2.2 Popcorn Functions
After selecting the function,“
”and “ ” light up, screen shows 1:30 and 50;
Press“ ” to set the weight. Then press“ ”or“ ”to adjust the weight,the range of weight is 50-100;
Press“
”to start cooking, the cooking time will count down and the symbol of popcorn “
Category
Popcorn
Weight
Cooking Time
Power
50g
1′30″
100%
100g
2′10″
100%
Display
”is flashing,
Remark
8.2.3Potato Functions
After selecting this function, the indicator “
” and“
”light up, screen shows 4:20 and 230.
Press“ ”to set the weight, thenpress“ ”or“
”to adjust the weight,the range of weight is 50-100;
Press“
”to start cooking, the cooking time will count down and the symbol of potato“
Category
Potato
Weight
Cooking Time
Power
230
4′30″
100%
560
8′00″
100%
A potato is about
690
11′30″
100%
230g
Display
8.2.4Hot Drinks Functions
After selecting this function, the indicator “
Press “ ” to set the weight, then press “
Press“
”is flashing.
Remark
”and “ ” light up, screen shows 1:15 and 250.
”or“
”to adjust the weight,the range of weight is 250-800;
”to start cooking, the cooking time will count down and the symbol of hot drinks“
”is flashin
g.
Category
hot drinks
Weight
Cooking
Display
Time
250
1′20″
100%
500
2′10″
100%
750
3′10″
100%
Power
8.2.5 Defrost By Weight
After selecting the function,the indicator “
” and “
Remark
250ml(A glass of
drinks is about 250ml)
” light up. Screen shows PR01 and 100.
8 Press “
” to switch to Defrost by Weight program. Then press “
“ or “
” to select the
correspondingprogram. There will be 5 programs from PR01 to PR05 for choosing;
Press “ ” again to set the weight,then press “ ” or “ ” to adjust the weight. The range of weight is from
100-2500.( Different programs have different weight)
Press “ ” to start cooking, and cooking time will count down. The symbol of defrost by weight “
” is flashing.
In the defrosting process, the appliance will stop when the time reached the half set time. And there will be
three beeps every 30 seconds for reminding. And the symbol “ ” will stop flashing while the word
“turn”appears on the screen and flash. You should open the door and turn the food over. Then close the door
and press “ ” to continue defrosting.
We can calculate the defrosting time according to different food and weight, and microwave power can adjust
automatically to reach the best defrosting effect. Furthermore, the table beneath offers reference value of defrosting
referring to the weight, which includes weight level, defrosting time and follow-up time.
DURATION TIME
PROGRAM
FOOD
WEIGHT(GRAM)
TIME(MIN)
PR 01
MEAT
100-2000
2:20-43:30
20-30
PR 02
BIRD SPECIES
100-2500
2:10-58:10
20-30
PR 03
FISH
100-2000
2:00-40:00
20-30
PR 04
FRUIT
100-500
2:36-13:00
10-20
PR 05
BREAD
100-800
2:25-19:20
10-20
(MIN)
8.2.6 Defrost By Time
After selecting this function, the indicator “
” and “
” light up. Screen shows 10:00.
Press“ ”to set the cooking time. Then press “ ”or “
”to adjust the cooking time. The MAX time is 90:00
Press“ ”to start cooking, and cooking time will count down. The symbol of defrost by weight “ ”is flashing.
In the defrosting process, the appliance will stop when the time reached the half set time. And there will be
three beeps every 30 seconds for reminding. And the symbol “ ” will stop flashing while the word
“turn”appears on the screen and flash. You should open the door and turn the food over. Then close the door
and press “ ” to continue defrosting.
8.3Delayed Start Time (Automatic cooking)
After cooking time and function is set, press“ ”again to set delay start time. “ ”lights up, screen displays
current time(hour is flashing). Press“ ”or“ ”to set delay start time(hour),press“ ”again, time(minutes) will
flash. Press“ ”or“ ”to set delay start time(minutes);Press“ ”to confirm the delay start time setting,If
press“ ”again, the appliance will work directly.
Screen shows the delayed start timeand current time in turn when the appliance is under standby mode.
Press“
”for 1 second if you want to cancel the selected function.
8.4 Pause In The Process Of Cooking
8.4.1、You can stop the cooking process at any time by pressing“
”or by opening the oven door. At the same time
when the appliance suddenly stops working, but Screen still displays the rest of the operating time still.
If you wish, at this time you can:
Turn or stir the food to ensure it will be evenly cooked;
Modify the process parameters;
Cancel the process by pressing“
”for 1 second;
To start the process, Cancel the door and press“ ”。
8.4.2、Modifying parameters
The operating parameters (time, weight, power, etc.) can only be modified when the cooking process has been
interrupted. Proceed as follows:
After pressing“ ”one second under standby mode the appliance will switch to function menu.
Press“ ”and“
”or“
”to set cooking time;
Press“ ”to switch to Power Setting Model;
Press“ ”to continue cooking process。
9 8.5 End cooking and cancel program
At the end of the process you will hear three beeps and the display will show the word ‘End’,The symbol
“ ”light. The beeps repeat every 30 seconds in five minutes until the door is opened or “ ” is pressed. The oven
returns to the OFF setting
During the process of setting program or oven working,press “
” the for 1 second and the appliance stops
working to go into standby mode
8.6Child Lock Function
On Lock:Under standby mode or working process, press “
” for 3seconds,the appliance will be locked with a
sound “di”. No matter what buttons you press after the appliance is locked,screen will always display
“bLOC” for 3 seconds, and then return to the previous content;
Unlock:Press “
” for 3 seconds,the appliance will be unlocked after a sound “di”. The symbol “
” disappears.
8.7 Cooling Fan System
The appliance is equipped with a cooling system which comes into operation as soon as a cooking function
starts.
Operation of the fans generates a normal air flow which comes out above the door and may continue for a
short time even after the appliance is switched off.
8.8 Door Interlock Switch
The light is on when the door interlock switch is not connected or closed incompletely, and it is available to set
the parameter, but you can't start the microwave.
The screen displays “door” when you press Start/Pause button, in the condition that the door interlock switch is
not connected or not closed. It would return to setting interface after 3 seconds.
8.9 Inside Light
The appliance light comes on:
1)、working condition except pause;
2)、When the oven door is opened in standby status;
3)、If the oven door is left open, the oven light will automatically shut-off after 10 minutes。
9.RECOMMENDED BAKING MENU
9.1 Cooking with Microwave
Warning! Read the section ‘Safety Precautions’ before cooking with your microwave.
Follow these recommendations when cooking with microwave:
●
Before heating or cooking foods with peel or skin (e.g. apples, tomatoes, potatoes, sausages) peel them
so that they do not burst. Cut the food up before starting to prepare it.
●
Before using a container or dish make sure that it is suitable for microwave use (see the section on
types of Microwave Ovenware).
●
When cooking food with very little moisture (e.g. defrosting bread, making popcorn, etc.) evaporation is
very quick. The Microwave Oven then works as if it was empty and the food may burn. The appliance
and the container may be damaged in such situation. You should therefore set just the cooking time
necessary and you should keep a close eye on the cooking process.
●
●
●
It is not possible to heat with much oil (frying) in the microwave.
●
●
Check that they reach at least a temperature of 70
If you have several containers, such as cups, for example, set them out uniformly on the turntable plate
Do not seal plastic bags with metal clips. Use plastic clips instead. Prick the bags for several holes so
that the steam can escape.
when heating or cooking foods.
There might come steam on the Microwave Oven door window during cooking and may start to drip.
This situation is normal and may be more noticeable if the room temperature is low. The process of
cooking is not affected by this. After you have finished cooking, clean up the water coming from the
Condensation。
● When heating liquids, use containers with a wide opening, so that the steam can evaporate easily.
Prepare the foods as per the instructions and keep in mind the cooking times and power levels indicated in the
tables.
10 Keep in mind that the figures given are only indicative and can vary depending on the initial state, temperature,
moisture and type of food. It is depending on the initial state, temperature, moisture and different types of food. It is
advisable to adjust the times and power levels to each situation. Depending on the exact characteristics of the food
you may need to increase or shorten the cooking times or increase or decrease the power levels.
Cooking with microwave。
1. The greater the amount of food, the longer the cooking time. Keep in mind that:
△ Double the quantity = double the time
△ Half the quantity = half the time
2. The lower the temperature, the longer the cooking time.
3. Foods containing a lot of liquid heat up more quickly
4. Cooking will be more uniform if the food is evenly distributed on the turntable. If you put dense foods on
the outer part of the plate and less dense ones on the centre of the plate, you can heat up different types
of food simultaneously.
5. You can open the Microwave door in the process of cooking. The Microwaveoven will switch off
automatically when you open the Microwave door. The microwave will start working again when you
close the door and press the start key.
6. It takes less time if you put a lid on the top of container when you cook. The lid used should have vents
for steam to circulate.
9.1.1Vegetables
Weight
Water
Fire
Time
Follow-up time
(gram)
(ml)
power
(Min)
(Min)
Cauliflower
500
100
800
9-11
2-3
Broccoli
300
50
800
6-8
2-3
Mushroom
250
25
800
6-8
2-3
Peas, carrots,
300
100
800
7-9
2-3
frozen carrots
250
25
800
8-10
2-3
Name
Notice
Cut into slices
Cover well
Cut into slices or
blocks, cover well
Peel and cut into
Potatoes
250
25
800
5-7
2-3
uniform size, cover
well
Chives
Frozen
cabbage
250
25
800
5-7
2-3
300
50
800
6-8
2-3
Cut into segments or
slices, cover well
Cover well
9.2. Defrosting with Microwaves
General instructions for defrosting
1. When defrosting, use only dishes that are appropriate for microwaves.
2. The defrost function by weight and the tables refer to the defrosting of raw food.
3. The defrosting time depends on the quantity and thickness of the food. When freezing food keep the defrosting
process in mind. Distribute the food evenly in the container.
4. Distribute the food on container. You can use aluminum foil when you cook delicate food. Important: The
aluminum foil should not come into contact with the interior Microwave Oven cavity as this may cause electrical
arcing.
5. Thick portions of food should be turned several times.
6. Distribute the frozen food as evenly as possible since narrow and thick portions defrost more quickly than the
thicker and broader parts.
7. Fat-rich foods such as butter, cheese and cream should not be completely defrosted. If they are kept in room
temperature they will be ready to be served in a few minutes. With ultra-frozen cream, if you find small pieces of
ice in it, you should mix these in before serving.
8. Place poultry on an upturned plate so that the meat juices can run off more easily.
9. Bread should be wrapped in a napkin so that it does not become too dry.
10. Remove frozen food from its wrapping and Don’t forget to take off any metal twist-tags. For containers that are
used to keep frozen food in the freezer and which can also be used for heating and cooking, all you need to do
is take off the lid. For all other cases you should put the food into containers that are suitable for microwave use.
11 11. The liquid resulting from defrosting, principally that from poultry, should be discarded. In no event should such
liquids be allowed to come into contact with other foods.
12. Do not forget that by using the defrosting function you need to allow for standing time until the food is completely
defrosted.
13. In defrost process, please turn food over when microwave oven alarms and displays "turn".
Please refer to the following table for different temperature of various food.
Name of food
Weight (gram)
100
Defrosting time
Follow-up time
Frequency of
(Min)
(Min)
turnover
2-3
5-10
1
200
4-5
5-10
1
Meat(veal, beef,
500
10-12
10-15
2
pork)
1000
21-23
20-30
2
1500
32-34
20-30
2
2000
43-45
25-35
3
500
8-10
10-15
2
1000
17-19
20-30
3
100
2-4
10-15
2
500
10-14
20-30
3
200
4-6
10-15
2
Beef stew
Minced meat
Sausage
500
9-12
15-20
3
Poultry
250
5-6
5-10
1
Chicken
1000
20-24
20-30
2
Dorking
2500
38-42
25-35
3
Fish fillet
200
4-5
5-10
1
Trout
250
5-6
5-10
1
Prawn
100
2-3
5-10
1
500
8-11
15-20
2
200
4-5
5-10
1
300
8-9
5-10
1
Fruit
500
11-14
10-20
2
200
4-5
5-10
1
500
10-12
10-15
1
800
15-17
10-20
2
Butter
250
8-10
10-15
Cheese
250
6-8
10-15
Cream
250
7-8
10-15
Bread
9.3.What kind of Microwave Ovenware can be used?
9.3.1Microwave function
For the microwave function, notice that microwave is reflected by metal surface. Glass, china, clay, plastic, and
paper make microwave pass. For the reason, metal pans, dishes or containers with metal parts or decorations
cannot be used in the microwave. Glassware and clay with metallic decoration or content (e.g. lead crystal) cannot
be used for Microwave Oven.
The ideal material for Microwave Oven is glass, refractory china or clay, or heat resistant plastic. Very thin,
fragile glass or china should only be used for short period of time (e.g.heating)
Always wearMicrowave Oven gloves to take mature food.
To test Microwave Ovenware, put the item in the Microwave Oven for 20 seconds at maximum microwave
power, after 20 seconds, take the Microwave Ovenware out immediately, it is suitable to use if it is cold or just
slightly warm. However, it is not suitable for Microwave Ovenif it heats up a lot or causes electric arcing.
12 9.4 Aluminum containers and foil
Pre-cooked food in aluminum containers or in aluminum foil can be put in the microwave if the following aspects are
respected.
●
●
Be noticed that manufacturer’s recommendations written on the external packing.
●
The cooking time is longer because Microwave only permeate into food from the top. If you have any
doubts, it is best to use only dishes suitable for microwave use.
●
Important: aluminum foil cannot come into contact with the cavity walls since this may cause electrical
arcing.
●
Lids
We recommend you use glass or plastic lids or cling film:
1. In case of excessive evaporation (mainly during very long cooking times)
2. Cooking time is shorter
3. The aroma is preserved
The lid should have vents so that no pressure produces. Plastic bags should be opened. Baby feeding
bottles or jars with baby food and similar containers can only be heated without tops/lids on otherwise
they may burst.
The aluminum containers cannot be more than 3 cm high or come in contact with the cavity walls
(minimum distance 3 cm). Any aluminum lid or top should be removed.
10.CLEANING AND MAINTENANCE
Before carrying out any operations, disconnect the appliance from the electricity supply. Take the plug out of the
socket or switch of the Microwave Oven’s power circuit.
Warning! Never use a jet of steam for cleaning the inside of the Microwave Oven.
Warning! The Microwave Oven should be cleaned regularly, with all food remains being removed. The surface of
microwave may deteriorate if it is not clean. That may reduce the Microwave Oven’s working life and possibly result
in a dangerous situation.
10.1. Cleaning stainless steel
To keep stainless steel in a good condition, it should be cleaned regularly.
10.2 Daily cleaning routine
When cleaning and caring for stainless steel surfaces, always use only specific products which do not contain
abrasives or chlorine-based acids.
Instructions for use: Pour the product onto a damp cloth and wipe over the surface, then rinse thoroughly and dry
with a soft cloth or chamois leather.
10.3 Food stains or spills
Never use metal scouring pads or sharp scrapers which may damage the surface of the Microwave Oven.
Use ordinary non-abrasive products with the aid of wooden or plastic utensils if necessary. Rinse thoroughly
and dry with a soft cloth or chamois leather.
10.4 Cleaning the Microwave Oven cavity
Cleaning is the only maintenance normally required. Every time after cooking, clean the inner cavity with a
damp cloth since this is an easier way to remove splashes or spots that may stick to the cavity.
To remove dirt that is harder to shift, use a non-aggressive cleaning product. Do not use Microwave Oven
sprays or other aggressive or abrasive cleaning products.
Always keep the door and the front panel ofMicrowave Oven clean to ensure that the door opens and closes
properly.
Make sure water does not permeate the microwave ventilation holes.
Regularly take out the turntable plate and the respective support and clean the cavity base, especially after any
liquid spillage.
Microwave should not work without turntable
If the Microwave Oven cavity is very dirty, put a glass of water on the turntable and switch on the Microwave
Oven for 2 or 3 minutes at maximum power. The steam released will soften the dirt which can then be cleaned easily
using a soft cloth. Unpleasant odors (e.g. after cooking fish) can be eliminated easily. Put a few drops of lemon juice
in a cup with water. Put a spoonful of coffee in the cup to avoid the water boiling over. Heat the water for 2 to 3
minutes at maximum microwave power.
13 10.5 Cleaning the cavity ceiling
If the Microwave Oven ceiling is dirty, to avoid the danger of burning, wait until the grill is cold before lowering it.
Do not use abrasive cleaning products or sharp objects.
To avoid any risk, do not remove the mica cover.
The glass lamp cover is located on the Microwave Oven ceiling and can be removed easily for cleaning. For this
you just need to unscrew it and clean it with water and dishwashing liquid.
10.6 Rinse of door seal and front panel
Please rinse in time if there are residues left in door seal or on front panel. Do not use rough cleaning tools like
hard brush, coarse cloth, wire netting, knife or any other sharp tools, using those sharp tools may scratch door seal
or the surface of the front panel. Please use non-abrasive detergent. You can use wooden or plastic cleaning tools if
it is necessary.
10.7 Cleaning the accessories
Clean the accessories after each use. If they are very dirty, soak them first of all and then use a brush and
sponge. The accessories can be washed in a dish washing machine.
Make sure that the turntable plate and the respective support are always clean. Do not switch on the Microwave
Oven unless the turntable and the respective support are in place.
11.SPECIAL MAINTENANCE
11.1 Replacing the light bulb
Concrete operations:
Take off the plug from power supply.
Take off the lampshade(1);
Take down halogen lamp(2);Warning: Hot lamp!
Fill new halogen lamp (230V-25W).
Operate according to the instruction.
Install lampshade well.
Connect the power.
WARNING: The lamp is not suggested for consumer to
replace. The replacing should be done by a
professional mechanic.
12.INSTALLING THE APPLIANCE
12.1Before the installation
Open the Microwave Oven door and take out all the accessories and remove the packing material.
Make sure that the Microwave Oven is not damaged by any way. Check that the Microwave Oven door closes
correctly and the inside of the door and front Microwave Oven panel are not damaged.
12.2DO NOT USE THE MICROWAVE OVEN
If the power cable or the plug is damaged, if the Microwave Oven does not function correctly or if it has been
damaged or dropped. Put the Microwave Oven on a flat and stable surface. The Microwave Ovenshould not be
installed close to any heat source, radios or televisions.
During installation, make sure that the power cable does not come into contact with any moisture or objects with
sharp edges and the back of the Microwave Oven. High temperature can damage the cable. Warning: after the
Microwave Oven is installed you should make sure you can access the plug.
12.3Positioning the Microwave Oven
If we put the Microwave Oven into cabinet, the material cabinet should be insulated, and the clearance between
the edge of the cabinet and the Microwave Ovenshould be over 100 mm for ventilation.
14 There are 4 screws on the inner side of the Microwave Oven door frame.
15 Note: Do not take the door handle as force bearing point during the installation and removal.
13.TROUBLE SHOOTING
Warning: Maintenanceshould bedoneby a professionalmechanic.
Circumstances that doesn’t need a professionalmechanic.
With no display!
■ Check the time indicator on or off
16 With no response after press any button!
■ Check if safety lock is on or not.
Microwave Oven doesn’t work!
■ Check the plug plugged well
■ Check the Microwave Oven power connected or not。
■ Make sure the Microwave Oven door closed tightly and rightly.
■ Ensure nothing caught between the door and front panel of the cavity.
Strange noise happens when Microwave Oven is in operation!
■ Check if metal objects inside the Microwave Oven arced or not.
■ Check if vessel touches inner wall of Microwave Oven by accident.
The Microwave Oven can’t heat or heat very slowly!
■ Usage of metal vessel by accident.
■ Check if running time and fire gear setting is appropriate.
■ Food put in the Microwave Oven is too big.
There is still noise after microwave oven stops working!
■This is normal, it takes some time for cooling fan to cool down.
Lamp doesn’t work after connecting power!
■ It doesn’t influence the usage of Microwave Ovenif other functions work well.
17