1
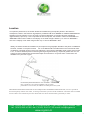
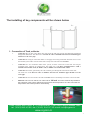
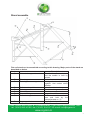
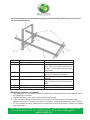
crypton international ltd.
Beautiful by nature! Powered by green energy!
Solar Water Heater User Manual
Town Center Mall Office #3 Providenciales, Turks and Caicos Islands, BWI
tel: (1649)946.45.88, fax: (1649) 946.47.95 e-mail: [email protected]
www.crypton.tc
1
Location
For optimum performance, the heater should be installed facing the equator (South in the Northern
Hemisphere, North in the Southern Hemisphere). ALWAYS USE A CO MPASS TO CHECK ORIENTATION
o
Deviation from the equator of up to 45 east or west has little effect on total annual solar contribution
(approximately 5 per cent). If it is not possible to face the equator, the decision of either an EASTERLY or
WESTERLY bias must be made. If the majority of hot water usage is before 2 p.m. favor an EASTERLY
bias. If the majority of hot water usage is after 2 p.m. favor a WESTERLY bias.
Ideally, the heater should be installed on a pitch equal to the geographic latitude of the place of installation.
However, variation in the pitch to within 20° of the latitude will have little effect on the total annual solar
contribution (nominally around a 5 per cent reduction). The minimum allowable angle of pitch of the heater
is 10°, to ensure sufficient pitch for thermosyphoning and glass cleaning. At pitches greater than 30°, the
system must be installed using special tank straps and mounted on a cyclone frame. These items are
available from your local supplier.
If
it is necessary to face the solar hot water heater 45° to either the
East or the West, a lower pitch installation will give better
performance. In such cases, the addition of a third panel to the system
THE HEATER MUST BE INSTALLED ON AN ADEQUATELY SUPPORTED AREA OF ROOF, as close as possible to
the most frequently used hot water outlet, or existing water heater system in retrofit installations. The heater must be installed
in an area that is free of shade all year round. Ensure that trees do not shade the heater, particularly in winter.
Town Center Mall Office #3 Providenciales, Turks and Caicos Islands, BWI
tel: (1649)946.45.88, fax: (1649) 946.47.95 e-mail: [email protected]
www.crypton.tc
2
The installing of key components will be shown below
1. Connection of Tank, collector
a.
Connection 1 is for hot water outlet. Hot water from the tank will get into the bathroom and kitchen
thought this connection. The outlet size is 3/4 inch. In order to minimize the heat lost. Insulation pipes
should cover the water pipe.
b.
Connection 2 is using for cold water intake. Civil supply water will get into tank when hot water is used.
Pressurized system makes sure the water tank is always full. The inlet size is3/4 inch.
c.
Connection 3 is for circulation outlet of the system, it allows cold water of the tank out and gets
circulated in the collector for gaining heat. The outlet size is 3/4 inch. CONNECTION 2 AND 3
MAYBE ONLY HAVE ONE, IN THIS CASE, A THREE VALVE WILL BE USED.
d.
Connection 7 hot water generated by the solar collector goes through this inlet into the water tank.
The outlet size is 3/4 inch. In order to minimize the heat lost. Insulation pipes should cover the
water pipe.
e.
Connection 4 is for active anode. The inlet is 1/2 inch. Active anode helps to clear the water in the tank.
f.
Device 5 This is for T/P VALVE; T/P valve inlet is 3/4 inch. This valve must be fully sealed for
the protection of the system against excess pressure and temperature. T/P valve can lower the
temperature and reduce pressure automatically,
Town Center Mall Office #3 Providenciales, Turks and Caicos Islands, BWI
tel: (1649)946.45.88, fax: (1649) 946.47.95 e-mail: [email protected]
www.crypton.tc
3
g.
Device 6 is the back up heating element for the solar water system. Cover must be installed to
protect the heating element from moisture and other risk. Heating element control and default
set ups is explain in the smart controllers’ user guide.
h.
White cover shown above is the cover for heating element protection.
i.
Device 8 is an optional system controller. Please read the Controller’s operation instruction for
more details.
Remarks: temperature sensor can come in contact with electrical heating element. Please keep
this in mind during the installation process.
Town Center Mall Office #3 Providenciales, Turks and Caicos Islands, BWI
tel: (1649)946.45.88, fax: (1649) 946.47.95 e-mail: [email protected]
www.crypton.tc
4
Stand assemble
Flat roof stand can be assembled according to this drawing. Major parts of the stand are
described as below.
Number
name
Description
Water
tank
support
band
Saddle
for water tank, tank
①
and the saddle is held by
screws
Stand
support
Makes the stand steadier
②
Back leg cross support
Holding the two back legs
③
together, that makes stand
steadier.
Collector clamp Holes
Holes for collector clamps
④
Back leg
Stand’s back leg
⑤
Stand support
Stand cross support
⑥
Stand slant leg
Leg of stand
⑦
Collector
support
bars
Collector
is laid on those
⑧
bars and held by the
clamps(located on ④)
Leg support hole
Leg supporter’s position
⑨
Town Center Mall Office #3 Providenciales, Turks and Caicos Islands, BWI
tel: (1649)946.45.88, fax: (1649) 946.47.95 e-mail: [email protected]
www.crypton.tc
5
Slant roof stand can be assembled regarding to this drawing. Major parts of the stand
are described as below.
Number
①
②
name
Water tank support frame
Water tank held screw
③
Collector support bars
④
Long supporting bar
⑤
Bottom leg
⑥
⑦
Front leg
Collector clamp Holes
Description
Support water tank
Screws located here to hold water
tank. Two more holes need to be
drilled in correct place for the other
two screws
Collector is laid on those bars and
held by the clamps(located on ⑦ )
Bar used to support tank and
collector
Stand leg, directly contact with roof.
Stand is held to roof by screws from
here
The same with ⑤
Holes for collector clamps
Mounting collector on stands
1. Lay collector(s) on the stand’s collector suppor t bars. Clamps must be preinstalled to avoid
the dropping of collector.
2. Tighten clamps to make sure collectors are held strongly.
3. Tight the brass fittings to the collector’s circulation inlet and outlet then connect pipes
(please refer to the “Connection of tank and collector” drawing) between tank and collector.
4. Fill the collector and tank; check all the connec tions of tank and collector. Detect any leaking
and repair leaks.
Town Center Mall Office #3 Providenciales, Turks and Caicos Islands, BWI
tel: (1649)946.45.88, fax: (1649) 946.47.95 e-mail: [email protected]
www.crypton.tc
6
FILLING AND COMMISSIONING THE STORAGE TANK AND COLLECTORS
1. Turn on a least one hot water outlet tap, preferably over a bath or laundry basin.
Open the main water supply valve on the line to the water heater to allow water to
Fill the storage cylinder and collectors, dispelling air out of the top of the cylinder
through the open tap. As soon as water flows freely (without air bursts) from the
tap, close the tap and allow the cylinder to pressurize. Check all joints for water tightness.
2. Turn ON the electric power to the booster element ensuring that the power is correctly
connected i.e. ‘Active’ line to ‘Active’ terminal etc.
Operate the lever on T/P valve to ensure that the valves are functional. The system tank is
now filled and ready to operate.
MAINTENANCE
Service Calls
Should your solar water heater not provide hot water please check the following before
requesting a service call?
1) Shading from trees is not excessive and is not covering the collectors for all or part of
the day.
2) Hot water usage is not excessive.
3) Hot water is not leaking from within the plumbing system.
4) Booster switch and/or time switch are turned ON.
5) Booster circuit fuse or circuit breaker is sound.
6) Electric or gas meter speeds up when the booster switch is turned ON after being OFF.
Contact us if all of the above have been checked and there is still no hot water.
Six Monthly Service
TEMPERATURE PRESSURE RELIEF VALVE
This valve is near the top of the water heater and is essential for its safe operation. It is possible
for the valve to release a little water through the drain line during each heating period. This
occurs as the water is heated and expands by approximately 1/50 of its volume. Continuous
leakage of water from the valve and its drain line may indicate a problem with the water heater
Town Center Mall Office #3 Providenciales, Turks and Caicos Islands, BWI
tel: (1649)946.45.88, fax: (1649) 946.47.95 e-mail: [email protected]
www.crypton.tc
7
WARNING: Never block the outlet of this valve or its drain line for any reason.
Operate the easing lever on the temperature pressure relief
valve once every six months. It is very important that the
lever is raised and lowered gently.
DANGER: Failure to do this may result in the water heater
cylinder failing, or under certain circumstances, exploding.
If water does not flow freely from the drain line when the
lever is lifted, t
The temperature pressure relief valve should be checked for
performance or replaced at intervals not exceeding 5 years, or
more frequently in areas where there is a high incidence of
water deposits.
COLLECTOR GLASS
Ensure the glass on your solar collectors is free of dust, salt spray or any other matter, which may reduce
the effectiveness of the solar collectors. If the collector glass becomes dirty, hose down, or, if the
collectors are accessible, wash the collector glass with water and a soft brush when the collectors are cool.
Have any trees trimmed which may shade the solar collectors.
Major Service (Usually Every Five Years)
This service should be performed every five years, or more often in poor water quality areas
(refer to Table below).
THE MAJOR SERVICE CAN ONLY BE C ARRIED OUT BY YOUR LOCALAUTHORISED
SERVICE REPRESENTATIVE.
Note: The major service and any replacement of components which have not failed are not
included in our warranty.
1) Replace the pressure/temperature operated relief valve.
2) Flush the cold water relief valve.
3) Where fitted, check the electric element for excessive calcium build up or corrosion. Replace
if necessary.
4) Visually check the unit for any potential problems, e.g. broken glass, excessive dust build-up,
shading etc.
5) Carefully inspect all connections.
6) Drain and flush out tank sediment build-up (if any)
7) Drain and flush out collectors
8) Replace the anode.
Town Center Mall Office #3 Providenciales, Turks and Caicos Islands, BWI
tel: (1649)946.45.88, fax: (1649) 946.47.95 e-mail: [email protected]
www.crypton.tc
8