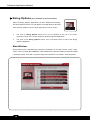
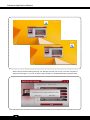
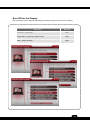
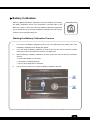
1
Notebook Software Application Manual V3.0 Software Application Manual Copyright Notice The material in this document is the intellectual property of MICRO-STAR INTERNATIONAL. We take every care in the preparation of this document, but no guarantee is given as to the correctness of its contents. Our products are under continual improvement and we reserve the right to make changes without notice. Trademarks All trademarks are the property of their respective owners. SRS Premium Sound, SRS and the symbol are trademarks of SRS Labs, Inc. THX and THX TruStudio Pro are trademarks of THX Ltd. which may be registered in some jurisdictions. All rights reserved. Technical Support If a problem arises with your system and no solution can be obtained from the user’s manual, please contact your place of purchase or local distributor. Alternatively, you may contact our technical staff for further guidance at: http://support.msi.com/ Revision History 2 Version Revision History Date 3.0 Latest Released 08, 2014 Preface 1-3 About This Manual This Software Application Manual provides instructions and illustrations on installing and using the software applications which are exclusively designed by MSI. This manual will give users more on how your notebook can be more efficient, convenient, and enjoyable with the help of these software applications. The software applications selected here may be optionally supported for particular models. Contact the local dealer for further information if necessary. Dragon Gaming Center (DGC) (for Gaming Series only)......................... 6 Dragon Gaming Center (DGC) is a handy application for integration of games installed and gaming software interface. Providing easy access to real-time system performance monitor and gaming environment setting, DGC empowers users to facilitate tweaking process without occupying system resources. XSplit Gamecaster (for Gaming Series only) .......................................... 16 XSplit Gamecaster is a one-of-a-kind live streaming and recording application designed for both casual and hardcore gamers. It allows every gamer to live stream or record their gameplay without complicated setup and configuration. SteelSeries Engine (SSE) (for Gaming Series only) .............................. 30 SteelSeries Engine is the Apps to combine all frequent functions for gamers in order to easily customize every individual key and functions to personalize every gamer's play style, including KLM, multiple devices management (for example, headset, mouse, and keyboard), keypress macros, and text macros. Shortcut Manager (for Workstation Series only) ....................................... 45 Shortcut Manager, exclusively designed by MSI, is a software application for users to define and manage the personally and frequently used keyboard hot keys. With the hot keys set in Shortcut Manager, users will be able to get a smooth and efficient experience in operating this notebook. Keyboard LED Manager (KLM) (for Workstation Series only) ................. 60 For the gaming notebook equipped with colorful keyboard LEDs, users control the color variation of the LEDs underneath the keyboard by using the Keyboard LED Manager (KLM) application. These colorful keyboard LEDs are designed to give users more visual entertainment while using the gaming notebook. 3 Software Application Manual Sizing Options (for selected models only) ............................................... 70 This application helps to adjust the system DPI setting conveniently. Only with the resolution (2880 x 1620) can provide the respective image including 100%, 125%, 150% (the best option), 175% and 200% DPI. Battery Calibration ..................................................................... 75 This application helps to extend the life cycle of the battery. It automatically refreshes the battery capacity through efficient processes of charging, discharging and recharging the battery. System Control Manager (SCM) ................................................ 79 System Control Manager (SCM) is a proprietary software for driving and controlling the Fn keys on the keyboard. The SCM is pre-installed with the default OS and will run automatically in background. Recovery Image Backup Tool.................................................... 85 Recovery Image Backup Tool, the utility designed to backup the recovery image to blank DVD disks, a USB flash disk or ISO files. They can be used to recover the system to manufacturer’s default settings when it is needed. Usage of this application on any product with no authorization may be prohibited. 4 Preface 1-5 Note 5 Software Application Manual Dragon Gaming Center When the Dragon Gaming Center application has been installed successfully, its launching icon will appear in the system tray. Click on this icon to launch. Main Window 1. System Monitor: This item shows current system loading information. 2. Utility: Default has included some pre-installed software shortcuts. 3. Instant Play: This item includes settings regarding gaming mode environment. 4. Hybrid Power: This item indicates whether Hybrid Power status is ON or OFF. (optionally supported). 5. Device Setting: This tab allows user to adjust or switch on/ off your device settings. 6 Preface 1-7 System Monitor The field shows real-time readings of major components including CPU/GPU, memory, temperature and network speed. Loading Status This item shows current status of CPU, memory, battery capacities, disk I/O loading, GPU, current power scheme, power consumption while AC power is unplugged, and fan speed. Temperature This item shows GPU and CPU temperature. Click on F can switch to Fahrenheit degree while click on C to Celsius degree. Network Speed This item shows Ethernet and Wireless speed. 7 Software Application Manual Utility This function integrates a maximum of nine shortcuts of software and utilities embedded in the notebook. 8 Preface 1-9 Instant Play Instant Play function allows users to define several features in P1 key shortcut or a combination of Fn + F4 key. One can designate an immediate startup for one specified game, set the key as a quick switch to ECO Gaming mode and adjust hardware configuration. Instant Play Play Key Setting Select to set one game for instant play. Press a combination of Fn + F4 key or a P1 key (if available), or click the game icon to enter game mode and launch the game immediately. Disable Windows Key With the Disable Windows Key field checked, Windows Key will be disabled when user enters the game mode. Note: This setting will also be applied to the Window Key setting in Device Setting tab. That is to say, after selecting Disable Windows Key box here, the setting of Windows Key in Device Setting tab will be overridden even if the key is enabled (Windows Key indicates yellow). 9 Software Application Manual Game List This tab gives you an easy and quick management of installed game database. Users can add shortcuts of your computer games by clicking "Add" in Game List. 10 Preface 1-11 Display & Audio Click on Apply Setting to switch to game mode where Display and Audio adjustments will be available in game mode from Instant Play. Mouse Click on Apply Setting to switch to game mode where Mouse adjustments will be available in game mode from Instant Play. 11 Software Application Manual Resource Release This item allows users check to remove unnecessary programs in End Task List for optimal gaming performance. 12 Preface 1-13 Hybrid Power (optionally supported) This function empowers users to monitor current Hybrid Power status. Hybrid Power Status Chart This item indicates the duration of the Hybrid Power mode the system has entered in the last 60 seconds. Hybrid Power Ability Hybrid Power shows current status of Hybrid Power mode and the function is only available in selected models. The selection will not be displayed in the following conditions: the model purchased does not support Hybrid Power, an unplugged AC power or a battery capacity that is lower than 30%. Hybrid Power Status This item indicates whether Hybrid Power status is ON or OFF. Note: Hybrid Power is only available in selected models. 13 Software Application Manual Device Setting This tab allows user to adjust or switch on or off your device settings. Yellow indicates the selected feature enabled and white disabled. Enabled Disabled Windows key: Enable or disable the Windows Key. Touchpad: Enable or disable Touchpad. High Performance: Enable or disable High Performance power plan. 14 Preface 1-15 Note 15 Software Application Manual XSplit Gamecaster (XGC) Registering an account only takes a minute and lets us keep you up-to-date with the latest releases and development news, as well as storing your personal settings in the cloud for easy access on multiple devices. When the XSplit Gamecaster application has been installed successfully, its launch icon will appear in the system tray. Click on this icon to launch. Sign In Use your XSplit Broadcaster account to log in if you have one, if you don't have an account yet, go to XSplit.com to register one. 16 Preface 1-17 Live Streaming and Recording Below is the default tab of XSplit Gamecaster which tells you how to start Live Streaming or recording in 3 easy steps. 1. Switch to any game or open console viewer. When XSplit Gamecaster loads into your game, you will see a notification that tells you what hot key is set to open the overlay. The default hot key combination to show the XSplit Gamecaster overlay is CTRL + TAB. 2. Press CTRL + TAB to show XSplit Gamecaster overlay. 3. Click Stream to Live Streaming or click Record to start recording. 17 Software Application Manual Share Your Recordings 1. Simply go to the Recordings tab. 2. Find the video that you wish to share. 3. Select the platform you wish to upload. The video must be uploaded to YouTube in order to share on your social networks. If you have not set up a YouTube account, follow a wizard to guide you through the process. 4. Once the video has been uploaded to YouTube, you can select the service that you wish to post the link. Follow the on-screen instructions to guide you through the uploading and sharing process. Click Share to post the link to Facebook. 18 Preface 1-19 Annotation The built-in annotation feature enables you to draw and highlight selected parts of the gameplay. 1. 2. Hit CTRL + TAB to open your overlay, and select annotation icon in the top bar. Press the F1 key to see the variety of tools available in annotation mode. To exit annotation mode press the ESC key. 3. You can add your commentary through drawings, sketches, and etc. 19 Software Application Manual Add a Webcam With XSplit Gamecaster, it's easier than ever to add your webcam whether live streaming or recording. Simply bring up the in-game overlay, click the camera button and then position it anywhere. You need to press Fn + F6 to turn the Webcam function on beforehand. 1. Add a webcam is Settings Tab. First, make sure you have your desired camera selected in the Settings tab of the XSplit Gamecaster window. 2. 3. Toggle your overlay and click on the camera icon to enable or disable your camera. You can choose to have your camera shown only in your recording or stream, or you can also pin it so you can see it in your game. 20 Preface 1-21 Use Chroma Key You can also activate Chroma Key and make your broadcast look even more immersive using a green screen transparency effect. Chroma keying allows you to take advantage of a chroma-compatible backdrop such as a green screen to immerse yourself within the game play footage. Red, blue, and green are the available colors for keying and you can adjust the threshold of the chroma key via the provided slider. 1. Locate CHROMA KEY in the Settings Tab, click it to enable. 2. Shows your game face in the game play footage. 21 Software Application Manual In Game HUD Set your camera to be visible to your screen viewer in-game to your viewer. 1. Go to where your camera's position in the overlay, check the In Game HUD to ON. 2. There you go, the screen shows in game HUD visibility to see the chat in game. 22 Preface 1-23 In-game Overlay Introduction Add a drawing to your stream or recording. Share your live stream on your social networking sites. Open Twitch panel to chat and edit broadcast title. Chat via twitch Chat button allows you to make a Twitch chat. Enable Camera. Adjust the volume. And turn on or turn off your microphone. 23 Software Application Manual Accounts The Accounts tab give you access to live streaming, video sharing and social networks. Do it all from a simple user-interface that works directly inside your favorite video game. 24 Preface 1-25 Image Overlay Customize your game by adding an image overlay. Use it to add your clan logo, your social media links or even a full screen game overlay. First, you need to update to the latest version of XSplit Gamecaster v. 1.7. The feature will not be available in old versions of XSplit Gamecaster. Look on the Start tab of XSplit Gamecaster and you will be prompted if you are not on the latest version. Change the image overlay 1. Launch your PC game (or open the console viewer) and open the XSplit Gamecaster overlay. Click the icon to activate Image Overlay. 2. Once activated, your image will initially be the XSplit Gamecaster logo. 3. To change and adjust the image, just hover over the image with your mouse to see the image toolbar. Click the icon to change the image. 4. Then a window will open for you to choose your preferred image overlay. When you’ve selected your graphic, click on the REPLACE IMAGE button or double-click on your selected image 25 Software Application Manual Adjust the image overlay When clicking on your chosen image, you can re-position the image by dragging it or resize the image by dragging the image outline. 26 Preface 1-27 The Image Overlay Toolbar When you click on your chosen image, an outline will appear with various highlighted sections that you can use to resize the image. You can re-position the image by dragging the image. Visibility The first option toggles visibility modes for the image. You can choose whether to show the image to your viewers and/or yourself. Opacity Set the opacity of Image Overlay. This controls the transparency of the image. A value of 100% means no transparency. 50% 100% 27 Software Application Manual Aspect Ratio Lock The third option (the arrow) toggles image aspect ratio lock on/off. It is usually suggested to keep this "on". 28 Preface 1-29 Note 29 Software Application Manual SteelSeries Engine (SSE) When the SteelSeries Engine application has been installed successfully, its launch icon will appear in the system tray. Click on this icon to launch. Main Window 1. Device Name: Shows model name of your notebook. 2. Function Pages: Select major functions from Buttons, Colors, Settings, Properties, and Statistics tabs. 3. News: Click to link to SteelSeries news webpage. 4. Actions: Select to edit a keyboard macro and drag it to left keyboard layout to replace it. 5. Profiles: Click on the profile name and edit Series Default and custom profiles created by the user. 6. Keyboard Layout: Shows the keyboard of a corresponding model. 7. Tips: Shows a description when the mouse pointer is over the area. 30 Preface 1-31 Button This tab allows user to assign custom actions to any programmable button, and to see a layout of the laptop with a brief overview of the assignment. After installing the SteelSeries Engine you will need to right click on the icon in the taskbar and open it. 1. Scale Here you can choose to scale the keyboard on this screen. On to scale keyboard to the size of your screen or Off to the size of original pixel size. 2. Keyboard Layout Keyboard Layout will show the keyboard of a corresponding model. Hotkeys illuminating green frame with mouse cursor movement indicates user defined hotkeys. Just right-click on a key, a gamer can easily customize every individual key as hot key to personalize his/her own play style, greatly increase the convenience on key usage. Note: Fn, F1 to F12 keys has been excluded to hotkeys to reduce the possibility of accidentally striking. 3. Active Layer and Layers Setting The SteelSeries Engine MSI gaming laptops incorporated supports four keyboard layers for gamers to set four usage scenarios. Press Fn+1 to 4 to switch layers. 31 Software Application Manual Action Type SteelSeries application allows you to choose between four types of actions for a key Keypress Macro, Text Macro, Launch Application and Disable Key. Keypress Macro The Keypress Macro type simulates mouse and keyboard inputs at a kernel level. 1. Designate a hotkey from keyboard layout. 2. Name the hotkey in Name field. 3. Select Keypress Macro in Action Type dropdown menu. 4. Enter Keypresses and click Record Delays to record delay between signals. 5. For advanced tweaks, click Advanced, and then follow the on-screen instructions to Advanced Macro Editor window where you can fine-tune the signal delay times. 6. 32 Click Save in bottom left corner in the main screen. Preface 1-33 33 Software Application Manual Text Macro The "Text Macro" type is used to copies and pastes the specified text. 1. Designate a hotkey from keyboard layout. 2. Name the hotkey in Name field. 3. Select Text Macro in Action Type dropdown menu. 4. Enter strings in Text field. Multilingual strings supported. 5. Set hotkeys for Start Key and Send Key as text macro ready, you will be able to start keystringssend in one keystroke. A macro that spams multiple keys with one keypress. 6. 34 Click Save in bottom left corner in the main screen. Preface 1-35 Launch Application The "Launch Application" type launches the designated game or other application. 1. Designate a hotkey from keyboard layout. 2. Name the hotkey in Name field. 3. Select Launch Application in Action Type dropdown menu. 4. In Application field, select the specific application by clicking Browse. 5. Click Save in bottom left corner in the main screen. 35 Software Application Manual Disable Key Disable Key ensures that nothing happens when the button is pressed. Finally there's the Macro Editor that can disable the keyboard when needed, among other tasks. 1. Designate a hotkey from keyboard layout. 2. Name the hotkey in Name field. 3. Select Disable Key in Action Type dropdown menu. 4. Click Save in bottom left corner in the main screen. 36 Preface 1-37 Color By clicking on the Colors tab, users can fully customize the keyboard illumination from the individual and group color settings to the intensity of the illumination. Active Layer This part shows current layer of backlit keyboard. 37 Software Application Manual Effect User can choose backlight modes, six usage scenarios available. 1. 2. Select desired effects in the list. Set backlight LED color by clicking on a color zone, and color setting windows will pop up. Then follow the on-screen instructions to continue. 3. 38 Click Save in bottom left corner in the main screen. Preface 1-39 Settings Select keyboard layout language You can configure the language of your keyboard layout, 17 languages available. 1. Select local language. 2. Click Save in bottom left corner in the main screen. 39 Software Application Manual Select User Interface language 1. Locate SteelSeries icon on system tray, and right-click Settings. 2. Select language in SteelSeries Settings Dialog and Click OK. 3. Click Save in bottom left corner in the main screen. 40 Preface 1-41 Properties User can launch specific profile according to corresponding games, for example, use profile 1 for First-Personal Shooting games (FPS), and profile 2 for Defense of the Ancients (DotA) games. 41 Software Application Manual Profiles The left hand side list in the SteelSeries Engine is specifically for Profiles - Default profiles including the SteelSeries Default and custom profiles created by the user. To import, export, rename, copy or delete a profile, right click on the profile name and select the desired function. Profiles will be applicable to SteelSeries Engine-supported devices or MSI gaming notebooks. Profile Activation Options. User can set the Profile to be automatically selected when the following applications are active. 42 Preface 1-43 Statistics Use the Statistics module to record your keyboard or mouse actions. You can then use this information to fine tune your macros as well as your key and mouse button assignments to optimize your tools to play and work. Statistics tab highlights the most frequently used keys. This solution also runs monitoring tests during any game or application, and enables users to calculate their Actions Per Minute (APM) to improve gaming efficiency and customize key locations. 1. 2. Click Start to start key presses record. Keyboard layout shows with both color and numbers the frequency of your key or button presses. Then review the peripheral heat map, which shows with both color and numbers the frequency of your key or button presses. 3. Time field shows duration of the record. 4. Click Save in bottom left corner in the main screen. 43 Software Application Manual Note 44 Preface 1-45 Shortcut Manager When the Shortcut Manager application has been installed successfully, the Shortcut Manager launching icon will appear under Programs and the system tray in the lower right-hand corner of screen. Click on this icon to launch the Shortcut Manager application. Icons and Notifications System Tray Icons Shortcut Manager Enabled Shortcut Manager Disabled On-Screen Notifications Shortcut Manager Shortcut Manager No Profile to be applied Enabled Disabled Shortcut Manager Disabled 45 Software Application Manual Main Window 1. Profile Manager: To add, delete, import, or export hotkey setting profiles. 2. Shortcut Enable/ Disable: To Enable or Disable the selected hotkey profile. 3. Hotkey Sets: Setting up the Hotkey Sets here. Each profile has 8 Hotkey Sets. Three shortcut types are available for selecting: Shortcuts, Commands, and Launch. 4. 5. List of Disabled Keys: 4 keys on the keyboard can be disabled for each profile. Keyboard Layout: Use the keyboard here to set up the Hotkey Set. This area is also used to show the detailed Hotkey settings. The selected hotkeys on the keyboard layout above will be colored with different color which represents different function type: Shortcuts, Commands, Launch, and Disabled Keys. 6. Language: Select a supported language from English, French, German, or Japanese in the drop menu. 46 Preface 1-47 Getting Started Now, follow the step by step instructions below to setup a personal shortcut profile in Shortcut Manager. Create a new profile Create a new profile while using Shortcut Manager. 1. Give a name for the new profile. 2. Click [OK] to continue. 47 Software Application Manual Define [Shortcuts] Hotkey This function makes a single hotkey to trigger at most 10 characters instantly. 1. Select a Hotkey Set from 8 Hotkey Sets. 2. Move the mouse cursor to keyboard layout and select a key for this Hotkey Set. 3. Give a name to this Hotkey Set: [MSI] 4. Select the function of this Hotkey Set: [Shortcuts] 5. To define another Hotkey Set, repeat the steps shown above. [Q] on the keyboard is selected as an example. 48 Preface 6. 1-49 Click on [Record] and then key in at most 10 keyboard strokes, including typewrite keys, numeric keys, cursor keys and function keys. Click on [Stop] when finish keying in. Click on [Reset] to clear the characters entered previously. Advanced Settings 1. Start Time and End Time: Adjust time length of key stroke. 2. Respond Time: Slide the scroll bar to adjust the hotkey responding rate. 3. Loop Gap: Choose a desired selection from the pull-down menu to make the hotkey execute repeatedly in a selected interval from 1 sec to 10 sec. Once the hotkey is triggered with Loop Gap selected, the application will continue executing the instructed hotkey function repeatedly until this hotkey is pressed again. When None is selected, the hotkey will only be executed once. 49 Software Application Manual Define [Commands] Hotkey This function makes a single hotkey to trigger a set of message content with no limit on the number of words. 1. Select a Hotkey Set from 8 Hotkey Sets. 2. Move the mouse cursor to keyboard layout and select a key for this Hotkey Set. 3. Give a name to this Hotkey Set: [Workstation] 4. Select the function of this Hotkey Set: [Commands] 5. Enter the command in texts under [Message Content] 6. To define another Hotkey Set, repeat the steps shown above. [E] on the keyboard is selected as an example. 50 Preface 1-51 Define Compound [Commands] Hotkey A single hotkey will also be capable of triggering a compound command, if required. A compound command is composed with 3 main orders: Start key, Message Content, and Send Key. Maximum 5 movements for Start key and Send key are allowed. No limit on the number of words for Message Content. Rec Start Key/ Stop Record/ Clear Start Key: Make a Start key that comprises any command given by the keyboard, such as SHIFT, CTRL, or ALT, etc.. Message Content: Give command in texts here. Rec Send Key/ Stop Record/ Clear Send Key: Make a Send key that comprises any command given by the keyboard, such as SHIFT, CTRL, or ALT, etc.. Follow the steps below to make a compound command: 1. Click [Rec Start Key] 2. Give commands with the physical keyboard. 3. Click [Stop Record] 4. Enter the command in texts under [Message Content] example: [Enter + Left_Shift + Numpad_* + Left_Shift + Numpad_*] 51 Software Application Manual 5. Click [Rec Send Key] 6. Give commands with the physical keyboard. 7. Click [Stop Record] 8. Click [Clear Start Key] or [Clear Send Key] to delete commands given previously for 9. Once this Hotkey Set is enabled, pressing the hotkey of [E] on the keyboard, you may example: [Left_Shift + 3 + Left_Shift + 3] Start Key or Send Key, if needed. see the result shown as below. 52 Preface 1-53 Define [Launch] Hotkey This function makes a single hotkey to activate a particular application, tool or file. 1. Select a Hotkey Set from 8 Hotkey Sets. 2. Move the mouse cursor to keyboard layout and select a key for this Hotkey Set. 3. Give a name to this Hotkey Set: [Paint] 4. Select the function of this Hotkey Set: [Lanuch] [T] on the keyboard is selected as an example. 53 Software Application Manual 5. Click on [Browse] to select an application or a file to be launched. 6. The tool of [Paint] is set to be activated for Launch hotkey as an example here. 7. To define another Hotkey Set, repeat the steps shown above. 54 Preface 1-55 Setup [Disabled Keys] Keys on the keyboard may be disabled temporarily if necessary. Setup the Disabled Keys under this section. 1. Click on the [Disabled Keys] section. 2. Click keys on keyboard layout to select keys to be disabled. 3. Maximum 4 keys can be disabled for each profile. 55 Software Application Manual Apply Hotkey Profile to keyboard Once the Hotkey Sets are defined successfully, remember to make the selections take effect for the physical keyboard. 1. Select a [Profile] 2. Click on [Shortcut Disabled] to make this button turn to [Shortcut Enabled] 3. There will be check icon for the hotkey profile which has been activated. NEW: Create a new profile. IMPORT: Import profiles from disk. EXPORT: Export profiles to disk. Shortcut Disabled/ Enabled: Turn Off/On the Hotkey. 56 Preface 1-57 Profile Editing The created Profile can be edited if needed. Move the mouse cursor to a profile and then right click the mouse. Copy/ Paste: Copy and paste an existed profile. Delete: Delete a profile. Rename: Change the profile’s name. Hotkey Sets Editing 1. Move the mouse cursor to a Hotkey Set and then right click the mouse. 2. Select [Copy], and then move the mouse cursor to another Hotkey Set where the 3. Right click the mouse again, and then select [Paste]. 4. A new and different Hotkey name will be given to this Hotkey Set. copied hotkey will be pasted. 57 Software Application Manual Keyboard Language Selections Shortcut Manager supports multilingual user interface for the keyboard. 58 Preface 1-59 Note 59 Software Application Manual Keyboard LED Manager (KLM) When the KLM application has been installed successfully, the KLM launching icon will appear under Programs and the system tray in the lower right-hand corner of screen. Click on this icon to launch the Keyboard LED Manager application. Standard Status and Idle Status KLM allows users to set different LED flashing modes under Standard status and Idle status. When a desired LED Flashing Mode is selected under [ Standard ] status, the selection will take effect while the system is still on. When a desired LED Flashing Mode is selected under [ Idle ] status, the selection will take effect while the system is in Sleep mode. 60 Preface 1-61 Selecting the LED Flashing Mode under Standard Status Click on [ Standard ], Select a desired LED flashing mode from the option: Dual Color, Wave, Breathing, Gaming, and Normal. Normal Mode: 1. When this mode is selected, the keyboard LEDs will always stay lit with the selected color. 2. Select an LED section (A, B, or C) by clicking on the corresponding area on the diagram. 3. Select a desired LED color for each LED section by clicking on the color wheel. 4. The selected color for each LED section will be shown in the LED Color Indicators below the keyboard diagram. 5. To turn off the LEDs of a particular LED section, simply click on the LED switch above each LED section. 6. To group all three LED sections into one main section, click [ Lock Keyboard ] on the left hand side. Then only one LED color can be selected for the keyboard LEDs. 61 Software Application Manual Gaming Mode: 1. The keyboard LEDs of Section-A will always be lit to show the selected color. 2. The keyboard LEDs of Section-B and Section-C will always be disabled when Gaming mode is selected. 3. Select a desired LED color by clicking on the color wheel. 4. The selected color will be shown in the LED Color Indicator for Section-A 62 Preface 1-63 Breathing Mode: 1. The keyboard LEDs of each section will be individually lit with the selected LED color and then darkened with a steady rhythm. 2. Select a desired LED color for each LED section by clicking on the color wheel. 3. The selected color for each LED section will be shown in the LED Color Indicators located below the keyboard diagram. 4. To group the three LED sections into one main section, click [ Lock Keyboard ] on the left hand side. 5. Now only a single LED color can be selected for the keyboard LEDs. 63 Software Application Manual Wave Mode: 1. The keyboard LEDs of Section A, B, and C will be lit with the selected LED color in order from LED Section-C to Section-B to Section-A, and then the LEDs will darken with a steady rhythm. 2. Select a desired LED color for each LED section by clicking on the color wheel. 3. The selected color for each LED section will be shown in the LED Color Indicators located below the keyboard diagram. 4. To group the three LED sections into one main section, click [ Lock Keyboard ] 5. Only a single LED color can be selected for the keyboard LEDs. 64 Preface 1-65 Dual Color Mode: 1. When Dual Color mode is selected, the keyboard LEDs will be grouped into one main section, and the keyboard LEDs will be lit with the two selected colors. 2. Select two LED colors at a time by clicking on the color wheel. 3. The two selected colors will be shown on the LED Color Indicator. 65 Software Application Manual Selecting the LED Flashing Mode under Idle Status Select a desired LED Flashing Mode in Idle status. The selection will take effect while the system is in Sleep mode. Click on [ Idle ], Select a desired LED flashing mode from Wave, Breathing, and Off. Off Mode: Turn off the Keyboard LED function. Breathing Mode: 1. The keyboard LEDs of each section will be individually lit with the selected LED color in order and then darkened with a steady rhythm. 2. Select a desired LED color for each LED section by clicking on the color wheel, and the selected color for each LED section will be shown in the LED Color Indicators located below the keyboard diagram. 3. To group the three LED sections into one main section, click [ Lock Keyboard ] so that only one LED color can be selected for the keyboard LEDs. 66 Preface 1-67 Wave Mode: 1. The keyboard LEDs of each section will be lit with the selected LED color in order from LED Section-C to Section-B, and to Section-A, and then dimmed in an on/off pattern. 2. Select a desired LED color for each LED section by clicking on the color wheel. 3. To group the three LED sections into one main section, click [ Lock Keyboard ], so that only one LED color can be selected for the keyboard LEDs. Adjusting the RGB Color level of LEDs The RGB Color level of the keyboard LEDs is adjustable. Make sure the KLM console is closed. Use the following buttons to adjust the shades of color of the LEDs. Increase LEDs' RGB saturation level. + + Decrease LEDs' RGB saturation level. 67 Software Application Manual Grouping the LED sections The divided LED sections can be grouped into one main section by clicking on the [ Lock Keyboard ] icon. Once the three LED sections are grouped, only one color can be selected to be illuminated. Note: Grouping function will not take effect in Gaming mode. Closing the KLM interface To close the KLM interface, simply click on the [ Close ] icon. Lock Keyboard 68 Close Preface 1-69 Note 69 Software Application Manual Sizing Options (Only available in selected models) When the Sizing Options application has been installed successfully, the Sizing Options launch icon will appear in the MSI folder of the Start menu and the system tray in the lower right-hand corner of screen. 1. Left click on Sizing Options shortcut icon on the desktop or the icon in the lower right-hand corner of the screen to launch the Sizing Options application. 2. Left click on the Sizing Options launch icon of the Start menu to launch the Sizing Options application. Main Window Sizing Options has 5 adjustable DPI (dots per inch)buttons in the main window: 100%, 125%, 150%, 175% and 200% DPI. 150% DPI is the default and the optimum setting for resolution 2880 x 1620 (3K panel). There will no preview image if the resolution is not 2880 x 1620 (3K panel). 70 Preface 1-71 5 Preview Windows When select one DPI setting will bring the following respective preview image: 71 Software Application Manual When change the DPI setting will bring one dialogue and ask you to sign out of the computer to apply these changes, or you can choose to sign out later, the updated DPI setting will take effect. 72 Preface 1-73 Best DPI for the Display We recommend you to apply the following DPI settings to get the best DPI for the display. Resolution Best DPI Resolution<1920X1080 100% 1920X1080 <= Resolution<2880 x 1620 125% 2880 x 1620 (3K panel) 150% 73 Software Application Manual Note 74 Preface 1-75 Battery Calibration When the Battery Calibration application has been installed successfully, the Battery Calibration launch icon will appear in the MSI folder of the Start menu. Click on this icon to launch the Battery Calibration application. It is recommended to go through the Battery Calibration process every 3 months to have the best battery life. Starting the Battery Calibration Process 1. Left click on the Battery Calibration launch icon in the MSI folder of the Start menu, and the Battery Calibration main display will appear. 2. If you are using the Battery Calibration process for the very first time, there will be no date information for the last calibration shown on the Stats field. 3. Before starting the Battery Calibration process, make sure that the following conditions are met: a. The AC/DC adapter is connected. b. The battery is installed properly. c. No any other application is activated. 4. Left click on the “Start” icon to start the Battery Calibration process. 75 Software Application Manual 5. The calibration process status will be shown on the display telling users that the system is now charging, recharging, or discharging. 6. Calibration completed. Note: MSI recommends doing Battery Calibration every 3 months to have the best battery life. 76 Preface 1-77 Warning Notification 1. If the AC/DC adapter is disconnected during the calibration process, a warning notification will appear. 2. Please reconnect the AC/DC adapter to continue the calibration process within 15 seconds; otherwise the calibration process will stop automatically. 3. If the battery of the notebook is not installed properly or removed during the calibration process, the warning notification will appear. 4. Please double check that the battery is installed properly, and then press the Try Again button to continue the calibration process. 77 Software Application Manual Note 78 Preface 1-79 System Control Manager (SCM) System Control Manager (SCM) is a software application for driving and controlling the Fn keys on the keyboard. The SCM is pre-installed with the default OS and will run automatically in background. If you intend to install your own version of OS, it is required to install SCM to enable the Fn keys. Quick Launch [Fn] Keys Use the Quick Launch [Fn] buttons on the keyboard to activate the specific applications and tools. With the help of these quick launch buttons, users will be able to do work more efficiently. F5: ECO Engine (Power Saving) Function ECO Engine, the outstanding and unique power saving function, provides various power saving modes – Movie mode, Presentation mode, Game mode, and Office mode, to extend the battery running time while performing different tasks with this notebook. Movie Mode Select this mode when playing multimedia applications. Presentation Mode Select this mode when performing presentation applications. Game Mode Select this mode when performing game applications. Office Mode Select this mode when dealing with office documentation tasks. ECO Off Select to disable ECO Engine. 79 Software Application Manual F6: Webcam F10: Airplane Mode 80 Preface 1-81 User Define key This function allows users to define the P1 quick launch button for launching the particular application. Once the shortcut has been created properly, users will be able to launch the selected program, application, utility, or path by pressing the P1 Fn key on the keyboard. Note: This function will not be available when Dragon Gaming Center is installed. To restore this function, uninstalling Dragon Gaming Center is necessarily required. To define the P1 quick launch button, move the cursor to the [SCM] icon on the lower right side of the display, and then right click the mouse to select P1 Setting to bring out the Use Defined Key settings dialogue. Click the Browse button to setup the shortcut to an appointed program, application, utility, or path, and then click OK to have this selection take effect. Click the Remove button to delete the previous shortcut made. F4: P1 Setting 81 Software Application Manual Dragon Gaming Center (optionally supported) When the application of Dragon Gaming Center is installed, activate Dragon Gaming Center with Quick Launch P1 Fn key. F4: Dragon Gaming Center 82 Preface 1-83 System Control Manager interface Besides using the [Fn] buttons on the keyboard to activate the specific applications and tools, users may also achieve the same results via the System Control Manager interface. Double right click on the SCM icon on the lower right corner of the display to bring up the System Control Manager interface as shown below. 1. Devices ON/ OFF Click on the device icon to switch the selected device on or off recurrently. 2. Brightness Level Click on the Left/ Right arrow to turn the display brightness level up and down. Volume Level Click on the Left/ Right arrow to turn the speaker volume level up and down. 3. ECO Engine (Power Saving) Function Select a proper power saving function by clicking on the icons. 4. Display ON/ OFF Click on the icon to switch off the display. To switch on the display, hit any key on the mouse or keyboard. 5. ODD Eject (optionally supported) Click on the icon to eject the ODD. (If there is multiple ODD on the notebook, this function will eject the first ODD by ASCII order.) 83 Software Application Manual Note 84 Preface 1-85 Recovery Image Backup Tool Recovery Image Backup Tool, the utility designed to backup the recovery image to blank DVD disks, a USB flash disk or ISO files. They can be used to recover the system to manufacturer’s default settings when it is needed. The illustrations and instructions provided here are for reference only and may vary from different operating system supported. Usage of this application on any product with no authorization may be prohibited. Note: For more detailed information about using Recovery Image Backup Tool, please refer to the User’s Manual of System Recovery. Activating the Utility 1. Find the shortcut of BurnRecovery on the Start Screen or Windows desktop. 2. Double click on the shortcut to activate the Recovery Image Backup Tool. 3. Main Selection page of the Recovery Image Backup Tool. 85 Software Application Manual 86 Preface 1-87 Create and Burn a Recovery Disk 1. To create and burn a Recovery Disk, select [Recovery Disk], and then follow the on-screen instructions to continue. 2. Prepare the number of the writable disk as requested. 3. Place the disk into the optical drive device, and then select [Burn]. 4. Note: Closing the other applications while burning the recovery disk is suggested. 5. Click [Close] when a disk is successfully created. 6. Click [Next] to continue the procedure of creating and burning recovery disks. 7. Exchange and place the rest disks into the optical drive device as instructed. 8. All recovery disks created and burned successfully. 87 Software Application Manual 88 Preface 1-89 89 Software Application Manual Recovering the System When the hard drive and system encountered non-recoverable problems, it is always recommended to perform the System Recovery Function with F3 Hotkey first. If the system is unable to recover to the manufactory default settings with F3 Hotkey, follow the instructions below to proceed the recovery function with the DVD recovery disks or USB flash drive. 1. Insert the DVD recovery disks to your computer. 2. Restart the computer. 3. Press the [F11] hotkey on the keyboard while the computer is re-booting. 4. Select to boot from [DVD Recovery disk], and press [Enter] to confirm the selection, and then follow the on-screen instructions to continue. 5. The main page of Recovery System appears. 90 Preface 6. 7. 1-91 Select [Hard Disk Recovery] to restore the hard disk to the manufactory default settings. Select [System Partition Recovery] to reset the hard disk drive partition where the operating system installed to the manufactory default settings. 91 Software Application Manual 8. AC power is required while proceeding the System Recovery Function. Assure that the AC power is connected to the notebook before moving forward to the next step. 9. The system recovery process will format the hard disk drive; make sure that the important data has been backed up before continuing the process. 92 Preface 10. 1-93 If the notebook is equipped with two or more hard disks, Windows OS and recovery partitions can be restored to a single hard disk, or separated hard disks. 11. Follow the on-screen instructions to continue. 93 Software Application Manual 94 Preface 1-95 Note 95