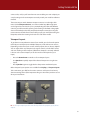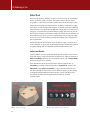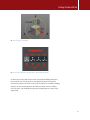
1
3D Modeling in Silo
This page intentionally left blank
3D Modeling in Silo
The Official Guide
Antony Ward
David Randall
Nevercenter
Amsterdam • Boston • Heidelberg • London • New York • Oxford • Paris
San Diego • San Francisco • Singapore • Sydney • Tokyo
Focal Press is an imprint of Elsevier
Focal Press is an imprint of Elsevier
30 Corporate Drive, Suite 400, Burlington, MA 01803, USA
The Boulevard, Langford Lane, Kidlington, Oxford, OX5 1GB, UK
Copyright © 2011 Elsevier Inc. All rights reserved
No part of this publication may be reproduced or transmitted in any form or by
any means, electronic or mechanical, including photocopying, recording, or any
information storage and retrieval system, without permission in writing from
the publisher. Details on how to seek permission, further information about the
Publisher’s permissions policies and our arrangements with organizations such as
the Copyright Clearance Center and the Copyright Licensing Agency, can be found
at our website: www.elsevier.com/permissions.
This book and the individual contributions contained in it are protected under
copyright by the Publisher (other than as may be noted herein).
Notices
Knowledge and best practice in this field are constantly changing. As new research
and experience broaden our understanding, changes in research methods,
professional practices, or medical treatment may become necessary.
Practitioners and researchers must always rely on their own experience and
knowledge in evaluating and using any information, methods, compounds, or
experiments described herein. In using such information or methods they should
be mindful of their own safety and the safety of others, including parties for whom
they have a professional responsibility.
To the fullest extent of the law, neither the Publisher nor the authors, contributors,
or editors, assume any liability for any injury and/or damage to persons or
property as a matter of products liability, negligence or otherwise, or from any
use or operation of any methods, products, instructions, or ideas contained in the
material herein.
Library of Congress Cataloging-in-Publication Data
Application submitted
British Library Cataloguing-in-Publication Data
A catalogue record for this book is available from the British Library.
ISBN: 978-0-240-81481-0
For information on all Focal Press publications
visit our website at www.elsevierdirect.com
10 11 12 13
54321
Printed in Canada
Contents
Acknowledgments. . . . . . . . . . . . . . . . . . . . . . . . . . . . . . . . . . . . . . . . . . . . . . . . . . vii
About the Authors . . . . . . . . . . . . . . . . . . . . . . . . . . . . . . . . . . . . . . . . . . . . . . . . . . ix
Introduction . . . . . . . . . . . . . . . . . . . . . . . . . . . . . . . . . . . . . . . . . . . . . . . . . . . . . . . xi
Chapter 1: Getting Started with Silo . . . . . . . . . . . . . . . . . . . . . . . . . . . . . . . . . . 1
Chapter 2: 3D Modeling Basics . . . . . . . . . . . . . . . . . . . . . . . . . . . . . . . . . . . . . . . 9
Chapter 3: Silo Modeling Tools . . . . . . . . . . . . . . . . . . . . . . . . . . . . . . . . . . . . . . 17
Chapter 4: Character Pre-production . . . . . . . . . . . . . . . . . . . . . . . . . . . . . . . . 49
Chapter 5: Organic Modeling—Basic Base Mesh . . . . . . . . . . . . . . . . . . . . . . 57
Chapter 6: Organic Modeling: Torso . . . . . . . . . . . . . . . . . . . . . . . . . . . . . . . .125
Chapter 7: Organic Modeling: Limb Detail . . . . . . . . . . . . . . . . . . . . . . . . . .163
Chapter 8: Organic Modeling: Head Detail . . . . . . . . . . . . . . . . . . . . . . . . . .205
Chapter 9: Virtual Sculpting: Clothing . . . . . . . . . . . . . . . . . . . . . . . . . . . . . .249
Chapter 10: Hard Surface Modeling . . . . . . . . . . . . . . . . . . . . . . . . . . . . . . . .267
Chapter 11: Adding Hair . . . . . . . . . . . . . . . . . . . . . . . . . . . . . . . . . . . . . . . . . . .295
Chapter 12: UV Mapping in Silo . . . . . . . . . . . . . . . . . . . . . . . . . . . . . . . . . . . .301
Chapter 13: Final Pose . . . . . . . . . . . . . . . . . . . . . . . . . . . . . . . . . . . . . . . . . . . . .303
Chapter 14: Silo Efficiency . . . . . . . . . . . . . . . . . . . . . . . . . . . . . . . . . . . . . . . . .311
Appendix: Resources . . . . . . . . . . . . . . . . . . . . . . . . . . . . . . . . . . . . . . . . . . . . . .313
Index . . . . . . . . . . . . . . . . . . . . . . . . . . . . . . . . . . . . . . . . . . . . . . . . . . . . . . . . . . . . .315
v
This page intentionally left blank
Acknowledgments
When first approached to write this book, I was initially skeptical. Yes, Silo is a
great application, but my concerns were more about the intended audience,
and just how many Silo users were out there. After some investigation, I was
pleased to find the user base rapidly growing, with more and more artists
being seduced by the “Silo Zen” workflow. I felt it was time to do my part, to
help bring Silo to more users while demonstrating what it is capable of, so I
eagerly agreed.
Chris Simpson (Associate Acquisitions Editor at Focal Press) and David Randall
(Director of Business Development at Nevercenter and co-author) have been
the perfect partners for this book, and I doubt I could have done it without
them. Their knowledge, patience, and expertise have been invaluable since
we kicked off production early this year.
I also want to thank the Silo community; in particular, the people who initially
reviewed my idea and helped with tips along the way—Glen Southern and
Carsten Lind (who you can find on Twitter as @SouthernGFX and @Cali3D).
vii
This page intentionally left blank
About the Authors
Antony Ward
Since the days when stipple was king, Antony Ward has grown with the game
development and computer graphics industries, adapting his skills to match
the increasing thirst for polygons. During the past 16 years, Antony has led
teams, developed workflows, and trained staff in some of today’s leading
game development studios, all while continuing to share new techniques
with people all over the world. During this time, he also wrote two successful
technical manuals: Game Character Development in Maya (2004) and Game
Character Development (2008). Both have been popular among the cg
community and have since been translated into many different languages,
including Chinese.
You can find out more about Antony Ward and follow him online at:
www.ant-online.co.uk
www.facebook.com/AntWardsArt
www.twitter.com/ant_ward
David Randall (Nevercenter)
David is newspaper journalist turned IT professional, and became the main
mouthpiece of Nevercenter in 2008, when he joined as the director of
marketing and business development. He has also worked on developing the
Silo website and Silo education tools (including the Glen Southern Tutorial
Series), and has worked closely with Silo’s chief developers, Thomas and John
Plewe, in crafting the language of the book to help bring out what the Silo
tools and commands do, and why.
Nevercenter Ltd. Co. is a private company based near Salt Lake City, UT, with
the goal of making 3D graphics more accessible to a wider variety of people
by emphasizing speed, appeal, and ease of use.
ix
This page intentionally left blank
Introduction
These days, it seems that new 3D applications are released every month.
Some claim to be the next best thing and bring a new, fresh perspective on
digital art, while older, more established programs simply tick along and bolt
on similar new features.
It is sometimes difficult to keep up with current trends, and trying each new
application can be time consuming and expensive. I have played around with
many programs in the past while trying to nail down the few I would retain as
part of my pipeline. Most either did not fit my particular style or my budget.
Then, while working at Sumo Digital many years ago, a friend introduced me
to Silo and I have been hooked ever since.
After modeling in a package for years with tools that weren’t fluid or user
friendly, Silo was a breath of fresh air, and I soon adopted it as my main
modeling application. Silo does not feature many of the advanced tools
of other programs, like animation or advanced shaders, but I have other
programs for that. Instead, Silo focuses on modeling, and does it very well.
Because of the great modeling tools, Silo is my starting point on any project.
I can quickly block out a rough model to use as a concept, and then take it
further by modeling and sculpting details until it is ready for texturing. Every
day I hear of a new freelance artist or studio bringing Silo on board, so I was
honored when asked to write this book and help bring Silo, and what it is
capable of, to the screens of many more digital artists.
I hope you find this book useful, and interesting, and continue to use Silo to
develop your skills. We would also love to see what you are using Silo for on
the Nevercenter Silo forums (http://silo3d.com/forum/index.php) and the
Facebook page (http://www.facebook.com/Silo3D).
Happy modeling!
About Silo
Silo is a focused 3D modeling application for Mac and Windows with the
capability to effortlessly switch between organically sculpting high-polygon
models and precisely controlling hard-edged angular surfaces. You can use
Silo for anything from creating 3D characters for video games and movies to
quickly exploring 3D architectural or industrial design ideas.
With a clean interface and high-speed workflow, Silo appeals to professionals
and newcomers alike, with top studios worldwide using it as both a
xi
Introduction
stand-alone design tool and a versatile element of a multi-software 3D
graphics workflow.
3D models in Silo are created at their most basic level using polygons. A
polygon for our purposes is simply three or more connected points in 3D
space that enclose a surface. A complete 3D model can be made from just a
couple of polygons or as many as several million. In this book, you will learn
more about the basics of working with polygons, and the powerful tools Silo
has to aid in creating and manipulating them.
Important features in the Silo toolset include:
●
●
●
●
●
Basic polygon creation, division, and manipulation tools
Subdivision tools and commands (to create smooth organic forms from
angular polygon models)
Sculpting brushes (to push and mold the surface of an object organically)
UV tools (to lay out the textures on an object)
Retopology tools (to create cleaner or lower-polygon-count meshes from
an existing model)
We cover all these tools in this book.
If you are a seasoned modeler, you might want to check the Table of Contents
and skip to the sections that seem most intriguing, coming back to the earlier
chapters as necessary. Experienced modelers coming from other 3D packages
often find they are able to pick up the Silo basics very quickly and focus more
of their learning time on advanced tools and specialty features.
For the newcomer to 3D: Welcome! We are very happy you have decided
to try Silo, and have done our best to guide you along the way. For you, we
recommend staying the course from chapter to chapter. Feel free to skip
ahead as you feel you can, but keep in mind we will be covering both tools
and techniques, which are important in understanding how to model.
Where Is the Companion CD?
Well, there is no CD with this book. We decided it would be better to place
what would be the CD content online for you to easily download. This means
we can update it as we see fit, with new assets and the latest versions of Silo,
so check back frequently to see if there have been any updates.
The bulk of the download will be versions of the project silo file (.sib) saved
out at various points. These will serve as a great point of reference should
you want to pick the models apart, or pick up the project somewhere in the
middle.
You will also be able to download a 30-day trial of Silo to use as you work on
your models. If you want to upgrade to the full version, use the code [Can we
make this code stand out better?] for a healthy discount (not that Silo is an
xii
Introduction
expensive application, at the time of writing the professional version will set
you back a mere $159.).
In this downloadable content you will also find a few Bonus chapters for you
to work with. These add to certain sections of the book, as well as enhance
what is already covered in the tutorials to show you how to create a pistol as
well as get to grips with Silo’s UV mapping and map extraction tools.
All you need to do now is download the files, which you can do from the
following location:
http://booksite.focalpress.com/companion/Ward
xiii
This page intentionally left blank
CHAPTER 1
Getting Started with Silo
In this chapter, we discuss how to view, select, and manipulate models in Silo.
If you are not familiar with Silo or polygon modeling, make sure to read the
“About Silo” section at the start of the book.
We recommend having Silo open and running as you read, as most of the
actual learning will co me as you try things out for yourself. Allow yourself to
play, have fun, and make mistakes; you will get comfortable with the software
much more quickly. If you do not already have Silo installed, a free 30-day trial
is included in the free downloadable content, and you can always find the
latest version available at www.nevercenter.com.
Viewing Objects
Working with a 3D model requires seeing the model from all angles. Changing
anything on the model to get it looking right from one angle has the potential
to negatively affect the way it looks from another. In Silo, you can easily zoom,
rotate, and pan the current viewport (i.e., the window used to see the model)
to make sure you are getting things right from all angles. It is important to
understand that you are not moving the model with these commands, just
3D Modeling in Silo. DOI: 10.1016/B978-0-240-81481-0.00001-7
© 2011 Elsevier Inc. All rights reserved.
1
3D Modeling in Silo
changing the camera position. Basic viewport controls involve holding the
Alt key along with different mouse buttons as follows:
●
●
●
Rotate Alt Left Mouse Button
Zoom Alt Right Mouse Button (or scroll with the scroll wheel)
Pan Alt Holding Down the Scroll Wheel or Middle Mouse Button
You can customize all of these controls, but in this book, we will assume you
are using the default configuration that ships with Silo.
●
●
To get a feel for manipulating the view in 3D space, create a new Silo file and
add a basic model by selecting Create > Custom Primitive > Base Man
With Feet from the top menu (more on custom primitives in Chapter 2).
Now try rotating, zooming, and panning to see the model from all angles
by holding down the Alt key and clicking and dragging with the different
mouse buttons or scroll wheel.
Viewport Cameras
So far we’ve been using the default viewport camera called “Free Perspective,”
which means it is a camera with perspective correction (i.e., objects further
away from the camera appear smaller) that is free to move in all directions.
Silo also includes nine additional viewport cameras to make sure you can get
a good sense of your model from all angles. The most important of these,
besides Free Perspective, are the fixed orthographic camera views, which
fix the viewport camera from the top, bottom, left, right, front, and back of
your scene. Orthographic views do not use perspective correction, so objects
further away from the camera do not appear smaller than objects close to the
camera.
Working from the various orthographic views feels more like working with
flat blueprints, although the model is of course still 3D. They offer greater
technical accuracy, a quick way to see what is going on with the model from
FIG. 1.1 Right-click menu showing the various viewport cameras.
2
Getting Started with Silo
various sides, and (as you’ll see when we start modeling our main subject) you
can place images in these viewports to exactly match your model to reference
material.
The easiest way to switch between viewport cameras is via the right-click
menu (under Viewport Camera), or use the number keys (0 through 9 are
each assigned to one view). As you try manipulating the view with different
cameras, you will notice that panning and zooming in the fixed orthographic
views work similarly to the free perspective viewport camera, but using the
rotate commands with a fixed camera will just spin your view (like turning the
blueprint) rather than rotating in 3D to the far side of the model.
Viewport Layout
To get the most comprehensive view of your model, you also have the option
to divide your workspace into multiple viewports, each with its own camera.
Depending on the size of your screen and the project, this can be very helpful.
You can right click in any viewport to change its camera, or left click to select
and start working in that viewport. (Whichever viewport is currently selected
is known as the active viewport, and is the one that will respond to your
input.)
●
●
●
Press the Down Arrow to switch to a four-viewport layout.
Use Spacebar to quickly expand the selected viewport in a single view
layout.
Press Spacebar again to toggle back to the previous multiview layout.
Other viewport layout options are available from Display > Viewport Layout.
Take a minute to get a feel for the various cameras and layouts. Don’t worry
about mastering them all; the important thing is to know they are there to use
when you need them.
FIG. 1.2 A four-pane viewport layout shows views of the object from the free perspective, top, left, and front
viewports.
3
3D Modeling in Silo
Selection
As in most 3D graphics software, models in Silo are made up of components
known as vertices, edges, and faces. The vertex is the most basic unit of
3D graphics—a point in space with no actual size or shape. An edge is a line
created by connecting two of these vertices. Together, a web of these edges
and vertices is used to outline the structure of a model, much like scaffolding
(often referred to as a wireframe). It defines the shape, but isn’t solid. Faces, or
polygons, are used to fill in spaces bordered by edges, like pieces of glass in a
stained-glass window, and make the model look solid. These components are
all interconnected—you can move a vertex directly, or by moving any edges
or faces it is part of. 3D modeling is simply the creation and arrangement of
these components.
Learning to think of your model in terms of vertices, edges, and faces all at
once is essential, as some tasks are impossible with one component type but
easy with another. This kind of thinking comes quickly with practice.
Selection Modes
Selection Modes are a way to tell Silo which type of component you want to
work with. There is a separate selection mode for faces, edges, and vertices; a
Multi-select Mode, which lets you see all three at once; and an Object Mode,
which we will get to in a moment.
Silo’s selection modes let you work in terms of these components—in
Face Mode, you will be manipulating faces; in Vertex Mode, vertices; and
Edge Mode, edges. Multi-select Mode is sort of a shorthand that lets you
see all three kinds of components at once. Often the key to good modeling
is recognizing which selection mode is best for a given task. Many tools
are context-sensitive, and change behavior based on the current
selection mode.
FIG. 1.3 Anatomy of a polygon.
4
FIG. 1.4 The keys and buttons for selection modes.
Getting Started with Silo
Silo contains a fifth selection mode, Object Mode. Objects are a useful, if
surprisingly complex, concept. For now, it is best to think of each separate
part of a model, which is not physically connected (e.g., each of a character’s
shoes), as a separate object. In Silo, you have to make sure the object is
selected in Object Mode before trying to edit it in other selection modes.
Many models will only contain one object, in which case it will be selected by
default.
Selection Styles
Optimizing a modeling working workflow often involves selecting multiple
elements with some precision, and to ease the process, Silo has three
selection styles: Paint, Area, and Lasso (Figure 1.5).
●
●
●
Paint Style allows you to hold down the Left Mouse Button and paint
over additional elements to select anything that comes under the path of
the mouse cursor.
Area Style creates a box as you hold down the Left Mouse Button, and all
visible elements in the box are selected (to select through a model, just
hold down the Middle Mouse Button or Scroll Wheel instead).
Lasso Style works similar to Area Style, but allows the user to draw a
shape around specific elements while holding down the Left Mouse
Button (or Middle Mouse Button or Scroll Wheel to select through and
model). Everything within the drawn shape will be selected.
You can also add to a selection regardless of the style by holding down Shift
and selecting additional elements (Shift Ctrl to deselect).
To get a feel for the various selection modes and styles, load a custom
primitive (Create > Custom Primitive > Base Man With Feet) and a cube
(Create > Cube) into a scene and try selecting objects, faces, edges, and
vertices with each of the selection styles.
FIG. 1.5 The three selection styles.
5
3D Modeling in Silo
Getting comfortable with selection and memorizing the keyboard commands
is a very important part of working quickly in Silo.
Manipulating Objects
With a feel for how to see models from all angles and how to select the various
elements, you are ready to start some actual modeling using a mainstay of 3D
software: the manipulator. In coming chapters we’ll learn about more freeform
ways to work with polygon elements and objects, so don’t get discouraged if
working with the manipulator feels a little too technical. Regardless of your
workflow, however, knowing how to use the various manipulators is crucial to
your 3D modeling success.
A manipulator is a small 3D object with handles that appears next to the
current selection and lets you interact with it. The three handles of the basic
manipulator point in each of the dimensions of a Silo scene’s space. The colors
on the manipulator match the red and blue on the Silo grid and represent
the X (red) and Z (blue) directions. The green side represents the Y or vertical
direction. To start, the manipulator will align with the Silo directions on the
grid, but as you work with a model and adjust the manipulator the orientation
will likely change.
Three single-function manipulators in Silo allow the user to move, scale, and
rotate objects and polygon elements. Each manipulator has outer handles and
a center handle that you can click on and drag to perform its functions. There
is also a Multi-use Manipulator with handles for all move, scale, and rotate
operations; and a Snapping Manipulator that allows for precise movement
and rotation. With the exception of the snapping manipulator, buttons for
all the manipulators are in the bottom center of the screen, and hotkeys are
on the Q row of the keyboard. You can access the snapping manipulator in
the main menu via Selection > Manipulator Tool > Snap. Figure 1.7 is a
breakdown of each manipulator and what the various handles do.
Once you have had a chance to review the chart of the various manipulators,
it is time to start playing.
●
●
6
Open a Silo scene and create a primitive base bust (Create > Custom
Primitive > Base Bust).
Try selecting each element type and using each of the handles on the
various manipulators to modify the bust.
Getting Started with Silo
FIG. 1.6 The anatomy of a manipulator.
FIG. 1.7 The various manipulators, what the handles do, and the keyboard commands.
For those just starting with 3D, do not be surprised if modifying the bust to
look a certain way is harder than you anticipated. We have just started to
scratch the surface of what Silo can do and how it works in a real-life modeling
situation. In the next few chapters, you will learn about various modeling
rules, Silo tools, and workflows that give the modeling process a much more
organic feel.
7
This page intentionally left blank
CHAPTER 2
3D Modeling Basics
Learning the Language of 3D
Working in 3D is part art and (unfortunately for many artists) part math. The
art elements can be easy to understand and very translatable from other
artistic endeavors. The mathematic concepts will, however, likely be new and
at first unintuitive. Therefore, before we jump into learning the Silo tools that
will help build and define our model, we will pause in this chapter to talk
about the important conventions of working in 3D.
This chapter is geared toward the inexperienced modeler. While most of
the rest of this book focuses on the “hows” of creating and manipulating
geometry, this chapter attempts to cover the “whys.” Those familiar with 3D
or coming to Silo from another 3D package might want to briefly review this
chapter, or just reference it throughout the modeling process if questions
arise. The concepts we will cover include subdivision, using quads and face
loops, avoiding poles and holes, maintaining appropriate polygon density,
and working with references and primitives.
3D Modeling in Silo. DOI: 10.1016/B978-0-240-81481-0.00002-9
© 2011 Elsevier Inc. All rights reserved.
9
3D Modeling in Silo
While perhaps not strictly a creative endeavor, understanding these technical
basics and creating models that look good and are well put together have
some valuable benefits, including:
Efficiency. Modeling smart means modeling faster. Following conventions
helps to provide standard solutions to common problems, and avoid
mistakes that can result in hours of reworking.
Versatility. 3D objects will often have a life in other 3D programs and
formats, and subdividing, posing, painting, sculpting, rigging, and
animating can become very difficult if the geometry is not done well.
Reusability. Modelers often reference their past work and integrate it into
new projects. The cleaner the reference, the easier it will be to use.
Understanding Subdivision
A necessary, powerful complement to working with polygons (and the reason
for many of the conventions of polygon modeling) is subdivision. In fact,
Silo is often referred to as a “subdivision surfaces modeler.” Subdivision tools
allow the software to create smooth organic surfaces from a coarse polygonal
mesh (see Figure 2.1). For example, if you create a cube and subdivide it
multiple times, it will end up looking smooth and spherical (although, for
mathematical reasons, not a perfect sphere). This system allows you to create
a model using only a few hundred polygons, but then automatically give
it a smooth finished look that might take hundreds of thousands or even
millions of polygons to achieve. Essentially, subdivision allows you to create
high-resolution models without having to create and control all of those tiny
polygons individually.
You control subdivision in Silo with the C and V keys. To get a feel for how it
works:
1. Create a new Silo file and add a basic model by selecting Create >
Custom Primitive > Base Man With Feet from the top menu.
FIG. 2.1 A character with no subdivision, one level of subdivision, and two levels of subdivision. (Model
courtesy of Glen Southern.)
10
3D Modeling Basics
2. Press C to subdivide and then V to return to the rough polygon mesh. You
will notice that while the surface changes, the lines that mark the original
polygons do not. In any layer of subdivision within Silo, the base mesh
remains editable.
3. Subdivide again and try moving a few edges and points using the
manipulator to get a feel for how the subdivided surface responds. You
are always selecting and working with the faces, edges, and vertices of the
low-resolution original, from which the subdivided version is created.
Subdivision is an iterative command, meaning each time you press C you’ll
get a smoother and smoother mesh, and each time you press V you’ll step
back one level. One temptation for beginning modelers is to use as high a
subdivision level as they can. However, because each level quadruples the
number of visible polygons from the previous level, going too high can take
a toll on your computer processor and dramatically slow modeling. It is best
to use low levels of subdivision (typically three or less) and jump up to higher
levels only periodically if needed.
Along with all the benefits, subdivision can reveal and magnify certain kinds of
modeling flaws. As mentioned earlier, this is why it plays a role in determining
the basic rules of polygon modeling—although it is not the only factor.
Magnified flaws caused by subdivision are known as subdivision artifacts, and
are essentially unexpected bumps, snags, or other types of visual problems.
In Figure 2.2, you can see how adding triangles to a model (something we will
discuss avoiding in the next section) did not cause a visible problem in the
base mesh, but did create a bump in the subdivided version.
Invoking the Holy Quad
One concept you will see reinforced throughout this book is the importance
of modeling almost exclusively using four-sided polygons, or “quads.” As a new
FIG. 2.2 Using non-quads in a mesh is one way to create subdivision artifacts.
11
3D Modeling in Silo
body part or some new detail is added to the character, you will see nonquads created (either triangles (“tris”) or polygons with more than four sides
(“n-gons”)) and then quickly eliminated using various techniques.
Using quads does not guarantee a clean mesh free of problems. Still, there are
some compelling reasons for sticking with quads as much as possible:
Quads subdivide beautifully. Subdivision is really the process of creating
quads within polygons, and then dividing those quads into more quads,
so starting with quads just makes sense. When starting with a triangle or
n-gon, the results can be dramatically less predictable. In Figure 2.3, while
the square is neatly and evenly subdivided, the triangle has started to
show some pinching, and the nine-sided polygon includes odd pinching
and potentially problematic spacing.
Quads make adding detail easier. Subdivision surface modeling,
particularly when it comes to what is called “box modeling,” is all about
roughing out shapes and then adding detail later. The best way to do
this is with groups of nicely maintained polygons that can be quickly and
cleanly divided. Triangles and n-gons often require individual attention
and cannot be worked on as easily in a group.
Cleaner interpretation in other software programs and game engines.
Some programs have a hard time dealing with n-gons. They may interpret
them a little different from Silo or other software programs, which can
cause hiccups when trying to finalize a project. To prevent hassle, it is
often just easiest to stick with quads.
Professional projects almost always use quads. Based on the reasons
just cited, pros usually stick to quads, which means if you ever want to
try your hand at freelance work, or even produce a professional-quality
project with fellow amateurs, the expectations will likely be almost
all-quads.
FIG. 2.3 Quads subdivide into a nice, even polygon mesh. The same cannot always be said for triangles
or n-gons.
12
3D Modeling Basics
Using Face Loops
As mentioned earlier, just because you stick with quads does not make for a
tidy, easy-to-work-with mesh. One key to a well-constructed object is creating
well-defined face loops. Face loops are simply strings of quads, which are
most useful when they follow the contours of an object.
Face loops that match the contours of an object help avoid subdivision
artifacts, and allow artists to easily add detail with commands that can select
(Select Loop) and split (Split Loop) whole loops at a time. A face loop down
the back of a human character or around a cheek can easily become two or
four loops, and the individual points can be tweaked to add spinal indentation
or muscle definition. Throughout the later chapters of this book as we get into
the modeling process, you will see repeatedly how we start with, maintain,
and create contour-matching face loops, and then use those loops to add
detail. Generally speaking, the better your face loops are, the more closely
your low-polygon base mesh will resemble the high-resolution subdivided
version, because you are more efficiently defining the contours of the shape.
Avoiding Poles
Inevitably, as face loops of polygons collide there will be places on the model
where several quads come together in an uncomfortable fashion (i.e., more
than four edges converging on a single vertex). These confluences are known
as poles, and can cause subdivision artifacts similar to those caused by
n-gons and triangles. (Like a face, a vertex will subdivide best when it has four
evenly spaced edges coming into it.) A pole can be seen in the center of the
subdivided nine-sided polygon in Figure 2.3.
Fig. 2.4 The side of the model is modified so that an edge loop can follow the body contours. This will help
when shaping the ribs and abdomen. You will see this again in Chapter 6.
13
3D Modeling in Silo
FIG. 2.5 Even in a mesh made of only quads, bringing too many quads together in a single point can cause
subdivision problems.
Poles cannot always be avoided, but their effect can often be diminished with
appropriate spacing or edge loop rerouting, as you will see throughout the
modeling in later chapters.
Avoiding Holes
Silo will allow you to create polygons with holes (sometimes filled with another
polygon) embedded in them. Note that this is different from using several
regular, solid polygons to carve out a hole in your mesh. Polygons with holes can
be useful in the modeling process when you are not working with subdivision,
such as in architectural models. However, holes embedded within polygons will
not subdivide in a desirable way, and can cause unpredictable problems down
the road in rendering packages and game engines. Most 3D software is not built
to handle embedded holes in polygons, so you will likely want to eliminate these
before subdividing or exporting. You can do this by turning each polygon with a
hole in it into multiple solid polygons that surround an opening.
Figure 2.6 shows two objects with holes. The first simply has a missing
polygon, and will cause problems in subdivision and when trying to use the
object in other programs. The second has a hole all the way through the
object connected on all sides by polygons, and won’t cause problems.
Maintaining Appropriate Polygon Density
One of the hardest senses to gain as a novice 3D modeler is how much detail
to add to a model, and when to do so. Most professionals lean on the side of
keeping the polygon density as low and uniform as possible until adding more
geometry for specific details becomes necessary. Throughout this book you will
see how, when using box modeling techniques, we define all the larger, simpler
shapes, such as arms and legs, before going into details like fingers or toes.
14
3D Modeling Basics
FIG. 2.6 Leaving holes in a model (as on the left) that are not connected all the way through (as on the right)
can cause problems when subdividing or trying to use a model in third-party programs.
Working from Reference Images
Nearly all 3D work is done from reference material to some degree or another.
Reference material will often be actual front and side views of what you want
the model to look like along with photographs or drawings of objects that are
similar to the planned finished product. In Silo, you can display these images
directly in the viewports while you are working, but you might also just have
them on hand to look at.
There are many reasons for using reference material, and a good portion of
Chapter 4 is dedicated to the reference material gathering process. Two main
reasons are:
1. Even with a clear direction for a model, it is very hard to visualize what the
model will look like from all angles and in every nook and cranny. Unlike
with 2D art, there is not much you can hide on a 3D model, and often
getting a calf muscle right is just as important as a smile. A picture is worth
a thousand words, but a model is worth a thousand pictures—it has to
look good rendered from any angle.
2. Even the most abstract creatures look best when core structures match
something in reality. A 3D model of a dragon, for example, can benefit
from referencing a lizard or alligator, or a spaceship might draw on design
elements of fighter planes or submarines.
Modeling with Primitives
Hugely important in 3D is the idea of working with premade content that can
serve as the starting point for a model. Within the 3D community, there is no
sense that you are taking the easy route by doing this; it’s all about getting the
best result as quickly and efficiently as you can. Silo includes a set of primitive
15
3D Modeling in Silo
FIG. 2.7 A collection of standard Silo primitives.
shapes—including cubes, cylinders, and spheres, and a “Base Bust” and “Base
Man”—that can be used as starting blocks. Experienced modelers often add
their own commonly reused models to Silo’s custom primitives, such as eyes
or teeth, wheels and other mechanical shapes, and various basic characters of
different shapes and sizes. They will frequently mine old projects for reusable
material.
Bring on the Tools
With a conceptual understanding of these basic 3D conventions, we are ready
to move on to the tools of the trade in Chapter 3. Then in Chapter 4, we will
begin the process of making our own model.
16
CHAPTER 3
Silo Modeling Tools
This chapter, more than any other in the book, most conceptually matches a
user manual for Silo. We will not be covering all of the tools (more will come
in Chapter 14), but we will cover the core functions needed for each type of
modeling in Silo. Those who are starting to feel comfortable with the software
and are coming from another 3D software package might want to skip this
chapter for now and reference the commands discussed here as necessary,
but for newcomers, we recommend that you work through this chapter
before moving on.
Throughout the later modeling chapters, important commands and processes
will be called out, and that is a great way to learn them, but those chapters
will not provide a background on the tools or a picture for how they fit into
the toolset as a whole. That is what this chapter is all about. The following
sections discuss keys tools in the context of some of the major modeling
workflows.
Box Modeling
Box modeling is perhaps the most popular and freeform method for working
with polygons, and it’s the approach demonstrated to create the example in
3D Modeling in Silo. DOI: 10.1016/B978-0-240-81481-0.00003-0
© 2011 Elsevier Inc. All rights reserved.
17
3D Modeling in Silo
FIG. 3.1 Primitives menu in Silo.
this book. The basic idea is to start with a cube (hence the name), cylinder,
or more advanced primitive shape and, using a few very important tools,
divide up, extrude from, and mold the shape into a finished object. It is a
similar concept to sculpting with clay, where you begin with a lump, rough
out the masses by adding, removing, or manipulating the material, and then
go over and over it again adding more detail. Box modeling works-in-progress
might bear little resemblance to the finished product before the detail is
added, and the artist must be careful to add detail methodically to avoid
traps that create messy geometry or break from the conventions listed in
Chapter 2. The following sections cover primitive creation, mirroring, and
important box modeling tools used to divide, expand, and modify primitive
shapes.
Primitives
Primitives are the building blocks for box modelers, and are accessible in Silo
from the Right Click menu or the Create drop-down menu (Figure 3.1). The
menu gives access to the basic shapes, and to custom primitives such as the
Base Man with Feet or the Base Bust that have already been modeled to
a certain point and can serve as an advanced jumping-off point. The most
common starting point, the cube, has a keyboard command: Alt C. By
selecting opt in the menu next to any of the primitives that have it, you will be
able to set various parameters such as height, width, and number of sections.
You can adjust these parameters before or immediately after creating a
primitive.
Mirroring
Often in the modeling process, what you are working on will have some type
of symmetry, and rather than trying to make very similar changes to two
sides of a model, Silo includes mirroring functionality.
●
18
There are two important types of mirroring. To try them, start by inserting
a cylinder into a new Silo scene with Alt Y; the cylinder will insert itself
at the XYZ origin of your scene. To see the effect we will be creating, it is
best to slide the shape along the X (red) axis a bit (Figure 3.2a).
Silo Modeling Tools
FIG. 3.2 Mirroring Geometry creates a second side of polygons and enables symmetry so changes are reflected
on both sides.
FIG. 3.3 Instance Mirroring shows a seam and a mirrored ghost half of the object that can be disabled and
re-enabled.
●
Now we are ready to Mirror Geometry. To try it, select the object and then
choose Modify > Mirroring > Mirror Geometry (Figure 3.2b).
This should create a second mirrored side to the model (Figure 3.2c), since it’s
making the geometry on one side of the blue grid line match the geometry
on the other side. This command will also turn on symmetry, so that any
changes made to one side of your model will also happen on the other, as in
Figure 3.2d.
Mirror Geometry; Modify Mirroring Mirror
Geometry; Alt Shift N
Options under Modify > Mirroring > Mirror Geometry > opt can control
the direction in which the mirroring happens and whether the two mirrored
sides will merge vertices along the seam within a certain distance of the
axis. Often it is helpful to open this window when performing a mirroring
operation. The symmetry of the two sides can be disabled at any time using
Modify > Mirroring > Symmetry Mode Toggle.
The other important type of mirroring is Instance Mirroring (Figure 3.3). As
opposed to geometry mirroring, Instance Mirroring does not actually create
new polygons, but simply creates a mirrored “instance” of your model. With
an instance mirror, only one side of your model will actually exist as editable
19