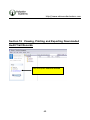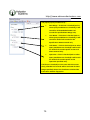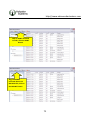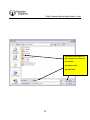
1
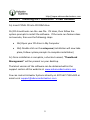
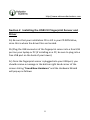
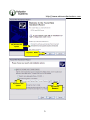
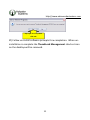
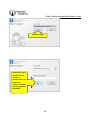
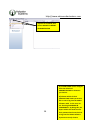
http://www.advancedactuators.com Table of Contents 1. 2. 3. Items Included with the ThumbLock® PCMU: ...................................... 2 IMPORTANT NOTE: ............................................................................... 2 Supported Operating Systems: ............................................................. 2 Section 1 Installing the ThumbLock® PCMU Software ........................ 3 Section 2 Installing the USB 2.0 Fingerprint Sensor and Driver.......... 4 Section 3 Uninstalling the ThumbLock® PCMU Software.................... 9 Section 4 Creating/Modifying the Super Administrator and General Administrators .................................................................. 12 Section 5 Logging into the ThumbLock® PCMU Software (Super and General Administrators) ................................................... 20 Section 6 Deleting General Administrator Accounts ........................ 22 Section 7 Setting up and Modifying Individual/Multiple ThumbLock® Access ............................................................................... 24 Section 8 Adding/Modifying Users at Individual Locks ..................... 30 Section 9 Assigning User/s to Multiple Locks ................................... 39 Section 10 Deleting Users from the PCMU ....................................... 43 Section 11 Exporting Data to Flash Drive for Uploading Data to ThumbLocks®................................................................... 49 Section 12 Uploading Exported Data from the Flash Drive to the ThumbLock® .................................................................... 53 Section 13 Viewing/Printing/Exporting System Logs in the PCMU .. 57 Section 14 Exporting Audit Trail Records from the ThumbLock® to the Flash Drive ...................................................................... 62 Section 15 Importing Audit Trail Records from the Flash Drive into the PCMU ........................................................................ 65 Section 16 Viewing, Printing and Exporting Downloaded Audit Trail Records ........................................................................... 69 1 http://www.advancedactuators.com BioAxxis® ThumbLock® PCMU User Manual 1. Items Included with the ThumbLock® PCMU: Software CD, including User Manual USB 2.0 Fingerprint Sensor Flash Drive 2. IMPORTANT NOTE: Prior to setting up the PCMU software, be sure to do the following: Set up correct Date/Time settings at the ThumbLock® (reference ThumbLock® User Manual for details). Create Lock ID at the ThumbLock® (reference ThumbLock® User Manual) 3. Supported Operating Systems: Win 2000 Service Pack 3, IE6.0 or above, Win 2000 Service Pack 4, Win XP Service Pack 2 and above, Win Server 2003 and Windows Vista, Windows 7 32 and 64-bit. 2 http://www.advancedactuators.com Section 1 Installing the ThumbLock® PCMU Software 1a) Insert PCMU CD into CD ROM drive 1b) CD should auto-run the .exe file. If it does, then follow the system prompts to install the software. If the auto-run feature does not execute, then use the following steps: 1bi) Open your CD drive in My Computer 1bii) Double click on the setup.exe (installation will now take place, follow system prompts to complete installation) 1c) Once installation is complete, a shortcut named, “ThumbLock Management” will be present on your desktop. The latest version of the software can be obtained within the support section of the website at: www.advancedactuators.com You can contact Actuator Systems directly at: 407-567-7130 x102 or email us at [email protected] 3 http://www.advancedactuators.com Section 2 Installing the USB 2.0 Fingerprint Sensor and Driver 2a) Be sure that your installation CD is still in your CD ROM drive, since this is where the driver files are located. 2b) Plug the USB connector of the fingerprint sensor into a free USB port on your laptop or PC (if installing on a PC, be sure to plug into a free USB port on the back of your tower). 2c) Once the fingerprint sensor is plugged into your USB port, you should receive a message in the bottom right hand corner of the screen stating “Found New Hardware” and the Hardware Wizard will pop up as follows: 4 http://www.advancedactuators.com 2d) Choose this option 2e) Click NEXT 2f) Choose this option 2g) Choose BROWSE 5 http://www.advancedactuators.com 2h) Click the plus sign symbol next to your CD ROM Drive 6 http://www.advancedactuators.com 2i) Click on the DRIVER File 2j) Click OK 7 http://www.advancedactuators.com 2k) Click NEXT 2L) Click CONTINUE ANYWAY 8 http://www.advancedactuators.com 2m) Click FINISH 2n) Once FINISH is clicked, you should receive a message in the bottom right hand corner of your desktop stating that the device is installed and ready to use. Section 3 Uninstalling the ThumbLock® PCMU Software a) In the bottom left hand corner of your screen, click STARTCONTROL PANEL 9 http://www.advancedactuators.com 3b) Double click on Add or Remove Programs 3c) Click on ThumbLock Management (PCMU) 3d) Click REMOVE 10 http://www.advancedactuators.com 3e) If you are sure, then click YES 3f) Follow un-install software prompts thru completion. When uninstallation is complete the ThumbLock Management shortcut icon on the desktop will be removed. 11 http://www.advancedactuators.com Section 4 Creating/Modifying the Super Administrator and General Administrators NOTE: Only the Super Administrator can Add and Delete other Administrators as well as perform every other programming function in the PCMU software. The PCMU software has one Super Administrator that can be created and multiple General Administrators. The multiple General Administrators can perform all functions in the PCMU software, except for changes or deletions of other administrators. However, they can make changes to themselves. Use the following steps to create the Super Administrator: 4a) Double click on the ThumbLock Management shortcut on the desktop. 12 http://www.advancedactuators.com 4b) Click LOGIN 4c) Until the Super Administrator is created, a password does not need to be entered. Click OK with the password field blank. 13 http://www.advancedactuators.com 4d) Click on SYSTEM, then choose MODIFY CURRENT ADMINISTRATOR 4e) LOGIN NAME can be changed from the default of ADMINISTRATOR to whatever you choose. 14 4f) Choose which of the 3 VERIFICATION TYPES you would like to use to log into the PCMU software with. In this case we are choosing PASSWORD & FINGERPRINT. By doing this, the Super Admin will need to enter their password and scan their FP to log into the PCMU software. If you were to only choose http://www.advancedactuators.com 15 http://www.advancedactuators.com 4i) Click the first box to add your fingerprint. For all three boxes, you will enroll the SAME finger. Be sure to choose a finger that has a clearly defined ridge pattern where a center swirl (vortex) can be clearly seen in the center of your fingerprint. 4j) Rest your fingerprint (that has a clearly defined ridge pattern) on the glass of the USB Fingerprint sensor. You may need to practice a couple of times to be sure that the vortex of your fingerprint is centered when registering. If your fingerprint has many cracks going across OR if the image is faded, be sure to use a different finger that is better defined. 16 http://www.advancedactuators.com 4k) Follow the same procedure with the SAME finger for the second and third enrollments. 4l) Click CONFIRM 4m) To add a backup finger (different from the Regular FP that was just enrolled), click ENROLL next to Backup FP. Follow the same process as steps 4i-4j. 17 http://www.advancedactuators.com 4n) Click OK 4o) The Super Administrator can also create multiple General Administrators. To do this, use the following steps: 18 http://www.advancedactuators.com 4p) Click on SYSTEM, then choose ADD SYSTEM ADMINISTRATOR 4q) Follow steps 4e to 4n from this section to add a new General Administrator. Once completed, the Super Administrator can use the same process to add multiple General Administrators. The General Administrator/s will need to be present if they are going to have fingerprints associated to their General Administrator account. 4r) Click on SYSTEM, then choose EXIT. In Section 5 we will learn how to log into the PCMU software with the administrative rights that were created. 19 http://www.advancedactuators.com Section 5 Logging into the ThumbLock® PCMU Software (Super and General Administrators) 5a) Double click on the ThumbLock Management icon that is located on your desktop. 5b) From the drop down menu, choose which Administrator to log in as. 5c) Click LOGIN 20 http://www.advancedactuators.com 5d) Enter your PASSWORD (if applicable) and click OK 5e) If you have associated a Fingerprint with your Administrator account during set up, then you will need to verify your registered fingerprint at Log In. Click VERIFY and rest your registered Administrator fingerprint on the USB fingerprint sensor for verification. 21 http://www.advancedactuators.com 5f) If successful, you will be in the Home screen of the PCMU software. Section 6 Deleting General Administrator Accounts NOTE: Only the Super Administrator can Delete other Administrators, therefore you must be a Super Administrator and logged in as a Super Administrator to perform the following function: 6a) Click on SYSTEM, then choose DELETE SYSTEM ADMINISTRATOR 22 http://www.advancedactuators.com 6b) Choose the General Administrator to be deleted and click DELETE. 6c) Click YES 6d) General Admin has been successfully deleted, click CANCEL. 23 http://www.advancedactuators.com Section 7 Setting up and Modifying Individual/Multiple ThumbLock® Access IMPORTANT NOTE: Prior to setting up the ThumbLocks® in the PCMU software, be sure to do the following: Set up correct Date/Time settings at the ThumbLock® (reference ThumbLock® User Manual for details). Create Lock ID at the ThumbLock® (reference ThumbLock® User Manual). ***CAUTION*** FALSE ACCEPTANCE RATE WILL INCREASE IF SENSITIVITY LEVEL IS RAISED TO LEVEL 8 or 9. 24 http://www.advancedactuators.com 7a) There are two ways to set up the locks…..you can either use the drop down menu OR the easy to see icons above ALL LOCKS. To keep things simple, we will use the icons located above ALL LOCKS. 7c) Use the up/down arrows or type in the LOCK ID number that you are creating (again, this should correspond to the Lock ID that has already been created at the lock). 7b) Click the icon with the green plus arrow (when cursor is held over icon, the text NEW LOCK appears) to add a new lock. 7d) Type in a NAME for the lock. 7e) Choose the desired level of FINGERPRINT SENSITIVITY from the drop down menu. Level 1 is the MOST stringent (requires very well defined fingerprint ridge patterns and almost perfect fingerprint placement) AND Level 9 is the LEAST stringent (requires less defined ridge patterns and is more forgiving of fingerprint placement). NOTE: There is no limit to the number of locks that can be created. 25 http://www.advancedactuators.com 7f) Under VERIFICATION MODE, there are three choices for how all enrolled users will verify themselves for access to unlock the specific door lock: 1:1…When this is chosen, all users enrolled at this lock must enter their User ID, then verify their enrolled Fingerprint or PIN Code to successfully unlock the door. 1:N…When this is chosen, all users enrolled at this lock will only need to match their enrolled Fingerprint or PIN Code to successfully unlock the door. BOTH…When this is chosen, all enrolled users can use the 1:1 OR 1:N method to successfully unlock the door. In this case, we are going to click on 1:1. 26 http://www.advancedactuators.com 7g) Click TIME SETTING 7h) Under the TIME SETTING tab, there are three TIME MODES that may be chosen for the lock: ALL DATES AND TIMES…When this is chosen, the specific lock allows for all enrolled Users to have access to unlock the door. The exception to this is if specific Timed Access is set up for individual Users. INVALID…This can also be called lock down mode. When this is enabled, only Administrators for the specific lock will have access to unlock the door. ROUTINE…This mode allows for timed access to the lock to be created for specific dates, days of the week and time frames within the days of the week chosen. NOTE: The Time Setting chosen/created for the lock will override any specific Timed Access assigned for a specific User. For example, if ROUTINE is chosen for the lock and set to Mon, Wed and Fri 9am to 5pm, Users will only have access to unlock the door during the set days and times, no matter what individual timed access was set for them. 27 http://www.advancedactuators.com 7i) Once Time Mode has been chosen/created, click SAVE 7j) The settings that have been saved for any lock can be edited. To edit a specific lock’s settings….. 7k) Click on the lock name that will have settings edited and click on the EDIT LOCK icon. 28 http://www.advancedactuators.com 7l) It is possible to delete an individual lock or multiple locks. To delete a specific lock….. 7m) Click on the lock name that will have settings edited and click on the DELETE LOCK icon (with red X). NOTE: Before a lock can be deleted, all users from the specific lock must be deleted first. 29 http://www.advancedactuators.com Section 8 Adding/Modifying Users at Individual Locks 8a) Highlight the lock for a User/s to be added to. 8b) There are two ways to add users to a specific lock…..you can either use the drop down menu OR use the easy to see icon with a green plus symbol. To keep things simple, we will use the icon with the green plus symbol. 30 http://www.advancedactuators.com 8c) Enter a NAME to associate to the User. 8d) Enter a 3 digit USER ID. NOTE: USER ID numbers 001003 have Administrative rights at the specific lock they are being created for. This means that they can make any programming updates or changes at the lock with their administrator fingerprint. 8e) Click on the FP & PIN tab 31 Users 004-999 will only have access to unlock the door that their fingerprints and/or PIN Codes are assigned to. They do not have access to make any programming updates or changes at the lock. http://www.advancedactuators.com 8f) If a PIN Code is desired for the specific User, click on the check box for PIN code. If a PIN Code is not desired, then leave the PIN Code checkbox unchecked. 8g) Enter a 1-10 digit PIN Code and re-enter the same 1-10 digit PIN Code. 32 http://www.advancedactuators.com 8h) Three different fingerprints (from three different fingers) can be enrolled for the individual User. 8i) Click ENROLL next to FINGER 1 to enroll the first of the three Users’ fingerprints. 8j) Click the first box to enroll the fingerprint. For all three boxes, the User will enroll the SAME finger. Be sure to choose a finger that has a clearly defined ridge pattern where a center swirl (vortex) can be clearly seen in the center of the fingerprint. 33 http://www.advancedactuators.com 8k) Rest the fingerprint (that has a clearly defined ridge pattern) on the glass of the USB Fingerprint sensor. The User may need to practice a couple of times to be sure that the vortex of the fingerprint is centered when registering. If the fingerprint has many cracks going across it OR if the image is faded, be sure to use a different finger that is better defined. 8l) Follow the same procedure with the SAME finger for the second and third enrollments. 8m) Click CONFIRM 34 http://www.advancedactuators.com 8n) Follow steps 8i thru 8m to enroll the Users’ other two selected fingerprints. 8o) Click TIME SETTING tab to create Timed Access for the User at the specific lock. 35 http://www.advancedactuators.com 8p) Under the TIME SETTING tab, specific timed access can be created for the specific User for the lock that they are assigned to. NOTE: Per Section 7h, the Timed Lock Access that has been assigned, will override any specific Timed User access that has been assigned. 8q) Under the TIME SETTING tab, there are three TIME MODES that may be created for the specific User: ALL DATES AND TIMES…When this is chosen, the specific User has access to unlock the door at any time with their enrolled Fingerprint or PIN Code. INVALID…This can also be called lock down mode for the specific User. When this is enabled, the User will not be able to unlock the door with their enrolled Fingerprint or PIN Code. 36 ROUTINE…This mode allows for the User to have specific timed access to the unlock the door with their enrolled Fingerprint or PIN Code, only for specific dates , days of the week and time frames within the days of the week chosen. http://www.advancedactuators.com 8r) Once Time Mode has been chosen/created, click SAVE 8s) Bill Smith (User ID 001) has now been successfully created in lock FRONT DOOR (Lock ID 1). 37 http://www.advancedactuators.com 8t) Follow the same process from Section 8 to add additional Users. 8v) Click on the EDIT USER icon (picture of person with pencil going thru it). 8u) It is also possible to EDIT a User. To do this, highlight the User Name 38 http://www.advancedactuators.com 8w) Make changes and click SAVE Section 9 Assigning User/s to Multiple Locks 9a) To assign an Individual User to Multiple Locks, use the following steps: 39 http://www.advancedactuators.com 9c) Click on the COPY USER icon (picture of overlapping paper) 9b) Highlight specific User 9e) Click on PASTE USER icon (picture of clipboard and paper. 9d) Highlight the lock to paste the copied User into. 40 http://www.advancedactuators.com 9f) User is now added to the lock he has been pasted into. The same process can be used to add the User into other locks. Note: Once User is pasted into a different lock, the User’s access can be edited by using the EDIT USER function. 9g) To assign Multiple Users to Multiple Locks, use the following steps: 9h) Highlight the lock that the USERS will be copied from. 9i) Click SELECT and choose ALL if all Users will be copied from the lock and pasted into another lock. OR PRESS and hold the CTRL button on your keyboard and click on the Users that need to be copied from the lock and pasted into another lock. 41 http://www.advancedactuators.com 9j) Click on the COPY USERS icon (picture of overlapping paper) 9l) Click on PASTE USERS icon (picture of clipboard and paper. 9k) Highlight the lock to paste the copied Users into. 42 http://www.advancedactuators.com 9m) Users have been added to the lock that they were pasted into. The same process can be used to add Multiple Users into other locks. Note: Once Users are pasted into different locks, the Users access can be edited by using the EDIT USERS function. Section 10 Deleting Users from the PCMU 10a) Use the following steps to delete a Single User from an Individual Lock: 10b) Highlight the LOCK that you want to delete the User from and then highlight the USER to be deleted from the lock. 43 http://www.advancedactuators.com 10c) Click on DELETE USER icon (picture of person with red X) 10d) Use the following steps to delete a Single User from Multiple Locks: 10e) Highlight the USER to be deleted and click the USER IN LOCKS icon (picture of blue folder) to see what locks the user has been assigned to. 44 http://www.advancedactuators.com 10f) USER IN LOCKS screen displays all of the locks that the USER is assigned to. To delete the USER from an individual lock, highlight the LOCK and press the DELETE USER icon (picture of person with red X). 45 http://www.advancedactuators.com 10g) To delete the USER from ALL locks they are assigned to, click SELECT and choose ALL from the drop down menu. Press the DELETE USER icon (picture of person with red X). 46 http://www.advancedactuators.com 10h) Use the following steps to delete Multiple Users from an Individual Lock: 10i) Highlight the LOCK that you want to delete multiple Users (but NOT ALL USERS) from and PRESS and hold the CTRL button on your keyboard and click on the Users that will be deleted from the lock. 10j) Click on DELETE USERS icon (picture of person with red X) 47 http://www.advancedactuators.com 10k) Use the following steps to delete ALL Users from an Individual Lock: 10l) Highlight the LOCK that you want to DELETE ALL USERS from and then click on SELECT and choose ALL. 10m) Click on DELETE USERS icon (picture of person with red X) 48 http://www.advancedactuators.com Section 11 Exporting Data to Flash Drive for Uploading Data to ThumbLocks® NOTE: All Lock and User Data that is exported from the PCMU to the Flash Drive, then uploaded to the ThumbLock/s® will overwrite any existing data in the ThumbLock/s® that data is being uploaded into. 11a) Plug your Flash Drive into the USB port of your Laptop or PC. 11b) Use the following steps to export Individual Lock/User Data to the Flash Drive: 11c) Highlight the Lock whose data will be exported to the Flash Drive and click on the EXPORT icon (picture of disk with green arrow above it). 49 http://www.advancedactuators.com 11d) Highlight your Flash Drive location. 11e) Click OK 11f) Click OK 11g) Go into MY COMPUTER and double click on the Flash Drive. 50 http://www.advancedactuators.com 11h) If Export was successful, you will see three files for the individual Lock ID. In this case the Lock ID is 0001. 11i) Use steps 11c thru 11h to Export other Individual Lock/User data to the Flash Drive. 11j) Use the following steps to export ALL Locks/User Data to the Flash Drive: 11k) Highlight ALL LOCKS and click on the EXPORT icon (picture of disk with green arrow above it). 51 http://www.advancedactuators.com 11l) Highlight your Flash Drive location. 11m) Click OK 11n) Click OK 11o) Go into MY COMPUTER and double click on the Flash Drive. 52 http://www.advancedactuators.com 11p) If Export was successful, you will see three files for each Lock ID. In this case the Lock IDs are 0001, 0002 & 0003. Section 12 Uploading Exported Data from the Flash Drive to the ThumbLock® NOTE: All Lock and User Data that is exported from the PCMU to the Flash Drive, then uploaded to the ThumbLock/s® will overwrite any existing data in the ThumbLock/s®that data is being uploaded into. 12a) Unplug the Flash Drive with exported data from your Laptop/PC. 12b) Plug Flash Drive into the USB port located at the bottom of the Interior Unit 12c) Click on “M” 53 NOTE: “M” is the Menu option. This controls all Menu Options on the ThumbLock®. http://www.advancedactuators.com 12d) If an Export Upload to the lock has been done in the past, the message on the LCD, “PRESS MASTER FP” appears. This means that an enrolled Administrator (Master) Fingerprint needs to be verified to gain access to the locks’ menu options. When the message, “PRESS MASTER FP” appears on the LCD, rest an enrolled Administrators’ Fingerprint (registered as User ID 001-003 for this lock in the PCMU) on the ThumbLock’s fingerprint sensor (located on the outside unit). The fingerprint sensor will stay powered on for 5 seconds before powering off. If this is the first time doing an Export Upload to the lock, this step can be skipped. 12e) The Main Menu screen is displayed after successfully completing step 12d. 54 http://www.advancedactuators.com 12f) Press the DOWN ARROW until Option 3. U-DISK OP is highlighted. 12g) Press “M” to select 12h) Press the DOWN ARROW until Option 3.2 DATA UPDATE is highlighted. 12i) Press “M” to select 12j) While data is being uploaded from Flash Drive to the ThumbLock® the message, “REC READING” appears on the LCD. 55 12k) When the Data Upload is complete, the LCD will revert back to 3.2 DATA UPDATE (highlighted) on the LCD. 12l) Press “E” (for Exit), until the LCD powers off. 12m) Remove the Flash Drive http://www.advancedactuators.com 12n) Repeat steps of Section 12 at all ThumbLocks® where data has been exported from the PCMU to the Flash Drive. 12o) For steps on how to unlock the door with Fingerprints/PIN Codes that has been uploaded from the Flash Drive to the ThumbLock/s®, see ThumbLock® User Manual. 56 http://www.advancedactuators.com Section 13 Viewing/Printing/Exporting System Logs in the PCMU Note: System Log records display all programming that has been done in the PCMU by Date/Time, Admin and Operation. This is not to be confused with imported Audit Trail Records (Section 14). 13a) Use the following steps to Download System Log Records: 57 http://www.advancedactuators.com 13b) Click on SYSTEM LOG 58 http://www.advancedactuators.com 13c) Specify Query Conditions by…. Date Range – If this box is checked (and no other Query Conditions are checked), it will search for all System Log records for specified Date Range only. Admin – If this box is checked (and no other Query Conditions are checked), it will search for System Log records specific to the Admin name entered only. Operation – If this is checked (and no other Query Conditions are checked) it will search for System Log records specific to operation entered only. If all three are checked (as is the case with this screen shot), all System Log records will be retrieved for Date Range specified, where PCMU Admin Bob Jones used the Delete function. 13d) In this case, we will search by specific Date Range. 13e) Once Date Range is entered, click QUERY. 59 http://www.advancedactuators.com 13f) Retrieved System Log records will display the Date and Time of the event, the PCMU Admin that performed the event and the Operation that was performed per the Query Conditions entered. 13g) To PRINT retrieved records, click the PRINT button. 60 http://www.advancedactuators.com 13h) To EXPORT retrieved data to an MS EXCEL file, click on the EXPORT button 13i) Choose the location on your computer for where to save the file. 13j) Name the file 13k) Click SAVE. 61 http://www.advancedactuators.com Section 14 Exporting Audit Trail Records from the ThumbLock® to the Flash Drive 14a) Plug Flash Drive into the USB port located at the bottom of the Interior Unit 14b) Click on “M” NOTE: “M” is the Menu option. This controls all Menu Options on the ThumbLock™. “E” is for Exit. When this is pressed the existing menu will be closed. If pressed multiple times, the message “BYE” will appear, all Menu screens are exited and LCD will power off. UP and DOWN arrows scrolls thru menu options. 62 http://www.advancedactuators.com 14c) When the message, “PRESS MASTER FP” appears on the LCD, rest an enrolled Administrators’ Fingerprint (registered as User ID 001-003 for this lock in the PCMU) on the ThumbLock® fingerprint sensor (located on the outside unit). The fingerprint sensor will stay powered on for 5 seconds before powering off. 14d) The Main Menu screen is displayed after successfully completing step 12d. 63 http://www.advancedactuators.com 14e) Press the DOWN ARROW until Option 3. U-DISK OP is highlighted. 14f) Press “M” to select 14g) Press Option 3.1 RECORD OUT to begin download of audit trail records to the flash drive. 14h) When the Audit Trail Download is complete, the LCD will revert back to 3.1 RECORD OUT (highlighted) on the LCD. 14i) Press “E” (for Exit), until the LCD powers off. 64 14j) Remove the Flash Drive from the bottom of the ThumbLock® http://www.advancedactuators.com Section 15 Importing Audit Trail Records from the Flash Drive into the PCMU 15a) Plug Flash Drive into available USB Port on your PC/Laptop 65 http://www.advancedactuators.com 15b) Click IMPORT RECORD 15c) Click BROWSE 66 http://www.advancedactuators.com 15d) Choose the file from your flash drive, where the four digit file name corresponds to the LOCK ID number that the Audit Trail records have been downloaded from. 15e) Click OPEN 15f) Click IMPORT 67 http://www.advancedactuators.com 15g) When audit trail records have been successfully downloaded, the message COMPLETED appears. 15h) Click CLOSE 68 http://www.advancedactuators.com Section 16 Viewing, Printing and Exporting Downloaded Audit Trail Records 16a) Click QUERY AND PRINT RECORD 69 http://www.advancedactuators.com 16b) Specify Query Conditions by…. Date Range – If this box is checked (and no other Query Conditions are checked), it will search for all downloaded Audit Trail records for specified Date Range only. User Name – If this box is checked (and no other Query Conditions are checked), it will search for Audit Trail records for the Specific User Name entered only. Lock Name – If this is checked (and no other Query Conditions are checked) it will search for Audit Trail records specific to the Lock Name entered only. Operation - If this is checked (and no other Query Conditions are checked) it will search for Audit Trail records specific to the Operation specified only. If all four are checked (as is the case with this screen shot), all Audit Trail records will be retrieved for Date Range specified, where Tom Tomlinson unlocked the Front Door with his fingerprint. 70 http://www.advancedactuators.com 16c) In this case, we will search by specific Date Range. 16d) Once Date Range is entered, click QUERY. 16e) Retrieved Audit Trail records will display the Date and Time of the event, Lock ID that the event took place at, Lock Name that the Lock ID is associated to, User ID associated to the event, User Name associated to the User ID and the Operation that was performed per the Query Conditions entered. 71 http://www.advancedactuators.com 16f) To PRINT retrieved records, click the PRINT button. 16g) To EXPORT retrieved data to an MS EXCEL file, click on the EXPORT button 72 http://www.advancedactuators.com 16h) Choose the location on your computer for where to save the file. 16i) Name the file 16j) Click SAVE. 73