1
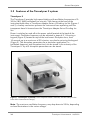
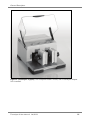
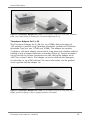
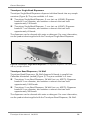
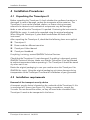
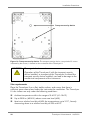
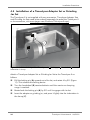
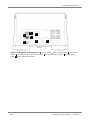
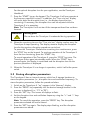
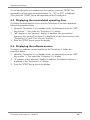
April 2010 TissueLyser II User Manual For disruption of up to 48 or 192 biological samples Sample & Assay Technologies QIAGEN Sample and Assay Technologies QIAGEN is the leading provider of innovative sample and assay technologies, enabling the isolation and detection of contents of any biological sample. Our advanced, high-quality products and services ensure success from sample to result. QIAGEN sets standards in: Purification of DNA, RNA, and proteins Nucleic acid and protein assays microRNA research and RNAi Automation of sample and assay technologies Our mission is to enable you to achieve outstanding success and breakthroughs. For more information, visit www.qiagen.com. Contents Contents 1 2 3 4 5 6 7 Safety Information 5 1.1 Proper use 5 1.2 Electrical safety 6 1.3 Environment 7 1.4 Biological safety 8 1.5 Chemicals 9 1.6 Waste disposal 9 1.7 Mechanical hazards Introduction 10 11 2.1 About this user manual 11 2.2 Intended use of the TissueLyser II 11 General Description 13 3.1 TissueLyser II principle 13 3.2 Features of the TissueLyser II system 14 3.3 Applications 20 Installation Procedures 21 4.1 Unpacking the TissueLyser II 21 4.2 Installation requirements 21 4.3 Transporting and repacking the TissueLyser II 23 4.4 Installation of a TissueLyser Adapter Set or Grinding Jar Set 24 4.5 Replacing the fuses 25 Operating Procedures 27 5.1 Sample disruption 27 5.2 Storing disruption parameters 28 5.3 Displaying the accumulated operating time 29 5.4 Displaying the software version 29 Maintenance Procedures 30 6.1 Regular maintenance 30 6.2 Regular safety checks 32 Troubleshooting Guide 33 7.1 Error codes displayed by the TissueLyser II TissueLyser II User Manual 04/2010 33 3 Contents Appendix A Technical data 35 Environmental conditions 35 Waste Electrical and Electronic Equipment (WEEE) 37 EC declaration of conformity 38 Appendix B Liability clause 4 35 39 39 TissueLyser II User Manual 04/2010 Safety Information 1 Safety Information Before using the TissueLyser II system, it is essential that you read this user manual carefully and pay particular attention to the safety information. The instructions and safety information in the user manual must be followed to ensure safe operation of the TissueLyser II and to maintain the TissueLyser II in a safe condition. The following types of safety information appear throughout this user manual. WARNING The term WARNING is used to inform you about situations that could result in personal injury to you or other persons. Details about these circumstances are given in a box like this one. CAUTION The term CAUTION is used to inform you about situations that could result in damage to the TissueLyser II or other equipment. Details about these circumstances are given in a box like this one. The advice given in this manual is intended to supplement, not supersede, the normal safety requirements prevailing in the user’s country. 1.1 Proper use WARNING Risk of personal injury and material damage Improper use of the TissueLyser II may cause personal injuries or damage to the instrument. Do not attempt to move the TissueLyser II during operation. The TissueLyser II should only be operated by qualified personnel who have been appropriately trained. Servicing of the TissueLyser II should only be performed by QIAGEN or an authorized agent (service technicians). Do not carry out any modifications of the instrument. QIAGEN shall not be held responsible for any injuries or damages resulting from nonobservance of the instructions and safety information in this user manual. The TissueLyser II should only be used for the applications described in the TissueLyser Handbook. The TissueLyser II should only be used in combination TissueLyser II User Manual 04/2010 5 Safety Information with accessories approved by QIAGEN (see Section 3.2, page 14). Do not continue to use the TissueLyser II or TissueLyser accessory if it is damaged. Perform the maintenance as described in Section 6. QIAGEN charges for repairs that are required due to incorrect maintenance. CAUTION Damage to the instrument Use of adapters and plasticware other than those described in this user manual may lead to damage to the clamps of the TissueLyser II. CAUTION Damage to the instrument Avoid spilling water or chemicals onto the TissueLyser II. Damage caused by water or chemical spillage will void your warranty. In case of emergency, switch off the TissueLyser II at the power switch and unplug the power cord from the power outlet. 1.2 Electrical safety WARNING Electrical hazard Any interruption of the protective conductor (earth/ground lead) inside or outside the TissueLyser II or disconnection of the protective conductor terminal is likely to make the TissueLyser II dangerous. Intentional interruption is prohibited. Lethal voltages inside the TissueLyser II When the TissueLyser II is connected to line power, terminals may be live, and opening the TissueLyser II or removing parts is likely to expose live parts. To ensure satisfactory and safe operation of the TissueLyser II, follow the advice below: The line power cord must be connected to a line power outlet that has a protective conductor (earth/ground). Do not adjust or replace internal parts of the TissueLyser II. Do not operate the TissueLyser II with any covers or parts removed. If liquid has spilled inside the TissueLyser II, switch off the TissueLyser II, disconnect it from the power outlet, and contact QIAGEN Technical Services. 6 TissueLyser II User Manual 04/2010 Safety Information If the TissueLyser II becomes electrically unsafe, prevent other personnel from operating it, and contact QIAGEN Technical Services; the TissueLyser II may be electrically unsafe when: It or the line power cord appears to be damaged. It has been stored under unfavorable conditions for a prolonged period. It has been subjected to severe transport stresses. If the TissueLyser II is not in use, switch it off at the power switch. If the TissueLyser II will not be used for a prolonged period of time, unplug the power cord from the power outlet. 1.3 Environment Operating conditions WARNING Explosive atmosphere The TissueLyser II is not designed for use in an explosive atmosphere. WARNING Risk of explosion The TissueLyser II is intended for use with reagents and substances supplied with QIAGEN kits. Use of other reagents and substances may lead to fire or explosion. CAUTION Damage to the instrument Direct sunlight may bleach parts of the instrument and cause damage to plastic parts. The TissueLyser II must be located out of direct sunlight. TissueLyser II User Manual 04/2010 7 Safety Information 1.4 Biological safety Specimens and reagents containing materials from humans should be treated as potentially infectious. Use safe laboratory procedures as outlined in publications such as Biosafety in Microbiological and Biomedical Laboratories, HHS (www.cdc.gov/od/ohs/biosfty/biosfty.htm). Samples Samples may contain infectious agents. You should be aware of the health hazard presented by such agents and should use, store, and dispose of such samples according to the required safety regulations. WARNING Samples containing infectious agents Some samples used with the TissueLyser II may contain infectious agents. Handle such samples with the greatest of care and in accordance with the required safety regulations. Always wear safety glasses, 2 pairs of gloves, and a lab coat. The responsible body (e.g., laboratory manager) must take the necessary precautions to ensure that the surrounding workplace is safe, and that TissueLyser II operators are suitably trained and not exposed to hazardous levels of infectious agents as defined in the applicable Material Safety Data Sheets (MSDSs) or OSHA,* ACGIH,† or COSHH‡ documents. Venting for fumes and disposal of wastes must be in accordance with all national, state, and local health and safety regulations and laws. * OSHA: Occupational Safety and Health Administration (United States of America). † ACGIH: American Conference of Government Industrial Hygienists (United States of America). ‡ COSHH: Control of Substances Hazardous to Health (United Kingdom). 8 TissueLyser II User Manual 04/2010 Safety Information 1.5 Chemicals WARNING Hazardous chemicals Some chemicals used with the TissueLyser II may be hazardous or may become hazardous after completion of the sample disruption process. Always wear safety glasses, gloves, and a lab coat. The responsible body (e.g., laboratory manager) must take the necessary precautions to ensure that the surrounding workplace is safe and that TissueLyser II operators are not exposed to hazardous levels of toxic substances (chemical or biological) as defined in the applicable Material Safety Data Sheets (MSDSs) or OSHA,* ACGIH,† or COSHH‡ documents. Venting for fumes and disposal of wastes must be in accordance with all national, state, and local health and safety regulations and laws. * OSHA: Occupational Safety and Health Administration (United States of America). † ACGIH: American Conference of Government Industrial Hygienists (United States of America). ‡ COSHH: Control of Substances Hazardous to Health (United Kingdom). Toxic fumes If working with volatile solvents, toxic substances, etc., you must provide an efficient laboratory ventilation system to remove vapors that may be produced. WARNING Toxic fumes Do not use bleach to clean or disinfect used labware. Bleach in contact with salts from the buffers used can produce toxic fumes. 1.6 Waste disposal Used labware, such as sample tubes, may contain hazardous chemicals or infectious agents from the sample disruption process. Such wastes must be collected and disposed of properly according to local safety regulations. For information on how to dispose of the TissueLyser II, see Appendix A (page 35). TissueLyser II User Manual 04/2010 9 Safety Information 1.7 Mechanical hazards WARNING Moving parts Do not leave the TissueLyser II unattended during operation. To ensure safety, the TissueLyer II will not operate until the transparent hood is closed. WARNING Moving parts Damage or personal injury can occur if the TissueLyser Adapter Set or Grinding Jar Set is not securely attached. Ensure that both adapters or grinding jars are of similar weight. Do not operate the TissueLyser II with only a single adapter or grinding jar installed. 10 TissueLyser II User Manual 04/2010 Introduction 2 Introduction Thank you for choosing the TissueLyser II system. We are confident it will become an integral part of your laboratory. Before using the TissueLyser II, it is essential you read this user manual carefully and pay particular attention to the safety information. The instructions and safety information in the user manual must be followed to ensure safe operation of the TissueLyser II and to maintain the TissueLyser II in a safe condition. 2.1 About this user manual This user manual provides information about the TissueLyser II in the following sections: 1. 2. 3. 4. 5. 6. 7. Safety Information Introduction General Description Installation Procedures Operating Procedures Maintenance Procedures Troubleshooting Guide Appendices The appendices contain the following: Technical data Warranty terms 2.2 Intended use of the TissueLyser II The TissueLyser II is intended for molecular biology applications. This product is neither intended for the diagnosis, prevention, or treatment of a disease, nor has it been validated for such use either alone or in combination with other products. Therefore, the performance characteristics of the product for clinical use (i.e., diagnostic, prognostic, therapeutic, or blood banking) are unknown. The TissueLyser II is not designed for continuous operation, but for single 8-hour shifts with 30% operating time. QIAGEN has successfully tested the TissueLyser II with the following adapter sets and grinding beads: TissueLyser Adapter Set 2 x 96, with one 3 mm diameter tungsten carbide bead or one 5 mm diameter stainless steel bead per collection microtube TissueLyser Adapter Set 2 x 24, with one 3 mm diameter tungsten carbide bead or one 5 mm or 7 mm diameter stainless steel bead per microcentrifuge tube TissueLyser II User Manual 04/2010 11 Introduction Damage to the clamps of the TissueLyser II The clamps of the TissueLyser II are designed for use with the following QIAGEN adapters and consumables: TissueLyser Adapter Set 2 x 24 (cat. no. 69982) containing standard 2 ml microcentrifuge tubes TissueLyser Adapter Set 2 x 96 (cat. no. 69984) containing Collection Microtubes (racked) (cat. no. 19560) sealed with Collection Microtube Caps (cat. no. 19566) QIAGEN adapters together with the recommended tubes form a component that is of an optimal thickness, allowing secure tightening of the clamps of the TissueLyser II without straining the clamping mechanism. Damage to the clamps of the TissueLyser II will occur if other components of reduced thickness are installed. Therefore, the TissueLyser II must not be used with adapters from other suppliers or with QIAGEN adapters containing tubes not recommended by QIAGEN.* Requirements for TissueLyser II users This table covers the general level of competence and training necessary for transportation, installation, use, maintenance, and servicing of the TissueLyser II. Task Personnel Training and experience Transportation No special requirements No special requirements Installation, routine use, and maintenance Laboratory technicians or equivalent Appropriately trained and experienced personnel Servicing QIAGEN or an authorized agent (service technicians) * Use of the TissueLyser II with non-QIAGEN adapters has been tested by other suppliers (e.g., Roche recommend use of the TissueLyser II with GS FLX Titanium emPCR Shaker Adapters, LV, which are accessories for the Genome Sequencer FLX Instrument). Use of such adapters has not been tested by QIAGEN. 12 TissueLyser II User Manual 04/2010 General Description 3 General Description The TissueLyser II is a flexible bead mill designed for rapid and efficient disruption of up to 48 or 192 samples at the same time. A wide variety of biological samples can be processed, including human, animal, and plant tissues as well as yeast and bacteria. Each sample is simultaneously disrupted and homogenized by high-speed shaking with a bead in a sealed tube (bead milling). 3.1 TissueLyser II principle Efficient sample disruption is a prerequisite for nucleic acid and protein purification procedures. Incomplete sample disruption can lead to significantly reduced yields and can increase the risk of clogging when using purification columns or magnetic particles. The TissueLyser II thoroughly disrupts and simultaneously homogenizes biological samples in the presence of lysis buffer. Plant tissues can alternatively be disrupted and homogenized in the absence of lysis buffer. Tubes containing sample and bead are placed in a TissueLyser Adapter Set and shaken at a very high speed, causing the samples to be disrupted and homogenized by the beating and grinding effect of the beads. The tubes can be discarded after use, which prevents cross-contamination and provides time savings, as there is no need to clean tubes after disrupting samples. In addition, there is no cross-contamination during sample disruption as each tube is securely sealed with its own lid. The TissueLyser II can also disrupt and homogenize large samples when used in combination with a Grinding Jar Set. Samples are placed in a 10 ml jar containing a grinding ball and shaken at high speed. TissueLyser Adapter Sets, Grinding Jar Sets, and sample tubes can be precooled to minimize degradation of nucleic acids during sample disruption. To find out which procedures require precooling, see the TissueLyser Handbook. TissueLyser II User Manual 04/2010 13 General Description 3.2 Features of the TissueLyser II system TissueLyser II The TissueLyser II provides high-speed shaking with oscillation frequencies of 3– 30 Hz (180–1800 oscillations per minute). Two clamps at the front of the instrument hold either a TissueLyser Adapter Set or a Grinding Jar Set (Figures 1 and 2). A safety mechanism prevents the instrument from operating until the transparent hood is lowered over the TissueLyser Adapter Set or Grinding Jar Set. Power is switched on and off at the power switch located at the back of the instrument. Oscillation frequency can be adjusted in steps of 0.1 Hz using a keypad (Figure 3) located on top of the instrument. Disruption time, from 10 seconds up to a maximum of 99 minutes, can also be set using the keypad (Figure 3). The disruption parameters for a particular application (i.e., oscillation frequency and disruption time) can be stored in the memory of the TissueLyser II. Up to 9 disruption parameters can be stored. Figure 1. TissueLyser II (closed). The transparent hood is lowered, and the clamps at the front of the instrument are empty. Note: The maximum oscillation frequency may drop down to 25 Hz, depending on local fluctuations in the mains voltage. 14 TissueLyser II User Manual 04/2010 General Description Figure 2. TissueLyser II (open). The transparent hood is raised, and a TissueLyser Adapter Set is installed. TissueLyser II User Manual 04/2010 15 General Description D C B A Figure 3. Keypad of the TissueLyser II. A “Memory” display, with “PROG” and “SET” keys for storing disruption parameters. B “Frequency 1/s” display, with “–” and “+” keys for adjusting oscillation frequency. C “Time min/sec” display, with “–” and “+” keys for adjusting disruption time. D “START” and “STOP” keys for starting and stopping operation of the TissueLyser II. TissueLyser Adapter Set 2 x 24 The TissueLyser Adapter Set 2 x 24 (cat. no. 69982) allows disruption of 48 samples in parallel using standard 2 ml microcentrifuge tubes (e.g., Eppendorf Safe-Lock micro test tubes*). The adapter set contains 2 adapters, with each adapter comprised of a top plate, a bottom plate, and a tube holder for holding 24 microcentrifuge tubes (Figure 4). Sample disruption can be carried out at room temperature or after storing the adapter set at –80°C for at least 2 hours. The adapter set can be cleaned with detergent, microbicides, or up to 96% ethanol. For more information, see the product sheet supplied with the adapter set. * Use of other tubes in combination with 7 mm diameter beads may result in the beads getting lodged in the lids of the tubes. 16 TissueLyser II User Manual 04/2010 General Description Figure 4. TissueLyser Adapter Set 2 x 24. Each adapter consists of a top plate, a bottom plate, and a tube holder for holding 24 microcentrifuge tubes (2 ml). TissueLyser Adapter Set 2 x 96 The TissueLyser Adapter Set 2 x 96 (cat. no. 69984) allows disruption of 192 samples in parallel using Collection Microtubes (racked) and Collection Microtube Caps (cat. nos. 19560 and 19566). The adapter set contains 2 adapters, with each adapter comprised of a top plate and a bottom plate for holding a rack of capped collection microtubes (Figure 5). Sample disruption can be carried out at room temperature or after storing the adapter set at –80°C for at least 2 hours. The adapter set can be cleaned with detergent, microbicides, or up to 96% ethanol. For more information, see the product sheet supplied with the adapter set. Figure 5. TissueLyser Adapter Set 2 x 96. Each adapter consists of a top plate and a bottom plate for holding a rack of capped collection microtubes. TissueLyser II User Manual 04/2010 17 General Description Grinding Jar Set, S. Steel The Grinding Jar Set, S. Steel (cat. no. 69985) allows disruption of 2 large samples in parallel using stainless steel grinding balls (Figure 6). Sample disruption can be carried out at room temperature or after freezing the grinding jars in liquid nitrogen. For more information, see the product sheet supplied with the Grinding Jar Set. Figure 6. Grinding Jar Set, S. Steel. Each 10 ml jar is made of stainless steel and contains a 20 mm diameter stainless steel grinding ball. Grinding Jar Set, Teflon® The Grinding Jar Set, Teflon (cat. no. 69986) allows disruption of 2 large samples in parallel using Teflon grinding balls (Figure 7). Sample disruption can be carried out at room temperature. For more information, see the product sheet supplied with the Grinding Jar Set. Figure 7. Grinding Jar Set, Teflon. Each 10 ml jar is made of Teflon and contains a 20 mm diameter Teflon grinding ball. 18 TissueLyser II User Manual 04/2010 General Description TissueLyser Single-Bead Dispensers TissueLyser Single-Bead Dispensers dispense individual beads into any sample container (Figure 8). They are available in 2 sizes: TissueLyser Single-Bead Dispenser, 5 mm (cat. no. 69965): Dispenses beads of 5 mm diameter, and contains a reservoir that can hold approximately 150 beads TissueLyser Single-Bead Dispenser, 7 mm (cat. no. 69967): Dispenses beads of 7 mm diameter, and contains a reservoir that can hold approximately 45 beads The dispensers can be cleaned with water or detergent. For more information, see the product sheet supplied with the TissueLyser Single-Bead Dispenser. Figure 8. TissueLyser Single-Bead Dispenser. The dispenser dispenses individual beads into any sample container. TissueLyser Bead Dispensers, 96-Well TissueLyser Bead Dispensers, 96-Well dispense 96 beads in parallel into Collection Microtubes (racked) (Figure 9). They are available in 2 sizes: TissueLyser 3 mm Bead Dispenser, 96-Well (cat. no. 69973): Dispenses beads of 3 mm diameter, and contains a reservoir that can hold approximately 1000 beads TissueLyser 5 mm Bead Dispenser, 96-Well (cat. no. 69975): Dispenses beads of 5 mm diameter, and contains a reservoir that can hold approximately 300 beads The dispensers can be cleaned with water or detergent. For more information, see the product sheet supplied with the TissueLyser Bead Dispenser, 96-Well. TissueLyser II User Manual 04/2010 19 General Description Figure 9. TissueLyser Bead Dispenser, 96-Well. The dispenser dispenses 96 beads into a rack of collection microtubes. Beads The following beads for the TissueLyser II are available from QIAGEN: Stainless Steel Beads, 5 mm (cat. no. 69989) Stainless Steel Beads, 7 mm (cat. no. 69990) Tungsten Carbide Beads, 3 mm (cat. no. 69997) 3.3 Applications The TissueLyser II enables disruption and homogenization of: Human and animal tissues Human and animal cells Plant tissues Yeast Gram-positive and gram-negative bacteria For information about specific applications and protocols for sample disruption, see the TissueLyser Handbook. 20 TissueLyser II User Manual 04/2010 Installation Procedures 4 Installation Procedures 4.1 Unpacking the TissueLyser II Before unpacking the TissueLyser II, check whether the cardboard container is damaged. In case of damage, contact the transporter of the container. The TissueLyser II must not be knocked, shaken, or thrown during transport, otherwise its electronic and mechanical components may be damaged. Make a note of how the TissueLyser II is packed. If returning the instrument to QIAGEN for repair, it needs to be repacked using the original packaging. When lifting the TissueLyser II, place both hands below the base of the instrument. After unpacking the TissueLyser II, check that the following items are supplied: TissueLyser II Power cords for different countries TissueLyser II User Manual TissueLyser Handbook If anything is missing, contact QIAGEN Technical Services. Check that the TissueLyser II is not damaged. If anything is damaged, contact QIAGEN Technical Services. Make sure that the TissueLyser II has equilibrated to ambient temperature before operating it. The TissueLyser II should be stored dry when not in use. Retain the original packaging in case you need to return the TissueLyser II to QIAGEN for repair. Using the original packaging minimizes damage during transportation of the TissueLyser II and avoids invalidation of your guarantee. 4.2 Installation requirements Removal of the transport security device A transport security device is located on the underside of the TissueLyser II: this is comprised of 2 screws (see Figure 10). Using a screwdriver, remove the 2 screws. Do not discard the screws, as they will need to be reinstalled if the TissueLyser II needs to be transported in the future. TissueLyser II User Manual 04/2010 21 Installation Procedures Transport security device Figure 10. Transport security device. The transport security device, comprised of 2 screws indicated by the arrows, is located on the underside of the TissueLyser II. CAUTION Damage to instrument Operation of the TissueLyser II with the transport security device installed, or transport of the TissueLyser II without the transport security device installed, can lead to damage to the mechanical components of the instrument. Site requirements Place the TissueLyser II on a flat, stable surface, and ensure that there is sufficient space around and under the instrument for ventilation. The TissueLyser II is for indoor use only under the following conditions: Ambient temperature within the range of 5–40°C (41–104°F) Up to 2000 m (6500 ft.) above mean sea level (MSL) Maximum relative humidity of 80% for temperatures up to 31°C, linearly decreasing down to a relative humidity of 50% at 40°C 22 TissueLyser II User Manual 04/2010 Installation Procedures CAUTION Damage to instrument Operation of the TissueLyser II at a temperature and humidity outside the range specified may lead to damage to its electronic and mechanical components as well as a reduction in instrument performance. Power requirements The power line to the TissueLyser II should be voltage-regulated and surgeprotected. Make sure that the voltage rating of the TissueLyser II (see the plate on the back of the instrument) is compatible with the AC voltage available at the installation site. Grounding requirements To protect operating personnel, the National Electrical Manufacturers Association (NEMA) recommends that the TissueLyser II be correctly grounded (earthed). The instrument should be plugged into an AC power outlet that has a ground (earth) connection. 4.3 Transporting and repacking the TissueLyser II Carry the TissueLyser II with both hands below the base of the instrument. Please retain all original packaging for the duration of the warranty period and beyond. A charge may be incurred in the event of damage during shipment if the original packaging is not used for the return of the TissueLyser II to QIAGEN for repair. CAUTION Damage to instrument Transport of the TissueLyser II using packaging other than the original packaging may lead to instrument damage. Before returning the TissueLyser II for repair, please contact QIAGEN to request a “Declaration of Decontamination” form. After completing and signing this form, place it in an envelope which should then be attached to the external surface of the cardboard container. In addition, place a copy of the form inside the container. To repack the TissueLyser II, first reinstall the transport security device using the two original screws supplied with the instrument (for details, see Section 4.2). Then return the TissueLyser II to its original packaging by following the unpacking steps in reverse order. TissueLyser II User Manual 04/2010 23 Installation Procedures 4.4 Installation of a TissueLyser Adapter Set or Grinding Jar Set The TissueLyser II is not supplied with any accessories. TissueLyser Adapter Sets and Grinding Jar Sets need to be ordered separately (to order the TissueLyser II or its accessories, visit www.qiagen.com/Products/TissueLyserII.aspx). A C B Figure 11. Left-hand clamp of the TissueLyser II. A Locking pin. B Handwheel. C Indentation in clamp. Attach a TissueLyser Adapter Set or Grinding Jar Set to the TissueLyser II as follows: Pull the locking pin (A) upward out of its slot, and rotate it by 90° (Figure 11). This releases the locking device. Turn the handwheel (B) counterclockwise until the maximum clamping range is reached. Rotate back the locking pin (A) by 90° until it engages with its slot. Insert the adapter or grinding jar, and press it lightly into the indentation in the clamp (C). 24 TissueLyser II User Manual 04/2010 Installation Procedures Turn the handwheel (B) clockwise with two fingers until the adapter or grinding jar is seated in the clamp and level, and does not move freely. Continue to rotate the handwheel clockwise until 6–8 easily audible clicks are heard; the locking pin (A) rises and falls with each audible click. The engaged locking pin prevents automatic opening of the adapter or grinding jar. If the locking pin cannot be pulled upward to release it, do not force it upward using a hammer or other tool, as damage may occur. To release the locking spin, turn the handwheel slightly clockwise: the locking pin should then be freely moveable. To remove the adapter or grinding jar, lift the locking pin (A) and turn the handwheel (B) in the opposite direction. CAUTION Damage to the instrument Use of adapters and plasticware other than those described in this user manual may lead to damage to the clamps of the TissueLyser II. WARNING Moving parts Damage or personal injury can occur if the TissueLyser Adapter Set or Grinding Jar Set is not securely attached. Ensure that both adapters or grinding jars are of similar weight. Do not operate the TissueLyser II with only a single adapter or grinding jar installed. 4.5 Replacing the fuses The fuses in the TissueLyser II can be replaced as follows: Unplug the power cord connected to the TissueLyser II. The fuse compartment is located between the power switch and the power cord socket (Figure 12). Press at the side of the fuse compartment to release it. Replace the fuses. The following are required: two MT 3.15 A fuses. Reinsert the fuse compartment and lock it into place. TissueLyser II User Manual 04/2010 25 Installation Procedures A B E C D F G Figure 12. Backside of TissueLyser II. A Power switch. B Fuse compartment. C Power cord socket. D RS-232 port (for service personnel). E Safety information plate. F Voltage rating plate. G Safety information plate. 26 TissueLyser II User Manual 04/2010 Operating Procedures 5 Operating Procedures This section describes how to operate the TissueLyser II system. Before proceeding, you should familiarize yourself with the features of the TissueLyser II (Section 3) and have properly installed the instrument (Section 4). 5.1 Sample disruption The procedure below describes how to disrupt samples using the TissueLyser II. For detailed information about sample disruption and protocols, see the TissueLyser Handbook. 1. Make sure that the TissueLyser Adapter Set or Grinding Jar Set is securely installed on the clamps of the TissueLyser II (see Section 4.4, page 24) and that the transparent hood is lowered. WARNING Moving parts Damage or personal injury can occur if the TissueLyser Adapter Set or Grinding Jar Set is not securely attached. Ensure that both adapters or grinding jars are of similar weight. Do not operate the TissueLyser II with only a single adapter or grinding jar installed. 2. Make sure that the TissueLyser II is connected to a power outlet. 3. Switch on the TissueLyser II using the power switch. 4. Check that “on” appears in the “Memory” display. If necessary, press the “PROG” key repeatedly until “on” is displayed. 5. Using the “+” or “–” key under the “Frequency 1/s” display, set the oscillation frequency. Briefly pressing the “+” or “–“ key changes the oscillation frequency by 0.1 Hz. Continuous pressing of the “+” or “–“ key causes the oscillation frequency to increase or decrease rapidly without any pauses. The selectable range of frequencies is 3–30 Hz. For the optimal oscillation frequency for your application, see the TissueLyser Handbook. 6. Using the “+” or “–” key under the “Time min/sec” display, set the disruption time. Briefly pressing the “+” or “–“ key changes the disruption time by 1 second. Continuous pressing of the “+” or “–“ key causes the disruption time to increase or decrease rapidly without any pauses. If 99 minutes is exceeded, the disruption time starts from 10 seconds again. TissueLyser II User Manual 04/2010 27 Operating Procedures For the optimal disruption time for your application, see the TissueLyser Handbook. 7. Press the “START” key on the keypad. The TissueLyser II will now operate at the frequency specified in step 5. In addition, the “Time min/sec” display will count down the disruption time (i.e., the display shows the time remaining). If necessary, the disruption time can be adjusted while the TissueLyser II is in operation. Note: The TissueLyser II will not start if the transparent hood has not been lowered. WARNING Moving parts Do not leave the TissueLyser II unattended during operation. 8. When the remaining time on the “Time min/sec” display reaches zero, the TissueLyser II stops operating. The display resets to display the disruption time for the previous disruption procedure carried out. To pause the TissueLyser II before the remaining time reaches zero, press the “STOP” key on the keypad. To continue operation of the TissueLyser II from the time remaining, press the “START” key. To cancel operation of the TissueLyser II, press the “STOP” key twice. The TissueLyser II then goes into standby mode. When the “START” key is pressed again, the display is reactivated and the disruption time for the previous procedure is displayed. 9. When the TissueLyser II is no longer in operation, switch it off at the power switch. 5.2 Storing disruption parameters The TissueLyser II has an internal memory which has 9 storage locations to store disruption parameters (i.e., disruption time and oscillation frequency). To store disruption parameters, follow the procedure below. 1. Switch on the TissueLyser II. “on” appears in the “Memory” display. 2. Press the “PROG” key repeatedly until the desired storage location in the memory is displayed (i.e., “P1” to “P9”). 3. Press the “SET” key. This causes all displays to flash. 4. Set the disruption time and oscillation frequency using the “+” and “–“ keys on the keypad. Note: To cancel the operation, press the “PROG” key. The disruption parameters selected will not be stored. 5. Press the “SET” key again. The display stops flashing, and the disruption parameters are stored. 28 TissueLyser II User Manual 04/2010 Operating Procedures To retrieve disruption parameters from the memory, press the “PROG” key repeatedly until the desired storage location (i.e., “P1” to “P9”) is displayed. Then press the “START” key to start operation of the TissueLyser II. 5.3 Displaying the accumulated operating time To display the total amount of time that the TissueLyser II has been operated, follow the procedure below. 1. When the TissueLyser II is in standby mode, simultaneously press the “SET” key and the “–” key under the “Frequency 1/s” display. 2. “bS” appears in the “Memory” display. In addition, the accumulated operating time for the TissueLyser II is displayed in hours and minutes in the “Frequency 1/s” and “Time min/sec” displays. 3. Press the “STOP” key to cancel the display. 5.4 Displaying the software version To display the software version installed on the TissueLyser II, follow the procedure below. 1. When the TissueLyser II is in standby mode, simultaneously press the “SET” key and the “+” key under the “Frequency 1/s” display. 2. “S” appears in the “Memory” display. In addition, the software version is displayed in the “Frequency 1/s” display. 3. Press the “STOP” key to cancel the display. TissueLyser II User Manual 04/2010 29 Maintenance Procedures 6 Maintenance Procedures Perform the following regular maintenance procedures (i.e., after each daily use) to ensure reliable operation of the TissueLyser II. CAUTION Damage to the instrument Do not use bleach, solvents, or reagents containing acids, alkalis, or abrasives to clean the TissueLyser II. If solvents or saline, acidic, or alkaline solutions are spilt on the TissueLyser II, wipe them away immediately. Do not autoclave any part of the TissueLyser II, TissueLyser Adapter Set, or Grinding Jar Set. WARNING Risk of electric shock Do not open any panels on the TissueLyser II. Risk of personal injury and material damage Only perform maintenance that is specifically described in this user manual. Servicing The TissueLyser II is supplied with a warranty that lasts for 12 months, starting from the date of shipment. The warranty includes all repairs due to mechanical breakdown. 6.1 Regular maintenance The TissueLyser II should be wiped after use using a soft cloth moistened with a suitable cleaning agent (see below). To remove residual cleaning agent and avoid instrument damage, the TissueLyser II should then be immediately wiped with a soft cloth moistened with water. Be sure to switch off the TissueLyser II at the power switch and unplug the power cord from the power socket before cleaning. The components of the TissueLyser Adapter Set or Grinding Jar Set should be cleaned after use using a suitable cleaning agent (see below), rinsed with distilled water, and then dried using paper towels. If the TissueLyser II is contaminated with infectious material, it should be decontaminated. The TissueLyser II should also be decontaminated before shipping, and a decontamination certificate must be completed to certify that the instrument has been decontaminated. To request a decontamination certificate, contact QIAGEN Technical Services. 30 TissueLyser II User Manual 04/2010 Maintenance Procedures Cleaning agents The following disinfectants and detergents are recommended for cleaning the TissueLyser II, TissueLyser Adapter Sets, and Grinding Jar Sets. Note: If you want to use disinfectants different from those recommended, ensure that their compositions are similar to those described below. General cleaning: Mild detergents 70% ethanol Disinfection: Ethanol-based disinfectants can be used for disinfection of surfaces: e.g., 25 g ethanol and 35 g 1-propanol per 100 g liquid or Mikrozid® Liquid (Schülke & Mayr GmbH, cat. no. 109160). Disinfectants based on glyoxal and quaternary ammonium salt can be used for submerging the TissueLyser Adapter Sets and Grinding Jar Sets: e.g., 10 g glyoxal, 12 g lauryldimethylbenzylammonium chloride, 12 g myristyldimethylbenzylammonium chloride, and 5–15% nonionic detergent per 100 g liquid, Lysetol® AF (Gigasept® Instru AF in Europe, cat. no. 107410, or DECON-QUAT® 100, Veltek Associates, Inc., in the USA, cat. no. DQ100-06-167-01). Removal of RNase contamination: RNaseKiller (5 PRIME, cat. no. 2500080) can be used for cleaning surfaces and spraying the TissueLyser Adapter Sets and Grinding Jar Sets Removal of nucleic acid contamination: DNA-ExitusPlus™ (AppliChem, cat. no. A7089,0100) can be used for cleaning surfaces and submerging the TissueLyser Adapter Sets and Grinding Jar Sets. General instructions: Do not use spray bottles to spray cleaning or disinfectant liquids onto surfaces of the TissueLyser II. Spray bottles should be used only for the TissueLyser Adapter Sets and Grinding Jar Sets. If solvents or saline, acidic, or alkaline solutions are spilt on the TissueLyser II, wipe the spilt liquid away immediately. Follow manufacturer's safety instructions for handling cleaning agents. Follow manufacturer's instructions for soaking time and concentration of cleaning agents: exposure for longer than the recommended soaking time can damage the TissueLyser II, TissueLyser Adapter Sets, and Grinding Jar Sets. TissueLyser II User Manual 04/2010 31 Maintenance Procedures WARNING Toxic fumes Do not use bleach to clean or disinfect used labware. Bleach in contact with salts from the buffers used can produce toxic fumes. CAUTION Damage to the instrument Do not use bleach, solvents, or reagents containing acids, alkalis, or abrasives to clean the TissueLyser II. CAUTION Damage to the instrument Avoid spilling water or chemicals onto the TissueLyser II. Damage caused by water or chemical spillage will void your warranty. 6.2 Regular safety checks Every 6 months, the limit switch and the brake should be checked for correct operation. To check the limit switch and the brake: Remove the TissueLyser Adapter Set or Grinding Jar Set from the clamps of the TissueLyser II. Switch on the TissueLyser II. Set the oscillation frequency to 30 Hz. Press the “START” key. Raise the transparent hood. The drive motor should switch itself off, and “F04” should appear in the display. Lower the transparent hood. The drive motor should not switch itself on again. If there is a defect, contact QIAGEN Technical Services to request repair of the instrument. TissueLyser Adapter Sets and Grinding Jar Sets may become worn, depending on the frequency of use and the samples disrupted. This may lead to damage to the clamps of the TissueLyser II. Check the TissueLyser Adapter Sets and Grinding Jar Sets regularly for wear and tear, and replace if necessary. 32 TissueLyser II User Manual 04/2010 Troubleshooting Guide 7 Troubleshooting Guide 7.1 Error codes displayed by the TissueLyser II Comments and suggestions “F01” displayed Drive motor of TissueLyser II overloaded When the drive motor is overloaded, the TissueLyser II switches itself off to allow the drive motor to cool. A display on the TissueLyser II alternates between “F01” and the remaining cooling time in minutes (e.g., “03” indicates 3 minutes). After the cooling time has elapsed, switch the TissueLyser II off and then on again before continuing to operate the instrument. “F02” displayed Drive motor of TissueLyser II not starting If the drive motor does not start after the “START” key has been pressed, contact QIAGEN Technical Services to request instrument repair. The drive motor may be blocked, or the motor or speed sensor may be defective. “F03” displayed Specified oscillation frequency exceeded If the specified oscillation frequency is exceeded, the TissueLyser II switches itself off and “F03” is displayed. Contact QIAGEN Technical Services to request instrument repair. The speed sensor may be defective. “F04” displayed Transparent hood not lowered To protect the operator, the drive motor of the TissueLyser II will only start if the transparent hood has been lowered. If the “START” key is pressed while the hood is raised, “F04” is displayed and the drive motor does not start. If the hood is raised while the TissueLyser II is in operation, the drive motor switches itself off and “F04” is displayed. To cancel the “F04” display, press the “STOP” key. TissueLyser II User Manual 04/2010 33 Troubleshooting Guide Comments and suggestions “F05” displayed Keys held down for too long If one or more keys on the keypad are pressed and held down for more than 15 seconds, the drive motor of the TissueLyser II switches itself off and “F05” is displayed. This is a safety mechanism to prevent unwanted changes in the operation of the TissueLyser II should an object land on the keypad. To cancel the “F05” display, switch the TissueLyser II off and then on again. “F06” displayed Speed sensor defective If one of the magnets controlling the speed of the TissueLyser II is missing or defective, the instrument switches itself off and “F06” is displayed. Contact QIAGEN Technical Services to request instrument repair. “F07” displayed Solenoid switch defective 34 If there is a defect in the cable for the solenoid switch, which monitors the raising of the transparent hood, the TissueLyser II switches itself off and “F07” is displayed. Contact QIAGEN Technical Services to request instrument repair. TissueLyser II User Manual 04/2010 Appendix A Appendix A Technical data QIAGEN reserves the right to change specifications at any time. Environmental conditions Operating conditions Power 100–240 V AC, 50–60 Hz, 150 W Mains supply voltage fluctuations are not to exceed 10% of nominal supply voltages Overvoltage category II Air temperature 5–40°C (41–104°F)* Relative humidity Maximum 80% (for temperatures up to 31°C; linearly decreasing down to a relative humidity of 50% at 40°C) Place of operation For indoor use only Altitude Up to 2000 m (6500 ft.) Pollution level 2 Transportation conditions Air temperature –25°C to 60°C (–13°F to 140°F) in manufacturer’s package Relative humidity Maximum of 75% (noncondensing) * The instrument can also be operated at 4°C under noncondensing conditions. TissueLyser II User Manual 04/2010 35 Appendix A Storage conditions Air temperature 5–40°C (41–104°F) in manufacturer’s package Relative humidity Maximum of 85% (noncondensing) Mechanical data Dimensions Height: 266 mm (up to 524 mm with the hood raised) Width: 371 mm Depth: 461 mm Mass Approx. 26 kg (without TissueLyser Adapter Set or Grinding Jar Set installed) Oscillation frequency 3–30 Hz Noise characteristic values The noise characteristic values are also influenced by the properties of the sample to be disrupted. Sound power level LWA = 71.4 dB(A) Emission value related to workplace LpAeq = 61 dB(A) 36 TissueLyser II User Manual 04/2010 Appendix A Waste Electrical and Electronic Equipment (WEEE) This section provides information about disposal of waste electrical and electronic equipment by users in the European Union. The European Directive 2002/96/EC on WEEE requires proper disposal of electrical and electronic equipment when it reaches its end of life. The crossedout wheeled bin symbol (see below) indicates that this product must not be disposed of with other waste; it must be taken to an approved treatment facility or to a designated collection point for recycling, according to local legislation. The separate collection and recycling of waste electronic equipment at the time of disposal helps to conserve natural resources and ensures that the product is recycled in a manner that protects human health and the environment. QIAGEN accepts its responsibility in accordance with the specific WEEE recycling requirements and, where a replacement product is being supplied by QIAGEN, provides free recycling of its WEEE-marked electronic equipment in Europe. If a replacement product is not being purchased from QIAGEN, recycling can be provided upon request at additional cost. To recycle electronic equipment, contact your local QIAGEN sales office for the required return form. Once the form is submitted, you will be contacted by QIAGEN either to request follow-up information for scheduling collection of the electronic waste or to provide you with an individual quote. TissueLyser II User Manual 04/2010 37 Appendix A EC declaration of conformity Name and address of the company QIAGEN GmbH QIAGEN Strasse 1 D-40724 Hilden Germany We herewith declare under our sole responsibility that the product TissueLyser II meets all applicable requirements of the following European Directives Low Voltage Directive (LVD) 2006/95/EC Electromagnetic Compatibility Directive (EMC) 2004/108/EC and the relevant harmonised standards IEC 61010-1:2001 IEC 61326-1:2005 Hombrechtikon, 11 January 2010 Pit Muggli Director Business Excellence QIAGEN Instruments AG 38 TissueLyser II User Manual 04/2010 Appendix B Appendix B Liability clause QIAGEN shall be released from all obligations under its warranty in the event repairs or modifications are made by persons other than its own personnel, except in cases where the Company has given its written consent to perform such repairs or modifications. All materials replaced under this warranty will be warranted only for the duration of the original warranty period, and in no case beyond the original expiration date of original warranty unless authorized in writing by an officer of the Company. Read-out devices, interfacing devices and associated software will be warranted only for the period offered by the original manufacturer of these products. Representations and warranties made by any person, including representatives of QIAGEN, which are inconsistent or in conflict with the conditions in this warranty shall not be binding upon the Company unless produced in writing and approved by an officer of QIAGEN. TissueLyser II User Manual 04/2010 39 Notes 40 TissueLyser II User Manual 04/2010 Notes TissueLyser II User Manual 04/2010 41 Notes 42 TissueLyser II User Manual 04/2010 Trademarks: QIAGEN® (QIAGEN Group); DNA-ExitusPlus™ (AppliChem); Gigasept®, Lysetol®, Mikrozid® (Schülke & Mayr GmbH); DECON-QUAT® (Veltek Associates, Inc.); Teflon® (E. I. du Pont de Nemours and Company). © 2009–2010 QIAGEN, all rights reserved. www.qiagen.com Australia Orders 1-800-243-800 Fax 03-9840-9888 Technical 1-800-243-066 Austria Orders 0800-28-10-10 Fax 0800-28-10-19 Technical 0800-28-10-11 Belgium Orders 0800-79612 Fax 0800-79611 Technical 0800-79556 Brazil Orders 0800-557779 Fax 55-11-5079-4001 Technical 0800-557779 Canada Orders 800-572-9613 Fax 800-713-5951 Technical 800-DNA-PREP (800-362-7737) China Orders 86-21-3865-3865 Fax 86-21-3865-3965 Technical 800-988-0325 Denmark Orders 80-885945 Fax 80-885944 Technical 80-885942 Finland Orders 0800-914416 Fax 0800-914415 Technical 0800-914413 France Orders 01-60-920-926 Fax 01-60-920-925 Technical 01-60-920-930 Offers 01-60-920-928 Germany Orders 02103-29-12000 Fax 02103-29-22000 Technical 02103-29-12400 Hong Kong Orders 800 933 965 Fax 800 930 439 Technical 800 930 425 Ireland Orders 1800 555 049 Fax 1800 555 048 Technical 1800 555 061 Italy Orders 800-789-544 Fax 02-334304-826 Technical 800-787980 Japan Telephone 03-6890-7300 Fax 03-5547-0818 Technical 03-6890-7300 Korea (South) Orders 080-000-7146 Fax 02-2626-5703 Technical 080-000-7145 Luxembourg Orders 8002-2076 Fax 8002-2073 Technical 8002-2067 Mexico Orders 01-800-7742-639 Fax 01-800-1122-330 Technical 01-800-7742-436 The Netherlands Orders 0800-0229592 Fax 0800-0229593 Technical 0800-0229602 Norway Orders 800-18859 Fax 800-18817 Technical 800-18712 Singapore Orders 1800-742-4362 Fax 65-6854-8184 Technical 1800-742-4368 Spain Orders 91-630-7050 Fax 91-630-5145 Technical 91-630-7050 Sweden Orders 020-790282 Fax 020-790582 Technical 020-798328 Switzerland Orders 055-254-22-11 Fax 055-254-22-13 Technical 055-254-22-12 UK Orders 01293-422-911 Fax 01293-422-922 Technical 01293-422-999 USA Orders 800-426-8157 Fax 800-718-2056 Technical 800-DNA-PREP (800-362-7737) 1062589 04/2010 Sample & Assay Technologies