1
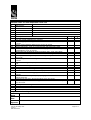
Vacuum Lifter Safety Code
Mark Mallen
Health and Safety Manager
Fenlock-Hansen Ltd
March 2005
Vacuum Lifter Safety Code
Version 1
Date: March 2005
Page 1 of 13
Contents
Page
1
2
3
Aims
Legal Framework
Safety Code
3
4
5
Appendices
1
2
3
4
5
Hansen ‘Vacuum Lifter Pre-Use Inspection Check List’
How we create and loose vacuum
Wind Speed
Calculating Glass Weight
Vacuum Lifter Capacity
Vacuum Lifter Safety Code
Version 1
Date: March 2005
8
10
11
12
13
Page 2 of 13
Aims
We intend this guidance document to act as a reminder to trained vacuum lifter operators and serves
as a useful source of reference material.
Furthermore, untrained operators, acting under the control of trained operators, may use it, to ensure
that operators follow their training.
In addition, there is daily pre-use inspection sheet contained within, which operators must complete
before using a vacuum lifter for the first lift and at the start of each subsequent day.
Finally, legislation underpins everything we do. The opening section briefly describes some of the
key pieces of legislation affecting the use of vacuum lifters. Our safety code is designed to ensure
we comply with these key pieces.
Vacuum Lifter Safety Code
Version 1
Date: March 2005
Page 3 of 13
Legal Framework
Health and Safety at Work, etc, Act 1974
Employees
Section 7
Section 8
Employees must take all reasonable care to look after their own health and
safety.
Employees must not interfere with or damage any equipment or system put
in place by their employers to safeguard their health and safety.
Employers
Section 2(2)
Have a duty to:
1.
2.
3.
Section 3
Provide safe plant and system of work
Ensure safe use, handling, storage and transport of articles
Provide information, instruction, training, and supervision to enable
them to carry out their job safely.
Have a duty to ensure that you carry out your undertaking in such a way as to
ensure the health and safety of those not in your employ.
Provision and Use of Work Equipment Regulation 1998
Regulation 9
Requires that all employees are provided with adequate training on all items
of work equipment that they may use.
Lifting Operations and Lifting Equipment Regulations 1998
Regulation 8 (1)
Requires that employers ensure that all lifting operations are:
1.
2.
3.
Properly planned by a competent person
Appropriately supervised
Carried out in a safe manner
Regulation 9 (3)(a)(1) Requires that any lifting accessory used in conditions liable to cause
deterioration likely to lead to dangerous conditions must have a thorough
examination carried out by a competent person at least 6 monthly.
Vacuum Lifter Safety Code
Version 1
Date: March 2005
Page 4 of 13
Vacuum Lifter Safety Code
Everybody
1)
2)
3)
4)
5)
We assess each lift and record our findings in the document – Lift Management Plan, ‘The
Plan’.
It is the Lift Supervisor’s responsibility to ensure that everybody involved in the lift knows what
to do and how to do it.
If you have not seen ‘The Plan’, or had its contents explained to you, ask the lift supervisor to
explain it to you.
Ensure that you read the risk assessments and safe working practices in ‘The Plan’.
If you do not understand them, ask questions until you are clear on what is happening and
what we expect of you.
Operator
6)
7)
8)
9)
10)
11)
Ensure that you understand what you need to do before using the vacuum lifter.
Check the operator’s manual; there may be features on the lifter with which you are unfamiliar.
Check the documentation for the lifter, ensure that the certification is within date, do not use if
the last test and inspection date is more than six months ago.
If you are unfit or unwell, do not engage in any lifting activity, as your judgement may be
affected.
Do not forget the use of alcohol & drugs may impair your judgement, if you are under the
influence of any substance, do not use the lifter.
If using the lifter in conjunction with a crane, fixed or mobile, the operator must be a qualified
slinger/signaller.
Authorised Users
12)
Vacuum lifters shall only be applied to the load and operated by :
a)
b)
c)
13)
Trained and authorised personnel, minimum age - 18 years of age.
Maintenance personnel in direct performance of their duties
Authorised inspectors (with trained operator in attendance)
Where assistance is required from untrained personnel, a designated and trained person must
be in direct supervision of the lift and lifter at all times.
Personal Protective Equipment - PPE
14)
15)
Wear the following PPE, as a minimum:
Hard Hat
Steel Toe Cap Boots
Hi Visibility Jacket or Vest
Gloves – Kevlar knit, with Nitrile rubber palms and fingers i.e. Powerflex Plus
Safety Glasses
In addition, the risk assessments and safe working practices for tasks you complete may
specify additional PPE.
For example, use harnesses and lanyards when working on hop-ups.
Vacuum Lifter Safety Code
Version 1
Date: March 2005
Page 5 of 13
Vacuum Lifter
16)
17)
18)
19)
20)
Do not use a vacuum lifter tagged ‘Out of Service’.
Check the vacuum lifter for any obvious defects i.e. damaged pads.
Complete the ‘Hansen Pre-Use Inspection Check List’, before use, each day, see Appendix 1
If the lifter fails the pre-use check, label it ‘Out of Service’, do not use, and inform your
supervisor.
Ensure that all lifting appliances and attachments, for example:
Minifor
Lifting Block
Shackles
Lifting beam
Strops
Have a undergone a thorough examination within the last 6 months, accompanied by a
certificate. Attach copy to the Lift Management Plan.
Weather Conditions
21)
22)
23)
Do not use the lifter in the rain or if the load is wet, see Appendix 2.
Do not use the vacuum outside the operating temperature range of -1°C to 40°C.
Do not use the lifter in wind speeds in excess of Beaufort Scale 3 = Wind speed 29Kmh. See
Appendix 3.
The Load
24)
25)
26)
27)
28)
29)
30)
Never lift a damaged or faulty load.
Never lift a wet load. See Appendix 2.
Ensure the load is clean and dry before applying the pads.
Dirt increases the risk of load slippage and moisture in the vacuum system lowers the amount
of vacuum available over time.
Ensure that the lifter/lifting device combination and any other accessories are capable of lifting
the load. Check the delivery note and / or label on glass to determine its weight.
If this information is unavailable, to calculate the weight of the glass, see Appendix 4.
Do not forget the load is the weight of the glass, the lifter, and any other lifting accessories i.e.
shackles or strops.
Applying the Lifter
31)
32)
33)
34)
35)
Always apply the lifter to within 40mm of the centre of gravity of the load.
The load may be within the SWL for the lifter. However, ensure that the lifter is physically
large enough for the size of glass.
Refer to the supplier for technical assistance on pad spread. For guidance, see Appendix 5.
Manufacturers recommend outer pad is no further than 500mm from edge of load.
Clean and dry the pads correctly, before applying to the load. Any moisture in the vacuum
system may reduce the amount of vacuum available over time.
Lifting Operations
36)
37)
Achieve the required vacuum and ensure that the pump turns off before attempting lift.
Lift the load 50mm and wait for 30 seconds, before commencing lift, to ensure vacuum is
stable.
Vacuum Lifter Safety Code
Version 1
Date: March 2005
Page 6 of 13
38)
39)
40)
41)
42)
43)
The safe level of vacuum is 65%.
Never lift from a rotated position.
Never allow personnel to ride the load.
Do not lift the load over people.
Do not pull the load sideways.
Never lift a load from flat position with the lift bar locked (see diagram).
44)
If lifting between hop-ups, ensure personnel are available to watch and guide the load at each
level.
Observe the load at all times.
If you spot problems, give the order to stop the lift, by shouting and by raising both arms aloft.
Do not leave unattended suspended loads.
45)
46)
47)
Releasing the Load
48)
49)
50)
Fully support the load, before releasing vacuum.
Never attempt to rotate off-centre loads as the frame could rotate too quickly.
Never release catches simultaneously.
Vacuum Lifter Safety Code
Version 1
Date: March 2005
Page 7 of 13
Appendix 1
See Hansen ‘Vacuum Lifter Pre-Use Inspection Check List’ overleaf
Vacuum Lifter Safety Code
Version 1
Date: March 2005
Page 8 of 13
Vacuum Lifter Pre-Use Inspection Check List
1
2
3
4
5
6
Item
7
8
9
Manufacturer
Model
Serial Number
SWL
Last Examination Date
Next Examination Date
Description
Yes✓
No✗
Check certificate, is thorough examination within date? If No, do not use.
Is a user manual available for the operator?
Is there any physical damage to the vacuum lifter i.e. cracked welds? If Yes, do
not use.
Are the vacuum pads for ripped or torn? If Yes, do not use.
10
Are the pads clean? If No, do not use and wash with warm soapy water.
11
Are the vacuum pipes and connections secure, pay particular attention to quick
12
release fittings? If No, do not use.
Where fitted, are all individual pad shut-off valves open? If No, open valves.
13
Are electrical connections secure and all switches undamaged? If No, do not use.
14
Does input mains voltage correspond with charger voltage - 110v or 240v? If No,
15
do not use.
Does battery have sufficient charge and is battery charger functional? If No, do
16
not use.
Is the Safe Working Load (SWL) of the lifter, sufficient for the load? If No, do not
17
use.
Are rotational and tilting movements functional? If No, do not use.
18
Energise vacuum lifter on Perspex or glass before commencing lifting duties.
Are lights or buzzers on during vacuum application? If No, do not use.
19
Does vacuum reach sufficient level before pump switches off? If No, do not use.
20
Woods lifters - Does battery gauge illuminate when pump switches off? If No, do
21
not use.
Pannkoke lifters - Does yellow pump (Pump) light remain illuminated? If No,
22
change 10a Fuse.
Does vacuum drop 5% in ten-minute period? If No, do not use.
23
Where fitted, does remote vacuum application and release function correctly? If
24
No, do not use.
Item Insert particulars of any defects and action taken
Inspection conducted by
Name
Date
Signature
Vacuum Lifter Safety Code
Version 1
Date: March 2005
Page 9 of 13
Appendix 2
How we create and loose vacuum
What is a Vacuum?
• A vacuum is a space completely empty of matter.
• In practice, a vacuum exists whenever the pressure within a space is less than the pressure
that surrounds it.
How do we create a Vacuum?
• We can create a vacuum by pumping out the air from within a vacuum chamber i.e. pad
• As we remove air, fewer air molecules are present, to push against the vacuum chamber
walls, thus reducing the pressure within the vacuum chamber.
How do we loose a Vacuum?
• If the pressure between the chamber and the atmosphere equalises
How does a Vacuum Cup Work i.e. Pad?
• As we remove the air from between the pad and surface, the difference in air pressure
causes the cup to adhere tightly to the surface.
• The pad adheres to the surface due to atmospheric pressure pushing against it.
• Atmospheric pressure is approximately 14.7 pounds per square inch (psi), or over 1 ton per
square foot, at sea level.
• Therefore, as the surface area of the pad or pads, increases, the greater the weight acting
against the surface of the object becomes.
Causes of Vacuum Lifter failure
• If the seal between the cup and the surface is broken, the vacuum fails and the load falls.
• We preserve the seal by the maintenance of a vacuum between the pad and glass surface.
• Conditions that affect the length of time that vacuum is maintained include:
The cleanliness of the load surface and vacuum pad
The roughness or smoothness of the load surface
The porosity of the material lifted
The condition of the vacuum pad, lines and pumps
• In the case of power loss to the pump, vacuum lifters maintain a vacuum, which is stored in
a vacuum reserve tank.
• This reserve reduces significantly by the collection of condensate within the tank.
• Condensate forms from moisture in the atmosphere, when we create the vacuum.
• If we operate in wet conditions, or if the load is wet, we greatly increase the amount of
condensate created.
• However, on rough, porous, or heavily contaminated surfaces, where we cannot maintain a
good seal during a power outage, immediate loss of the load may occur.
Vacuum Lifter Safety Code
Version 1
Date: March 2005
Page 10 of 13
Appendix 3
Wind Speed
The maximum operating wind speed is 29 km/h, equivalent to 18mph, 16.5 knots or 8m/s.
Use an anemometer to measure the wind speed. If one is not available, use the Beaufort scale, see
below:
Beaufort Scale: Devised by British admiral Francis Beaufort in 1805:
Rating
0
1-3
4-5
6-7
8-9
10-11
Description
Calm
Light wind
Moderate wind
Strong wind
Gale
Storm
Wind Speed
@ 1.6 km/h
up to 29 km/h
up to 36 km/h
up to 67 km/h
up to 87 km/h
up to 116 km/h
Indicators
Smoke rises straight up
Leaves and twigs move, flags blow out
Small trees sway, makes waves on a lake
Large trees sway, makes walking hard
Slates fall off roofs
Widespread damage
Please not that wind speeds vary dramatically on site. The height at which one takes the readings
has a dramatic effect, in conjunction with the vortices, which surround high buildings.
Always co-ordinate lifting operations with the crane operator and site management.
At speeds below 29 km/h, ‘tag lines’ can always be used, if concerns remain about the effects the
wind may have on the lift.
Vacuum Lifter Safety Code
Version 1
Date: March 2005
Page 11 of 13
Appendix 4
Calculating Glass Weight
To calculate the weight of glass, obtain the following dimensions:
Length
Width
Thickness
Multiply the dimensions to obtain the volume of glass.
For example:
A sheet, 3m x 2m x 10 mm weighs:
3mx2mx0.01m = 0.06m³
The density of glass is 2.5 tonnes per m³, alternatively, 1m³ of glass weighs 2.5 tonnes
Therefore, the sheet weighs:
2.5t/m³x0.06m³ = 0.15 tonnes or 150 kg
There is an alternative method, which gives the weight of the glass directly in kilogrammes (kg)
For the same sheet:
3m x 2m x 10 mm thick
3 x 2x 10 x 2.5 (weight of glass per cubic metre) = 150 kg
Please remember
• Double the weight of the glass, if the panel is laminated
• Add a further 5% to the weight of the glass, to include the weight of the frame (spacer bar)
• Add a further 2% to the weight of the glass, to include the weight of the interlayer between the
glass
Therefore, laminated, framed panel, the weight would be:
Weight of glass
Weight of frame
Weight of interlayer
Total weight of laminated panel
Vacuum Lifter Safety Code
Version 1
Date: March 2005
= 150kg x 2 = 300kg
= 5% of 300kg = 15kg
= 2% of 300kg = 6kg
= 300 + 15 + 6 = 321kg
Page 12 of 13
Appendix 5
Vacuum Lifter Capacity
In addition to the weight of the load, we must consider the support the glass requires from the pads.
For a example, if glass is lifted flat, gravity and the weight of the glass will cause it to bow. If the
glass bows too much, it will crack, vacuum may be lost, and the glass will fall.
Support requirements depend on the angle of the glass during the lift and the thickness of the glass.
The chart below indicates allowable overhang, from the edge of the pad, based on the carrying
angle and thickness of the glass. The lifter’s pad spread must be large enough to limit overhang and
provide adequate support for the glass.
Please not this chart applies only to single leaf glass.
4mm
5mm
7mm
8mm
10mm
13mm
16mm
20mm
23mm
26mm
Maximum overhang from the pad edge to the glass edge
90º
60º
45º
30º
508mm
635mm
736mm
812mm
889mm
1041mm
1168mm
1270mm
1371mm
1473mm
558mm
685mm
787mm
889mm
965mm
1117mm
1244mm
1371mm
1473mm
1574mm
609mm
762mm
863mm
965mm
1066mm
1244mm
1371mm
1524mm
1625mm
1752mm
736mm
889mm
1041mm
1168mm
1270mm
1473mm
1651mm
1803mm
1955mm
2082mm
Upright
Glass
Thickness
Flat
To calculate the minimum pad spread dimensions:
Subtract twice (2x) the allowable overhang from the overall dimensions. For example,
A piece of glass is 2000mm long x 1500mm wide x 4mm thick, and will be tilted from flat (90
degrees) to vertical (0 degrees)
From the chart, the allowable overhang is 508mm, from each edge of the glass.
To calculate the pad spread:
508mm x 2 = 1016 mm total overhang
2000mm - 1016mm = 984mm length
1500mm - 1016mm = 484mm width
Therefore minimum pad spread = 984mm x 484mm
However, if you are unsure on what support your glass requires, please contact the supplier:
GGR, tel: 0161 624 6655.
Vacuum Lifter Safety Code
Version 1
Date: March 2005
Page 13 of 13