1
Banner Getting Started Guide
November 2006
Release 7.4
What can we help you achieve?
Confidential Business Information
This documentation is proprietary information of SunGard Higher Education and is not to be copied, reproduced, lent or disposed of,
nor used for any purpose other than that for which it is specifically provided without the written permission of SunGard Higher
Education.
Prepared By:
SunGard Higher Education
4 Country View Road
Malvern, Pennsylvania 19355
United States of America
© 2005-2007 SunGard. All rights reserved. The unauthorized possession, use, reproduction, distribution, display or disclosure of this
material or the information contained herein is prohibited.
In preparing and providing this publication, SunGard Higher Education is not rendering legal, accounting, or other similar professional
services. SunGard Higher Education makes no claims that an institution's use of this publication or the software for which it is provided
will insure compliance with applicable federal or state laws, rules, or regulations. Each organization should seek legal, accounting and
other similar professional services from competent providers of the organization's own choosing.
Without limitation, SunGard, the SunGard logo, Banner, Campus Pipeline, Luminis, PowerCAMPUS, Matrix, and Plus are trademarks
or registered trademarks of SunGard Data Systems Inc. or its subsidiaries in the U.S. and other countries. Third-party names and marks
referenced herein are trademarks or registered trademarks of their respective owners.
Getting Started Guide
Banner
Preface
Purpose/Audience . . . . . . . . . . . . . . . . . . . . . . . . . . . . . . . . . . . . vii
How to Use This Manual . . . . . . . . . . . . . . . . . . . . . . . . . . . . . . . . vii
Related Documentation . . . . . . . . . . . . . . . . . . . . . . . . . . . . . . . . . viii
SunGard Higher Education Documentation File Naming Conventions. . . . . . . . . . viii
SunGard Higher Education Documentation Distribution. . . . . . . . . . . . . . . . . ix
Electronic Documents on CD . . . . . . . . . . . . . . . . . . . . . . . . . . ix
Online Documentation with the System . . . . . . . . . . . . . . . . . . . . ix
Typographical Conventions Used in this Documentation
Italics . . . . . . . . . . . . . . . . . . . . . .
Bold. . . . . . . . . . . . . . . . . . . . . . .
Monospace . . . . . . . . . . . . . . . . . . .
.
.
.
.
.
.
.
.
.
.
.
.
.
.
.
.
.
.
.
.
.
.
.
.
.
.
.
.
.
.
.
.
.
.
.
.
.
.
.
.
.
.
.
.
.
.
.
.
.
.
.
.
.
.
.
.
.
.
.
.
.
.
.
.
x
x
xi
xi
How to Contact SunGard Higher Education . .
Documentation Ordering Information.
ActionLine . . . . . . . . . . . . . .
Customer Support Center . . . . . . .
.
.
.
.
.
.
.
.
.
.
.
.
.
.
.
.
.
.
.
.
.
.
.
.
.
.
.
.
.
.
.
.
.
.
.
.
.
.
.
.
.
.
.
.
.
.
.
.
.
.
.
.
.
.
.
.
.
.
.
.
.
.
.
.
xii
xii
xii
xiii
.
.
.
.
.
.
.
.
.
.
.
.
.
.
.
.
.
.
.
.
SunGard Higher Education Education Centers . . . . . . . . . . . . . . . . . . . . . . xiv
Consulting/Modification Services . . . . . . . . . . . . . . . . . . . . . . . . . . . . xiv
1 Overview
Introduction . . . . . . . . . . . . . . . . . . . . . . . . . . . . . . . . . . . . . . . 1-1
Starting Banner . . . . . . . . . . . . . . . . . . . . . . . . . . . . . . . . . . . . . 1-1
Using the Mouse and Keyboard . . . . . . . . . . . . . . . . . . . . . . . . . . . . . 1-3
Keyboard Equivalents . . . . . . . . . . . . . . . . . . . . . . . . . . . . . . 1-3
Quick Reference Chart . . . . . . . . . . . . . . . . . . . . . . . . . . . . . 1-4
Naming Conventions . . . . . . . . . . . . . . . . . . . . . . . . . . . . . . . . . . 1-6
iii
Table of Contents
2 All About Forms
What Is a Form? . . . .
Windows . . .
Window Panes
Dialog Boxes .
Alert Boxes . .
.
.
.
.
.
.
.
.
.
.
.
.
.
.
.
.
.
.
.
.
.
.
.
.
.
.
.
.
.
.
.
.
.
.
.
.
.
.
.
.
.
.
.
.
.
.
.
.
.
.
.
.
.
.
.
.
.
.
.
.
.
.
.
.
.
.
.
.
.
.
.
.
.
.
.
.
.
.
.
.
.
.
.
.
.
.
.
.
.
.
.
.
.
.
.
.
.
.
.
.
.
.
.
.
.
.
.
.
.
.
.
.
.
.
.
.
.
.
.
.
.
.
.
.
.
.
.
.
.
.
.
.
.
.
.
.
.
.
.
.
.
.
.
.
.
.
.
.
.
.
.
.
.
.
.
.
.
.
.
.
2-1
2-1
2-2
2-3
2-3
Types of Forms . . . . . . .
Main Menu . . . .
Application Forms .
Validation Forms .
Rule Forms . . . .
Control Forms . . .
Query Forms . . .
Inquiry Forms . . .
Wizard Forms . . .
.
.
.
.
.
.
.
.
.
.
.
.
.
.
.
.
.
.
.
.
.
.
.
.
.
.
.
.
.
.
.
.
.
.
.
.
.
.
.
.
.
.
.
.
.
.
.
.
.
.
.
.
.
.
.
.
.
.
.
.
.
.
.
.
.
.
.
.
.
.
.
.
.
.
.
.
.
.
.
.
.
.
.
.
.
.
.
.
.
.
.
.
.
.
.
.
.
.
.
.
.
.
.
.
.
.
.
.
.
.
.
.
.
.
.
.
.
.
.
.
.
.
.
.
.
.
.
.
.
.
.
.
.
.
.
.
.
.
.
.
.
.
.
.
.
.
.
.
.
.
.
.
.
.
.
.
.
.
.
.
.
.
.
.
.
.
.
.
.
.
.
.
.
.
.
.
.
.
.
.
.
.
.
.
.
.
.
.
.
.
.
.
.
.
.
.
.
.
.
.
.
.
.
.
.
.
.
.
.
.
.
.
.
.
.
.
.
.
.
.
.
.
.
.
.
.
.
.
.
.
.
.
.
.
.
.
.
.
.
.
.
.
.
.
.
.
.
.
.
.
.
.
.
.
.
.
.
.
.
.
.
.
.
.
.
.
.
.
.
.
.
.
.
.
.
.
.
.
.
2-4
2-5
2-8
2-9
2-10
2-11
2-12
2-13
2-14
Parts of a Form . . .
Menu Bar .
Toolbars . .
Title Bar . .
Blocks . . .
Auto Hint .
Status Line.
.
.
.
.
.
.
.
.
.
.
.
.
.
.
.
.
.
.
.
.
.
.
.
.
.
.
.
.
.
.
.
.
.
.
.
.
.
.
.
.
.
.
.
.
.
.
.
.
.
.
.
.
.
.
.
.
.
.
.
.
.
.
.
.
.
.
.
.
.
.
.
.
.
.
.
.
.
.
.
.
.
.
.
.
.
.
.
.
.
.
.
.
.
.
.
.
.
.
.
.
.
.
.
.
.
.
.
.
.
.
.
.
.
.
.
.
.
.
.
.
.
.
.
.
.
.
.
.
.
.
.
.
.
.
.
.
.
.
.
.
.
.
.
.
.
.
.
.
.
.
.
.
.
.
.
.
.
.
.
.
.
.
.
.
.
.
.
.
.
.
.
.
.
.
.
.
.
.
.
.
.
.
.
.
.
.
.
.
.
.
.
.
.
.
.
.
.
.
.
.
.
.
.
.
.
.
.
.
.
.
.
.
.
.
.
.
.
2-14
2-15
2-24
2-26
2-26
2-28
2-28
Elements on a Form . . . . . . . . .
Buttons . . . . . . . . . . .
Check Boxes . . . . . . . .
Radio Buttons . . . . . . . .
Scroll Bars. . . . . . . . . .
Fields . . . . . . . . . . . .
Records, Rows, and Columns
Pull-Down Lists . . . . . . .
.
.
.
.
.
.
.
.
.
.
.
.
.
.
.
.
.
.
.
.
.
.
.
.
.
.
.
.
.
.
.
.
.
.
.
.
.
.
.
.
.
.
.
.
.
.
.
.
.
.
.
.
.
.
.
.
.
.
.
.
.
.
.
.
.
.
.
.
.
.
.
.
.
.
.
.
.
.
.
.
.
.
.
.
.
.
.
.
.
.
.
.
.
.
.
.
.
.
.
.
.
.
.
.
.
.
.
.
.
.
.
.
.
.
.
.
.
.
.
.
.
.
.
.
.
.
.
.
.
.
.
.
.
.
.
.
.
.
.
.
.
.
.
.
.
.
.
.
.
.
.
.
.
.
.
.
.
.
.
.
.
.
.
.
.
.
.
.
.
.
.
.
.
.
.
.
.
.
.
.
.
.
.
.
.
.
.
.
.
.
.
.
.
.
.
.
.
.
.
.
.
.
.
.
.
.
.
.
2-29
2-29
2-32
2-33
2-33
2-34
2-35
2-36
.
.
.
.
.
.
.
.
.
.
.
.
.
.
.
.
.
.
.
.
.
.
.
.
.
.
.
.
.
.
.
.
.
Oracle Functions Used in Banner . . . . . . . . . . . . . . . . . . . . . . . . . . . . 2-37
3 Getting Around Banner
Main Menu . . . . .
Direct Access . . . .
Object Search . . . .
Site Map. . . . . . .
Tabs . . . . . . . . .
Options Menu. . . .
Option Window . . .
Iconic Buttons . . . .
Mouse. . . . . . . .
Keyboard Equivalents
iv
.
.
.
.
.
.
.
.
.
.
.
.
.
.
.
.
.
.
.
.
.
.
.
.
.
.
.
.
.
.
.
.
.
.
.
.
.
.
.
.
.
.
.
.
.
.
.
.
.
.
.
.
.
.
.
.
.
.
.
.
.
.
.
.
.
.
.
.
.
.
.
.
.
.
.
.
.
.
.
.
.
.
.
.
.
.
.
.
.
.
.
.
.
.
.
.
.
.
.
.
Banner Release 7.4
Getting Started Guide
.
.
.
.
.
.
.
.
.
.
.
.
.
.
.
.
.
.
.
.
.
.
.
.
.
.
.
.
.
.
.
.
.
.
.
.
.
.
.
.
.
.
.
.
.
.
.
.
.
.
.
.
.
.
.
.
.
.
.
.
.
.
.
.
.
.
.
.
.
.
.
.
.
.
.
.
.
.
.
.
.
.
.
.
.
.
.
.
.
.
.
.
.
.
.
.
.
.
.
.
.
.
.
.
.
.
.
.
.
.
.
.
.
.
.
.
.
.
.
.
.
.
.
.
.
.
.
.
.
.
.
.
.
.
.
.
.
.
.
.
.
.
.
.
.
.
.
.
.
.
.
.
.
.
.
.
.
.
.
.
.
.
.
.
.
.
.
.
.
.
.
.
.
.
.
.
.
.
.
.
.
.
.
.
.
.
.
.
.
.
.
.
.
.
.
.
.
.
.
.
3-2
3-2
3-3
3-4
3-4
3-5
3-6
3-8
3-8
3-8
November 2006
Confidential
Table of Contents
QuickFlow . . . . . . . . . . . . . . . . . . . . . . . . . . . . . . . . . . . 3-9
Last 10 Forms in the File Pull-Down Menu . . . . . . . . . . . . . . . . . . . 3-10
Display Navigation Window Key . . . . . . . . . . . . . . . . . . . . . . . . 3-10
Entering Information . . . . . . . . . . . . . . . .
Entering Information Into Validated Fields .
Entering Information From Another Form .
Entering IDs . . . . . . . . . . . . . . . .
Inserting New Records . . . . . . . . . .
Data Format Recommendations . . . . . .
Avoid Special Characters . . . . . . . . .
.
.
.
.
.
.
.
.
.
.
.
.
.
.
.
.
.
.
.
.
.
.
.
.
.
.
.
.
.
.
.
.
.
.
.
.
.
.
.
.
.
.
.
.
.
.
.
.
.
.
.
.
.
.
.
.
.
.
.
.
.
.
.
.
.
.
.
.
.
.
.
.
.
.
.
.
.
.
.
.
.
.
.
.
.
.
.
.
.
.
.
.
.
.
.
.
.
.
.
.
.
.
.
.
.
.
.
.
.
.
.
.
.
.
.
.
.
.
.
.
.
.
.
.
.
.
.
.
.
.
.
.
.
3-10
3-11
3-16
3-17
3-23
3-23
3-26
Querying Information . . . . . . . . . . .
Query Functions . . . . . . . . .
Wildcards . . . . . . . . . . . . .
Extended Queries . . . . . . . . .
Extended ID and Name Searching .
Date Queries . . . . . . . . . . .
.
.
.
.
.
.
.
.
.
.
.
.
.
.
.
.
.
.
.
.
.
.
.
.
.
.
.
.
.
.
.
.
.
.
.
.
.
.
.
.
.
.
.
.
.
.
.
.
.
.
.
.
.
.
.
.
.
.
.
.
.
.
.
.
.
.
.
.
.
.
.
.
.
.
.
.
.
.
.
.
.
.
.
.
.
.
.
.
.
.
.
.
.
.
.
.
.
.
.
.
.
.
.
.
.
.
.
.
.
.
.
.
.
.
3-27
3-27
3-30
3-30
3-32
3-40
.
.
.
.
.
.
.
.
.
.
.
.
.
.
.
.
.
.
.
.
.
.
.
.
Viewing Job Submission Output . . . . . . . . . . . . . . . . . . . . . . . . . . . . . 3-41
Extracting Banner Data to a Spreadsheet . . . . . . . . . . . . . . . . . . . . . . . . . 3-42
Availability of the Extract Feature . . . . . . . . . . . . . . . . . . . . . . . . 3-42
Extracting Data . . . . . . . . . . . . . . . . . . . . . . . . . . . . . . . . . 3-46
4 Features of Banner
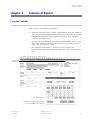
Using the Calendar . . . . . . . . . . . . . . . . . . . . . . . . . . . . . . . . . . . 4-1
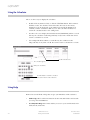
Using the Calculator . . . . . . . . . . . . . . . . . . . . . . . . . . . . . . . . . . . 4-2
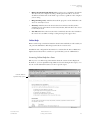
Using Help. . . . . . . . . . . . . . . . .
Online Help. . . . . . . . . . . .
Local Dynamic Help . . . . . . .
Banner Documentation Bookshelf.
Help (Item Properties) . . . . . . .
Show Keys. . . . . . . . . . . . .
Auto Hint . . . . . . . . . . . . .
.
.
.
.
.
.
.
.
.
.
.
.
.
.
.
.
.
.
.
.
.
.
.
.
.
.
.
.
.
.
.
.
.
.
.
.
.
.
.
.
.
.
.
.
.
.
.
.
.
.
.
.
.
.
.
.
.
.
.
.
.
.
.
.
.
.
.
.
.
.
.
.
.
.
.
.
.
.
.
.
.
.
.
.
.
.
.
.
.
.
.
.
.
.
.
.
.
.
.
.
.
.
.
.
.
.
.
.
.
.
.
.
.
.
.
.
.
.
.
.
.
.
.
.
.
.
.
.
.
.
.
.
.
.
.
.
.
.
.
.
.
.
.
.
.
.
.
.
.
.
.
.
.
.
.
.
.
.
.
.
.
4-2
4-3
4-7
4-12
4-15
4-15
4-15
Using the Editor . . . . . . . . . . . . . . . . . . . . . . . . . . . . . . . . . . . . . 4-15
Banner Messaging . . . . . . . . . . . . . . . . . . . . . . . . . . . . . . . . . . . . 4-18
5 Customization
Customizing Banner . . . . . . .
My Banner . . . . . . .
Title Bar Display Options
Displayed Form Names .
v
.
.
.
.
.
.
.
.
.
.
.
.
.
.
.
.
.
.
.
.
.
.
.
.
.
.
.
.
.
.
.
.
Banner Release 7.4
Getting Started Guide
.
.
.
.
.
.
.
.
.
.
.
.
.
.
.
.
.
.
.
.
.
.
.
.
.
.
.
.
.
.
.
.
.
.
.
.
.
.
.
.
.
.
.
.
.
.
.
.
.
.
.
.
.
.
.
.
.
.
.
.
.
.
.
.
.
.
.
.
.
.
.
.
.
.
.
.
.
.
.
.
5-1
5-1
5-11
5-12
November 2006
Confidential
Table of Contents
Customizing the Main Menu . .
Changing Your Alerts . . . . . .
Changing Your Banner Password
Changing Your Banner Colors . .
Optimal Screen Resolution . . .
.
.
.
.
.
.
.
.
.
.
.
.
.
.
.
.
.
.
.
.
.
.
.
.
.
.
.
.
.
.
.
.
.
.
.
.
.
.
.
.
.
.
.
.
.
.
.
.
.
.
.
.
.
.
.
.
.
.
.
.
.
.
.
.
.
.
.
.
.
.
.
.
.
.
.
.
.
.
.
.
.
.
.
.
.
.
.
.
.
.
.
.
.
.
.
.
.
.
.
.
.
.
.
.
.
.
.
.
.
.
.
.
.
.
.
.
.
.
.
.
5-13
5-14
5-14
5-15
5-16
Shortcuts for Entering Information . . . . .
Navigation Shortcuts from the Main Menu
Other Navigation Shortcuts . . . . . . . .
Queries . . . . . . . . . . . . . . . . . .
Logging In/Out . . . . . . . . . . . . . .
Error Messages . . . . . . . . . . . . . .
Miscellaneous . . . . . . . . . . . . . . .
.
.
.
.
.
.
.
.
.
.
.
.
.
.
.
.
.
.
.
.
.
.
.
.
.
.
.
.
.
.
.
.
.
.
.
.
.
.
.
.
.
.
.
.
.
.
.
.
.
.
.
.
.
.
.
.
.
.
.
.
.
.
.
.
.
.
.
.
.
.
.
.
.
.
.
.
.
.
.
.
.
.
.
.
.
.
.
.
.
.
.
.
.
.
.
.
.
.
.
.
.
.
.
.
.
.
.
.
.
.
.
.
.
.
.
.
.
.
.
.
.
.
.
.
.
.
.
.
.
.
.
.
.
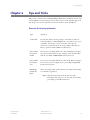
6-1
6-2
6-3
6-3
6-4
6-4
6-5
6 Tips and Tricks
Index
vi
Banner Release 7.4
Getting Started Guide
November 2006
Confidential
Preface
Purpose/Audience
Preface
Purpose/Audience
Documentation for Banner systems consists of complementary user guides,
handbooks, technical reference manuals, and online help. User guides provide
overview information such as form descriptions, report descriptions, and operations
cycles. Handbooks provide in-depth information for specific areas within some
products. Technical reference manuals provide information useful to technical staff.
Online help provides form and field information.
The Getting Started Guide provides an introduction to the Banner system. New users
can learn how to navigate through the application; understand the different types
of forms used in Banner, and the parts of each form; perform queries for
information; and customize Banner to best reflect their needs and preferences.
How to Use This Manual
This manual is organized into the following chapters:
Chapter 1, “Overview”
Chapter 2, “All About Forms”
Chapter 3, “Getting Around Banner”
Chapter 4, “Features of Banner”
Chapter 5, “Customization”
Chapter 6, “Tips and Tricks”
Index
November 2006
Confidential
Banner Release 7.4
Getting Started Guide
vii
Preface
Related Documentation
Related Documentation
In addition to the Banner Getting Started Guide, the following documentation
supports your work with Banner:
General User Guide—a user/reference manual for the General product, its
functions and features.
General Technical Reference Manual—a technical reference manual on General
utilities, with application-specific supplements.
Banner Documentation Bookshelf Getting Started Guide—a how-to manual directing
the installation and maintenance of the Bookshelf.
General Release Guide —a document containing notes about a release of the
product, including descriptions of the enhancements and other modifications
in the new release.
GTVSDAX Handbook—a user/technical/reference manual describing the setup
and use of the Crosswalk Validation Form (GTVSDAX), which is used with the
Object:Access views.
General Upgrade Guide—a technical guide to support your institution’s
conversion to the newest release.
API —an Application Program Interface provides an overview, documents the
parameters, and describes the logic of fundamental business units of Banner.
API Developer’s Guide—a developer’s guide that describes the proper treatment
of APIs in the Banner system.
ERDs— Entity Relationship Diagrams provide documents and schematics that
show the interrelationship between different database tables in Banner.
SunGard Higher Education Documentation File Naming Conventions
SunGard Higher Education uses similar naming conventions to create the file name
of every document delivered in electronic format. This section describes the
components of this name. The PDF file names for most electronic documents
generated from Banner use the following naming convention: Product Identifier /
five-digit Release Identifier / Manual Type Identifier. The Release Identifier uses five
digits to accommodate products that distribute double-digit interim releases within
a main release. An example of a file name for a manual delivered as one file is
humres70301rg.pdf.
viii
Banner Release 7.4
Getting Started Guide
November 2006
Confidential
Preface
SunGard Higher Education Documentation Distribution
•
The Product Identifier is humres for Human Resources.
•
The five-digit release identifier is 70301 for 7.3.1.
•
The 7 represents the major release number of the product.
•
The 03 represents the mandatory interim release number.
•
The 01 represents an optional interim release number.
•
The Manual Type Identifier identifies the type of documentation. For example,
the initials rg represent release guide.
•
This file name is followed by a .pdf extension which represents the Adobe
Acrobat Portable Document Format (pdf).
Exceptions to this naming convention include:
•
Some manuals are produced for multiple releases and require a date rather
than a release number. For example, this Release Identifier would be 0605 for
June 2005.
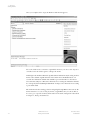
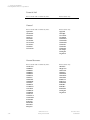
Some examples of valid document names are listed below:
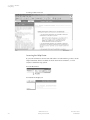
Document
PDF Name
Finance Release Guide 6.5
Human Resources Release Guide 7.0.1
Employee Self-Service User Guide 7.2
Advancement TRM Supplement 6.6
GTVSDAX Handbook, May 2006
finance60500rg.pdf
humres70001rg.pdf
empss70200u.pdf
advanc60600trmsup.pdf
gtvsdax0506hb.pdf
SunGard Higher Education Documentation Distribution
SunGard Higher Education delivers Banner documentation to our clients in
electronic format.
Electronic Documents on CD
User manuals, reference manuals, and other product documents are delivered as
electronic files in portable document format (PDF) on one or more CDs. You may
print the files in whole or in part, and copies may be freely distributed to users at
your institution. Your system administrator may choose to make the PDF files
available electronically from a secured intranet Web site, or directly from a network.
Online Documentation with the System
SunGard Higher Education also provides online documentation in the form of
HTML-based help that runs in a web browser. Help is available for all Banner forms
with the exception of certain security-restricted forms. Form and field descriptions
November 2006
Confidential
Banner Release 7.4
Getting Started Guide
ix
Preface
Typographical Conventions Used in this Documentation
and task instructions form a comprehensive help support system for each of the
Banner products. Form help provides an overview of the purpose and use of the
form and procedural help relates the form functions to the real-life tasks you’ll
perform.
Banner Online Help can be accessed from the Online Help button on the toolbar,
the Online Help option in the Help menu, and through the Help Center link on
the main menu. It is delivered through a download from the Customer Support
Center. Navigation features include a bread crumb trail, table of contents, index,
and a search feature. More information about Online Help can be found in this
document.
Dynamic Help, Local Dynamic Help, and Item Properties still exist and can be used
to enter custom documentation. They also display column information when
available.
Typographical Conventions Used in this Documentation
Special formatting is used in this document to enhance the meaning of various
words. You will see italics, bold, and monospace. The meanings and examples of
these conventions, listed below, show how they are used.
Italics
Italics identifies text when it is emphasized, an error message exists, or document
appears, or the text represents a value. See the following examples:
x
Reason
Example
Emphasis
For this release, Workflow has been removed from Banner
menus and form descriptions to more accurately reflect
the functionality of these forms.
Error Message
The message was: *WARNING* Dynamic parms exist at the
Application level or Variable level that are not compiled into the
selection ID(s). You should recompile the selection ID(s). New
parms are: &SAISUSR_NAME.
Document
For details, please refer to Section 1, “User Interface
Enhancements,” of the Web General 6.1 Release Guide.
Banner Release 7.4
Getting Started Guide
November 2006
Confidential
Preface
Typographical Conventions Used in this Documentation
Reason
Example
Value
With this release, disabled text is black. The text has the
following codes:
R=0
G=0
B=0
Bold
Bold indicates a field label. For example,
Reason
Example
Field Label
The Employer Name field is really an Edit box, like the
comment fields.
Monospace
Monospace type identifies computer terms, code, or related items that should stand
out.
Reason
Example
Computer Terms
Whenever either GORSEVS_USA_CITY or
GORSEVS_NONUSA_CITY contained a city name that was
longer than 16 characters and GORSEVS_SVTS_CODE
contained C, an additional record was created even
though nothing had been changed.
Code
Execute the following statements:
set serverout on;
call dbms_java.set_output(20000);
begin
gb_messaging.p_register_entity('$CREATE_H
ELLO_WORLD',
gb_messaging.CREATE_OPERATION);
gb_messaging.p_add_parameter('$MESSAGE',
'Hello Banner World');
gb_messaging.p_publish;
end;
/
Related Items (URL)
November 2006
Confidential
http://www.sungardhe.com/Education/index.html
Banner Release 7.4
Getting Started Guide
xi
Preface
How to Contact SunGard Higher Education
How to Contact SunGard Higher Education
Documentation Ordering Information
You may order a Banner documentation CD by mail, by telephone, by FAX, by
ActionLine, by Customer Support Center, or by e-mail. Use the address and phone
numbers listed below.
Address
SunGard Higher Education Distribution Services
SunGard Higher Education
4 Country View Road
Malvern, PA 19355
Telephone
(800) 522 - 4827, option 5
Distribution Services is staffed Monday through Friday,
9:00 am to 5:00 pm (EST).
FAX
(610) 578 - 6033
Customer
http://connect.sungardhe.com
Support Center
E-mail
[email protected]
ActionLine
ActionLine personnel provide support to SunGard Higher Education maintenance
customers. They help users resolve any questions or concerns that relate to SunGard
Higher Education products.
The ActionLine telephone number for Bronze Maintenance level clients is:
800-522-4827
The ActionLine telephone number for Silver Maintenance level clients is:
866-265-9264
The ActionLine telephone number for Platinum Maintenance level clients is:
888-543-8094
xii
Banner Release 7.4
Getting Started Guide
November 2006
Confidential
Preface
How to Contact SunGard Higher Education
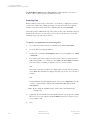
Customer Support Center
The Customer Support Center refers to the secured area of SunGard Higher
Education's World Wide Web site dedicated to ActionLine and other related services
available to clients. Users must be registered to obtain access to the secured site.
Users can request an account to gain access to SunGard Higher Education's secured
Customer Support Center by accessing http://connect.sungardhe.com, and
proceeding as follows:
1.
In the Customer Support Center Login area, select the link Request a Customer
Support Center Account to create a new account.
2.
Follow the instructions on the subsequent pages.
(a) Select Customer Support Center Admin.
(b) Enter your e-mail address.
(c) Select Request for Username/Password.
(a) Enter your full name, the institution you are representing, your role at the
institution and your phone number in the body of the message.
(d) Select Submit.
SunGard Higher Education will verify your information as a new user and send a
confirmation e-mail message when the Customer Support Center account has been
set up and you are registered.
Within the Customer Support Center you can take advantage of the following online
functions:
November 2006
Confidential
•
Search through SunGard Higher Education Solutions/FAQs, documentation,
downloads, defects or Request for Product Enhancements (RPEs).
•
Obtain the latest software updates and patches.
•
Access the complete SunGard Higher Education documentation library.
•
View, update, and track support for SunGard Higher Education products as
Service Requests.
•
Submit and track the status of product defects and RPEs.
•
Review your institution’s products, contact information, entitlements, and
download history.
Banner Release 7.4
Getting Started Guide
xiii
Preface
SunGard Higher Education Education Centers
SunGard Higher Education Education Centers
SunGard Higher Education’s Education Centers provide a centralized location for
training on the entire Banner series of systems and on various other products,
including Oracle. The Education Centers provide an environment where SunGard
Higher Education clients can leave behind daily office responsibilities and focus
their attention on learning to use Banner. The Centers also offer an ideal
opportunity to interact with colleagues from other installations, compare notes on
implementations, and share information.
The SunGard Higher Education Education Center courses are led by seasoned
SunGard Higher Education professional service consultants. Participants receive
detailed training on each specific module. They are also provided with SunGard
Higher Education Professional Services training materials that can be used for
internal training upon their return to their respective institutions. Each class is
conducted as a hands-on training session. Classes covering each module of the
Higher Education Banner series are available on a regularly scheduled basis.
SunGard Higher Education Education Centers are located in:
Malvern, PA
Rochester, NY
San Diego, CA
Salt Lake City, UT
Toronto, Canada
Altrincham, UK
Consulting/Modification Services
SunGard Higher Education offers several Banner short- and long-term consulting
and custom system modification services. Your institution’s SunGard Account
Representative will work with you to determine a package of support services that
meets your needs.
xiv
Banner Release 7.4
Getting Started Guide
November 2006
Confidential
1 Overview
Introduction
Chapter 1
Overview
Introduction
This handbook describes the basic features of the Banner System. Learning to use
these features is the foundation for using Banner at your institution.
Sample forms in this handbook were created in a Windows environment. Your forms
may have subtle differences if you use a different environment; however, most
functionality is the same regardless of your environment.
Starting Banner
The steps for accessing Banner depend on your hardware, software, and network
configuration. Because there are many ways to access Banner, this section does not
give specific steps for launching your system. Instead, this section describes the
common requirements for getting into Banner. Your institution’s implementation
may be different.
To help ensure that only authorized users access Banner, you must log in with a
username (user ID) and a password. Your institution may have additional network
and operating system login and security procedures.
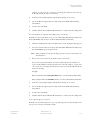
These are the common steps for starting Banner.
November 2006
Confidential
1.
Use your institution’s procedures to start your workstation.
2.
Launch your web browser and enter the URL used to access Banner.
3.
Enter your username, password, and database (depending on your
environment) at the logon prompts. If you enter a wrong username or
password, you are prompted to reenter both. (Your institution determines the
number of times you can try to log on.)
Banner Release 7.4
Getting Started Guide
1-1
1 Overview
Starting Banner
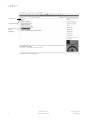
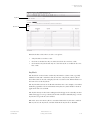
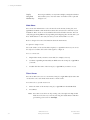
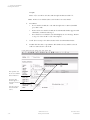
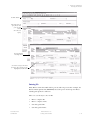
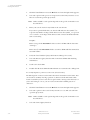
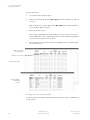
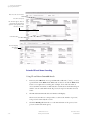
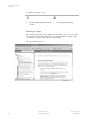
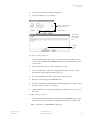
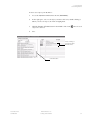
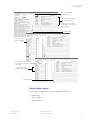
Once you complete these steps, the Banner main menu appears:
Select the folder next to a menu to expand the menu so you can see the objects it
contains. Select the folder again to collapse the menu.
In this figure the Products Menu is expanded. Your institution may be using another
menu as the default expanded menu on the main menu. Individual users can
override the institution default and establish a personal default. See the Banner
General Technical Reference Manual for instructions on setting the institution default.
See “To Specify the Default Expanded Menu” in chapter 5 for instructions on setting
a personal default.
The main menu is the starting point for navigating through Banner. You can use the
menu structure to access a form, job, menu, or QuickFlow. Or you can use Direct
Access to go to a specific form if you know the form’s name. Navigation is described
in chapter 3, Getting Around Banner.
1-2
Banner Release 7.4
Getting Started Guide
November 2006
Confidential
1 Overview
Using the Mouse and Keyboard
Using the Mouse and Keyboard
You can perform most Banner functions with either a mouse or keyboard. For
example, you can save information by clicking a button on the toolbar, selecting an
item from a pull-down menu, or pressing equivalent keystrokes.
Because you can choose from several methods, this handbook does not usually tell
you specifically how to perform a function. Instead, the instructions say to “select”
the function. Mouse and keyboard instructions are given only if they are distinctly
different from each other. Two symbols appear throughout this handbook to
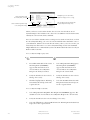
indicate the different sets of instructions:
Mouse instructions
Keyboard instructions
Keyboard Equivalents
Specific keystrokes for a function depend on your environment. For example, Enter
Query might be F7 in one environment and F11 in another. Because keystrokes vary
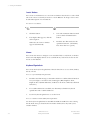
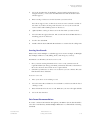
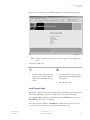
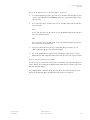
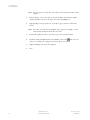
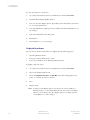
from one environment to another, they are not described in this manual. Show Keys
is a valuable tool that helps you use the keyboard. This function lists the keyboard
equivalents available in your environment for the current form, window, and field.
Show Keys lists the keyboard
equivalents that are available
in your environment for the
current form, window, and
field.
November 2006
Confidential
Banner Release 7.4
Getting Started Guide
1-3
1 Overview
Using the Mouse and Keyboard
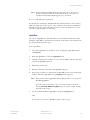
To display keyboard equivalents:
Select Help>Show Keys.
OR
Use the keystrokes for the Show Keys
function. (Check with your data center
personnel for these keystrokes.)
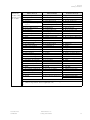
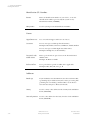
Quick Reference Chart
You can complete the chart on the next page and use it as a quick reference for
keyboard equivalents at your institution. First use Show Keys to determine the
equivalent for each option on the Banner pull-down menus. Then record each
equivalent on the chart. You can post the chart for easy reference.
1-4
Banner Release 7.4
Getting Started Guide
November 2006
Confidential
1 Overview
Using the Mouse and Keyboard
File
Edit
Options
Block
Item
Record
Query
Help
Varies by form
Previous
Previous
Previous
Enter
Online Help
Direct Access
Cut
Object Search
Copy
Next
Next
Next
Execute
Dynamic
Help Query
QuickFlow
Paste
Clear
Clear
Scroll Up
Last Criteria
Dynamic
Help Edit
Select
Edit
Duplicate
Scroll Down
Cancel
SCT Banner
Bookshelf
Rollback
Clear
Count Hits
Help (Item
Properties)
Save
Remove
Fetch Next Set
Show Keys
Refresh
Insert
List
Print
Duplicate
Display Error
Exit
Lock
Display
ID Image
Exit QuickFlow
Calendar
Preferences
Calculator
SCT Banner
XtenderSolutions
Extract Data
with Key
SCT Banner
XtenderSolutions
Info
Extract Data
No Key
Technical
Support
About SCT
Banner
November 2006
Confidential
Banner Release 7.4
Getting Started Guide
1-5
1 Overview
Naming Conventions
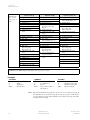
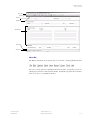
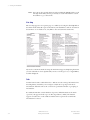
Naming Conventions
Banner form, report, job, and table names have the following structure.
Note: For information about table and column naming conventions, refer to
the General Technical Reference Manual.
Position 1
identifies the
primary system
owning the
form, report,
job, or table.
(See note on
page 1-8.)
1-6
A
B
C
D
E
F
G
I
Advancement
Property Tax
Courts
Cash Drawer
XtenderSolutions
Finance
General
Information Access
K
L
N
O
P
Q
R
S
Work Management
Occupational Tax/License
Position Control
Customer Contact
HR/Payroll/Personnel
Electronic Work Queue
Financial Aid
Student
Banner Release 7.4
Getting Started Guide
T
U
V
X
W
Y
Z
Accounts Receivable
Utilities
Voice Response
Records Indexing
Reserved for client
applications that co-exist
with Banner
November 2006
Confidential
1 Overview
Naming Conventions
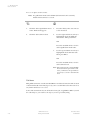
Position 2
identifies the
module owning
the form, report,
job, or table.
Advancement (A)
Financial Aid (R)
Membership
Designation
Event Management
Campaign
Pledge and Gift/Pledge
Payment
L Label
M Prospect Management
O Organization
P Constituent/Person
S Solicitor Organization
T Validation form/table
U Utility
V Reserved-Can. Solution Ctr.
X Expected Matching Gift
Finance (F)
A Accounts Payable
B Budget Development
C Cost Accounting
E Electronic Data Interchange
F Fixed Assets
G General Ledger
I Investment Management
N Endowment Management
O Operations
P Purchasing/Procurement
R Research Accounting
S Stores Inventory
T Validation form/table
U Utility
V Reserved-Can. Solution Ctr.
X Archive/Purge
Information Access/Kiosk (I)
R Financial Aid
S Student
A
D
E
F
G
B
C
E
F
H
J
L
N
O
P
R
S
T
U
V
E
J
L
O
P
S
T
U
V
X
F
G
O
R
S
T
U
V
Budgeting
Record Creation
Electronic Data Exchange
Funds Management
History and Transcripts
Student Employment
Logging
Need Analysis
Common Functions
Packaging & Disbursements
Requirements Tracking
Student System Shared Data
Validation form/table
Utility
Reserved-Can. Solution Ctr.
General (G)
Event Management
Job Submission
Letter Generation
Overall
Purge
Security
Validation form/table
Utility
Reserved-Can. Solution Ctr.
Cross product
Accounts Receivable (T)
Finance Accounts Receivable
General Accounts Receivable
Overall
Research Accounting
Student Accounts Receivable
Validation form/table
Utility
Reserved-Can. Solution Ctr.
A
B
C
D
E
H
O
P
R
S
T
U
V
X
HR/Payroll/Personnel (P)
Position Control (N)
Application
Budget
COBRA
Benefit/Deductions
Employee
Time Reporting/History
Overall
General Person
Electronic Approvals
Security
Validation/rule table
Utility
Reserved-Can. Solution Ctr.
Tax Administration
Student (S)
Admissions
Catalog
Support Services
Registration/Fee Assessment
General Student
Grades/Academic History
Faculty Load
Reserved-Intntl. UK
Location Management
CAPP
Overall
Person
Recruiting
Schedule
Validation form/table
Utility
Reserved-Can. Solution Ctr.
XtenderSolutions (E)
T Validation form/table
X XtenderSolutions
A
C
E
F
G
H
I
K
L
M
O
P
R
S
T
U
V
All Products
W Reserved for client forms or modules used within a Banner application
Y (character in position 1 does not equal W, Y, or Z)
Z
November 2006
Confidential
Banner Release 7.4
Getting Started Guide
1-7
1 Overview
Naming Conventions
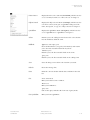
Position 3
identifies the
type of form,
report, job, or
table.
A
B
C
I
P
R
T
V
A
B
I
M
Q
R
V
A
I
P
Q
R
V
Advancement (A)
Application form
Base table
Called/list form
Inquiry form
Process/report
Repeating rules table
Temporary table
Validation form
View
Finance (F)
Application form
Base table
Inquiry form
Maintenance form
Query form
Rule table
Repeating table
Report/process
Validation form/table
View
Accounts Receivable (T)
Application form
Inquiry form
Process
Query form
Report
Validation form/table
A
B
I
P
R
T
V
A
B
I
O
Q
R
T
V
Financial Aid (R)
Application form
Base table
Inquiry form
Process/report
Rule table
Repeating rules table
Report
Temporary table
Validation form/table
View
General (G)
Application form
Base table
Batch COBOL process
Inquiry form
Online COBOL process
Query form
Rule table/form
Repeating table
Report/process
General maintenance
Temporary table
Validation form/table
View
A
B
I
P
R
V
HR/Payroll/Personnel (P)
Position Control (N)
Application form
Base table
Batch COBOL process
Inquiry form
Process
Rule table
Repeating table
Report/process
Validation form/table
Student
Application form
Base table
Inquiry form
Process
Query form
Rule table
Repeating table
Report/process
V Validation form/table
View
Information Access/Kiosk (I)
R Report
A
B
I
P
Q
R
XtenderSolutions (E)
A Application form
V Validation form/table
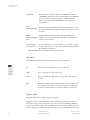
Positions 4, 5, 6, and 7 uniquely identify the form, report, job, or table.
Examples
GUAIDEN
G
U
A
IDEN
General
Utility
Application
Identification
GJRRPTS
GTVZIPC
G
J
R
RPTS
G
T
V
ZIPC
General
Job Submission
Report
Report and Parameter
Information
General
Validation form/table
Validation form/table
ZIP/Postal Code
Note: The system identifier in position 1 can be one or two characters long. If
the identifier is one character long, the form, report, job, or table name
is seven characters long. If the identifier is two characters long, the name
is eight characters long.
1-8
Banner Release 7.4
Getting Started Guide
November 2006
Confidential
2
Chapter 2
All About Forms
What Is a Form?
All About Forms
What Is a Form?
A form is an online document where you can enter and look up information in your
database. A form visually organizes information so it is easier to enter and read. A
Banner form is similar to a paper form, except information is entered once and then
used by other forms, reports, and jobs.
Forms can include windows, window panes, dialog boxes, and alert boxes.
Windows
A window is a framed portion of a form. Just as some paper forms have multiple
pages, some Banner forms have multiple windows. The first window in a form is
called the main window and is identified by the form name. All other windows in the
form have their own unique names.
More than one window can be open at the same time. The only limits are
determined by the amount of memory installed on your system. Not all windows are
the same size, so you might see parts of more than one window at the same time.
This form has three
open windows:
main window
Revenue window
Expenses window
The Expenses window is the
active window, indicated by
the highlighted title bar.
November 2006
Confidential
Banner Release 7.4
Getting Started Guide
2-1
2 All About Forms
What Is a Form?
You can move a window by dragging its title bar to a new location. (You cannot move
the title bar above the screen.) Your environment may let you resize and move
windows in other ways. Refer to the documentation for your environment.
Caution: Banner windows do not use the close button ( ) in the upper right
corner. Choosing that button will close the form.
Window Panes
A window pane is an area within a window that has more fields than can appear at
one time.
This is a window pane.
A horizonal scroll bar always
appears under a window pane.
You can use the horizontal scroll bar at the bottom of a window pane to see the
remaining fields in the pane. You cannot see all fields at one time.
2-2
Banner Release 7.4
Getting Started Guide
November 2006
Confidential
2
All About Forms
What Is a Form?
To scroll through the fields in a window pane:
Click and drag the scroll box right or
left.
OR
Click the arrow at either end of the scroll
bar.
Select the Next Item function (to move
to the right) or the Previous Item
function (to move to the left).
Note: The cursor skips display-only fields,
moving only to enterable fields.
Dialog Boxes
A dialog box is a window that appears when you must choose from two or more
responses.
This dialog box has three
possible responses.
You must acknowledge a dialog box before you can do anything else on the form.
To acknowledge a dialog box:
Click the button you want.
1.
Select the Next Item function to
move to the button you want.
2.
Press Enter.
Alert Boxes
An alert box is a window that notifies you of a condition that may impact data. You
can choose to receive extra alerts when accessing IDs of deceased people, or for IDs
that are confidential in nature. Refer to chapter 5 for information about setting up
extra confidential and deceased notifications.
For example, this alert box may appear if you try to enter information for a deceased
person:
November 2006
Confidential
Banner Release 7.4
Getting Started Guide
2-3
2 All About Forms
Types of Forms
An alert box always has one response.
You must acknowledge an alert box before you can do anything else on the form.
To acknowledge an alert box:
Click the OK button.
Press Enter.
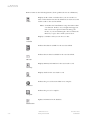
Types of Forms
Eight types of forms are used throughout Banner:
Main menu
Use this form to navigate through Banner. It provides an
overview of the menus, forms, jobs, and QuickFlows in the
system.
Application
forms
Use these forms to enter, update, and query information. This is
the most common type of form.
Validation forms Use these forms to define the values that can be entered in
specific fields on application forms. These values are used
throughout Banner. When you look up a code or select the List
function, these values appear in the List of Values window.
2-4
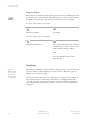
Rule forms
Use these forms to define the calculations and parameters that
impact processing on other forms, reports, and jobs.
Control forms
Use these forms to define the processing rules for application
and validation forms at the system level.
Query forms
Use these forms to look up existing information, often returning
information to the calling form. You must access these forms
from another form. You cannot access them directly from the
main menu, with Direct Access, or with Object Search.
Banner Release 7.4
Getting Started Guide
November 2006
Confidential
2
All About Forms
Types of Forms
Inquiry forms
Use these forms to look up existing information, often returning
information to the calling form. You can access these forms from
the main menu, from another form, with Direct Access, or with
Object Search.
Wizard forms
Use these forms to give step-by-step instructions for completing
an application.
Validation, rule, and control forms are used to tailor Banner to your institution’s
procedural requirements when Banner is implemented. You can make revisions
with these forms any time, if your security level permits.
Note: Only Banner General uses all of the different form types. Most products
use only five or six.
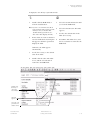
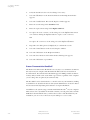
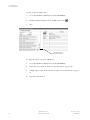
Main Menu
The main menu provides access to the menus, forms, jobs, and QuickFlows in
Banner, and is used to navigate through Banner. Refer to chapter 3, “Getting
Around Banner,” for instructions about using the main menu to navigate.
The main menu displays the Banner products in a familiar Windows-style
hierarchical folder structure. Standard menus are delivered with Banner, but your
institution can reorganize and add menus to meet your specific needs.
November 2006
Confidential
Banner Release 7.4
Getting Started Guide
2-5
2 All About Forms
Types of Forms
collapsed menu
expanded menu
Currently selected
menu is
highlighted.
2-6
Banner Release 7.4
Getting Started Guide
November 2006
Confidential
2
All About Forms
Types of Forms
Using the Banner Menu Folders
The main menu provides many options for navigating Banner, as well as a place to
create your own custom menus and links for frequently accessed forms, processes,
and external web sites. These features are described briefly here, and in more detail
in chapter 3, Getting Around Banner.
The large pane of the main menu displays two menus:
•
My Banner. This menu contains the menus, forms, jobs, and QuickFlows most
important in the workday of the individual user. This menu is tied to a user’s
Oracle user ID.
•
Products Menu. This menu organizes menus, forms, jobs, and QuickFlows by
the following Banner products: Student, Advancement, Finance, Human
Resources, Financial Aid, General, and Banner XtenderSolutions.
The main menu is delivered with the Products Menu expanded. During installation,
your system administrator can establish another menu as the default expanded
menu. Individual users can override the institution default and establish a personal
default for the menu that is expanded on the main menu. See the Banner General
Technical Reference Manual for instructions on setting the institution default. See “To
Specify the Default Expanded Menu” in chapter 5 for instructions on setting a
personal default.
Customizing Menus
You can use the following forms to customize menus for your entire institution or
individual users:
November 2006
Confidential
Menu Maintenance
Form (GUTGMNU)
Lets you create custom menus for your institution. See
“Customizing Menus” in chapter 5.
My Banner
Maintenance Form
(GUAPMNU)
Lets you create a My Banner for an individual user. See
"My Banner" in chapter 5.
My Banner Copy Form
(GUTPMNU)
Lets you copy a My Banner from one user to other users.
See "My Banner" in chapter 5.
Banner Release 7.4
Getting Started Guide
2-7
2 All About Forms
Types of Forms
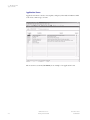
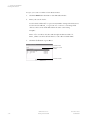
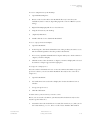
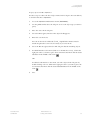
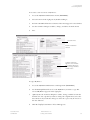
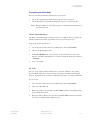
Application Forms
Application forms are used to enter, update, and query information in Banner. This
is the most common type of form.
The Letter Process Form (GUALETR) is an example of an application form.
2-8
Banner Release 7.4
Getting Started Guide
November 2006
Confidential
2
All About Forms
Types of Forms
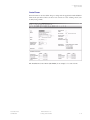
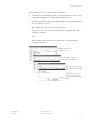
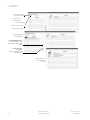
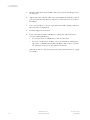
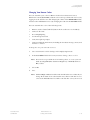
Validation Forms
Validation forms are used to define the values that can be entered in specific fields
on application forms. These values make up a field’s List of Values (LOV).
Banner uses LOVs to validate many fields. When the cursor is in a field that must be
validated, List of Values appears in the status line, indicating that the entry must
come from the LOV. If you try to enter a value that isn’t in the LOV, an auto hint
message appears. See "Entering Information Into Validated Fields" in chapter 3 for
more information.
Most validation forms are completed when Banner is implemented. If your security
level permits, you can use a validation form to enter new values or update existing
ones. Remember, you can only change values with a validation form, not through an
LOV window.
The ZIP/Postal Code Validation Form (GTVZIPC) is an example of a validation
form.
November 2006
Confidential
Banner Release 7.4
Getting Started Guide
2-9
2 All About Forms
Types of Forms
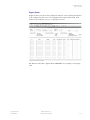
Rule Forms
Rule forms are used to define the calculations and parameters that impact
processing on other forms, reports, and jobs. These forms let you tailor Banner to
your institution’s procedural requirements. You can enter new rules or revise
existing ones if your security level permits.
The Object Definition Rules Form (GLROBJT) is an example of a rule form.
2-10
Banner Release 7.4
Getting Started Guide
November 2006
Confidential
2
All About Forms
Types of Forms
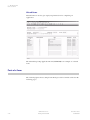
Control Forms
Control forms are used to define the processing rules for application and validation
forms at the system level. You can enter new controls or revise existing ones if your
security level permits.
The Installation Control Form (GUAINST) is an example of a control form.
November 2006
Confidential
Banner Release 7.4
Getting Started Guide
2-11
2 All About Forms
Types of Forms
Query Forms
Query forms are used to look up existing information, often returning information
to the calling form. You must access a query form from another form. You cannot
access it directly from the main menu, with Direct Access, or with Object Search.
The Dorm Room Query Form (SLARUSE) is an example of a query form.
2-12
Banner Release 7.4
Getting Started Guide
November 2006
Confidential
2
All About Forms
Types of Forms
Inquiry Forms
Inquiry forms are used to look up existing information, often returning information
to the calling form. You can access an inquiry form from the main menu, from
another form, with Direct Access, or with Object Search.
The Function Attendance Inquiry Form (GEIATTD) is an example of an inquiry
form.
November 2006
Confidential
Banner Release 7.4
Getting Started Guide
2-13
2 All About Forms
Parts of a Form
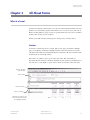
Wizard Forms
Wizard forms are used to give step-by-step instructions for completing an
application.
The Wizard Step Setup Application Form (GOADSTE) is an example of a wizard
form.
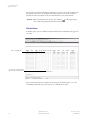
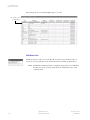
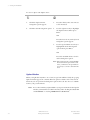
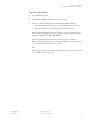
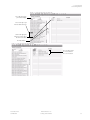
Parts of a Form
The following figure shows a sample form. Each part of the form is described on the
following pages.
2-14
Banner Release 7.4
Getting Started Guide
November 2006
Confidential
2
All About Forms
Parts of a Form
menu bar
toolbar
title bar
key block
other blocks
auto hint
status line
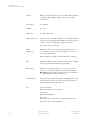
Menu Bar
The Banner menu bar, located at the top of every form, contains pull-down menus.
You can access an option in a pull-down menu at any time, except when you are in
a dialog box, alert box, or List of Values (LOV). (You must respond to these windows
before you can access a pull-down menu.)
November 2006
Confidential
Banner Release 7.4
Getting Started Guide
2-15
2 All About Forms
Parts of a Form
To access an option in the menu bar:
Note: If a pull-down menu item is dimmed, that menu item is currently
disabled and cannot be accessed.
1.
Click the desired pull-down menu
name. Menu items appear.
1.
Press the Alt key. The cursor moves
to the menu bar.
2.
Click the desired menu item.
2.
Use the right and left arrow keys to
highlight the desired pull-down
menu name. Then press Enter.
OR
Press the underlined letter for the
desired pull-down menu name.
3.
Use the up and down arrow keys to
highlight the desired menu item.
Then press Enter.
OR
Press the underlined letter for the
desired menu item.
Note: If the Options menu contains multiple
menu items that begin with the same
letter, you must use the up and down
arrow keys to select the desired menu
item.
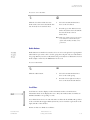
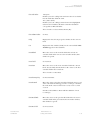
File Menu
This pull-down menu contains standard Banner and Oracle functions. The bottom
of the menu lists the last forms (up to ten) you accessed in this session. You can select
any form in this list to re-access it.
Some of the menu items let you call another form, job, or QuickFlow. When you exit
the called object, you return to the object you were previously using.
2-16
Banner Release 7.4
Getting Started Guide
November 2006
Confidential
2
All About Forms
Parts of a Form
Direct Access
Displays the Direct Access Form (GUAPARM), which is used to
access a form by its name. See "Direct Access" in chapter 3.
Object Search
Displays the Object Search Form (GUIOBJS), which is used to
search for a menu, form, job, or QuickFlow with part of the
name, description, or type. See "Object Search" in chapter 3.
QuickFlow
Displays the QuickFlow Form (GUAQFLW), which is used to
access a QuickFlow. See "QuickFlow" in chapter 3.
Select
Returns you to the calling form and enters the selected value
into the field that called the form.
Rollback
Application and inquiry forms
Clears all information (except key information) and returns
you to the first enterable field in the key block.
Validation forms
Returns you to the first enterable field on the form.
Query forms
Returns you to the first enterable field on the calling form.
Save
Saves all changes entered since the last time you saved.
Refresh
Clears the message line.
Print
Prints the current window with the date and time in the title
bar.
Exit
Forms and windows
Exits you from the form or window.
Main menu
Exits you from Banner.
Query mode
Cancels the query and takes the form out of query mode.
Exit QuickFlow
November 2006
Confidential
Exits you from a QuickFlow.
Banner Release 7.4
Getting Started Guide
2-17
2 All About Forms
Parts of a Form
Preferences
Displays the General User Preferences Maintenance Form
(GUAUPRF), which is used to customize Banner for individual
users. See "Title Bar Display Options," "Displayed Form
Names," and "Customized Main Menu," all in chapter 5,
Customization.
Banner
XtenderSolutions
If Banner® XtenderSolutions™ a is installed, displays a list of
documents that match the query criteria for the current cursor
location.
Banner
XtenderSolutions Info
If Banner® XtenderSolutions™ is installed, displays the
number of documents that match the query criteria for the
current cursor location.
List of recently
accessed forms
Lets you quickly re-access forms that were previously accessed
in this session (up to ten). See "Last 10 Forms in the File PullDown Menu" in chapter 3.
a.XtenderSolutions is a trademark of Legato Systems, Inc.
Edit Menu
This pull-down menu contains the functions used to edit text items.
Cut
Cuts selected text and places it on the clipboard.
Copy
Copies selected text to the clipboard.
Paste
Pastes text from the clipboard to the spot where the cursor is
located.
Edit
Displays the Editor window, which is used to enter or update text.
You can display this window from most fields. It is particularly
useful in long data fields. See "Using the Editor" in chapter 4.
Options Menu
This pull-down menu contains navigation options.
Navigation options vary from form to form and depend on where the cursor is
currently located. Some options take you to other blocks and windows within the
current form. Other options take you outside the current form to related forms. For
options that take you outside the current form, you can optionally display the form
2-18
Banner Release 7.4
Getting Started Guide
November 2006
Confidential
2
All About Forms
Parts of a Form
name associated with the option. You can set up this display option on the General
User Preferences Maintenance Form (GUAUPRF). See "Displayed Form Names" in
chapter 5.
Banner is delivered with standard navigation options. Your system administrator can
use the Options Maintenance Form (GUAOPTM) to change and add navigation
options for your institution. Only those staff members with appropriate security can
perform this task.
Note: Only the first 24 options defined on GUAOPTM will appear in the
Options pull-down menu.
Block Menu
This pull-down menu contains the functions used to navigate among the blocks of
information on a form.
Previous
Moves the cursor to the previous block that has at least one
enterable field. If the previous block is in another window, that
window is opened.
Next
Moves the cursor to the next block that has at least one enterable
field. If the next area is in another window, that window is
opened.
Clear
Clears all information from the current block. (Information is
not removed from any records or tables.)
Item Menu
This pull-down menu contains the functions used to navigate among the fields or
items on a form.
November 2006
Confidential
Previous
Moves the cursor to the previous enterable field (item) in the
current block.
Next
Moves the cursor to the next enterable field (item) in the current
block. Occasionally, Next Item moves the cursor to the first
enterable field (item) in the next block.
Clear
Clears all information from the current field (item).
(Information is not removed from any records or tables.)
Banner Release 7.4
Getting Started Guide
2-19
2 All About Forms
Parts of a Form
Duplicate
In a blank row of a repeating record, duplicates the contents of
the same field (item) in the previous record and copies it into the
new record.
Record Menu
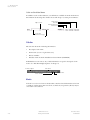
This pull-down menu contains the functions used to work with records on a form.
Previous
Moves the cursor to the first enterable field in the previous
record and triggers previous record logic coded into the form.
Next
Moves the cursor to the first enterable field in the next record of
the current block and triggers next record logic coded into the
form. If the cursor is in the last record, a new record is created.
Scroll Up
Scrolls up the list of repeating records, putting the first displayed
record near the bottom of the list.
Scroll Down
Scrolls down the list of repeating records, putting the last
displayed record near the top of the list.
Clear
Clears all information from the current record. (Information is
not removed from any records or tables.)
Remove
Removes all information for the current record. When you Save,
the removed information is deleted.
Insert
Inserts a new blank record into the list of existing records.
Duplicate
Duplicates the contents of all fields in the record and copies
them into a new record.
Lock
Temporarily locks the contents of the record so no other Banner
user can update it. Save, Rollback, and Exit release the lock.
Query Menu
This pull-down menu contains the functions used to query information in the
database based on specified criteria. See "Querying Information" in chapter 3.
2-20
Banner Release 7.4
Getting Started Guide
November 2006
Confidential
2
All About Forms
Parts of a Form
Enter
Puts the form into query mode so you can enter search criteria to
see what information is already in the database.
Execute
Searches the database and displays the first set of records that
match your search criteria.
Last Criteria
Enters the criteria from your last search.
Cancel
Cancels the query and takes the form out of query mode.
Count Hits
Counts the number of records that match the search criteria and
displays that number in the auto hint.
Fetch Next Set
If more records match the search criteria than fit in the window,
replaces the current set of displayed records with the next set.
Tools Menu
This pull-down menu contains actions that can be performed with Banner Xtender
Solutions as well as options to submit or release a Workflow. Refer to the
documentation for Banner Xtender Solutions or Workflow for more information
about these options.
Banner Xtender
Solutions
Puts the form into query mode so you can enter search criteria to
see what information is already in the database.
Workflow
Searches the database and displays the first set of records that
match your search criteria.
Help Menu
This pull-down menu contains various help tools.
November 2006
Confidential
Banner Release 7.4
Getting Started Guide
2-21
2 All About Forms
Parts of a Form
2-22
Online Help
Displays online information for the current form. See "Online
Help" in chapter 4.
Dynamic Help
Query
Displays the Dynamic Help Form (GUAHELP) in query mode,
which is used to display traditional help for a field, block, or
form. See "Dynamic Help" in chapter 4.
Dynamic Help
Edit
Displays the Dynamic Help Form (GUAHELP) in edit mode,
which is used to edit traditional help for a field, block, or form.
Use this feature to maintain custom information at your
institution. See "Dynamic Help" in chapter 4.
Help (Item
Properties)
Displays the Oracle item properties window for the current field.
See "Help (Item Properties)" in chapter 4.
Show Keys
Displays the Keys list, which lists the functions and their
equivalent keystrokes available in your environment for the
current form, window, and field. See "Show Keys" in chapter 4.
List
Displays the List of Values (LOV) for the current field if List of
Values appears in the status line. See "Entering Information Into
Validated Fields" in chapter 3.
Display Error
If an Oracle error occurs, displays the code that is in error.
Display
ID Image
If the cursor is in an ID field, displays the image associated with
the ID, if available.
Calendar
Displays the calendar. See "Using the Calendar" in chapter 4.
Calculator
Displays the calculator. See"Using the Calculator" in chapter 4.
Extract Data
with Key
Extracts Banner data for the current block, with key data, to a
spreadsheet. See "Extracting Banner Data to a Spreadsheet" in
chapter 3.
Extract Data
No Key
Extracts Banner data for the current block, without key data, to a
spreadsheet. See "Extracting Banner Data to a Spreadsheet" in
chapter 3.
Technical
Support
This sub-menu provides access to SQL Trace, optimization mode,
and database reconnection features.
Banner Release 7.4
Getting Started Guide
November 2006
Confidential
2
All About Forms
Parts of a Form
Turn SQL Trace
On
Turns the SQL Trace feature on. SQL Trace is a tool that helps
your technical support staff track performance issues that need
to be resolved. Refer to the Banner General Technical Reference
Manual.
Turn SQL Trace
Off
Turns the SQL Trace feature off. SQL Trace is a tool that helps
your technical support staff track performance issues that need
to be resolved. Refer to the Banner General Technical Reference
Manual.
Set Query
Optimizer to All
Rows
This cost-based optimization mode is recommended for testing
batch processing. Rather than immediately populating the
cursor, this option optimizes the query to get the best time for the
entire results set to be displayed. Because of this, it is a good
option for batch processing rather than online processing.
Note: You must be connected to an Oracle10g database in
order to use this option.
Warning: Changing optimization modes mid-session may cause
your results to be invalid due to cached data from
previous queries. SunGard Higher Education
recommends that you exit and re-enter Banner if want
to change optimization modes.
Set Query
Optimizer to
First Rows
This cost-based optimization mode optimizes the query to get the
first set of rows as quickly as possible. It is useful for online
processing. DBAs can configure how many rows will be defined
as the “first rows,” for example, 1,100, 1000.
Note: You must be connected to an Oracle10g database in
order to use this option.
Warning: Changing optimization modes mid-session may cause
your results to be invalid due to cached data from
previous queries. SunGard Higher Education
recommends that you exit and re-enter Banner if want
to change optimization modes.
November 2006
Confidential
Banner Release 7.4
Getting Started Guide
2-23
2 All About Forms
Parts of a Form
Set Query
Optimizer to
Rule
This standard rule-based mode is based on sql and database
schema, and optimization is based on Oracle rules in the
database (for example, if an index is present, then use it). It does
not optimize queries, but rather executes them based on a series
of Oracle rules.
Note: You must be connected to an Oracle10g database in
order to use this option.
Warning: Changing optimization modes mid-session may cause
your results to be invalid due to cached data from
previous queries. SunGard Higher Education
recommends that you exit and re-enter Banner if want
to change optimization modes.
Reconnect to
Database
Reconnects to the database.
About
Banner
Displays the About Banner Form (GUAABOT), which identifies
the current form, release number, date, and time, as well as all
legal statements and copyright information for Banner.
This form also displays a list of installed Banner products, their
release number, and their installation date. This information will
be helpful if you need to contact the ActionLine with a question
or problem.
Toolbars
The Banner toolbar contains buttons that perform common functions. It is located
directly under the menu bar:
2-24
Banner Release 7.4
Getting Started Guide
November 2006
Confidential
2
All About Forms
Parts of a Form
toolbar
Tool tips describe the
functions of buttons
When you move your cursor over a button and pause, a tool tip appears with text
that describes the function of the button.
To access a toolbar button:
Select the appropriate button. You can click a button any time, except when you are
in a dialog box, alert box, or List of Values (LOV). (You must respond to these
window before you can select a button.) If a button is dimmed, then it is disabled
and cannot be clicked.
Standard Buttons
Standard buttons are delivered on the toolbar:
Insert Record
Remove Record
Previous Record
Next Record
Save
Rollback
Select
November 2006
Confidential
Previous Block
Next Block
Enter Query
Execute Query
Cancel Query
View/Send Message
Print
Banner Release 7.4
Getting Started Guide
Banner Xtender Solutions
BXS-Add Document
Workflow Submit
Workflow Release
Broadcast Messages
FGAC Security
MIF Code
Online Help
Exit
2-25
2 All About Forms
Parts of a Form
Links on the Main Menu
In addition to the toolbar buttons, several links are available from the main menu.
Information about using these links is located in chapter 3, Getting Around Banner.
Object search
Help Center
Site Map
Refresh Menu tree
Products list
Go To field
Welcome message
Title Bar
The title bar shows the following information:
•
Descriptive form name
•
Form name (seven or eight characters)
•
Release number
•
Database name from the Installation Control Form (GUAINST)
Individual users can remove any of this information except the descriptive form
name. See "Title Bar Display Options" in chapter 5.
form description
form name
release number
database name
Blocks
A block is a section of a form or window that contains related information. If a form
or window contains more than one block, each block (except the key block) may be
enclosed in a beveled box.
2-26
Banner Release 7.4
Getting Started Guide
November 2006
Confidential
2
All About Forms
Parts of a Form
key block
other blocks
Most blocks have a title. There are three exceptions:
•
A key block does not have a title.
•
If a form or window has only one block, the block does not have a title.
•
If a form has a key block and only one other block, the second block does not
have a title.
Key Block
The first block on most forms contains key information. (Some forms, especially
validation forms and certain list forms, do not have a key block.) The key block
determines what is entered or displayed on the rest of the form. All information on
the form refers to the key block.
The key block has at least one field and sometimes more. For example, a form that
maintains population selection information may have key block fields for both an
application and a selection ID.
The key block stays on the form as subsequent blocks appear. Occasionally, another
window may appear on top of the key block if the window is unusually large or if the
key block is not pertinent to the window.
When the cursor is in the key block, enterable fields in the key block are enabled.
When you leave the key block, enterable fields in the key block are disabled.
November 2006
Confidential
Banner Release 7.4
Getting Started Guide
2-27
2 All About Forms
Parts of a Form
Other Blocks
Other blocks contain additional details for the key information. Each block contains
related information and is usually enclosed in a beveled box.
Auto Hint
The auto hint at the bottom of the form can contain the following information for
the field where the cursor is located:
•
Brief field description
•
Error and processing messages
•
Keyboard equivalents, if you can access other blocks, windows, or forms from
the field
keyboard equivalents:
LIST to display codes
COUNT HITS to display paragraph codes
DUPITEM to display letter codes
field description
Status Line
The status line directly under the auto hint can contain one or more of the following
messages:
2-28
Record n/n
Shows the number of the current record followed by the total
number of records in the current block. If there are more records
than fit in the window, the total appears as a question mark (for
example, 3/?) until you scroll to the last record in the block. Once
the last record is displayed, the total appears as a number (for
example, 3/15).
List of Values
Indicates the field has a List of Values; see "Entering Information
Into Validated Fields" in chapter 3.
Banner Release 7.4
Getting Started Guide
November 2006
Confidential
2 All About Forms
Elements on a Form
Enter Query
Indicates the form is in query mode.
status line
Elements on a Form
The following figure shows various elements that appear on forms. Each element is
described on the following pages.
buttons
radio
buttons
fields
checkbox
record
Buttons
Buttons are visual images used to perform an action or respond to the system.
Banner forms use iconic buttons and response buttons.
Iconic Buttons
These buttons are small squares that contain an icon (picture). They represent one
or more actions that can be performed for the associated field or record. For
example, you can use iconic buttons to display a validation form for the field, copy
a record, or display a window for entering freeform text.
November 2006
Confidential
Banner Release 7.4
Getting Started Guide
2-29
2 All About Forms
Elements on a Form
Banner forms use the following buttons. (Some products do not use all buttons.)
Search
Displays another form or window where you can search for a
value or information related to the field. You can often select and
return a value to the associated field.
Note: Sometimes the Search button can perform more than
one function. In these cases, an Option List appears.
You can select an option from the list using your
mouse, or you can tab among the choices and use the
Enter key or space bar to make your selection.
Displays a calendar so that you can choose a date.
Calendar
Indicates that data is available for the associated field.
Data
Indicates that no data is available for the associated field.
No Data
Displays summary information for the associated record.
Summary
Displays details for the associated record.
Details
Indicates the process has started but is not complete.
In Process
Indicates the process is complete.
Complete
Updates information in the database.
Maintenance
2-30
Banner Release 7.4
Getting Started Guide
November 2006
Confidential
2 All About Forms
Elements on a Form
Copies the current record or records.
Copy
Displays a window where you can enter freeform text for the
associated record.
Comments
Performs a calculation on data in the associated field.
Calculate
Indicates the process is approved.
Approve
Indicates the process is not approved.
Disapprove
Generates a new ID.
Generate ID
If a field has an iconic button, the auto hint identifies the equivalent function that
can be used instead of the button. If the button can perform more than one
function, each equivalent is identified in the auto hint.
To select an iconic button:
1.
Click the button.
2.
If an Option List appears, click the
desired option.
Otherwise, the form or window
appears automatically.
November 2006
Confidential
Banner Release 7.4
Getting Started Guide
1.
Select the Next Item function until
you reach the field that has the
button.
2.
Read the auto hint and select the
equivalent function. (A field may
have more than one option.)
2-31
2 All About Forms
Elements on a Form
Response Buttons
These buttons are shaded rectangles that appear in alert boxes and dialog boxes. An
alert box has one response button. A dialog box has two or more response buttons.
You must use the buttons to respond to the system before you can continue.
To select a response button in an alert box:
Click the OK button.
Press Enter.
To select a response button in a dialog box:
Click the desired button.
Select the Next Item function or use the
left and right arrow keys to move to the
desired button. Then press Enter.
OR
Press the underlined letter on the
desired button.
Check Boxes
Selected:
Check boxes are small boxes used to enable or disable features or options. When an
option is enabled, a check mark appears in the check box. When the option is
disabled, the check box is empty.
Not selected:
Check boxes often represent yes/no conditions. For example, the first sample on
the left indicates the record has more detail. The second sample indicates the
record does not have more detail. Sometimes check boxes indicate navigation to
other windows. The auto hint tells you when a check box is used for this kind of
navigation.
2-32
Banner Release 7.4
Getting Started Guide
November 2006
Confidential
2 All About Forms
Elements on a Form
To select or clear a check box:
Click the check box. If the box was
unchecked, it is now checked. If the box
was checked, it is now unchecked.
1.
Select the Next Item function to
move to the check box.
2.
Press the space bar. If the box was
unchecked, it is now checked. If the
box was checked, it is now
unchecked.
Note: If the space bar does not toggle a check
box, it may not be defined on your
system. Check with your data center
personnel.
Radio Buttons
Radio buttons are small circles used to select one of several options in a group. Each
radio button represents a choice for the group. You can pick only one radio button
in a group. When you select a radio button, the previously selected button is cleared.
In the sample on the left, the Both button is selected.
To select a radio button:
Click the radio button.
1.
Select the Next Item function to
move to the radio group.
2.
Press the left or right arrow key to
move to the desired radio button.
Scroll Bars
Scroll bars are used to display overflow information when a form has more
information than can be displayed at once. They also indicate that a form has an
unlimited number of repeating records.
A scroll bar has an arrow on each end and a scroll box in the middle. The position
of the scroll box shows approximately how far you are from the top/bottom or the
right/left side of the window.
Forms can have two kinds of scroll bars:
November 2006
Confidential
Banner Release 7.4
Getting Started Guide
2-33
2 All About Forms
Elements on a Form
•
A vertical scroll bar, located directly to the right of the rows, indicates there are
more records than are shown. A record can have one or more fields and one or
more lines. A vertical scroll bar is disabled if all the records appear at once.
•
A horizontal scroll bar, located directly under the window, indicates there are
more columns of information than are shown.
To use a scroll bar:
Click and drag the scroll box up/down
(vertical) or left/right (horizontal).
1.
Select the Next Item function to
move to one of the fields controlled
by the scroll bar.
2.
To move up and down (vertical
scroll bar), select the Next Record
or Previous Record function.
OR
Click the arrow at either end of the scroll
bar. The scroll box moves in the
direction of the arrow.
OR
Click anywhere in the scroll bar. The
scroll box moves between the previous
location and where you click.
OR
To move left and right (horizontal
scroll bar), select the Next Item or
Previous Item function.
Fields
Fields are areas on a form where you can enter, query, change, and display specific
information. A field is sometimes called an item. This is the case in the names of the
functions Next Item, Previous Item, and Duplicate Item. The following terms describe a
field:
2-34
•
Enabled. You can put the cursor in the field. Information in the field appears
in black text.
•
Disabled. You cannot put the cursor in the field. Information (if it exists)
appears in black text, the same as enabled fields. Your site administrator may
choose to change the color of disabled text for your site. Refer to the Banner
Middle Tier Implementation Guide for more information.
•
Enterable. You can enter information in the field. The field is usually enabled.
In certain situations, however, it may be disabled.
•
Display only. You cannot enter information in the field.
Banner Release 7.4
Getting Started Guide
November 2006
Confidential
2 All About Forms
Elements on a Form
Some fields are usually enabled but may be disabled occasionally. For example, in
query mode sometimes you cannot query a field that is normally enabled, and
sometimes you can query a field that is normally disabled. This is also true for
enabled fields in a key block; once you leave the key block, all fields in the key block
are disabled.
Text fields may appear to be a few characters longer than they actually are. For
example, a field that allows up to 60 characters may look like it still has space after
the sixtieth character. This is because each character uses a different amount of
space.
To access an enterable field:
Click the field.
Select the Next Item function until the
cursor is in the field.
Records, Rows, and Columns
A record is a set of related fields. For example, a street, city, state, and ZIP/postal
code form an address record.
If a block has multiple records, the records often appear in rows and columns. A
horizontal scroll bar appears under the columns if all columns don’t fit into the
window at once. A vertical scroll bar appears on the right side of the rows if all rows
don’t fit into the window at once. When you select a row, the entire record is
highlighted to identify it as the current record.
November 2006
Confidential
Banner Release 7.4
Getting Started Guide
2-35
2 All About Forms
Elements on a Form
This sample shows a form with multiple printer records:
The current record
is highlighted.
Pull-Down Lists
Pull-down lists are used to select a field value from a list of pre-defined values. A
down arrow in the right side of the field indicates the field has a pull-down list.
Note: Fields with a Search button have a similar-looking down arrow. Pull-down
lists have the arrow inside the field, while the Search button is located
outside the field.
2-36
Banner Release 7.4
Getting Started Guide
November 2006
Confidential
2 All About Forms
Oracle Functions Used in Banner
To select a value from a pull-down list:
1.
2.
1.
Click the field. The entire pulldown list appears with the currently
selected item highlighted.
2.
Click the desired item. The selected
value appears in the field.
Select the Next Item function to
move to the pull-down list.
Press the Alt and down arrow keys
simultaneously to display the entire
pull-down list with the currently
selected item highlighted.
OR
Press the down arrow key to scroll
through the list items one at a time.
3.
Use the arrow keys to move to the
desired item.
OR
Type a character to highlight the
next item that begins with that
character. For example, to choose
Inactive, type I. If more than one
item starts with I, then the first item
that starts with I is selected.
Continue to press I until the correct
choice appears.
4.
Press Enter. The selected value
appears in the field.
Oracle Functions Used in Banner
Oracle functions trigger actions within a form. The following list describes the
Oracle functions commonly used in Banner. For more complete technical
descriptions, refer to your Oracle documentation.
Note: Banner sometimes redefines the standard Oracle functions to perform
other functions. For example, Count Query Hits often calls another
form. Use the Show Keys function to list the functions defined for the
current form, window, or field.
November 2006
Confidential
Banner Release 7.4
Getting Started Guide
2-37
2 All About Forms
Oracle Functions Used in Banner
Cancel
Exits you from an Option List, List of Values, Editor window,
or Dynamic Help without making a selection or saving
information.
Clear Form
See Rollback.
Commit
See Save.
Count Hits
See Count Query Hits.
Count Query Hits
In query mode, counts the number of records that match the
search criteria and displays that number in the auto hint. To
retrieve records, select the Execute Query function.
Also referred to as Count Hits.
Down
(arrow key)
Moves the cursor to the first enterable field in the next
record, moves you lower in a List of Values, or moves you
lower in a pull-down list.
Down is similar to Next Record without next record logic.
Edit
Displays the Editor window, which is used to enter or update
text. It is particularly useful in long data fields.
Enter Query
Puts the form into query mode so you can enter search
criteria to see what information is already in the database.
Enter Query appears in the status line. For more information,
see "Querying Information" in chapter 3.
Execute Query
In query mode, searches the database and displays all records
that match your search criteria. For more information, see
"Querying Information" in chapter 3.
Exit
Forms and windows
Exits you from the form or window.
Main menu
Exits you from Banner.
Query mode
Cancels the query and takes the form out of query mode.
Also referred to as Exit without Value.
2-38
Banner Release 7.4
Getting Started Guide
November 2006
Confidential
2 All About Forms
Oracle Functions Used in Banner
Exit with Value
Called form
Returns you to the calling form and enters the selected value
into the field that called the form.
List of Values (LOV)
Returns you to the calling form and enters the highlighted
value into the field that called the form. The OK button
corresponds to Exit with Value.
Also referred to as Select and Next Primary Key.
Exit without Value
See Exit.
Help
Displays the Oracle item properties window for the current
field.
List
Displays the List of Values (LOV) for the current field if List
of Values appears in the status line.
Next Block
Moves the cursor to the next block that has at least one
enterable field. If the next area is in another window, that
window is opened.
Next Field
See Next Item.
Next Item
Moves the cursor to the next enterable field in the current
block. Occasionally, Next Item moves the cursor to the first
enterable field in the next block.
Also referred to as Next Field.
Next Primary Key
See Exit with Value.
Next Record
Moves the cursor to the first enterable field in the next record
of the current block and triggers next record logic coded into
the form. If the cursor is in the last record, a new record is
created.
Next Record is similar to Down with the addition of next
record logic.
November 2006
Confidential
Previous Block
Moves the cursor to the previous block that has at least one
enterable field. If the previous block is in another window,
that window is opened.
Previous Field
See Previous Item.
Banner Release 7.4
Getting Started Guide
2-39
2 All About Forms
Oracle Functions Used in Banner
Previous Item
Moves the cursor to the previous enterable field in the
current block.
Also referred to as Previous Field.
Previous Record
Moves the cursor to the first enterable field in the previous
record and triggers any previous record logic coded into the
form.
Previous Record is similar to Up with the addition of previous
record logic.
Rollback
Application and inquiry forms
Clears all information (except key information) and returns
you to the first enterable field in the key block. If you enter
changes and do not save them before trying to roll back, you
are prompted to save.
Validation forms
Returns you to the first enterable field on the form.
Query forms
Returns you to the first enterable field on the calling form.
Also referred to as Clear Form.
Save
Saves all changes entered since the last time you saved.
Also referred to as Commit.
Scroll Down
Scrolls down the list of multiple records, putting the last
displayed record near the top of the list.
Scroll Up
Scrolls up the list of multiple records, putting the first
displayed record near the bottom of the list.
Select
See Exit with Value.
Show Keys
Displays the Keys list, which lists the functions and their
equivalent keystrokes available in your environment for the
current form, window, and field.
Up
(arrow key)
Moves the cursor to the first enterable field in the previous
record, moves you higher in a List of Values, or moves you
higher in a pull-down list.
Up is similar to Previous Record without previous record
logic.
2-40
Banner Release 7.4
Getting Started Guide
November 2006
Confidential
3
Chapter 3
Getting Around Banner
Getting Around Banner
Banner provides numerous ways to navigate through the system:
November 2006
Confidential
Main menu
You can select from a list of the menus, forms, jobs, and
QuickFlows in Banner.
Direct Access
You can access a menu, form, job, or QuickFlow by its name.
Object Search
You can access a form, job, or QuickFlow if you know part of its
name, description, or type.
Site map
You can view a list of the top-level menus and one level below
them.
Tabs
You can access windows on tabbed forms by selecting the tab.
Options menu
You can access other forms, windows, and blocks related to the
current form, window, and block.
Option list
You can right-click on a form anywhere outside a field to display
the Option list, from which you can perform functions, navigate
to other parts of the form, or add the form to your personal
menu.
Buttons
You can access another form or window related to the current
record or field.
Mouse
You can click an iconic button, field, record, block, or window
that is currently displayed.
Keyboard
equivalents
You can use the keyboard to access a form, window, block, or
field.
QuickFlow
You can automatically access forms that are linked in a chain.
Last 10 forms in
the File pulldown menu
You can quickly re-access a form that was previously opened in
the current session.
Banner Release 7.4
Getting Started Guide
3-1
3
Getting Around Banner
Display
Navigation
Window key
You can press this key on any form to display a navigation window
that enables you to enter the name of another form or job and
navigate to it.
Main Menu
You can use the main menu to select from a list of the menus, forms, jobs, and
QuickFlows in Banner. The main menu shows the various levels of menus at your
institution. These levels are nested within a hierarchical folder structure. You can
easily navigate through Banner by expanding and collapsing these menus. Once you
have “drilled down” to the item you want, you can click its link to access it.
Refer to chapter 2 for more information about the main menu.
To expand or collapse a menu:
Select the folder (or its associated description) to expand the menu so you can see
the objects it contains. Select the folder again to collapse it.
To access a menu item:
1.
Expand the menu you want to start with (for example, General).
2.
Continue expanding menus until you drill down to the form, job, or QuickFlow
you want.
3.
Double-click the name of the form, job, or QuickFlow you want to access.
Direct Access
You can use Direct Access to access a menu, form, job, or QuickFlow by its name. You
can use Direct Access from the main menu or from a form.
To use Direct Access from the main menu:
1.
Enter the name of the menu, form, job, or QuickFlow in the Go To field.
2.
Press Enter.
Note: You cannot search for an object using code/description lookup in this
field. You can, however, search by selecting the Search button and then
performing your search on GUIOBJS.
3-2
Banner Release 7.4
Getting Started Guide
November 2006
Confidential
3
Getting Around Banner
To use Direct Access from a form:
Note: When you use Direct Access from a form, the current form remains open.
When you exit the requested form, job, or QuickFlow, you return to the
original form.
1.
Select File>Direct Access. The Direct Access Form (GUAPARM) appears.
2.
Enter the name of the form, job, or QuickFlow in the Enter Valid Name field.
(You cannot use Direct Access to access a menu from a form.)
3.
Click the Start button or press Enter.
Object Search
You can use Object Search to access a form, job, or QuickFlow if you know part of
its name, description, or type.
When you use Object Search from a form, the current form remains open. When
you exit the requested object, you return to the original form.
Note: You cannot search for an object using code/description lookup in this
field. You can, however, search by selecting the Search button and then
performing your search on GUIOBJS.
To use Object Search:
1.
Double-click the Go To field on the main menu. You can also use the Search
button.
OR
Select File>Object Search from any form.
OR
Select Help>List on the Object field on menu maintenance forms. Make sure
your cursor is in the Object field for the menu you are building, and not for
the list of all objects that you pick from.
2.
Enter your search criteria on the Object Search Form (GUIOBJS).
You can use any or all of the Name, Description, and Type fields. You can use
the Oracle wildcards % and _. (See "Wildcards" in this chapter.)
November 2006
Confidential
3.
Select the Execute Query function. A list of all matches appears.
4.
Scroll to the desired name.
5.
Double-click the desired name or click the Start button.
Banner Release 7.4
Getting Started Guide
3-3
3
Getting Around Banner
Note: You can use the up and down arrow keys within the Go To field to scroll
through forms that you have previously accessed in the Banner session.
Press Enter to go to that form.
Site Map
The site map appears on a separate page accessible by selecting the Site Map link on
the main menu. It lists the top-level menus in your installation, and one level below
them. There are no fields on it, only links to the various menus and forms.
If you select a menu from the site map, the main menu appears, displaying the menu
you selected with one level expanded. If you select a form, a process, or a QuickFlow,
it will be displayed.
Tabs
Certain forms feature a tabbed interface. Tabs are used to arrange information in a
meaningful way, and allow you to navigate easily between groups or blocks of
information. Tab titles reflect the contents of a particular window or grouping of
information.
For tabbed forms that contain windows of parent/child information, the main
(“parent”) tab appears in the top row. The dependent (“child”) information
appears on tabs lower on the window and below the top-level tab to which the
information is related.
3-4
Banner Release 7.4
Getting Started Guide
November 2006
Confidential
3
Getting Around Banner
To navigate between tabbed windows:
•
•
Click the tab.
•
The List Tab Pages key (F2) displays
a list of other tabbed windows on
the form. Use the mouse to select a •
different tab from the list. For
forms that have tabs within a tabbed
window, navigation is based on the •
location of the cursor when List Tab
Pages is selected.
Control-Tab moves forward and
Control-Shift-Tab moves backward
through the tabs on a form.
Control-Page Up moves forward
and Control-Page Down moves
backward through the tabs.
The List Tab Pages key (F2) displays
a list of other tabbed windows on
the form. Use the up and down
arrow keys to select a different tab
from the list. For forms that have
tabs within a tabbed window,
navigation is based on the location
of the cursor when List Tab Pages is
selected.
Options Menu
You can use the Options menu in the menu bar to navigate within Banner. Options
in the menu depend on where the cursor is currently located. Some options take you
to other blocks and windows within the current form. Other options take you
outside the current form to other related forms.
The Options menu optionally displays the form name associated with each option
that takes you outside the current form. You can set up this option on the General
User Preferences Maintenance Form (GUAUPRF). See "Displayed Form Names" in
chapter 5.
Banner is delivered with standard navigation options. The system administrator at
your institution can use the Options Maintenance Form (GUAOPTM) to change
and add navigation options for your institution. Only those staff members with
appropriate security can perform this task.
Note: Only the first 24 options defined on GUAOPTM will appear in the
Options pull-down menu.
November 2006
Confidential
Banner Release 7.4
Getting Started Guide
3-5
3
Getting Around Banner
To select an option in the Options menu:
1.
Click the Options menu.
Navigation options appear.
1.
Press the Alt key. The cursor moves
to the menu bar.
2.
Click the desired navigation option. 2.
Use the right arrow key to highlight
the Options menu. Then press
Enter.
OR
Press the letter O on your keyboard.
Navigation options appear.
3.
Use the up and down arrow keys to
highlight the desired navigation
option. Then press Enter.
OR
Press the underlined letter for the
desired navigation option.
Note: If the Options menu contains multiple
menu items that begin with the same
letter, you must use the up and down
arrow keys to select the desired menu
item.
Option Window
When you right-click anywhere on a form (except from within a field), the pop-up
Option window appears. It contains different options related to the form, such as
functions you can perform and navigation options. You can also choose to add the
form to your personal menu.
Note: To see the form that you just added to your personal menu via the Option
window, you must first refresh the menu by either clicking the Menu link
on GUAGMNU or entering REFRESH in the Go To field.
3-6
Banner Release 7.4
Getting Started Guide
November 2006
Confidential
3
Getting Around Banner
The Option window displays a list of
form-specific options..
To select an option in the Option window:
1.
Right-click on the form (but not
from within a field). The Option
window appears.
2.
Click the desired option.
Note: There is no keyboard
equivalent for the Option
window; however, most options
are available from either the
File or Options pull-down
menu.
1.
Press the Alt key. The cursor moves
to the menu bar.
2.
Use the right arrow key to highlight
the File or Options menu. Press
Enter.
OR
Press the letter F or O on your
keyboard. Options appear.
3.
Use the up and down arrow keys to
highlight the desired option. Then
press Enter.
OR
Press the underlined letter for the
desired option.
Note: If the Options menu contains multiple
menu items that begin with the same
letter, you must use the up and down
arrow keys to select the desired menu
item.
November 2006
Confidential
Banner Release 7.4
Getting Started Guide
3-7
3
Getting Around Banner
Iconic Buttons
You can use iconic buttons to access a form or window related to the record or field
where the cursor is currently located. See "Iconic Buttons" in chapter 2 for a more
detailed description of iconic buttons.
To select an iconic button:
1.
Click the button.
2.
If an Option List appears, click the
desired option.
Otherwise, the form or window
appears automatically.
1.
Select the Next Item function until
you reach the field that has the
button.
2.
Read the auto hint and select the
equivalent function. (A field may
have more than one option.)
Mouse
You can use the mouse to navigate to an enterable field, record, block, or window
that is currently displayed. You can access fields in any order. You can also use the
mouse to click buttons.
Keyboard Equivalents
You can use the keyboard equivalents of Oracle functions to access a form, window,
block, or field.
To access a form with keyboard equivalents:
1.
Read the auto hint message to determine whether a redefined Oracle function
lets you navigate to another form. (Count Query Hits, Duplicate Item,
Duplicate Record, Exit with Value, and List are the most commonly redefined
functions.)
2.
If a redefined function is available, use Show Keys to find the keyboard
equivalent for the redefined function.
3.
Use the keyboard equivalent to access the form.
To access a window or block with keyboard equivalents:
Use the keyboard equivalents for Next Block and Previous Block to move among
blocks. If the next/previous block is in another window, these keys take you to
another window.
3-8
Banner Release 7.4
Getting Started Guide
November 2006
Confidential
3
Getting Around Banner
Note: Occasionally the Next Block function appears to move the cursor to
another enterable field in the same block. In these cases, there are
actually two blocks that visually appear to be one block.
To access a field with keyboard equivalents:
Use the Tab key (Next Item) and Shift+Tab keys (Previous Item) to move among
fields. You must move in the specific order coded into the form. If a field has the
Autoskip feature, the cursor automatically moves to the next field as soon as you
enter the required number of characters.
QuickFlow
You can use a QuickFlow to automatically access forms that are linked in a chain.
Activating a QuickFlow opens the first form in the chain. When you exit that form,
the next form automatically opens.
To use a QuickFlow:
1.
Select File>QuickFlow or use Direct Access to display the QuickFlow Form
(GUAQFLW).
2.
Enter the QuickFlow code in the Quickflow field.
3.
Click the Start button, press Enter, or select the Next Block function. The first
form in the QuickFlow appears.
4.
Enter data on the form.
5.
Exit the form. The next form in the QuickFlow appears.
6.
Repeat steps 4 and 5 for each form in the QuickFlow. After you pass through
all the forms in the QuickFlow, the GUAQFLW Form reappears.
Note: If you want to exit the QuickFlow before all the forms are accessed, select
File>Exit QuickFlow.
If you do not have any data to enter on a form, exit the form. If the
message DO YOU WANT TO QUIT? appears, answer Y. (The message
depends on the form.)
7.
If you are finished with the QuickFlow, exit the GUAQFLW Form.
OR
If you want to execute the QuickFlow again, return to step 3.
November 2006
Confidential
Banner Release 7.4
Getting Started Guide
3-9
3 Getting Around Banner
Entering Information
Last 10 Forms in the File Pull-Down Menu
You can quickly re-access a form that was previously opened in the current session.
The bottom of the File pull-down menu lists the last forms (up to ten) you used in
this session. You can re-access any form in the list.
Note: The only forms that never appear in this list are the QuickFlow Form
(GUAQFLW), Direct Access Form (GUAPARM), and Object Search
Form (GUIOBJS).
To access a form from the File pull-down menu:
1.
Access the File pull-down menu.
2.
Select the form name from the list at the bottom of the pull-down menu.
Display Navigation Window Key
The Display Navigation Window key displays a navigation window on the top of your
screen that allows you to enter the name of a form and then navigate to it. Usually
this key is F5, but your institution may use a different key.
The navigation mini-window also contains the My Institution link that appears on the
main menu.
To exit the navigation window, press F5 (or equivalent at your site) again, or perform
a Next Block or Previous Block function.
To use the Display Navigation Window key:
1.
Press the Display Navigation Window key (F5) from any form.
2.
Enter the name of the form in the Go To field, or use the Search button to
search for the form name.
3.
Press Enter.
Note: The Display Navigation Window key does not work in query mode.
Entering Information
This section tells you how to enter information on Banner forms. Recommendations
for formatting data are included at the end of this section.
3-10
Banner Release 7.4
Getting Started Guide
November 2006
Confidential
3
Getting Around Banner
Entering Information
Entering Information Into Validated Fields
Many fields only accept codes from a defined list of values (LOV). Most codes and
and their associated descriptions in an LOV are defined on a validation form.
You can access the LOV for a Code/Description field by either clicking the Search
button or by double-clicking in the field.
Note: If you double-click a field other than Code/Description that has a LOV,
the LOV will not open. (You must use the Search button or keyboard
equivalent.) You can use the User Preferences Form (GUAUPRF) to
change the color of Code/Description fields to help you visually identify
fields in which double-clicking invokes an LOV.
Some validation forms contain more than just the valid codes and their associated
descriptions. For example, the Site Code Validation Form (STVSITE) includes
address information. When an LOV is called from a specific field, only information
that is relevant to the current form is displayed in the LOV.
Using the Code/Description Lookup Feature
The code/description lookup feature helps you enter information into validated
fields. With this feature you can:
•
Enter a complete code or description
•
Look up a code or description based on a partial entry
•
Display the entire LOV and select a code
If you look up a code/description or display the entire LOV, you can refine your
search by entering search criteria or use a drill-down search.
To enter a complete code or description in a field with an LOV:
1.
Enter the full code (for example, A005) or full description (for example,
Registration).
2.
Press Enter. The code and description appear. Depending on the field, the
cursor may automatically skip to the next field.
To look up a code or description in a field with an LOV:
Note: Do not use these steps if you are in query mode. Instead, execute a
normal query. See "Querying Information" in this chapter for more
information.
1.
November 2006
Confidential
Enter as much of the code or description as you know. Use the Oracle wildcard
% to represent any number of unspecified characters.
Banner Release 7.4
Getting Started Guide
3-11
3 Getting Around Banner
Entering Information
Example:
Enter A% to search for all codes and descriptions that start with “A”.
Note: If there is no wildcard, the search looks for an exact match.
2.
Press Enter.
•
If one match is found, the code and description are returned, and this
procedure ends.
•
If more than one match is found, the Search Results window appears with
all matches. Continue with step 3.
•
If no matches are found, the auto hint displays an error message. Return
to step 1 to enter another code or description.
3.
Scroll (if necessary) to the desired value in the Search Results window.
4.
Double-click the value or press Enter. The window closes, and the selected
value is returned to the code field.
Enter a partial code.
Be sure to include the
Oracle wildcard %.
Press Enter. This
window appears if
more than one match
is found.
Go to the code you
want and doubleclick it.
3-12
Banner Release 7.4
Getting Started Guide
November 2006
Confidential
3
Getting Around Banner
Entering Information
To display the entire LOV for a field with an LOV:
Double-click the Code field, or
click the Search button.
1.
Select the Next Item function until
you reach the Code field.
Note: If you are on a form that was called
from a field on another form, press the
Ctrl key before you double-click.
(Double-clicking by itself selects a
value rather than displays an LOV.)
2.
Select the List function. The LOV
appears.
3.
Scroll to the desired value in the
LOV (if necessary).
4.
Press Enter. The LOV closes, and
the selected value is returned to the
Code field.
1.
2.
If more than one form or window is
associated with the field, an Option
List appears. Click the option that
displays the LOV.
Otherwise, the LOV appears
automatically.
3.
Scroll (if necessary) to the desired
value in the LOV.
4.
Double-click the value. The LOV
closes, and the selected value is
returned to the Code field.
Double-click
this field, or
choose the
Search button.
This LOV
appears.
Go to the code
you want and
double-click it.
November 2006
Confidential
Banner Release 7.4
Getting Started Guide
3-13
3 Getting Around Banner
Entering Information
To refine your search in an LOV or Search Results window:
1.
Click the Find field in the LOV or Search Results window.
2.
Enter your search criteria.
Use the Oracle wildcard % to represent any number of unspecified characters.
Use the Oracle wildcard _ to represent one occurrence of an unspecified
character. You can use both wildcards in the same search string.
Examples:
Enter A% to search for all codes and descriptions that start with “A”.
Enter _AID to search for all four-character codes that end with “AID”.
3.
Click the Find button or press Enter.
Click this field.
Enter your search
criteria.
Click this button.
3-14
Banner Release 7.4
Getting Started Guide
November 2006
Confidential
3
Getting Around Banner
Entering Information
To use a drill-down search in an LOV or Search Results window:
1.
In the LOV or Search Results window, press the first character of your search
string. The list displays all codes that begin with that character.
2.
Press the next character in the string. The list displays all codes that begin with
the two characters entered.
3.
Keep adding characters to reduce the list of matches.
When you see the code you want, double-click it or press Enter. The code is
returned to the field.
OR
When you have reduced the list to one match, the code is automatically
returned to the field.
Start with a full list of values
for department codes.
Press the character E. The list
shows all codes that start with E.
Press the character N. The list
shows all codes that start with
EN.
You can choose a value from
the list or continue entering
characters until you get a single
match.
November 2006
Confidential
Banner Release 7.4
Getting Started Guide
3-15
3 Getting Around Banner
Entering Information
Entering Information From Another Form
Sometimes the Search button next to a Code/Description field takes you to another
form to look for values, rather than to an LOV. You can select information from the
“called form,” and return it to the current field.
To enter information in a field from a called form:
1.
Click the Search button.
2.
If an Option List appears, click the
desired option to display the form.
1.
Select the Next Item function until
you reach the field that has the
button.
2.
Read the auto hint and select the
equivalent function. (A field may
have more than one option.) The
form appears.
Otherwise, the form appears
automatically.
3.
If the form opens in query mode,
enter your search criteria and select 3.
Execute Query. The form displays
matching values.
Otherwise, the form displays
available values.
4.
5.
3-16
Scroll (if necessary) to the desired
value on the called form.
Double-click the value. The called
form closes, and the selected value
is returned to the field.
Banner Release 7.4
Getting Started Guide
If the form opens in query mode,
enter your search criteria and select
Execute Query. The form displays
matching values.
Otherwise, the form displays
available values.
4.
Scroll (if necessary) to the desired
value on the called form.
5.
Choose the Select function. The
called form closes, and the selected
value is returned to the field.
November 2006
Confidential
3
Getting Around Banner
Entering Information
Click this button.
If the form opens in
query mode, enter
your selection
criteria.
Select Execute
Query.
The form displays
matching values.
Scroll (if necessary) to the value
you want. (The selected record is
highlighted.) Double-click.
Entering IDs
Many Banner forms have ID fields for persons and non-persons. For example, the
Function Participant Form (GEAPART) uses both person and nonperson IDs to
identify participants in a function.
There are several ways to enter an ID:
November 2006
Confidential
•
Enter a complete ID.
•
Enter a complete name.
•
Search by partial ID.
•
Search by partial name.
Banner Release 7.4
Getting Started Guide
3-17
3 Getting Around Banner
Entering Information
•
Search by SSN (U.S.), SIN (Canada), TFN (entities), or birth date.
•
Use a product-specific search form.
•
Search by the pattern of characters in the name (Oracle Soundex).
To enter a complete ID:
1.
Enter the full ID (for example, 2314780) in the ID field.
2.
Press Enter. The ID and name appear.
To enter a complete name:
1.
Make sure the ID field is blank.
2.
Tab to the Name field (unlabeled field next to the ID field).
3.
Enter the full name.
The format is last, first, middle with a comma between each part of the name.
Spaces between each piece are optional. Characters can be upper or lower
case. (You get the same results whether you enter upper or lower case letters.)
Examples:
Smith, Thomas, James
Smith, Thomas (no middle name)
4.
Press Enter.
•
If one match is found, the ID and name are returned to the form.
•
If more than one match is found, the ID and Name Extended Search
window appears. You can select an ID (see “To select an ID from the ID and
Name Extended Search window”), reduce your search (see “To reduce
your search in the ID and Name Extended Search window”), or access a
product-specific search form (see “To access a search form from the ID and
Name Extended Search window”).
To search by partial ID:
1.
Enter a partial ID in the ID field. Use the Oracle wildcard % to represent any
number of unspecified characters.
Example:
Enter 21% to search for all IDs that start with “21”.
2.
3-18
Press Enter.
•
If one match is found, the ID and name are returned to the form.
•
If more than one match is found, the ID and Name Extended Search
window appears. You can select an ID (see “To select an ID from the ID and
Banner Release 7.4
Getting Started Guide
November 2006
Confidential
3
Getting Around Banner
Entering Information
Name Extended Search window” in this chapter), reduce your search (see
“To reduce your search in the ID and Name Extended Search window” in
this chapter), or access a product-specific search form (see “To access a
search form from the ID and Name Extended Search window” in this
chapter).
To search by partial name:
1.
Make sure the ID field is blank.
2.
Tab to the Name field (unlabeled field next to the ID field).
3.
Enter a partial name.
The format is last, first, middle with a comma between each part of the name.
Spaces between each piece are optional. Characters can be upper or lower
case. (You get the same results whether you enter upper or lower case letters.)
Use the Oracle wildcard % to represent any number of unspecified characters.
Examples:
Enter smith,J% to search for all IDs with the last name “Smith” and first names
that start with “J”.
Enter mag%,p% to search for all IDs with last names that start with “Mag” and
first names that start with “P”.
Enter ,Barbara to search for all IDs with the first name “Barbara”.
4.
Press Enter.
•
If one match is found, the ID and name are returned to the form.
•
If more than one match is found, the ID and Name Extended Search
window appears. You can select an ID (see “To select an ID from the ID and
Name Extended Search window” in this chapter), reduce your search (see
“To reduce your search in the ID and Name Extended Search window” in
this chapter), or access a product-specific search form (see “To access a
search form from the ID and Name Extended Search window” in this
chapter).
To select an ID from the ID and Name Extended Search window:
Use these steps when you search by ID or name and multiple matches are displayed
on the ID and Name Extended Search window.
1.
Pull down the list of matches in the Search Results field.
Note: Previous names and IDs are indented under the current name and ID.
November 2006
Confidential
2.
Scroll to the desired name and ID.
3.
Click the desired name and ID. The ID and name are returned to the form.
Banner Release 7.4
Getting Started Guide
3-19
3 Getting Around Banner
Entering Information
To reduce your search in the ID and Name Extended Search window:
Use these steps when you search by ID or name and multiple matches are displayed
on the ID and Name Extended Search window.
1.
Select the Person, Non-Person, or Both radio button in the Reduce Search By
block to identify the kind of IDs you want to search. The field next to the
Search Results field shows the number of matches.
2.
Enter your search criteria in the fields in the Reduce Search By block.
3.
Click the Search button or select Execute Query. The field next to the Search
Results field shows the number of matches.
4.
(Optional) Repeat steps 2 and 3 to further reduce your search.
To access a search form from the ID and Name Extended Search window:
Use these steps when you search by ID or name and multiple matches are displayed
on the ID and Name Extended Search window.
1.
Click the Person Search Detail button or the Non-Person Search Detail button.
The associated search form appears with IDs that match your original search
criteria. Your original search criteria appear at the top of the form.
Example:
If Smith, J% is your original search criteria and you select the Person Search
Detail button, the search form shows all person IDs with the last name “Smith”
and first names that start with “J.”
2.
To select an ID, skip to step 8.
OR
To reduce your search further, go to step 3.
3.
Select the Enter Query function. A dialog box appears.
4.
To extend the current search, select the Extend Your Current Query button.
Information on the form is cleared. (Your original search criteria remain at the
top of the form.)
OR
To discard the current search and start over, click the Start a New Query
button. Information on the form is cleared.
5.
Enter your search criteria in any fields on the form.
If you enter a partial field value as a search criteria, use Oracle wildcards. Use
the symbol % to represent any number of unspecified characters. Use the
3-20
Banner Release 7.4
Getting Started Guide
November 2006
Confidential
3
Getting Around Banner
Entering Information
symbol _ to represent one occurrence of an unspecified character. You can use
both wildcards in the same search string.
6.
Verify the Case Sensitive Query radio buttons. Change if necessary.
7.
Select the Execute Query function. The form shows all IDs with matching
information.
8.
Scroll to the desired ID.
9.
Double-click the desired ID. The ID and name are returned to the calling form.
To search by SSN (U.S.), SIN (Canada), TFN (entities) or birth date:
ID fields on some forms allow you to go to the SSN/SIN/TFN Alternate ID Search
Form (GUIALTI) and search for an ID by SSN, SIN, TFN or birth date.
1.
Click the Search button next to the ID field on a form. An Option List appears.
2.
Select the alternate ID search option. The SSN/SIN/TFN Alternate ID Search
Form (GUIALTI) opens in query mode.
Note: Other available search options depend on the specific form and are not
described here.
3.
Enter your search criteria in any fields on the search form.
If you enter a partial field value, use Oracle wildcards. Use the symbol % to
represent any number of unspecified characters. Use the symbol _ to represent
one occurrence of an unspecified character. You can use both wildcards in the
same search string.
Examples:
Enter 148296890 in the SSN/SIN/TFN field to search for IDs with that SSN.
Enter 06-JUN-1982 in the Birthdate field to search for IDs with that birth date.
4.
Verify the Case Sensitive Query radio buttons. Change if necessary.
5.
Select the Execute Query function. The form shows all IDs with matching
information.
6.
Scroll to the desired ID.
7.
Double-click the desired ID. The ID and name are returned to the calling form.
To use a product-specific search form:
ID fields on some forms allow you to go to a product-specific search form and search
for a person or non-person by ID or name.
November 2006
Confidential
Banner Release 7.4
Getting Started Guide
3-21
3 Getting Around Banner
Entering Information
1.
Click the Search button next to the ID field on a form. An Option List appears.
2.
Select the option for the person or non-person search form you want to access.
The selected form opens in query mode.
Note: Other available search options depend on the specific form and are not
described here.
3.
Enter your search criteria in any fields on the search form.
If you enter a partial field value, use Oracle wildcards. Use the symbol % to
represent any number of unspecified characters. Use the symbol _ to represent
one occurrence of an unspecified character. You can use both wildcards in the
same search string.
Examples:
Enter Carnegie in the Last Name field to search for all IDs with the last name
“Carnegie”.
Enter Chris% in the First Name field to search for all IDs with first names that
start with “Chris”.
4.
Verify the Case Sensitive Query radio buttons. Change if necessary.
5.
Select the Execute Query function. The form shows all IDs with matching
information.
6.
Scroll to the desired ID.
7.
Double-click the desired ID. The ID and name are returned to the calling form.
To search by the pattern of characters in the name (Oracle Soundex):
An added option on most search forms is the Oracle Soundex search feature. You
can search for an ID by entering a pattern of characters in the ID’s name. This
feature is useful if you aren’t sure how to spell a name. As long as the first letter of
your search string is correct, you can retrieve names with a similar pattern of
characters.
1.
Click the Search button next to the ID field on a form. An Option List appears.
2.
Select the option for the search form you want to access. The selected form
opens in query mode.
Note: Other available search options depend on the specific form and are not
described here.
3.
3-22
Select the Cancel Query function.
Banner Release 7.4
Getting Started Guide
November 2006
Confidential
3
Getting Around Banner
Entering Information
4.
Select the Search Using “Sounds Like” option from the Option menu (or
navigation frame), or select the Next Block function. The Soundex Search
window appears.
5.
Enter a string of characters for the last name you want to find.
You can use upper, lower, or mixed case. You can enter as much or as little of
the name as you know. As long as the first letter is correct, the search will
retrieve names with a similar pattern of characters.
6.
(Optional) Enter a string of characters for the first name you want to find.
7.
Select the Execute Query function. The search form shows all IDs that have a
matching pattern of characters.
8.
Scroll to the desired ID.
9.
Double-click the desired ID. The ID and name are returned to the calling form.
Inserting New Records
Many forms contain multiple records that appear as rows. For example, an ID might
have multiple address records (billing, home, and emergency contact).
You must be careful when you insert a new record:
•
Once you start entering information for a new record, you must enter all
required fields. If you change your mind, you must use Clear Record or Remove
Record to exit. You cannot click out of a required field.
•
Sometimes you must save or delete a record before you can continue. The auto
hint identifies these situations.
To insert a new record:
1.
Place your cursor on an existing record.
2.
Select the Insert Record function. A new blank record is inserted in the list of
existing records.
3.
Enter information for the new record. Make sure you enter all required fields.
4.
Select the Save function.
Data Format Recommendations
To ensure consistent information throughout your Banner System, data should be
entered in a standard way. SunGard Higher Education recommends the following
standards.
November 2006
Confidential
Banner Release 7.4
Getting Started Guide
3-23
3 Getting Around Banner
Entering Information
Identification (ID) Numbers
Persons
Enter an identification number of your choice, or use the
identification number generated by the system on any
Identification Form (xxxIDEN).
Non-persons
Use the system-generated identification number.
Names
Upper/lower case
Use conventional upper- and lower-case letters.
Last names
Do not enter spaces within prefixed last names.
Examples: MacArthur, O’Connor, VanHusen, deBolt, DuShen
Do not enter spaces within hyphenated last names.
Examples: Smith-Jones, Cochram-Ashley
First initials with
middle names
Enter a period and one space between the first initial and
middle name.
Example: R. Maureen Smith
Prefixes/suffixes
Use a period after a prefix or suffix, where applicable.
Examples: Miss, Mrs., Mr., Rev., Jr., II
Addresses
3-24
Pound sign
If your institution uses the Banner Letter Generation module,
a pound sign (#) in addresses may affect letter processing. The
pound sign is a formatting command. Refer to the Banner
General Technical Reference Manual for details.
County
Use the county codes defined on the County Code Validation
Form (STVCNTY).
State and province
Use the codes defined on the State/Province Code Validation
Form (STVSTAT).
Banner Release 7.4
Getting Started Guide
November 2006
Confidential
3
Getting Around Banner
Entering Information
ZIP/postal code
Use the standard format for the country in the address. Use
the codes defined on the ZIP/Postal Code Validation Form
(GTVZIPC).
Nation
Enter a nation code only if you want to include the nation
when the address is printed. Use the codes defined on the
Nation Code Validation Form (STVNATN).
Letter Generation
Paragraph
Letter Generation uses the pound sign (#) and period (.) to set
the output mode back to normal. If you want a # or period to
be text in your output, then precede it with a backslash.
Dates
A setting on the Installation Control Form (GUAINST) controls how you enter
dates:
If this format is selected:
Enter February 5, 2002 like this:
MDY
Month, Day, Year
02/05/02, 02-05-02, or 020502
DMY
Day, Month, Year
05/02/02, 05-02-02, or 050202
YMD
Year, Month, Day
02/02/05, 02-02-05, or 020205
Banner determines which parts of a date entry are the month, day, and year, and
automatically converts and stores the date in the DD-MON-YYYY format. Year
numbers 00 through 49 are converted to 2000 through 2049. Year numbers 50 and
above default to 1950 through 1999. You can override the century default.
Follow these general recommendations when you enter dates:
•
Always enter two digits for the day and month. For example, enter 01 for
January, not 1.
•
If you enter only part of the date, the rest of the current date is the default.
•
You can enter a date without separators (no spaces), or you can use a dash (-)
or slash (/) as separators.
Tip: You can enter any single, non-numeric character into the Date field and Banner
will automatically convert it to today’s date. For example, if you enter “a” or “g” and
go to the next field, Banner will enter today’s date as the default.
November 2006
Confidential
Banner Release 7.4
Getting Started Guide
3-25
3 Getting Around Banner
Entering Information
Dates in Job Submission
Use the DD-MON-YYYY or DD-MON-YY format to enter date parameters for reports
and processes run with the Process Submission Control Form (GJAPCTL).
Dates in Reports and Process Output
Some, but not all, reports include the century with the year in their output.
Dates in Query Mode
Specify all four digits for a year when you query on a date field. For example, enter
26-JUN-2002, not 26-JUN-02. If you omit the century, zeros are entered for the
century. In this example, if you enter 26-JUN-02, Banner expands the date to
26-JUNE-0002, not 26-JUN-2002.
Avoid Special Characters
In general, you should avoid using special characters in text fields. Characters such
as the hyphen (-), slash (/), asterisk (*), and plus sign (+) may cause confusion, for
example, because they can also represent mathematical instructions.
The pound sign (#), as noted earlier, is a formatting character in Letter Generation
output. To avoid problems with Letter Generation, do not enter a pound sign (#) in
addresses.
Special characters won’t always cause immediate problems, but they represent a
potential source of complications when Banner interoperates with other systems.
The following characters should generally be avoided in text fields:
•
the pound sign (#)
•
the slash (/)
•
the plus (+)
•
the hyphen (-)
•
the ampersand (&)
•
the at-sign (@), except in e-mail addresses
•
the dollar sign ($)
•
the exclamation point (!)
•
the comma (,)
•
the asterisk (*)
•
the percent sign (%)
If you must use a special character, use it without any spaces before or after it:
Valid: Separated/Divorced
Invalid: Separated / Divorced
3-26
Banner Release 7.4
Getting Started Guide
November 2006
Confidential
3
Getting Around Banner
Querying Information
Querying Information
Querying is the process of looking to see what information is already entered in the
Banner database. You can use inquiry forms, query forms, and most application
forms to perform queries.
Some forms automatically open in query mode, usually because a large number of
records would have to be retrieved. When a form opens in query mode, Enter Query
appears in the status line. You can immediately specify search criteria to narrow the
search. If a form does not open in query mode you must put the form into query
mode before you can enter search criteria.
Query Functions
Use the following functions to perform queries:
Enter
Puts the form into query mode so you can enter search criteria to see
what information is already in the database. Enter Query appears in
the status line.
Execute
Searches the database and displays the first set of records that match
your search criteria. This function is enabled only if you are in query
mode.
Last
Criteria
Enters the criteria from your last search. You can change any of the
criteria. This function is enabled only if you are in query mode.
Exit or
Cancel
Cancels the query and takes the form out of query mode.
Note: If you aren’t in query mode, the Cancel Query button on
the toolbar exits you from the form.
November 2006
Confidential
Count
Query Hits
Counts the number of records that match the search criteria and
displays that number in the auto hint.
Fetch Next
Set
Replaces the current set of displayed records with the next set of
records if more records match the search criteria than fit in the
window. This function is enabled only if you are in query mode.
Banner Release 7.4
Getting Started Guide
3-27
3 Getting Around Banner
Querying Information
To query information:
1.
Access the form you want to query.
2.
If the form opens in query mode (Enter Query is in the status line), go directly
to step 3.
If the form does not open in query mode (Enter Query is not in the status line),
select the Enter Query function.
3.
Enter the search criteria.
You can query information in any field that you can access. You can use the
Oracle wildcards % and _. Capitalization matters. Data is matched against the
search criteria exactly as you enter them.
4.
Select the Execute Query function. The form displays all records that match
the search criteria.
Make sure the form
is in query mode.
Enter the search criteria.
Select Execute Query.
The form displays
all matching
records.
To change your search criteria and re-query:
Use these steps after you query information and you want to re-query with different
search criteria.
3-28
Banner Release 7.4
Getting Started Guide
November 2006
Confidential
3
Getting Around Banner
Querying Information
1.
With the original matches displayed, select the Enter Query function.
Matching records from the previous query disappear.
2.
Select the Enter Query function a second time. The original search criteria
appear.
3.
Revise your search criteria.
4.
Select the Execute Query function. The form displays all records that match
the revised search criteria.
To query a checked check box:
1.
Select the Enter Query function.
2.
Select (check) the check box.
3.
(Optional) Enter additional search criteria.
4.
Select the Execute Query function. The form displays records that have
matching information, including a checked check box.
To count queries:
Use these steps to determine how many records match your query criteria before
you execute the query.
1.
Access the form you want to query.
2.
If the form opens in query mode (Enter Query is in the status line), go directly
to step 3.
If the form does not open in query mode (Enter Query is not in the status line),
select the Enter Query function.
3.
Enter the search criteria.
You can query information in any field that you can access. You can use the
Oracle wildcards % and _. Capitalization matters. Data is matched against the
search criteria exactly as you enter them.
4.
Select the Count Query Hits function. The auto hint shows the number of
matches.
Note: On some forms the Count Query Hits function is redefined to a special
function. In these cases, Count Query Hits may not count the number of
records that match your query criteria.
November 2006
Confidential
Banner Release 7.4
Getting Started Guide
3-29
3 Getting Around Banner
Querying Information
Wildcards
You can use the Oracle wildcards % and _ in the search criteria:
•
The character % represents any number of unspecified characters.
•
The character _ represents one occurrence of an unspecified character.
The following examples illustrate the use of wildcards:
To get these results:
Enter this criteria:
All entries that contain “ma”
%ma%
All entries that begin with “ma”
ma%
All entries that have “ma” as the last two characters
%ma
All entries that have “m” as the second character
_m%
With experience, it becomes easier to narrow your queries to get the results you
want.
Extended Queries
With extended queries, you can use SQL*Plus operators to enter more specific
query criteria.
Note: The column(s) you select in an extended query must be in “base”
database tables; they cannot come from temporary work fields. For
example, if you try to use the extended query feature on the Class field
(by entering a: and then selecting Execute query) on the AOAIDEN form,
it does not open the Query/Where window, but instead displays the
following message:
FRM-40301: Query caused no records to be retrieved. Re-enter.
To determine whether data is coming from a base table, you can check
the item properties on the field:
(a) Choose Help>Item Properties in the menu bar.
(b) Check whether the attribute called base table contains a value of TRUE' or
FALSE'. If the value is FALSE, then you will not be able to do an extended
query on that field. If the value is TRUE, then you can use the extended
query feature.
3-30
Banner Release 7.4
Getting Started Guide
November 2006
Confidential
3
Getting Around Banner
Querying Information
To perform an extended query:
1.
Access the form you want to query.
2.
If the form opens in query mode (Enter Query is in the status line), go directly
to step 3.
If the form does not open in query mode (Enter Query is not in the status line),
select the Enter Query function.
3.
Move to the field where you want to use extended query.
4.
Enter a colon followed by an identifying character such as A. If you are using
extended query in more than one field, enter a different character in each field
(for example, :B, :C, and :D).
5.
(Optional) Enter additional search criteria.
6.
Select the Execute Query function. The Query/Where window opens.
7.
Enter the search criteria beginning with a colon, followed by the identifying
character, the appropriate SQL*Plus query operators, and values to match.
Example: :A>’15-SEP-02’
Note: Due to Oracle limitations, the maximum number of search characters is
200.
8.
Click the OK button. The form reappears with the results of the query.
Note: The Search button in the Query/Where window controls the Oracle
Search and Replace function, not the Execute Query function.
November 2006
Confidential
Banner Release 7.4
Getting Started Guide
3-31
3 Getting Around Banner
Querying Information
Enter :A as the search criteria.
Select Execute Query.
This window appears. Enter :A
followed by the appropriate
SQL*Plus query operators and
the values to match.
Click this button.
The form displays
all matching
records.
Extended ID and Name Searching
Using ID and Name Extended Search
1.
In the key block ID field, enter a partial ID and a wildcard ( % and _), or enter
a partial name in the Name field. Wildcards can also be used in the Name field
but are not required for searching. For example, if an entire last name is
entered, with no first name or wildcards, the extended search window will open
and the search results will include all persons/non-person that have the last
name.
2.
The ID and Name Extended Search window will display.
The Person/Non-Person count provides a count of the number of persons/
non-persons returned by the search.
3.
3-32
Click the Results pull-down list to see the ID and name of the person/nonpersons returned from the query.
Banner Release 7.4
Getting Started Guide
November 2006
Confidential
3
Getting Around Banner
Querying Information
Note: A person/non-person may be listed multiple times in the results list if the
person has alternate names or IDs. However, each person/non-person is
only included in the count once.
To review additional information about the persons in the search result set:
Click the Person Search Detail Icon. The Person Search form will open. (The form
that is called will vary by Banner product. For example, if the searching is being
performed on a Student form such as SPAIDEN, the SOIDEN form will open.) An
ID can be selected on this form. If the ID is selected, you will be returned to the
original form and this ID will display in the keyblock. If no ID is selected, when you
exit this form, you will return to the keyblock of the original form. The extended
search window will not redisplay automatically.
To review additional information about the non-persons in the search result set:
Click the Non-Person Search Detail icon. The Non-Person Search form will open
(The form that is called will vary by Banner product. For example, if the searching
is being performed on a Student form such as SPAIDEN, the SOACOMP form will
open.). An ID can be selected on this form. If the ID is selected, you will be returned
to the original form and this ID will display in the keyblock. If no ID is selected, when
you exit this form, you will return to the keyblock of the original form. The extended
search window will not redisplay automatically.
To reduce the search to person or non-person:
1.
Click the radio button for person or non-person.
2.
The results will be updated to included only persons or non-persons
depending on your selection.
3.
To reset the results to include all, select the radio button Both.
To reduce search based on additional criteria:
November 2006
Confidential
1.
Add additional search criteria in any combination of the fields: City, State or
Province, ZIP or Postal Code, Name Type, SSN/SIN/TIN, Birth Date, Gender.
2.
Click the Reduce Search button.
Banner Release 7.4
Getting Started Guide
3-33
3 Getting Around Banner
Querying Information
To clear a data from a previous search, or to enter a new query:
1.
Click the Clear Search button.
To close the extended search window:
1.
Click the X in the upper right hand corner of the window, or use the keystrokes
to perform Clear Form.
To enter current identification data for a person:
1.
Access an Identification Form (%IDEN).
2.
Enter the ID.
Note: If Common Matching is enabled for you, you will be directed to the
Common Matching Entry Form (GOAMTCH) where you can enter
information for the new ID and check for matches. Save the record. The
ID and associated name are displayed in the key block.
3.
Go to the Current Identification tab.
Note: If the person currently has a record in Banner, the system copies the
identification information and automatically places it into the fields in
the current identification block. Complete the remaining fields,
following the directions below.
4.
Enter the person's Name Type.
5.
Enter the person's SSN/TIN/SIN.( This field is available on FOAIDEN and
PPAIDEN).
6.
Enter the person's Last Name.
7.
Enter the person's First Name.
8.
Enter the person's Middle Name.
9.
Enter the person's name Prefix.
10. Enter the person's name Suffix.
11. Enter the person's Marital Status. (This field is available on APAIDEN and
FOAIDEN).
12. Save.
3-34
Banner Release 7.4
Getting Started Guide
November 2006
Confidential
3
Getting Around Banner
Querying Information
To enter alternate identification data for a person:
1.
Access an Identification Form (%IDEN).
2.
Verify the ID and the First Name, Last Name, and Middle Initial information
in the Current Identification tab.
Note: If the ID is generated, you must save the record before accessing the
Alternate Identification block.
Note: If Common Matching is enabled for you, you will be directed to the
Common Matching Entry Form (GOAMTCH) where you can enter
information for the new ID and check for matches. Save the record. The
ID and associated name are displayed in the key block.
3.
Go to the next block (Alternate Identification tab).
4.
Enter the Change of Name or ID.
Note: Duplicate Record will copy the ID or name information into the
appropriate fields in the Alternate Identification tab depending on what
type of change you enter.
5.
Enter the person's alternate ID.
OR
Enter the person's alternate Last Name.
6.
Enter the person's alternate First Name.
7.
Enter the person's alternate Middle Name.
8.
Save your changes.
To view alternate identification data for a person:
1.
Access an Identification Form (%IDEN).
2.
Verify the ID and the First Name, Last Name, and Middle Name information
on the Current Identification tab.
3.
Go to the next block (Alternate Identification tab).
To enter address information for a person:
November 2006
Confidential
1.
Access an Identification Form (%IDEN).
2.
Enter the ID.
Banner Release 7.4
Getting Started Guide
3-35
3 Getting Around Banner
Querying Information
3.
Verify that the person's First Name and Last Name have been entered on the
main window in the Current Identification tab.
4.
Go to the Address Information tab.
Note: If the person currently has a record in Banner, the system displays the
address information in the Address Information tab. You can insert new
information by selecting Insert Record. Complete the remaining fields,
following the directions below.
5.
Enter the Type code for a new address.
OR
Select an address to be modified from the group of addresses previously
entered for the person.
6.
Enter the street address portion of the address in the Address fields. The first
field is required. The remaining fields of the address are optional.
7.
Enter the City (required), State or Province, and ZIP or Postal Code portion
of the address.
OR
Search to select a City, ZIP or Postal Code, and State or Province from the ZIP
or Postal Code Validation Form (GTVZIPC).
Note: If the city and state are both blank and a ZIP or postal code is entered,
the city and state will default into those fields from GTVZIPC.
8.
Enter the Nation code portion of the address.
Note: You must enter either the State /Province code or the Nation code.
9.
If you do not want to create bar codes for the address, go to the last step.
OR
If you want to create bar codes for the addresses, go to the next step.
10. Select the ZIP/PC field, and open the Delivery Information window.
11. Enter all available delivery information.
12. Return to the Address tab.
13. (Optional) Enter the Phone number associated with the Address.
14. Save.
Note: A person must have at least one complete address.
3-36
Banner Release 7.4
Getting Started Guide
November 2006
Confidential
3
Getting Around Banner
Querying Information
To enter current identification data for a non-person:
1.
Access an Identification Form (%IDEN).
2.
Enter an ID.
Note: If Common Matching is enabled for you, you will be directed to the
Common Matching Entry Form (GOAMTCH) where you can enter
information for the new ID and check for matches. Save the record. The
ID and associated name are displayed in the key block.
3.
Go to the next block.
4.
Enter the name of the non-person in the Non-Person Information field.
5.
Save.
To enter address information for a non-person:
1.
Access an Identification Form (%IDEN).
2.
Enter the ID of the non-person you are identifying.
3.
Verify the non-person's Name field entry have been entered on the Current
Identification tab.
4.
Go to the Address tab.
5.
Enter the Type code for a new address.
OR
Select an address to be modified from the group of addresses previously
entered for the person.
6.
Enter the street address portion of the address in the Address fields. The first
field is required. The remaining fields of the address are optional.
7.
Enter the City (required), State or Province, and ZIP or Postal Code portion
of the address.
OR
Search to select a City, ZIP or Postal Code, and State or Province from the ZIP
or Postal Code Validation Form (GTVZIPC).
Note: If the city and state are both blank and a ZIP or postal code is entered,
the city and state will default into those fields from GTVZIPC.
8.
Enter the Nation code portion of the address.
Note: You must enter either the State/Province code or the Nation code.
November 2006
Confidential
Banner Release 7.4
Getting Started Guide
3-37
3 Getting Around Banner
Querying Information
9.
If you do not want to create bar codes for the address, go to step 13.
OR
If you want to create bar codes for the addresses, go to step 10.
10. Select the ZIP/PC field, and open the Delivery Information window.
11. Enter all available delivery information.
12. Return to the Address tab.
13. (Optional) Enter the Telephone number associated with the address.
14. Save.
To enter a primary telephone number with a new address:
1.
Access an Identification Form (%IDEN).
2.
Enter the ID of the non-person.
3.
Go to the next block.
4.
Go to the Address tab.
5.
Enter the Type code for the new address.
6.
Enter the street address portion of the address in the Address fields. The first
field is required. The remaining fields of the address are optional.
7.
Enter the City (required), State or Province, and ZIP or Postal Code portion
of the address.
OR
Search to select a City, ZIP or Postal Code, and State or Province from the ZIP
or Postal Code Validation Form (GTVZIPC).
Note: If the city and state are both blank and a ZIP or postal code is entered,
the city and state will default into those fields from GTVZIPC.
8.
Enter the Nation Code portion of the address.
Note: You must enter either the State/Province code or the Nation code.
9.
Enter the area code, basic number, and the extension in the Phone fields.
10. Enter the Telephone Type.
3-38
Banner Release 7.4
Getting Started Guide
November 2006
Confidential
3
Getting Around Banner
Querying Information
Note: Telephone types are associated with address types on the Address Type
Code Validation Form (STVATYP). The telephone type associated with
the address type defaults, but can be overwritten.
11. Save.
Note: Telephone numbers entered on the address tab are automatically
associated with an address.
To add a primary number to an existing address:
1.
Access an Identification Form (%IDEN).
2.
Enter the ID of the non-person.
3.
Go to the next block.
4.
Go to the Address tab.
5.
In the Address tab, select the address that is associated with the telephone
number.
6.
Enter the area code, basic number, and the extension in the Phone fields.
7.
Enter the Telephone Type.
Note: Telephone types are associated with address types on the Address Type
Code Validation Form (STVATYP). The telephone type associated with
the address type defaults, but can be overwritten.
8.
Save.
To update an organization's and a person's name or ID:
1.
Access an Identification Form (%IDEN).
2.
Go to the Current Identification tab.
3.
Enter the new data over the existing data.
4.
Save.
5.
Go to the next block (Alternate Identification tab) to see the changes.
Note: For updated IDs, the ID appears in the Change field. For updated names,
the name appears in the Change field.
6.
November 2006
Confidential
Select Next Record to view alternate names or IDs.
Banner Release 7.4
Getting Started Guide
3-39
3 Getting Around Banner
Querying Information
To delete an organization's and person's alternate name or ID:
1.
Access an Identification Form (%IDEN).
2.
Select Next Record until the desired name or ID appears.
3.
Select Remove Record.
4.
Save.
Note: The record is no longer displayed, and it no longer exists on either the
Person Search Form (SOAIDEN) or the Non-Person Search Form
(SOACOMP).
To determine who entered the current name/ID of a non-person and the form on which the data
was entered:
1.
Access an Identification Form (%IDEN).
2.
Enter the ID of the non-person you are identifying.
3.
Verify that the non-person's name has been entered on the main window on
the Current Identification tab.
4.
Review the data in the ID and Name Source block.
To determine who entered the alternate name/ID of a non-person and the form on which the
data was entered:
1.
Access an Identification Form (%IDEN).
2.
Enter the ID of the non-person you are identifying.
3.
Verify that the non-person's name has been entered on the main window on
the Current Identification tab.
4.
Go to the Alternate Identification tab.
5.
Review the data in the Origin, User, Activity Date, Create User, and Create Date
fields.
Date Queries
Date queries require special care.
Centuries in the Year
You must specify all four digits for a year when you query on a date field. For
example, enter 26-JUN-2002, not 26-JUN-02. If you omit the century, zeros are
3-40
Banner Release 7.4
Getting Started Guide
November 2006
Confidential
3 Getting Around Banner
Viewing Job Submission Output
entered for the century. In this example, if you enter 26-JUN-02, Banner expands the
date to 26-JUNE-0002, not 26-JUN-2002.
Dates and Time Stamps
Banner stores most dates with a time stamp. You don’t see the time stamp, but it’s
part of the date record and can affect the results of a query.
When you include a date in your query criteria, Banner often adds the time 00:00:00
to the query criteria. You probably won’t get any matches with this timestamp,
resulting in the message Query caused no records to be retrieved. Re-enter.
To get the results you want, use one of these methods to enter the search criteria:
•
Use a relational operator with an earlier or later date. For example, to find
records dated 26-JUN-2002, enter >25-JUN-2002 and < 27-JUN-2002. The query
results will include all records dated after June 25 and before June 27.
•
Use an extended query. In the Query/Where window, use a two-digit year (for
example, 02 rather than 2002). For more information on extended query, see
"Extended Queries" on page 3-30.
•
Use the TRUNC function. The query :A>'15-SEP-02' will return all rows that
have an activity date (or some other date) of 15 September 2002. However, to
find a row(s) that occurs on one date, you need to use the TRUNC function as
follows:
TRUNC(:A) = '05-MAY-2004'
Viewing Job Submission Output
You can view Job Submission output online with the Saved Output Review Form
(GJIREVO):
•
The .log file contains technical details about running the report or process.
•
The .lis file contains the report output.
•
The .doc file (for mail merges) can be viewed for the Letter Generation Print
Report (GLRLETR).
These files can be written to the database, if so requested, and can also be displayed
or saved to your local desktop machine.
November 2006
Confidential
Banner Release 7.4
Getting Started Guide
3-41
3 Getting Around Banner
Extracting Banner Data to a Spreadsheet
To view, save, and print output:
1.
Use the Process Submission Control Form (GJAPCTL) to run the report or
process as usual. Enter DATABASE in the Printer field.
2.
Access the Saved Output Review Form (GJIREVO). The form shows the
Process and Number of the report or process just run.
3.
Double-click the File Name field (or use the button) to display a list of the files
that were created.
4.
Choose the file you want to display. Click OK. The output appears in your
Banner window.
5.
(Optional) If you want to view the output in a browser window:
(a) Select Show Documents (Save and Print File) from the Options menu. A
dialog box asks if you want to continue.
(b) Click the Yes button. The output appears in a browser window.
Note: Your site administrator must set up the Web URL needed to view output
in a browser window.
6.
(Optional) To save the output, use the browser File>Save As option.
7.
(Optional) To print the output:
(a) If you have not already done so, use the browser File>Save As option to save
the output.
(b) Open the saved output.
(c) Use the File>Print option to print the output.
Extracting Banner Data to a Spreadsheet
You can extract data from a Banner form to a spreadsheet. On some forms, you have
the option to extract detail data from the current block either with or without data
from the key block included. Once in a spreadsheet, you can easily make graphs and
reports for the data.
Availability of the Extract Feature
SunGard Higher Education delivers the extract feature on all validation forms, and
also on a limited number of rule, application, and inquiry forms where the feature
has been tested. This feature has been tested on the following non-validation forms:
3-42
Banner Release 7.4
Getting Started Guide
November 2006
Confidential
3 Getting Around Banner
Extracting Banner Data to a Spreadsheet
Accounts Receivable
Extract details with or without key data:
Extract details only:
TFADETL
TGIACCD
TSASBRL
TGACPSV
TSAAREV
Advancement
Extract details with or without key data:
Extract details only:
AGCDESG
AGCGADJ
AGCGIFT
AGCPADJ
AGCPLDG
ADAGIFT
APACLUB
APACOMB
APAEXRS
APAFHIS
APAIGRP
SOAHOLD
AAAMBDP
AAAMBRL
AFCCAMP
AGAADJR
AGACTRL
AGAMGIF
AMCSTGY
APAACTY
APADCDP
APAGHIS
ASCSORG
AUAIGRP
SLABQRY
SLQEVNT
Finance
November 2006
Confidential
Extract details with or without key data:
Extract details only:
FGITBAL
FIASPND
FOATEXT
FRABUDP
FRIBUDT
FRIBUTG
FRIEVNG
FRIEVNP
FRIGSUM
SOAHOLD
FEREDIC
FFAFDEL
FFASYSC
FGIBAVL
FGIBDST
FOA1099
FOASYSC
FRIBUDG
FRIBUDP
FRIGRNT
FRIPROP
FTMACCI
FTMACCT
FTMACTV
FTMCOAS
FTMLOCN
SLABQRY
SLQEVNT
Banner Release 7.4
Getting Started Guide
3-43
3 Getting Around Banner
Extracting Banner Data to a Spreadsheet
Financial Aid
Extract details with or without key data:
Extract details only:
RCRDTSR
General
Extract details with or without key data:
Extract details only:
GJAPDEF
GLAEXTR
GLIEXTR
GLISLCT
GLIVRBL
GUALETR
GUAOPTM
GUAPARA
GUIMAIL
SOAHOLD
GJAJOBS
GLIOBJT
GOAADRL
GOAFBPR
GORDMCL
GORDMSK
GORFDMN
GORFDPI
GORFDPL
GORFDTP
GUAOBJS
SLABQRY
SLQEVNT
Human Resources
3-44
Extract details with or without key data:
Extract details only:
NBAPOSN
NBIBHSC
NBIBHSF
NBIBHSP
NBIBHSR
NBIBTOT
NBIPINC
NBIPORG
NBIWKSH
NHIDIST
NHIEDST
NOIEMSG
NTRAPTY
NTRBROL
NTRFBLD
NTRPCLS
NTRROUT
NTRWKSH
PDAFLEX
PDIDLST
PEAFDED
PEALEAV
PEAJACT
NBAFISC
NBQPOSN
NTRAUSG
NTRFINI
NTRFRNG
NTRHROL
NTRSGRP
PTRBCAT
PTRCALN
PTRETHN
PTRSKIL
PTRSKLV
PTRUSER
SLABQRY
SLQEVNT
Banner Release 7.4
Getting Started Guide
November 2006
Confidential
3 Getting Around Banner
Extracting Banner Data to a Spreadsheet
Extract details with or without key data:
Extract details only:
PEAJFAC
PEAPADV
PEAXJOB
PEIDTOT
PEILHIS
PHADSUM
PHAMTIM
PHATIME
PHIDERR
PHIETIM
PHITTOT
PTRBDCA
PTREARN
PTRECLS
PTRSHFT
PXAASCD
SOAHOLD
Student
Extract details with or without key data:
Extract details only:
SFAFAUD
SFARCTT
SFARGFE
SFASLST
SHACRSE
SIAASGQ
SOAHOLD
SOAXREF
SRASUMI
SFAREGQ
SFAREGS
SHACRMQ
SHARQTC
SHARQTS
SLABQRY
SLQEVNT
SMACACT
SOAATRM
SOACCOL
SOILCUR
SORCACT
Your system administrator can use the Object Maintenance Form (GUAOBJS) to
enable the extract feature on any form where the extract has been tested.
Extract results are unpredictable on forms that have not been tested with this
feature. If you want to extract data on an untested form, your system administrator
can consider enabling the extract feature on GUAOBJS. SunGard Higher Education
does not support this feature on untested forms, but will, however, continue to test
more forms and expand support with future releases.
You can tell that the extract feature is enabled on a specific form if one or both of
the following options is enabled in the Help pull-down menu for the form:
November 2006
Confidential
•
Extract Data with Key extracts details in the current block with key data.
•
Extract Data No Key extracts details in the current block without key data.
Banner Release 7.4
Getting Started Guide
3-45
3 Getting Around Banner
Extracting Banner Data to a Spreadsheet
The Data Extract Option field on GUAOBJS determines whether one, both, or
neither of these extract options is available for a form.
Extracting Data
Extracted data can be saved to a file with a .csv extension, or displayed as text in a
new browser window, depending upon what is set up on the Directory Options
window of the General User Preferences Maintenance Form (GUAUPRF).
Generally, your site administrator specifies a value for the entire institution, but you
may have the option to set your own preference. If you do, then you can use the
following steps to specify your preference.
To specify your preference for extracting data:
1.
Access the General User Preferences Maintenance Form (GUAUPRF).
2.
Go to the Directory Options window.
3.
Scroll to the record where Description is Data extract format: FILE (.csv) , TEXT,
or WEBUTIL.
4.
If you want your extracted data to be placed into a file in comma separated
value format (with a .csv extension), enter FILE in the User Value field. When
you extract data, you will be prompted to save it to your local drive.
OR
If you want your extracted data to be displayed in a separate browser window,
enter TEXT. The information is display-only, but you can save it in a variety of
formats.
OR
If your institution uses the WebUtil option, you can enter WEBUTIL to save the
.csv file to your local drive using the General WebUtil File Extract Form
(GUQWUTL).
Note: Before using the WebUtil option, ensure that your institution has
configured it.
3-46
5.
(Optional) If your institution uses the WebUtil option, you can specify a default
directory to save your output in the User Value field for the Local directory for
saving output record.
6.
Save.
Banner Release 7.4
Getting Started Guide
November 2006
Confidential
3 Getting Around Banner
Extracting Banner Data to a Spreadsheet
To perform a data extract:
1.
Access the Banner form.
2.
If applicable, display the desired records on the form.
3.
Select one of the following options from the Help pull-down menu:
•
Extract Data with Key (to extract key data and data in the current block)
•
Extract Data No Key (to extract data in the current block only)
Extracted data is displayed in a browser window, or you are prompted to save
the output file, depending on which option is specified on the General User
Preferences Maintenance Form (GUAUPRF).
Tip: To save the data from your browser window to a file, use Internet
Explorer’s File>Save As option to save the extracted data to a local directory as
a .txt file. Then rename the file as a .csv file.
OR
For Netscsape, use the browser’s File>Save As option to save the extracted data
to a local directory as a .csv file.
November 2006
Confidential
Banner Release 7.4
Getting Started Guide
3-47
3 Getting Around Banner
Extracting Banner Data to a Spreadsheet
This page intentionally left blank
3-48
Banner Release 7.4
Getting Started Guide
November 2006
Confidential
4
Chapter 4
Features of Banner
Using the Calendar
Features of Banner
Using the Calendar
There are three ways to display the calendar:
•
Double-click any date field, or click the Calendar button. If the date field has a
value, the calendar highlights that date. If the date field is empty, the calendar
highlights the current date. You can double-click a date on the calendar to
return it to the calling form.
•
Use Direct Access to display the Calendar Form (GUACALN). When accessed
this way, the calendar works independently of any form or field. You cannot
select a date and return it to a form.
•
Select Help>Calendar. When accessed this way, the calendar works
independently of any form or field. You cannot select a date and return it to a
form.
Double-click
this field.
The calendar appears.
Double-click any date on the calendar to
return it to the Date field on the form.
November 2006
Confidential
Banner Release 7.4
Getting Started Guide
4-1
4 Features of Banner
Using the Calculator
Using the Calculator
There are three ways to display the calculator:
•
Double-click any numeric field, or click the Calculator button. If the numeric
field has a value, the calculator shows that value. You can use the mouse,
number keys on the keyboard, or the numeric keypad (if the NumLock is
enabled) to make calculations. When you’re done, click the OK button to
return the calculated value to the calling form.
•
Use Direct Access to display the Calculator Form (GUACALC). When accessed
this way, the calculator works independently of any form or field. You cannot
return a calculation to a form.
•
Select Help>Calculator. When accessed this way, the calculator works
independently of any form or field. You cannot return a calculation to a form.
Double-click this field.
The calculator appears.
Make your calculations.
Click this button to return the calculated
value to the numeric field on the form.
Using Help
Banner has several kinds of help that can give you immediate online assistance:
4-2
•
Online help. This is online information about forms and fields as well as tasks
you can perform with Banner.
•
Local Dynamic Help. This format enables you to store your own information for
fields, blocks, and forms.
Banner Release 7.4
Getting Started Guide
November 2006
Confidential
4
Features of Banner
Using Help
•
Banner Documentation Bookshelf. This tool lets you access Banner documents
directly from your computer by using a desktop shortcut. These electronic
documents look the same as the hard copy versions, regardless of the computer
you are using.
•
Help (Item Properties). This list shows all the properties of the field where the
cursor is currently located.
•
Show Keys. This list shows the Oracle functions and associated keystrokes
available in your environment for the field, window, and form where the cursor
is currently located.
•
Auto hint. This hint at the bottom of the form briefly describes the field where
the cursor is located. Error and processing messages also appear here.
Online Help
Banner online help contains information about forms and fields, as well as tasks you
can perform with Banner. This help system runs in a web browser.
Installation and configuration information is contained in the Banner Middle Tier
Implementation Guide. These activities are performed by your site administrator.
Accessing Online Help for a Form
When you access online help, information about the current form is displayed.
From there, you can expand the help window to browse through other topics, or to
use the search and index features to look for specific topics.
Click this button to
expand the help system.
November 2006
Confidential
Banner Release 7.4
Getting Started Guide
4-3
4 Features of Banner
Using Help
To display online help for a form:
1.
Click the Online Help button in the 1.
toolbar.
Select Help>Online Help.
Browsing for Topics
The Contents tab and the bread crumb trail both enable you to browse for topics
categorically. Form and field information is organized by Banner module. Task
information is contained under the Procedures heading.
Browsing with the Contents tab
4-4
Banner Release 7.4
Getting Started Guide
November 2006
Confidential
4
Features of Banner
Using Help
Searching for Topics
The Search tab allows you to search for topics within the help system. You can also
use your browser’s “search on page” feature to find specific text on a help page.
Searching with the Search tab
Using the Index
The Index tab provides an alphabetical listing of topics within the help system. Click
on a letter in the index to scroll through topics that begin with that letter.
November 2006
Confidential
Banner Release 7.4
Getting Started Guide
4-5
4 Features of Banner
Using Help
Searching with the Index tab
Accessing the Help Center
If you want information about forms and tasks for another Banner product, use the
Help Center link, which is available from the main menu of Banner, or from
anywhere within the help system.
From the Main Menu
From Within the Help System
4-6
Banner Release 7.4
Getting Started Guide
November 2006
Confidential
4
Features of Banner
Using Help
From either the main menu or within the help system, the Help Center appears:
Note: Only products that are licensed at your site appear on the Help Center
page.
To display the Help Center
1.
Click the Help Center link on the
main menu, or click the Banner
Help Center link within the help
system.
1.
Use the Tab key to navigate to the
Banner Help Center link within the
help system.
2.
Press the Enter key.
Local Dynamic Help
This help is completely written and maintained by your institution. System upgrades
do not affect this help text. It is the default when you access Dynamic Help.
Local Dynamic Help is displayed on the Help Form (GUAHELP). You can access
GUAHELP in query mode or edit mode.
You can use the main window of GUAHELP to identify the help text you want to
access. A check box tells you if the requested item has help text.
November 2006
Confidential
Banner Release 7.4
Getting Started Guide
4-7
4 Features of Banner
Using Help
Identify the specific item whose
Dynamic Help you are accessing.
Choose Dynamic Help
for a form, block, or field.
This checkbox indicates whether the
requested Dynamic Help exists.
Choose Banner Dynamic Help
or Local Dynamic Help.
When you first access the main window, the selection criteria indicate Local
Dynamic Help for the field where the cursor is located. Banner internal item names
identify the current form, block, and field.
You can override the defaults and access help text for another form, block, or field.
For Local Dynamic Help, you can create block and field names that make sense to
your institution. (Banner does not define the names.) Once you create a name, you
must always use that name to access Local Dynamic Help for the item. SunGard
Higher Education recommends that you use the Banner-defined names for all your
Banner-delivered forms.
To access Dynamic Help in query mode:
1.
Press Shift and double-click a field.
The Help Form (GUAHELP)
appears. The default selection
criteria indicate Local Dynamic
Help for the field you clicked.
1.
Select Help>Dynamic Help Query.
The Help Form (GUAHELP)
appears. The default selection
criteria indicate Local Dynamic
Help for the current field.
2.
Verify the default selection criteria.
Change if necessary.
2.
Verify the default selection criteria.
Change if necessary.
3.
Click the Display button. The Help 3.
Text window shows help text for the
requested item.
Select the Next Block function. The
Help Text window shows help text
for the requested item.
To access Dynamic Help in edit mode:
4-8
1.
Select Help>Dynamic Help Edit. The Help Form (GUAHELP) appears. The
default selection criteria indicate Local Dynamic Help for the current field.
2.
Verify the default selection criteria. Change if necessary.
3.
Select the Edit button or the Next Block function. The Help Text window shows
help text for the requested item.
Banner Release 7.4
Getting Started Guide
November 2006
Confidential
4
Features of Banner
Using Help
To override the defaults and access Dynamic Help for another item:
1.
Access Dynamic Help in either query mode or edit mode. The default selection
criteria on the Help Form (GUAHELP) indicate Local Dynamic Help for the
current field.
2.
To access help text for another form, choose the Form radio button and enter
the form name.
OR
To access help text for another block, choose the Block radio button and enter
the form and block names.
OR
To access help text for another field, choose the Field radio button and enter
the form, block, and field names.
3.
Select the radio button for the type of Dynamic Help you want to access
(Banner Dynamic Help or Local Dynamic Help).
4.
Select the Display button (query mode), Edit button (edit mode), or Next
Block function. The Help Text window shows help text for the requested item.
To choose a block or field name from an LOV:
Use these steps if you don’t know the block or field name of the Dynamic Help you
want to display. You can display an LOV that lists all the blocks or fields on the form
that have Dynamic Help.
If you display Banner Dynamic Help, the LOV shows internal item names. If you
display Local Dynamic Help, the LOV shows the names you assigned.
November 2006
Confidential
Banner Release 7.4
Getting Started Guide
4-9
4 Features of Banner
Using Help
1.
Access the Help Form
(GUAHELP).
1.
Access the Help Form
(GUAHELP).
2.
Click the Banner or Local radio
button on the main window.
2.
Select the Banner or Local radio
button on the main window.
3.
Verify the form name. Change if
necessary.
3.
Verify the form name. Change if
necessary.
4.
For block names, click the Search
button on the Block field. An LOV
appears.
4.
For block names, select the Next
Item function until you reach the
Block field.
OR
OR
For field names, verify the block
name. Then click the Search button
on the Field field. An LOV appears.
For field names, verify the block
name. Then select the Next Item
function until you reach the Field
field.
5.
Scroll to the desired name.
6.
Double-click the name. The
selected name is returned to
GUAHELP.
5.
Select the List function. An LOV
appears.
6.
Scroll to the desired name.
7.
Press Enter. The selected name is
returned to GUAHELP.
To enter or update Dynamic Help:
1.
Select Help> Dynamic Help Edit. The Help Form (GUAHELP) appears. The
default selection criteria indicate Local Dynamic Help for the current field.
2.
Verify the default selection criteria. Change if necessary.
3.
Select the Edit button or the Next Block function. The Help Text window shows
help text for the requested item.
4.
Enter your changes in the Help Text window.
You can use the Editor to modify text. See "Using the Editor" in chapter 4. You
can search for a specific string of characters or replace a string of characters
with another string (instructions follow).
5.
4-10
Select the OK button in the Help Text window. The GUAHELP main window
appears.
Banner Release 7.4
Getting Started Guide
November 2006
Confidential
4
6.
Select the Save function. A dialog box appears.
7.
Select the OK button or press Enter.
Features of Banner
Using Help
Verify the selection criteria.
Change if necessary.
Click this button.
This window
appears. Enter
your changes
here.
Click this
button.
Save.
To search for a string of characters:
1.
Access Dynamic Help in query mode or in edit mode. The default selection
criteria on the Help Form (GUAHELP) indicate Local Dynamic Help for the
current field.
2.
Verify the default selection criteria. Change if necessary.
3.
Select the Edit button (edit mode), Display button (query mode), or Next
block function. The Help Text window appears.
4.
Select the Search button. The Search/Replace window appears.
5.
Enter the search string in the Search for field.
6.
Select the Search button. The Help Text window displays the area that contains
the first occurrence of the search string.
7.
(Optional) Continue selecting the Search button to find the next occurrence of
the string.
To replace a string of characters:
1.
Select Help> Dynamic Help Edit. The Help Form (GUAHELP) appears. The
default selection criteria indicate Local Dynamic Help for the current field.
Note: You must access GUAHELP in edit mode.
November 2006
Confidential
Banner Release 7.4
Getting Started Guide
4-11
4 Features of Banner
Using Help
2.
Verify the default selection criteria. Change if necessary.
3.
Select the Edit button or the Next block function. The Help Text window
appears.
4.
Select the Search button. The Search/Replace window appears.
5.
Enter the search string in the Search for field.
6.
Enter the replacement string in the Replace with field.
7.
To replace the next occurrence of the string, select the Replace button. You
can continue clicking the Replace button to replace each occurrence.
OR
To replace all occurrences of the string, select the Replace All button.
8.
Respond to the dialog boxes (if displayed) to continue the search.
9.
Select the Cancel button on the Search/Replace window.
10. Select the OK button on the Help Text window.
11. Select the Save function on the main window. A dialog box appears.
12. Select the OK button or press Enter.
Banner Documentation Bookshelf
The Banner Documentation Bookshelf is an easy way to access Banner documents
directly from your computer. The Bookshelf includes both user and technical
documentation. Documents in the Bookshelf appear in PDF (portable document
format). They look the same as the hard copy versions, regardless of the computer
you are using. You can print any document locally.
The Bookshelf can be downloaded to a central location at your institution, making
it available for use by authorized users. Your system administrator can use the Banner
Documentation Bookshelf Gettting Started Guide to set up the Bookshelf.
In addition to the system setup, you must install Adobe Reader® on your computer.
This software is freely available from Adobe and lets you read, print, and search the
PDF files in the Bookshelf. Once you know the location of the Bookshelf at your
institution, you can create a shortcut on your desktop to access it easily.
4-12
Banner Release 7.4
Getting Started Guide
November 2006
Confidential
4
Features of Banner
Using Help
To create a desktop shortcut for the Bookshelf:
1.
Open Windows Explorer.
2.
Browse to the location where the Bookshelf directory is stored at your
institution (bdoc6x or bdoc7x, depending upon the version of Banner you are
using).
3.
Right click bkshlfxx.pdf and choose Create Shortcut.
4.
Drag the shortcut to your desktop.
5.
(Optional) Rename it.
6.
Double-click the icon to launch the Bookshelf.
To access a specific manual and chapter:
1.
Open the Bookshelf.
2.
In the left pane, click the bookmark in front of the product you want to access.
The bookmark expands to show the product’s documents.
3.
If necessary, expand bookmarks in the left pane until you see the document or
chapter you want to display.
4.
Click the name of the document or chapter you want to display. The selected
document or chapter appears in the right pane.
To set up your search preferences:
You can search for information in one or more documents. You must set up your
preferences before you can search the Bookshelf. You only need to enter these
setups once.
1.
Open the Bookshelf.
2.
Select File>Preferences>Search to display the Acrobat Search Preferences
window.
3.
Set up your preferences.
4.
Click the OK button.
To attach indexes for the documents you want to search:
Before you can search a document, you must attach its index. You only need to
attach a specific index once.
1.
November 2006
Confidential
Determine where the index files are located (file extension .pdx). They are in
the folder named _indexXx,where X is the release number. This folder is
Banner Release 7.4
Getting Started Guide
4-13
4 Features of Banner
Using Help
located in the same folder as the Bookshelf files. Check with your data center
personnel, if necessary.
2.
Open the Bookshelf.
3.
Select Search Indexes in the left pane. The Index Selection window appears
with a list of the currently attached indexes.
4.
Click the Add button. The Add Index window appears.
5.
Select the index you want to attach. You may have to change directories to find
it.
6.
Click the Open button. The selected index is added to the Index Selection
window.
7.
Repeat steps 4 through 6 for each index you want to add.
8.
Click the OK button in the Index Selection window.
To search for information:
Note: Adobe Reader must be loaded on your computer.
1.
Open the Bookshelf.
2.
Click the Search button in the Acrobat toolbar, or select Search Query in the
left pane. The Adobe Acrobat Search window opens.
3.
Enter the text you want to find.
4.
Click the Indexes button. The Index Selection window appears.
5.
Select the manuals you want to search.
6.
Click the OK button in the Index Selection window. The Index Selection
window closes.
7.
Click the Search button in the Adobe Acrobat Search window.
If one file contains the requested text, the file appears. This procedure ends.
OR
If more than one file contains the requested text, the Search Results window
appears with a list of the files that contain the requested text. Continue with
step 8.
4-14
8.
Select the file you want to display.
9.
Click the View button. The selected file appears.
Banner Release 7.4
Getting Started Guide
November 2006
Confidential
4
Features of Banner
Using the Editor
Help (Item Properties)
Help (Item Properties) lists all the properties of the current field. For example, you
can find its internal database name, whether it is queryable, whether it is required,
type of data (character or numeric), maximum length, and minimum and
maximum values. See your Oracle documentation for information on each item
property.
To display Help (Item Properties) for a field:
1.
Place the cursor in the field.
2.
Select the Help (Item Properties) function.
Show Keys
Show Keys lists the Oracle functions and associated keystrokes available in your
environment for the current field, window, and form. Specific keystrokes for a
function depend on your environment.
To display Show Keys:
Select the Show Keys function.
Auto Hint
The auto hint at the bottom of the form can contain the following information for
the field where the cursor is located:
•
Brief field description
•
Error and processing messages
•
Keyboard equivalents (if you can access other blocks, windows, or forms from
the field)
Using the Editor
The editor is a tool that helps you enter, update, and view information in a data field.
For example, you can use the editor to enter, update, and view Dynamic Help text
on the Help Form (GUAHELP).
Some data fields are actually longer than they appear on the form. With the editor,
you can expand a data field to display a larger, freeform window where it is easier to
read or enter more data. The size of the window depends on the defined length of
the field.
November 2006
Confidential
Banner Release 7.4
Getting Started Guide
4-15
4 Features of Banner
Using the Editor
To expand a data field:
1.
Place the cursor in the field you want to expand.
2.
Select the Edit function. A freeform window appears.
Note: Some data fields have a Comment button that you can click to open the
freeform window.
To select text:
1.
Click on one side of the text you
want to select.
1.
Use the arrow key to move to one
side of the text you want to select.
2.
Drag the cursor to the other side of
the text you want to select.
2.
3.
Release the mouse button. The
selected text is highlighted.
Hold down the Shift key as you use
the arrow key to move to the other
side of the text you want to select.
The selected text is highlighted.
To insert text:
1.
Click where you want to insert the
text.
1.
Use the arrow key to move to where
you want to insert the text.
2.
Enter the new text.
2.
Enter the new text.
To replace text:
1.
Select the text you want to replace.
2.
Enter the new text. The new text replaces the existing text.
To copy text and save it on the clipboard:
4-16
1.
Select the text you want to copy.
2.
Select the Copy function. The text remains in its current location and is copied
into an invisible clipboard.
Banner Release 7.4
Getting Started Guide
November 2006
Confidential
4
Features of Banner
Using the Editor
To cut text and save it on the clipboard:
1.
Select the text you want to cut.
2.
Select the Cut function. The text is deleted from its current location and is
copied into an invisible clipboard.
To paste text from the clipboard:
1.
Place the cursor where you want to paste text.
2.
Select the Paste function. Text from the clipboard is inserted.
To delete text:
1.
Select the text you want to delete.
2.
Press Delete.
To search for text:
November 2006
Confidential
1.
Expand the data field. A freeform window appears.
2.
Select the Search button. The Search/Replace window appears.
3.
Enter the search string in the Search for field.
4.
Select the Search button. The window displays the area that contains the first
occurrence of the search string.
5.
Respond to the dialog boxes (if displayed) to continue the search.
6.
Select the Cancel button on the Search/Replace window.
7.
Select the OK button on the freeform window.
8.
Select the Save function on the main window. A dialog box appears.
9.
Press Enter.
Banner Release 7.4
Getting Started Guide
4-17
4 Features of Banner
Banner Messaging
To replace text:
1.
Expand the data field. A freeform window appears.
2.
Select the Search button. The Search/Replace window appears.
3.
Enter the search string in the Search for field.
4.
Enter the replacement string in the Replace with field.
5.
To replace the next occurrence of the string, select the Replace button. You
can continue clicking the Replace button to sequentially replace the next
occurrence.
OR
To replace all occurrences of the string, select the Replace All button.
6.
Select the Cancel button on the Search/Replace window.
7.
Select the OK button on the freeform window.
Banner Messaging
If you have the appropriate security, you can send messages to and receive messages
from other Banner users. Messages are created and viewed on the General Message
Form (GUAMESG).
When you have a new message to view, a checkmark appears next to the Check
Banner Messages link on the main menu. You can select this link at any time to view
messages, or go directly to the General Message Form (GUAMESG) from another
form in Banner using Direct Access or some other method.
In addition to individual messages, Banner has the ability to display broadcast
messages for all Banner users. These messages appear near the bottom of the main
menu. When there is a new broadcast message, the Broadcast Message button on
your toolbar becomes enabled, and takes you to the main menu when clicked.
Note: Users assigned to the Broadcast security object can send broadcast
messages to all users. To send a broadcast message, create it on
GUAMESG as usual, and choose BASELINE as the recipient.
4-18
Banner Release 7.4
Getting Started Guide
November 2006
Confidential
5 Customization
Customizing Banner
Chapter 5
Customization
Customizing Banner
You can customize Banner to meet your individual needs. For example, you can:
•
Create a personalized menu with My Banner
•
Choose what information appears in title bars
•
Specify whether form names are displayed on menus
•
Customize the appearance of the main menu
My Banner
My Banner includes the forms, jobs, menus, and QuickFlows that are most
important in your daily work. You can access My Banner from the main menu. It is
tied to your Oracle user ID.
The following forms are used to create and copy My Banner menus:
•
The My Banner Maintenance Form (GUAPMNU) lets you create and change
My Banner.
•
The My Banner Maintenance and Copy Form (GUTPMNU) lets you copy a My
Banner menu to or from another user.
Making Changes to My Banner
There are several ways to add Banner objects to My Banner:
•
Scroll through the object list to find what you want to add
•
Enter the name of the object
•
Query the object list to narrow your search
You can also delete objects from My Banner either one at a time or all at once.
To use the object list to add an object to My Banner:
November 2006
Confidential
1.
Access the My Banner Maintenance Form (GUAPMNU).
2.
Use the pull-down list above the left pane to select the object type you want to
display. The left pane lists the objects of the selected type.
Banner Release 7.4
Getting Started Guide
5-1
5 Customization
Customizing Banner
Note: You can query to reduce the object list. See the instructions later in this
chapter.
3.
In the left pane, select each object you want to add to the menu by doubleclicking it. When you select an object, the name is highlighted.
4.
(Optional) Repeat steps 2 and 3 for each object type you want to add to the
menu.
Note: You can select objects from multiple object types (for example, a form
and a menu) and insert them all at one time.
5-2
5.
Click in the right pane where you want to place the new menu items.
6.
Click the Insert Selection button in the middle of the form
. The selected
objects are added to the right pane below the place you clicked.
7.
(Optional) Change the object descriptions.
8.
Save.
Banner Release 7.4
Getting Started Guide
November 2006
Confidential
5 Customization
Customizing Banner
Select the object type
you want to display.
Select each object you
want to add to the menu.
Click in the right pane
where you want to place
the new menu items.
Click this button.
The new menu items
are inserted below
the cursor location.
November 2006
Confidential
Banner Release 7.4
Getting Started Guide
5-3
5 Customization
Customizing Banner
To add an object to My Banner if you know the object’s name:
1.
Access the My Banner Maintenance Form (GUAPMNU).
2.
Place the cursor in a blank Object field in the right pane.
3.
Enter the object’s name.
4.
Press Enter. The object’s type, description, and name appear in the right pane.
5.
(Optional) Change the object description.
6.
Save.
If you know the object’s
name, enter the object
name in a blank Name
field and press Enter.
5-4
Banner Release 7.4
Getting Started Guide
November 2006
Confidential
5 Customization
Customizing Banner
To query objects and add to My Banner:
Use these steps to reduce the list of object names in the left pane. You can add any
or all of the matches to My Banner.
1.
Access the My Banner Maintenance Form (GUAPMNU).
2.
Use the pull-down list above the left pane to select the object type you want to
query.
3.
Place the cursor in the left pane.
4.
Select the Enter Query function. The object list disappears.
5.
Enter the search criteria.
You can use the Oracle wildcards % and _. Capitalization matters. Data is
matched against the search criteria exactly as you enter them.
6.
Select the Execute Query function. The left pane lists the matching objects.
7.
To add all matches to the menu (if there are 20 matches or less), click in the
right pane where you want to place the new menu items. Then click the Insert
All button in the middle of the form
.
OR
To add selected matches to the menu, select the objects in the left pane by
double-clicking each one. Click in the right pane where you want to place the
new menu items. Then click the Insert Selection button in the middle of the
form
.
8.
November 2006
Confidential
Save.
Banner Release 7.4
Getting Started Guide
5-5
5 Customization
Customizing Banner
Select the object type
you want to query.
Place the cursor
in the left pane.
Select Enter Query.
Enter the search criteria.
Select Execute Query.
The form displays all
matching objects.
To select individual objects:
Select the objects, click in
the right pane, and click this
button.
To select all objects
(20 or less):
Click in the right pane, and
click this button.
Objects appear on
your My Banner
menu.
5-6
Banner Release 7.4
Getting Started Guide
November 2006
Confidential
5 Customization
Customizing Banner
To delete selected objects from My Banner:
1.
Access the My Banner Maintenance Form (GUAPMNU).
2.
In the right pane, select each object you want to delete by double-clicking it.
When you select an object, the name is highlighted.
3.
Click the Remove Selection button in the middle of the form
objects are deleted.
4.
Save.
. The selected
Select each object
you want to delete
from the menu.
Click this button.
November 2006
Confidential
Banner Release 7.4
Getting Started Guide
5-7
5 Customization
Customizing Banner
To delete all objects from My Banner:
1.
Access the My Banner Maintenance Form (GUAPMNU).
2.
Click the Remove All button in the middle of the form
3.
Save.
.
Click this button to
delete all menu items.
To change the location of an object in My Banner:
5-8
1.
Access the My Banner Maintenance Form (GUAPMNU).
2.
Delete the object from the menu (see the instructions on page 5-7).
3.
Add the object to the menu in its new location (see the instructions on page 54).
4.
Select the Save function.
Banner Release 7.4
Getting Started Guide
November 2006
Confidential
5 Customization
Customizing Banner
To customize a lower level menu on My Banner:
1.
Access the My Banner Maintenance Form (GUAPMNU).
2.
Select the menu in the right pane by double-clicking it.
3.
Perform a Next Block function. Contents of the menu appear in a new window.
4.
Use the normal techniques to add to, change, and delete from the menu.
5.
Save.
Select the menu.
Perform a Next Block
function.
Contents of the menu
appear in a new window.
Use normal techniques to
add to, change, and delete
from the menu.
To copy a My Banner:
November 2006
Confidential
1.
Access the My Banner Maintenance and Copy Form (GUTPMNU).
2.
Use the User pull-down list to select the My Banner you want to copy. The
selected My Banner appears in the right pane.
3.
(Optional) Use the normal techniques to add to, change, and delete from the
menu before it is copied. If you want to change the original menu, select the
Save function. If you want the changes to affect the copies only, do not select
the Save function.
4.
Click the Display Users button. A list of IDs appears.
Banner Release 7.4
Getting Started Guide
5-9
5 Customization
Customizing Banner
5.
Click the Copy button in the middle of the form. A list of user IDs appears in
the left pane.
6.
(Optional) To reduce the list of IDs, enter a partial ID in the field above the left
pane. Start with the first character and enter as many characters as you know.
Press Enter.
7.
Select each user ID to receive the copied menu by double-clicking it. When an
ID is selected, it is highlighted.
8.
Click the Copy to User(s) button.
9.
If any of the IDs already has a My Banner, a dialog box asks if you want to
overwrite existing My Banners.
•
To overwrite all selected My Banners, click the Yes button.
•
To review each ID before deciding, choose the No button. A dialog box
appears for each ID that already has a My Banner. Choose Yes to overwrite
the old menu, or No to keep the old menu for the ID.
When the menus are copied, a message tells you how many menus were copied
successfully.
5-10
Banner Release 7.4
Getting Started Guide
November 2006
Confidential
5 Customization
Customizing Banner
Select the My Banner
you want to copy.
Contents of the My Banner
appear in the right pane.
Add to, change, and delete
from the menu, if necessary,
before copying.
Click this button.
A list of user IDs
appears in the left
pane.
If you want to reduce the list of
IDs, enter search characters and
press Enter.
Select each user ID to
receive the copied menu.
Click this button.
Title Bar Display Options
You can choose to display any or all of the following in title bars:
November 2006
Confidential
•
Form names
•
Release numbers
•
Database instances
Banner Release 7.4
Getting Started Guide
5-11
5 Customization
Customizing Banner
To select information for your title bars:
1.
Access the General User Preferences Maintenance Form (GUAUPRF).
2.
Click the Form Display Options button.
3.
Select or clear the display options, depending on the information you want to
see on your form title bars.
4.
Select the OK button. A dialog box says you must exit and restart Banner to see
the changes.
5.
Select the OK button in the dialog box.
6.
Exit Banner.
7.
Restart Banner to see your changes.
Displayed Form Names
You can choose whether form names are displayed in the following places:
•
Options pull-down menu
•
Left pane of menu maintenance forms
•
List of open windows on the Window pull-down menu
To display or hide form names:
1.
Access the General User Preferences Maintenance Form (GUAUPRF).
2.
Choose the Display Options tab.
3.
Check the Display Form Name on Title Bar check box to display the form
name, or clear the check box to hide it.
4.
Save.
5.
Exit the form.
Note: A change to this display option, as well as to the release number or
database instance, occurs immediately. You do not need to exit Banner.
However, if you change any other display options, you must exit and
restart Banner to see the changes.
5-12
Banner Release 7.4
Getting Started Guide
November 2006
Confidential
5 Customization
Customizing Banner
Customizing the Main Menu
You can customize the Banner main menu in several ways:
•
Specify the default expanded menu that appears when you log in
•
Create My Links for frequently used Banner objects or external web sites
Note: Changes to Banner colors will not appear on the main menu until you log
out and log back in.
Default Expanded Menu
The Banner main menu appears when you first access Banner. You can change the
default product menu that is expanded to suit your personal preference.
To specify the default expanded menu:
1.
Access the General User Preference Maintenance Form (GUAUPRF).
2.
Choose the Menu Options tab.
3.
In the User Default field, enter the name of the menu that you want as the
default, or click the Search button to search for it using the Object Search Form
(GUIOBJS).
4.
Save your changes.
My Links
You can create a link from the main menu to a web site or Banner object using
Personal Links. Make sure you do not have pop-ups blocked with any third-party
software. Pop-up blockers can interfere with the performance of your personal links.
To create a link:
November 2006
Confidential
1.
Go to the General User Preferences Maintenance Form (GUAUPRF).
2.
Choose the My Links tab.
3.
Enter a description of your link in the User Value field associated with the first
personal link description.
4.
Enter the URL or Banner object name in the User Value field associated with
the first personal link URL or Banner object.
Banner Release 7.4
Getting Started Guide
5-13
5 Customization
Customizing Banner
5.
Save. You must exit Banner and log back in to see your changes.
Note: You can create up to six personal links. Each personal link is comprised
of two records—the description and the URL/object. Make sure the
description record matches the corresponding URL or Banner object
record. The following example illustrates a personal link for a weather
web site.
Field Name
Name of Your Link
URL or Banner object
Description
Enter the description for the
“My Personal Link 1” link.
Enter the URL or Banner
object for the “My Personal
Link 1” link.
Default Value
Your first personal link
description
Your first personal link URL or
Banner object
User Value
My weather page
www.weather.com
Changing Your Alerts
Alert options enable you to customize how you are prompted by Banner in certain
situations. Access the Display Options tab on GUAUPRF to customize any of the
following:
•
Check the Prompt Before Exiting Banner check box if you want Banner to
verify that you want to quit the Banner session before exiting.
•
Check the Display Additional Confidential Alert check box if you want Banner
to display an extra Confidential pop-up message for records that contain
confidential information.
•
Check the Display Additional Deceased Alert check box if you want Banner to
display an extra Deceased message for records associated with a deceased
person.
Changing Your Banner Password
The Change Banner Password link goes to the Oracle Password Change Form
(GUAPSWD), where you can change your password.
5-14
Banner Release 7.4
Getting Started Guide
November 2006
Confidential
5 Customization
Customizing Banner
Changing Your Banner Colors
You can customize your colors for Banner via the General User Preferences
Maintenance Form (GUAUPRF). Custom colors can be specified at the site level, by
logging in as the baseline user and changing the values in the Default Value fields,
and also at the individual user level, by changing the values in the User Value fields.
You can customize the color of the following items:
•
Buttons, such as Cancel and OK (buttons in the toolbar are not included).
•
Canvas of all forms
•
Record highlighting
•
Scroll and separator bars
•
Code/Description prompts
•
Canvases within the main menu, including the broadcast message, menu, and
menu tree canvases
To change the color of an item at the user level:
1.
Go to User Interface Color Settings on the Display Options tab.
2.
In the User Value field for the item you want to change, choose a color.
Note: You can select a pre-defined color from the palette, or create your own
shade by using HSB (Hue Saturation Brightness) or RGB (Red Green
Blue) values.
3.
Select OK.
4.
Save.
Note: SunGard Higher Education delivers the default values as seed data. If you
change the default colors as the baseline user, all users who have not set
colors at the individual user level will see the baseline colors you selected.
November 2006
Confidential
Banner Release 7.4
Getting Started Guide
5-15
5 Customization
Customizing Banner
Optimal Screen Resolution
Standard screen resolution of 1024x768 allows ample room for displaying user
interface components in Banner.
If you have the Display Properties>Appearance of your workstation set to Windows
XP style, you may see horizontal or vertical Windows scrollbars. If you want to
eliminate the scrollbars, you can use any of the following techniques:
5-16
•
On the workstation, set the Display Properties>Appearance to Windows Classic
style.
•
On the workstation, leave the display properties as Windows XP style, but go to
Display Properties>Settings>Advanced and choose a Custom DPI setting of 95
DPI, which is 99% of the normal size.
•
On the workstation, leave the display properties as Windows XP style, but go to
Display Properties>Settings>Advanced, select the Active Title Bar item from
the Item pull-down list, and enter a value of 18 in the corresponding Size field.
Enter a value of 8 in the Size field for the font.
•
Use the Windows XP style on the workstation, but have your site administrator
establish a Banner URL configuration that sets the client DPI value to 95. This
method eliminates the need for users to change their individual workstation
settings.
Banner Release 7.4
Getting Started Guide
November 2006
Confidential
6
Chapter 6
Tips and Tricks
Tips and Tricks
This section contains some of SunGard Higher Education consultants’ favorite tips
for using Banner and teaching new users about it. A few of the tips that appear in
this chapter are also described in more detail elsewhere in the handbook.
Shortcuts for Entering Information
Topic
Tip /Trick
System date
In most date fields, entering a single, non-numeric character
followed by Enter or Tab will display the current date. It’s easy to
remember T for Today, or S for System Date. Even special
characters work for this shortcut. Forget what today’s date is?
Enter a question mark and Banner will tell you.
Dates within
the current
month
If you enter a two-digit number in a date field, Banner assumes
the current month and year. For example, if the month is May
and the year 2005, 10-MAY-2005 has the shortcut 10.
Dates within
the current
year
If you enter a four-digit number in a date field, Banner assumes
the current year. For example, if the year is 2005, 15-JUN-2005
has the shortcut 0615.
Populating
records on
forms
After entering the SSN, click in the first enterable field, and the
record will be populated.
Note: This shortcut works for about 80% of forms.
Remember that you proceed out of the key block by
performing a Next Block function.
November 2006
Confidential
Banner Release 7.4
Getting Started Guide
6-1
6
Tips and Tricks
Navigation Shortcuts from the Main Menu
Topic
Tip /Trick
Shortcuts in
Enter SITE to navigate to the site map.
the Go To field
Enter TREE to navigate from the site map to the product tree.
Enter REFRESH to:
•
Refresh your personal menu (My Banner) after making
changes on GUAUPRF
•
Return to the Banner menu even if you are buried deep
inside other menus
•
Refresh the site map
Press the up or down arrow keys to navigate to any of the last 10
forms you accessed.
Enter the menu name to expand that menu.
Example: *GENJOB
Expands the General JOBSUB directory.
Enter EXIT to end your Banner session.
Enter the Quickflow name to automatically open the first form in
the Quickflow.
Enter a job name and GJACPTL will open and run it.
Enter *PERSONAL to open the My Banner menu.
Enter *MENU to open the Banner menu no matter where you
are.
6-2
Banner Release 7.4
Getting Started Guide
November 2006
Confidential
6
Tips and Tricks
Other Navigation Shortcuts
Topic
Tip /Trick
Rollback
The Rollback function clears out the record and takes you back
to the key block, so you can take another snapshot from the
database or enter another ID number.
Shortcut to
calendar or
calculator
Double-clicking in a number or date field will display the
calculator or calendar, respectively.
Queries
November 2006
Confidential
Topic
Tip /Trick
Enter/exit
query
sequence
You must always perform an Enter Query function before
performing an Execute Query function. Even if the form is blank
when you access it, you must ensure it is in Enter Query mode.
Re-executing a
query
If you have not selected a record after your query, and wish to
execute another, you can perform two Enter Query functions in
a row, and Banner will retrieve the last set of query criteria you
executed.
Wildcards
The character _ represents a single character in your query, while
the character % represents any number of continuous
characters.
Banner Release 7.4
Getting Started Guide
6-3
6
Tips and Tricks
Logging In/Out
Topic
Tip /Trick
Enter login
information all
on one line
When logging in, you can enter the username and password all
on one line.
For example:
Username: rsmith/yourpassword
instead of
Username: rsmith
Password: yourpassword
Note: If you enter your password in the Username field
along with your name, your password will be visible.
Enter EXIT to
quit Banner
Enter EXIT in the Go To field on the main menu to end your
Banner session.
Eliminate extra
prompt before
exiting
Clear the Prompt Before Exiting Banner check box on the
Display Options tab of GUAUPRF to eliminate the extra message
that verifies whether you want to quit prior to ending your
Banner session.
Error Messages
6-4
Topic
Tip /Trick
GUAERRM
appears
If the Banner Error Messages Form (GUAERRM) appears, then
the error resulted from an API. This information can be helpful
when trying to resolve the error with your system administrator.
Banner Release 7.4
Getting Started Guide
November 2006
Confidential
6
Tips and Tricks
Miscellaneous
Topic
Tip /Trick
Names are
formatted
differently
across Banner
products
Names in the Name fields on Banner forms may be formatted
differently across Banner products. This is due to different
functional areas at your institution having different needs for
displaying and working with name data.
Quick and
easy pie chart
Go from a Banner form to a pie chart in four mouse clicks. From
the Help pull-down menu on the main menu, choose the Extract
Data No Key option to create a .csv file that can be opened and
formatted using a spreadsheet program.
Not all forms have a data extract option. Query the Data Extract
Option field on GUAOBJS to determine the forms for which it is
available.
Best
information
about new
functionality
You will generally find the best information about new
functionality in the release guide where it was first introduced, or
when available, in a handbook specific to a topic (especially when
it involves multiple product areas).
Ask your IT department for the latest release guides when they
are available.
November 2006
Confidential
Banner Release 7.4
Getting Started Guide
6-5
6
Tips and Tricks
This page intentionally left blank
6-6
Banner Release 7.4
Getting Started Guide
November 2006
Confidential
Index
Index
A
ActionLine xii
address, format of 3-24
alert box 2-3, 2-32
application forms 2-8
Approve button 2-31
auto hint 2-28, 4-15
B
Banner
customizing 5-1
entering information 3-10
exiting 2-38
extracting data to a spreadsheet 3-42
help 4-2
messaging 4-18
naming conventions 1-6
Oracle functions used with 2-37
querying information 3-27
see Banner
starting 1-1
Banner Dynamic Help
see Dynamic Help
block
definition of 2-26
key block 2-27
title of 2-27
Block menu 2-19
blue field names 3-11
Bookshelf
see Banner Documentation Bookshelf
buttons
iconic 2-29
on toolbars 2-24
radio 2-33
response 2-32
toolbar 2-25
C
Calculate button 2-31
calculator 4-2
calendar 4-1
Calendarbutton 2-30
Cancel function 2-38
Cancel Query function 3-27
century in queries 3-40
changing Banner colors
main menu 5-15
changing Banner password
November 2006
Confidential
main menu 5-14
changing your alerts
preferences 5-14
check box
querying 3-29
use of 2-32
checkbox
clearing 2-33
selecting 2-33
Clear Form function
see Rollback function
code/description lookup 3-11
column 2-35
Comments button 2-31
Commit function
see Save function
Complete button 2-30
consulting services xiv
contacting SunGard Higher Education xii
control forms 2-11
conventions used in this manual
typographical x
Copy button 2-31
Count Hits function
see Count Query Hits function
Count Query Hits function 2-38, 3-27
Customer Support Center xiii
customizing Banner
expanded menu 5-1
form names in navigation frame 5-12
main menu 5-13
My Banner 5-1
Options menu 5-12
title bar 5-12
D
Data button 2-30
data extract 3-42
data format
addresses 3-24
dates 3-25
IDs 3-24
names 3-24
dates
century in queries 3-40
format of 3-25
in Job Submission 3-26
in queries 3-26, 3-40
on reports 3-26
time stamp 3-41
description lookup 3-11
Detail button 2-30
dialog box 2-3, 2-32
Direct Access 1-2, 3-2
Banner Release 7.4
Getting Started Guide
I-1
Index
disabled field 2-34
Disapprove button 2-31
Display Navigation Window key 3-10
display only field 2-34
documentation
distribution ix
electronic ix
file naming conventions viii
online ix
related viii
Documentation Bookshelf
accessing a manual 4-13
indexes 4-13
searching 4-14
Down function 2-38
drill-down search 3-15
Dynamic Help
accessing in edit mode 4-8
accessing in query mode 4-8
creating 4-10
description of 4-7
Local Dynamic Help 4-7
replacing 4-11
searching 4-11
updating 4-10
E
Edit function 2-38
Edit menu 2-18
editor
copying text 4-16
cutting text 4-17
deleting text 4-17
description of 4-15
expanding a field 4-16
inserting text 4-16
pasting text 4-17
replacing text 4-16, 4-18
searching text 4-17
selecting text 4-16
education centers xiv
enabled field 2-34
Enter Query function 2-38, 3-27
enterable field 2-34
entering information
format recommendations 3-23
from another form 3-16
ID 3-17
in validated fields 3-11
new record 3-23
with a Search button 3-16
Execute Query function 2-38, 3-27
Exit function 2-38
Exit Query function 3-27
I-2
Exit with Value function 2-39
Exit without Value function
see Exit function
exiting Banner 2-38
extended query 3-30
extracting Banner data 3-42
F
Fetch Next Set function 3-27
fields
accessing 2-35
description of 2-34
disabled 2-34
display only 2-34
enabled 2-34
enterable 2-34
File menu 2-16, 3-10
file naming conventions viii
format
addresses 3-24
dates 3-25
IDs 3-24
names 3-24
forms
application 2-8
control 2-11
definition of 2-1
elements on 2-29
GJIREVO Saved Output Review Form 3-42
GUAHELP Help Form 4-7
GUAPMNU My Banner Maintenance Form 5-1
GUAUPRF General User Preferences Maintenance
Form 3-46
GUIALTI SSN/SIN/TFN Alternate ID Search Form 321
GUTPMNU My Banner Maintenance and Copy Form 51
inquiry 2-13
main menu 2-5
naming conventions 1-6
parts of 2-14
query 2-12
rule 2-10
types of 2-4
validation 2-9
wizard 2-14
G
General User Preferences Maintenance Form (GUAUPRF)
3-46
Generate ID button 2-31
Banner Release 7.4
Getting Started Guide
November 2006
Confidential
Index
GJIREVO Saved Output Review Form 3-42
GUAHELP Help Form 4-7
GUAPMNU My Banner Maintenance Form 5-1
GUAUPRF General User Preferences Maintenance Form 346
GUIALTI SSN/SIN/TFN Alternate ID Search Form 3-21
GUTPMNU My Banner Maintenance and Copy Form 5-1
H
entering IDs 3-18
entering names 3-18
reducing a search 3-20
searching for IDs 3-18
searching for names 3-19
selecting an ID 3-19
identification number. See ID
In Process button 2-30
inquiry forms 2-13
item 2-34
Item menu 2-19
help
auto hint 2-28, 4-15
Dynamic Help 4-7
Help (Item Properties) 4-15
online help 4-3
Show Keys 4-15
Help (Item Properties) 4-15
Help Form (GUAHELP) 4-7
Help function 2-39
Help menu 2-21
horizontal scroll bar 2-2, 2-34
J
Job Submission
dates 3-26
Job Submission forms
Saved Output Review Form (GJIREVO) 3-42
jobs, naming conventions 1-6
K
I
iconic buttons
Approve 2-31
Calculate 2-31
Calendar 2-30
Comments 2-31
Complete 2-30
Copy 2-31
Data 2-30
Detail 2-30
Disapprove 2-31
Generate ID 2-31
In Process 2-30
Maintenance 2-30
navigating with 3-8
No Data 2-30
on toolbars 2-25
Search 2-30
selecting 2-31, 3-8
Summary 2-30
within forms 2-29
ID
entering 3-17, 3-18
format of 3-24
Oracle Soundex search 3-22
searching for 3-18, 3-21
selecting 3-19
ID search forms 3-20, 3-21
ID/name search
accessing a search form 3-20
November 2006
Confidential
key block 2-27
keyboard usage 1-3, 3-8
Keys list 1-3, 2-40, 4-15
L
Last Criteria function 3-27
links
main menu links 2-26
List function 2-39
List of Values
defining 3-11
displaying 3-13
drill-down search 3-15
refining a search 3-14
selecting Dynamic Help 4-9
use of 2-9, 3-11
Local Dynamic Help 4-7
LOV. See List of Values
M
main menu
accessing 1-1
changing Banner colors 5-15
changing Banner password 5-14
Banner Release 7.4
Getting Started Guide
I-3
Index
customizing 5-13
description of 2-5
format of 2-5
left pane 3-2
My Banner 2-7
navigation 3-2
right pane 3-2
main window, definition of 2-1
Maintenance button 2-30
menu bar 2-15
menus
accessing a main menu item 3-2
accessing a menu bar item 2-16
Block menu 2-19
customizing 2-7, 5-1
Edit menu 2-18
expanding 3-2
File menu 2-16
Help menu 2-21
Item menu 2-19
menu bar 2-15
Options menu 2-18, 3-5, 5-12
Query menu 2-20
Record menu 2-20
Tools menu 2-21
messages 4-18
mouse usage 1-3, 3-8
My Banner
adding objects 5-1, 5-4
copying 5-9
deleting objects 5-7, 5-8
description of 2-7
lower level menus 5-9
querying objects 5-5
reordering objects 5-8
My Banner Maintenance and Copy Form (GUTPMNU) 5-1
My Banner Maintenance Form (GUAPMNU) 5-1
N
name
entering 3-18
format of 3-24
searching for 3-19
naming conventions 1-6
navigation
Direct Access 3-2
Display Navigation Window key 3-10
File menu 3-10
iconic buttons 3-8
keyboard equivalents 3-8
main menu 3-2
mouse 3-8
Object Search 3-3
option window 3-6
Options menu 3-5
I-4
QuickFlow 3-9
site map 3-4
Tabs 3-4
navigation frame 5-12
new records 3-23
Next Block function 2-39
Next Field function 2-39
Next Item function
see Next Field function
Next Primary Key function
see Exit with Value function
Next Record function 2-39
No Data button 2-30
non-person IDs 3-24
O
Object Search 3-3
online help 4-4
Option List 2-30, 3-13
option window
navigating with 3-6
selecting 3-6
Options menu 2-18, 3-5, 5-12
Oracle functions used with Banner 2-37
Oracle Soundex search 3-22
Oracle wildcards 3-30
P
password 1-1
person IDs 3-24
postal code, format of 3-25
pound sign 3-24, 3-25
preferences
changing your alerts 5-14
Previous Block function 2-39
Previous Field function 2-39
Previous Item function
see Previous Field function
Previous Record function 2-40
Professional Services
see education centers xiv
pull-down list 2-36
purpose/audience vii
Q
queries
Banner Release 7.4
Getting Started Guide
November 2006
Confidential
Index
century in dates 3-40
counting hits 3-29
dates 3-26, 3-40
definition of 3-27
extended query 3-30
Oracle functions 3-27
querying information 3-28
time stamp 3-41
wildcards 3-30
query forms 2-12
Query menu 2-20
QuickFlow
navigational tool 3-9
R
radio button 2-33
record
count 2-28
description of 2-35
inserting 3-23
Record menu 2-20
reports and processes
naming conventions 1-6
printing online output 3-42
saving online output 3-42
viewing online output 3-42
response button 2-32
Rollback function 2-40
row 2-35
rule forms 2-10
S
sample forms
application form 2-8
control form 2-11
inquiry form 2-13
main menu 2-5
query form 2-12
rule form 2-10
validation form 2-9
wizard form 2-13
Save function 2-40
Saved Output Review Form (GJIREVO) 3-42
scroll bars
horizontal 2-2, 2-35
use of 2-33
vertical 2-34, 2-35
Scroll Down function 2-40
Scroll Up function 2-40
Search button 2-30
Select function
November 2006
Confidential
see Exit with Value function
Show Keys function 1-3, 2-40, 4-15
site map 3-4
Soundex search 3-22
spreadsheet, data extracted to 3-42
SSN/SIN/TFN Alternate ID Search Form (GUIALTI) 3-21
starting Banner 1-1
status line, contents of 2-28
Summary button 2-30
System Functions/Administration forms
General User Preferences Maintenance Form
(GUAUPRF) 3-46
Help Form (GUAHELP) 4-7
My Banner Maintenance and Copy Form (GUTPMNU)
5-1
My Banner Maintenance Form (GUAPMNU) 5-1
SSN/SIN/TFN Alternate ID Search Form (GUIALTI) 321
T
tables, naming conventions 1-6
Tabs 3-4
text
copying 4-16
cutting 4-17
deleting 4-17
inserting 4-16
pasting 4-17
replacing 4-16, 4-18
searching 4-17
selecting 4-16
time stamp 3-41
title bar
contents of 2-26
customizing 5-12
toolbar
accessing 2-25
description of 2-24
horizontal 2-25
Tools menu 2-21
types of forms 2-4
typographical conventions used in this manual x
U
Up function 2-40
user ID 1-1
username 1-1
Banner Release 7.4
Getting Started Guide
I-5
Index
V
validation forms
use of 2-9, 3-11
vertical scroll bar 2-34
W
wildcards 3-30
window pane 2-2
windows
alert box 2-3
definition of 2-1
dialog box 2-3
pane 2-2
wizard forms 2-14
Z
ZIP code, format of 3-25
I-6
Banner Release 7.4
Getting Started Guide
November 2006
Confidential