1
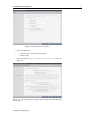
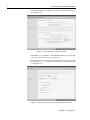
Bright Cluster Manager 7.0
Cisco UCS® Deployment Manual
Revision: 6130
Date: Mon, 20 Apr 2015
©2015 Bright Computing, Inc. All Rights Reserved. This manual or parts
thereof may not be reproduced in any form unless permitted by contract
or by written permission of Bright Computing, Inc.
Trademarks
Linux is a registered trademark of Linus Torvalds. PathScale is a registered trademark of Cray, Inc. Red Hat and all Red Hat-based trademarks
are trademarks or registered trademarks of Red Hat, Inc. SUSE is a registered trademark of Novell, Inc. PGI is a registered trademark of The
Portland Group Compiler Technology, STMicroelectronics, Inc. SGE is a
trademark of Sun Microsystems, Inc. FLEXlm is a registered trademark
of Globetrotter Software, Inc. Maui Cluster Scheduler is a trademark of
Adaptive Computing, Inc. Cisco UCS is a registered trademark of Cisco
Systems, Inc. ScaleMP is a registered trademark of ScaleMP, Inc. All other
trademarks are the property of their respective owners.
Rights and Restrictions
All statements, specifications, recommendations, and technical information contained herein are current or planned as of the date of publication
of this document. They are reliable as of the time of this writing and are
presented without warranty of any kind, expressed or implied. Bright
Computing, Inc. shall not be liable for technical or editorial errors or
omissions which may occur in this document. Bright Computing, Inc.
shall not be liable for any damages resulting from the use of this document.
Limitation of Liability and Damages Pertaining to
Bright Computing, Inc.
The Bright Cluster Manager product principally consists of free software
that is licensed by the Linux authors free of charge. Bright Computing,
Inc. shall have no liability nor will Bright Computing, Inc. provide any
warranty for the Bright Cluster Manager to the extent that is permitted
by law. Unless confirmed in writing, the Linux authors and/or third parties provide the program as is without any warranty, either expressed or
implied, including, but not limited to, marketability or suitability for a
specific purpose. The user of the Bright Cluster Manager product shall
accept the full risk for the quality or performance of the product. Should
the product malfunction, the costs for repair, service, or correction will be
borne by the user of the Bright Cluster Manager product. No copyright
owner or third party who has modified or distributed the program as
permitted in this license shall be held liable for damages, including general or specific damages, damages caused by side effects or consequential
damages, resulting from the use of the program or the un-usability of the
program (including, but not limited to, loss of data, incorrect processing
of data, losses that must be borne by you or others, or the inability of the
program to work together with any other program), even if a copyright
owner or third party had been advised about the possibility of such damages unless such copyright owner or third party has signed a writing to
the contrary.
Table of Contents
Table of Contents . . . . . . . . . . . . . . .
0.1 About This Manual . . . . . . . . . . .
0.2 About The Manuals In General . . . .
0.3 Getting Administrator-Level Support
.
.
.
.
.
.
.
.
.
.
.
.
i
iii
iii
iv
1
Introduction
1.1 Cisco Unified Computing System . . . . . . . . . . . . . . .
1.2 UCS Integration in Bright Cluster Manager . . . . . . . . .
1.3 Cisco usNIC . . . . . . . . . . . . . . . . . . . . . . . . . . .
1
1
2
2
2
UCS Cluster Deployment Procedure
2.1 Pre-install Checklist . . . . . . . . . . . .
2.2 Switch Configuration . . . . . . . . . . .
2.3 Head Node Installation . . . . . . . . . .
2.4 Compute Nodes Provisioning . . . . . .
2.5 Firmware Upgrade On Servers . . . . .
2.6 Post-Installation Configuration . . . . .
2.7 Using usNIC . . . . . . . . . . . . . . . .
2.7.1 Verifying The usNIC Installation
2.7.2 Running MPI Applications . . .
.
.
.
.
.
.
.
.
.
.
.
.
.
.
.
.
.
.
.
.
.
.
.
.
.
.
.
.
.
.
.
.
.
.
.
.
.
.
.
.
.
.
.
.
.
.
.
.
.
.
.
.
.
.
.
.
.
.
.
.
.
.
.
.
.
.
.
.
.
.
.
.
.
.
.
.
.
.
.
.
.
.
.
.
.
.
.
.
.
.
.
.
.
.
.
.
.
.
.
.
.
.
.
.
.
.
.
.
.
.
.
.
.
.
.
.
.
.
.
.
.
.
.
.
.
.
.
.
.
.
.
.
.
.
.
5
5
6
6
9
10
10
10
10
11
3
Nexus Switch Configuration
13
4
UCS Firmware
4.1 Head Node Firmware Upgrade . . . .
4.1.1 CIMC Firmware Update . . . .
4.1.2 CIMC Firmware Activation . .
4.1.3 CIMC Firmware Version View
4.1.4 BIOS Firmware Update . . . .
4.1.5 BIOS Firmware Version View .
4.2 Compute Node Firmware Upgrade . .
4.2.1 CIMC Firmware Update . . . .
4.2.2 CIMC Firmware Activation . .
4.2.3 CIMC Firmware Version View
4.2.4 BIOS Firmware Update . . . .
4.2.5 BIOS Firmware Version View .
.
.
.
.
.
.
.
.
.
.
.
.
15
15
15
15
16
16
16
16
17
17
17
17
18
.
.
.
.
19
19
21
23
24
5
UCS Node And Category Configuration
5.1 BIOS Settings . . . . . . . . . . . . .
5.2 VIC Adapters . . . . . . . . . . . . .
5.3 NTP Settings . . . . . . . . . . . . . .
5.4 Syslog Settings . . . . . . . . . . . . .
.
.
.
.
.
.
.
.
.
.
.
.
.
.
.
.
.
.
.
.
.
.
.
.
.
.
.
.
.
.
.
.
.
.
.
.
.
.
.
.
.
.
.
.
.
.
.
.
.
.
.
.
.
.
.
.
.
.
.
.
.
.
.
.
.
.
.
.
.
.
.
.
.
.
.
.
.
.
.
.
.
.
.
.
.
.
.
.
.
.
.
.
.
.
.
.
.
.
.
.
.
.
.
.
.
.
.
.
.
.
.
.
.
.
.
.
.
.
.
.
.
.
.
.
.
.
.
.
.
.
.
.
.
.
.
.
.
.
.
.
.
.
.
.
.
.
.
.
.
.
.
.
.
.
.
.
.
.
.
.
.
.
.
.
.
.
.
.
.
.
.
.
.
.
.
.
.
.
.
.
ii
Table of Contents
5.5
5.6
5.7
5.8
5.9
6
Fault Logs . . . . . . . . . . . . . . . . . . .
The KVM Button . . . . . . . . . . . . . . . .
5.6.1 KVM Console Requirements . . . .
Importing UCS Settings From An XML File
Applying UCS Settings Changes . . . . . .
UCS Category Settings . . . . . . . . . . . .
.
.
.
.
.
.
.
.
.
.
.
.
.
.
.
.
.
.
.
.
.
.
.
.
.
.
.
.
.
.
.
.
.
.
.
.
.
.
.
.
.
.
.
.
.
.
.
.
.
.
.
.
.
.
Monitoring
A UCS Profiles
A.1 UCS Profile: HPC . . . . . . . . . . . . . . . . . . . . . . . .
A.2 UCS Profile: Custom . . . . . . . . . . . . . . . . . . . . . .
A.3 UCS Profile: Default . . . . . . . . . . . . . . . . . . . . . .
24
25
25
26
26
26
29
33
33
34
35
Preface
Welcome to the UCS Deployment Manual for Bright Cluster Manager 7.0.
0.1
About This Manual
This manual is aimed at helping cluster administrators understand and
manage Cisco UCS server capabilities that are integrated into Bright Cluster Manager. The administrator is expected to be reasonably familiar with
the Bright Cluster Manager Administrator Manual.
0.2
About The Manuals In General
Regularly updated versions of the Bright Cluster Manager
7.0 manuals are available on updated clusters by default at
/cm/shared/docs/cm.
The latest updates are always online at
http://support.brightcomputing.com/manuals.
• The Installation Manual describes installation procedures for a basic
cluster.
• The Administrator Manual describes the general management of the
cluster.
• The User Manual describes the user environment and how to submit
jobs for the end user.
• The Cloudbursting Manual describes how to deploy the cloud capabilities of the cluster.
• The Developer Manual has useful information for developers who
would like to program with Bright Cluster Manager.
• The OpenStack Deployment Manual describes how to deploy OpenStack with Bright Cluster Manager.
• The Hadoop Deployment Manual describes how to deploy Hadoop
with Bright Cluster Manager.
• The UCS Deployment Manual describes how to deploy the Cisco UCS
server with Bright Cluster Manager.
If the manuals are downloaded and kept in one local directory, then in
most pdf viewers, clicking on a cross-reference in one manual that refers
to a section in another manual opens and displays that section in the second manual. Navigating back and forth between documents is usually
possible with keystrokes or mouse clicks.
For example: <Alt>-<Backarrow> in Acrobat Reader, or clicking on
the bottom leftmost navigation button of xpdf, both navigate back to the
previous document.
iv
Table of Contents
The manuals constantly evolve to keep up with the development of
the Bright Cluster Manager environment and the addition of new hardware and/or applications. The manuals also regularly incorporate customer feedback. Administrator and user input is greatly valued at Bright
Computing. So any comments, suggestions or corrections will be very
gratefully accepted at [email protected].
0.3
Getting Administrator-Level Support
Unless the Bright Cluster Manager reseller offers support, support is provided by Bright Computing over e-mail via support@
brightcomputing.com. Section 10.2 of the Administrator Manual has
more details on working with support.
1
Introduction
This chapter introduces how Cisco Unified Computing System (Cisco UCS)
is integrated with Bright Cluster Manager. It introduces the following
topics:
• Section 1.1 gives a brief overview of Cisco UCS.
• Section 1.2 discusses how servers in Cisco UCS are managed and
integrated in Bright Cluster Manager.
1.1
Cisco Unified Computing System
Cisco UCS is a data center server platform that comprises compute servers,
switching fabric, and management software. The physical chassis used in
the platform is available in two models:
• the B-Series blade chassis with blade servers
• the C-Series rack mount servers
The hardware in both models can be managed by the UCS Manager software, which typically runs on the fabric interconnect(s). When the CSeries servers are used as part of UCS they perform the same functions
as the B-Series blade servers. A cluster instance that is managed by UCS
Manager is called a Cisco UCS domain in Cisco terminology.
The C-Series rack servers can also operate in a standalone environment. Here “standalone” means without the UCS Manager software, and
typically managed by a cluster manager such a Bright Cluster Manager.
In such a setup they are normally connected with a Cisco Nexus switch.
The C-Series rack servers are managed and monitored through the Cisco
Integrated Management Controller (CIMC). The CIMC can be accessed
through a Web-based GUI, a CLI, and IPMI, like any other baseboard
management controller. The CIMC also exposes an XML API, which is
a programmatic interface to the CIMC, and which accepts XML documents through HTTP/HTTPS requests. The CIMC XML API implements
a subset of the methods available in the Cisco UCS Manager XML API.
The scope of the CIMC XML API is limited to a single C-Series server.
For extensive and detailed documentation on Cisco UCS the hardware
vendor or the Cisco website should be consulted.
The next section explains how Bright Cluster Manager 7.0 integrates
into the Cisco UCS domain and makes use of the CIMC XML API to configure, monitor, and manage the rack servers.
© Bright Computing, Inc.
2
Introduction
1.2
UCS Integration in Bright Cluster Manager
Bright Cluster Manager 7.0 can configure, monitor, and manage C-Series
rack servers directly—that is in the standalone mode, or via UCS Manager. Deployment and management of UCS C-Series servers from Bright
Cluster Manager is designed to be easy in this version. Complete support for configuring and managing B-Series blade chassis and servers are
intended for future versions of Bright Cluster Manager.
Chapter 2 describes a simplified deployment of a Bright UCS cluster
that should serve the most common needs.
After deployment, interaction with the rack servers is performed through
the CIMC XML API. The CIMC XML API presents all information from a
rack server as a hierarchical tree comprising several managed objects and
classes. This information is stored as properties of a node or a category of
nodes in Bright Cluster Manager. These properties can then be modified,
monitored, and managed using standard Bright Cluster Manager tools
such as the cluster management GUI (cmgui, section 2.4 of the Administrator Manual) or the cluster management shell (cmsh, section 2.5 of the
Administrator Manual).
Bright Cluster Manager allows the administrator to:
• modify BIOS tokens and BIOS boot order
• modify Cisco VIC Adapter and interface properties
• assign and modify usNIC profiles for Cisco VIC interfaces
• modify Fibre Channel Adapter and Interface properties
• launch remote KVM console to nodes
• modify network-related settings of a CIMC, such as NTP and syslog
• monitor metrics related to power supply, fans, temperature, voltage, and storage
• automatically configure CIMC user and network
Chapter 5 explains how to accomplish the preceding tasks in detail.
1.3
Cisco usNIC
The Cisco user-space NIC (usNIC) is a vital feature that improves the
performance of MPI applications running in an HPC environment. The
MPI applications bypass the kernel and interact directly with the Cisco
UCS VIC 1225 adapter when sending and receiving network packets. A
Bright Cisco UCS cluster has all the required software pre-installed and
configured for Cisco usNIC functionality to work out-of-the box. The
following are installed and configured by default:
• The Linux kernel verbs driver for usNIC (kmod-usnic_verbs)
• The Linux kernel driver for enic (kmod-enic)
• The user space library
(lib_usnic_verbs)
libibverbs
plugin
for
usNIC
• The latest Open MPI software that provides full support for usNIC
© Bright Computing, Inc.
1.3 Cisco usNIC
• The services that required are enabled to start on boot (rdma for
usnic_verbs)
• The recommended BIOS and CIMC usNIC settings are preconfigured
Section 2.7 covers the following Cisco usNIC topics in more detail:
• Verifying that usNIC is working and available in user space
• Running MPI applications using usNIC
© Bright Computing, Inc.
3
2
UCS Cluster Deployment
Procedure
This chapter describes a step-by-step procedure to deploy Bright Cluster
Manager on Cisco UCS hardware. With it, an experienced cluster administrator should quickly be able to get Bright Cluster Manager running on
a Cisco UCS cluster.
A Cisco UCS cluster is also called a domain in Cisco terminology,
and in Bright Cluster Manager 7.0 implies a combination of Cisco UCS
C-Series Rack Servers and supported fabric interconnects or fabric extenders. Full support for Cisco UCS B-Series Blade Servers is planned for
later.
Following the deployment procedure does not require extensive knowledge of Bright Cluster Manager or Cisco UCS. A brief explanation of
the task is given at each step, and references to other documentation are
given if necessary. However, only references to the Bright Cluster Manager manuals are provided. Further Cisco UCS documentation can be
obtained from Cisco or the appropriate hardware vendors.
The procedure follows.
2.1
Pre-install Checklist
Before starting deployment, the following should be checked or considered. This prevents delays or having to restart at a later stage of the deployment.
• Choosing the node booting and provisioning network: In a Cisco
UCS domain, nodes can boot from the regular 1GE network interface, or from the Cisco VIC 10GE interface. On most UCS C-Series
rack servers, the 1GE interface is the first device in the network boot
order.
If the interface used to boot and provision compute nodes is:
– the Cisco VIC 10GE interface, then:
* Cisco VIC ports must be cabled to the 10GE switch or fabric extender that is connected to the switch.
* The first boot device in the network boot order must be set
to the Cisco VIC that the node should boot from.
© Bright Computing, Inc.
6
UCS Cluster Deployment Procedure
– the 1GE interface, then:
* The 1GE ports must be cabled to a 1GE switch, or to the
10GE switch through a GBIC converter.
* The first boot device in the network boot order must be set
to the 1GE interface that the node should boot from.
• Choosing the CIMC (BMC) network: It is best to connect the dedicated BMC ports to an external network which is accessible from
outside the cluster. This makes reaching the remote console of the
node easier if there is a communication failure between the head
and compute nodes. However, the BMC network can also be configured to be internal to the cluster.
• RAID configuration: It is best to consult with the hardware vendor for known issues with a specific RAID configuration for the
RAID controller on the servers. RAID volumes can be configured
by choosing Ctrl-H (WebBios) during boot.
2.2
Switch Configuration
The servers in a Cisco UCS cluster are typically connected via a 10GE
Cisco Nexus Switch running the NX-OS operating system.
The switch should be configured according to the recommended procedures for proper functioning of the cluster and for extracting maximum
network performance. Chapter 3: Nexus Switch Configuration has details
on the configuration options and recommended settings.
The switch must be configured properly before the compute nodes
can be provisioned, or provisioning is likely to fail. Other issues may also
occur due to bad configuration, even if provisioning is succesful.
2.3
Head Node Installation
The head node now has to have Bright Cluster Manager installed onto it.
Chapter 1 of the Bright Cluster Manager Installation Manual has a quick
start guide for this. A bare-metal installation procedure is recommended.
During installation onto Cisco UCS, the following choices must be
made:
• Hardware vendor: Cisco UCS must be chosen as the hardware vendor on the node information screen, if it was not chosen during
download of the Bright Cluster Manager ISO.
• UCS Profile: (figure 2.1) This profile determines the default UCS
configuration that is applied for the head node and the default category of compute nodes. Appendix A has more on the default profile
types.
© Bright Computing, Inc.
2.3 Head Node Installation
Figure 2.1: Selecting The UCS Profile
• The following items:
– a separate layer-3 network for 10 Gig-E
– node booting
can be set in the Additional High Speed Networks section of
figure 2.2:
Figure 2.2: Allowing Separate Layer-3 Networking And Node Booting
For 10 Gig-E
© Bright Computing, Inc.
7
8
UCS Cluster Deployment Procedure
• An External Network should be selected for the BMC Ethernet segment (figure 2.3):
Figure 2.3: Select Ethernet segment for BMC
• If the BMC is to use DHCP to obtain BMC IP addresses, it should be
set to do so in the same section of figure 2.3.
• If a separate layer-3 network was chosen and is to be used for node
booting, then 10genet should be selected as the management network (figure 2.4).
Figure 2.4: Select 10 Gig-E Network As Management Network
© Bright Computing, Inc.
2.4 Compute Nodes Provisioning
Otherwise the default (internalnet) can be used.
• In the Network Interfaces screen (figure 2.5), the correct interface
that will be used for management and external networks on the
head node must be chosen.
By default:
– eth0 is assigned an IP address on the internal network.
– eth1 is assigned an IP address on the external network.
If the Cisco VIC interface is to be used for management and node
booting, then the network of the corresponding interface—the one
identified by the enic driver—should be set to:
– 10genet if the separate 10genet was chosen
– set to internalnet otherwise.
Figure 2.5: Set network of Cisco VIC interface
2.4
Compute Nodes Provisioning
After the head node installation is done, the compute nodes must be installed. The following procedure installs the compute nodes:
• Ensuring the switch has been configured correctly (section 2.2).
• Ensuring that nodes are configured to boot from the network in
their BIOS settings.
• Booting the compute nodes/servers.
• Carrying out the compute node installation. The Bright Cluster
Manager quick start installation guide (section 1.3 of the Installation
Manual) has a simplified guide of this process for the administrator.
© Bright Computing, Inc.
9
10
UCS Cluster Deployment Procedure
2.5
Firmware Upgrade On Servers
If the firmware for different components in Cisco UCS servers needs to be
upgraded, then Chapter 4: UCS Firmware has instructions on downloading and upgrading the firmware for all servers in the cluster.
2.6
Post-Installation Configuration
Bright Cluster Manager can configure and manage all important components of a Cisco UCS server from the UCS tab in cmgui or from the ucs
submode in cmsh. This is discussed in the following sections:
• Chapter 5: possible configuration options for the head node and
individual compute nodes are described, as well as for node categories.
• Appendix 6: an overview of all metrics that are monitored from the
CIMC of a server is provided.
2.7
Using usNIC
After a Bright UCS cluster has been deployed, Cisco usNIC is configured
and ready to use out of the box.
• Section 2.7.1 explains how to verify the usNIC installation.
• Section 2.7.2 describes how to verify MPI communication using the
installed example programs.
2.7.1 Verifying The usNIC Installation
The following helps verify that usNIC has been installed correctly and is
working.
• Listing the usnic_verbs kernel module and related dependencies
$ lsmod | grep usnic_verbs
usnic_verbs 78776 0
ib_core
73747 13\
ib_ipoib,rdma_ucm,ib_ucm,ib_uverbs,ib_umad,rdma_cm,\
ib_cm,iw_cm,ib_sa,ib_mad,iw_cxgb4,iw_cxgb3,\
usnic_verbs
enic
67741 1 usnic_verbs
The preceding output may vary depending on the other kernel modules installed.
• Viewing The Configuration Of usNIC-enabled Interfaces
$ ibv_devinfo
hca_id: usnic_1
...
...
state: PORT_ACTIVE(2)
...
hcaid: usnic_0
...
© Bright Computing, Inc.
2.7 Using usNIC
11
...
state: PORT_ACTIVE(2)
...
• Verifying that rdma service is running and is using the usNIC-related
modules. Bright Cluster Manager enables the service by default and
is also configured to start on boot, as chkconfig output should
show:
$ chkconfig --list rdma
rdma
0:off
1:off
2:on
3:on
4:on
$ service rdma status
Low level hardware support loaded:
none found
Upper layer protocol modules:
ib_ipoib
User space access modules:
rdma_ucm ib_ucm ib_uverbs ib_umad usnic_verbs
Connection management modules:
rdma_cm ib_cm iw_cm
2.7.2 Running MPI Applications
Tranmission of the usNIC network packages between the hosts can be
verified by running the following program:
su - cmsupport
module load cluster-tools-ext
cm-ibv-pingpong-test
To verify correctness of MPI traffic, the cm-usnic-ring-test program can be run. The following example shows how to run it as the
cmsupport user.
su - cmsupport
module load openmpi/gcc cluster-tools-ext
cm-usnic-ring-test
© Bright Computing, Inc.
5:on
6:off
3
Nexus Switch Configuration
This chapter recommends configuration settings for a Cisco Nexus Switch
that is part of a Cisco UCS C-Series rack mount cluster. The following instructions are based on the Cisco Nexus Operating System (NX-OS) version 6.0 running on a Cisco Nexus 3548 switch, and assume command
line access to the switch.
The administrator should consult the appropriate switch and NX-OS
documentation for possible changes before proceeding with the configuration.
The administrator executes the following steps:
• The switch is logged into (details on logging in are to be found in
the switch documentation).
• The configuration mode is entered:
configure terminal
• The interfaces are selected, and flow control is set:
interface ethernet 1/1-48
flowcontrol receive on
flowcontrol send on
• The network-qos policies are set:
class-map type network-qos class1
policy-map type network-qos my_network_policy
class type network-qos class1
pause no-drop
system qos
service-policy type network-qos my_network_policy
policy-map type network-qos jumbo
class type network-qos class-default
mtu 9216
system qos
service-policy type network-qos jumbo
© Bright Computing, Inc.
14
Nexus Switch Configuration
• The qos is set:
configure terminal
class-map type qos class1
match cos 2
policy-map type qos my_qos_policy
class type qos class1
set qos-group 1
• The running qos can be displayed:
show running-config ipqos
© Bright Computing, Inc.
4
UCS Firmware
This chapter explains how to upgrade the CIMC and BIOS firmware of
multiple C-Series servers after a Bright Cluster has been installed—that
is, after the head node and compute nodes are in the status UP, and are
running.
Bright Cluster Manager installed on UCS comes pre-installed with the
latest Cisco UCS firmware packages that were available at the time of
installation. The firmware files are placed in a shared location, accessible
to all the nodes: /cm/shared/apps/hwvendor/ciscoucs.
If different firmware files are to be used, then placing them in that
location is recommended.
4.1
Head Node Firmware Upgrade
The example that follows uses the head node C-Series server model C220.
The variables $CIMC_FIRMWARE and $BIOS_FIRMWARE are set in this example to point to firmware files for Cisco UCS version 1.5.4.
The path and names of the files must be changed if the firmware files
are in a different location. The examples are based on where the files are
located on a default Bright Cluster Manager installation.
4.1.1 CIMC Firmware Update
The head node CIMC firmware can be upgraded as follows:
Example
[root@bright70 ~]# export CIMC_FIRMWARE=/cm/shared/apps/hwvendor/ciscou\
cs/current/firmware/c220//cimc/upd-pkg-c220-m3-cimc.full.1.5.4.bin
[root@bright70 ~]# service ipmi start
[root@bright70 ~]# /cm/shared/apps/hwvendor/ciscoucs/current/firmware/f\
wup cimc update $CIMC_FIRMWARE
The update takes several minutes. The administrator must wait for
it to complete. It is completed when a message appears prompting the
administrator to run CIMC firmware activation.
4.1.2 CIMC Firmware Activation
The head node CIMC firmware can be activated as follows:
Example
[root@bright70 ~]# /cm/shared/apps/hwvendor/ciscoucs/current/firmware/f\
wup cimc activate
© Bright Computing, Inc.
16
UCS Firmware
4.1.3 CIMC Firmware Version View
The head node CIMC firmware can be viewed as follows:
Example
[root@bright70 ~]# /cm/shared/apps/hwvendor/ciscoucs/current/firmware/f\
wup cimc show version
Firmware Update Utility v1.1 Build 9
Copyright (c) 2011 Cisco Systems Inc.
All rights reserved.
Platform detected ...... C240M3 Series
...
4.1.4 BIOS Firmware Update
The head node BIOS firmware can be updated as follows:
Example
[root@bright70 ~]# export BIOS_FIRMWARE=/cm/shared/apps/hwvendor/ciscou\
cs/current/firmware/c220/bios/UCS/C220-BIOS-1-5-4-0.CAP
[root@bright70 ~]# /cm/shared/apps/hwvendor/ciscoucs/current/firmware/b\
iosup -n -p -u $BIOS_FIRMWARE
For the head node BIOS firmware update:
• The update takes several minutes. The hosts automatically reboot
after ’biosup’ has completed.
• In some cases the hosts do not power on automatically. The hosts
must then be powered on manually, for example via cmgui.
4.1.5 BIOS Firmware Version View
The head node BIOS firmware can be viewed as follows:
Example
[root@bright70 ~]# /cm/shared/apps/hwvendor/ciscoucs/current/firmware/b\
iosup -i
BIOS Update Utility v2 Build 8
Copyright (c) 2013 Cisco Systems Inc.
All rights reserved.
Vendor
Version
StartAddr
BIOSReleaseDate
BIOS RomSize
BIOS BIOSCharacteristics
4.2
:
:
:
:
:
:
Cisco Systems, Inc.
C240M3.1.5.4f.0.111320130505
61440 (0xf000)
11/13/2013
127 (0x7f)
1066113152 (0x3f8b9880)
Compute Node Firmware Upgrade
The following example assumes that the compute nodes use the CSeries server model C220, and that the variables $CIMC_FIRMWARE and
$BIOS_FIRMWARE point to the respective firmware files.
The paths and names of the files used in the example are defaults, and
may need adjustment if the firmware locations are elsewhere.
© Bright Computing, Inc.
4.2 Compute Node Firmware Upgrade
4.2.1 CIMC Firmware Update
The compute node CIMC firmware can be updated as follows:
Example
[root@bright70 ~]# cmsh
[bright70]% device
[bright70->device]% pexec -b -n node001..node002 "export CIMC_FIRMWARE\
=/cm/shared/apps/hwvendor/ciscoucs/current/firmware/c220/cimc/upd-pkg-c\
220-m3-cimc.full.1.5.4.bin; service ipmi start; /cm/shared/apps/hwvendo\
r/ciscoucs/current/firmware/fwup cimc update $CIMC_FIRMWARE"
The text between the quote marks is one long line, using backslashes
to indicate continuation on the printed page as is customary in the Bright
Cluster Manager manuals.
The CIMC firmware update takes several minutes. The administrator
must wait for it to complete. It is completed when a message appears
prompting the administrator to run CIMC firmware activation.
4.2.2 CIMC Firmware Activation
The compute node CIMC firmware can be activated as follows:
Example
[root@bright70 ~]# cmsh
[bright70]% device
[bright70->device]% pexec -b -n node001..node004 "service ipmi start; \
/cm/shared/apps/hwvendor/ciscoucs/current/firmware/fwup cimc activate"
The CIMC firmware activation will take several minutes. The administrator must wait for it to complete. It is completed when the CIMC completion message is seen.
4.2.3 CIMC Firmware Version View
The compute node CIMC firmware can be viewed as follows:
Example
[root@bright70 ~]# cmsh
[bright70]% device
[bright70->device]% pexec -n node001..node004 "service ipmi start; /cm/\
shared/apps/hwvendor/ciscoucs/current/firmware/fwup cimc show version"
4.2.4 BIOS Firmware Update
The compute node BIOS firmware can be updated as follows:
Example
[root@bright70 ~]# cmsh
[bright70]% device
[bright70->device]% pexec -b -n node001..node004 "export BIOS_FIRMWARE=\
/cm/shared/apps/hwvendor/ciscoucs/current/firmware/c220/bios/UCS/C220-B\
IOS-1-5-4-0.CAP; /cm/shared/apps/hwvendor/ciscoucs/current/firmware/bio\
sup -n -p -u $BIOS_FIRMWARE"
For the compute node BIOS firmware updates:
© Bright Computing, Inc.
17
18
UCS Firmware
• The BIOS firmware update takes several minutes. The hosts automatically reboot after the biosup command has completed.
• In some cases the hosts do not power on automatically. The hosts
must then be powered on manually, for example via cmgui.
4.2.5 BIOS Firmware Version View
The compute node BIOS firmware can be viewed as follows:
Example
[root@bright70 ~]# cmsh
[bright70]% device
[bright70->device]% pexec -b -n node001..node004 "/cm/shared/apps/hwven\
dor/ciscoucs/current/firmware/biosup -i"
Nodes down:
node001
[bright70->device]%
[node002] :
BIOS Update Utility v2 Build 8
Copyright (c) 2013 Cisco Systems Inc.
All rights reserved.
Vendor
: Cisco Systems, Inc.
Version
: C220M3.1.5.4f.0.111320130449
StartAddr
: 61440 (0xf000)
BIOSReleaseDate
: 11/13/2013
BIOS RomSize
: 127 (0x7f)
BIOS BIOSCharacteristics : 1066113152 (0x3f8b9880)
© Bright Computing, Inc.
5
UCS Node And Category
Configuration
This chapter describes the management of UCS configuration for individual head and compute nodes using cmgui.
Section 5.1 explains the BIOS Settings tab, which allows the BIOS settings of the node to be modified directly.
Section 5.2 explains how to modify properties of VIC adapter interfaces.
Section 5.3 explains NTP-related settings that can be configured for
the CIMC.
Section 5.4 describes syslog parameters and other settings that can be
configured for the CIMC.
Section 5.5 describes fault logging.
Section 5.6 explains how to launch a KVM session to the node console.
Section 5.7 describes how to import CIMC/UCS-related settings from
an XML file into the UCS configuration settings of the node.
Section 5.9 describes how node categories are used in managing UCS
configuration.
5.1
BIOS Settings
Figure 5.1 shows a view of the BIOS subtab properties that can configured.
© Bright Computing, Inc.
20
UCS Node And Category Configuration
Figure 5.1: Full-width View Of The BIOS Subtab In cmgui
If this manual has been printed on A4 paper, then figure 5.1 has an
unreadable text size. The text in the figure can however be read with the
Bright-released PDF file version of this manual, if it is on a display and if
zooming in on the figure is allowed.
If running cmgui itself to display the UCS tabs screen with its subtabs, then the full-width view is quite readable on a relatively modest 21"
monitor with a resolution of 1280x1024, or better.
A zoomed-in view that shows some details and is thus helpful for A4
paper readers is shown in figure 5.2.
Figure 5.2: Smaller Window View Of The BIOS Subtab In cmgui
In the BIOS subtab, the different BIOS properties that can be configured are grouped into boxes based on their functionality. These subtabs
are:
• Console redirection
• LOM and PCIe Slots Configuration (LOM - Lan On Motherboard)
• Server Management
© Bright Computing, Inc.
5.2 VIC Adapters
• Processor Configuration
• Memory Configuration
• USB Configuration
• Onboard Storage
• QPI Configuration (QPI - Quick Path Interconnect)
• Other Settings
• PCI Configuration
• BIOS Boot Order
If a BIOS property is modified then the Save button can be clicked to
update the settings via CIMC.
For example,
in figure 5.3,
the property Intel(R)
Hyper-Threading Technology has been modified to enabled.
Save has become clickable, and clicking it requests CIMC to update the
property.
Figure 5.3: Edit BIOS tokens using cmgui
5.2
VIC Adapters
The VIC Adapters subtab as seen in figure 5.4 shows the list of physical,
vNIC and vHBA interfaces that have identified themselves to the system,
along with a summary of their settings. Properties of a physical interface cannot be modified, but vNIC and vHBA interface properties can be
modified.
© Bright Computing, Inc.
21
22
UCS Node And Category Configuration
Figure 5.4: Overview of vNICs and vHBAs in cmgui
Double-clicking on a vNIC interface row opens an edit dialog (figure 5.5). Property classes that can be modified for a vNIC interface are:
• vNIC Settings
• Receive Side Scaling
• usNIC Profile
Each of these property classes has several device properties that can be
changed. The Save button of the dialog saves the changes via CIMC
directly.
Figure 5.5: Edit vNIC properties using cmgui
© Bright Computing, Inc.
5.3 NTP Settings
Double clicking on a vHBA interface will open an edit dialog (figure 5.6). Property classes that can be modified for a vHPB interface are:
• General Settings
• Error Recovery
• Fiber Channel Properties
• Queue Profiles
• Boot Table
• Persistent Bindings
Device properties in these classes can be changed. The Save button
of the dialog saves the changes via CIMC directly.
Figure 5.6: Edit vHBA properties using cmgui
5.3
NTP Settings
Enabling and configuring the NTP clients via CIMC can be done using
the NTP Settings subtab (figure 5.7).
© Bright Computing, Inc.
23
24
UCS Node And Category Configuration
Figure 5.7: Configuring NTP Settings Using cmgui
5.4
Syslog Settings
Logging controls for the CIMC are configured from the Syslog Settings
subtab figure 5.8). The properties that can be configured are
• the Remote Syslog Server Primary
• the Remote Syslog Server Secondary
• the Local Logging
Figure 5.8: Configuring Syslog Settings Using cmgui
5.5
Fault Logs
The Fault Log subtab (figure 5.9) shows a summary of faults instances
reported by the CIMC. System event logs and CIMC authentication and
audit logs are not captured at the moment. The fault summary is initially
empty at the start of a cmgui session. Clicking on the Refresh button
retrieves and displays the list of faults. The values displayed persist in
© Bright Computing, Inc.
5.6 The KVM Button
the subtab until a click of the Refresh button retrieves the latest fault
logs. The values are not refreshed automatically.
Figure 5.9: CIMC Fault Logs In cmgui
5.6
The KVM Button
The CIMC provides a KVM console. The KVM console is an interface that
emulates direct keyboard, video, and mouse connections to the server. It
also allows mapping physical device locations to virtual drives that are
accessible during the KVM session.
A KVM console is launched within cmgui by clicking the KVM button.
The button is found on the status bar of the UCS configuration settings
subtabs of each node.
5.6.1 KVM Console Requirements
The following must be installed on the host that is running cmgui, in
order for cmgui to launch the KVM console:
• JRE (Java Runtime Environment) version 1.5.0 or greater
• Java Web Start application (IcedTea WebStart on Linux)
The KVM button launches a request to CIMC to obtain the JNLP file
containing the information to make connection to the console. If the
CIMC replies with a valid JNLP file, then cmgui checks if Java Web Start
(typically javaws) exists in the default path. If javaws is found, then
cmgui uses a downloaded JNLP file to automatically launch the KVM
console (figure 5.10).
© Bright Computing, Inc.
25
26
UCS Node And Category Configuration
Figure 5.10: KVM Console Launched From KVM Button
An error is reported by cmgui if CIMC does not provide a valid JNLP
file, or if javwas is not found.
5.7
Importing UCS Settings From An XML File
Configuration and settings for different components in CIMC for a particular node can be imported from an XML file. The list of specifications
in the XML file is called the UCS profile.
The Load UCS XML from file button launches a file browser to
help import of the XML file. After import, the contents populate all the
UCS subtabs. Clicking the Save button, stores the imported changes in
the CMDaemon database, and CIMC is notified of the requested changes.
Appendix A has the XML schema details for the UCS profile.
5.8
Applying UCS Settings Changes
UCS settings for a node can be applied while the node is up.
If a node has been provisioned at least once before, and is known to
Bright Cluster Manager, then when changes are made to the UCS settings
of the node or to the UCS settings of the node category, the change request
is immediately sent to the CIMC of the node. This is done by CMDeamon
on the head node, as already explained in the other sections of this chapter.
5.9
UCS Category Settings
In Bright Cluster Manager, defining a configuration at category level means
that compute nodes in that category inherit the specified configuration.
The default category that is defined in a standard vanilla installation of Bright Cluster Manager is preconfigured with the UCS profile (section 5.7). The UCS profile can be selected during head node installation,
but by default it takes the default value (Appendix A.3). In this case,
all nodes by default therefore simply inherit the default UCS profile.
© Bright Computing, Inc.
5.9 UCS Category Settings
The list of nodes to which the UCS profile is applied to is conveniently
listed at the top of the UCS tab of the specific category (figure 5.11). Selecting an individual node from there with a double click then opens up the
node item, and allows configuration adjustments per node, as described
in the preceding sections of this chapter.
Figure 5.11: The Category UCS Tab
While in the UCS tab of the category, subtabs allow UCS configuration, just as for individual nodes. So, BIOS settings (section 5.1), VIC
adaptors (section 5.2), NTP settings (section 5.3), syslog settings (section 5.4),
fault logging (section 5.5), and importing a UCS profile (section 5.7), can
all be configured at the just like was done for at the node level. The difference being that the configuration profile thus created is applied at the
category level, and can be overridden at node level.
Launching a KVM console (section 5.6) is not included in the preceding list of category configuration settings. This is because having the
KVM button work directly at the category level to open up many consoles for all the nodes in the category is hardly likely to be useful. Instead,
clicking on the button in category mode simply prompts the user to select
a specific node, and launches a console for the selected node.
© Bright Computing, Inc.
27
6
Monitoring
Metrics that can be measured and monitored through CIMC on a C-series
rack server are covered in this chapter. The majority of the metrics are
reported via IPMI, while some metrics are measured through the CIMC
XML API. Chapter 9 of the Administrator Manual has more information
about metric collection and metric collection scripts.
The following table shows a list of metrics that are monitored from the
CIMC using the XML API.
Metric
Description
boardconsumedPower
Power consumed by board
boardinputVoltage
Input voltage across board
boardinputCurrent
Input current into board
boardfrontTemp
Front temperature of board
boardioh1Temp
Temperature of IOH1 on board
boardioh2Temp
Temperature of IOH2 on board
boardambientTemp
Ambient temperature of board
boardrearTemp
Temperature of rear of board
DIMM_A1
Temperature of DIMM A1
DIMM_B1
Temperature of DIMM B1
DIMM_C1
Temperature of DIMM C1
DIMM_D1
Temperature of DIMM D1
DIMM_E1
Temperature of DIMM E1
DIMM_F1
Temperature of DIMM F1
DIMM_G1
Temperature of DIMM G1
...continues
© Bright Computing, Inc.
30
Monitoring
...continued
Metric
Description
DIMM_H1
Temperature of DIMM H1
P1_TEMP_SENS
Temperature of power supply 1
P2_TEMP_SENS
Temperature of power supply 2
CIMC XML API Metrics
The metric collection script that is used to collect the preceding metrics
is located on the head node at:
/cm/local/apps/cluster-tools/ext/ucs/ucsmetrics
Plots from the data values obtained from these sensors can then be
viewed in the monitoring inteface of cmgui:
Figure 6.1: Plot of CIMC metrics obtained via XML API
© Bright Computing, Inc.
31
Figure 6.2: UCS metrics monitoring
© Bright Computing, Inc.
A
UCS Profiles
In this appendix, XML schemas are listed for the following Cisco UCS
profiles:
• HPC (Appendix A.1)
• Custom (Appendix A.2)
• Default (Appendix A.3)
A.1
UCS Profile: HPC
<UCSProfile>
<topSystem>
<biosUnit>
<biosSettings>
<!-- CPU -->
<biosVfIntelHyperThreadingTech vpIntelHyperThreadingTech="disabled"/>
<biosVfCoreMultiProcessing vpCoreMultiProcessing="all"/>
<biosVfIntelVirtualizationTechnology vpIntelVirtualizationTechnology="enabled"/>
<biosVfIntelVTForDirectedIO vpIntelVTDCoherencySupport="enabled"\
vpIntelVTForDirectedIO="enabled" vpIntelVTDATSSupport="enabled"/>
<biosVfCPUPerformance vpCPUPerformance="hpc"/>
<biosVfHardwarePrefetch vpHardwarePrefetch="enabled"/>
<biosVfAdjacentCacheLinePrefetch vpAdjacentCacheLinePrefetch="enabled"/>
<biosVfDCUPrefetch vpStreamerPrefetch="enabled" vpIPPrefetch="enabled"/>
<biosVfDirectCacheAccess vpDirectCacheAccess="enabled"/>
<biosVfCPUPowerManagement vpCPUPowerManagement="energy-efficient"/>
<biosVfEnhancedIntelSpeedStepTech vpEnhancedIntelSpeedStepTech="enabled"/>
<biosVfIntelTurboBoostTech vpIntelTurboBoostTech="enabled"/>
<biosVfProcessorC6Report vpProcessorC6Report="enabled"/>
<biosVfProcessorC1E vpProcessorC1E="enabled"/>
<biosVfPStateCoordType vpPStateCoordType="HW ALL"/>
<biosVfCPUFrequencyFloor vpCPUFrequencyFloor="disabled"/>
<biosVfCPUEnergyPerformance vpCPUEnergyPerformance="energy-efficient"/>
<!-- MEMORY -->
<biosVfSelectMemoryRASConfiguration vpSelectMemoryRASConfiguration=\
"maximum-performance"/>
<biosVfDRAMClockThrottling vpDRAMClockThrottling="performance"/>
<biosVfNUMAOptimized vpNUMAOptimized="enabled"/>
<biosVfLvDIMMSupport vpLvDDRMode="performance-mode"/>
© Bright Computing, Inc.
34
UCS Profiles
<biosVfDramRefreshRate vpDramRefreshRate="auto"/>
<biosVfMemoryInterleave vpChannelInterLeave="auto" vpRankInterLeave="auto"/>
<biosVfPatrolScrub vpPatrolScrub="enabled"/>
<biosVfDemandScrub vpDemandScrub="enabled"/>
<biosVfAltitude vpAltitude="300-m"/>
</biosSettings>
</biosUnit>
</topSystem>
</UCSProfile>
A.2
UCS Profile: Custom
<UCSProfile>
<topSystem>
<biosUnit>
<biosSettings>
<!-- CPU -->
<biosVfIntelHyperThreadingTech vpIntelHyperThreadingTech="disabled"/>
<biosVfCoreMultiProcessing vpCoreMultiProcessing="all"/>
<biosVfIntelVirtualizationTechnology vpIntelVirtualizationTechnology=\
"enabled"/>
<biosVfIntelVTForDirectedIO vpIntelVTDCoherencySupport="enabled"\
vpIntelVTForDirectedIO="enabled" vpIntelVTDATSSupport="enabled"/>
<biosVfCPUPerformance vpCPUPerformance="hpc"/>
<biosVfHardwarePrefetch vpHardwarePrefetch="enabled"/>
<biosVfAdjacentCacheLinePrefetch vpAdjacentCacheLinePrefetch=\
"enabled"/>
<biosVfDCUPrefetch vpStreamerPrefetch="enabled" vpIPPrefetch=\
"enabled"/>
<biosVfDirectCacheAccess vpDirectCacheAccess="enabled"/>
<biosVfCPUPowerManagement vpCPUPowerManagement="energy-efficient"/>
<biosVfEnhancedIntelSpeedStepTech vpEnhancedIntelSpeedStepTech\
="enabled"/>
<biosVfIntelTurboBoostTech vpIntelTurboBoostTech="enabled"/>
<biosVfProcessorC6Report vpProcessorC6Report="enabled"/>
<biosVfProcessorC1E vpProcessorC1E="enabled"/>
<biosVfPStateCoordType vpPStateCoordType="HW ALL"/>
<biosVfCPUFrequencyFloor vpCPUFrequencyFloor="disabled"/>
<biosVfCPUEnergyPerformance vpCPUEnergyPerformance="energy\
-efficient"/>
<!-- MEMORY -->
<biosVfSelectMemoryRASConfiguration vpSelectMemoryRASConfiguration=\
"maximum-performance"/>
<biosVfDRAMClockThrottling vpDRAMClockThrottling="performance"/>
<biosVfNUMAOptimized vpNUMAOptimized="enabled"/>
<biosVfLvDIMMSupport vpLvDDRMode="performance-mode"/>
<biosVfDramRefreshRate vpDramRefreshRate="auto"/>
<biosVfMemoryInterleave vpChannelInterLeave="auto"\
vpRankInterLeave="auto"/>
<biosVfPatrolScrub vpPatrolScrub="enabled"/>
<biosVfDemandScrub vpDemandScrub="enabled"/>
<biosVfAltitude vpAltitude="300-m"/>
</biosSettings>
</biosUnit>
© Bright Computing, Inc.
A.3 UCS Profile: Default
35
</topSystem>
</UCSProfile>
A.3
UCS Profile: Default
<UCSProfile>
<topSystem>
<biosUnit>
<biosSettings>
<!-- CPU -->
<biosVfIntelHyperThreadingTech vpIntelHyperThreadingTech="disabled"/>
<biosVfCoreMultiProcessing vpCoreMultiProcessing="all"/>
<biosVfIntelVirtualizationTechnology vpIntelVirtualizationTechnology=\
"enabled"/>
<biosVfIntelVTForDirectedIO vpIntelVTDCoherencySupport="enabled"\
vpIntelVTForDirectedIO="enabled" vpIntelVTDATSSupport="enabled"/>
<biosVfCPUPerformance vpCPUPerformance="enterprise"/>
<biosVfHardwarePrefetch vpHardwarePrefetch="enabled"/>
<biosVfAdjacentCacheLinePrefetch vpAdjacentCacheLinePrefetch="enabled"/>
<biosVfDCUPrefetch vpStreamerPrefetch="enabled" vpIPPrefetch="enabled"/>
<biosVfDirectCacheAccess vpDirectCacheAccess="enabled"/>
<biosVfCPUPowerManagement vpCPUPowerManagement="custom"/>
<biosVfEnhancedIntelSpeedStepTech vpEnhancedIntelSpeedStepTech="enabled"/>
<biosVfIntelTurboBoostTech vpIntelTurboBoostTech="enabled"/>
<biosVfProcessorC6Report vpProcessorC6Report="disabled"/>
<biosVfProcessorC1E vpProcessorC1E="disabled"/>
<biosVfPStateCoordType vpPStateCoordType="HW ALL"/>
<biosVfCPUFrequencyFloor vpCPUFrequencyFloor="enabled"/>
<biosVfCPUEnergyPerformance vpCPUEnergyPerformance="custom"/>
<!-- MEMORY -->
<biosVfSelectMemoryRASConfiguration vpSelectMemoryRASConfiguration=\
"maximum-performance"/>
<biosVfDRAMClockThrottling vpDRAMClockThrottling="performance"/>
<biosVfNUMAOptimized vpNUMAOptimized="enabled"/>
<biosVfLvDIMMSupport vpLvDDRMode="performance-mode"/>
<biosVfDramRefreshRate vpDramRefreshRate="auto"/>
<biosVfMemoryInterleave vpChannelInterLeave="auto" vpRankInterLeave="auto"/>
<biosVfPatrolScrub vpPatrolScrub="disabled"/>
<biosVfDemandScrub vpDemandScrub="enabled"/>
<biosVfAltitude vpAltitude="300-m"/>
</biosSettings>
</biosUnit>
</topSystem>
</UCSProfile>
© Bright Computing, Inc.