1
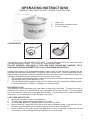
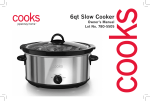
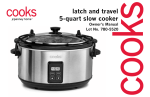
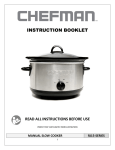
IMPORTANT SAFEGUARDS
When using electrical appliances especially when children are present, basic safety
precautions should always be followed to reduce the risk of fire, electric shock, and/or
injury to persons, including the following:
1. READ ALL INSTRUCTIONS.
2. Do not touch hot surfaces. Use any handles or knobs. Use pot holders when
removing cover or handling hot containers.
3. To protect against electrical shock, do not place cord, plug or appliance in water or
other liquid.
4. Close supervision is necessary when any appliance is used by or near children.
5. Unplug from outlet when not in use and before cleaning. Allow to cool before
cleaning.
6. Do not operate any appliance with a damaged cord or plug, or after the appliance
malfunctions or has been damaged in any manner. Return appliance to the nearest
authorized service facility for examination, repair or adjustment.
7. The use of accessory attachments not recommended by the appliance manufacturer
may cause injury.
8. Do not use outdoors.
9. Do not let cord hang over edge of table or counter or touch hot surfaces.
10. Do not place on or near a hot gas or electric burner, or in a heated oven.
11. Extreme caution must be used when moving an appliance containing hot food,
water or other hot liquids.
12. Do not use appliance for other than intended use.
13. Lift and open cover carefully to avoid scalding, and allow water to drip into unit.
14. To disconnect, turn control to Off, then remove plug from wall outlet.
15. Containers are designed for use with this appliance only. Container should never
be used on a rangetop. Do not set a hot container on a wet or cold surface. Do not
use a cracked container.
16. FOR HOUSEHOLD USE ONLY.
SAVE THESE INSTRUCTIONS
2
OPERATING INSTRUCTIONS
PRODUCT MAY VARY SLIGHTLY FROM ILLUSTRATIONS
1.
2.
3.
Plastic Lid
Removable Stoneware Insert
2½ Cup Capacity
ACCESSORIES:
Spiral Spoon
Mesh Dipping Tool
This appliance is for HOUSEHOLD USE ONLY. It may be plugged into an AC electrical outlet
(ordinary household current). Do not use any other electrical outlet.
DO NOT OPERATE APPLIANCE IF THE LINE CORD SHOWS ANY DAMAGE, OR IF
APPLIANCE WORKS INTERMITTENTLY OR STOPS WORKING ENTIRELY.
A short power-supply cord (or detachable power-supply cord) is to be provided to reduce the risk
resulting from becoming entangled in or tripping over a longer cord. Longer detachable powersupply cords or extension cords are available and may be used if care is exercised in their use.
If a longer detachable power-supply cord or extension cord is used,
1. The marked electrical rating of the cord set or extension cord should be at least as great as
the electrical rating of the appliance, and
2. The cord should be arranged so that it will not drape over the countertop or tabletop where
it can be pulled on by children or tripped over unintentionally.
POLARIZED PLUG
This appliance has a polarized plug (one blade is wider than the other). To reduce the risk of
electric shock, this plug is intended to fit into a polarized outlet only one way. If the plug does
not fit fully into the outlet, reverse the plug and try again. If it still does not fit, contact a qualified
electrician. Do not attempt to modify the plug in any way.
LINE CORD SAFETY TIPS
1. Never pull or yank on cord or the appliance.
2. To insert plug, grasp it firmly and guide it into outlet.
3. To disconnect appliance, grasp plug and remove it from outlet.
4. Before each use, inspect the line cord for cuts and/or abrasion marks. If any are found, this
indicates that the appliance should be serviced and the line cord replaced.
5. Never wrap the cord tightly around the appliance, as this could place undo stress on the
cord where it enters the appliance and cause it to fray and break.
3
During the first few minutes of initial use, you may notice smoke and/or a slight odor. This is
normal and should quickly disappear. It will not recur after appliance has been used a few
more times.
BEFORE USING
Solid surface countertops can be easily scratched, cracked, scorched, or damaged, especially
when exposed to heat. To prevent damage, the following precautions should be observed
when using this product:
• Always use a trivet under heat generating sources such as Slow Cookers, Toaster
Ovens, Skillets, etc.
• Do not place hot pans, pots, ceramic or stoneware inserts, etc. directly on the countertop
surface.
• Slow Cooker stoneware inserts have a rough bottom. To avoid scratching surfaces,
always place the stoneware insert on a heat resistant placemat or trivet.
Carefully unpack the chocolatier and remove any labels or packaging materials. Wash
stoneware insert and lid in warm, soapy water. Rinse well and dry thoroughly. Wipe interior
and exterior surfaces of the base with a soft, moist cloth to remove dust particles collected
during packing and handling. NEVER IMMERSE THE BASE, CORD OR PLUG IN WATER
OR ANY OTHER LIQUID. Product should be operated before initial use. After cleaning, place
insert inside the base. Pour ½ cup of water into the stoneware insert and cover with lid. Plug
into electrical wall outlet and allow to operate approximately 20 minutes. After 20 minutes
unplug. Allow unit to cool. Remove insert and discard water. Rinse the stoneware insert, dry
thoroughly and place it into the base.
STONEWARE INSERT
Like any piece of cookware, the stoneware insert may crack or break if not properly handled.
Failure to follow these instructions can cause breakage resulting in injury or property damage.
•
Stoneware insert is breakable. Handle with care.
•
ALWAYS USE POT HOLDERS WHEN HANDLING HOT STONEWARE INSERT.
•
DO NOT place hot insert on counter. Use protective trivet.
•
DO NOT strike utensils against rim to dislodge food.
•
DO NOT use stoneware insert to pop corn, caramelize sugar, or make candy.
•
DO NOT use abrasive cleaners, scouring pads, or any object that will scratch the
stoneware insert.
•
DO NOT use or repair any insert that is chipped, cracked, or broken.
•
Bottom of product may be rough. To avoid scratching surfaces, place on place mat,
tablecloth, or trivet.
•
DO NOT use stoneware insert for reheating foods or for general food storage.
•
NEVER heat the slow cooker base without the insert in place.
CARE: Use only wooden, nylon, or plastic utensils. Metal utensils can scratch. Insert can
be washed by hand or in a dishwasher. Load carefully to avoid contact with, and bumping
against, other items during cycle.
DO NOT allow stoneware insert to soak/stand in water for an extended period of time. If
scouring is necessary, use only plastic or nylon cleaning pads with nonabrasive cleaners.
•
When removing the insert from microwave, be sure to use pot holders or oven mitts.
•
Always use pot holders or oven mitts when removing stoneware insert from chocolatier
base. Do not set insert directly on counter top or table; use a trivet or hot pad.
•
Unplug unit and allow to cool after use. Do not pour cold water into hot insert.
HOW TO USE
The chocolatier is intended to keep chocolate or candy toppings melted at the proper
temperature for dipping baked foods, cake pops, candies or fruit while decorating. It can
also be used to heat, hold and serve your favorite cheese, dips and appetizers at the ideal
temperature.
1. Fill the chocolatier. The capacity is between 16 and 20 ounces.
2. Plug the power cord of the mini crock into the wall outlet.
4
3.
Heat the contents until they are fully melted and hot, stirring occasionally. Depending
upon volume of ingredients, this should take between 30 and 75 minutes.
4. Decorate, serve and enjoy. The contents of the chocolatier should remain warm for up to
4 hours. Keeping the lid in place will help to hold the contents at the desired consistency.
NOTE: This chocolatier should not be used to cook foods. It will not cook
meat, so any ingredients should be pre-cooked prior to placing them in the
ceramic insert.
CHOCOLATE AND CANDY MELTS:
The removable stoneware insert makes it convenient to melt chocolates or candy melts and
then keep them at the proper consistency for decorating using a single dish.
1. Place candy melts, chocolate, frosting or desired recipe in removable stoneware insert.
It is recommended to follow package directions for candy melts, but the
following can be used as a general guide.
2. Place stoneware insert in microwave and heat at 40% to 50% power for 1 minute.
3. Remove stoneware insert from microwave and stir contents.
4. Return insert to microwave and heat in 30 second intervals, stirring after every 30
seconds until desired consistency is reached.
5. Place stoneware insert into BABYCAKES chocolatier and plug into wall outlet. The
BABYCAKES chocolatier should maintain the consistency while dipping and decorating.
USER MAINTENANCE INSTRUCTIONS
This appliance contains no user serviceable parts. Do not try to repair it yourself. Refer it to
qualified service personnel if servicing is needed.
PRECAUTIONS:
•
Always unplug from wall outlet and allow to cool before cleaning.
•
Always handle ceramic insert carefully. Avoid hitting against faucet or hard surfaces.
•
Do not touch sides of chocolatier while food is cooking. Use pot holders or oven mitts
when removing the stoneware insert.
TO CLEAN:
This appliance should be cleaned after every use.
After unit has been allowed to cool, wash insert and lid in warm, soapy water. Rinse well and
dry. If food sticks to the surface of the insert, fill the pot with warm, soapy water and allow it
to soak for a short time before cleaning.
Wipe interior and exterior surfaces of the base with a soft, slightly damp cloth or sponge.
NEVER IMMERSE THE BASE IN WATER.
NEVER USE ABRASIVE CLEANSERS OR SCOURING PADS TO CLEAN THE INSERT OR
BASE, AS THESE CAN DAMAGE THE SURFACES.
Dishwasher Cleaning
The recommended cleaning method for this product is by hand as described as above, but
if proper care is taken, the stoneware insert and plastic lid may be cleaned in an automatic
dishwasher. To prevent damage, position the stoneware insert in the rack so that it will not
hit other items during cleaning. THE LID SHOULD BE PLACED ON THE TOP RACK ONLY.
TO STORE:
Be sure all parts are clean and dry before storing. Store appliance in its box or in a clean, dry
place. Never store it while it is hot or wet. To store, place ceramic pot inside the base and the
plastic lid over the pot. Never wrap cord tightly around the appliance; keep it loosely coiled.
GLAZES AND CANDY COATING RECIPES
Candy Melts
Candy melts are readily available at craft and hobby stores as well as stores specializing in
cake decorating or candy making. Melt according to package directions.
Tip: If candy melts are too thick, add 1 to 2 tablespoons of shortening.
5
Almond Bark Coating
Add 1 to 2 tablespoons shortening to each 12 ounces of almond bark to make a dipping
consistency. Melt according to package directions.
White Chocolate Glaze
Ingredients:
•
1 package (6 ounces) white chocolate
•
3 tablespoon heavy whipping cream
•
3 tablespoons butter, cut into thirds and softened
•
½ cup confectioners’ sugar, sifted
•
½ teaspoon vanilla
Directions:
1. Combine white chocolate and cream in removable stoneware insert. Microwave on HIGH
power (100%) for 1 minute. Stir. Add butter and microwave on HIGH power (100%) for
30 seconds. Stir. Microwave on HIGH power (100%) for an additional 10 to 15 seconds if
necessary for white chocolate and butter to melt.
2. Blend in sugar and vanilla. Stir until smooth.
3. Dip cake pops or other food in warm frosting dip. Place insert into BABYCAKES chocolatier
to keep a glaze consistency.
Makes about 1 cup of glaze
Frosting Dip
Ingredients:
•
1 container (16 ounces) Creamy Chocolate, Vanilla or Lemon Frosting *
•
½ cup semi-sweet chocolate or vanilla chips *
Directions:
1. Spoon frosting into removable stoneware insert. Microwave on HIGH power (100%) for 1
minute. Stir well. Blend in chips. Microwave on HIGH power (100%) for 1 minute.
2. Allow to stand 2 to 3 minutes. Stir. Microwave on HIGH power (100%) for an additional 10
to 15 seconds if necessary to melt chips. Stir until smooth.
3. Dip cake pops in warm frosting dip.
4. Place insert into BABYCAKES chocolatier and plug into wall outlet to keep a glaze
consistency.
Makes about 1⅔ cups of frosting
*Tip: Choose complimentary flavors of frosting and chips. For example, blend semi-sweet
chocolate chips into chocolate frosting or vanilla chips into vanilla or lemon frosting.
Vanilla Glaze
Ingredients:
•
¼ cup melted butter
•
1¼ cups confectioners’ sugar, sifted
•
1 teaspoon vanilla
•
2 to 2½ tablespoons hot water
Directions:
1. Combine melted butter with confectioners sugar, stirring until well blended.
2. Stir in vanilla.
3. Blend in 2 tablespoons hot water and stir until smooth.
4. Add a little of the remaining hot water, if needed, to make a thin glaze consistency.
Makes about ¾ cup of glaze
6
ONE YEAR LIMITED WARRANTY
SELECT BRANDS, INC. warrants, subject to the conditions stated below, that from the date
of purchase, this product will be free from mechanical defects for a period of one (1) year.
SELECT BRANDS, INC., at its option, will repair or replace this product found to be defective
during the warranty period. Should this product become defective by reason of improper
workmanship or material defect during the specified warranty period, Select Brands, Inc. will
repair or replace the same effecting all necessary parts replacements for a period of one year
from the date of purchase. Transportation charges on parts, or products in whole, submitted
for repair or replacement, under this warranty, must be borne by the purchaser.
CONDITIONS: This warranty is valid for the original retail purchaser from the date of initial
retail purchase and is not transferable. Keep the original sales receipt. Proof of purchase is
required to obtain warranty service or replacement. Dealers, service centers, or retail stores
do not have the right to alter, modify or in any way, change the terms and conditions of this
warranty. Warranty registration is not necessary to obtain warranty on Select Brands, Inc.
products. Save your proof of purchase receipt.
ABOUT YOUR PRODUCT WARRANTY: Most warranty repairs are handled routinely, but
sometimes requests for warranty service may not be appropriate. For example, warranty
service would NOT apply if the product damage occurred because of misuse, lack of routine
maintenance, shipping, handling, warehousing or improper installation. Similarly, the warranty
is void if the manufacturing date or the serial number on the product has been removed or the
equipment has been altered or modified. During the warranty period, the authorized service
dealer, at its option, will repair or replace any part that, upon examination, is found to be
defective under normal use and service.
NORMAL WEAR: This warranty does not cover normal wear of parts or damage resulting
from any of the following: Negligent use or misuse of the product; Improper voltage or current;
Use contrary to the operation instructions; Deviation from instructions regarding storage
and transportation; Repair or alteration by anyone other than SELECT BRANDS, INC. or an
authorized service center. Further, the warranty does not cover Acts of God, such as fire,
flood, hurricanes and tornadoes.
SELECT BRANDS, INC. shall not be liable for any incidental or consequential damages
caused by the breach of any express or implied warranty. Except to the extent prohibited
by applicable law, any implied warranty of merchantability or fitness for a particular purpose
is limited in duration to the duration of the above warranty. Some states, provinces or
jurisdictions do not allow the exclusion or limitation of incidental o consequential damages or
limitations on how long an implied warranty lasts, so the above limitations or exclusion may
not apply to you. This warranty gives you specific legal rights, and you may also have other
rights that vary from state to state or province to province.
HOW TO OBTAIN WARRANTY SERVICE: You must contact SELECT BRANDS, INC.
Customer Service at 1-913-663-4500. A Customer Service representative will attempt
to resolve warranty issues over the phone. If telephone resolution is not possible, the
Customer Service representative will require your assistance in performing routine diagnostic
procedures. This warranty is effective for the time periods listed above and subject to the
conditions provided for in this policy.
To view other BABYCAKES products, visit us online at www.thebabycakesshop.com
BABYCAKES is a registered trademark of Select Brands, Inc. 66219
Made in China
7