1
DigiTrace 910 Series
Heat Trace Controller
®
Installation, Operating, and Maintenance Instructions
Firmware versions up to V3.1X
Document H56873
Please read all instructional literature carefully and thoroughly before
starting.
2
TABLE OF CONTENTS
Certification . . . . . . . . . . . . . . . . . . . . . . . . . . . . . . . . . . . . . . . . . . . . . . . . . . . . . . . . . . . . . . . . . . . . . . . . . . .4
Limited Warranty . . . . . . . . . . . . . . . . . . . . . . . . . . . . . . . . . . . . . . . . . . . . . . . . . . . . . . . . . . . . . . . . . . . . . . .4
Warranty Exclusion/Disclaimer . . . . . . . . . . . . . . . . . . . . . . . . . . . . . . . . . . . . . . . . . . . . . . . . . . . . . . . . . . . .4
Exclusive Remedies . . . . . . . . . . . . . . . . . . . . . . . . . . . . . . . . . . . . . . . . . . . . . . . . . . . . . . . . . . . . . . . . . . . . .4
Conducted and Radiated Emissions . . . . . . . . . . . . . . . . . . . . . . . . . . . . . . . . . . . . . . . . . . . . . . . . . . . . . . . .5
Section 1—Overview . . . . . . . . . . . . . . . . . . . . . . . . . . . . . . . . . . . . . . . . . . . . . . . . . . . . . . . . .6
1.1 Introduction . . . . . . . . . . . . . . . . . . . . . . . . . . . . . . . . . . . . . . . . . . . . . . . . . . . . . . . . . . . . . . . . . . . . . . . .6
1.2 Controllers Covered by this Manual . . . . . . . . . . . . . . . . . . . . . . . . . . . . . . . . . . . . . . . . . . . . . . . . . . . . . .6
1.3 Product Overview . . . . . . . . . . . . . . . . . . . . . . . . . . . . . . . . . . . . . . . . . . . . . . . . . . . . . . . . . . . . . . . . . . .6
1.4 Modular Components . . . . . . . . . . . . . . . . . . . . . . . . . . . . . . . . . . . . . . . . . . . . . . . . . . . . . . . . . . . . . . . .8
1.5 Controller Assemblies . . . . . . . . . . . . . . . . . . . . . . . . . . . . . . . . . . . . . . . . . . . . . . . . . . . . . . . . . . . . . . . .8
1.6 Ordering and Configuration Guide . . . . . . . . . . . . . . . . . . . . . . . . . . . . . . . . . . . . . . . . . . . . . . . . . . . . . . .9
Section 2—Installation and Wiring . . . . . . . . . . . . . . . . . . . . . . . . . . . . . . . . . . . . . . . . . . . . . . .10
2.1 Introduction . . . . . . . . . . . . . . . . . . . . . . . . . . . . . . . . . . . . . . . . . . . . . . . . . . . . . . . . . . . . . . . . . . . . . . .10
2.2 Initial Inspection . . . . . . . . . . . . . . . . . . . . . . . . . . . . . . . . . . . . . . . . . . . . . . . . . . . . . . . . . . . . . . . . . . .10
2.3 Operator Safety Considerations . . . . . . . . . . . . . . . . . . . . . . . . . . . . . . . . . . . . . . . . . . . . . . . . . . . . . . . .10
2.4 Operating Environment . . . . . . . . . . . . . . . . . . . . . . . . . . . . . . . . . . . . . . . . . . . . . . . . . . . . . . . . . . . . . .10
2.5 Installation Location . . . . . . . . . . . . . . . . . . . . . . . . . . . . . . . . . . . . . . . . . . . . . . . . . . . . . . . . . . . . . . . .10
2.6 Mounting Procedures . . . . . . . . . . . . . . . . . . . . . . . . . . . . . . . . . . . . . . . . . . . . . . . . . . . . . . . . . . . . . . .11
2.7 Wiring . . . . . . . . . . . . . . . . . . . . . . . . . . . . . . . . . . . . . . . . . . . . . . . . . . . . . . . . . . . . . . . . . . . . . . . . . . .11
2.8 Initial Power-up . . . . . . . . . . . . . . . . . . . . . . . . . . . . . . . . . . . . . . . . . . . . . . . . . . . . . . . . . . . . . . . . . . . .14
2.9 Setup for the 910 . . . . . . . . . . . . . . . . . . . . . . . . . . . . . . . . . . . . . . . . . . . . . . . . . . . . . . . . . . . . . . . . . .14
Section 3—Operator Console and Operation . . . . . . . . . . . . . . . . . . . . . . . . . . . . . . . . . . . . . . . . .15
3.1 Alphanumeric Display . . . . . . . . . . . . . . . . . . . . . . . . . . . . . . . . . . . . . . . . . . . . . . . . . . . . . . . . . . . . . . .15
3.2 Keypad . . . . . . . . . . . . . . . . . . . . . . . . . . . . . . . . . . . . . . . . . . . . . . . . . . . . . . . . . . . . . . . . . . . . . . . . . .15
3.3 LED Indicators . . . . . . . . . . . . . . . . . . . . . . . . . . . . . . . . . . . . . . . . . . . . . . . . . . . . . . . . . . . . . . . . . . . . .16
3.4 Operational Basics . . . . . . . . . . . . . . . . . . . . . . . . . . . . . . . . . . . . . . . . . . . . . . . . . . . . . . . . . . . . . . . . . .16
Section 4—Operator Console Modes . . . . . . . . . . . . . . . . . . . . . . . . . . . . . . . . . . . . . . . . . . . . . .18
4.1 Alarm Mode . . . . . . . . . . . . . . . . . . . . . . . . . . . . . . . . . . . . . . . . . . . . . . . . . . . . . . . . . . . . . . . . . . . . . . .18
4.2 Monitor Mode . . . . . . . . . . . . . . . . . . . . . . . . . . . . . . . . . . . . . . . . . . . . . . . . . . . . . . . . . . . . . . . . . . . . .19
4.3 Configure Mode . . . . . . . . . . . . . . . . . . . . . . . . . . . . . . . . . . . . . . . . . . . . . . . . . . . . . . . . . . . . . . . . . . . .20
Section 5—Configuration Parameter Details . . . . . . . . . . . . . . . . . . . . . . . . . . . . . . . . . . . . . . . .27
5.1 Introduction . . . . . . . . . . . . . . . . . . . . . . . . . . . . . . . . . . . . . . . . . . . . . . . . . . . . . . . . . . . . . . . . . . . . . . .27
5.2 Point Setup Parameters . . . . . . . . . . . . . . . . . . . . . . . . . . . . . . . . . . . . . . . . . . . . . . . . . . . . . . . . . . . . . .27
5.3 Miscellaneous Setup Parameters . . . . . . . . . . . . . . . . . . . . . . . . . . . . . . . . . . . . . . . . . . . . . . . . . . . . . .35
5.4 Temperature Sensor Alarms Configuration . . . . . . . . . . . . . . . . . . . . . . . . . . . . . . . . . . . . . . . . . . . . . . .36
5.5 Other Alarms Configuration . . . . . . . . . . . . . . . . . . . . . . . . . . . . . . . . . . . . . . . . . . . . . . . . . . . . . . . . . . .39
5.6 Communications Setup . . . . . . . . . . . . . . . . . . . . . . . . . . . . . . . . . . . . . . . . . . . . . . . . . . . . . . . . . . . . . .47
5.7 Operator Console Functions . . . . . . . . . . . . . . . . . . . . . . . . . . . . . . . . . . . . . . . . . . . . . . . . . . . . . . . . . .49
Section 6—Monitored Parameter Details . . . . . . . . . . . . . . . . . . . . . . . . . . . . . . . . . . . . . . . . . . .51
6.1 Introduction . . . . . . . . . . . . . . . . . . . . . . . . . . . . . . . . . . . . . . . . . . . . . . . . . . . . . . . . . . . . . . . . . . . . . . .51
6.2 Analog Readings . . . . . . . . . . . . . . . . . . . . . . . . . . . . . . . . . . . . . . . . . . . . . . . . . . . . . . . . . . . . . . . . . . .51
6.3 Maintenance Data . . . . . . . . . . . . . . . . . . . . . . . . . . . . . . . . . . . . . . . . . . . . . . . . . . . . . . . . . . . . . . . . . .52
Section 7—Control Modes . . . . . . . . . . . . . . . . . . . . . . . . . . . . . . . . . . . . . . . . . . . . . . . . . . . . .54
7.1 Introduction . . . . . . . . . . . . . . . . . . . . . . . . . . . . . . . . . . . . . . . . . . . . . . . . . . . . . . . . . . . . . . . . . . . . . . .54
7.2 Switch Control Modes . . . . . . . . . . . . . . . . . . . . . . . . . . . . . . . . . . . . . . . . . . . . . . . . . . . . . . . . . . . . . . .54
7.3 Load Shedding Control Mode . . . . . . . . . . . . . . . . . . . . . . . . . . . . . . . . . . . . . . . . . . . . . . . . . . . . . . . . .56
Section 8—Troubleshooting . . . . . . . . . . . . . . . . . . . . . . . . . . . . . . . . . . . . . . . . . . . . . . . . . . . .57
8.1 Operator Checks . . . . . . . . . . . . . . . . . . . . . . . . . . . . . . . . . . . . . . . . . . . . . . . . . . . . . . . . . . . . . . . . . . .57
8.2 Common Problem Areas . . . . . . . . . . . . . . . . . . . . . . . . . . . . . . . . . . . . . . . . . . . . . . . . . . . . . . . . . . . . .57
8.3 Common Alarms—What to Look for . . . . . . . . . . . . . . . . . . . . . . . . . . . . . . . . . . . . . . . . . . . . . . . . . . . .60
Section 9—Maintenance . . . . . . . . . . . . . . . . . . . . . . . . . . . . . . . . . . . . . . . . . . . . . . . . . . . . . .63
9.1 Operator Maintenance . . . . . . . . . . . . . . . . . . . . . . . . . . . . . . . . . . . . . . . . . . . . . . . . . . . . . . . . . . . . . . .63
9.2 Replaceable Parts . . . . . . . . . . . . . . . . . . . . . . . . . . . . . . . . . . . . . . . . . . . . . . . . . . . . . . . . . . . . . . . . . .63
Appendix A—Specifications . . . . . . . . . . . . . . . . . . . . . . . . . . . . . . . . . . . . . . . . . . . . . . . . . . . .64
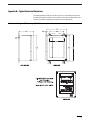
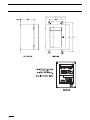
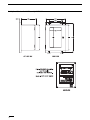
Appendix B—Typical Enclosure Dimensions . . . . . . . . . . . . . . . . . . . . . . . . . . . . . . . . . . . . . . . . .65
B.1 Standard Fiberglass EMR Assembly . . . . . . . . . . . . . . . . . . . . . . . . . . . . . . . . . . . . . . . . . . . . . . . . . . . .65
B.2 Optional Stainless Steel EMR Assembly . . . . . . . . . . . . . . . . . . . . . . . . . . . . . . . . . . . . . . . . . . . . . . . . .66
B.3 Standard Fiberglass SSR Assembly . . . . . . . . . . . . . . . . . . . . . . . . . . . . . . . . . . . . . . . . . . . . . . . . . . . .67
B.4 Optional Stainless Steel SSR Assembly . . . . . . . . . . . . . . . . . . . . . . . . . . . . . . . . . . . . . . . . . . . . . . . . .68
B.5 910 Series HTC Control Module Dimensions . . . . . . . . . . . . . . . . . . . . . . . . . . . . . . . . . . . . . . . . . . . . .69
Appendix C—Wiring Diagrams . . . . . . . . . . . . . . . . . . . . . . . . . . . . . . . . . . . . . . . . . . . . . . . . . .70
C.1 TS Wiring . . . . . . . . . . . . . . . . . . . . . . . . . . . . . . . . . . . . . . . . . . . . . . . . . . . . . . . . . . . . . . . . . . . . . . . .70
C.2 Power Wiring . . . . . . . . . . . . . . . . . . . . . . . . . . . . . . . . . . . . . . . . . . . . . . . . . . . . . . . . . . . . . . . . . . . . .70
C.3 Communications Wiring . . . . . . . . . . . . . . . . . . . . . . . . . . . . . . . . . . . . . . . . . . . . . . . . . . . . . . . . . . . . .71
C.4 Alarm Output Wiring . . . . . . . . . . . . . . . . . . . . . . . . . . . . . . . . . . . . . . . . . . . . . . . . . . . . . . . . . . . . . . . .72
C.5 External Input/Output Port Wiring . . . . . . . . . . . . . . . . . . . . . . . . . . . . . . . . . . . . . . . . . . . . . . . . . . . . . .73
Appendix D—HTC Load Shedding Sequence . . . . . . . . . . . . . . . . . . . . . . . . . . . . . . . . . . . . . . . . .74
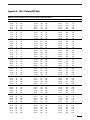
Appendix E—100 Ω Platinum RTD Table . . . . . . . . . . . . . . . . . . . . . . . . . . . . . . . . . . . . . . . . . . .75
Appendix F—100 Ω Nickel-Iron RTD Table . . . . . . . . . . . . . . . . . . . . . . . . . . . . . . . . . . . . . . . . . .76
Appendix G—Factory Default Configuration V3.1X . . . . . . . . . . . . . . . . . . . . . . . . . . . . . . . . . . . .77
910 Series HTC . . . . . . . . . . . . . . . . . . . . . . . . . . . . . . . . . . . . . . . . . . . . . . . . . . . . . . . . . . . . . . . . . . . . . . .77
3
DigiTrace® 910 Series Heat Trace Controller
Installation and Maintenance Instructions for Firmware Versions up to and Including
V3.1X
Notice: The information contained in this document is subject to change without notice.
Certification
Tyco Thermal Controls certifies that this product met its published specifications at the time
of shipment from the Factory.
Limited Warranty
This Tyco Thermal Controls product is warranted against defects in material and workmanship for a period of 18 months from the date of installation or 24 months from the date of
purchase, whichever occurs first. During the warranty period, Tyco Thermal Controls will, at
its option, either repair or replace products that prove to be defective.
For warranty service or repair, this product must be returned to a service facility designated
by Tyco Thermal Controls. The Buyer shall prepay shipping charges to Tyco Thermal
Controls and Tyco Thermal Controls shall pay shipping charges to return the product to the
Buyer. However, the Buyer shall pay all shipping charges, duties, and taxes for products
returned to Tyco Thermal Controls from another country.
Tyco Thermal Controls warrants that the software and firmware designated by Tyco Thermal
Controls for use with the DigiTrace 910 Controller will execute its programming instructions
properly. Tyco Thermal Controls does not warrant that the operation of the hardware, or
software, or firmware will be uninterrupted or error-free.
Warranty Exclusion/Disclaimer
The foregoing warranty shall not apply to defects resulting from improper or inadequate
maintenance by the Buyer, Buyer-supplied software or interfacing, unauthorized modification or misuse, operation outside of the specifications for the product, or improper installation.
No other warranty is expressed or implied. Tyco Thermal Controls disclaims the implied
warranties of merchantability and fitness for a particular purpose.
Exclusive Remedies
The remedies provided herein are the buyer’s sole and exclusive remedies. Tyco Thermal
Controls shall not be liable for any direct, indirect, special, incidental, or consequential damages, whether based on contract, tort, or any other legal theory.
4
Conducted and Radiated Emissions—FCC/DOC Statement of Compliance
This equipment has been tested and found to comply with the limits for a Class A digital
device, pursuant to Part 15 of the FCC rules. These limits are designed to provide reasonable protection against harmful interference when the equipment is operated in a commercial environment. This equipment generates, uses, and can radiate radio frequency energy
and, if not installed and used in accordance with the instruction manual, may cause harmful
interference to radio communications. Operation of this equipment in a residential area is
likely to cause harmful interference, in which case the user will be required to correct the
interference at his own expense.
This equipment does not exceed Class A limits for radio emissions as set out in Schedule V
to VIII of the Radio Interference Regulations of Communication Canada.
Cet apparel respecte les limites de bruits radioelectriques applicables aux appareils
numeriques de Classe A prescrites dans la norme sur le materiel brouilleur: “Appareils
Numeriques,” NMB-003 edictee par le Ministre des Communications.
5
Section 1—Overview
1.1 Introduction
This manual provides information pertaining to the installation, operation, testing, adjustment, and maintenance of the Tyco Thermal Controls DigiTrace™ Model 910 Series Heat
Tracing Controller.
Additional copies of this user manual may be ordered separately through your Tyco Thermal
Controls representative or online at www.tycothermal.com using the document number
H56873.
1.2 Controllers Covered by this Manual
This document covers the 910 Series Heat Trace Controllers and its available options. The
information coincides with the specific releases of firmware for the 910 product which are
listed on the front page. As Tyco Thermal Controls releases new firmware to modify or
enhance the product significantly, new documentation will accompany these releases. To
ensure that you are using the correct documentation for your particular version of controller,
please check the firmware version number of the 910 against the version number listed on
the front of this manual. This may be displayed using the Operator Console or a communicating device. As subsequent changes are made, supplements to this document will be
issued and included in manuals shipped after the firmware is released. Supplements will
make specific reference to the operational or functional changes, and are available at
www.tycothermal.com.
1.3 Product Overview
1.3.1 DESCRIPTION
The 910 Series electronic Heat Tracing Controller controls, monitors, and communicates
alarms and data for one heating circuit. The ability to install the units in Class 1, Division 2
areas supports direct field installation, if desired. It is available with a solid-state relay (SSR)
output for use in hazardous areas or with electro-mechanical relay (EMR) output for use in
ordinary (non-hazardous) areas.
1.3.2 FEATURES
A detailed description of available features may be found in Section V of this manual.
Highlights of specific features follow.
Keypad and Alphanumeric Display
A six character alphanumeric LED display provides the operator with large easy to read messages and prompts, eliminating complex and cryptic programming. Six individual keys are
provided to quickly access alarming and operational information.
–40°F to 140°F (–40°C to 60°C) Operation
Extended temperature operation permits installation in all but the harshest environments.
Single or Dual Temperature Sensor Inputs
The ability to utilize one or two temperature sensor (TS) inputs allows the selection of one of
eight control modes and programming of all temperature parameters.
High and Low Temperature Alarms
High and low temperature alarms are offered for both temperature sensor inputs of each
control point.
6
High and Low Current Alarms
The 910 offers full adjustment of both the high and low alarm points over the entire current
measurement range.
Solid State or Electromechanical Relay (EMR) Output
The 910 is available with either a solid-state relay (SSR) or an electromechanical relay
(EMR) output switch. With the SSR option, the user may select a time-proportional control
algorithm, a simple deadband control mode, or one of two ambient control algorithms. The
EMR version always uses either the deadband mode or the proportional ambient contactor
mode. Switching device failure alarms are supported for both types of output devices.
Ground Fault Alarm and Trip
Ground Fault (GF) current levels are monitored and may be displayed in milliamps. The
availability of the actual ground fault level gives the user the choice of both alarm and trip
levels suitable for the particular installation.
Overcurrent Protection
A unique overcurrent protection algorithm greatly reduces the possibility of damage to the
circuit or the controller in the event of a temporary overload while allowing for initially high
in-rush currents (SSR options only).
Soft Starting
Given the circuit breaker size, the 910 will limit the energy let-through to help prevent nuisance breaker trips due to cable in-rush. This feature makes the controller particularly
attractive for use with self-regulating cables (SSR options only).
Minimum/Maximum Temperature Tracking
The controller maintains the minimum and maximum temperature values it has measured
since the last reset of these values. This is helpful in determining causes of temperature
alarms.
Latching/Non-Latching Temperature Alarms
User selectable non-latching temperature alarms allow the controller to automatically clear
the alarm when the condition no longer exists.
High and Low Voltage Alarms
Operating at voltages less than design can cause serious loss of heater output. The alarming of preset voltage deviations ensures availability of sufficient wattage output.
Power-Limiting
The 910 will control the maximum output wattage if the full load power exceeds the specified Maximum Power Setpoint. This feature eliminates the need for low voltage transformers in many applications and can assist in standardization of heating cable types (SSR
options only).
Autocycling
The controller will momentarily energize the circuit (for 10 seconds) at a programmable
interval. Circuit alarms will be generated at the time of autocycle instead of when the heat is
required. This feature eliminates the need for a preventive maintenance program as these
tests are performed at regular intervals by the controller.
Temperature Sensor Failure Alarm
Both open and shorted sensors are detected and alarmed by the controller.
Random Start
A startup delay between 0 and 9 seconds ensures that all units do not come on line at the
same time.
7
Full Digital Communications
An optional internal communications interface allows the communication of alarms and
analog data to a monitoring system. Industry-standard RS-232 or RS-485 serial communications are available for applications requiring direct interfacing to other devices. The
modem version maintains compatibility with legacy products, including the Group
Communications Controller (Model 780/GCC-9000). With heat trace data at the user’s fingertips, historical trending of temperatures, power consumption, or other parameters are
available for analysis and system optimization.
CSA C/US
The 910 Series of controllers are approved for Class I, Division 2, Groups A, B, C, D
hazardous locations making them ideal for direct installation in the field. This may save
the significant expense of wiring back to a centrally located electrical distribution center.
1.4 Modular Components
The 910 Series controller is made up of two components. Each component’s primary function is described below.
1.4.1 CONTROL MODULE
The 910 Control Module forms the heart of a single heat trace control solution. Each Control
Module provides all of the intelligence required to control and monitor one heat trace circuit.
It includes indicators for alarm and output status and an integral Operator Console. An internal connector is provided to plug in an optional communications interface.
The Control Module packaging provides a rugged, vibration-proof design.
Temperature sensor, communications, and alarm control wiring are connected to the leveroperated spring terminals, providing gas-tight, vibration-resistant connections.
A large, easy-to-read alphanumeric display and menu-driven interface eases controller configuration and eliminates the need for an external programmer. Access is available for all
monitored parameters, programmed values, and alarm information. Enhanced security is
provided by password protection.
Single phase current monitoring, ground fault detection, and voltage monitoring are provided. The 910 Control Module also incorporates a universal power supply, allowing operation
directly from 100 to 277 Vac.
1.4.2 COMMUNICATIONS INTERFACE
In applications where the user wishes remote configuration capability, or wants to communicate trace information and/or alarms to another device such as a Group Communications
Controller (780 Series/GCC-9000), an optional communications interface may be installed in
the Control Module.
A modem version that maintains compatibility with legacy products is available, or other
industry-standard interfaces such as RS-232 and RS-485 may be specified.
1.5 Controller Assemblies
Two standard assemblies are available and stocked at the Factory:
1. An SSR version for use in ordinary or Class I, Division 2 areas
2. An EMR version for use in ordinary locations only
8
1.6 Ordering and Configuration Guide
DIGITRACE 910 CONTROLLERS – FACTORY INVENTORY
Description
Catalog Number
Part Number
Weight
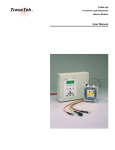
DigiTrace 910 controller in an 8" x 10" FRP enclosure with window.
2-pole 30 A EMR. Controls a single circuit with a 2-pole electromechanical relay.
(Approved for ordinary areas only)
910*E1FWL*EMR2
10170-001
15
DigiTrace 910 controller in an 8" x 10" FRP enclosure with window.
2-pole 30 A EMR. Controls a single circuit with a 2-pole electromechanical relay.
Includes an isolated 2-wire RS-485 communication option.
(Approved for ordinary areas only)
910*E1FWL*EMR2*485
10170-015
15
DigiTrace 910 controller in an 8" x 10" FRP enclosure with window.
2-pole 30 A 277 V SSR. Controls a single circuit with a 2-pole solid-state relay.
(Approved for Class I, Div. 2 areas)
910*E1FWL*SSR2
10170-002
20
DigiTrace 910 controller in an 8" x 10" FRP enclosure with window.
2-pole 30 A 277 V SSR. Controls a single circuit with a 2-pole solid-state relay.
Includes an isolated 2-wire RS-485 communication option.
(Approved for Class I, Div. 2 areas)
910*E1FWL*SSR2*485
10170-016
20
DigiTrace-DigiTrace Supervisor Software
DigiTrace Supervisor
10391-002
1
DIGITRACE 910 CONTROLLERS – MADE-TO-ORDER (Contact factory for lead time)
DigiTrace 910 controller in an 8" x 10" stainless-steel enclosure with window.
2-pole 30 A EMR. Controls a single circuit with a 2-pole electromechanical relay.
(Approved for ordinary areas only)
910*E1SW*EMR2
10170-003
20
DigiTrace 910 controller in an 8" x 10" stainless-steel enclosure with window.
2-pole 30 A EMR. Controls a single circuit with a 2-pole electromechanical relay.
Includes an isolated 2-wire RS-485 communication option.
(Approved for ordinary areas only)
910*E1SW*EMR2*485
10170-017
20
DigiTrace 910 controller in an 8" x 10" stainless-steel enclosure with window.
2-pole 30 A 277 V SSR. Controls a single circuit with a 2-pole solid-state relay.
(Approved for Class I, Div. 2 areas)
910*E1SW*SSR2
10170-004
25
DigiTrace 910 controller in an 8" x 10" stainless-steel enclosure with window.
2-pole 30 A 277 V SSR. Controls a single circuit with a 2-pole electromechanical
relay. Includes an isolated 2-wire RS-485 communication option.
(Approved for Class I, Div. 2 areas)
910*E1SW*SSR2*485
10170-018
25
100-ohm platinum RTD with 10' stainless-steel corrugated sheath
RTD10CS
RTD10CS
1.0
RTD, ambient, cable style
MONI-RTD-200
254741
0.1
C1D1 RTD, –100°F to 900°F, pipe mounted
RTD7AL
RTD7AL
2.0
RTD, –100°F to 900°F, pipe mounted
RTD4AL
RTD4AL
1.2
RTD SENSORS
OPTIONS
Append the following code(s) to the end of the standard Model Code to have the option
included at the factory.
Option Code
Description
*232
RS-232 communications option (replace *485 with *232)
*MDM
Modem communications option (replace *485 with *MDM)
*ALR
Red LED pilot light
*ALG
Green LED pilot light
Contact your local representative for configurations not listed here.
9
Section 2—Installation and Wiring
Caution: Be sure all personnel involved in installation, servicing, and programming are qualified and familiar with electrical equipment, their ratings and proper practices and codes.
Multiple voltages and signal levels may be present during the installation, operation, and
servicing of this product. Do not power the product until the safety provisions outlined in
this section have been observed.
2.1 Introduction
This section includes information regarding the initial inspection, preparation for use, and
storage instructions for the 910 Series Heat Trace Controller.
2.2 Initial Inspection
Inspect the shipping container for damage. If the shipping container or cushioning material
is damaged, it should be kept until the contents of the shipment have been verified for completeness and the equipment has been checked mechanically and electrically. Procedures
for configuring and operating the heat trace controller are given in Sections III, IV, and V. If
the shipment is incomplete, there is mechanical damage, a defect, or the controller does not
pass the electrical performance tests, notify the nearest Tyco Thermal Controls representative. If the shipping container is damaged, or the cushioning material shows signs of stress,
notify the carrier as well as your Tyco Thermal Controls representative. Keep the shipping
materials for the carrier’s inspection.
2.3 Operator Safety Considerations
The standard 910 controller using solid-state relays is suitable for Class 1, Division 2,
Groups A, B, C, and D hazardous areas. Hazardous areas are defined by Article 500 of the
National Electrical Code and Section 18 of the Canadian Electrical Code. Electromechanical
relay (EMR) based assemblies are suitable for use in ordinary (non-hazardous) areas only.
Caution: Some wiring configurations will use more than one power source and all must be
de-energized prior to performing any maintenance on a controller circuit.
2.4 Operating Environment
The operating environment should be within the limitations specified in the 910 Heat Trace
Controller Specifications outlined in Appendix A.
2.5 Installation Location
The wide ambient operating temperature range of the controller permits installation in most
any convenient location. Considerations should include expected atmospheric conditions,
accessibility for maintenance and testing, the location of existing conduits and hazardous
area rating. Ambient temperature conditions may affect load current ratings.
Caution: Always be sure that the intended location is classified as an area that the product
is approved for as defined by Article 500 of the National Electrical Code and/or Part I,
Section 18 of the Canadian Electrical Code.
10
2.6 Mounting Procedures
Mounting hole dimensions for the standard enclosures are shown in Appendix B. Conduit
entries should be made in the bottom of the enclosure if possible to reduce the possibility
of water entry or leakage. Conduit entries must be drilled/punched following the enclosure
manufacturers’ recommendations. Use bushings suitable for the enclosure type and install
such that the completed installation remains waterproof. For nonmetallic enclosures,
grounding hubs and conductors must be installed in accordance with Article 501-4(b) of the
National Electrical Code and Part I of the Canadian Electrical Code.
The user may want to consider enclosure drain holes in applications where moisture is a
problem; drill 0.125" holes in the bottom of the enclosure on both the left and right sides.
Two holes reduce the possibility that one will plug and ensures drainage if the enclosure is
not perfectly level. Note that drilling holes in the enclosure compromises the NEMA 4 rating.
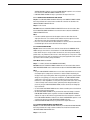
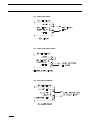
2.6.1 Controller Installation and Removal
Caution: Always ensure that the power to the unit is turned off during installation or
removal to avoid the risk of injury and damage to the controllers.
Warning—Explosion Hazard! Do not install or remove the control module while the unit is
powered.
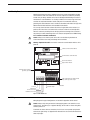
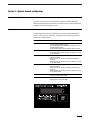
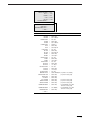
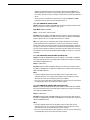
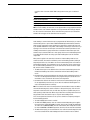
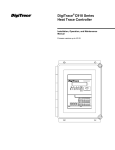
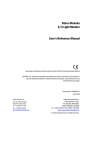
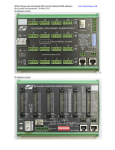
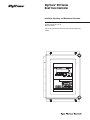
HTCBus communications address
Communications status indicators
Alarm status indicator
Output status indicator
Communications interface
type label (optional)
RTD, communications, inhibit/override
input, alarm dry contact output
D910-010
L1/Line in
L2/Neutral in
L1/Line out to tracer
L2/Neutral out to tracer
AC alarm output
Fig. 2.1 Control module face
2.7 Wiring
Wiring diagrams for typical configurations are included in Appendix C of this manual.
Caution: Always verify wiring connections before applying power to the controller or connected circuits. To avoid injury or equipment damage, do not install or remove wiring while
controller power is on.
To minimize the chance of loose connections, the 910 uses lever-operated, spring-loaded
terminals for signal wiring. See Appendix A for allowable wire sizes and recommended insulation strip lengths.
11
2.7.1 TEMPERATURE SENSOR CONNECTIONS
Use shielded, twisted, three-conductor wire for the extension of RTD leads. The wire size
should ensure that the maximum allowable lead resistance is not exceeded. Shields on RTD
wiring should be grounded at the controller end only, using the terminals provided.
Temperature Sensors
Terminal No.
Shield
19
TS 1 Source (WHT)
20
TS 1 Sense (WHT)
21
TS 1 Common (RED)
22
Shield
8
TS 2 Source (WHT)
9
TS 2 Sense (WHT)
10
TS 2 Common (RED)
11
2.7.2 ALARM RELAY CONNECTIONS
Two types of alarm relays are provided: one is a programmable dry contact output relay and
the other is a line voltage AC relay (Triac). Both may be programmed for N.O., N.C., steady
or flashing operation, and are typically used to annunciate an alarm to an external device
such as a DCS, PLC, etc.
Notes:
• Both alarm relays are controlled by the 910 using the same signal. The N.O., N.C., and
flashing parameter settings affect both the dry contact and the AC alarm relays.
• The dry contact alarm relay is intended to be used for switching low-voltage, low-current
signals. Do not use this relay to directly switch line voltages. Ensure that your application stays within the ratings of the relay contacts as defined in Appendix A.
The AC alarm relay alarm relay is typically used to drive a local, external, line-voltage pilot
light, etc. Refer to the wiring diagrams in Appendix C for example connection details.
Dry Contact Alarm and Control Signals
Terminal No.
Alarm relay dry contact output
14
Alarm relay dry contact output
15
Ground
4
+12Vdc nom. Out
3
AC Alarm and Control Signals
Terminal No.
L1/Line out
1
L2/Neutral out
2
AC alarm relay
12
AC alarm relay
13
2.7.3 EXTERNAL CONTACT INPUT/OUTPUT
These input terminals are used to implement the inhibit and override features. Refer to
Section V of this manual for programming details, and Appendix C for example wiring diagrams.
Miscellaneous Signals
12
Terminal No.
External input (+)
6
External input (-)
7
2.7.4 COMMUNICATION SIGNAL CONNECTIONS
The communications terminal assignments change based on the type of option installed. If
present in a 910 Control Module, the type of communications interface will be identified by
a label located on the front of the control module (Figure 2.1).
Communications wiring should use twisted pair, shielded cable. Shields on communications
wiring should be grounded at one end only, using the terminals provided.
The following tables define the appropriate signal connections for the various types of interfaces:
RS-485 (2-Wire) Connections
Communication Signal
Terminal No.
Receive/transmit data (+)
16
Receive/transmit data (-)
17
Shield
18
RS-232 (3-Wire) Connections
Communication Signal
Terminal No.
Receive data
16
Transmit data
17
Common
18
Modem Interface Connections
Communication Signal
Modem
Terminal No.
16
Modem
17
Shield
18
2.7.5 POWER CONNECTIONS
All of the power terminals are labeled for easy identification. Do not attempt to use wire
sizes that exceed the marked terminal ratings and avoid terminating two wires on the same
terminal whenever possible.
Always be sure that all terminals are adequately tightened according to the terminal manufacturer’s specification. See Appendix A for allowable wire sizes, recommended insulation
strip lengths, and tightening torque. A loose terminal can cause arcing and damage to the
terminal or incorrect operation of the controller.
Note: Make sure that power terminals are retightened several days after installation.
Stranded wire will tend to compress when initially installed; therefore, these terminals
should be checked for tightness several times after the system is installed to ensure that a
good connection is maintained. Be certain to use the proper size screwdriver for the terminal blocks to minimize the chance of damage to the terminals.
If the controllers are installed in either a metallic or non-metallic enclosure, follow the
enclosure manufacturer’s recommendations for proper grounding. Do not rely on conduit
connections to provide a suitable ground.
Grounding terminals/screws are provided for connection of system ground leads. Proper
system grounding is required for safe and correct operation of the controller’s protection
features.
13
2.7.6 INPUT POWER
The 910 controller may be powered directly from a 100 to 277 Vac circuit. The wiring terminal assignments are defined below.
Power Connections
Terminal No.
Line/L1 power input
A
Neutral/L2 power input
B
Line/L1 output to trace
C
Neutral/L2 output to trace
D
Wiring diagrams for typical configurations are included in Appendix C.
Caution: Many wiring configurations will use more than one power source and all must be
de-energized prior to performing any maintenance on a controller circuit.
2.8 Initial Power-up
Caution: Before applying power to the controller, ensure that powering the circuit will not
damage it if power limiting or the setpoint temperature have not been set correctly. If there
is any doubt, the load should be disconnected until the 910 has been suitably programmed
for correct and safe operation.
2.8.1 INITIAL CABLE TEST
To minimize the risk of damage to the controller due to a cable fault, the integrity of the
heating cable should be verified by:
1. Performing a high voltage insulation test using a “Megger”
2. Using an ohmmeter to ensure that the heating cable is not shorted
These tests must be performed with the controller output disconnected.
Once the cable has been checked, it may be reconnected to the controller and power
applied.
2.8.2 RANDOM START DELAY
All 910 Series Control Modules incorporate a RANDOM START-UP DELAY feature, ensuring
that all units do not power on at the same time. When power is first applied to a controller, it
will hold its output off for a random time (0 to 9 seconds), equal to the last digit of the
HTCBUS™ communications address (see Section 5.6.2). Once the start-up delay has timed
out, the controller will begin normal operation.
2.9 Setup for the 910
The 910 may be programmed using the Operator Console, or if a communications option is
installed, with an external communicating device. For instructions on the operation of these
devices, refer to the corresponding operating manuals. For complete instructions on programming the 910, see the Programming and Configuration Section of this manual.
14
Section 3—Operator Console and Operation
3.1 Alphanumeric Display
The console incorporates a six character, fourteen segment plus decimal LED display.
Messages and prompts that are greater than six characters long are scrolled, allowing more
meaningful, non-cryptic messages to be used.
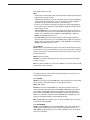
3.2 Keypad
The local keypad consists of six keys that allow you to select the console mode function
that you are interested in. For certain keys, the SHIFT key selects an alternate function, as
shown by the text above that key.
Key
Function
SHIFT
• Press to activate a SHIFTed function; the next key pressed
uses the alternate (shifted) function
• The SHIFT LED illuminates, indicating the next key uses the
alternate (shifted) function
• Pressing SHIFT again cancels the alternate (shifted) function
TEST [shift ALARM]
• Turns on tracing for 30 seconds
• When prefixed by the SHIFT key, this key switches the console
to the Alarm mode
BACK [shift MONITOR]
• Exits the current menu (or cancels the new setting when
editing a parameter)
• Moves the cursor to the left when editing an alphanumeric
parameter
• When prefixed by the SHIFT key, this key switches the console
to the Monitor mode
ENTER [shift CONFIG]
• Selects the item in the display (or accepts the setting when
editing a parameter)
• Moves the cursor to the right when editing an alphanumeric
parameter
• When prefixed by the SHIFT key, this key switches the console
to the Configure mode
• Moves to the previous item in a menu
• Increments the value when editing
• Moves to the next item in a menu
• Decrements the value when editing
15
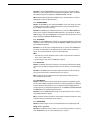
3.3 LED Indicators
The console includes eight LED indicators:
Four LEDs indicate the console operating mode (SHIFTed function, ALARM, MONITOR, or
CONFIGure modes).
There are two status LEDs which indicate the alarm and control output status of the
controller:
1. The output LED, when illuminated steadily, indicates that the output of the controller is
turned on and is allowing current to flow into the loadtrace circuit. For SSR versions programmed for proportional modes, a flashing LED indicates that the controller is pulsing
its output on and off to maintain the setpoint temperature and/or control the average
amount of current/power the tracer uses.
2. The alarm LED will flash (approximately once per second) when the controller has detected an alarm condition.
The two additional LEDs are used to indicate external communications activity and are only
used when an optional communications interface is installed. The “Rx” LED flashes to show
that the Controller is receiving information via its communications port. The “Tx” LED
flashes when the Controller is transmitting information via its communications port.
3.4 Operational Basics
3.4.1 OPERATING MODES
The console operates in one of four modes and is related to the basic function the operator
selects.
Mode
Function
Scan
This is the default mode. In this mode, the console
sequentially displays load current, temperature, and
setpoint readings.
Alarm
Invoked when you press the SHIFT key followed by the
ALARM key. This mode allows you to examine or reset any
alarms that may exist. The LED above the ALARM key is
illuminated while in this mode.
Monitor
Invoked when you press the SHIFT key followed by
MONITOR key. In this mode, you may examine any of
the controller readings such as temperature, load current,
etc. The LED above the MONITOR key is illuminated while
in this mode.
Configure
Invoked when you press the SHIFT key followed by
CONFIG key. In this mode, you may examine or alter the
controller configuration. The LED above the CONFIG key
is illuminated while in this mode
3.4.2 MENUS
Each of the operating modes has a list of data items associated with it. For example, in the
Monitor mode you may view temperatures, load current, resistance, ground fault current,
voltage, or power information. This collection of data items is referred to as a menu.
Only one menu item may be viewed at a time. The () keys move to the next (previous)
item in the menu. When you reach the end of the menu (indicated by ---- END ---), wraps you to the first item in the menu; conversely, wraps you to the last item in the
menu.
Some of the items within a menu are actually entry points to sub-menus—these entries are
indicated with “…” at the end of the message. To enter a sub-menu, press the key. To
move around in the menu, use the and keys move to the next and previous items
respectively. The key exits the current menu and returns to the previous menu.
16
After approximately five minutes of keypad inactivity, the current menu and mode will be
exited and the console will revert to the Scan mode.
Note: Some menus are dynamic; that is, some items appear or disappear depending on the
configuration. For example, if you disable the Low Voltage Alarm, then the corresponding
Low Voltage Setpoint is not available and will not be displayed.
3.4.3 CHANGING THE CONFIGURATION
To change the Controller configuration, follow the directions listed below.
• Position the desired parameter (menu item) in the display.
• Press the key to initiate an edit session.
• If the console is “locked” you are prompted to enter the passcode.
• The present setting will flash on the display to indicate that you are editing the parameter.
• Use the and keys to change the value.
• The operation of the and varies depends on the type of data being editing. See the following sections for details.
Note: Once you have initiated an edit session, you must end it before switching to another
mode or invoking another function. An edit session ends when you enter a new value (using
the key) or you back out of it (using the key).
3.4.4 CHANGING A NON-NUMERIC PARAMETER
To change a non-numeric parameter (e.g.: an alarm mask setting), follow the directions
below.
• Position the appropriate parameter in the display.
• Press the key to initiate the edit session.
• If the console is “locked” you are prompted to enter the passcode.
• The present setting will flash on the display to indicate that you are editing the parameter.
• Use or until the desired value appears in the display.
• Pressing saves the new value.
• Pressing ends the edit session without altering the parameter.
3.4.5 CHANGING A NUMERIC PARAMETER
To change a numeric parameter (e.g. the control setpoint), follow the directions below.
• Position the appropriate parameter in the display.
• Press the key to initiate the edit session.
• If the console is “locked” you are prompted to enter the passcode.
• The present value is displayed and the last (rightmost) digit blinks.
• The blinking digit identifies the digit that you are editing.
• Use or to set the desired value.
• Use or to move to a different digit.
• To enter a negative value, scroll to the first (leftmost) digit until a “-” appears in the
display.
• Pressing while on the last (rightmost) digit saves the new value.
• Pressing while on the first (leftmost) digit ends the edit session without altering the
parameter.
3.4.6 PASSCODE PROTECTION
The 910 Series Controller provides a passcode for protection of its configuration. You may
view any portion of the configuration with the console “locked”; however, when you attempt
to initiate an edit session by pressing , you are prompted to enter the passcode. Entering
the passcode is just like entering any other numeric value; see Section 3.4.5 “Changing a
Numeric Parameter.”
Once the console is “unlocked,” you may edit any configuration parameter. The console will
automatically re-lock after approximately five minutes of keypad inactivity, or until the user
explicitly locks it.
Notes:
• Setting the programmed passcode to “0” disables passcode protection.
17
• The console does not have to be unlocked to reset alarms.
3.4.7 FEATURE MODES
There are two types Configuration Menus in the 910 Series Controller.
1. A “Basic” Configuration Menu which only contains seven parameters
2. An “Advanced” Configuration Menu which contains all of the parameters
Both types of Configuration Menus contain a “Feature Mode” parameter which allows the
user to select which type of Configuration Menu is most desirable.
3.4.8 QUICK NOTES ON OPERATION
Remember the following basic rules for efficient Console use:
• Use the SHIFT key followed by the appropriate function key—ALARM, MONITOR, or
CONFIG—to select the operating mode
• Use and to move around in the menu
• Use to enter a new menu, enter a new value, or select a menu item
• Use to exit the current menu or cancel an edit
Section 4—Operator Console Modes
4.1 Alarm Mode
The Alarm mode is invoked when you press the SHIFT key followed by the ALARM key. This
mode allows you to examine and reset any alarms that may exist. Use () to examine
the next (previous) active alarm.
4.1.1 RESETTING ONE ALARM
To reset an alarm, press . You are prompted for confirmation; answering YES resets the
alarm and advances you to the next alarm.
4.1.2 RESETTING ALL ALARMS
To reset all active alarms, press . You are prompted for confirmation; press to select
ALL and press to accept.
4.1.3 MONITOR MODE TRACKING
The Monitor mode “tracks” the Alarm mode. If the Monitor mode is selected while viewing
an alarm, the controller will enter the MONITOR menu and display an appropriate reading.
For example, if you are examining a High Load Current Alarm and then select the Monitor
mode, the starting point within the MONITOR menu will be the load current reading. Once
the Monitor mode has been selected, you may move around in the menu using and .
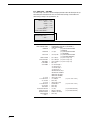
4.1.4 ALARM MESSAGES
Table 4.1 lists sample alarms and the corresponding starting point in the Monitor mode
menu, if it is invoked from the Alarm mode.
18
Table 4.1 Alarm Messages
Sample Alarm
LO TS 1
HI TS 1
TS 1 FAIL
Message
Monitor Mode Starting Point
= –2°C
TS 1 temperature
= 102°C
TS 1 temperature
= ALARM
TS 1 temperature
LO TS 2
= –4°C
TS 2 temperature
HI TS 2
= 105°C
TS 2 temperature
TS 2 FAIL
= ALARM
TS 2 temperature
CTL TS FAIL
= ALARM
Control temperature
LO LOAD
= 0.5 A
Load current
HI LOAD
= 21.0 A
Load current
HI GFI
= 52 mA
Ground fault current
GFI TRIP
= 77 mA
Ground fault current
LO VOLT
= 85 V
Voltage
HI VOLT
= 140 V
Voltage
LO RESIST
= 3.38 Ω
Resistance
HI RESIST
= 9.24 Ω
Resistance
OVERCURRENT TRIP
= ALARM
Load current
SWITCH FAIL
= ALARM
Load current
Time since last reset
HTC RESET
= ALARM
SWITCH LIMITING
= ALARM
Load current
C.B. LIMITING
= ALARM
Load current
POWER LIMITING
= ALARM
Power
EEROM DATA FAIL
= ALARM
n/a
CONTACTOR COUNT
= 200000
Contactor cycle count
4.2 Monitor Mode
The Monitor mode is invoked when you press the SHIFT key followed by the MONITOR key.
This mode allows you to test the heat tracing and examine any of the analog readings. The
data is updated in real-time, providing the user with a method of viewing tracer information
as it occurs.
4.2.1 MAIN MENU
Table 4.2 Monitor Mode Main Menu
CONTROL MODE
=
4°C
TS 1 TEMP
=
4°C
TS 2 TEMP
=
7°C
LOAD
=
8.9 A
RESIST
=
13.26 Ω
GFI
=
0 mA
(only if TS2 is being used)
VOLT
=
118 V
POWER
=
1050 W
TEST TRACING
=
(Turn on tracing for 30 seconds)
DISPLAY TEST
=
(To abort DISPLAY TEST, press any key)
MAINTENANCE DATA…
=
Note the “…” indicating a sub-menu
(or POWER = 10.4 kW)
--- END ----
4.2.2 “MAINTENANCE DATA…” SUB-MENU
This sub-menu is used to view minimum and maximum temperatures, total accumulated
power, hours in use, and the number of hours since the last time the Controller was reset.
19
These parameters may be reset by the user.
CONTROL TEMP = 4°C
TS 1 TEMP = 4°C
TS 2 TEMP = 7°C
LOAD = 8.9 A
RESIST = 13.26 Ω
GFI = 0 mA
VOLT = 118 V
POWER = 1050 W
TEST TRACING
DISPLAY TEST
MAINTENANCE DATA…
---- END ----
Table 4.3 Maintenance Data Sub-Menu
MIN CTL TEMP
=
–2°C
MAX CTL TEMP
=
65°C
TS 1 MIN TEMP
=
–2°C
TS 1 MAX TEMP
=
65°C
TS 2 MIN TEMP
=
–1°C
TS 2 MAX TEMP
=
61°C
POWER ACCUM
=
145.9 kW-h
CONTACTOR CYCLE COUNT
=
1234
IN USE
=
2896 h
TIME SINCE LAST RESET
=
675 h
(only if Deadband or Prop. Amb. Contactor
modes are being used)
---- END ----
4.3 Configure Mode
The Configure mode is selected when the operator presses the SHIFT key followed by the
CONFIG key. This mode allows you to examine or alter the Controller’s configuration. There
are two types of configuration modes each presenting different features: Basic and
Advanced.
The Basic Configuration Mode will limit the display to seven of the most commonly modified parameters, while the Advanced Configuration Mode presents all of the available parameters. Both Configure mode menus contain a parameter called FEATURE MODE which
allows the user to specify which Configure mode is to be used.
Note: All parameters that are enabled are active with their corresponding settings even if the
Basic Configuration Mode is currently active. Selecting the Basic Configure mode of operation simply hides the display of certain parameters, but does not disable them.
20
4.3.1 Basic Configure Mode Menu
Table 4.4 Basic Configure Mode Menu
CONTROL SETPOINT
=
{–60 to 570}°C
LO TS 1
=
{–60 to 570}°C
LO LOAD
=
{0.3 to 100.0} A
SWITCH CONTROL MODE
=
{Proportional, Prop. Amb., SSR, Deadband, or Prop. Amb.
Contactor}
CIRCUIT BREAKER
=
{0.3 TO 100.0} A (only if SSR is being used)
TEMP UNITS
=
{°C or °F}
FEATURE MODE
=
{Basic or Advanced}
LOCK DATABASE
=
(Only if passcode is not 0 and database is unlocked)
UNLOCK DATABASE
=
(Only if passcode is not 0 and database is locked)
---- END ----
4.3.2 ADVANCED CONFIGURE MODE MAIN MENU
Menu items with a trailing “...” indicate an entry point to a sub-menu. To enter a sub-menu,
use and to position the menu item in the display and then press . Note that the controller “remembers” where you are in the Configure mode if you temporarily switch to a different mode (such as the Monitor mode). Switching back to the Configure mode will return
you to the same menu item.
Note: A few of the controller parameters that are often used have been duplicated in the
Advanced Configure mode main menu for quick access. These parameters (Lo TS 1, Lo
Load, Hi GFI, GFI Trip) may also be accessed using their respective sub-menus.
Table 4.5 Advanced Configure Mode Main Menu
CONTROL SETPOINT
= {–60 to 570}°C
LO TS 1
= {–60 to 570}°C
LO LOAD
= {0.3 to 100.0} A
HI GFI
= {20 to 250} mA
GFI TRIP
= {20 to 250} mA
FEATURE MODE
TS ALARMS CONFIG…
OTHER ALARMS CONFIG…
= {Basic or Advanced}
Note that the menu items with a trailing “…” indicate the
entry point to a sub-menu
POINT SETUP…
MISC SETUP…
COMMUNICATIONS SETUP…
LOCK DATABASE
UNLOCK DATABASE
(Only if passcode is not 0 and database is unlocked)
(Only if passcode is not 0 and database is locked)
---- END ----
This sub-menu is used to set up alarms that relate to any of the temperature sensors. Each
alarm may be ENAbled or DISabled, and if the alarm is ENAbled, an alarm setting may be
entered.
4.3.3 “TS ALARMS CONFIG…” SUB-MENU
This sub-menu is used to set up alarms that relate to any of the temperature sensors. Each
alarm may be ENAbled or DISabled, and if the alarm is ENAbled, an alarm setting may be
entered.
21
CONTROL SETPOINT = 20°C
LO TS 1 = –10°C
LO LOAD = 1.0 A
HI GFI = 50 mA
GFI TRIP = 75 mA
TS ALARMS CONFIG…
OTHER ALARMS CONFIG…
POINT SETUP…
MISC SETUP…
COMMUNICATIONS SETUP…
---- END ----
Table 4.6 TS Alarms Configuration Sub-Menu
TS 1 FAIL
=
{ENA or DIS}
LO TS 1
=
{ENA or DIS}
LO TS 1
=
{–60 TO 570}°C
HI TS 1
=
{ENA or DIS}
HI TS 1
=
{–60 TO 570}°C
TS 2 FAIL
=
{ENA or DIS}
LO TS 2
=
{ENA or DIS}
LO TS 2
=
{–60 TO 570}°C
HI TS 2
=
{ENA or DIS}
HI TS 2
=
{–60 TO 570}°C
LO TS FILTERS
=
{0 to 999} MIN (only if LO TS 1 or 2 are enabled)
HI TS FILTERS
=
{0 to 999} MIN (only if HI TS 1 or 2 are enabled)
LATCH TS ALARMS
=
{YES or NO}
CTL TS FAIL
=
{ENA or DIS}
---- END ----
4.3.4 “OTHER ALARMS CONFIG...” SUB-MENU
This sub-menu allows the user to set up all alarms that do not directly relate to the temperature sensors. These include all AC alarms (voltage, current. ground fault, etc.) as well as
protection settings such as power limiting, etc.
Each alarm may be ENAbled or DISabled. If the alarm is ENAbled, an alarm setting and filter
setting may be entered.
22
CONTROL SETPOINT = 20°C
LO TS 1 = –10°C
LO LOAD = 1.0 A
HI GFI = 50 mA
GFI TRIP = 75 mA
TS ALARMS CONFIG…
OTHER ALARMS CONFIG…
POINT SETUP…
MISC SETUP…
COMMUNICATIONS SETUP…
---- END ----
Table 4.7 Other Alarms Configuration Sub-Menu
LO LOAD
LO LOAD
LO LOAD FILTER
HI LOAD
HI LOAD
HI LOAD FILTER
HI GFI
HI GFI
HI GFI FILTER
GFI TRIP
GFI TRIP
LO VOLT
LO VOLT
LO VOLT FILTER
HI VOLT
HI VOLT
HI VOLT FILTER
LO RESIST
LO RESIST
LO RESIST FILTER
HI RESIST
HI RESIST
HI RESIST FILTER
NOMINAL RESIST
OVERCURRENT TRIP
SWITCH FAIL
HTC RESET
C.B. LIMITING
POWER LIMITING
SWITCH LIMITING
CONTACTOR COUNT
=
=
=
=
=
=
=
=
=
=
=
=
=
=
=
=
=
=
=
=
=
=
=
=
=
=
=
=
=
=
=
{ENA or DIS}
{0.3 to 100.0} A
{0 to 12} S
{ENA or DIS}
{0.3 to 100.0} A
{0 TO 12} S
{ENA or DIS}
{20 to 250} mA
{0 to 12} S
{ENA or DIS}
{20 to 250} mA
{ENA or DIS}
{10 to 330} V
{0 to 12} S
{ENA or DIS}
{10 to 330} V
{0 to 12} S
{ENA or DIS}
{1 to 100} %
{0 to 12} S
{ENA or DIS}
{1 To 250} %
{0 to 12) S
{2.00 to 2000.00} Ω
{ENA or DIS}
{ENA or DIS}
{ENA or DIS}
{ENA or DIS}
{ENA or DIS}
{ENA or DIS}
{ENA or DIS}
CONTACTOR COUNT
=
{0 to 999999}
EEROM DATA FAIL
---- END ----
=
{ENA or DIS}
(only if LO or HI is enabled)
(only if SSR is being used)
(only if SSR is being used)
(only if SSR is being used)
(only if SSR is being used)
(only if Deadband or Prop Amb
Contactor are being used)
(only if Deadband or Prop Amb
Contactor are being used)
23
4.3.5 “POINT SETUP…” SUB-MENU
The “Point Setup” sub-menu is used to configure parameters that relate directly to the specific control point. Included in this menu are control mode settings, circuit breaker and
switch ratings, autocycle set-up parameters, etc.
CONTROL SETPOINT = 20°C
LO TS 1 = –10°C
LO LOAD = 1.0 A
HI GFI = 50 mA
GFI TRIP = 75 mA
TS ALARMS CONFIG…
OTHER ALARMS CONFIG…
POINT SETUP…
MISC SETUP…
COMMUNICATIONS SETUP…
---- END ----
Table 4.8 Point Setup Sub-Menu
24
TAG
SWITCH CONTROL MODE
=
=
DEADBAND
=
PROP BAND
=
CYCLE TIME
=
SWITCH RATING
CIRCUIT BREAKER
MAX POWER
=
=
=
{19 ALPHANUMERIC CHARACTERS}
{PROPORTIONAL, PROP AMB SSR, DEADBAND, or
PROP AMB CONTACTOR}
{1 to 50}°C
(only if SWITCH CONTROL MODE
is DEADBAND)
{1 to 50}°C
(only if SWITCH CONTROL MODE
is not DEADBAND)
{10 to 255} MIN
(only if SWITCH CONTROL MODE
is not PROP AMB CONTACTOR)
{0.3 to 100.0} A
(only if SSR is being used)
{0.3 to 100.00} A (only if SSR is being used)
{3 W to 33,000} W (only if SSR is being used)
TS FAIL MODE
=
{OFF or ON}
TS CTL MODE
=
TS 1 TYPE
=
{TS 1-FAIL OFF (ON) or
TS 1-FAIL TO TS 2 or
TS 2-FAIL OFF (ON) or
TS 2-FAIL TO TS 1 or
AVERAGE-FAIL OFF (ON) or
AVERAGE-FAIL TO GOOD or
LOWEST-FAIL OFF (ON) or
LOWEST-FAIL TO GOOD}
{100 Ω PLAT or NI-FE}
TS 1 LEAD RESIST
TS 1 HI LIMIT
TS 2 TYPE
TS 2 LEAD RESIST
TS 2 HI LIMIT
AUTO-CYCLE
AUTO-CYCLE INTERVAL
AUTO-CYCLE UNITS
OVERRIDE SOURCE
LOAD SHEDDING
---- END ----
=
=
=
=
=
=
=
=
=
=
{1 to 20.000} Ω
{ENA or DIS}
{100 Ω PLAT or NI-FE}
{0 TO 20.000} Ω
{ENA or DIS}
{ENA or DIS}
{1 to 240}
{HOURS or MINUTES}
{REMOTE or EXT INPUT}
{ENA or DIS}
(only if TS 1 TYPE = NI-FE)
(only if TS 2 TYPE = NI-FE)
(only if AUTO-CYCLE=ENA)
(only if AUTO-CYCLE=ENA)
4.3.6 “MISC. SETUP…” SUB-MENU
The “Misc. Setup” sub-menu is used to configure miscellaneous parameters.
CONTROL SETPOINT = 20°C
LO TS 1 = –10°C
LO LOAD = 1.0 A
HI GFI = 50 mA
GFI TRIP = 75 mA
TS ALARMS CONFIG…
OTHER ALARMS CONFIG…
POINT SETUP…
MISC SETUP…
COMMUNICATIONS SETUP…
---- END ----
Table 4.9 Misc. Setup Sub-Menu
TEMP UNITS
VERSION
EXT. INPUT
FLASH ALARM OUTPUT
ALARM OUTPUT
LANGUAGE
PASSCODE
SCROLL DELAY
LOAD DEFAULTS
---- END ----
=
=
=
=
=
=
=
=
{°C or °F}
V3.16.3
{NOT USED, INHIBIT or FORCE ON}
{YES or NO}
{N.C. or N.O.}
{ENGLISH or FRANCAIS}
{0000 to 9999}
(only if 0 or database is unlocked)
{0.07 to 0.25} S
25
4.3.7 “COMMUNICATIONS SETUP...” SUB-MENU
The settings found in this sub-menu must be configured whenever an optional communications board is installed in the Control Module.
CONTROL SETPOINT = 20°C
LO TS 1 = –10°C
LO LOAD = 1.0 A
HI GFI = 50 mA
GFI TRIP = 75 mA
TS ALARMS CONFIG…
OTHER ALARMS CONFIG…
POINT SETUP…
MISC SETUP…
COMMUNICATIONS SETUP…
---- END ----
Table 4.10 Communications Setup
26
PROTOCOL
=
HTCBUS ADDR
MODBUS ADDR
MODBUS SUB ADDR
BAUD RATE
=
=
=
=
PARITY
HARDWARE
=
=
DRIVER
=
PROFILE
=
Tx DELAY
---- END ----
=
{HTCBUS or MODBUS ASCII
or MODBUS RTU}
{1 to 16777215}
{1 to 247}
{0 to 31}
{AUTO or 9600 or 4800
or 2400 or 1200 or
600 or 300}
{NONE or ODD or EVEN}
{NONE OR MODEM OR
RS-232 or RS-485}
{AUTO or RS-485 or
RS-232 or MODEM}
{AUTO or 3-WIRE RS-232
or RS-485 or 1200 BAUD
MODEM or 300 BAUD
MODEM}
{0.00 to 2.50} S
(only if PROTOCOL=HTCBUS)
(only if PROTOCOL≠HTCBUS)
(only if PROTOCOL≠HTCBUS)
(only if PROTOCOL≠HTCBUS)
Section 5—Configuration Parameter Details
5.1 Introduction
The sections that follow explain the various functions of the 910 controller and how they
may be accessed. The first line of each section identifies the function to be described. Each
section goes on to explain the purpose of the function, the range over which it may be set,
the procedure for setting or enabling the feature, and finally any Notes or Cautions that pertain to the particular function.
Setting and using the alarming functions of the 910 controller is a two step procedure:
1. The alarm must be enabled or disabled as desired. When using the Operator Console,
access to all alarming functions is available using the ADVANCED CONFIGURE mode submenus. When using either the Model 780/GCC-9000 Group Communications Controller,
the alarm masks may be found in the HTC SET-UP Section. Please see the appropriate
operating manual for instructions on accessing controller parameters using these
devices.
2. The corresponding alarm point value may be modified appropriately for the application.
When using the Operator Console, access to the alarm points is also available using the
ADVANCED CONFIGURE mode sub-menus. Modification of the alarm setpoint values is
found in the HTC SETPOINTS Section of the Model 780/GCC-9000 Group
Communications Controller. Please see the appropriate operating manual for instructions
on accessing controller parameters using these devices.
Note: The Operator Console and the Model 780/GCC-9000 will NOT allow modification of an
alarm point value if the alarm has been disabled (DIS) with the exception of the HIGH TS
ALARM temperature settings. These may still be modified if the corresponding HIGH LIMIT
CUTOUT has been enabled (ENA) to incorrect design or factors outside those considered by
the design.
5.2 Point Setup Parameters
This section describes the setup parameters that relate to the 910.
5.2.1 CONTROL SETPOINT TEMPERATURE
Purpose: The CONTROL SETPOINT temperature is the value at which the heat trace controller maintains the circuit temperature through either proportional, proportional ambient
SSR, proportional ambient contactor, or deadband control, depending on the controllers’
configuration. The CONTROL SETPOINT temperature is compared to the temperature
measured by the control temperature sensor (TS). A decision is then made to turn on or
turn off the output to control power to the tracer.
Range: –76°F to 1058°F (–60°C to 570°C)
Procedure: Adjust the CONTROL SETPOINT temperature value to the desired maintain
temperature. The HTC will switch the output ON and OFF in an attempt to maintain this
temperature.
Notes:
• See Section 7.2 of this manual for an explanation of Proportional, Proportional Ambient
SSR, Proportional Ambient Contactor, and Deadband Control algorithms.
• When using the Operator Console, the CONTROL SETPOINT temperature range may be
limited by the CONSOLE SETPOINT MAXIMUM and MINIMUM values (see Sections
5.2.23 and 5.2.24). This is a safety feature to prevent users in the field from modifying
the CONTROL SETPOINT temperature setting to a dangerous level.
27
5.2.2 ALPHANUMERIC TAG ASSIGNMENT
Purpose: A 19 character alphanumeric TAG may be assigned to a control point to allow it to
be easily associated with a pipe, vessel, process, circuit, drawing name, or number.
Setting: Any combination of 19 characters from A–Z, 0–9, /, -, ., (, ), or #.
Procedure: Using the Operator Console, enter the desired text.
5.2.3 SWITCH CONTROL MODE
Purpose: This allows selection of the type of algorithm to be used by the HTC to maintain
the CONTROL SETPOINT temperature. There are four different control algorithms available
in the HTC—proportional, proportional ambient SSR, proportional ambient contactor, and
deadband. See Section 7.2 for a complete explanation of these controlling techniques as
implemented in the HTC.
Setting: PROPORTIONAL, PROPORTIONAL AMBIENT SSR, PROPORTIONAL AMBIENT
CONTACTOR, or DEADBAND
Procedure: Select the desired control technique. Note that deadband control and proportional ambient contactor should be selected when using contactors or when precise control
and advanced current handling functions are not required.
Note: If deadband is selected, a DEADBAND setting will be available in the HTC configuration menu; otherwise, a PROPORTIONAL BAND setting will be available. No MAXIMUM
POWER, SWITCH CURRENT RATING, or CIRCUIT BREAKER CURRENT RATING settings are
available when the controller is set to operate in either contactor mode. If proportional
ambient contactor is selected, the CYCLE TIME setting will also be available.
5.2.4 PROPORTIONAL BAND SETTING
(For use with the three proportional control modes only).
Purpose: When an HTC equipped with SSRs is used to control a heating circuit, proportional or proportional ambient SSR modes are normally used, allowing for more precise temperature control. When using contactors, the proportional ambient contactor mode should
be selected.
This programmable proportional band acts to vary the on to off time of the output based on
the difference between the measured control temperature and the desired CONTROL
SETPOINT temperature.
Range: 2°F to 90°F (1°C to 50°C)
Procedure: Adjust the PROPORTIONAL BAND setting to the desired differential from the
CONTROL SETPOINT temperature.
Notes:
• See Section 7.2 of this manual for an explanation of how the three proportional modes
use the PROPORTIONAL BAND setting.
• When using Series-type, constant wattage, or self-regulating tracers in an ambient temperature control application, significant energy savings may be realized by setting the
PROPORTIONAL BAND to match the expected range of operating ambient temperatures.
Tracer design is normally done assuming worst-case conditions, where 100% of the
design output power is required to maintain the desired minimum temperature. When the
ambient temperature is above the design minimum, but some heat is still required,
adjusting the PROPORTIONAL BAND width accordingly will allow only the amount of
power required by the application to be consumed, while maintaining the minimum
required temperature.
28
Example: A water line must be protected from freezing when the ambient temperature falls
below 10°C. Either the proportional ambient SSR or proportional ambient contactor mode is
selected as the control method (depending on the type of switch being used). The heater
and insulation combination are chosen to impart enough heat to the line to keep it from
freezing at a worst-case ambient temperature of –40°C. At 10°C, the heater should be completely off, since no heat is required at this temperature to guarantee that the product will
not freeze. It follows that the amount of heat required by the water line decreases as the
ambient temperature increases from –40°C to 10°C (theoretically, at –15°C the heater output should be approximately 50%). Setting the CONTROL SETPOINT temperature to 10°C,
and the PROPORTIONAL BAND to 50°C, will force the controller’s output to be 100% on at
–40°C, 50% on at –15°C, and off at 10°C.
5.2.5 DEADBAND SETTING
(Deadband control mode only)
Purpose: When an HTC equipped with a contactor is used to control a heating circuit, it is
necessary to use deadband rather than proportional control. This is done to prevent the
contactor from switching on and off rapidly and being worn out prematurely. This deadband
acts as an on/off control where the decision to turn the output off or on is based upon a
window of difference between the measured control temperature and the desired CONTROL
SETPOINT temperature.
Range: 2°F to 90°F (1°C to 50°C)
Procedure: Adjust the DEADBAND setting to the desired differential from the desired CONTROL SETPOINT temperature. When the control temperature is above the setpoint + deadband value, the controller will turn off the output to the tracer. If the control temperature
drops down below the setpoint, the output will be turned back on. Note that the smaller the
DEADBAND setting, the more often the contactor will cycle on and off, decreasing its operational life.
Note: See Section 7.2 of this manual for an explanation of Deadband Control. Note that the
MAXIMUM POWER, SWITCH CURRENT RATING, and CIRCUIT BREAKER CURRENT RATING settings are not available when the HTC is set to Deadband mode (typically when
switching a contactor).
5.2.6 CYCLE TIME SETTING
(For proportional ambient contactor control mode only).
Purpose: This parameter determines the minimum amount of time it will take for a complete contactor ON-OFF-ON cycle.
Range: 10 to 255 minutes
Procedure: Adjust the CYCLE TIME setting to yield the desired contactor ON+OFF time for a
particular duty cycle. For instance, if the contactor should remain on for five minutes with a
50% duty cycle, then the CYCLE TIME should be 10 minutes. A new duty cycle (based on
measured control temperature, PROPORTIONAL BAND, and CONTROL SETPOINT) is calculated every time the contactor is required to change state.
Notes:
• If the calculated duty cycle is 0% or 100%, then the contactor will not change state and
the duty cycle will not be calculated again for a time period = CYCLE TIME/30.
• The minimum cycle time setting is 10 minutes, and the minimum controller output duty
cycle is 3%. This results in a minimum contactor ON time of 18 seconds.
29
5.2.7 SWITCH CURRENT RATING SETTING (SSR ONLY)
Purpose: The SWITCH CURRENT RATING setting defines the current rating of the output
switch. It is used by the controller to limit the maximum average current that will be allowed
to flow to the load before it begins to adjust the output duty cycle, limiting the amount of
current to an acceptable level.
Range: 0.3 to 100.0 Amps
Procedure: Adjust the SWITCH CURRENT RATING setting to the match the current rating of
the output device (i.e. 30.0 Amps).
5.2.8 CIRCUIT BREAKER CURRENT RATING SETTING (SSR ONLY)
Purpose: The CIRCUIT BREAKER CURRENT RATING setting helps prevent in-rush induced
nuisance tripping of the circuit breaker immediately upstream of the controller. The HTC
evaluates the square of the current related to time (I2t) and adjusts the output duty cycle
accordingly, limiting the amount of current to an acceptable level.
Range: 0.3 to 100.0 Amps
Procedure: Adjust the CIRCUIT BREAKER CURRENT RATING setting to the heating circuit
breaker size (i.e. 30.0 Amps).
Note: This feature should NOT be used to reduce the size of a circuit breaker or increase the
maximum heating cable length. It can be quite effective in preventing nuisance trips due to
incorrect design or factors outside those considered by the design.
5.2.9 MAXIMUM POWER SETTING (SSR ONLY)
Purpose: This user selectable level limits the maximum amount of power applied to a heat
trace circuit. This is an average power calculated by the controller using the average current
and applied voltage. The HTC switches the output on and off rapidly to limit the average current to an appropriate level. The MAXIMUM POWER level may be adjusted to eliminate stepdown transformers, lower the effective output wattage of a cable, or implement energy
management of the heat trace circuit.
Range: 3 to 33,000 Watts
Procedure: Adjust the MAXIMUM POWER level to the desired value (watts). Use the TEST
TRACING function to observe the power limiting operation.
Notes:
• This function may be set within reasonable limits for the particular tracer being powered.
The effective resolution of the setting is limited to 1/30th of the calculated full on power.
• Do not set the MAXIMUM POWER below full output for applications that do not require
power limiting.
5.2.10 TS FAIL MODE
Purpose: This parameter determines whether the HTC turns the output switch ON or OFF if
all selected temperature sensors fail to provide a valid control temperature.
Setting: OFF or ON
Procedure: If the HTC should turn the output switch off when it cannot read a valid control
temperature, then select OFF, otherwise if the output switch should turn on, then select ON.
Note: This parameter is part of the TS CONTROL MODE.
5.2.11 TEMPERATURE SENSOR CONTROL MODE
Purpose: The TS CONTROL MODE allows the selection of one of eight possible temperature
control modes for the controller. The different modes allow redundant fail-safe temperature
sensing, averaging, or minimum maintain temperature control.
Setting: Select one of the following eight possible modes:
CONTROL TS AND DESCRIPTION
30
CONTROL USING TS 1, FAIL OFF/ON
CONTROL USING TS 1, FAIL TO TS 2
CONTROL USING TS 2, FAIL OFF/ON
CONTROL USING TS 2, FAIL TO TS 1
CONTROL ON AVERAGE, FAIL OFF/ON
CONTROL ON AVERAGE, FAIL TO GOOD
CONTROL ON LOWEST, FAIL OFF/ON
CONTROL ON LOWEST, FAIL TO GOOD
Where OFF/ON = Controllers’ output switch turned OFF or ON as determined by the TS FAIL
MODE.
Example: With a TS CONTROL MODE of CONTROL ON AVERAGE, FAIL TO GOOD, the controller will measure both sensors (TS 1 and TS 2), averaging the two temperature values,
display the results, and cycle the heater ON or OFF to maintain the CONTROL SETPOINT
temperature. This is the primary control mode. If either sensor should fail, the controller will
transfer control to the remaining “good” sensor and generate the appropriate TS 1 or TS 2
FAILURE ALARM (assuming that the alarm is enabled). The temperature will now be maintained based on this measured value. If the remaining “good” sensor fails, the controller will
turn the heater OFF or ON as determined by the TS FAIL MODE setting. The appropriate TS
1 or TS 2 FAILURE ALARM will be also be generated.
Procedure: Select the control mode that best suits the application.
Note: Ensure that TS FAILURE ALARMS are enabled. See Sections 5.4.1, 5.4.4, and 5.4.10
for a complete explanation of RTD failure detection in the HTC.
5.2.12 TS 1 TYPE
Purpose: This parameter specifies the type of RTD that is connected to the HTC’s TS 1
input.
Setting: 3 wire 100 Ω Platinum or 2 (or 3) wire 100 Ω Nickel Iron (NI-FE).
Procedure: Select the type of RTD that is connected to the TS 1 input.
Note: If a 2 wire 100 Ω Nickel Iron (NI-FE) RTD is selected then the TS 1 LEAD RESISTANCE must be entered manually (see Section 5.2.13).
5.2.13 TS 1 LEAD RESISTANCE
(For NI-FE RTDs only.)
Purpose: This parameter specifies the lead resistance of a 2 wire Nickel Iron RTD connected
to the HTC’s TS 1 input.
Range: 0 to 20.00 Ω
Procedure: Measure the resistance of one of the Nickel Iron RTD leads (from the RTD to the
HTC’s TS 1 input) and use this value as the TS 1 LEAD RESISTANCE.
5.2.14 TS 1 HIGH LIMIT CUTOUT
Purpose: When enabled, the TS 1 high limit cutout feature will override the CONTROL SETPOINT temperature and force the controller output off if the TS 1 reading exceeds the HIGH
TS 1 ALARM temperature setting. This is a non-latching condition, so once the TS 1 reading
drops below the HIGH TS 1 ALARM temperature setting, the controller will resume normal
operation.
Setting: ENABLE or DISABLE
Procedure: Enable or disable the cutout feature as desired.
Notes:
• The TS 1 HIGH LIMIT CUTOUT feature overrides an autocycle test. A pending autocycle
will be initiated immediately after the TS 1 temperature drops below the HIGH TS 1
ALARM temperature setting.
31
• If a TS 1 failure occurs and the TS 1 HIGH LIMIT CUTOUT feature is enabled, the switch
output will latch off regardless of the TS CONTROL MODE setting or the TS FAIL MODE
setting.
• If the TS 1 HIGH LIMIT CUTOUT feature is enabled, then the HIGH TS 1 ALARM temperature setting can be set, regardless of whether the HIGH TS 1 ALARM is enabled.
5.2.15 TS 2 TYPE
Purpose: This parameter specifies the type of RTD that is connected to the HTC’s TS 2
input.
Setting: 3 wire 100 Ω Platinum or 2 (or 3) wire 100 Ω Nickel Iron (NI-FE).
Procedure: Select the type of RTD that is connected to the TS 2 input.
Note: If a 2 wire 100 Ω Nickel Iron (NI-FE) RTD is selected then the TS 2 LEAD RESISTANCE must be entered (see Section 5.2.16).
5.2.16 TS 2 LEAD RESISTANCE
(For NI-FE RTDs only.)
Purpose: This parameter specifies the lead resistance of a 2 wire Nickel Iron RTD connected
to the HTC’s TS 2 input.
Range: 0 to 20.00 Ω
Procedure: Measure the resistance of one of the Nickel Iron RTD leads (from the RTD to the
HTC’s TS 2 input) and use this value as the TS 2 LEAD RESISTANCE.
5.2.17 TS 2 HIGH LIMIT CUTOUT
Purpose: When enabled, the TS 2 high limit cutout feature will override the CONTROL SETPOINT temperature and force the controller output off if the TS 2 reading exceeds the HIGH
TS 2 ALARM temperature setting. This is a non-latching condition, so once the TS 2 reading
drops below the HIGH TS 2 ALARM temperature setting, the controller will resume normal
operation.
Setting: ENABLE or DISABLE
Procedure: Enable or disable the cutout feature as desired.
Notes:
• The TS 2 HIGH LIMIT CUTOUT feature overrides an autocycle test. A pending autocycle
will be initiated immediately after the TS 2 temperature drops below the HIGH TS 2
ALARM temperature setting.
• If a TS 2 failure occurs and the TS 2 HIGH LIMIT CUTOUT feature is enabled, the switch
output will latch off regardless of the TS CONTROL MODE setting or the TS FAIL MODE
setting.
• If the TS 2 HIGH LIMIT CUTOUT feature is enabled, then the HIGH TS 2 ALARM temperature setting can be set, regardless of whether the HIGH TS 2 ALARM is enabled.
5.2.18 AUTOCYCLE ENABLING
Purpose: The autocycle function momentarily (approximately 10 seconds) applies power to
the heating circuit at the selected interval. It is used to test the integrity of the heating circuit. Alarms present at the time of autocycle then become latched and remain active after
the completion of the autocycle function. Autocycling effectively eliminates the need for preventive maintenance by automatically verifying the heating circuit integrity.
Setting: ENABLE or DISABLE
Procedure: Enable or disable the autocycling feature as desired. If the feature is disabled,
you will not be prompted to enter the AUTOCYCLE INTERVAL or AUTOCYCLE UNITS.
Notes:
• Autocycling should always be enabled for normal operation. Disabling this feature should
32
•
•
•
•
only be required where the HTC system is monitoring a circuit exercised by some other
device or means. Although this function defeats temperature control and forces output
on, the controller will continue to adjust the output for protection purposes or power limiting (SSR option only).
Autocycling is inhibited if the controller is in the load shedding mode. See Section 7.3.
If autocycling is enabled, the HTC will always autocycle for 10 seconds when power is
initially applied.
If autocycling is enabled, and TS FAIL MODE = OFF and all the control temperature sensors have failed, the HTC will still perform an autocycle.
If an alarm condition with an alarm filter time greater than 0 appears during the autocycling, then the autocycle will be extended (past the 10 seconds) until the alarm filter
time has expired.
5.2.19 AUTOCYCLE TIME INTERVAL
Purpose: AUTOCYCLE INTERVAL is the number of hours/minutes between successive heating circuit integrity tests depending on the AUTOCYCLE UNITS specified.
Range: 1 to 240
Procedure: Set the AUTOCYCLE INTERVAL to the desired time period.
Notes:
• When using proportional ambient contactor mode, the CYCLE TIME setting should be
less than the AUTOCYCLE INTERVAL; otherwise, autocycling could affect the duty-cycle.
• If an AC ALARM becomes active during an autocycle, but the AUTOCYCLE INTERVAL
expires prior to the corresponding ALARM FILTER time, then autocycling will continue
until the ALARM FILTER time has elapsed.
• For the earliest possible alarming of heating circuit problems, the AUTOCYCLE INTERVAL
should be set to a small value.
5.2.20 AUTOCYCLE TIME UNITS
Purpose: The autocycle time units parameter allows selection of minutes or hours for the
AUTOCYCLE INTERVAL setting.
Setting: HOURS or MINUTES
Procedure: Set the AUTOCYCLE UNITS to the desired time units.
5.2.21 OVERRIDE SOURCE
Purpose: An override signal can be sent to the HTC from one of two sources. This override
signal can be used to override the controller’s temperature control and force the output
switch off or on. This is especially useful when the user wishes to turn a controller or a
group of controllers off over the summer months, during maintenance, or when a line is
flowing and does not require heating.
Setting: REMOTE or EXT. INPUT
Procedure: If the override signal will be generated remotely and received by the HTC via the
optional communications interface, select REMOTE as the OVERRIDE SOURCE. If the override signal will be received by the HTC via the external input, select EXTERNAL INPUT as the
OVERRIDE SOURCE.
Notes:
• If the EXTERNAL INPUT is not configured as either INHIBIT or FORCE ON then OVERRIDE SOURCE will always automatically be set to REMOTE. See Section 5-3-3 for further
details.
• If the autocycle feature is enabled, it will continue to function even when an INHIBIT override signal is being received as long as load shedding is not active.
• Fail safe mode is inactive if an INHIBIT override signal is being received.
• Load shedding and fail safe modes are inactive if a FORCE ON override signal is being
received.
33
• Only the LOW TS ALARMS for temperature sensors used by the TS CONTROL MODE are
inactive if an INHIBIT override signal is being received.
5.2.22 LOAD SHEDDING ENABLING
Purpose: The load shedding function allows the controller output to be forced OFF by way
of a remote contact input on the 780 Group Communications Controller or using the communications port and an upstream device. It may be used to turn OFF the output of one or
more controllers in order to reduce energy consumption to avoid peak demand surcharges,
remove power from unused circuits, or remove power from circuits which may be subjected
to steam cleaning.
Setting: ENABLE or DISABLE
Procedure: Enable or disable the load shedding control mode as desired.
Note: To completely configure the HTC for load shedding operation, the following additional
parameters must be set up using the Model 780/GCC-9000:
Fail Safe Mode
Load Shedding GCC Contact Association
These additional parameters may only be accessed using the Group Communications
Controller. See the appropriate Section of the GCC manual for further details.
Notes:
• Fail safe mode is not supported when using proportional ambient SSR or proportional
ambient contactor modes.
• For fail safe mode to function, at least one LOW TS ALARM of the controlling temperature
sensor(s) must be enabled and the corresponding LOW TS ALARM temperature setting
must be less than the CONTROL SETPOINT temperature.
5.2.23 CONSOLE SETPOINT MAXIMUM
Purpose: When using the Operator Console the maximum setting of the CONTROL SETPOINT temperature may be limited to the CONSOLE SETPOINT MAXIMUM value. This is a
safety feature to prevent users in the field from modifying the CONTROL SETPOINT temperature setting to a dangerous level.
Range: –76°F to 1058°F (–60°C to 570°C)
Procedure: Adjust the CONSOLE SETPOINT MAXIMUM temperature value to limit the maximum allowable CONTROL SETPOINT TEMPERATURE that may be set using the Operator
Console. The CONSOLE SETPOINT MAXIMUM may only be set using a communicating
device such as the Model 780/GCC-9000. See the 780/GCC-9000 user manual for the proper procedure.
Note: The CONSOLE SETPOINT MAXIMUM is not displayed on the Operator Console.
5.2.24 CONSOLE SETPOINT MINIMUM
Purpose: When using the Operator Console the minimum setting of the CONTROL SETPOINT temperature may be limited to the CONSOLE SETPOINT MINIMUM value. This is a
safety feature to prevent users in the field from modifying the CONTROL SETPOINT temperature setting to a dangerous level.
Range: –76°F to 1058°F (–60°C to 570°C)
Procedure: Adjust the CONSOLE SETPOINT MINIMUM temperature value to limit the minimum allowable CONTROL SETPOINT TEMPERATURE that may be set using the Operator
Console. The CONSOLE SETPOINT MINIMUM may only be set using a communicating
device such as the Model 780/GCC-9000. See the 780/GCC-9000 manual for the proper
procedure.
Note: The CONSOLE SETPOINT MINIMUM is not displayed on the Operator Console.
34
5.3 Miscellaneous Setup Parameters
The following section describes miscellaneous the setup parameters.
5.3.1 TEMPERATURE DISPLAY UNITS
Purpose: This allows selection of the type of temperature units to display on the Operator
Console. All temperature related values will be displayed in the selected units.
Note: This setting will not affect the temperature units displayed at a 780/GCC-9000 Group
Communications Controller. The GCC may be set independently.
Setting: DEGREES F or DEGREES C
Procedure: Adjust the setting to the desired temperature units (°F or °C).
Note: To minimize possible confusion, it is recommended that the temperature units be set
the same on the HTC and any other communicating devices.
5.3.2 VERSION OF FIRMWARE AND HARDWARE
Purpose: The first three digits indicate the revision level of the firmware programmed into
the controller. As new features are added to the HTC, the firmware revision level is incremented to allow the user to determine which features are available for the particular unit
being used.
5.3.3 EXTERNAL INPUT PORT
Purpose: This input port may be used as an OVERRIDE SOURCE to sense a remote dry
contact closure. This will override the controller’s temperature control and force its output
switch off or on.
Setting: NOT USED, INHIBIT, or FORCE ON
Procedure: If the EXTERNAL INPUT is not being used, select NOT USED. If a remote dry
contact closure should force the output switch off then select INHIBIT. If a remote dry contact closure should force the output switch on, then select FORCE ON.
If the EXTERNAL INPUT is set to INHIBIT or FORCE ON, then OVERRIDE SOURCE must be
set to EXT. INPUT.
Notes:
• When used with the INHIBIT/FORCE ON feature, a contact closure sensed by the EXTERNAL INPUT will initiate the INHIBIT/FORCE ON mode. An open input will cause the controller to revert to normal temperature control operation.
One possible use of the INHIBIT feature is to use an external device (such as a flow
meter) to provide a contact closure if there is flow in a line. As long as the line has adequate flow, the heating will be off (INHIBITed from operating). See Appendix C for typical
connection diagrams when using this input.
• EXTERNAL INPUT must be set to INHIBIT or FORCE ON before OVERRIDE SOURCE can
be set to EXT. INPUT. Setting EXTERNAL INPUT to NOT USED or TEMPBUS™ will automatically set OVERRIDE SOURCE to REMOTE.
5.3.4 FLASH ALARM OUTPUT SETTING
Purpose: Programs both the alarm output relays (dry contact and AC alarm) for flashing or
steady output in case of an alarm condition.
Setting: YES (Flash) or NO (Steady)
Procedure: Set the alarm output relays to flash or not to flash on an alarm condition,
whichever suits the application.
Notes:
• If the alarm output is used to drive a pilot light, it is recommended that YES be selected
to enable flashing operation. When the output is also configured for normally closed
operation, the pilot light will be on steady for normal operation, flash in case of alarm,
35
and be extinguished due to a bulb failure or loss of power.
• If multiple alarm outputs from different controllers are wired in series (i.e.: multi-point
panels), set this parameter to NO (steady).
5.3.5 ALARM OUTPUT NORMAL STATE
Purpose: Configures both the alarm output relays (dry contact and AC alarm) for normally
open or normally closed operation. The normal condition is assumed to be when the HTC is
powered and no alarms exist.
Setting: N.O. (Normally Open) or N.C. (Normally Closed)
Procedure: Set the alarm output relays to normally open or normally closed to suit the
application.
Note: If a pilot light is used for indication of alarms, normally closed operation provides a
steady illumination of the lamp when the circuit is operating correctly. A light that is flashing
or out indicates a fault condition. A burned out lamp is readily identified if the HTC is set to
flash the dry contact alarm output relay and the AC Alarm Relay output in case of alarm.
See the Section 5.3.4.
5.3.6 LANGUAGE
Purpose: Defines which language the Operator Console is to use when prompting the user
for input and/or displaying messages and status.
Setting: ENGLISH or FRANCAIS
Procedure: Select the language of choice: ENGLISH for English prompts and messages, or
FRANCAIS for French prompts and messages.
5.3.7 PASSCODE
See Section 5.7.1.
5.3.8 SCROLL DELAY SETTING
Purpose: Allows the user to modify the speed at which information is scrolled on the
Operator Console for ease of viewing.
Range: 0.07 to 0.25 seconds
Procedure: Decreasing the scroll delay value will cause the information on the display to
scroll by faster. Increasing the scroll delay value will cause the information on the display to
scroll by slower.
5.4 Temperature Sensor Alarms Configuration
This section defines the temperature related alarming functions of the 910 controller.
5.4.1 TEMPERATURE SENSOR 1 FAILURE ALARM
Purpose: Enabling TS 1 FAILURE will provide indication of an open or shorted failure of TS 1.
Alarm Mask: ENABLE or DISABLE
Procedure: Enable or disable alarming of a failed temperature sensor connected to the TS 1
input as required.
Notes:
• This failure alarm should be enabled if a temperature sensor is connected to the TS 1
input.
• This alarm is always latched and must be reset by the user.
5.4.2 LOW TEMPERATURE SENSOR 1 ALARM
Purpose: If enabled, the LOW TS 1 ALARM allows for alarming of low temperature conditions as sensed by the first temperature sensor (TS 1).
36
Alarm Mask: ENABLE or DISABLE
Range: –76°F to 1058°F (–60°C to 570°C)
Procedure: Adjust the LOW TS 1 ALARM temperature setpoint to the desired value. Note
that the LOW TS 1 ALARM must be enabled in order to adjust the LOW TS 1 ALARM temperature setpoint.
Notes:
• This alarm should normally be enabled and the setpoint should be appropriate for the
heating application. Maintaining a minimum 5°C differential between low temperature
alarming and the CONTROL SETPOINT temperature will minimize nuisance alarming due
to momentary dips in temperature. Another alternative to this is to configure the controller for non-latching temperature alarms.
• This alarm must be enabled and its setpoint must be below the CONTROL SETPOINT
temperature if fail safe mode uses the temperature reading from TS 1.
5.4.3 HIGH TEMPERATURE SENSOR 1 ALARM
Purpose: If enabled, the HIGH TS 1 ALARM allows for alarming of high temperature conditions as sensed by the first temperature sensor (TS 1).
Alarm Mask: ENABLE or DISABLE
Range: –76°F to 1058°F (–60°C to 570°C)
Procedure: Adjust the HIGH TS 1 ALARM temperature setpoint to the desired value. Note
that the HIGH TS 1 ALARM must be enabled in order to adjust the HIGH TS 1 ALARM temperature setpoint unless the TS 1 high limit cutout feature is enabled.
Note: This alarm should only be used for applications where a product that is sensitive to
over temperature is involved. General usage may result in nuisance alarms due to the flow
of hot product or steam out. This may be a case where the alarm should be enabled and
non-latching temperature alarming should be used. A high temperature condition resulting
from a forced on failure of the heating circuit should first be alarmed by the SWITCH FAILURE ALARM. See Section 5.5.18 for more information.
5.4.4 TEMPERATURE SENSOR 2 FAILURE ALARM
Purpose: Enabling TS 2 FAILURE will provide indication of an open or shorted failure of TS 2.
Alarm Mask: ENABLE or DISABLE
Procedure: Enable or disable alarming of a failed temperature sensor connected to the TS 2
input as required.
Notes:
• If no second sensor is installed, this alarm should be disabled. This failure alarm should
be enabled if a second temperature sensor is connected to the TS 2 input.
• This alarm is always latched and must be reset by the user.
5.4.5 LOW TEMPERATURE SENSOR 2 ALARM
Purpose: If enabled, the LOW TS 2 ALARM allows for alarming of low temperature conditions as sensed by the second temperature sensor (TS 2).
Alarm Mask: ENABLE or DISABLE
Range: –76°F to 1058°F (–60°C to 570°C)
Procedure: Adjust LOW TS 2 ALARM temperature setpoint to the desired value. Note that
the LOW TS 2 ALARM must be enabled in order to adjust the LOW TS 2 ALARM temperature setpoint.
Notes:
• If no second sensor is installed this alarm should be disabled. This alarm should be
enabled and the setpoint should be appropriate for the heating application. Maintaining a
37
minimum 5°C differential between low temperature alarming and the CONTROL SETPOINT temperature will minimize nuisance alarming due to momentary dips in temperature. Another alternative to this is to configure the controller for non-latching temperature
alarms.
• This alarm must be enabled and its setpoint must be below the CONTROL SETPOINT
temperature if fail safe mode uses the temperature from TS 2.
5.4.6 HIGH TEMPERATURE SENSOR 2 ALARM
Purpose: If enabled, the HIGH TS 2 ALARM allows for alarming of high temperature conditions as sensed by the second temperature sensor (TS 2).
Alarm Mask: ENABLE or DISABLE
Range: –76°F to 1058°F (–60°C to 570°C)
Procedure: Adjust the HIGH TS 2 ALARM temperature setpoint to the desired value. Note
that the HIGH TS 2 ALARM must be enabled in order to adjust the HIGH TS 2 ALARM temperature setpoint unless the TS 2 high limit cutout feature is enabled.
Note: If no second sensor is installed this alarm should be disabled. This alarm may be
used for applications where a product that is sensitive to over temperature is involved.
General usage could result in nuisance alarms due to the flow of hot product or steam out.
This may be a case where the alarm could be enabled and non-latching temperature alarming used. A high temperature condition resulting from a forced on failure of the heating circuit should first be alarmed by the SWITCH FAILURE ALARM. See Section 5.5.18 for more
information.
5.4.7 LOW TEMPERATURE SENSOR ALARM FILTER TIME SETTING
Purpose: The LOW TS ALARM FILTER will prevent LOW TS 1 and/or LOW TS 2 ALARMS
from being indicated until their corresponding alarm condition has existed for the duration
of the LOW TS ALARM FILTER time.
Range: 0 to 999 minutes
Procedure: Adjust the LOW TS ALARM FILTER time to the desired value. Note that either
the LOW TS 1 ALARM and/or the LOW TS 2 ALARM must be enabled in order to adjust the
LOW TS ALARM FILTER time.
Notes:
• If an alarm condition appears and then disappears before the alarm filter time has
expired, the filter timer is reset and the alarm condition must exist again for the entire
alarm filter time before the corresponding alarm will be indicated.
• If the user resets an alarm while the alarm condition is still exists, then the alarm will not
be indicated again until the entire alarm filter time has expired.
5.4.8 HIGH TEMPERATURE SENSOR ALARM FILTER TIME SETTING
Purpose: The HIGH TS ALARM FILTER will prevent HIGH TS 1 and/or HIGH TS 2 ALARMS
from being indicated until their corresponding alarm condition has existed for the duration
of the HIGH TS ALARM FILTER time.
Range: 0 to 999 minutes
Procedure: Adjust the HIGH TS ALARM FILTER time to the desired value. Note that either
the HIGH TS 1 ALARM and/or the HIGH TS 2 ALARM must be enabled in order to adjust the
HIGH TS ALARM FILTER time.
Notes:
• If an alarm condition appears and then disappears before the alarm filter time has
expired, the filter timer is reset and the alarm condition must exist again for the entire
alarm filter time before the corresponding alarm will be indicated.
• If the user resets an alarm while the alarm condition is still exists, then the alarm will not
be indicated again until the entire alarm filter time has expired.
38
• The HIGH TS ALARM FILTER time setting will not affect the cutout time when the HIGH
LIMIT CUTOUT feature is enabled.
5.4.9 LATCH TEMPERATURE SENSOR ALARMS SETTING
Purpose: This allows for the selection of automatic clearing of all HIGH and LOW TS
ALARMS (non-latching) when a temperature alarm condition no longer exists or permanent
alarming of such a condition (latching) until the alarm is manually reset.
Setting: YES (LATCHING) or NO (NON-LATCHING)
Procedure: Adjust the LATCH TS ALARMS setting to the desired mode (latching or nonlatching).
Notes:
• If your application is subject to periodic situations where cold or hot product is part of
the process, it may be appropriate to configure the HTC for non-latching temperature
alarms to avoid nuisance alarms. If it is important to be aware of any temperature alarm
conditions that may have existed in a pipe, then the HTC should be configured for latching temperature alarms.
• This setting does not affect the TS FAILURE ALARMS—these are always latching.
5.4.10 CONTROL TEMPERATURE SENSOR FAILURE ALARM
Purpose: Control TS FAILURE ALARM indicates a failure of the temperature sensor designated as the control sensor.
One of eight TS CONTROL MODES may be selected. These modes determine which TS
input(s) is(are) designated to provide the control temperature. See Section 5-2-11 for a full
description of the temperature sensor control designations.
Alarm Mask: ENABLE or DISABLE
Procedure: Enable or disable the alarming of a failure of the designated control temperature
sensor as required.
Note: This alarm should always be enabled. If the controller experiences a Control TS
Failure it will turn the output off or on (as specified by TS FAIL MODE) until this alarm is
cleared.
5.5 Other Alarms Configuration
This section defines the non-temperature-related alarming functions of the 910 controller
(current, ground fault, voltage and resistance).
5.5.1 LOW LOAD CURRENT ALARM
Purpose: Alarms current levels which are lower than a preset limit for the application.
Monitoring for lower than expected current levels may be an effective means of continuity
monitoring. See also HIGH RESISTANCE ALARM in Section 5.5.14.
Alarm Mask: ENABLE or DISABLE
Range: 0.3 to 100.0 Amps
Procedure: Adjust the LOW CURRENT ALARM level to the desired value. Note that the LOW
CURRENT ALARM must be enabled in order to adjust the LOW CURRENT ALARM level.
Notes:
• For series type heating cables, adjusting the LOW CURRENT ALARM to 50% of full load
current will properly alarm a problem and reduce nuisance alarms due to voltage dips.
Parallel heaters should be adjusted to a level as close as possible to full load current but
lower than the current at worst case voltage. The low current setting as a percentage of
full load current will vary depending on the facility and its power system.
• A LOW CURRENT ALARM may also result from a switch failed open. The controller can-
39
not detect a switch failure due to no current. A no current condition would be identified
by a LOW CURRENT ALARM (if enabled) and the analog value reported with the alarm
will be 0.0 A.
• It may be advantageous to consider using the HIGH RESISTANCE ALARM to indicate a
cable fault when using certain types of heaters. See Sections 5.5.12 and 5.5.14 for an
explanation of the resistance alarming feature.
5.5.2 LOW LOAD CURRENT ALARM FILTER TIME SETTING
Purpose: The LOW CURRENT ALARM FILTER will prevent LOW LOAD CURRENT ALARMS
from being indicated until a low current condition has existed for the duration of the LOW
CURRENT ALARM FILTER time.
Range: 0 to 12 seconds
Procedure: Adjust the LOW CURRENT ALARM FILTER time to the desired value. Note that
the LOW CURRENT ALARM must be enabled in order to adjust the LOW CURRENT ALARM
FILTER time.
Notes:
• If an alarm condition appears and then disappears before the alarm filter time has
expired, the filter timer is reset and the alarm condition must exist again for the entire
alarm filter time before the corresponding alarm will be indicated.
• If the user resets an alarm while the alarm condition is still exists, then the alarm will not
be indicated again until the entire alarm filter time has expired.
5.5.3 HIGH LOAD CURRENT ALARM
Purpose: Alarms current levels which are higher than a preset limit for the application.
Alarm Mask: ENABLE or DISABLE
Range: 0.3 to 100.0 Amps
Procedure: Adjust the HIGH CURRENT ALARM level to the desired value. Note that the
HIGH CURRENT ALARM must be enabled in order to adjust the HIGH CURRENT ALARM
level.
Note: As the HTC automatically protects itself from overload, it would not normally be necessary to enable this alarm. This automatic protection can be used effectively to guard
against accidental paralleling of heating circuits. In-rush, or cold start currents typically
associated with self-regulating cables, may cause nuisance HIGH CURRENT ALARMS. If
this is undesirable this alarm should be disabled.
5.5.4 HIGH LOAD CURRENT ALARM FILTER TIME SETTING
Purpose: The HIGH CURRENT ALARM FILTER will prevent HIGH LOAD CURRENT ALARMS
from being indicated until a high current condition has existed for the duration of the HIGH
CURRENT ALARM FILTER time.
Range: 0 to 12 seconds
Procedure: Adjust the HIGH CURRENT ALARM FILTER time to the desired value. Note that
the HIGH CURRENT ALARM must be enabled in order to adjust the HIGH CURRENT ALARM
FILTER time.
Notes:
• If an alarm condition appears and then disappears before the alarm filter time has
expired, the filter timer is reset and the alarm condition must exist again for the entire
alarm filter time before the corresponding alarm will be indicated.
• If the user resets an alarm while the alarm condition is still exists, then the alarm will not
be indicated again until the entire alarm filter time has expired.
5.5.5 HIGH GROUND FAULT CURRENT ALARM
Purpose: Alarms ground fault current levels which are higher than a preset limit for the
application.
40
Alarm Mask: ENABLE or DISABLE
Range: 20 to 250 mAmps
Procedure: Adjust the HIGH GFI ALARM level to the desired value. Note that the HIGH GFI
ALARM must be enabled in order to adjust the HIGH GFI level.
5.5.6 HIGH GROUND FAULT CURRENT ALARM FILTER TIME SETTING
Purpose: The HIGH GFI ALARM FILTER will prevent HIGH GFI ALARMS from being indicated until a high GFI condition has existed for the duration of the HIGH GFI ALARM FILTER
time.
Range: 0 to 12 seconds
Procedure: Adjust the HIGH GFI ALARM FILTER time to the desired value. Note that the
HIGH GFI ALARM must be enabled in order to adjust the HIGH GFI ALARM FILTER time.
Notes:
• If an alarm condition appears and then disappears before the alarm filter time has
expired, the filter timer is reset and the alarm condition must exist again for the entire
alarm filter time before the corresponding alarm will be indicated.
• If the user resets an alarm while the alarm condition is still exists, then the alarm will not
be indicated again until the entire alarm filter time has expired.
5.5.7 GROUND FAULT TRIP ALARM
Purpose: This value sets the upper limit of allowable ground fault leakage current.
Exceeding this limit will result in the output switch being latched off and the GFI TRIP
ALARM activated to indicate a ground fault condition.
Alarm Mask: ENABLE or DISABLE
Range: 20 to 250 mAmps
Procedure: If ground fault tripping is desired, enable the GFI TRIP ALARM and adjust the
G.F. TRIP CURRENT to the desired value. To disable ground fault tripping, disable the alarm.
Note that the GFI TRIP ALARM must be enabled in order to adjust the G.F. TRIP CURRENT
level.
Caution: In order to implement a ground fault trip function, ALL NON-GROUNDED power
conductors must be opened upon detection of a ground fault condition.
Note: National Electrical Codes may require that all legs of non-neutral based power
sources be opened upon detection of a Ground Fault. Multi-pole switch configurations
should be used on non-neutral based power systems. Check the requirements with your
local Electrical Authority.
5.5.8 LOW VOLTAGE ALARM
Purpose: Alarms voltage levels that are lower than a preset limit for the application.
Alarm Mask: ENABLE or DISABLE
Range: 10 to 330 Volts
Procedure: Adjust the LOW VOLTAGE ALARM level to the desired value. Note that the LOW
VOLTAGE ALARM must be enabled in order to adjust the LOW VOLTAGE ALARM level.
Note: It is recommended that the LOW VOLTAGE ALARM always be enabled.
5.5.9 LOW VOLTAGE ALARM FILTER TIME SETTING
Purpose: The LOW VOLTAGE ALARM FILTER will prevent LOW VOLTAGE ALARMS from
being indicated until a low voltage condition has existed for the duration of the LOW VOLTAGE ALARM FILTER time.
Range: 0 to 12 seconds
Procedure: Adjust the LOW VOLTAGE ALARM FILTER time to the desired value. Note that
41
the LOW VOLTAGE ALARM must be enabled in order to adjust the LOW VOLTAGE ALARM
FILTER time.
Notes:
• If an alarm condition appears and then disappears before the alarm filter time has
expired, the filter timer is reset and the alarm condition must exist again for the entire
alarm filter time before the corresponding alarm will be indicated.
• If the user resets an alarm while the alarm condition is still exists, then the alarm will not
be indicated again until the entire alarm filter time has expired.
5.5.10 HIGH VOLTAGE ALARM
Purpose: Alarms voltage levels that are higher than a preset limit for the application. Serves
as a monitor of the voltage used to power the tracing circuit.
Alarm Mask: ENABLE or DISABLE
Range: 10 to 330 Volts
Procedure: Adjust the HIGH VOLTAGE ALARM level to the desired value. Note that the HIGH
VOLTAGE ALARM must be enabled in order to adjust the HIGH VOLTAGE ALARM level.
5.5.11 HIGH VOLTAGE ALARM FILTER TIME SETTING
Purpose: The HIGH VOLTAGE ALARM FILTER will prevent HIGH VOLTAGE ALARMS from
being indicated until a high voltage condition has existed for the duration of the HIGH VOLTAGE ALARM FILTER time.
Range: 0 to 12 seconds
Procedure: Adjust the HIGH VOLTAGE ALARM FILTER time to the desired value. Note that
the HIGH VOLTAGE ALARM must be enabled in order to adjust the HIGH VOLTAGE ALARM
FILTER time.
Notes:
• If an alarm condition appears and then disappears before the alarm filter time has
expired, the filter timer is reset and the alarm condition must exist again for the entire
alarm filter time before the corresponding alarm will be indicated.
• If the user resets an alarm while the alarm condition is still exists, then the alarm will not
be indicated again until the entire alarm filter time has expired.
5.5.12 LOW RESISTANCE ALARM
Purpose: Alarms heater resistance levels that have decreased from the NOMINAL RESISTANCE setting by more than the selected amount.
Alarm Mask: ENABLE or DISABLE
Range: 1% to 100% (deviation from NOMINAL RESISTANCE)
Procedure: Adjust the LOW RESISTANCE ALARM deviation to the desired value. Note that
the LOW RESISTANCE ALARM must be enabled in order to adjust the LOW RESISTANCE
deviation.
Notes:
• This feature would not normally be enabled. It can be used effectively to guard against
accidental paralleling of heating circuits. Care must be taken when using this alarm feature with heating cables that exhibit a variable resistance with temperature. Low resistance alarming may not be practical when the load has an increasing resistance with
temperature (such as self-regulating cables).
• Use of the LOW RESISTANCE ALARM assumes that the controller power is derived from
the same circuit as the tracing power (either by direct connection or through a step-down
transformer).
• No LOW RESISTANCE ALARMS will be generated if the measured voltage is below the
LOW VOLTAGE ALARM setpoint, regardless if the LOW VOLTAGE ALARM is enabled. This
stops an alarm from being generated when the circuit power is turned off. If the LOW
42
VOLTAGE ALARM is disabled, ensure that the LOW VOLTAGE setpoint is set to a relevant
level otherwise no LOW RESISTANCE ALARMS will occur.
• LOW RESISTANCE ALARMS will only be generated if the output switch is on.
5.5.13 LOW RESISTANCE ALARM FILTER TIME SETTING
Purpose: The LOW RESISTANCE ALARM FILTER will prevent LOW RESISTANCE ALARMS
from being indicated until a low resistance condition has existed for the duration of the
LOW RESISTANCE ALARM FILTER time.
Range: 0 to 12 seconds
Procedure: Adjust the LOW RESISTANCE ALARM FILTER time to the desired value. Note
that the LOW RESISTANCE ALARM must be enabled in order to adjust the LOW RESISTANCE ALARM FILTER time.
Notes:
• If an alarm condition appears and then disappears before the alarm filter time has
expired, the filter timer is reset and the alarm condition must exist again for the entire
alarm filter time before the corresponding alarm will be indicated.
• If the user resets an alarm while the alarm condition is still exists, then the alarm will not
be indicated again until the entire alarm filter time has expired.
5.5.14 HIGH RESISTANCE ALARM
Purpose: Alarms heater resistance levels that have increased from the NOMINAL RESISTANCE setting by more than the selected amount. The HIGH RESISTANCE ALARM may be
used to indicate an open or a high resistance connection or, when using constant wattage
parallel cables, may indicate the failure of one or more heating zones. It may also be used to
monitor a failed series-type cable or connection in three-phase applications while minimizing nuisance alarms created by voltage fluctuations.
Alarm Mask: ENABLE or DISABLE
Range: 1% to 250% (deviation from NOMINAL RESISTANCE)
Procedure: Adjust the HIGH RESISTANCE ALARM level to the desired value. Note that the
HIGH RESISTANCE ALARM must be enabled in order to adjust the HIGH RESISTANCE deviation.
Notes:
• Using the LOW CURRENT ALARM feature to ensure that unexpected decreases in current
consumption by the heating cable are alarmed is a reliable method of monitoring the
integrity of series-type heating cables. When using parallel-type heaters (zoned constantwattage or self-regulating) or in three-phase installations, the LOW CURRENT ALARM
setting must be chosen as close to the lowest expected current as possible to detect
failed zones, or cable degradation, or a lost phase. The problem with such a close setting
is that it inevitably leads to nuisance alarms, particularly when voltage fluctuations are
present. By using the HIGH RESISTANCE ALARM, nuisance alarms due to voltage dips
may be minimized.
• Use of the HIGH RESISTANCE ALARM assumes that the controller power is derived from
the same circuit as the tracing power.
• No HIGH RESISTANCE ALARMS will be generated if the measured voltage is below the
LOW VOLTAGE ALARM setpoint, regardless of whether the LOW VOLTAGE ALARM is
enabled. This stops an alarm from being generated when the circuit power is turned off.
If the LOW VOLTAGE ALARM is disabled ensure that the LOW VOLTAGE setpoint is set to
a relevant level otherwise no HIGH RESISTANCE ALARMS will occur.
• HIGH RESISTANCE ALARMS will only be generated if the output switch is on.
5.5.15 HIGH RESISTANCE ALARM FILTER TIME SETTING
Purpose: The HIGH RESISTANCE ALARM FILTER will prevent HIGH RESISTANCE ALARMS
from being indicated until a high resistance condition has existed for the duration of the
HIGH RESISTANCE ALARM FILTER time.
Range: 0 to 12 seconds
43
Procedure: Adjust the HIGH RESISTANCE ALARM FILTER time to the desired value. Note
that the HIGH RESISTANCE ALARM must be enabled in order to adjust the HIGH RESISTANCE ALARM FILTER time.
Notes:
• If an alarm condition appears and then disappears before the alarm filter time has
expired, the filter timer is reset and the alarm condition must exist again for the entire
alarm filter time before the corresponding alarm will be indicated.
• If the user resets an alarm while the alarm condition is still exists, then the alarm will not
be indicated again until the entire alarm filter time has expired.
5.5.16 NOMINAL RESISTANCE SETTING
Purpose: This parameter defines the nominal expected heater resistance. A value must be
entered by the user to allow the HIGH and LOW RESISTANCE ALARMS to be used. In installations where the power source may experience periodic fluctuations (surges and/or brownout conditions), alarming on resistance deviation offers an improved method of monitoring
tracer integrity than simple LOW and HIGH CURRENT ALARMS. Since the ratio of voltage to
current is monitored, the HIGH and LOW RESISTANCE ALARMS offer cable monitoring that
is relatively immune to voltage fluctuations.
Range: 2.00 to 2000.00 Ω
Procedure: The NOMINAL RESISTANCE value can only be set if either the LOW RESISTANCE and/or the HIGH RESISTANCE ALARMS are enabled. Once the controller and the
heating cable have been installed, the following procedure should be used to determine the
NOMINAL RESISTANCE setting:
• Adjust the CONTROL SETPOINT temperature to turn on the output switch.
• Allow the load to come up to design temperature and its power consumption to stabilize.
• Using the 920 Operator Console, access the RESISTANCE reading and record its value.
Return the CONTROL SETPOINT temperature to its proper setting.
• Enter the recorded resistance value as the NOMINAL RESISTANCE setting.
Note: The setup procedure outlined above may have to be repeated a number of times to
arrive at a correct nominal resistance setting. This value will be affected by the heating cable
temperature, which in turn is affected by ambient temperature, insulation level, a full or
empty pipe or vessel, etc.
5.5.17 OVERCURRENT TRIP ALARM (SSR ONLY)
Purpose: The overcurrent trip feature is always enabled when using an SSR output switch
and is used to provide protection for the output switch. Enabling this alarm will only inform
the user of an excessively high current condition and that the output switch has been
latched off. During a high current condition, the controller attempts to soft start a heating
cable using a technique involving measured in-rush current and the SWITCH CURRENT
RATING. If the controller is unable to start the cable, it will eventually trip its output switch
off and will not retry or pulse its output switch again. At this point the OVERCURRENT TRIP
ALARM is latched on.
Notes:
• The controller is NOT a safety cutout or an overcurrent protective device as defined by the
National and Canadian Electrical Codes (NEC and CEC). A protective device such as a circuit breaker or fuse must be included as part of a proper design and be selected in accordance with the requirements defined in the National Electrical Code (NEC) and/or the
Canadian Electrical Code (CEC).
• The controller cannot protect the SSR from short circuits or excessive overcurrent conditions. Always ensure that the power is off prior to performing any maintenance or troubleshooting of the heating circuit. Verify that no damage has occurred to the cable or the
controller prior to re-energizing the circuit.
Alarm Mask: ENABLE or DISABLE
Procedure: Adjust the SWITCH CURRENT RATING setting to the actual current rating of the
44
SSR. Enable or disable the alarm as required. Note that the OVERCURRENT TRIP ALARM
does not have to be enabled in order to adjust the SWITCH CURRENT RATING setting.
Note: It is highly recommended that this alarm be left enabled since an overcurrent trip condition would normally represent a serious problem. Note that this is a factory set alarm
value and disabling the alarm does not disable the overcurrent trip function. In some applications the use of self-regulating cable will produce very high in-rush currents during cold
startup. These currents may exceed the overcurrent trip limit and the controller will not be
able to soft start the trace circuit. If this condition persists please contact your nearest sales
office for recommendations and solutions to this problem.
5.5.18 SWITCH FAILURE ALARM
Purpose: The purpose of the SWITCH FAILURE ALARM is to indicate that an output switch
failure has occurred. The controller determines that if the output switch is turned off and
there is load current present, then the output switch has failed closed and the alarm is
latched on.
Alarm Mask: ENABLE or DISABLE
Procedure: Enable or disable the alarming of an output switch that has failed in the closed
position.
Note: The SWITCH FAILURE ALARM SHOULD ALWAYS BE ENABLED. A high temperature
condition as a result of a failed circuit can only be caused if the output switch fails closed.
When an output switch fails closed, the controller cannot turn the tracer off; therefore, no
protection features are available (ground fault trip, power limiting, etc.). If a SWITCH FAILURE ALARM is detected, the unit should be serviced immediately.
5.5.19 HTC RESET ALARM
Purpose: The HTC RESET ALARM is used to indicate:
1. Power to the HTC has been interrupted and subsequently restored.
2. A transient has caused the HTC’s microprocessor to restart.
3. An internal condition has caused the HTC’s microprocessor to restart its program.
Alarm Mask: ENABLE or DISABLE
Procedure: Enable or disable alarming on reset as desired.
Note: Normally the HTC RESET ALARM is left disabled since powering the controller off and
on for maintenance or trouble-shooting would require the user to reset this alarm every
time. If the particular installation includes a Model 780/GCC-9000, this alarm may be left
enabled since resets are not considered normal occurrences and the Model 780/GCC-9000
provides the capability to easily log and reset alarms such as these. The difference in time
between when a COMMUNICATIONS FAIL ALARM and an HTC RESET ALARM are logged
provide an indication of how long the circuit has been “OFF.”
5.5.20 CIRCUIT BREAKER LIMITING STATUS (SSR ONLY)
Purpose: The circuit breaker limiting feature is always enabled when using an SSR output
switch and is intended to prevent the circuit breaker immediately upstream of the controller
from tripping during a temporary overcurrent condition. Enabling this alarm will only inform
the user that circuit breaker limiting is currently active.
Alarm Mask: ENABLE or DISABLE
Procedure: Adjust the CIRCUIT BREAKER CURRENT RATING setting to the heating circuit
breaker size (i.e. 15.0 or 20.0 Amps). Enable or disable the alarm as required. Note that the
CIRCUIT BREAKER LIMITING ALARM does not have to be enabled in order to adjust the
CIRCUIT BREAKER CURRENT RATING setting.
Notes:
• This is a non-latching alarm.
• This alarm may be considered an advisory alarm. If the measured current exceeds the
45
level that would cause the upstream circuit breaker to release, the HTC will begin to
switch the SSR ON and OFF rapidly to limit the average current to an acceptable level.
5-5-21 POWER LIMITING STATUS (SSR ONLY)
Purpose: The power limiting feature is always enabled when using an SSR output switch
and is intended to limit the average amount of power that is applied to the trace circuit. The
controller measures the voltage and current of the tracing circuit and will vary its output
switch to limit the amount of power applied to the trace to the value set by the MAXIMUM
POWER setting. Enabling this alarm will only inform the user that power limiting is currently
active.
Alarm Mask: ENABLE or DISABLE
Procedure: Adjust the MAXIMUM POWER setting to the desired value. Enable or disable the
alarm as required. Note that the POWER LIMITING ALARM does not have to be enabled in
order to adjust the MAXIMUM POWER setting.
Notes:
• This is a non-latching alarm.
• This alarm may be considered more appropriately an advisory alarm and is normally disabled. It will be active if the MAXIMUM POWER setting is set below the power output
level required for temperature maintenance. In other words, if the circuit demands the
maximum power allowed and the alarm is enabled, then this alarm will be indicated and
the output switch will pulse ON and OFF to limit the average power output to a value
approximately equal to the MAXIMUM POWER setting.
5.5.22 SWITCH LIMITING STATUS (SSR ONLY)
Purpose: The switch limiting feature is always enabled when using an SSR output switch
and is intended to provide protection for the output switch. Enabling this alarm will only
inform the user that switch limiting is currently active and an excessively high current condition is present. The controller pulses its output switch for a small number of cycles and
reads the resulting current. If the measured current exceeds the SWITCH RATING setting,
then the duty-cycle of its output switch will be varied so that an average current not exceeding the SWITCH RATING setting is maintained.
Alarm Mask: ENABLE or DISABLE
Procedure: Adjust the SWITCH CURRENT RATING setting to the actual current rating of the
SSR. Enable or disable the alarm as required. Note that the SWITCH LIMITING ALARM does
not have to be enabled in order to adjust the SWITCH CURRENT RATING setting.
Notes:
• This is a non-latching alarm.
• This alarm should normally be enabled. Currents in this range cannot be considered normal and should be investigated.
5.5.23 CONTACTOR COUNT ALARM
Purpose: Generates an alarm if the number of off-to-on transitions of a contactor reaches or
exceeds the CONTACTOR COUNT ALARM setting. This serves as a method to perform preventative maintenance on the contactor before a failure is likely to occur.
Alarm Mask: ENABLE or DISABLE
Range: 0 to 999999 off-to-on transitions
Procedure: Adjust the CONTACTOR ALARM setting to the desired value. Note that the CONTACTOR ALARM must be enabled in order to adjust the CONTACTOR ALARM setting.
Note: The CONTACTOR ALARM is only available if the SWITCH CONTROL MODE is set to
either DEADBAND or PROPORTIONAL AMBIENT CONTACTOR.
46
5.5.24 EEROM DATA FAILURE ALARM
Purpose: The EEROM DATA FAILURE ALARM indicates that the controller has detected a
failure in its nonvolatile memory.
Alarm Mask: ENABLE or DISABLE
Procedure: Enable or disable alarming of a nonvolatile memory failure as desired.
Note: The EEROM DATA FAILURE ALARM should always be enabled. This memory stores
all of the controller’s configuration and calibration settings and the alarm will only be generated if the microprocessor cannot bypass the failed area of its memory. This indicates an
internal problem and the 910 should be replaced and returned to the factory for repair.
5.6 Communications Setup
The following section describes the setup parameters that relate to the way in which the
controller is to communicate with another device. If the optional communications interface
is not installed in the 910 Control Module, these parameters need not be configured.
5.6.1 PROTOCOL
Purpose: Defines the communications language used by the controller to communicate with
other devices.
Setting: HTCBUS™ or MODBUS ASCII or MODBUS RTU
Procedure: Select the HTCBUS™ protocol when communicating with existing Pyrotenax
Heat Trace Control products, including the Model 780/GCC-9000 Group Communications
Controller.
If you are communicating directly with the controller using a different device, select the
MODBUS protocol. For a detailed description of the controller’s MODBUS mapping please
refer to 910 Series Heat Trace Controller—Modbus Protocol Interface document.
5.6.2 HTCBUS™ ADDRESS
Purpose: Defines the communications address to be used by the controller when using the
HTCBUS™ protocol to communicate with a Model 780/GCC-9000.
Range: 1 to 16,777,215
Procedure: Set the communications address as desired. This must be an address unique to
the entire communications network to avoid messaging conflicts. The HTCBUS™ protocol
must be selected in order to set the HTCBUS™ ADDRESS.
Note: A unique HTCBus™ communications address is always assigned by the Factory and
identified by the label on the top of the controller module (see Fig. 2.1). It is recommended
that the pre-assigned address be used whenever possible to minimize the chances of an
address being duplicated in the user’s system.
5.6.3 MODBUS ADDRESS
Purpose: The MODBUS ADDRESS along with the MODBUS SUB ADDRESS define the communications address to be used by the controller when using either MODBUS protocol to
communicate with a MODBUS compatible device.
Range: 1 to 247
Procedure: Set the communications address as desired. Together with the MODBUS SUB
ADDRESS, this combination must be unique to the entire communications network to avoid
messaging conflicts. Either MODBUS protocol must be selected in order to set the MODBUS ADDRESS.
5.6.4 MODBUS SUB ADDRESS
Purpose: The MODBUS SUB ADDRESS along with the MODBUS ADDRESS define the communications address to be used by the controller when using either MODBUS protocol to
communicate with a MODBUS compatible device.
47
Range: 0 to 31
Procedure: Set the communications sub address as desired. Together with the MODBUS
ADDRESS, this combination must be unique to the entire communications network to avoid
messaging conflicts. Either MODBUS protocol must be selected in order to set the MODBUS
SUB ADDRESS.
Note: Since a 910 HTC does not use all 65,535 data registers that are available for each
MODBUS ADDRESS, the data register range is subdivided to allow up to 32 HTCs to share
the same MODBUS ADDRESS. This increases the number of HTCs allowed on a single
Modbus port from 247 to 7,904 (= 247 x 32). This requires that any HTC sharing the same
MODBUS ADDRESS as another HTC must have its own unique MODBUS SUB ADDRESS.
5.6.5 BAUD RATE
Purpose: Defines the data rate at which communications occur.
Setting: AUTO or 9600 or 4800 or 2400 or 1200 or 600 or 300
Procedure: Select the data rate to be compatible with other devices that will be connected
to the controller for communications purposes.
Note: Not all communications interfaces will support the various data rates—it is recommended that the setting be set to AUTO. The controller will automatically select a BAUD
RATE that is compatible with the communications interface installed. If BAUD RATE = AUTO
and a MODEM communication interface is used then a data rate of 300 will always be used.
Otherwise, if BAUD RATE = AUTO and a non-MODEM communication interface is used the
PROTOCOL is either MODBUS protocol then a data rate of 9600 is used.
5.6.6 PARITY (MODBUS)
Purpose: Defines the type of parity bit to be used with MODBUS communications.
Setting: NONE or ODD or EVEN
Procedure: Select the desired type of parity. Note that PARITY can only be selected when
using either MODBUS protocol.
5.6.7 HARDWARE
Purpose: Identifies the type of communications interface installed in the 910. The controller
will automatically determine and display which communications interface type is available.
Values: NONE, MODEM or RS-232 or RS-485
5.6.8 DRIVER
Purpose: Defines the way in which the controller’s program communicates with the communications interface.
Setting: AUTO or RS-232 or RS-485 or MODEM
Procedure: It is recommended that the setting be set to AUTO—this will allow the controller
to automatically choose the setting to match the type of communications interface installed.
5.6.9 PROFILE
Purpose: Defines the way in which the controller’s program supports communications
handshaking and communication interface signals.
Setting: AUTO or
3-WIRE RS-232 or
RS-485 or
1200 BAUD MODEM or
300 BAUD MODEM
Procedure: Select the PROFILE to be compatible with other devices that will be connected
to the controller for communications purposes. It is recommended that the setting be set to
AUTO. The controller will automatically select a profile based on the type of communica-
48
tions interface installed in the 910.
Notes:
• AUTO: Selects a communications profile based on the data rate and the type of communications interface installed in the 910.
• 3-WIRE RS-232: Continuously asserts the internal RTS signal. Internal CTS and DCD signals are ignored. The Tx Delay timer is active. This is the profile used when PROFILE =
AUTO and an RS-232 communication interface is used with the 910.
• RS-485: Uses the internal RTS signal and the Tx Delay timer. Internal CTS and DCD signals are ignored. This is the profile used when PROFILE = AUTO and an RS-485 communication interface is used.
• 1200 BAUD MODEM: Uses the internal RTS signal with a fixed 10 msec Tx Delay time,
ignores the internal CTS signal. Uses the internal DCD signal to qualify each receive data
character. This is the profile used when PROFILE = AUTO, BAUD RATE = 1200 and a
MODEM communication interface is used.
• 300 BAUD MODEM: Uses the internal RTS signal with a fixed 30 msec Tx Delay time,
ignores the internal CTS signal, uses the internal DCD signal to qualify each receive data
character. This is the profile used when PROFILE = AUTO, BAUD RATE is not 1200 and a
MODEM communication interface is used.
5.6.10 TX DELAY
Purpose: Allows a programmable delay between the receipt of a communications message
and the controller’s reply. In some applications, it may be necessary to delay the controller’s
response to an inquiry for a short period of time to allow external devices to start up, stabilize and/or synchronize.
Range: 0.00 to 2.50 seconds
Procedure: Set the amount of delay between the receipt of a message and the controller’s
response as required.
Note: This selectable TX DELAY is only used if the PROFILE is set to either RS-485 or AUTO
and an RS-485 interface is installed.
5.7 Operator Console Functions
The following features are part of the controller’s programming, but are only used in conjunction with the Operator Console.
5.7.1 PASSCODE
Purpose: The four digit, numeric PASSCODE feature stops unauthorized users from modifying the controller’s configuration parameters using the Operator Console.
Range: 0000 to 9999
Procedure: Enter the desired PASSCODE (in the “Miscellaneous Common Setup” submenu) using the Operator Console keypad. A PASSCODE of 0000 disables the lockout feature and allows all configuration parameters to be modified using the Operator Console
without requiring a PASSCODE. Setting the PASSCODE to any other value will require the
database to be unlocked by entering the correct PASSCODE prior to modifying any of the
controller’s configuration parameters using the Operator Console.
Note: The PASSCODE can be edited only if it is set to 0 or the database has been unlocked
by entering the proper PASSCODE.
5.7.2 LOCK DATABASE
Purpose: If the PASSCODE has been enabled (PASSCODE is not set to 0) and the user has
unlocked console modification access to the controller’s configuration parameters, the
LOCK DATABASE feature allows the user to re-lock this modification access once programming has been completed.
49
Procedure: Select the LOCK DATABASE function (at the end of the “Configuration Mode
Main Menu”) to lock out Operator Console configuration modification access. The display
will confirm the operation by displaying a “DATABASE LOCKED” message.
Note: Operator Console configuration modification access will automatically re-lock after
approximately 5 minutes of keypad inactivity.
5.7.3 UNLOCK DATABASE
Purpose: If a PASSCODE has been enabled (PASSCODE is not set to 0) and the user wants
to modify any of the controller’s configuration parameters using a the Operator Console,
then the database must first be unlocked.
Procedure: Try modifying any configuration parameter, or select the UNLOCK DATABASE
function (at the end of the “Configuration Mode Main Menu”), and a prompt for the PASSCODE will appear. If the correct PASSCODE is entered then the display will confirm the operation by displaying a DATABASE UNLOCKED message.
5.7.4 TEST TRACING
Purpose: The TEST TRACING feature provides an easy method of temporarily overriding the
temperature control, without having to modify the CONTROL SETPOINT temperature or any
other configuration parameter.
Procedure: Press the TEST key on the Operator Console or select the TEST TRACING function to force the output switch on for approximately 30 seconds. After the test time has
expired, the unit will automatically revert back to normal operation.
Notes:
• This feature only overrides temperature control; it does not override other control parameters such as power limiting.
• If load shedding is active then TEST TRACING is inhibited.
5.7.5 DISPLAY TEST
Purpose: The DISPLAY TEST feature provides an easy method of illuminating each display
segment and all the LEDs of the Operator Console to ensure that they are functioning properly.
Procedure: Select DISPLAY TEST and watch the Operator Console to verify that each display segment and each LED is illuminated during the test sequence.
Note: Pressing any key on the Operator Console keypad during the DISPLAY TEST will
cause the DISPLAY TEST to abort.
5.7.6 LOAD DEFAULTS
Purpose: To provide a quick method of setting all of the controller’s configuration parameters to the factory default configuration parameters, as defined in Appendix G. In additional,
all of the maintenance data parameters are reset. Note that all load shedding parameters
(including fail safe) are configured with default values. The CONSOLE SETPOINT MAXIMUM
and MINIMUM are also configured with default values.
Procedure: Select the LOAD DEFAULTS function (in the “Miscellaneous Setup” sub-menu)
using the Operator Console keypad.
Note: This function will also overwrite the communication configuration parameters, which
could affect existing communications to the controller.
5.7.7 FEATURE MODE
Purpose: Provides two types of menus on the Operator Console for configuring the 910.
Setting: BASIC or ADVANCED
Procedure: Select BASIC if access to only the seven most common parameters is required.
Select ADVANCED if access to all of the 910 parameters is required.
50
Section 6—Monitored Parameter Details
6.1 Introduction
The following text provides a brief summary of each of the measured and calculated parameters that the 910 Series Control Module provides to the user. Detailed information
regarding settings, alarms limits, etc. may be found in Section 5 of this manual.
Detailed information regarding the display of these variables using the Operator Console
may be found in Section 4.2 of this manual.
For detailed information regarding the display of these variables using the Model 780/GCC9000, refer to the GCC user manual.
6.2 Analog Readings
6.2.1 CONTROL TEMPERATURE
Purpose: This is the temperature that the controller uses to determine whether its output
switch should be on or off. Depending on the TS CONTROL MODE setting and whether one
or two RTDs are installed, the CONTROL TEMPERATURE may be derived from TS 1 or TS 2,
or a combination of the two temperatures. See Section 5.2.11 of this manual for further
details regarding the TS CONTROL MODE settings.
6.2.2 TS 1 TEMPERATURE
Purpose: This temperature is the value that the controller is reading from the RTD connected to its TS 1 input. Depending on the TS CONTROL MODE, it may be used to determine the
CONTROL TEMPERATURE (see Section 6.2.1 above).
Note: If the TS 1 input is not being used by the controller, the TS 1 TEMPERATURE is not
displayed.
6.2.3 TS 2 TEMPERATURE
Purpose: This temperature is the value that the controller is reading from the RTD connected to its TS 2 input. Depending on the TS CONTROL MODE, it may be used to determine the
CONTROL TEMPERATURE (see Section 6.2.1 above).
Note: If the TS 2 input is not being used then by the controller then the TS 2 TEMPERATURE is not displayed.
6.2.4 LOAD CURRENT
Purpose: The LOAD CURRENT reading indicates the average current being drawn by the
heating cable.
6.2.5 RESISTANCE
Purpose: Resistance is calculated using the average adjusted voltage reading divided by the
average adjusted current reading to yield a load resistance in ohms. If the controller’s output switch is on, but no current is present, the RESISTANCE will read “open circuit.”
Note: If the controller’s output switch is off, the RESISTANCE will always display the last
resistance which was calculated while the output switch was last on.
6.2.6 GROUND FAULT CURRENT
Purpose: If the controller detects any leakage current in the output circuit, it will indicate the
level in milliamps.
Note: To minimize nuisance alarms, the controller will not report a leakage current of less
than 20 mAmps.
51
6.2.7 VOLTAGE
Purpose: The voltage reading indicates the average circuit voltage being measured by the
910.
6.2.8 POWER
Purpose: Load power provides an indication of the average power being consumed by the
heat trace cable .
Note: The controller calculates load power by multiplying the average adjusted voltage reading by the average adjusted current reading.
6.3 Maintenance Data
6.3.1 MAX / MIN TEMPERATURE VALUES
MAX CONTROL TEMP
MIN CONTROL TEMP
TS 1 MAX TEMP
TS 1 MIN TEMP
TS 2 MAX TEMP
TS 2 MIN TEMP
Purpose: This feature indicates the maximum and minimum temperatures recorded by the
HTC since the last time the values were reset. It may be useful to log the maximum/minimum temperatures experienced on a particular tracing circuit for the purposes of troubleshooting or gathering data for future design criteria. The temperature values are written
to the controller’s non-volatile memory once every 24 hours or whenever any maintenance
data is reset by the user. Max/min temperatures are recorded for TS 1, TS 2 and the CONTROL TS.
Range: Can only be reset (cleared) by the operator.
Procedure: The max/min temperatures may be reset using the Operator Console or a communicating device. Resetting any one of the temperatures will reset all of them.
6.3.2 POWER ACCUMULATOR
Purpose: This feature indicates the total power consumption of the trace circuit since the
last time the POWER ACCUMULATOR was reset. It may be useful to log the amount of
power consumed on a particular trace circuit for the purposes of energy management or
gathering of data for future design criteria. The value of this accumulator is written to the
controller’s non-volatile memory once every 24 hours or whenever any maintenance data is
reset by the user.
Procedure: The POWER ACCUMULATOR may be reset to zero using the Operator Console
or a communicating device.
Note: The POWER ACCUMULATOR value will roll over to zero when the upper limit of the
POWER ACCUMULATOR has been exceeded. This upper limit is 214,748,364.7 kW-hours.
6.3.3 CONTACTOR CYCLE COUNTER
Purpose: This feature indicates the total number of off-to-on transitions a contactor has
made since the last time the CONTACTOR CYCLE COUNTER was reset. This serves as a
method to perform preventative maintenance on the contactor according to the manufacturer’s specifications. This count value is written to the controller’s nonvolatile memory once
every 24 hours or whenever any maintenance data is reset by the user.
Procedure: The CONTACTOR CYCLE COUNTER may be reset to zero using the Operator
Console or a communicating device.
52
Note:
• Once the CONTACTOR CYCLE COUNTER reaches 999,999,999 it will stop counting.
• The CONTACTOR CYCLE COUNTER is only indicated if the SWITCH CONTROL MODE is
set to either DEADBAND or PROPORTIONAL AMBIENT CONTACTOR.
6.3.4 TIME IN USE
Purpose: The purpose of this feature is to indicate the total hours in use of the controller
since its initial operation. It may be useful to log the amount of time a particular controller
has been in operation for the purposes of maintenance planning or reliability testing. The
value of this accumulator is written to the controller’s nonvolatile memory once every 24
hours or whenever any maintenance data is reset by the user.
Procedure: The IN USE hours accumulator can be reset to zero using the Operator Console
or a communicating device.
Note: The IN USE hours accumulator value will roll over to zero when the upper limit of the
accumulator has been exceeded. This limit is 999,999,999 hours.
6.3.5 TIME SINCE LAST RESET
Purpose: This feature indicates the total hours in use of the controller since the last reset. It
may be useful to log the amount of time a particular controller has been in operation since
the last time the controller’s power was cycled for trouble-shooting purposes.
Procedure: The TIME SINCE LAST RESET hours accumulator can only be reset by cycling
the controller’s power.
Note: The TIME SINCE LAST RESET will roll over to zero when the upper limit of 65,535
hours has been exceeded.
6.3.6 PEAK LOAD CURRENT
Note: The PEAK LOAD CURRENT is not displayed on the Operator Console.
Purpose: This feature indicates the highest instantaneous load current measured since the
last time the PEAK LOAD CURRENT was reset. This value is written to the controller’s nonvolatile memory once every 24 hours or whenever any maintenance data is reset by the
user.
Procedure: The PEAK LOAD CURRENT may only be reset to zero using a communicating
device.
6.3.7 PEAK GROUND FAULT CURRENT
Note: The PEAK GROUND FAULT CURRENT is not displayed on the Operator Console.
Purpose: This feature indicates the highest instantaneous ground fault current measured
since the last time the PEAK GROUND FAULT CURRENT was reset. This current value is
written to the controller’s non-volatile memory once every 24 hours or whenever any maintenance data is reset by the user.
Procedure: The PEAK LOAD CURRENT may only be reset to zero using a communicating
device.
6.3.8 EXTERNAL INPUT STATUS
Note: The EXTERNAL INPUT STATUS is not displayed on the optional Operator Console.
Purpose: This feature indicates the actual status of the external input regardless of the controller’s configuration. This may be useful if the user wishes to use the controller’s external
input to monitor the status of an external dry contact and pass this on to another device.
Procedure: The EXTERNAL INPUT STATUS may only be viewed using a communicating
device.
53
Section 7—Control Modes
7.1 Introduction
There are several different types of control modes in the controller. Some of these modes
require further explanation in order to fully understand and implement their operation.
This section describes the control modes available in the HTC and how to set their associated parameters.
7.2 Switch Control Modes
There are four different SWITCH CONTROL modes associated with the HTC. The following is
an explanation of their implementation in the controller and the differences between them.
7.2.1 PROPORTIONAL CONTROL (FOR USE WITH SSRS ONLY)
Proportional control on the HTC is implemented as follows:
• When using SSRs to directly control the power applied to a trace circuit, the output may
be switched on/off very rapidly. The controller implements proportional temperature control on a cycle by cycle basis (50 or 60 Hz power line cycle).
• This algorithm monitors the temperature of the heating circuit and compares it to the
CONTROL SETPOINT temperature. If the temperature of the control sensor is at or below
the CONTROL SETPOINT temperature, then power is applied to the trace with a duty
cycle of 100%—the controller output is full on.
• If the temperature sensed by the control sensor is equal to or greater than the CONTROL
SETPOINT temperature + the PROPORTIONAL BAND setting, then the controller output
will have a duty cycle of 0%—the output will be off.
• The temperature of the control sensor is constantly monitored and the output duty cycle
is adjusted proportionally according to where the temperature falls within the 0%–100%
band.
Proportional Control Temperature Band
Control Sensor Temperature
Setpoint + proportional band
Setpoint + proportional band/2
Setpoint
Duty Cycle
0%
50%
100%
7.2.2 DEADBAND CONTROL (FOR USE WITH EXTERNAL CONTACTORS)
Deadband control on the HTC is implemented as follows:
• When using the HTC in an application where the controller is used to open and close a
contactor, proportional control cannot be used since this would cycle the contactor too
quickly. In these situations, a deadband control algorithm is used. The output duty cycle
is not controlled, instead the output is either fully on or completely off. The user may set
the DEADBAND value.
• The controller monitors the temperature of the trace circuit and compares it to the CONTROL SETPOINT temperature as in the proportional control mode. If the control sensor
temperature is above the CONTROL SETPOINT temperature by more than the DEADBAND
value, the output is turned off.
• If the control sensor temperature falls below the CONTROL SETPOINT temperature the
output is turned on.
This is a very simple control algorithm but it works very effectively in heat trace applications
where the temperature of a traced system changes relatively slowly.
54
Deadband Control Temperature Band
Control Sensor Temperature
Output State
Setpoint + deadband
Off
Setpoint
On
When the control sensor temperature is within the deadband, the output does not change
its state. Also, when using deadband control, a contactor is not allowed to toggle faster than
every two seconds. If an AC alarm with an alarm filter time greater than 0 is detected, the
contactor will not toggle until the alarm filter time has expired.
7.2.3 PROPORTIONAL AMBIENT SSR CONTROL (FOR USE WITH SSRS ONLY)
When an HTC using an SSR is used to control the output using the ambient temperature,
this control mode should be used.
Proportional ambient SSR control on the HTC is implemented as follows:
• When using SSRs to directly control the power applied to a heating circuit, the output
may be switched on/off very rapidly. The controller implements proportional temperature
control on a cycle by cycle basis (50 or 60 Hz power line cycle).
• This algorithm monitors ambient temperature and compares it to the CONTROL SETPOINT temperature. If the temperature of the control sensor is at or below the CONTROL
SETPOINT temperature minus the PROPORTIONAL BAND setting, then power is applied
to the trace with a duty cycle of 100%—the controller output is fully on.
• If the temperature sensed by the control sensor is equal to or greater than the CONTROL
SETPOINT temperature, then the output will have a duty cycle of 0%—the controller output will be off.
• The temperature of the control sensor is constantly monitored and the output duty cycle
is adjusted proportionally according to where the temperature falls within the 0%–100%
band.
Proportional Ambient SSR Control Temperature Band
Control Sensor Temperature
Setpoint
Setpoint - proportional band/2
Setpoint - proportional band
Duty Cycle
0%
50%
100%
Note: The load shedding “fail safe mode” is not supported when using proportional ambient
SSR control, since ambient temperature is being monitored rather than pipe temperature.
7.2.4 PROPORTIONAL AMBIENT CONTACTOR CONTROL (FOR USE WITH CONTACTORS)
When an HTC using a contactor is used to control the output based on the ambient temperature, this control mode should be used.
Proportional ambient contactor control on the HTC is implemented as follows:
• The output may not be switched on/off rapidly when using a contactor, so proportional
temperature control is implemented by applying the required duty cycle over the selected
CYCLE TIME.
• The output is fully on for a portion of the CYCLE TIME as determined by the calculated
duty cycle, and it will be completely off for the remainder of the CYCLE TIME.
• The duty cycle is calculated each time the output toggles, based on the ambient temperature, PROPORTIONAL BAND setting, and the CONTROL SETPOINT temperature setting.
• The controller monitors the ambient temperature and compares it to the CONTROL SETPOINT temperature as in proportional ambient SSR control. If the temperature of the
control sensor is at or below the CONTROL SETPOINT temperature minus the PROPORTIONAL BAND setting, then power is applied to the trace with a duty cycle of 100%. The
controller output will be fully on for 1/30 of the CYCLE TIME setting before the duty cycle
is calculated again.
• If the temperature sensed by the control sensor is equal or greater than the CONTROL
SETPOINT temperature, then the output will have a duty cycle of 0%. The controller out55
put will be off for 1/30 of the CYCLE TIME setting before the duty cycle is calculated
again.
Proportional Ambient Contactor Control Temperature Band
Control Sensor Temperature
Setpoint
Setpoint - proportional band/2
Setpoint - proportional band
Duty Cycle
0%
50%
100%
Note: The load shedding “fail safe mode” is not supported when using proportional ambient
contactor control, since ambient temperature is being monitored rather than pipe temperature. Also note that if an AC alarm, with an alarm filter time greater than 0, is detected the
contactor will not toggle until the alarm filter time has expired.
7.3 Load Shedding Control Mode
Load shedding is a control mode that may be programmed and initiated only by an external
communicating device or by the Model 780/GCC-9000 Group Communications Controller,
which overrides temperature control and forces the output of the controller OFF until reset
by the 780/GCC-9000. When using a GCC, load shedding is initiated by a contact closure (or
opening) on one of the four contact inputs on the GCC. Each contact input initiates a load
shedding command for the group of controllers associated with that contact input. Each
controller may be associated with one or more groups. Refer to the Load Shedding Section
in the GCC manual for details on setting up the load shedding features of the HTC when
using a GCC.
When power is applied to the controller, it determines if load shedding mode has been
enabled. If enabled, the controller immediately enters load shedding operation (holding its
output off) and waits to see if the GCC or an external communicating device has initiated a
load shedding command. If no command is present, the controller resumes normal operation. If a load shedding command is present, the controller will continue to hold its output
OFF, until one of three conditions occurs:
1. The GCC contact input or zone definition bits of an external communicating device that
initiated load shedding clears and the command to terminate load shedding mode is
issued.
2. Communications are interrupted between the controller and its communicating device (as
in the case of a damaged communications wire). Approximately 30 seconds after communications ceases, the controller will return to normal operation.
3. Communications between the controllers and the external communicating device go offline for approximately two minutes (as occurs when the 760 Hand Held Programmer is
used to communicate with the controller).
Note: The controller will return to normal operation if communications between the GCC or
external communicating device and the controller is disrupted in any way. This will return
temperature control to the HTC. Also, the HTC does not perform a periodic autocycle test
while operating in load shed mode. When using a GCC it must be configured for load shedding operation before the controller may be set up for load shedding control.
There are three parameters that must be set up in the controller to completely configure it
for load shedding operation:
1. The load shedding feature must be enabled.
2. The FAIL SAFE MODE parameter must be enabled or disabled depending on the application requirements. If FAIL SAFE MODE is enabled, then at least one LOW TS ALARM (of a
TS used in the TS CONTROL MODE) must be enabled and its alarm temperature must be
less than the CONTROL SETPOINT temperature; otherwise, fail safe mode will be disabled.
3. The GCC contact input(s) or zone definition bits of an external communicating device that
are to be associated with the load shedding action for the controller must be defined.
56
These parameters may only be configured using an external communicating device or the
Model 780/GCC-9000 Group Communications Controller. Refer to the Model 780/GCC-9000
user manual for details on how to set up these options. Note that the Operator Console may
be used to enable or disable the load shedding feature but not set any of the other load
shedding parameters.
Notes:
• Fail safe mode is always disabled if the SWITCH CONTROL MODE is set to either of the
two proportional ambient control modes, or the TS CONTROL MODE = EXT. INPUT, FAIL
OFF/ON.
• If the TS CONTROL MODE uses both TS 1 and TS 2 to calculate the control temperature,
the HTC will turn on its output if the following conditions are met:
– load shedding is active
– fail safe mode is enabled
– the control temperature falls below either of the LOW TS ALARM settings
– both TS 1 and TS 2 have their LOW TS ALARMS enabled
• A FORCE ON override signal has higher priority than a load shedding signal. An INHIBIT
signal has higher priority than fail safe mode.
Section 8—Troubleshooting
8.1 Operator Checks
Note: If the controller does not operate properly and is being returned to Tyco Thermal
Controls for service, information must be provided as to why the unit was removed from
service. Contact the Tyco Thermal Controls customer service department for a Return
Authorization form and number prior to returning any units for repair.
Upon receipt of the controller, or to check the controller for an indication of normal operation, follow the operational procedures shown below. These procedures are designed to
familiarize the operator with the controller and to provide an understanding of its operation.
In order to determine if a fault is associated with the heat tracing, wiring or the controller, it
will be necessary to troubleshoot the wiring and tracer circuit. If the fault remains, remove
power from the controller and exchange it with another controller. This may require some
reprogramming of the new HTC. Refer to the following sections for the appropriate topic.
If the fault clears, exchange the controller on another circuit to determine if the fault moves
with the controller. If the fault moves with the controller, verify that the HTC has been configured correctly for the application. If the configuration is correct it may be necessary to
return the controller to Tyco Thermal Controls for evaluation.
8.1.1 GETTING STARTED
In order to access the functions of the 910 Series HTC, use the Operator Console. If the
modem communications option is installed in the 910, the Model 780/GCC-9000 Group
Communications Controller may also be used to access controller parameters. Refer to the
GCC User Manual for operational details.
8.2 Common Problem Areas
The HTC may be used as an effective troubleshooting tool to pinpoint problem areas of heat
trace circuits. Described below are a few of the more common problem areas, their symptoms, and parameters to check to determine the actual faulty portion of the heat trace circuit.
57
8.2.1 RTDS
RTD failures after installation can generally be attributed to incorrect wiring or improper
installation of the sensor. Troubleshooting of these failures is a very simple procedure if the
proper steps are undertaken in the correct order. Some specific RTD problems and the correct methods for troubleshooting are outlined as follows.
1. TS Failure Alarm(s)
If the HTC controller indicates a failure of an RTD:
• Ensure that the RTD is a 3-wire 100 ( Platinum Type (for V3.00). For V3.11 and up
ensure that the TS TYPE setting matches the RTD being used.
TURN THE POWER TO THE CONTROLLER OFF BEFORE PROCEEDING!!
• Disconnect the RTD wiring from the input terminals.
• Measure the RTD’s resistance between the source (WHT) and sense (WHT) leads at the
controller (it should not exceed 40 Ω). Excessive lead resistance will cause a TS FAILURE
ALARM and must be corrected. Look for loose terminals, excessive lead length, or insufficient wire gauge and correct as necessary.
• Measure the RTD’s resistance between the source (WHT) or sense (WHT) lead and the
common (RED) lead of the RTD at the controller (should be between 60 and 330 Ω
depending on the temperature and the lead resistance. See Appendix E or Appendix F).
• Verify that the RTD is wired correctly—the heat tracing controllers will always be terminated in the order: source (WHT), sense (WHT), common (RED). When wiring to the 910,
the terminals are marked as follows:
Terminal No.
Description
19
Shield
20
TS 1 Source (WHT)
21
TS 1 Sense (WHT)
22
TS 1 Common (RED)
8
Shield
9
TS 2 Source (WHT)
10
TS 2 Sense (WHT)
11
TS 2 Common (RED)
The RTD manufacturer will typically color code the leads with the source and sense being
the same color, and the common a different color. Ensure that the RTD extension wire shield
is terminated at one end only, normally using the terminal block provided at the terminal
board.
Note: Some manufacturers use the common Black-White-Red triad color code for the RTD
connections. Usually, the RED lead is the common connection (same as the White-WhiteRed color scheme) and the White and Black connections may be used interchangeably.
2. Seemingly Incorrect Temperature
If you feel that the indicated or displayed temperature is not correct, the controller and the
RTD can be quickly checked for correct operation.
To verify the RTD:
TURN THE POWER TO THE CONTROLLER OFF BEFORE PROCEEDING!!
• Disconnect the RTD wiring from the input terminals.
• To calculate the temperature indicated by the RTD, measure the resistance from source
(white wire) or sense (white wire) to common (red wire) and subtract the resistance measured between source and sense. This will give a compensated resistance value that can
be cross-referenced to one of the RTD tables found in Appendix E or Appendix F.
Compare the measured resistance and cross-referenced temperature value obtained from
the RTD table to the indicated or displayed value. These should agree to within the accuracy standards of the HTC and the RTD.
Notes:
• Ensure you refer to the correct RTD table for the type of RTD you are using.
58
• Ensure that the TS TYPE setting matches the type of RTD that you are using.
To verify the Controller:
TURN THE POWER TO THE CONTROLLER OFF BEFORE PROCEEDING!!
• Disconnect the RTD wiring from the input terminals.
• Connect a 100 Ω resistor across the source or sense terminal and common. Insert a
jumper between the source and sense terminals.
• Apply power to the controller. The indicated or displayed temperature should be about
32°F (0°C) depending on the actual resistance of the test resistor if TS TYPE is set to 100
Ω Platinum.
3. Unstable or Bouncing Temperature
An erratic indication of temperature can be caused by several factors external to the controller, however a bouncing temperature of a few degrees should not be confused with
incorrect operation. The controller’s accuracy and resolution will result in an indicated
temperature change of a couple of degrees if the measured resistance temperature falls
between two discrete values (this is sometimes referred to as quantization error).
If the bounce or instability is excessive, check:
• Wire used for extension of the RTD should be three-wire, twisted and shielded with the
shield grounded at the controller only. Each of the three lead wires must be of the same
gauge.
• The ideal installation has a separate conduit for the RTD leads (if they have been extended). It is not usually a problem to run low signal levels in the same conduit as the power
leads even in high power applications, as long as the RTD wire is a twisted, shielded type
with an insulation rating equal to or greater than the highest voltage in the conduit.
Follow the proper Electrical Code requirements for your particular installation.
• Terminal connections that are not tight can add resistance to an RTD circuit. Check the
tightness of all screw terminal connections at time of installation and during subsequent
maintenance checks.
• Check the specifications for the particular cable being used to ensure that it does not
have excessive capacitance when used in long lengths. This can cause a temperature offset between what the controller reads and what the RTD actually measures. This again is
normally not a problem since the controller compensates for all but the worst cases of
this.
• Lastly, it is possible for the RTD itself to fail on an intermittent basis but this failure mode
should be considered unusual. This kind of failure is probably the most difficult to find
but fortunately it is also the least likely as a failure mechanism.
8.2.2 GROUND FAULT
Ground fault alarms can be due to incorrect installation as well as leakage resulting from
wet system components or faulted cables.
The 910 Series Controller detects ground faults by summing the outgoing and return trace
currents through an internal current transformer. Under normal operating conditions (no
ground fault condition) this current will be zero. When there is a flow of current from one of
the trace supply wires to ground, a ground fault condition occurs.
If a ground fault alarm is present on start-up of a new installation it is likely due to a wiring
error or damaged cable. To verify this condition:
• Check that the heating circuit neutrals return to the controller and are not connected
directly to the distribution panel. This can be a common problem if the installation is a
retrofit situation.
• On paralleled circuits, be certain that ALL neutrals return. The late addition of a circuit
may not be obvious.
Use the monitoring feature available at the 910 Operator Console or the Model 780/GCC9000 Group Communications Controller to view the measured ground fault current at the
heat trace controller. If this value is at the maximum that the controller can measure, it is
usually an indication that the wiring is incorrect. If the value is less than 250 mAmps then
59
an actual ground fault condition may exist in the cable.
Note: The controller monitors the integrity of the ground fault (GF) detection transformer
and associated wiring. If a fault is detected, the controller will report a GF value of 300
mAmps.
8.3 Common Alarms—What to Look for
The 910 has a wide range of alarming features that may be selectively enabled or disabled
to allow the monitoring and indication of trouble conditions. Described below are the different alarm conditions available on the 910, their meanings, and possible causes.
8.3.1 High TS 1/ TS 2 Temperature
This alarm appears when the temperature exceeds the HIGH TS ALARM temperature setting.
Cause of Alarm:
• Alarm temperature setting too close to maintain temperature
• Flow of hot product
• Steaming out lines
• Incorrect tracer wiring
8.3.2 LOW TS 1/TS 2 TEMPERATURE
This alarm appears when the temperature decreases below the LOW TS ALARM temperature setting.
Cause of Alarm:
• Alarm temperature setting too close to maintain temperature
• Flow of cold product
• Empty pipe
• Damaged, wet, or missing insulation
• Heating cable not sized properly for the application
8.3.3 TS 1/ TS 2 FAILURE
This alarm indicates a sensor is not operating properly. The temperature sensor may fail due
to an “open” or “shorted” condition.
Cause of Alarm:
• Incorrect or damaged field wiring—open leads or excess resistance (either intermittent or
continuous) may be due to broken or damaged wires or loose terminals.
• Damaged or inoperative temperature sensors
8.3.4 CONTROL TS FAILURE
This alarms a failure of the temperature sensing element designated as the control element
by the TS CONTROL MODE setting. Depending on the chosen TS FAIL MODE and TS CONTROL MODE, the output switch may be latched off or on until this failure is corrected.
Cause of Alarm:
• Incorrect or damaged field wiring—open leads or excess resistance (either intermittent or
continuous) may be due to broken or damaged wires or loose terminals.
• Damaged or inoperative temperature sensors
8.3.5 HIGH CURRENT
This alarms current levels that are greater than the HIGH CURRENT ALARM setting for the
application.
Cause of Alarm:
• Alarm setting too close to normal operating current
• High in-rush current from “cold start” of self regulating cable
• Damaged or partially shorted heating cable
• “As built” cable length is greater than design value
60
8.3.6 LOW CURRENT
This alarms current levels which are less than the LOW CURRENT ALARM setting.
Cause of Alarm:
• Alarm setting too close to normal operating current
• Low source voltage
• Damaged or inoperative heating cable
• Open connection—wiring problem
• SSR or contactor failed open
8.3.7 HIGH GFI
This alarms ground fault current levels which are greater than the HIGH GFI ALARM setting.
Cause of Alarm
• Alarm setting too close to normal leakage current
• Damaged cable insulation and/or moisture present
• Moisture in junction box
• Poor splice or termination
• Moisture provides conductive ground path which allows ground fault current
8.3.8 GFI TRIP
This value sets the upper limit of allowable ground fault leakage. Exceeding this limit will
result in the output switch being latched off and the alarm activated to indicate a ground
fault condition.
Cause of Alarm
• Trip setting too close to normal leakage current
• Damaged cable insulation and/or moisture present
• Moisture in junction box
• Poor splice or termination
• Moisture provides conductive ground path which allows ground fault current
8.3.9 HIGH VOLTAGE
This alarms voltage levels that are greater than the HIGH VOLTAGE ALARM setting.
Cause of Alarm
• Alarm setting too close to normal operating voltage
• Incorrect wiring
• Power surge
8.3.10 LOW VOLTAGE
This alarms voltage levels which are less than the LOW VOLTAGE ALARM setting.
Cause of Alarm
• Alarm setting too close to normal operating voltage
• Damaged power cable
• Incorrect VOLTAGE TURNS RATIO
• “Brown-out” conditions
• Loss of power to the circuit
8.3.11 OVERCURRENT TRIP
If the controller is unable to start the cable due to high current or after attempting to soft
start it, the controller will trip its output switch off.
Cause of Alarm
• Excessive in-rush current
• Incorrect wiring
• Damaged cable
61
8.3.12 SWITCH FAILURE
This alarm indicates that the controller senses current flow when the output switch should
be off.
Cause of Alarm
• Some other device energized heat trace
• Output switch has failed “closed”
8.3.13 HTC RESET
This alarm is latched when power is restored after an interruption. Used to identify intermittent power losses.
Cause of Alarm
• Circuit breaker tripped
• Power line transient
8.3.14 POWER LIMITING
This alarm indicates that the solid state relay is limiting the average amount of power that is
applied to the trace circuit as defined by the MAXIMUM POWER setting.
Cause of Alarm
• Power applied to trace circuit is being limited to the MAXIMUM POWER setting
8.3.15 C.B. LIMITING
This alarm indicates that the solid state relay is limiting the average current that is applied to
the trace circuit to the C.B. CURRENT RATING setting to protect the upstream heater circuit
breaker from tripping.
Cause of Alarm
• Excessive current caused by in-rush current
• C.B. CURRENT RATING setting too low for normal heater current draw or not matched to
actual circuit breaker size
8.3.16 SWITCH LIMITING
This alarm indicates that the controller is limiting the average current that is applied to the
trace circuit based on the SWITCH RATING setting to protect the solid state relay from
excess current.
Cause of Alarm
• Excessive current caused by in-rush current
• Excessive ambient temperature
8.3.17 HIGH RESISTANCE
This alarm indicates that the heating cable resistance has deviated from the NOMINAL
RESISTANCE setting by more than the HIGH RESISTANCE ALARM setting.
Cause of Alarm
• Alarm setting too close to actual operating resistance
• NOMINAL RESISTANCE not set properly
• Open connection—wiring problem
• Damaged cable
8.3.18 LOW RESISTANCE
This alarm indicates that the heating cable resistance has deviated from the NOMINAL
RESISTANCE setting by more than the LOW RESISTANCE ALARM setting.
Cause of Alarm
• Alarm setting too close to actual operating resistance
• NOMINAL RESISTANCE not set properly
• Partial short—wiring problem
• Damaged cable
62
8.3.19 EEROM DATA FAILURE
This alarm indicates that the controller has detected a failure in its nonvolatile memory (this
is where all of the controller’s configuration and calibration settings are stored). This indicates an internal problem and the HTC should be replaced and returned to the factory for
repair.
Cause of Alarm
• The HTC cannot bypass the failed area of its memory and has loaded factory defaults into
this failed area.
8.3.20 CONTACTOR COUNT
This alarm indicates that the number of off-to-on transitions of a contactor has exceeded
the CONTACTOR COUNT ALARM setting and the contactor should be replaced.
Cause of Alarm
• Contactor has been controlling the trace circuit for a long time
• Some configuration parameter (i.e. DEADBAND, AUTO CYCLE INTERVAL, load shedding
etc.) is causing the contactor to toggle more than usual.
Section 9—Maintenance
9.1 Operator Maintenance
The 910 series controller is designed to be a maintenance-free product. Once installed properly the only maintenance required is retightening of the terminal connections approximately one week after installation and inspection periodically thereafter. Also, alarm pilot lamps
(if installed) may need periodic replacement. EMR versions may require periodic contactor
replacement.
Caution: Make sure that the power to the controller is OFF when replacing the pilot lamps!
Also, be certain power is OFF to the controller before attempting to test or service the heat
tracing. Do not rely on the controller as a disconnect device!
9.2 Replaceable Parts
There are no user-serviceable parts in the 910 series controller or accessories (except
lamps in optional alarm pilot lights). The unit is designed to be modular and easily changed
out in the field in a matter of minutes. A 910 appearing inoperative should be returned to
the nearest Tyco Thermal Controls Service Center for service.
Warning: Tampering with the 910 components without approval from Tyco Thermal
Controls could result in the product’s warranty being void.
63
Appendix A—Specifications
Specifications are @ 25°C unless otherwise noted and are subject to change without notice.
System Ratings
Storage Ambient
–40°F to 185°F (–40°C to 85°C)
Approvals
CSA C/US
Classification
• Cl I, Div 2, Grps A,B,C,D and Ex nA IIA, IIB, IIC (Zone 2)
• SSR Version T-code: T4
• Ordinary locations (SSR and EMR versions)
Wiring Terminal Ratings
Signal Terminals
28-12 AWG, strip length: 0.2"
Power Terminals
30A: 22-8 AWG, strip length: 0.47", torque: 10.7 in-lb
(1.2 N-m)
Ground Lugs
14-6 AWG torque: 12 in-lb (1.35 N-m)
Assembly Ratings
Operating Temperature
–40°F to 140°F (–40°C to 60°C)
Enclosures
FRP: Nema 4X/IP65
SS: Type 304, Nema 4X/IP65
Solid State Relay Rating
• 2 pole switching
• 30 A continuous @ 40°C, derate linearly to:
15 A max. @ 60°C
resistive load
• 100–277 Vac nom. max., 80 A 1 sec.
in-rush, 625 A 1 cycle in-rush
Electromechanical Relay Rating
• 2 pole switching
• 30 A continuous @ 40°C derate linearly to:
20 A max. @ 60°C
• 100–277 Vac nom. max.
Control Module Ratings
Operating Temperature
Power Requirements
Output Power
Control Modes
Temperature Inputs
Temperature Measurement
Range
Voltage Measurement Range
Current Measurement Range
GF Current Measurement Range
Dry Contact Alarm Relay Output
AC Alarm Relay Output
64
–40°F to 140°F (–40°C to 60°C)
100 to 277 Vac nom., 1PH, 50/60 Hz, 0.2A. max. + 0.75A
(Aux. AC output terminals)
+12Vdc nom., 250ma. max.
• Proportional, Deadband, Proportional Ambient (SSR),
Proportional Ambient (Contactor) modes
• Adjustable 2°F to 90°F (1°C to 50°C)
(2) RTD inputs: 3-wire 100Ω Platinum (DIN 43760,
α=0.00385Ω/Ω/°C) or 2/3-wire 100Ω Ni-Fe, open/shorted
sensor detection/protection, lead resistance compensated
0 to 20Ω per lead
–76°F to 1058°F (–60°C to 570°C), accuracy ± 0.5% of
span ± 1LSD
80 to 295Vac, accuracy: ± 1% of span ± 2LSD,
repeatability: ± 1.5% of span
0.3 to 100A, resolution: 0.1A (0.3A to 11A range),
0.3A (11A to 40A range), 0.7A (40A to 100A range),
accuracy: ± 2.5% of reading ± resolution
20 to 250ma, accuracy: ± 2.5% of span ± 2LSD at
nominal load, repeatability: ±4% of span
48Vac/dc, 500ma, 10VA switching max.
0.75A, 100–277 Vac nom. max.
Appendix B—Typical Enclosure Dimensions
The following drawings provide the user with enclosure size and mounting dimensions for
the stock 910 enclosure assemblies. Please contact your local Tyco Thermal Controls representative for information regarding other available sizes and configurations.
B.1 Standard Fiberglass EMR Assembly #10170-001
0.3" dia
0.3" dia
0.3" dia
0.3" dia
65
B.2 Optional Stainless Steel EMR Assembly #10170-003
0.25" dia
0.25" dia
66
0.25" dia
0.25" dia
B.3 Standard Fiberglass SSR Assembly #10170-0002
0.3" dia
0.3" dia
0.3" dia
0.3" dia
67
B.4 Optional Stainless Steel SSR Assembly #10170-004
0.3" dia
0.3" dia
68
0.3" dia
0.3" dia
B.5 910 Series HTC Control Module Dimensions
Mounting slots suitable
for a #8 machine screw
69
Appendix C—Wiring Diagrams
The following drawings provide sample wiring diagrams for the 910 Series control products
and optional accessories. Please contact your local Tyco Thermal Controls representative
for information regarding other available options.
C.1 TS Wiring
Note: Temperature sensor manufacturers may use different lead wire colors than those
shown in the diagram above. Some common color combinations are shown in the table
below, but others may also be available. See Sections 2.7.1 and 8.2.1 for additional details.
C.2 Power Wiring
70
Signal Description
Lead Wire
Color Scheme #1
Lead Wire
Color Scheme #2
Lead Wire
Color Scheme #3 (IEC 751)
Source
White
White
Red
Sense
White
Black
Red
Common
Red
Red
White
C.3 Communication Wiring
C.3.1 2-WIRE MODEM OPTION
C.3.2 2-WIRE RS-485 OPTION
C.3.3 RS-232 OPTION
71
C.4 Alarm Output Wiring
C.4.1 USED AS A DRY CONTACT
C.4.2 USED AS A SWITCHED DC CONTACT
C.4.3 USED AS AN AC ALARM RELAY
72
C.4.4 Used as a Powered AC Alarm Relay
C.5 External Input/Output Port Wiring
C.5.1 EXTERNAL INHIBIT/OVERRIDE USING A DRY CONTACT
C.5.2 EXTERNAL INHIBIT/OVERRIDE USING A DC SIGNAL
73
Appendix D—HTC Load Shedding Sequence
1. If an HTC is associated with more than one contact input, all inputs must be activated
before the HTC will go into a Load Shedding mode.
2. If communications between an HTC and an upstream device such as a GCC or supervisory
software are interrupted, or if the power has been reset to the HTC, the HTC will hold its
output OFF, waiting for a Load Shedding command.
3. Only if the Low Temperature Alarm is ENABLED.
4. For 910 Series controllers, a “<Load Shedding>” message will displayed after the load
current reading.
74
Appendix E—100 Ω Platinum RTD Table
DIN 43760—100 Ω Platinum Resistance Temperature (RTD)—0.00385 Ohms/Ohm/°C
Ohms
60.25
62.28
64.30
66.31
68.33
70.33
72.33
74.33
76.33
78.32
80.31
82.33
84.27
86.25
88.22
90.19
92.16
94.12
96.09
98.04
100.0
101.95
103.90
105.85
107.79
109.73
111.67
113.61
115.54
117.47
119.40
121.32
123.24
125.16
127.07
128.98
130.89
132.80
134.70
136.60
138.50
140.39
142.29
144.17
146.06
147.94
149.82
151.70
153.58
155.45
157.31
°C
°F
-100
-95
-90
-85
-80
-75
-70
-65
-60
-55
-50
-45
-40
-35
-30
-25
-20
-15
-10
-5
0
5
10
15
20
25
30
35
40
45
50
55
60
65
70
75
80
85
90
95
100
105
110
115
120
125
130
135
140
145
150
-148
-139
-130
-121
-112
-103
-94
-85
-76
-67
-58
-49
-40
-31
-22
-13
-4
5
14
23
32
41
50
59
68
77
86
95
104
113
122
131
140
149
158
167
176
185
194
203
212
221
230
239
248
257
266
275
284
293
302
Ohms
159.18
161.04
162.90
164.76
166.61
168.46
170.31
172.16
174.00
175.84
177.68
179.51
181.34
183.17
184.99
186.82
188.63
190.45
192.26
194.07
195.88
197.69
199.49
201.29
203.08
204.88
206.67
208.45
210.24
212.02
213.80
215.57
217.35
219.12
220.88
222.65
224.41
226.17
227.92
229.67
231.42
233.17
234.91
236.65
238.39
240.13
241.86
243.59
245.31
247.04
248.76
°C
°F
Ohms
°C
°F
155
160
165
170
175
180
185
190
195
200
205
210
215
220
225
230
235
240
245
250
255
260
265
270
275
280
285
490
295
300
305
310
315
320
325
330
335
340
345
350
355
360
365
370
375
380
385
390
395
400
405
311
320
329
338
347
356
365
374
383
392
401
410
419
428
437
445
455
464
473
482
491
500
509
518
527
536
545
554
563
572
581
590
599
608
617
626
635
644
653
662
671
680
689
698
707
716
725
734
743
752
761
250.48
252.19
253.90
255.61
257.32
259.02
260.72
262.42
264.11
265.80
267.49
269.18
270.86
272.54
274.22
275.89
277.56
279.23
280.90
282.56
284.22
285.87
287.53
289.18
290.83
292.47
294.11
295.75
297.39
299.02
300.65
302.28
303.91
305.53
307.15
308.76
310.38
311.99
313.59
315.20
316.80
318.4
319.99
321.59
323.18
324.76
326.35
327.93
329.51
331.08
332.66
410
415
420
425
430
435
440
445
450
455
460
465
470
475
480
485
490
495
500
505
510
515
520
525
530
535
540
545
550
555
560
565
570
575
580
585
590
595
600
605
610
615
620
625
630
635
640
645
650
655
660
770
779
788
797
806
815
824
833
842
851
860
869
878
887
896
905
914
923
932
941
950
959
968
977
986
995
1004
1013
1022
1031
1040
1049
1058
1067
1076
1085
1094
1103
1112
1121
1130
1139
1148
1157
1166
1175
1184
1193
1202
1211
1220
75
Appendix F—100 Ω Nickel-Iron RTD Table
Ohms
69.8
71.1
72.3
73.1
74.3
75.5
76.7
78.0
78.8
80.0
81.2
82.2
82.9
84.2
85.7
86.9
88.1
88.9
90.1
91.4
92.2
93.4
94.6
95.8
97.1
98.3
99.5
100.8
102.0
103.3
104.6
105.9
107.2
108.5
109.8
111.1
112.5
113.8
115.2
116.5
117.9
119.2
120.6
122.0
123.4
124.8
126.2
127.6
129.0
130.5
131.9
76
°C
-73
-70
-67
-65
-62
-59
-56
-53
-51
-48
-45
-42
-40
-37
-34
-31
-28
-26
-23
-20
-17
-15
-12
-9
-6
-3
-1
1
4
7
10
12
15
18
21
23
26
29
32
35
37
40
43
46
48
51
54
57
60
62
65
°F
-100
095
-90
-85
-80
-75
-70
-65
-60
-55
-50
-45
-40
-35
-30
-25
-20
-15
-10
-5
0
5
10
15
20
25
30
35
40
45
50
55
60
65
70
75
80
85
90
95
100
105
110
115
120
125
130
135
140
145
150
Ohms
133.4
134.8
136.3
137.8
139.3
140.8
142.3
143.8
145.3
146.8
148.4
149.9
151.5
153.0
154.6
156.2
157.7
159.3
160.9
162.5
164.2
165.8
167.4
169.0
170.7
172.3
174.0
175.7
177.4
179.1
180.8
182.5
184.2
185.9
187.6
189.
191.1
192.9
194.5
196.4
198.2
199.9
201.7
203.5
205.3
207.2
109.0
210.8
212.7
214.5
216.4
°C
°F
Ohms
°C
°F
68
71
73
76
79
82
85
87
90
93
96
98
101
104
107
110
112
115
118
121
123
126
129
132
135
137
140
143
146
148
515
154
157
160
162
165
168
171
173
176
179
182
185
187
190
193
196
198
201
204
207
155
160
165
170
175
180
185
190
195
200
205
210
215
220
225
230
235
240
245
250
255
260
265
270
275
280
285
290
295
300
305
310
315
320
325
330
335
340
345
350
355
360
365
370
375
380
385
390
395
400
405
218.2
220.1
222.0
223.9
225.8
227.7
229.6
231.5
233.5
235.4
237.4
239.3
241.3
243.3
245.3
247.2
249.3
251.2
253.3
255.2
257.3
259.3
261.4
263.4
265.5
267.6
269.6
271.7
273.8
275.9
278.0
280.1
282.3
284.4
286.5
288.6
290.8
293.1
295.2
297.5
299.8
301.4
303.7
306.0
308.3
310.6
312.2
314.5
316.8
319.1
320.6
210
212
215
218
221
223
226
229
232
235
237
240
243
246
248
251
254
257
260
262
265
268
271
273
276
279
282
285
287
290
293
296
298
301
304
307
310
312
315
318
321
323
326
329
332
335
337
340
343
346
348
410
415
420
425
430
435
440
445
450
455
460
465
470
475
480
485
490
495
500
505
510
515
520
525
530
535
540
545
550
555
560
565
570
575
580
585
590
595
600
605
610
615
620
625
630
635
640
645
650
655
660
Appendix G—Factory Default Configuration V3.1X
910 Series HTC
BASIC MODE MENU
(All other parameters are set as shown in the Advanced Mode Sub-Menus)
Configuration Mode Menu
Parameter
Factory
Control Setpoint
68°F (20°C)
Lo TS 1
14°F (–10°C)
Lo Load
1.0A
Switch Control Mode
Deadband
Circuit Breaker
*n/a (30.0A)
Temperature Units
°F
Feature Mode
Basic
User
ADVANCED MODE MENUS
Configuration Mode Main Menu
Parameter
Factory
Control Setpoint
68°F (20°C)
Lo TS 1
14°F (–10°C)
Lo Load
1.0 A
Hi GFI
20 mA
GFI Trip
30 mA
Feature Mode
Advanced
User
TS Alarms Configuration Sub-Menu
Parameter
TS 1 Fail
Lo TS 1
Lo TS 1
Hi TS 1
Hi TS 1
TS 2 Fail
Lo TS 2
Lo TS 2
Hi TS 2
Hi TS 2
Lo TS Filter
Hi TS Filter
Latch TS Alarms
CTL TS Fail
Factory
Enable
Enable
14°F (–10°C)
Disable
*n/a
(212°F (100°C))
Disable
Disable
*n/a
(14°F (–10°C))
Disable
*n/a
(212°F (100°C))
0 min
*n/a (0 min)
Yes
Enable
User
77
Other Alarms Configuration Sub-Menu
Parameter
Lo Load
Lo Load
Lo Load Filter
Hi Load
Hi Load
Hi Load Filter
Hi GFI
Hi GFI
Hi GFI Filter
GFI Trip
GFI Trip
Lo Volt
Lo Volt
Lo Volt Filter
Hi Volt
Hi Volt
Hi Volt Filter
Lo Resist
Lo Resist
Lo Resist Filter
Hi Resist
Hi Resist
Hi Resist Filter
Nominal Resist
Overcurrent Trip
Switch Fail
HTC Reset
C.B. Limiting
Power Limiting
Switch Limiting
Contactor Count
Contactor Count
EEROM Data Fail
78
Factory
Enable
1.0 A
0 sec
Disable
*n/a (30.0A)
*n/a (0 sec)
Enable
20 mA
0 sec
Enable
30 mA
Enable
90 V
0 sec
Disable
*n/a (270V)
*n/a (0 sec)
Disable
*n/a (50%)
*n/a (0 sec)
Disable
*n/a (50%)
*n/a (0 sec)
*n/a (6.00 Ω)
*n/a (Enable)
Enable
Disable
*n/a (Disable)
*n/a (Disable)
*n/a (Disable)
Enable
200,000
Enable
User
Point Setup Sub-Menu
Parameter
Factory
Tag
TAG -(factory ID)
Switch Control Mode
Deadband
Prop Band
*n/a (4°F (2°C))
Deadband
5°F (3°C)
Cycle Time
*n/a (10 min)
Switch Rating
*n/a (30.0 A)
Circuit Breaker
*n/a (30.0 A)
Max Power
*n/a (7200 W)
TS Fail Mode
Off
TS CTL Mode
TS1-Fail Off
TS 1 Type
100Ω Plat
TS 1 Lead Resist
*n/a (0)Ω
TS 1 Hi Limit
Disable
TS 2 Type
100Ω Plat
TS 2 Lead Resist
*n/a (0Ω)
TS 2 Hi Limit
Disable
Autocycle
Enable
Autocycle Interval
8
Autocycle Units
Hours
Override Source
Remote
Load Shedding
Disable
User
Miscellaneous Setup Sub-Menu
Parameter
Factory
Temperature Units
°F
Version
V3.1x.xx
Ext. Input
Not used
Flash Alarm Output
Yes
Alarm Output
N.C.
Language
English
Passcode
0
Scroll Delay
0.15 sec
Load Defaults
(See user manual)
User
n/a
Communications Setup Sub-Menu
Parameter
Factory
Protocol
HTCBUS
HTCBUS Addr
(factory ID)
Modbus Addr
*n/a (1)
Modbus Sub Addr
*n/a (0)
Baud Rate
Auto
Parity
*n/a (None)
Hardware
None, modem, RS-232, RS-485
Driver
Auto
Profile
Auto
Tx Delay
0.06 sec
User
n/a
*n/a: Parameter may only appear if certain features are enabled. Values shown in brackets are the Factory
defaults if the settings are enabled.
This information defines the default 910 Series Control Module configuration as set by the Factory for
firmware V3.1X. These settings are subject to change without notice.
It is the user’s responsibility to verify that all configuration parameters are chosen appropriately for the
intended application.
79
12/02
H56873
Previously Pyrotenax doc# 20276008
Printed in U.S.A.
Important: All information, including illustrations, is believed to be reliable. Users, however,
should independently evaluate the suitability of each product for their particular application.
Tyco Thermal Controls makes no warranties as to the accuracy or completeness of the
information, and disclaims any liability regarding its use. Tyco Thermal Controls’ only obligations are those in the Tyco Thermal Controls Standard Terms and Conditions of Sale for
this product, and in no case will Tyco Thermal Controls or its distributors be liable for any
incidental, indirect, or consequential damages arising from the sale, resale, use, or misuse
of the product. Specifications are subject to change without notice. In addition, Tyco
Thermal Controls reserves the right to make changes—without notification to Buyer—to
processing or materials that do not affect compliance with any applicable specification.
WORLDWIDE HEADQUARTERS
TYCO THERMAL CONTROLS
300 Constitution Drive
Menlo Park, California 94025-1164
USA
Phone: (800) 545-6258
Fax: (800) 596-5004
[email protected]
www.tycothermal.com
CANADA
TYCO THERMAL CONTROLS
250 West Street
Trenton, Ontario
Canada K8V 5S2
Phone: (800) 545-6258
Fax: (800) 596-5004
LATIN AMERICA
TYCO THERMAL CONTROLS
Carlos Calvo 2560
(C1230AAP)
Buenos Aires, Argentina
Phone (54 11) 4 308 6444
Fax: (54 11) 4 308 6445
© 2002 Tyco Thermal Controls LLC
Tyco and DigiTrace are trademarks of Tyco Thermal Controls LLC or its affiliates.