1
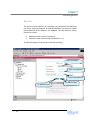
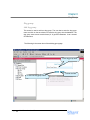
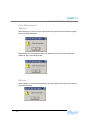
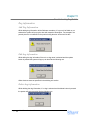
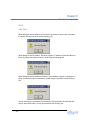
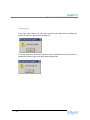
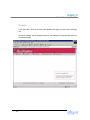
Marricpapillon.COM
User Manual Document
DOCUMENT ID: RIF-MAP-UM-001
REVISION NO: 1.0
FILENAME: RIF-MAP-UM-001.doc
STATUS: For Approval
PREPARED BY:
Jayamohan. M
NUMBER OF PAGES: 40
CREATED ON: 17/11/2003
LAST REVISED: 8/12/2003
REVIEWED BY:
Signature
Date
REVIEWED BY:
REVIEWED BY:
Signature
Date
Signature
APPROVED BY
Date
Signature
Date
APPROVED AND ACCEPTED BY
Signature
Date
Signature
>>
1
User Manual version 1.0
Date
Signature
Date
Revision History
Date
Nov 17, 2003
>>
2
Reason/History
Version 1.0
User Manual version 1.0
Revision
1.0
By Whom
Jayamohan
User Manual
Version 1.0
>>
3
User Manual version 1.0
Table Of Contents
>>
4
Chapter
1
2
3
4
5
6
7
8
9
10
Description
About this Book
Welcome to marricpapillons.com
How to administrate marricpapillons.com
Administration Menu
User Management
Dog Group
Dog Info
Links
News
Home
Dog/Bitch/Puppy Details and Pedigree Info
Page No
5
6
7
8
9
12
15
19
21
24
25
11
12
13
14
15
16
17
18
19
20
Portfolio
Papillons Links
Troubleshooting-User Management
Troubleshooting-Dog group
Troubleshooting-Dog Details
Troubleshooting-Links
Troubleshooting-News
Troubleshooting-Login Screen
Troubleshooting-Portfolio
Features Of this Web System
27
28
29
31
33
34
36
38
39
40
User Manual version 1.0
Chapter 1
About this Book
This handbook is a designed to help you get up and running quickly on your copy
of the Marricpapillons.com web system. It describes all you need to know about
how to use your web system and the screens that come with it. It describes:
•
•
•
•
•
•
•
•
The General Requirements
Features
User Controls
Functionalities
Screens
Procedures
Administrative Controls
Trouble Shooting
After you are familiar with the basic functionality of the web system, you can use
the rest of this handbook as a reference for performing less common tasks, for
maintaining the MarriPapillons.com web system and the problems that arise
related to that.
>>
5
User Manual version 1.0
Chapter 2
Welcome to MarricPapillons.com
Terminology
This manual contains many techie terms (some little bit nutty too) that may be
confusing for the normal man. No worries though. We have thought about that too.
This page describes them in a human readable form (Gasp!!).
So here it goes…
>>
6
•
Internet: Internet is a worldwide network of connected computers. This
network enables you to communicate with the rest of the World in many
different ways.
•
Browser: Any software tool that is used for browsing the Internet is called
a Web Browser or in short Browser. If you ask me for a techie description
then I would say, “An Internet Browser interprets HTML, the programming
language of the internet, into the words and graphics that you see when
viewing a web page”. Microsoft Internet Explorer and Netscape Navigator
are two of the most popular web browsers available, and hey, they are
totally free. You can download them from the website of Microsoft
http://www.microsoft.com/windows/ie/downloads/critical/ie6sp1/default.asp
or Netscape (http://channels.netscape.com/ns/browsers/download.jsp).
•
Normal User: Any user who browse the MarricPapillons.com web system
to get the information about Marricpapillon.
•
Administrative User: Any user who has the full right to change the
information stored in the database directly using the Administrative
Controls provided exclusively. For this a username and password will be
assigned.
User Manual version 1.0
Chapter 3
How to administrate marricpapillons.com
Marricpapillons.com has to two section in it one is Administration section and other
one is End user section i.e. Home Page.
To go to the administration part just type the following address in the address of
the browser http://marricpapillons.com/admin/
This will load the administrative welcome screen in the browser
Login Screen
This is the login screen for the administrator part. Here we have to enter the user
name and password. If the given username and password is valid then the page
is redirected to menu screen.
The following screen is the screen shot of the Administration login page.
Enter user ID
Enter password
Click here to Sign in
>>
7
User Manual version 1.0
Chapter 4
Administration Menu
Menu Screen
This menu screen has links to go other screen in a tree like structure. Expand the
tree and click on the nodes to link to the other pages. On clicking each link it will
load a new screen to enter data’s.
This is the screen shot of the admin part home.
Click here to go to the add user page.
Click here to go to the edit user page.
Click here to expand this
Click here to LOG OFF
>>
8
User Manual version 1.0
Chapter 5
User Management
User Management
Add User
This screen is used to add new user to manage the system. Here the admin has
to enter the user name and password, both fields are mandatory. By clicking on
save button the entered data will be inserted in to the database if the entered
values are valid. The clear button is used to clear the form fields.
!
!
!
!
User name cannot exceed 20 characters
User name cannot contain the special characters “ & #
Password cannot exceed 20 characters
Password can not contain the special characters “ & #
The following image is the screen shot of the page user creation.
Enter user name
Enter password
To save the data
>>
9
User Manual version 1.0
To clear the fields
Chapter 5
User Management
Edit User
This screen is used to edit the user information. Here the admin has to select the
user name, enter new password, all fields are mandatory. By clicking on update
button password will be updated in the database. The clear button is used to
clear the form fields.
!
!
Password cannot exceed 20 characters
Password cannot contain the special characters “ & #
The following image is the screen shot of the edit user page.
Select user name
Enter new password
Confirm new password
To update the data
>>
10
User Manual version 1.0
To clear the fields
Chapter 5
User Management
Delete user
This screen is used to delete the existing users. To delete a user the admin has
to select the user name from the select box. By clicking on the delete button we
can remove that user from the database. The clear button is used to clear the
form fields.
The following is the screen shot of the delete user screen
Select user name.
To delete the user
>>
11
User Manual version 1.0
To clear the field
Chapter 6
Dog Group
Dog group
Add dog group
This screen is used to add new dog group. The user has to enter the dog group
name and click on the save button to insert the dog group into the database. The
dog group name cannot contain these (& “ #) special characters. It can’t exceed
50 characters.
The following is the screen shot of the add dog group page.
Enter dog group name
To clear the field
To save the dog group name
>>
12
User Manual version 1.0
Chapter 6
Dog Group
Edit dog group
This page is to edit the dog group details. In this page we have to select the
group name and enter the new name for the group. The dog group name cannot
contain these (& “ #) special characters. It can’t exceed 50 characters. By clicking
on update button we can update the values in the database. The clear button is
used to clear the fields in the form.
The following image is the screen shot of the dog group edit page.
Select dog group
Enter new dog group name
To Update dog group name
>>
13
User Manual version 1.0
To clear the fields
Chapter 6
Dog Group
Delete dog group
This page is used to delete the unwanted dog groups from the database. The
user has to select the dog group from the select box. Then by clicking on the
delete button we can remove that particular group from the database.
The following image is the screen shot of the delete dog group page.
Select dog group name
To delete dog group name
>>
14
User Manual version 1.0
To clear the field
Chapter 7
Dog Info
Dog Info
Add Dog Info
This page is used to add the dog information such as name images, image
description and feature images and description. In this page the user have to
select the dog group from the select box. Then he/she has to select the dog type.
Dog name, title, father name, mother name and image description can’t exceed
50 and # “ & are not allowed. All fields are mandatory.
Image Size
All Dog Image size should be 300x250.To get an optimal output it is better to use
the recommended image size.
The following image is the screen shot of the add dog details page
Select dog group
Select dog type
Enter dog name
Select portrait image
Enter dog title
Select image1
Enter father name
Enter mother
Select image2
Enter image1 description
Enter image2 description
Enter image3 description
Select image3
Select feature image
Enter feature image description
To save the dog details
>>
15
User Manual version 1.0
To clear the fields
Chapter 7
Dog Info
Edit Dog Info
This page is used to edit the dog information such as images, image description
and feature images and description. In this page the user have to select the dog
group from the select box. Then he/she has to select the dog type.
Title, father name, mother name and image description can’t exceed 50 and # “ &
are not allowed. All fields are mandatory.
The following image is the screen shot of the edit dog details page
Select dog name
Select dog group
To update the dog details
>>
16
User Manual version 1.0
To clear the fields
Chapter 7
Dog Info
Delete dog Info
This page is to delete the unwanted dog details from the databases. Select the
dog group from the select box; it will list all the dogs in that group then the user
can check the dogs that have to be deleted. By clicking on delete button the user
can delete those checked dogs.
The following image is the screen shot of the delete dog details page.
Select the dog group
Select the dog
To delete the dog(s)
>>
17
User Manual version 1.0
To clear the fields
Chapter 8
Link
Add Link
This page is used to add the link(s). The user has to enter link name, link
address and link description. By clicking on save button data will be stored in the
database if entered value is valid. Clear button is used to clear the form fields.
All fields are mandatory. Special characters like # “ & are not allowed. Link and
link address can’t exceed 50 characters. Link description can’t exceed 500
characters.
Enter link name
Enter link address
Enter link description
To save the link details
>>
18
User Manual version 1.0
To clear the fields
Chapter 8
Link
Edit Link
This page is used to edit the link details. The user has to select link name. The
user can edit link address and link description. By clicking on update button data
will be stored in the database if entered value is valid. Clear button is used to clear
the form fields.
All fields are mandatory. Special characters like # “ & are not allowed. Link address
can’t exceed 50 characters. Link description can’t exceed 500 characters.
The following image is the screen shot of the edit link details page.
Select link name
Enter link name
Enter link description
Enter link address
To update the link details
To clear the fields
>>
19
User Manual version 1.0
Chapter 8
Link
Delete link
This page is used to delete the unwanted links from the database. Select the
links you want to delete. By clicking on delete we can remove those links from
the database. Clear button is used to clear all the fields in the form.
The following image is the screen shot of the delete links page.
Select the link
To delete the link(s)
>>
20
User Manual version 1.0
To clear the fields
Chapter 9
News
News
Add News
This page is used to add News. The user has to enter News Heading and News
description. By clicking on save button data will be stored in the database if
entered value is valid. Clear button is used to clear the form fields.
All fields are mandatory. Special characters like # “ & are not allowed. News and
can’t exceed 50 characters. News description can’t exceed 500 characters.
>>
21
User Manual version 1.0
Chapter 9
News
Edit News
This page is used to edit the entered News. The user has to select News Heading.
The user can edit News Heading and News description. By clicking on update
button data will be stored in the database if entered value is valid. Clear button is
used to clear the form fields.
All fields are mandatory. Special characters like # “ & are not allowed. News
Heading can’t exceed 50 characters. News description can’t exceed 500
characters.
The following image is the screen shot of the edit link details page.
Select News
To update the News details
>>
22
User Manual version 1.0
To clear the fields
Chapter 9
News
Delete News
This page is used to delete the unwanted News from the database. Select the
News you want to delete. By clicking on delete we can remove those links from
the database. Clear button is used to clear all the fields in the form.
The following image is the screen shot of the delete links page.
Select the News
To delete the News
>>
23
User Manual version 1.0
To clear the fields
Chapter 10
Home
As said above Marricpapillons.com has to two section in it one is Administration
section and other one is End user section i.e. Home Page.
To go to the Home page just type the following URL in the address of the browser
http://www.marricpapillons.com/
This will load the home page of marricpapillons.com
Menu
Brief News
Links
Featured Papillion Image
Links to other pages
>>
24
User Manual version 1.0
Chapter 10
Dog/Bitch/Puppy Details and Pedigree Info
This page will give the details of Dog/Bitch/Puppy with their pedigree information. This
page is loaded with details of the dog as queried by the user
The following picture is the screen shot of the image
Link to See the Other Pictures
Click this For Pedigree Info
On clicking Next Link (Pointed as Link to see other pictures in the picture) the
other picture of the dog is loaded on the screen.
To view the pedigree details of the dog click the button with caption “Pedigree
Information” (Pointed in the Picture) which open a new window with pedigree
information of the dog.
The following is the screen shots with pedigree info
>>
25
User Manual version 1.0
Chapter 10
Dog/Bitch/Puppy Details and Pedigree Info
Close Window
The above screen will show the pedigree information of the queried dog.
On clicking the button with caption “Close Window” the window will be closed.
>>
26
User Manual version 1.0
Chapter 11
Portfolio
Portfolio
On the Clicking the Portfolio in Home page menu this will display a sub menu with
Papillons – Portfolio that will list all the types of Dogs (As in the Picture)
Page Number
On clicking the Dog link in the submenu this will load the entire dog with their images.
Each page will list 15 dogs and to see the next 15 dogs click the page number
Click on the dog image to see the Dog details. (Refer Chapter 10)
>>
27
User Manual version 1.0
Chapter 12
Papillons Links
Papillons Links
Clicking on the Papillons Links menu will load the page with Link to other sites and with
link description.
Link to Other Site
Page Number
Three links will be shown per page. To view the other links click on the next page number
(As shown in the picture).
Click on the link to view the other site, which will be loaded in a new window.
>>
28
User Manual version 1.0
Chapter 13
Troubleshooting-User Management
User Management
Add user
While adding user if the user name is left blank and you press the save button the system
will pop up the following alert.
While adding user If the password field is left blank and you press the save button the
system will pop up the following alert.
Edit user
While editing if no user names selected and you press update button the system will pop
up the following alert.
>>
29
User Manual version 1.0
Chapter 13
Troubleshooting-User Management
While editing if the password is blank and you press update button the system will pop up
the following alert.
While editing, if you have entered the new password but not confirmed, the system will
pop up the following alert.
While editing, if you have entered the new password but not confirmed correctly, the
system will pop up the following alert.
>>
30
User Manual version 1.0
Chapter 13
Troubleshooting-User Management
Delete user
While deleting the user, if the user name is not selected the system will pop up the
following alert.
>>
31
User Manual version 1.0
Chapter 14
Troubleshooting-Dog Group
Dog group
Add Dog group
While adding the dog group if the dog group is not entered and the save button is
pressed the system will pop up the following alert.
Edit dog group
While editing dog group information if the dog group is not selected and the update
button is pressed the system will pop up the following alert.
>>
32
User Manual version 1.0
Chapter 15
Troubleshooting-Dog Details
Dog information
Add Dog Information
While adding dog information all the fields are mandatory. If any one is left blank or not
selected the system will pop up the alert with respective description. For example if the
portrait picture is not selected for the particular dog the alert will be look like this.
Edit dog information
While editing the dog information if there is no dog name is selected and the update
button is pressed the system will pop up an alert like the following one.
Other alerts are same as specified in the add dog info section.
Delete dog information
While deleting the dog information, if no dog is selected and the delete button is pressed
the system will pop up an alert like the following one.
>>
33
User Manual version 1.0
Chapter 16
Troubleshooting-Links
Link
Add Link
While adding link and its details if no link name is typed and the save button is pressed
the system will pop up an alert like the following one.
While adding link and its details if link name is typed , no address is typed and the save
button is pressed the system will pop up an alert like the following one.
While adding link and its details if link name is typed, address is typed, no description is
typed and the save button is pressed the system will pop up an alert like the following
one.
The link description is restricted to 250 characters. If the description exceeds that limit
and you press save button, you will get an alert like the following one.
>>
34
User Manual version 1.0
Chapter 16
Troubleshooting-Links
Edit Link
While editing the link details, if there is no link is selected and the update button is
pressed the system will pop up an alert like the following one.
The other alerts are very same as the alert specified in the link add section.
Delete Link
While deleting the link if no link is selected and the delete button is pressed the system
will pop an alert like the following one.
>>
35
User Manual version 1.0
Chapter 17
Troubleshooting-News
News
Add News
While adding news if the news heading is left blank and the save button is pressed the
system will pop up the following alert.
While adding news if the news heading is entered, the news description field is left blank
and the save button is pressed the system will pop up the following alert.
While adding the news details if the news description exceeds 250 characters the system
will pop an alert like the following one.
>>
36
User Manual version 1.0
Chapter 17
Troubleshooting-News
Edit News
While editing the news if there is no news is selected and the update button is pressed,
the system will pop up an alert like the following one.
All other alerts are very same as specified in the add news section.
Delete news
While deleting news if no news is checked and the delete button is pressed the system
will pop up an alert like the following one.
>>
37
User Manual version 1.0
Chapter 18
Troubleshooting-Administration Login
Login page
In the login page if there is no user name entered and the login button is pressed the
system will pop up an alert like the following one.
In the login page if the user name entered, but not the password and the login button is
pressed the system will pop up an alert like the following one.
>>
38
User Manual version 1.0
Chapter 19
Troubleshooting-Portfolio
Portfolio
In the user side if there is no data in the database the page will look like the following
one.
The same message will be displayed whenever the database is empty and the user tries
to look at the page.
>>
39
User Manual version 1.0
Chapter 20
Features of the web system
In the case of Marric Papillons web system, the developers have incorporated the
following additional features.
!
!
!
>>
40
All the screens are compatible with Microsoft Internet Explorer4.0+, Netscape
Navigator 7.0+ and Opera 7.2+
All the screens have been configured for uniform display across widely accepted
resolutions. The common resolutions 800x600, 1024x768 are supported without
any modifications.
The fonts used for the web system are uniform across all common platforms.
User Manual version 1.0