1
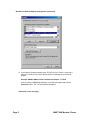
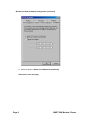
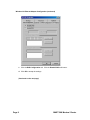
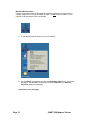
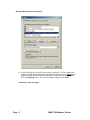
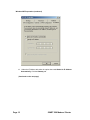
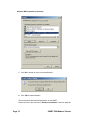
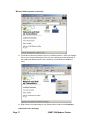
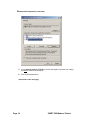
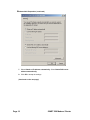
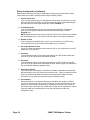
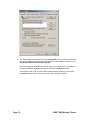
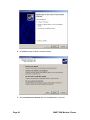
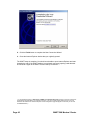
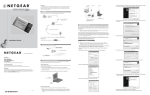
BEST DATA
User’s Manual
Model: 56NET
TABLE OF CONTENTS
SAFETY NOTICES
REQUIREMENTS
INTRODUCTION
INSTALLATION
……………………………………………………………………….
……………………………………………………………………….
……………………………………………………………………….
……………………………………………………………………….
Product Checklist
...............................................
Ethernet Installation
...............................................
Ethernet Configuration
...............................................
Windows 98
...............................................
Windows ME
...............................................
Windows 2000
...............................................
Windows XP
...............................................
Mac OS 9.xx
...............................................
Mac OS 10.xx
...............................................
Other OS
...............................................
Hardware Installation
...............................................
CONFIGURATION
……………………………………………………………………….
Basic Configuration
...............................................
Modem Status / Home
...............................................
Dialup Configuration
...............................................
Advanced Dial-up
...............................................
Save Settings / Reboot
...............................................
BROWSER SETUP
……………………………………………………………………….
TROUBLESHOOTING ……………………………………………………………………….
TECH SUPPORT
……………………………………………………………………….
1
1
2
3
3
3
3
4
10
16
21
26
28
29
30
31
31
32
33
36
37
38
43
45
Safety Notices
To avoid a shock hazard
Do not attempt installation of this product during an electrical storm.
The power cord to your computer equipment must be connected to a properly
grounded receptacle.
To prevent static discharge
Discharge static electricity from your body prior to installation of this product. This can be
accomplished by touching an unpainted part of your computers case (usually on the rear side
of the computer case) .
Hardware Minimum System Requirements
Microsoft Windows 98, ME, 2000, XP
Apple Mac OS 9.x and higher
Other Operating Systems *
Compatible ISP **
* This product can function with other operating systems since the 56NET is completely hardware controlled
and there is no software needed to installed into the operating system. The basic product requirement is an
operating system capable of networking through the TCP/IP protocol and a web browser that can handle
frames.
** This product will not function with some ISP’s. The type of ISP’s this product will not function with are the type which
rd
require you to install a piece of software (typically a 3 party dialer) on your system. NetZero is an example of such an
ISP. AOL also falls into this category and will not function with the 56NET modem.
Page 1
56NET 56K Modem / Router
INTRODUCTION
Thank you for purchasing the Best Data 56NET modem / router. We hope the
product will give you great service for years to come.
With the 56NET you have the power of both a 56K dialup modem combined with a 10/100baseT
network router.
The 56K analog modem allows you to connect with most ISP’s. Any ISP that is capable of being
setup without installing any additional software into the operating system should qualify for use
with the 56NET.
The router enables you to connect two computers together for network access. The router will
assign a DHCP lease to each computer connected to the LAN ports on the 56NET. You can
optionally connect a network hub or switch to one of the two LAN ports on the 56NET if you have
more than 2 computers in your network. The router will allow all computers connected through the
LAN ports to share the Internet connection of the 56K modem that is built into the router.
You have the ability to share files between any 2 systems or more* with the 56NET. Any systems
that obtain a DHCP lease from the 56NET can setup sharing on their systems where you can
share specific folders for others to see.
In addition to file sharing the 56NET can share a printer** on one system with any other system
connected through the 56NET.
Please carefully read through this manual and follow each step exactly as instructed. The
following page begins walking you through the installation process. At the end of each set of
steps you will be instructed which chapter and page to turn to next. If you run into any issues
please follow the steps listed within the troubleshooting section of this manual.
* More than 2 computers can be connected through the 56NET. You will need to have a 10/100 hub or switch connected
to one of the LAN ports on the 56NET.
** Most any printer can be shared with the 56NET. The printer must support network printing. Some of the newer printers
on the market no longer support network printing. Please check with your printer manufacturer if you are not sure if
network printing is supported.
Page 2
56NET 56K Modem / Router
INSTALLATION
Do NOT connect the 56NET to your computer until instructed. Before connecting the 56NET to
your equipment there are some steps that must be performed. Please use the following
guidelines that best apply to your environment.
Before you begin you should make sure that you have all of the required materials needed to
setup your network. Check each item in the list for confirmation.
1. Product Installation Checklist
Please ensure that you have all of the items in the following checklist
available to you prior to installion.
56NET Modem + Router
AC Power Adapter
Quick Start Guide
Ethernet Adapter **
Ethernet Cable
Phone Cable
Operating System CD
** The 56NET requires that each system you plan on using the device with already has
an Ethernet device installed. The 56NET does not come bundled with an Ethernet device.
The Ethernet device can be either a 10 or 10/100baseT network adapter in the form of an
ISA card, PCI card, or USB dongle. Please seek more information from your local
computer retailer if you do not yet have an Ethernet device for your system(s).
1. Ethernet Adapter Installation
If you already have an Ethernet adapter and its driver installed into the operating system you
can skip this step. If you do not yet have a Ethernet adapter installed in your system you will
first need to install the Ethernet adapter along with any drivers that it may require. Once you
are certain that your Ethernet device and drivers are installed you can continue to step 3.
Please consult your Ethernet adapter documentation / manufacturer for specific installation
instructions for their Ethernet adapter.
2. Ethernet Adapter Configuration
Before connecting the 56NET to your first system it is very important that you perform the
following network configuration steps from within your operating system. Procedures are
listed for every popular operating system being used in today’s computer world. Go to the
configuration steps for your particular operating system by referring to the page numbers
listed below.
Windows 98
Windows ME
Windows 2000
Windows XP
Macintosh OS 9.xx
Macintosh OS 10.xx
Other Operating Systems
Page 3
PAGE 4
PAGE 10
PAGE 16
PAGE 21
PAGE 26
PAGE 28
PAGE 29
56NET 56K Modem / Router
Windows 98 Ethernet Adapter Configuration
Follow the steps listed below for Windows 98 computers to ensure your network card is
correctly configured for use with the 56NET product. Do NOT attach the 56NET to your
computer until instructed to in the next chapter.
1. Locate the Network Neighborhood icon on your desktop.
2. Click the right mouse button on the Network Neighborhood icon, and left click
Properties when the sub-menu appears. The Network Properties dialog will appear.
(Continued on the next page)
Page 4
56NET 56K Modem / Router
Windows 98 Ethernet Adapter Configuration (continued)
3. In the Network Properties dialog locate TCP/IP in the list. If there is more than 1
listing for TCP/IP you will need to identify which one belongs to your Ethernet
adapter.
Example: ADMtek AN983 10/100 Fast Ethernet Adapter -> TCP/IP
Click the listing of TCP/IP that belongs to your Ethernet adapter and click the
Properties button. The TCP/IP properties will appear.
(Continued on the next page)
Page 5
56NET 56K Modem / Router
Windows 98 Ethernet Adapter Configuration (continued)
a. Select the option to Obtain an IP Address Automatically.
(Continued on the next page)
Page 6
56NET 56K Modem / Router
Windows 98 Ethernet Adapter Configuration (continued)
b. Click the Gateway tab. If there are any numbers listed in the
Installed gateways box please select each one individually and
click the Remove button.
(Continued on the next page)
Page 7
56NET 56K Modem / Router
Windows 98 Ethernet Adapter Configuration (continued)
c. Click the DNS Configuration tab. Click the Disable DNS radio button.
d. Click OK to accept the settings.
(Continued on the next page)
Page 8
56NET 56K Modem / Router
Windows 98 Ethernet Adapter Configuration (continued)
a. Click OK to accept the settings.
b. Click Yes to restart your computer.
This concludes the Windows 98 preparation for the 56NET.
Please continue to the next section, Hardware Installation, located on page 30.
Page 9
56NET 56K Modem / Router
Windows ME Preparation
Follow the steps listed below for Windows 98 computers to ensure your network card is
correctly configured for use with the 56NET product. Do NOT attach the 56NET to your
computer until instructed to in the next chapter.
1. Locate the My Network Places icon on your desktop.
2. Use the RIGHT mouse button and click the My Network Places icon. A sub-menu
will appear. Use the LEFT mouse button and click Properties. The Network
Properties dialog box will appear
(Continued on the next page)
Page 10
56NET 56K Modem / Router
Windows ME Preparation (continued)
3. Locate TCP/IP in the list. If there is more than 1 instance of TCP/IP make sure to
locate the TCP/IP that is listed next to your Ethernet adapter. Use the LEFT mouse
button and single click the correct TCP/IP listing. The item will now be highlighted.
Click the Properties button. The TCP/IP properties dialog box will appear.
(Continued on the next page)
Page 11
56NET 56K Modem / Router
Windows ME Preparation (continued)
4.
Under the IP Address tab select the option that reads Obtain An IP Address
Automatically. Click the Gateway tab.
(Continued on the next page)
Page 12
56NET 56K Modem / Router
Windows ME Preparation (continued)
5. Make sure there are not any IP addresses listed under Installed Gateways, otherwise
highlight each address separately and click the Remove button until the list is blank.
Click the DNS Configuration tab. The DNS configuration will be displayed.
(Continued on the next page)
Page 13
56NET 56K Modem / Router
Windows ME Preparation (continued)
6. Click the Disable DNS option and click OK to accept the settings
(Continued on the next page)
Page 14
56NET 56K Modem / Router
Windows ME Preparation (continued)
7. Click OK to accept all of the recent modifications.
8. Click YES to restart Windows.
This concludes the Windows ME preparation for the 56NET.
Please continue to the next section, Hardware Installation, located on page 30.
Page 15
56NET 56K Modem / Router
Windows 2000 Preparation
Follow the steps listed below for Windows 2000 computers to ensure your network card is
correctly configured for use with the 56NET product. Do NOT attach the 56NET to your
computer until instructed to in the next chapter.
1. Locate the My Network Places icon on your desktop.
2. Right click the My Network Places icon and left click Properties as shown in the
illustration above. The Network and Dial-Up Connections will appear.
(Continued on the next page)
Page 16
56NET 56K Modem / Router
Windows 2000 Preparation (continued)
3. Locate the Local Area Connection icon for your Ethernet device. When you highlight
the icon you can see a description of the icon in the left frame as pictured above. In
this instance the Ethernet device was a AmbiCom 10/100 Ethernet CardBus PC
Card.
4. Right click the icon that belongs to your Ethernet device and left click Properties.
(Continued on the next page)
Page 17
56NET 56K Modem / Router
Windows 2000 Preparation (continued)
5. Locate Internet Protocol (TCP/IP) in the list and single left click the line, making
sure not to uncheck the checkbox.
6. Click the Properties button.
(Continued on the next page)
Page 18
56NET 56K Modem / Router
Windows 2000 Preparation (continued)
7. Select Obtain an IP address automatically. Select Obtain DNS server
address automatically.
8. Click OK to accept the settings.
(Continued on the next page)
Page 19
56NET 56K Modem / Router
Windows 2000 Preparation (continued)
9. Click OK to accept the changes. This may take a minute. Don’t be alarmed if the box
does not disappear immediately. Once the box disappears you can continue the
installation.
This concludes the Windows 2000 preparation process.
Please continue to the next section, Hardware Installation, located on page 30.
Page 20
56NET 56K Modem / Router
Windows XP Preparation
1. Click the Start button and locate My Network Places. Click the RIGHT mouse button
on My Network Places and left click Properties. The Network Connections box will
appear.
Note: Depending on how your Windows XP system is setup, your start menu may look slightly different
than what is shown in the example. You can also use the My Network Places icon on the desktop
instead of the one in the start menu.
(Continued on the next page)
Page 21
56NET 56K Modem / Router
Windows XP Preparation (continued)
2. Locate the Local Area Connection icon that resembles your Ethernet device. The
name of your ethernet device will be printed just below “Local Area Connection”. In
this example the ethernet device is a ADMtek AN983 10/100 PCI adapter. Use the
RIGHT mouse button and click the Ethernet device. A sub-menu will appear. Use the
LEFT button and click Properties. The properties for your Ethernet device will appear.
(Continued on the next page)
Page 22
56NET 56K Modem / Router
Windows XP Preparation (continued)
3. Highlight Internet Protocol TCP/IP and click Properties (making sure NOT to uncheck
the box next to TCP/IP). The TCP/IP properties will appear.
(Continued on the next page)
Page 23
56NET 56K Modem / Router
Windows XP Preparation (continued)
4. Select the option to Obtain An IP Address Automatically. Select the option to
Obtain DNS Server Address Automatically. Click OK to accept the settings.
(Continued on the next page)
Page 24
56NET 56K Modem / Router
Windows XP Preparation (continued)
5. Click OK to close the Local Area Connection settings.
This concludes the Windows XP system preparation for the 56NET.
Please continue to the next section, Hardware Installation, located on page 30.
Page 25
56NET 56K Modem / Router
Apple Macintosh OS 9.xx Preparation
1. Click the Apple menu. Select Control Panels, then select TCP/IP.
(Continued on the next page)
Page 26
56NET 56K Modem / Router
Apple Macintosh OS 9.xx Preparation (continued)
2. Click the Connect VIA pull down menu and select Ethernet.
3. Click the Configure menu and select Using DHCP Server.
This concludes the Mac OS 9.xx system preparation for the 56NET.
Please continue to the next section, Hardware Installation, located on page 30.
Page 27
56NET 56K Modem / Router
Apple Macintosh OS 10.xx Preparation
1. Click the Apple menu and click System Preferences.
2. Double click the Network icon.
3. Look for a dropdown menu titled Show. Select your Ethernet adapter from this menu.
4. Look for a dropdown menu titled Configure. Select Using DHCP from this menu.
5. Click the Apple Now button to complete the configuration.
Page 28
56NET 56K Modem / Router
Other Operating Systems Preparation
The 56NET will work with virtually any operating system that is capable of using the TCP/IP
protocol routed through a Ethernet device.
Since there are many operating systems out there besides Windows or Mac Os that fit into this
description that it is too difficult to produce instructions for all remainder operating systems. We
feel that only advanced users are seriously using other operating systems, and hopefully this
information is all you will need to properly configure you system for use with the 56NET.
1. You need to configure your TCP/IP settings for DHCP.
2. You need to configure your web browser for LAN access.
Once your system is configured to meet the above requirements you can continue to the next
section, Hardware Installation, located on page 30.
Page 29
56NET 56K Modem / Router
HARDWARE INSTALLATION
1. Follow the steps below to ensure proper hardware installation.
2. Connect the AC power adapter to a power receptacle.
3. Connect the remaining end into the power connector located on the rear of the 56NET.
4. Connect an Ethernet cable to the Ethernet device on your system (can be a PCI
5. Ethernet or USB Ethernet device).
6. Connect the remaining end of the cable into either of the 2 RJ-45 connectors on the back of
the device.
7. Power on your computer and let the operating system boot-up.
8. Continue to the 56NET configuration on page 31.
Page 30
56NET 56K Modem / Router
CONFIGURATION
Basic Configuration
The Basic Configuration is required for the first time setup of the 56NET modem.
This guide will assist you in configuring the unit for the first time use.
Logon to the 56NET Using the provided 56NET Configuration CD
1. Insert the 56NET Configuration CD into your CD-ROM drive and wait for the auto-run
menu to appear.
NOTE 1: If the menu does not automatically appear it is likely that your system is not
configured for auto-run mode. You can alternately double click the My Computer
icon, double click the CD-ROM icon, and double click the 56NET (or 56NET.EXE)
icon to access the menu.
NOTE 2: If you receive a DLL error regarding a file missing or out of date it is due to
your Windows files not being up to date. This will usually only happen on Windows 98
systems that have not had any Windows updates installed. To correct this problem
you can double click the My Computer icon, RIGHT click the CD-ROM icon, left click
OPEN, and double click the RUNTIME (or RUNTIME.EXE) icon. This will bring your
Windows system files up to date. You will be asked to restart the computer after the
update it complete. After restarting please return to and complete step 1.
2. Click the Configure 56NET button. Your default web browser will appear with the
56NET configuration page visible. Continue to the next page in this manual.
Logon to the 56NET without using the 56net Configuration CD
1. You can alternately open your web browser and type: 10.0.0.2 in the address bar to
access the configuration. A logon box will appear. Type admin into the User Name
field. Type epicrouter into the Password field. These are the default username and
password fields used to logon to the 56NET configuration pages. You can optionally
check the Remember my password check box if you are not located in a secure
environment such as a residence. Click OK when you are ready to proceed.
Note:
Page 31
If the above logon box does not appear you may need to adjust the setting of your Ethernet
device forcing a 10baseT connection instead of auto-sense. Please consult the
troubleshooting section for specific instructions.
56NET 56K Modem / Router
Modem Status / Home
The Modem Status screen will be displayed. After you complete this
installation you will be able to force the modem to Connect & Disconnect
the connection to your ISP from this screen by clicking the Connect or
Disconnect button. You can later get back to this screen by clicking
the Home button.
You should now be logged in as administrator and the configuration screen
should be visible. The following instructions will assist you with the completing
the modem / router configuration. As you complete each screen we recommend
clicking the File / Print option to make a hard copy backup of your configuration. The
configuration instructions begin on the next page.
Page 32
56NET 56K Modem / Router
Dialup Configuration
Click the Dialup Configuration link. The following screen will appear. Each feature is
documented on the pages that follow.
Page 33
56NET 56K Modem / Router
Dialup Configuration (Continued)
Each feature listed within the Dialup Configuration screen is documented below. Please
ensure each field is filled in properly before using the 56NET product.
1. Outside Line Prefix
If your location requires that you dial a special code to obtain an outside line you can
place the code in the Outside Line Prefix field and the modem will automatically dial
the code each time a call is placed with the modem. Example: 9,
2. Call Waiting Prefix
If you have call waiting service on your phone line and would like to disable the
service, you can type the required code into this field followed by a comma.
Example: *70,
NOTE: Please check with your phone company to find out the correct code to disable
the call waiting service. *70 is the most common code for most phone companies.
3. Number To Dial
Type the telephone number that you use for your connection to your ISP. Please
consult with your ISP for a list of access numbers for your local area.
4. Secondary Number To Dial
If there is a second or alternate number that you use for your connection to your ISP
please type it into this field.
5. Username
Type the username that you have been assigned by your ISP. Please consult with
your ISP if you do not have this information on hand.
6. Password
Type the password that you have been assigned by your ISP. Please consult with
your ISP if you do not have this information on hand. Please retype your password in
the next field that follows the password field.
7. Disconnect Timeout
Type the number of seconds you would like the modem to wait before automatically
disconnecting from your ISP when the connection is idle. Type the number 0 into this
field if you would like to disable this feature (meaning that the modem will never
disconnect from your ISP until requested by the configuration utility.
8. Dial Attempts
Select the number of consecutive calls that you would like the modem to make to
your ISP in case there is a failure in the connection. A failure could be due to a busy
signal, the remote modem not answering, or possibly line trouble. If the number of
consecutive calls is exceeded, the modem will no longer dial out until another request
has been made from a web browser or from the Connect button within the
configuration utility.
Page 34
56NET 56K Modem / Router
Dialup Configuration – General Settings
1. Country Selection
Please make sure to select the correct country selected for the location that modem
is being used at.
2. Dial On Demand
Check this box if you would like the modem to automatically connect to your ISP
when there has been a request to the WAN (Wide Area Network) from a web
browser.
3. Automatic Reconnect
Select this check box if you want the modem to automatically reconnect to your ISP
in the event that the connection is dropped. This setting will ensure the modem is
always connected to your ISP.
4. Enable Quick Connect
Check the Enable Quick Connect box if you are connecting to a V.92 compatible ISP
which supports the Quick Connect V.92 feature.
5. V.34 Failsafe Mode
Select this option if your phone line conditions are not able to properly handle a
V.90/V.92 connection. This will force the modem to connect at rates of 33,600 or
lesser. Selecting V.34 mode disables the quick connect feature.
6. Check here if you do not have touch tone service
Check this box if you do not have touch tone dialing enabled on your phone line. This
will force the modem to use the pulse dialing method.
7. Check here if you have Voicemail on this phone line
Check this box if your phone line has voicemail setup through your telephone
company. Checking this option will cause the modem to pause briefly before dialing
any numbers to take account for the extra tone that most voicemail systems put on
your phone line which alert you of new messages.
8. Submit
Click the submit button to accept any recent changes made to this page. This option
does not permanently save the configuration to the 56NET.
9. Save Configuration
Clicking this link will open the Save Configuration screen. Click the Save and Reboot
button to save the current configuration. Once the configuration is saved the router
will automatically reset. Please wait for the process to complete before clicking on
anything else within the web browser window.
Page 35
56NET 56K Modem / Router
Advanced Dialup Configuration
These settings will affect your local networked computers that are attached to this unit or
through a hub that is attached to this unit.
1. Extra AT Initialization Commands
You can optionally place a modem initialization string into this field. In most situations you
will not need to use this feature.
2. Auto Configured DNS Server
Checking this box will allow the modem to obtain the DNS server information from the
server you are connecting to. This is the default option and this configuration will be
appropriate for most internet connections.
3. User Configured DNS Server
If your ISP does not send the DNS server information with their DHCP lease you can
place the DNS server IP addresses into this section by typing the IP address and clicking
the ADD option.
4. HTTP Password Protection
Enabling this option will force the user to type a password when accessing the router
configuration page. When you enable the password the username for the login is: user
5. Save Configuration
You will need to click the Save Configuration link for any changes on this page to be
saved permanently to the 56NET.
Page 36
56NET 56K Modem / Router
1. Reset & Reboot
Click this button to restore the 56NET to the factory default settings.
1. Save & Reboot
Click the Save & Reboot button to save any recent changes you have made to the
configuration of the router. After the changes are saved the router will perform a warm
boot (reset). The reboot only button is there in case you want to abandon any recent
changes that were made to the configuration of the 56NET.
Congratulations, you have completed the 56NET configuration! It is almost time to be
able to go online with the 56NET. The last step is to configure your web browser for use
with a LAN connection.
Please continue to the section titled Web Browser Configuration.
Page 37
56NET 56K Modem / Router
Web Browser Configuration
This chapter will assist you with setting up your web browser to function with the 56NET.
Internet Explorer Configuration
Use the following guide to setup the 56NET to function with Internet Explorer.
1. Launch the Internet Explorer web browser.
2. Click the Tools menu and choose Internet Options.
Page 38
56NET 56K Modem / Router
3. The Internet Options will appear. Click the Connections tab. If you had a previous dial
up modem installed, your previous Internet connection should appear under the list of
Dial-up and Virtual Private Network settings.
For functionality with the 56NET you should remove any existing dial up connections in
the list by individually highlighting each item and clicking the Remove button.
Once the list of Dial-up and Virtual Private Network settings is blank you should click
the Setup button to continue and the new connection wizard will appear.
Page 39
56NET 56K Modem / Router
|
4. Click Next to begin the New Connection Wizard.
5. Select Connect to the Internet and click the Next button to proceed.
Page 40
56NET 56K Modem / Router
6. Select Set up my connection manually and click Next.
7. Select Connect using a broadband connection that is always on and
click Next to continue.
Page 41
56NET 56K Modem / Router
8. Click the Finish button to complete the New Connection Wizard.
9. Close the Internet Explorer window that you originally opened.
The 56NET setup is complete. You should now be able to open Internet Explorer and start
browsing the web. If the 56NET modem is not already connected, opening a web browser
should send a signal to the 56NET to start a dial up connection **
** If you selected the option to Reconnect on WAN and Automatic Reconnect covered on page 35 of this guide
the modem should start dialing your internet connection. If you did not select these options then you can type
10.0.0.2 in the address bar of Internet Explorer and the configuration page will appear. From there you can click
the Connect button.)
Page 42
56NET 56K Modem / Router
TROUBLESHOOTING
Here you will find answers to the most commonly experienced problems that can be expected for
this type of product. Please contact our technical support if you cannot resolve the problem with
the material provided in this section.
Problem
Network Cable Unplugged
If you are receiving a message in the system tray stating that the network cable
is unplugged or your Ethernet device does not show a solid link it may be due to
a few different issues.
Solution 1
You may have a faulty or wrong type of Ethernet cable. Make sure to first try the
Ethernet cable provided with this product. If available try another Ethernet cable.
The Ethernet cable should be a standard straight thru network patch cable.
Solution 2
You may be experiencing a compatibility issue between our 56NET and your
Ethernet device. Most Ethernet devices have the ability to force a 10baseT or
100baseT connection from within the driver setup for the Ethernet device.
Windows 95/98/ME users can get to these settings by going to Start / Settings /
Control Panel / Network. When the network properties appear look for your
Ethernet device in the list of components and single click it so that it is
highlighted. Click the Properties button.
Windows 2000/XP users can get to these settings by going to Start / Settings /
Control Panel / Network (possibly under Network and Internet connections
depending on your view). Right click the Local Area Connection and left click
Properties. Click the Configure button.
Windows 95/98/ME/2000/XP (continued from above step) users should look for a
Settings or Advanced tab when the properties appear. Now look for a setting
similar to Media Type, Connection Type, Connect Speed, etc. The correct listing
will have options in the drop down menu such as 10baseT or 100baseT, possibly
showing full and half duplex options. We recommend starting using 100baseT
and then reducing the rate to 10baseT if needed.
Macintosh users should contact Apple to see if there is a possible way to force
the network connection type to either 10baseT or 100baseT. We are not aware of
any way to handle this within the operating system.
Page 43
56NET 56K Modem / Router
Problem
Modem dials but does not connect
If the modem is able to dial your ISP but is not able to connect it could be due to
a couple of different issues.
Solution 1
Verify you have typed in the correct telephone number, username and password
to your ISP from within the configuration of the 56NET. You can verify this by
opening a web browser, such as Internet Explorer, and type: 10.0.0.2 into the
address bar. This will bring up the logon box. The default username is admin
and the default password is epicrouter. Click OK to logon to the 56NET. Once
you are in the configuration click the Dialup Configuration link in the left frame.
Verify that you have the correct information in the various fields.
Solution 2
You may be experiencing an issue between the modem in the 56NET and the
type being used by your ISP. If you still have a regular analog modem as part of
your computer system we recommend testing the previous modem through a
terminal emulator, such as Hyper Terminal, Procomm Plus, Microphone LT, etc
Most versions of Windows come with Hyper Terminal. You can open Hyper
Terminal by clicking Start / Programs / Accessories / Hyper Terminal (located
in Communications in later versions of Windows). Once you are in Hyper
Terminal you can type TEST for the connection name and click OK to continue.
Type the phone number in the phone number field and make sure the correct
modem is listed under Connect Using option and click OK to continue. Verify the
phone number is correct and click the Dial button. If the modem is able to
connect you should see a login prompt appear within the main Hyper Terminal
window. Try to login using your assigned username and password.
If your previous modem is unable to complete this step we recommend
contacting your ISP to see if there is an alternate phone number you can
connect to.
If your previous modem is able to connect, and you are able to login using your
username and password from within a terminal emulator then chances are that
there is either a problem with the 56NET modem or there is a compatibility issue
between the 56NET modem and the type of modems being used by your ISP.
You can also try the next solution to see if it eliminates the problem.
Solution 3
Page 44
The phone line conditions between your location and your local phone company
may not be of the greatest quality. For areas with poor phone lines there is an
option in the 56NET to force a V.34 connection (connect speeds of 33.6kbps or
lesser). You can implement this option by opening a web browser, such as
Internet Explorer, and type: 10.0.0.2 into the address bar. This will bring up the
logon box. The default username is admin and the default password is
epicrouter. Click OK to logon to the 56NET. Once you are in the configuration
click the Dialup Configuration link in the left frame. Scroll down the page to V.34
Failsafe Mode and place a check in the box. Go to the bottom of the page and
click the Submit button. Go to the bottom of the page and click the Save
Configuration link, then click the Save & Reboot button. Try connecting again
after the 56NET is finished rebooting.
56NET 56K Modem / Router
Best Data Technical Support
If you run into any issues while using this product first try to resolve the issue by reviewing the
troubleshooting section located on page 52 of this guide.
If your are unable to resolve the issue with the troubleshooting section you can contact our live
technical support via phone or e-mail for continued product support.
Prior to contacting technical support please have the following information available for the
technician who assists you:
Product Model #:
Computer Brand:
CPU Type:
Operating System:
Ethernet Device(s):
Issue Description:
Steps taken:
56NET
Example: PC Clone, Compaq, Dell, Apple, etc.
Example: Intel Pentium 4 2.4GHZ, AMD Athlon 2000XP, etc.
Example: Windows XP, Mac OS 9.2, etc.
Example: Realtek 8139, ADMtek AN983 10/100, etc.
Example: Modem reports no dial tone.
List any steps you have taken to resolve the issue.
Contact Technical Support
Telephone Number
Days of operation
Hours
E-mail
Page 45
(818) 773-9600
Monday-Friday
8:00am-4:30pm
[email protected]
56NET 56K Modem / Router