1
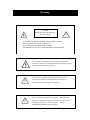
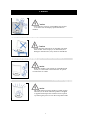
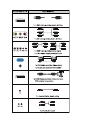
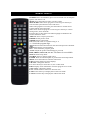
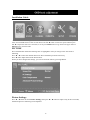
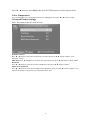
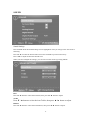
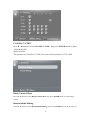
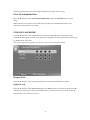
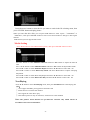
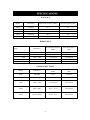
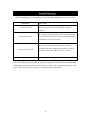
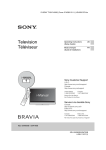
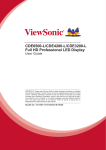
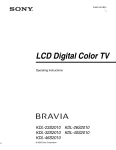
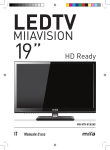
USER’S MANUAL LED TV SET 32” HD LED TV FEHS32V7A Contents Introduction Warning Caution Main Unit Description Remote Control OSD basic adjustment ATSC Features USB Features Specifications Trouble Shooting 1 Introduction Thank you very much for your purchase of our product of LED TV. It serves as a normal color TV and PC monitor. To enjoy your set to the full from the very beginning, read this manual carefully and keep it handy for ready reference. INSTALLATION ① Locate the receiver in the room where direct light does not strike the screen. Total darkness or a reflection on the picture screen can cause eyestrain. Soft and indirect lighting is recommended for comfortable viewing. ② Allow enough space between the receiver and the wall to permit ventilation. ③ Avoid excessively warm locations to prevent possible damage to the cabinet or premature component failure. ④ This TV receiver can be connected to AC100-240V 50/60HZ. ⑤ Do not install the receiver in a location near heat sources such as radiator, air ducts, direct sunlight, or in a place somewhere like close compartment and close area. Do not cover the ventilation openings when using the set. ⑥ The indicator light will last about 30 seconds to go out after cutting off the electricity, during this period, you cannot repower it on until the indicator light goes out. Thanks a lot for your attention! 2 Warning CAUTION RISK OF ELECTRIC SHOCK DO NOT OPEN CAUTION: TO AVOID THE RISK OF ELECTRIC SHOCK. DO NOT REMOVE COVER (OR BACK). NO USER- SERVICEABLE PARTS INSIDE. REFER SERVICING TO QUALIFIED SERVICE PERSONNEL. This symbol is intended to alert the user to avoid the risk of electric shock, do not disassemble this equipment by anyone except a qualified service personnel. This symbol is intended to alert the user to the presence of important operation and maintenance instructions in the literature accompanying the equipment. Class I structures of equipment should be connected to the grid power output with a protective earth connection on the socket. Power plug as a broken appliance,broken installations should be easy to operate. 3 Caution Caution High voltages are used in the operation of this product. - Do not remove the back cabinet from your set. Refer servicing to qualified service personnel. Caution To prevent fire or electrical shock hazard, Do not expose the main unit to moisture, do not place objects filled with liquids, such as vases, on the apparatus. Caution Do not drop or push objects into the television cabinet slots or openings. Never spill any kind of liquid on the television receiver. Caution Avoid exposing the main unit to direct sunlight and other source of the heat. Do not stand the television receiver directly on other produces which give off heat. E. g. video cassette players, Audio amplifiers. Do not block the ventilation holes in the back cover. Ventilation is essential to prevent failure of electrical component. Do not squash power supply cord under the main unit. 4 Caution Caution Never stand on, lean on, push suddenly the product or its stand. You should pay special attention to children. Caution Do not place the main unit on an unstable cart stand, shelf or table. Serious injury to an individual, and damage to the television, may result if it should fall. Caution When the product is not used for an extended period of time, it is advisable to disconnect the AC power cord from the AC outlet. Caution The LCD panel used in this product is made of glass. Therefore, it can break when the product is dropped or applied with impact. Be careful not to be injured by broken glass pieces in case the LCD panel breaks. 5 Main unit description Control Panel Button Function VOL+ : Volume up. VOL- : Volume down. CH+ : TV channel up. CH- : TV channel down. MENU : Press to select the main menu. TV/AV : Select the input signal. POWER : Switch on when at standby mode or enter the standby mode. TV Terminal Connections 1. Coaxial out terminal. 2. RF antenna. 3. VGA input terminal of simulation signal of PC. 4. PC AUDIO input terminal. 5. Video input terminal. 6. AUDIO input terminal. 7.Component input terminal. 8. HDMI1 input terminal. 9. HDMI2 input terminal. 10. HDMI3 input terminal 11. Line out terminal. 12. EARPHONE out terminal. 13. USB input terminal. 6 7 8 Remote control POWER: Power on/off button, press once to turn the TV on and press again to turn the TV off. MUTE: Press this button to mute or restore sound. MTS/AUDIO: When stereo program is received, press this key to switch sound system between mono and stereo. When SAP program is received, press this button to switch sound system between mono and SAP When stereo and SAP program is received, press this key to switch among mono, stereo and SAP. Press this key to show the list of audio languages available for the current channel in ATSC ASPECT: Press to adjust picture ratio. PMODE: Select picture mode. SMODE: Select sound mode. 0-9: Select and switch to a channel using 0 - 9. -/--: Switch the program digit. : Switch back and front between the current and previous channels. DISPLAY: Display TV information. EPG:Enter electronic program guide AUTO: Adjust the picture automatically in pc mode. RED, GREEN, YELLOW, CYAN: This button is not available. SLEEP: Set the sleep timer. SOURCE: Press to change signal source. ENTER: Enter the selected option or perform the selected operation. MENU: Press this button to enter the main menu. EXIT: Exit the OSD (On-screen display). CH+/CH-: Change the channel. CC: Press this key to select the CC ,ON or OFF mode INFO: Display some information of current program in TV mode. VOL+/VOL-: Adjust the volume. FAV: Switch between custom set "Favorite List" F.LIST: Press this key to display the Favorite List mode. C.LIST: Press this key to display the channel list mode. 9 Installation Guide Press MENU button to display the MAIN OSD MENU; Press ◄ / ►button to select the MENU you want; Press ENTER button to enter the sub menu; Press ▼ / ▲ button to select the option and then press ◄ / ► to adjust the value in the sub menu; You can press MENU button to go back to the upper menu or EXIT button to close the OSD. PICTURE Press ENTER when the Picture Settings item is highlighted. Then you will go to the sub-menu as following. Press ▼ / ▲ to select the desired menu item. Press ENTER to proceed if necessary. Press ◄ / ► to adjust the item the desired level. When you have changed the settings, you can exit from the menu by pressing MENU. Picture Settings Press ▼ / ▲ button to select Picture Settings, then press ◄ / ► button to adjust. Only in the User mode, the detail options as following can be adjusted. 10 Press ▼ / ▲ button to select Brightness, then press ◄ / ► button to adjust. . Press ▼ / ▲ button to select Contrast, then press ◄ / ► button to adjust. . Press ▼ / ▲ button to select Color, then press ◄ / ► button to adjust. . Press ▼ / ▲ button to select Tint, then press ◄ / ► button to adjust. Press ▼ / ▲ button to select Sharpness, then press ◄ / ► button to adjust. . Screen Size Press ▼ / ▲ button to select Screen Size, then press ◄ / ► button to adjust. PC Settings Note : The pc settings only in pc mode .Press ENTER when the PC Settings item is highlighted. Then you will go the sub-menu as following. .Press ▼ / ▲ to select the desired menu item. Press ENTER to ▼ / ▲ proceed if necessary. .Press ◄ / ► to adjust the item to the desired level. .When you have changed the settings, you can exit from the menu by pressing MENU. Press ▼ / ▲ button to select Auto Adjust, then press ENTER button to start auto adjusting. Press ▼ / ▲ button to select Horizontal Position, then press ◄ / ► button to adjust. Press ▼ / ▲ button to select Vertical Position, then press ◄ / ► button to adjust. Press ▼ / ▲ button to select Clock, then press ◄ / ► button to adjust. Press ▼ / ▲ button to select Phase, then press ◄ / ► button to adjust. 11 Press ▼ / ▲ button to select Reset, then press ENTER button to reset the options above. Color Temperature Press ENTER when the Color Temperature item is highlighted. Then press ◄ / ► button to adjust. Advanced Picture Settings Note: This option in the PC mode no role! Dynamic Contrast Press ▼ / ▲ button to select the item Dynamic Contrast, then press ◄ / ► button to adjust. It can adjust the contrast Film Mode Press ▼ / ▲ button to select the item Film Mode, then press ◄ / ► button to adjust. Noise Reduction Press ▼ / ▲ button to select the item Noise Reduction, then press ◄ / ► button to adjust. MPEG Noise Reduction Press ▼ / ▲ button to select the item MPEG Noise Reduction, then press ◄ / ► button to adjust. It can improve the quality of the pictures by reducing the block noise. 12 SOUND Sound Settings Press ENTER when the Sound Settings item is highlighted. Then you will go to the sub-menu as following. Press ▼ / ▲ to select the desired menu item. Press ENTER to proceed if necessary. Press / to adjust the item the desired level. When you have changed the settings, you can exit from the menu by pressing MENU. Bass Press ▼ / ▲ button to select the item Bass, then press ◄ / ► button to adjust. Treble Press ▼ / ▲ button to select the item Treble, then press ◄ / ► button to adjust. Balance Press ▼ / ▲ button to select the item Balance, then press ◄ / ► button to adjust. 13 Surround Mode Press ▼ / ▲ button to select the item Surround Mode, then press ENTER button to adjust. AVL Press ▼ / ▲ button to select the item AVL, then press ENTER button to adjust. Analog Sound Press ▼ / ▲ button to select the item Preferred Analog Sound, then press ◄ / ► button to select the prefer audio Digital Sound Press ▼ / ▲ button to select the item Preferred Digital Sound, then press ◄ / ► button to select the prefer audio Digital Audio output Press ▼ / ▲ button to select the item Digital Audio output, then press ◄ / ► button to select the Audio output mode. Equalizer Settings Press ▼ / ▲ button to select the item Equalizer Settings, then press ◄ / ► button to select the desired mode. CHANNEL MENU Note: This menu is only shown when the input source is TV. 14 Channel List Press ▼ / ▲ button to select Channel List, then press enter scan the Channel List. If you select the press enter button to option “In Channel List” On, the channel label will display in the list. Favorite List Press ▼ / ▲ button to select Favorite List, then press ENTER button to scan the Favorite Channel List. Channel Setting Press ▼ / ▲ button to select Manual Channel Setting, then press ENTER button to set the value in the sub menu. 15 Skip Set the channel to be skipped when using CH+/Ch- to view channels. Favorite Set the channel to your favorite list. Label Rename label of the channel. Signal Type Press ▼ / ▲ button to select Signal Type, then press button ◄ / ► to select the type you want to set. There are two selections: Air and Cable. Auto Channel Search Press ▼ / ▲ button to select Auto Channel Search, then press ENTER button to search channel. A Channel Search Menu will appear as below. 16 PARENTAL CONTROL Input password to enter, default password is “0000”. V-CHIP Press ▼ / ▲ button to select V-CHIP, then press ENTER button to adjust. A Sub Menu Will appear as below. 17 US V-CHIP Press ▼ / ▲ button to select US V-CHIP, then press ENTER button to adjust. A Sub Menu Will appear as below. Movie Rating Press ▼ / ▲ button to select Movie Rating, then press ENTER button to adjust. A Sub Menu Will appear as below. Press ▼ / ▲ button to select Rating, then press ENTER button to lock TV Rating Press ▼ / ▲ button to select TV Rating, then press ENTER button to adjust. A Sub Menu will appear as below. Press ▼ / ▲ / ◄ / ► button to select Rating, then press ENTER button to lock. 18 CANADA V-CHIP Press ▼ / ▲ button to select CANADA V-CHIP , then press ENTER button to adjust. A Sub Menu Will appear as below. The operation of CANADA V-CHIP is the same as the operation of US V-CHIP. Block Unrated Show Press ▼ / ▲ button to select Block Unrated Show, then press ENTER button to set the rating locked. Downloadable Rating Press ▼ / ▲ button to select Downloadable Rating, then press ENTER button to set the rating. If 19 the DTV program doesn’t have this rating information, this option will be in gray. Clear Downloadable Data Press ▼ / ▲ button to select Clear Downloadable Data, then press ENTER button to set the rating. Note: The above two operation only valid when playing the downloadable data stream. The operations are the same as US V-CHIP. CHANGE PASSWORD Press ▼ / ▲ button to select Change Password, then press ENTER button to adjust the value. A Sub Menu Will appear as below. If the password is changed, all of the passwords in the menu will be changed at the same time. Note: If you forget your password, you can use “1470” to enter any menu locked. Keypad Lock Press ▼ / ▲ button to select the item Keypad Lock, then press ENTER button to adjust. Source Lock Press ▼ / ▲ button to select Source Lock, then press Enter button to enter the sub menu. Press ▼ / ▲ button to select Source, then press ENTER button to set the Source Lock. You can’t enter the locked source if you set the source lock. 20 Setup Menu Closed Caption Press ▼ / ▲ button to select the item Closed Caption, then press ◄ / ► button to adjust. 21 Caption Display Press ▼ / ▲ button to select Caption Display, then press ◄ / ► button to select ON or OFF. Analog Caption Type Press ▼ / ▲ button to select Analog Caption Type, then press ◄ / ► button to select the type. Digital Caption Type Press ▼ / ▲ button to select Digital Caption Type, then press ◄ / ► button to select the type. Digital CC Preset Press ▼ / ▲ button to select Digital CC Preset, then press ◄ / ► button to select Default or Custom. Digital CC Style This menu is only shown when the Digital CC Preset is selected Custom. CC Size Press ▼ / ▲ button to select CC Size, then press ◄ / ► button to set. CC Font Press ▼ / ▲ button to select, then press ◄ / ► button to select the Font. 22 CC Opacity Press ▼ / ▲ button to select CC Opacity, then press ◄ / ► button to select the Opacity. Text Color Press ▼ / ▲ button to select Text Color, then press ◄ / ► button to select the color. CC Background Opacity Press ▼ / ▲ button to select CC Background Opacity, then press ◄ / ► button to select the Opacity. CC Background Color Press ▼ / ▲ button to select CC Background Color, then press ◄ / ► button to select the Color. Menu Language Press ▼ / ▲ button to select the item Menu Language, then press ◄ / ► button to adjust. Clock Press ▼ / ▲ button to select the Clock, then press ENTER to edit. Time Zone Press ▼ / ▲ button to select Timer Zone, then press ◄ / ► button to set. Auto Clock Press ▼ / ▲ button to select the item Auto Clock. then press ENTER button to adjust. Setup Time Press ▼ / ▲ button to select Setup Time, then press ◄ / ► button to adjust the time and use the ENTER button to go to the next option. Day Of Week This option displays the Day Of Week corresponding to the setup time. Daylight Saving Time Press ▼ / ▲ button to select the item Daylight Saving Time. then press ENTER button to adjust. 23 OTHERS MENU Blue Back Press ▼ / ▲ button to select Blue Background, then press ENTER button to select when there is no signal, whether set the background in blue or not. No Signal Power Off Press ▼ / ▲ button to select No Signal Power Off, then press ENTER button to select it On or Off. When set it on, if there is no signal input, it will go into standby. No Operation Power Off Press ▼ / ▲ button to select No Operation Power Off, then press ENTER button to select it On or Off. When set it on, if there is no operation, it will go into standby. All Reset Press ▼ / ▲ button to select All Reset, then press ENTER button to execute reset. When you select All Reset item, a dialogue box will appear as following 24 USB Features Connect the USB and press the source button, select “Media” by“/”button, then press “ENTER” button to enter USB mode. Music Press“/”button to select the music menu, and press “ENTER” button to enter. Press the “/” button to select the drive disk you want to watch, and press “ENTER” button to enter. Press the “/,/” button to select the file you want to Listen in the file selecting menu, then press “ENTER” button to play. Press Source button to change to other signal channel. When play the music: Press “VOL/VOL “button to adjust the volume size, and press“/”button to select the play previous chapter、 Pause、 next chapter、 Stop, Press “ENTER” button to confirm。 Note: Music just can support MP3 format. Photo Press“/” button to select the Photo menu, and press “ENTER” button to enter. Press the “/” button to select the drive disk you want to watch, and press “ENTER” button to enter. Press the “EXIT” button to select return option to go back to the previous menu. 25 Press the“/” button to select the file you want to watch in the file selecting menu, then press “ENTER” button to display picture. When you select the drive disk, you can press“/”button to select “Open”、 “Thumbnail”or “Slideshow”, Then press“ENTER” button to enter. Press Source button to change to other signal channel. Note: Picture just can support JPG format. Media Setting Press“/”button to select Media Setting menu, Then press“ENTER” button to enter.. Press“” button to select Slideshow Interval and Press“/”button to adjust the Interval time. Press “/” button to select Slideshow Effect and Press“/”button to adjust Effect mode. Press“/” button to select Slideshow Repeat and Press“/”button to select Off、On. Press“/” button to select Music Play Mode and Press“/”button to adjust satisfying Play Mode. Press“/” button to select Music Play Repeat and Press“/”button to select Off、On. Press“/” button to select Music Auto Play and Press“/”button to select Off、On. NowPlaying Press“/”button to select NowPlaying menu, Then press ENTER button to the Playing file. Note: ① Non-support the HDD, just support less than 4G USB. ② MAX current is not more than 500mA. ③ Non-support the video file to play. ④ This feature picture is only for reference, actual item is to the standard. Note: The pictures about function are provided for reference only which will be in accordance with exact circumstances. 26 RGB INPUT Model Resolution Horizontal Frequency(KHz) Vertical Frequency(HZ) DOS 720x400 31.5 70 VGA 640x480 31.5 60 SVGA 800x600 37.9 60 XGA 1024x768 48.4 60 WXGA 1360x768 47.7 60 HDMI INPUT Resolution Horizontal Frequency (KHz) Vertical Frequency (HZ) 480i 720 x480i 15.73 59.94/60 480p 720 x480p 31.47 59.94/60 720p 1280 x 720p 37.50 44.96 50 59.94/60 1080i 1920 x 1080i 28.13 33.75 50 59.94/60 1080p 1920 x 1080p 56.25 67.5 50 59.94/60 Mode COMPONENT INPUT Horizontal Frequency Vertical Frequency (KHz) (HZ) 720 x480i 15.73 59.94/60 480p 720 x480p 31.47 59.94/60 720p 1280 x 720p 37.50 44.96 50 59.94/60 1080i 1920 x 1080i 28.13 33.75 50 59.94/60 1080p 1920 x 1080p 56.25 67.5 50 59.94/60 Model Resolution 480i 27 Before consulting service personnel, check the following chart for possible solutions. PROBLEM TV will not turn on SOLUTION ●Make sure the power cord is plugged in. ●The batteries in the remote control may be Exhausted; replace the batteries. ●Check the cable between TV and antenna/ external AV device. ●Press the power button on the remote. ●Press the No picture, no sound SOURCE button the remote, then press the “▲/▼”button repeatedly to select the TV source. ●Check the cable between TV and antenna/ external AV device. ●Try another channel, the station may have Poor picture, sound OK Audio noise broadcast difficulties. ●Adjust the brightness/contrast in the Video menu. Check that the unit is set to NTSC. ●Move any infrared equipment away from the TV. The TFT LED panel uses a panel consisting of sub pixels which requires sophisticated technology to produce. However, there may be a small number of bright or dark pixels on the screen. These pixels will have no impact on the performance of the product. 28 Furrion Warranty Congratulations on your purchase of a Furrion product. All Furrion products are made to stringent quality standards and if used properly for their intended purpose you should enjoy many years use from your purchase. We are pleased to provide you with a 1 year warranty on all Furrion products. The details of this warranty are set out in the terms and conditions (see below) which supplement the authorized dealer’s Terms and Conditions of Sale. This warranty is given in addition to your other rights under the laws of United States. Warranty Terms and Conditions 1. The warranty guarantees that Furrion products will be free from faults or defects in workmanship and materials for a period of 1 years commencing on the date of delivery to you. If a valid claim is made under warranty then you will only be entitled to claim in accordance with paragraph 6 below. 2. The warranty only applies: a. to Furrion products with a valid serial number b. to the person who purchased the Furrion product. It is not transferrable to any other person; c. to individuals who purchased the Furrion products as a consumer for private use, not to businesses, companies, partnerships or sole traders; d. to Furrion products used solely within a domestic environment for personal use, not to Furrion products put into and used within business premises, place of work, rental properties, student properties or similar; e. to Furrion products used within the environment intended by their design f. to Furrion products used and installed in accordance with the instructions supplied with the product; g. where the purchaser of the Furrion product has validated the warranty in accordance with paragraph 4 below; h. to Furrion products purchased and used within the United States. 3. The warranty does not cover: a. items where the serial number has been defaced and/or rendered unidentifiable; b. damage caused or contributed to by poor, faulty or incorrect use, installation or maintenance; c. damage caused or contributed to by events outside Furrion’s control including but not limited to Acts of God, fire, explosion, contact with corrosive matter, extreme weather conditions, flood, vandalism, soiling, misuse, abrasion, improper storage following delivery, rot and/or infestation following delivery, leaks (or similar incidents), damage due to non-domestic use; d. damage or deterioration caused or contributed to as a result of normal wear and tear; e. damage caused or contributed to by maintenance or repairs other than those carried out by an authorized dealer; f. damage caused or contributed to by willful damage, abuse, mistreatment, negligence, abnormal storage or environmental conditions; g. damage caused or contributed to by household animals and misuse by children. 29 4. To validate the warranty you must: a. fill in the registration card provided with the Furrion product; and b. register the warranty covering the Furrion product within 6 months of delivery of the Furrion product by following the instructions on the registration card. 5. To make a claim under your warranty you must contact Furrion’s customer service at [email protected] or the address on your warranty card. 6. Following the filing of a claim, Furrion will investigate the claim and if we believe there is a defect or fault covered by the warranty, we will at our option either repair the defective Furrion product (or part), replace the defective Furrion product (or part), or issue a refund of the price you paid for the product. 7. Please note in the event that no fault can be found, it is your responsibility to pay for the re-delivery of the replacement items. 8. Installation of any repaired or replacement Furrion product will not be Furrion’s responsibility. 9. If you do not allow the authorized dealers representative to view the Furrion product which is the subject of the warranty claim, you will invalidate the warranty in respect of that claim. 10. Any repaired or replacement Furrion product parts shall be guaranteed on the terms of this warranty for the unexpired portion of the warranty period only. 11. This warranty is non-transferrable and is personal to the original purchaser as shown on the invoice. 12. This warranty is subject to the jurisdiction of the courts of USA, and any dispute or claim arising out of, or in connection with it or its subject matter, shall be governed by, and construed in accordance with United States of America law. Furrion.com 30