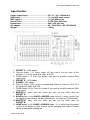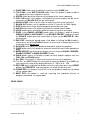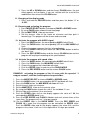
1
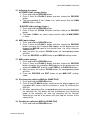
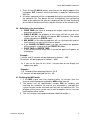
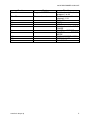
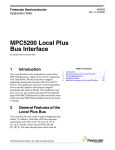
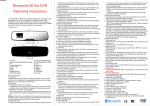
24CH DMX DIMMER CONSOLE
24CH DMX DIMMER CONSOLE
Introduction
Thank you for choosing our 24 channel dimmer console. This console is provided
with microprocessor control system and it is full compatible with international
DMX512 and MIDI standards. The console is provided with 24 channels DMX512
and MIDI standard, 48 programs can be programmed on 4 pages and the maximal
number of steps doesn’t exceed 4500. It is strongly recommended to read the
following user manual before first use. This device is the most advanced item in this
class concerning the price and size. Furthermore it is very simple in use and
faultless.
www.flash-butrym.pl
1
24CH DMX DIMMER CONSOLE
Specification:
Power supply input……………………………..DC 12 – 18V / 500mA min.
DMX input.. …….………………………………...3 – pin XLR male socket
MIDI signal……..…………………………………5 – pin DIN socket
Internal fuse……………………………………...F0.5A 250V (5x20mm)
Dimensions………………………………………482 x 264 x 85 mm
AC adapter……………………………………….AC~230V/50Hz – DC 12V/500mW
Weight……………………………………………..4,8 kg
1. PRESET`A` - LED diodes.
2. Channel sliders 1-12, those sliders will be used to set the value of the
channels 1-12 in the range of 0-100% or 0-255.
3. FLASH button 1-12. Press this button if you want to send the maximal DMX
signal value.
4. PRESET`B` - LED diodes.
5. SCENES - LED diodes.
6. Channel sliders 13-24: set the corresponding sliders of channels 13 to 24 in
the range of 0-100% or 0-255.
7. FLASH button 13-24: Press this button if you want to send the maximal DMX
signal value.
8. MASTER`A` slider: with this slider you can set the DMX value for
PRESET`A`.
9. BLIND button: in the CHASE<>SCENES mode, when it is active it cause that
the output of each channel will be controlled only via sliders or FLASH button.
10. MASTER`B` slider: with this slider you can set the DMX value for
PRESET`B`.
11. HOME button: in the CHASE<>SCENES mode – if it is active then the control
system of the output of each channel will be changed from slider or button
control to controlled via program.
www.flash-butrym.pl
2
24CH DMX DIMMER CONSOLE
12. FADE TIME slider: push the button in order to set the FADE time.
13. TAP SYNC: in the AUTO CHASE mode. Press this button in order to define
the speed of the scene sequence (chase).
14. SPEED slider: push the slider to set the speed of the scene sequence.
15. FULL ON button: if this button is activated the channel outputs will be set on
maximum and BLACK OUT will be switched off.
16. AUDIO LEVEL slider: use this slider in order to set the sound sensitivity.
17. BLACK OUT button: use this button to set the “0” value for all DMX signals.
18. STEP button: press once and the program will perform one step.
19. AUDIO button: press this button to activate the sound control mode.
20. HOLD button: press and hold in order to keep the signal on the output.
21. PARK: in the CHASE<>SCENES mode, press this button in order to choose
SINGLE CHASE or MIX CHASE. In the DOUBLE PRESET mode pressing of
the PARK`B` button gives the same effect as if you set the MASTER`B` slider
on maximum.
22. REC EXIT: leaving the record mode. If the diode is flashing the KILL mode is
active, press any of the FLASH channels to cause that all output channels will
reach zero value beside one.
23. ROCORD button: press this button to record one step of the program.
24. PAGE button: press this button to choose the desired scene from appropriate
page.
25. MODE SELECT: by pushing this button you can choose CHASE<>SCENES,
DOUBLE PRESET or SINGLE PRESET mode.
26. DARK button: press this button in order to close outputs together with the
FULL ON and FLASH option.
27. ALL REV: if this button is active it will reverse the run of all programs.
28. The “0%” or “0-255” button: By using one of those two buttons % or 0-255 you
can choose the range of the displayed value: 0 – 100% or 0 – 255.
29. REV ONE: press and hold this button and at the same time press any SCENE
button from PRESET`B` and the program run mode will be reversed.
30. CHASE REV: this button reverse the run of the program sequence controlled
via the speed slider.
31. BEAT REV: this button is used for reversing the sequence (chase) of
programs controlled via regular beat.
REAR PANEL
www.flash-butrym.pl
3
24CH DMX DIMMER CONSOLE
1.
2.
3.
4.
5.
6.
7.
8.
Power supply input:
MIDI THRU:
MIDI OUT:
MIDI IN:
DMX OUT:
DMX POLARITY SELECT:
AUDIO INPUT:
Remote control, Full on:
and Black out
12 – 18V / 500mA
MIDI pass thru
sends the MIDI signal from the console
receives the MIDI signal
DMX output
choosing of the channel polarity
direct connection of the sound 100mW – 1 Vpp
controlled via Stereo jack
Operating instructions:
1. Activating the record mode.
1. Press and hold the RECORD button.
2. Press successively the FLASH 1, FLASH 5, FLASH 6, FLASH 8
buttons.
3. Release the RECORD button and when the corresponding LED diode
will flash it means that the record mode is activated.
2. Deleting all programs
1. Press and hold the RECORD button.
2. Press successively the FLASH 1, FLASH 3, FLASH 2, FLASH 3
buttons.
3. Release the RECORD button.
3. Clearing the memory
1. Press the RECORD button and then press REC CLEAR.
2. Release the RECORD and REC CLEAR button at the same time.
4. Recording the program
1. Set the chosen channel for recording
2. The corresponding diode of the page is on
3. Press the RECORD button and then press the appropriate FLASH
button.
4. Release the RECORD button.
EXAMPLE: creating the program and saving the scene 28
1. Clear the memory.
2. By using the MODE SELECT button choose the mode from 1 to 24 single.
3. Set the sliders of the 1-24 channels on minimum and the MASTER`A`
slider on maximum.
4. Push the slider 1 on maximum, press the RECORD button and then set
the slider on minimum. Repeat the same procedure for all sliders.
5. By using the PAGE button choose the page 3, the corresponding LED3
will flash.
6. Press and hold the RECORD button and press the FLASH16 button.
www.flash-butrym.pl
4
24CH DMX DIMMER CONSOLE
7. Release the RECORD and FLASH16 button and the program that sets
successively the maximal values of the 1 to 24 channels will be saved in
the scene 28.
5.
Deleting the program
1. By using the PAGE button choose the desired page.
2. Press the RECORD button and then press twice the appropriate
FLASH button.
EXAMPLE: deleting the program from the scene 40
1. By using the PAGE button choose the page 4, the corresponding LED
diode 4 will flash.
2. Press and hold the RECORD button and press twice the FLASH 16
button.
3. Release the RECORD button.
6.
Editing the scenes
1. By using the PAGE button choose the desired page.
2. By using the MODE SELECT button choose the CHASE<>SCENES
mode.
3. Press the EDIT button and at the same time by using the FLASH
button choose the desired scene.
4. Release the EDIT and FLASH button, the corresponding diode of the
scene is on and others are off. Now the edition is activated.
EXAMPLE: enter the edition mode of the scene nr 11
1. Press the PAGE button to switch on the diode 1
2. By using the MODE SELECT button choose the CHASE<>SCENES
mode.
3. Press the button EDIT and FLASH23.
4. Release the button EDIT and FLASH23.
7.
Exit the edition mode
1. Press the RECORD button and then press the EXIT button.
2. Release the button RECORD and EXIT.
8. Deleting the steps
1. In the edition mode press the button STEP so long to proceed with the
program until you find the desired step.
2. Press the DELETE button and the step will be deleted and the next
one will be executed.
9. Adding steps
1. Save in the edition mode the step that has to be added.
2. Press the STEP button to run the program to the place where the step
has to be added.
10. Modifying the steps
1. In the edition mode press the STEP button to run the program till you
find the step that has to be modified.
www.flash-butrym.pl
5
24CH DMX DIMMER CONSOLE
2. Press the UP or DOWN button and the chosen FLASH button, the end
effect appears on the display. If you are satisfied with the result of the
modification then release the FLASH button.
11. Changing of the display mode
1. Press and hold the RECORD button and then press the button “%” or
“0-250”.
12. Choosing and activating the program
1. Press MODE SELECT button and choose CHASE<>SCENES mode.
2. By using PAGE button choose the desired page.
3. Set the MASTER`B` slider on maximum.
4. Set the channel slider of the scene on minimum and then push it
forward (up). The program will be chosen and executed.
13. Activate the program with AUDIO signal
1. Press the ADUIO button, the corresponding AUDIO led will flash.
2. Press the PARK button, the corresponding LED of the MIX MODE will
flash.
3. Choose the scenes program that has to be activated.
4. Push the SPEED slider or push twice the TAP SYNC button to define
the “beat” time.
5. Press the REC SPEED button and the chosen FLASH button and the
program will be played according to the specified beat.
14. Activate the program with speed slider.
1. Press the AUDIO button, the corresponding AUDIO led will flash.
2. Press the PARK button, the MIX MODE led will flash.
3. Choose the program that should be activated.
4. Push the SPEED slider in order to set the SHOW MODE.
5. Press the REC SPEED button and the chosen FLASH button.
EXAMPLE: activating the program of the 14 scene with the speed of “1
step pro second”, with the control option via speed slider.
Press the MODE SELECT to choose CHASE<>SCENES mode.
Press the AUDIO button, the corresponding AUDIO led diode will flash.
Press the PARK button, the MIX MODE led diode will flash.
Set all channel sliders on minimum.
Set the MASTER`B` slider on the maximal value.
By using the PAGE button choose the side 2, the led diode 2 is on.
Set the slider of the channel 14 on maximum.
Push the SPEED slider until on the display appears the value of 1.00, the
corresponding SPEED diode is on.
9. Press the REC SPEED and FLASH 14 button and next release them at the
same time. The program will run 1 step pro second.
10. Set the SPEED slider in the SHOW MODE. Press the REC SPEED and
FLASH 14 in order that the program can be controlled via SPEED slider.
Push the SPEED slider and on the display appears the value 0.10, and the
program in the scene 14 will run in the sequence of 10 steps pro second.
1.
2.
3.
4.
5.
6.
7.
8.
www.flash-butrym.pl
6
24CH DMX DIMMER CONSOLE
15. Adjusting the speed
A) SPEED slider settings (5min.)
1. Press and hold the RECORD button.
2. Press 3 times the FLASH 5 button and then release the RECORD
button.
3. The corresponding (5 min.) diode is on, which means that the 5 MIN
SPEED slider is active.
B) SPEED slider settings (10min.)
1. Press and hold the RECORD button.
2. Press 3 times the FLASH 10 button and then release the RECORD
button.
3. The diode 10 MIN is on, which means that the slider 10 MIN SPEED
is active.
16. MIDI input settings
1. Press and hold the RECORD button.
2. Press 3 times the FLASH 1 button and then release the RECORD
button and when the inscription CHI appears on the display you can
choose the MIDI IN input on the channel from 1 to 16 by using the
FLASH button.
3. After you push the chosen FLASH button the corresponding diode
will flash.
4. Press the RECORD and EXIT button to quit MIDI IN settings mode.
17. MIDI output settings
1. Press and hold the RECORD button.
2. Press 3 times the FLASH 2 button and then release the RECORD
button and when the inscription CHO appears on the display you can
choose the MIDI OUT channel using FLASH 1 to FLASH 16 buttons.
3. After you push the chosen FLASH button the corresponding diode
will flash.
4. Press the RECORD and EXIT button to quit MIDI OUT settings
mode.
18. Receiving the collective MIDI file (DUMP FILE)
1. Press and hold the RECORD button.
2. Press 3 times FLASH 3 button, and when on the display appears the
inscription IN it means that the controller is ready for receiving the
MIDI file.
3. All others operation will be suspended during the transferring time of
the collective file. The device will exit automatically the transferring
mode of the collective file after the receiving will be finished.
Switching on and off of the device will also stop the transfer of the
collective file.
19. Sending the collective MIDI file (DUMP FILE)
1. Press and hold the RECORD button.
www.flash-butrym.pl
7
24CH DMX DIMMER CONSOLE
2. Press 3 times FLASH 4 button, and when on the display appears the
inscription OUT it means that the controller is ready for receiving the
MIDI file.
3. All others operation will be suspended during the transferring time of
the collective file. The device will exit automatically the transferring
mode of the collective file after the sending will be finished. Switching
on and off of the device will also stop the transfer of the collective file.
20. Definition of the inscriptions
1. FADE TIME: the cycle of changing the output signal from zero to
maximum and reverse.
2. SINGLE MODE: the program of the scene will be run one after
another and on the display will appear NO inscription. The speed
will be controlled via SPEED slider.
3. MIX MODE: all the chosen programs will run synchronically and for
each channel you can set the chosen speed.
4. If the CHASE<>SCENES diode is on you can choose the program
of the scene by using one of the PRESET B sliders.
5. FADE TIME and SPEED TIME:
if you set the time for more then 1 minute two points will appear on
the display.
Example:
1 minute and 15 seconds will be displayed as follows – 1.15
10 minutes will be displayed as follows – 10.0.
b) if you set the time for less then 1 minute then on the display will
appear one point
Example:
11.5 seconds will be displayed like this: 11.5
1.2 seconds will be displayed like this: 1.2
21. Enabling the MIDI mode
1. If the MIDI signal won’t be received within 10 minutes then the
channel and the program enabled by MIDI will be cleared.
2. The device has an identification number 55H for sending and
receiving the collective file and all the information’s (included the
system version) will be received and sent with the collective file. The
program of the scene can be sent as well to another unit as it can be
received from other unties.
3. This unit receives and sends the below listed information’s:
www.flash-butrym.pl
8
24CH DMX DIMMER CONSOLE
Number
22 – 69
Fast
Program MASTER
70 – 93
Dimmer channels
94
95
96
97
98
99
100
101
102
www.flash-butrym.pl
Functions
Switched on/off of the
program 1 to 48
Switched
on/off
the
channels 1-24
FULL ON
DARK
HOLD
Switched on/off AUDIO
CHASE
CHASE <> SCENES
DOUBLE
PRESET
MODE
SINGLE PRESET MODE
STEP CHANGE
BLACKOUT
9