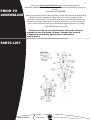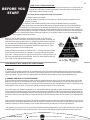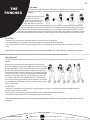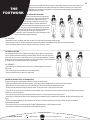
1
THE MAN
Training Target
simply good products
for real life TM
USER
MANUAL
Model No.
8913TM
Age Recommendation:
13+
Do not allow more than one person to exercise with this product at any time.
ADULT ASSEMBLY REQUIRED.
Please visit www.pureglobalbrands.com to register your product to ensure warranty coverage.
Please read all the instructions before using this product. Consult a physician
before beginning any exercise program or strenuous activity.
!
Pure Boxing is a Trademark
of Pure Global Brands, Inc.
Customer Service
WARNING
The contents of this package are not suitable for children
under 3 years of age. Contains small parts which
may cause choking.
1 866 498 5269
[email protected]
IMPORTANT MESSAGE
PLEASE READ
WARNING
CHOKING HAZARD - Small Parts
NOT for children under 3 years of age.
ADULT ASSEMBLY REQUIRED
WARNING
While every attempt is made to ensure the highest degree
of protection in all equipment, we cannot guarantee freedom
from injury. The user assumes all risks of injury due to use.
All merchandise is sold on this condition, which no
representative of the company can waive or change.
Customer Service
1 866 498 5269
[email protected]
MODEL NO. 8913TM
USER MANUAL
CUSTOMER SERVICE INFORMATION
Thank you for purchasing our Pure Boxing “THE MAN” Training Target
At Pure Global Brands, we want all of our customers to be completely satisfied with their purchase.
Please take time to review the contents of the product you have just received to make sure that all
of the parts are included. If you find that any parts are missing or damaged, we will happily provide
replacement parts at no charge within 30 days of purchase. Please keep in mind that for select
damaged part replacement requests, we will require a photo for submission to our quality
control office.
To order these parts, or if you have any other questions or concerns about this Pure Global product,
please e-mail the Pure Global Brands, Inc. customer service department at:
[email protected] or contact us at 1-866-498-5269. You can also visit our
website at: www.pureglobalbrands.com
If you request replacement parts, please be sure to include the following information in
your correspondence:
YOUR NAME
YOUR MAILING ADDRESS
YOUR EMAIL ADDRESS
RETAILER WHERE YOU PURCHASED PRODUCT
DATE OF PURCHASE
ORDER # (IF AVAILABLE)
PRODUCT MODEL #: 8913TM
SERIAL #
PRODUCT NAME: THE MAN
PART # (located in manual)
QUANTITY NEEDED
PICTURE OF DAMAGED PART(s) – SUBMIT VIA Email , Fax, or Mail
Again, thank you for purchasing a Pure Global Brands product.
Sincerely,
Customer Service
Pure Global Brands, Inc.
Phone: 1-866-498-5269
Email: [email protected]
8040 Belvedere Rd.
West Palm Beach, FL 33411
Customer Service
1 866 498 5269
[email protected]
MODEL NO. 8913TM
LIMITED WARRANTY
Pure Global Brands, Inc. warrants this product to be free from defects in workmanship and materials
under normal use and conditions for the duration of the period outlined below FROM THE DATE OF
ORIGINAL PURCHASE. This Limited Warranty is not transferable and is available only for the
original purchaser of the Product.
The various components of the trampoline/enclosure are warranted against defects and workmanship
for the following time period(s):
• 90 Days
All warranty coverage extends only to the original retail purchaser from the date of purchase. Pure
Boxing’s obligation under this Warranty is limited to replacing or repairing, at Pure Boxing’s option, the
product at one of its authorized service centers. All products for which a warranty claim is made must
be received by Pure Boxing at one of its authorized service centers and accompanied by sufficient
proof of purchase (photocopy of the original store receipt, indicating the date of purchase). All freight
and handling fees are the responsibility of the consumer to pay, both to and from Pure Boxing. All
warranty claims must be pre-authorized by Pure Boxing. Pre-authorization can be obtained by calling
866-498-5269. This warranty does not extend to any product or damage to a product caused by or attributable to freight damage, abuse, misuse, improper or abnormal usage, or repairs not provided by
a Pure Boxing authorized service center or for products used for commercial or rental purposes. This
warranty does not cover ordinary wear and tear, weathering, failure to follow directions, improper
installation, improper maintenance or acts of Nature (such as damage caused by wind, lightning,
snow, water or ice). Weather damage, damage caused by unauthorized repair work or damage
caused by improper use of the products are not covered by the product warranty. No other warranty
beyond that specifically set forth above is authorized by Pure Boxing.
PURE BOXING IS NOT RESPONSIBLE OR LIABLE FOR INDIRECT, SPECIAL OR CONSEQUENTIAL DAMAGES ARISING OUT OF OR IN CONNECTION WITH THE USE OR PERFORMANCE
OF THE PRODUCT OR OTHER DAMAGES WITH RESPECT TO ANY ECONOMIC LOSS, LOSS
OF PROPERTY, LOSS OF REVENUE OR PROFITS, LOSS OF ENJOYMENT OR USE, COST OF
REMOVAL, INSTALLATION OR OTHER CONSEQUENTIAL DAMAGES. SOME STATES DO NOT
ALLOW THE EXCLUSION OR LIMITATION OF INCIDENTAL OR CONSEQUENTIAL DAMAGES.
ACCORDINGLY, THE ABOVE LIMITATION MAY NOT APPLY TO YOU. THE WARRANTY
EXTENDED HEREUNDER IS IN LIEU OF ALL OTHER WARRANTIES AND Pure Boxing
SPECIFICALLY DISCLAIMS ANY IMPLIED WARRANTY OF MERCHANTABILITY OR FITNESS
FOR A PARTICULAR PURPOSE IS LIMITED IN ITS SCOPE AND DURATION TO THE TERMS
SET FORTH HEREIN. SOME STATES DO NOT ALLOW LIMITATION ON HOW LONG AN
IMPLIED WARRANTY LASTS. ACCORDINGLY, THE ABOVE LIMITATION MAY NOT
APPLY TO YOU.
This warranty gives you specific legal rights. You may also have other rights, which vary from
state to state.
Customer Service
1 866 498 5269
[email protected]
MODEL NO. 8913TM
TABLE OF
CONTENTS
IMPORTANT SAFETY TIPS
............................................................................... 6
SPECIFICATIONS & PARTS
............................................................................... 7
BEFORE YOU START: DIET AND WORKOUT PHASES
........................................... 8
DETERMINING YOUR HEART RATE ZONE ............................................................. 9
GETTING TO KNOW THE MAN
THE BEGINNING: GETTING STARTED ............................................................. 10
THE PUNCHES ................................................................................................. 11
THE FOOTWORK .............................................................................................. 13
THE MONITOR ................................................................................................. 14
THE WORKOUT ................................................................................................. 15
THE REST: PROGRESS CHARTS, CARE & STORAGE, FAQs Customer Service
1 866 498 5269
......................... 17
[email protected]
MODEL NO. 8913TM
Please read these
warnings and the
information in this
manual in its entirety.
Failure to comply with
the following instructions
may increase the risk of
serious injury and/or death:
WARNINGS
IMPORTANT
PLEASE READ!
● This unit must be assembled and
disassembled by ADULTS ONLY.
● This equipment is recommended for use by individuals 13 years and older.
● FOR INDOOR HOME USE ONLY: This product is designed
for indoor residential use. It is NOT intended for use outdoors,
in commercial applications and/or use in public areas such as
communal gyms, parks, etc.
● ALWAYS WEAR BOXING GLOVES WHILE HITTING THE
MAN. Boxing gloves will protect your hands. Follow the instructions in the Getting Started section to properly put on your gloves.
Serious injury may occur to your hands if gloves are not worn.
● ALWAYS locate this equipment on a stable, level surface AT
LEAST 7 feet away from any structure, obstruction, or possible
hazard(s) such as walls, furniture, power cables, overhangs, or
other obstructions
● Start out slowly and progress sensibly. Progress at a pace that
is comfortable for you. Perform all of the exercises as described in
this manual and demonstrated in the video (available on line) for
best results.
● MONITOR YOUR HEART RATE WHILE YOU EXERCISE AND
KEEP YOUR PULSE RATE WITHIN YOUR TARGET HEART
RATE ZONE. Follow the instructions in this manual regarding heart
rate monitoring and determining your appropriate target heart rate
zone.
● STAY HYDRATED. Drink plenty of water before, during and
after your workout.
● WARM-UP AND STRETCH prior to working out with The
Man.
● THE MAN IS NOT INTENDED FOR USE BY CHILDREN.
Keep this and all fitness equipment out of the reach of
children.
Customer Service
1 866 498 5269
● SET UP THE MAN ON AN APPROPRIATE SURFACE. Set
6
up and use The Man on a solid, level surface with plenty of
clearance space around it. Do not assemble or use The Man
unit on wooden ftoor: if you must, then take precaution to
protect your ftoor. A thick rubber mat or rubber-backed carpeting
will provide a protective, non-skid surface. Follow the
instructions on the enclosed Assembly Instructions sheet.
● DO NOT place objects on or under this item, or allow people
and pets to climb on the unit.
● DO NOT OVER EXERT YOURSELF WITH THIS OR ANY
OTHER EXERCISE PROGRAM. Listen to your body and
respond to any reactions you may be having. You must distinguish discomfort, like fatigue, from pain, which hurts. If you
experience any pain or tightness in your chest, an irregular
heartbeat or shortness of breath, stop exercising immediately.
Consult your physician before continuing.
● REMOVE ALL JEWELRY AND WEAR APPROPRIATE
CLOTHING WHEN EXERCISING. For safety purposes, remove
all jewelry before you begin to box. Workout clothing should be
comfortable and lightweight. Wear athletic shoes, such as running or aerobic shoes. Do not use this product with bare feet.
● DO NOT store this item outside, or in extreme humidity or
temperatures.
● ALWAYS secure the The Man against unauthorized and
unsupervised use.
● Before each use of this product, inspect this unit for any
worn, defective or missing parts. Although this item is
made to take a lot of wear, over time parts may need to be
replaced. It is important to check the unit to ensure the Rear
Frame, Padding and Monitor are secure and all parts are in
good condition. If any loose, cracked, missing, or otherwise
damaged components are found, cease use of this item immediately and secure it from unauthorized use until the issue has
been corrected and/or replacement parts obtained. Failure to do
so may result in injury and/or void your warranty.
● Please read and refer to other warnings and use information
in these instructions before use.
Dispose of all packaging materials safely and
per local ordinance.
[email protected]
MODEL NO. 8913TM
7
PRIOR TO
ASSEMBLING
Please visit: www.pureglobalbrands.com for any important product
information updates and/or additional safety warnings before assembling or using this
product.
Use search word: 8913TM
When you are ready to start, make sure that you have the correct tools at hand, and
adequate space for assembly. Please refer to the following pages for part
descriptions and numbers. The assembly instruction uses these descriptions and
numbers as reference. Make sure you have all parts listed. If you are missing any
parts, contact customer service at: [email protected] or by calling
1-866-498-5269 (9am-5pm, M-F).
Enclosed are the current specifications and product features
available at time of printing, however, changes may be made
in equipment, availability, specifications and features
without notice.
PARTS LIST
Customer Service
1 866 498 5269
[email protected]
MODEL NO. 8913TM
8
BEFORE YOU
START
YOUR TOTAL FITNESS PROGRAM:
A Total Fitness Program is more than exercise and more than eating right. It is a “fitness-for-life” plan
that goes hand-in-hand with an overall, healthy lifestyle. This includes regular check-ups, exercise
and good eating habits for the rest of your life.
Your total fitness program consists of three parts:
1. Aerobic exercise to burn calories.
2. Strength conditioning exercises to tone and shape your muscles, increase your metabolic rate, and
strengthen your bones.
3. A diet that is safe, sensible and healthy. (Refer to Eating Plan Booklet included in your package.)
Today, fitness experts recommend both aerobic exercise and strength conditioning to achieve balanced fitness.
By improving your aerobic fitness you will strengthen your heart and lungs. improve your stamina and endurance,
and help with weight loss and weight maintenance. Strength conditioning adds lean muscle to your body, increasing your
body’s fat-burning ability by increasing your metabolism. In this process, your body burns more calories, even while you rest.
When you combine aerobic workouts with strength conditioning, as you will with The Man, you can burn more fat and calories
when compared to aerobic exercise alone.
Working out with The Man will help you out with the first two parts of your Total Fitness
Program, but you need to make healthy, low-fat eating a big priority as well. Consult with your
physician about an eating plan that’s right for you. Healthy eating habits and exercise will help
you reach your goal. We recommend that you follow dietary guidelines approved by the U.S.
Department of Agriculture and the U.S. Department of Health and Human Services. These
guidelines are contained in the Food Guide Pyramid:
Starting at the base of the pyramid, you should strive for 6 - 11 servings a day from the Bread,
Cereal, Rice and Pasta food group. You should eat 3 - 5 servings a day from the Vegetable
group, and 2 - 4 servings from the Fruit group. You should also eat 2 - 3 servings a day from the
Milk, Yogurt and Cheese group, and from the Meat, Poultry, Fish, Beans, Eggs and Nuts food
group. Lastly, use Fats, Oils and Sweets sparingly.
YOUR WORKOUT WILL CONSIST OF THREE PHASES:
1. WARM-UP
To prevent injury and maximize performance, we recommend that you begin each workout with at least five minutes of exercise that gradually
increases your heart rate and warms up your muscles. You can do this by practicing all of the The Man Workout movements at a slow tempo and
easy range of motion. This type of warm-up is demonstrated in the instructional video available on line at: www.pureglobalbrands.com.
2. AEROBIC AND MUSCLE TONING WORKOUT
To gain the health and fitness benefits that you seek, the warm-up should be followed by about 15 to 20 minutes of aerobic boxing with The Man.
Build up to this amount as your current fitness level allows, and progress at a rate that is comfortable to you. As your fitness level increases you
may want to gradually increase the length of your workouts to a total of 30 minutes most days of the week. Start out with 2 or 3 workouts per week.
If losing weight is one of your goals, you may want to gradually increase your workouts to 5 or 6 days per week.
Once a basic workout with The Man is comfortable for you, interval training offers the opportunity for greater workout variety, cardiovascular benefits and increased fat and calorie burning. Interval training means alternating short periods of higher intensity boxing (using higher intensity punches with large range of motion footwork) with periods of lower intensity boxing (upper body only). When you perform the high intensity routines, you
will work at a level that is at the high end of your Target Heart Rate Zone. The lower intensity routines are at the low end of your Target Heart Rate
Zone.
Monitor your heart rate throughout your workout. This will help you determine the level of exertion that is safe and appropriate for you and serve as
a good measure of your progress toward improved fitness. See Page 8 for instructions on how to determine your target heart rate. There are three
variables that will help you control the intensity of your The Man workout and keep your heart rate at a safe and appropriate level.
• The speed of your workout. You can choose from three different skill levels programmed into your The Man. Start with Level l, which will be
the slowest speed. As workouts at that level become easier, or when you want more challenge, progress to faster workouts with Levels 2 and 3.
Customer Service
1 866 498 5269
[email protected]
MODEL NO. 8913TM
9
WORKOUT PHASES (CONT.):
BEFORE YOU
START
• The amount of lower body work (footwork) that you choose to put into your routines. Adding footwork such as “slipping” or “ducking” uses the large muscles of the hips and legs.
When performed simultaneously with the upper body punches, your workout intensity will increase. To
decrease intensity, perform the punches without any footwork.
• The type of punch you choose to use. As you learn proper punching techniques, you will also
learn which punches to use on each of targets on The Man. Punches such as a “power punch” or “upper cut”
require more effort than a punch such as a “jab.” Using different punches will vary the intensity of your workout.
3. COOL DOWN
At the end of your aerobic boxing workout, return to easy boxing movements (like you did in the warm-up) and slow
down the range of motion and tempo. Gradually slow down to a stop and complete your workout with some gentle
stretches. This allows your heart rate to drop slowly back toward its normal resting rate. An example cool-down and stretches
are demonstrated in the on-line video.
HEART RATE:
DETERMINING YOUR TARGET HEART RATE ZONE
Effective aerobic training to improve your fitness and health requires working out at an exercise intensity
that raises your pulse to a level that safely challenges your heart and lungs. This level can range between
50% - 80% of your maximum heart rate and is called your Target Heart Rate Zone. If you are new to
exercise or out of shape, 50 - 60% or less, may be adequate to promote cardiovascular conditioning and
health benefits. A well conditioned athlete may prefer to work up to an 80% - 85% rate.
Using your heart rate as an indicator of your fitness level provides a built-in monitor to gauge how hard
you’re working. If you’re untrained, you’ll require less effort to reach your target heart rate zone. As your
cardiovascular fitness improves and you become stronger, it will require more effort for you to reach your
Target Heart Rate Zone.
The chart illustrates the predicted minimum and maximum target heart rate zones for cardiovascular fitness
for the average individual in good health. To use the chart, find your age and the corresponding minimum
and maximum target heart rate zones.
DETERMINING YOUR HEART RATE
To determine your heart rate use one of the following methods:
• Pause just long enough from your exercise to take your pulse at your wrist. Take a ten second reading and
multiply it by six. Check the chart to see if you are within your range according to your age.
• Use an electronic heart rate monitor. You do not need to stop and take your pulse with a monitor as it constantly gives you a heart rate readout.
Remember that training heart rate ranges are predictions and based on averages. Regardless .of your exercise heart rate, you should slow down if
you are breathless and cannot carry on a short conversation.
Also, remember that during interval training your heart rate may exceed the 80% maximum rate. Because of the harder effort, this would be expected. When you resume aerobic training your heart rate will adjust back to the normal target heart rate zone.
Customer Service
1 866 498 5269
[email protected]
MODEL NO. 8913TM
10
THE
BEGINNING
GETTING STARTED:
The following instructions will prepare you to learn ‘the The Man punches and footwork:
• Once The Man is assembled and filled with sand, make sure it is on a solid, level surface with plenty of
room around it. (Refer to the separate Assembly Sheet inside the product packaging).
• Adjust The Man to the appropriate height by loosening the brackets and moving it up or down. Retighten the screws after adjusting. Initially, adjust The Man to a height that is close to your own. When you
are ready for more challenges, adjust The Man up or down for a taller or shorter opponent.
• Remove all jewelry and put on your boxing gloves before you begin to box. It is important that you always
wear boxing gloves while hitting The Man in order to protect your hands. Slip a boxing glove on each hand
and fasten the velcro straps firmly around your wrists
• As you learn to hit The Man harder and more accurately, you may want to use hand wraps for additional protection.
Hand wraps are wound around your hands and knuckles before you put on your gloves. Hand wraps can be purchased
inexpensively in most sporting good stores and come with directions on how to wrap your hands.
• Practice making a gentle fist with each hand. This is your hand position for all punches. When making a fist, keep the thumb
outside your fingers. Your glove will automatically create the proper form for your fist.
BASIC BOXING STANCE AND PYRAMID POSITION:
BASIC BOXING STANCE
Stand with your feet about shoulder width apart, knees slightly bent. If you are right handed, place
your left foot forward in a 12:00 position and your right foot back in a 2:00 position. Keep your weight
centered and your body “tight” (in a state of readiness!) so that your punches will flow with
force. Roll your shoulders slightly forward and keep your chin down for maximum protection of the
face. This is referred to as the Orthodox position. If you are left-handed, position yourself with the
opposite foot forward. This is referred to as the South Paw position. It is recommended that you learn
all of the punches in both the Orthodox and South Paw positions in order to balance the workload on
both sides of your body.
Your body should be at a 3/4 angle facing The Man. Never “square up”
your hips or shoulders toward your opponent. (In a real fight this would give
your opponent a larger target and a bigger advantage to land a punch.)
Proper body positioning can be achieved by always keeping one foot
pointed towards The Man. This foot will be called your “lead foot”.
PYRAMID POSITION
Now, bend your elbows and bring your fists up under your chin. Your
elbows are pointing down and close to your ribs. While boxing, your
fists should remain in this Pyramid position unless you are engaging
in an actual punch. The Pyramid position enables you to protect
your face and is your starting and ending position for each punch.
THE WARM-UP
At the beginning of the workout, you should begin with a basic warm-up which includes slowly thrown punches and individual footwork patterns.
This will allow you to review and practice correct technique for each punch while warming up your muscles. Incorporating the basic footwork patterns will enhance coordination and your total body warm-up. This rhythmic movement should be followed by a short period of gentle stretching.
Customer Service
1 866 498 5269
[email protected]
MODEL NO. 8913TM
THE
PUNCHES
You should become familiar with the following punches before beginning a workout with The Man.
THE JAB
The jab is executed with the lead hand.
Right-handed or Orthodox boxers throw the jab
with their left hand. Left-handed or South Paw
boxers use their right hand.
Assume the basic boxing stance (Orthodox or South
Paw). Distribute your weight evenly and place your
hands in the Pyramid position. Punch straight out in front
of you with your fist facing down toward the ground. It is
important not to bend your wrist or lock your elbow during the
execution of the jab. Extend your arm about 95%. Make contact
with The Man with the knuckles of the index and middle fingers.
Keep the non-punching arm/elbow close to your body and keep your
fist close to your face to protect your jaw. Then, quickly bring your
punching arm back to the pyramid position.
KEY ELEMENTS:
• As you are throwing the jab, concentrate on proper form. Don’t throw a jab and let it “hang” out in front of you. Bring it back as quickly as you
punch it out.
• Before you release the jab, do not lift the elbow.
• Remember, a jab comes from the shoulder. Avoid snapping the elbow.
• It is important to retract the arm quickly to the Pyramid position after the punch is thrown.
• As with all punches, the exercise benefit comes from extending the arm and moving from the shoulder. Let your punches go! No half punches.
When the jab is executed properly, the muscles worked include the shoulders, arms, chest, upper back and abdominals.
THE POWER PUNCH
Power Punches are also referred to as Straight Right Hand or Straight Left
Hand punches. While the jab is powered by the muscles of the shoulder region,
the power punch comes off the back foot. This involves coordinated movement
of the entire body.
Assume the basic boxing stance (Orthodox or South Paw). Distribute your
weight evenly and place your hands in the Pyramid position. Shift your weight
onto your back foot and pull your arm down and back slightly. Push off your
back foot, and release your punch toward The Man. If you’re in the Orthodox
position, your right fist should release right from the jaw (Southpaw position
releases a left hand punch). As you punch, twist your body letting your shoulders and hips rotate. If you’re an Orthodox boxer, your right side will swing
forward as your left side swings back. Southpaws will reverse this action. After
your punch hits The Man, finish the power punch by retracting your arm back
to Pyramid position and shifting your weight back to a centered stance.
KEY ELEMENTS
• Power punching is a total body experience. Let your legs be the pivotal force and remember to breathe normally.
• When your abs are tight and you rotate your torso, you are using your entire body in synchronization. No Rotation =No Power.
• As you deliver the punch, keep the bottom of your fist parallel to the floor.
• Retract the punch with the same intensity that you used to deliver the punch.
• Keep your elbows tight to the body (pyramid position) when you’re not punching. Do not let your elbows flair out as you release the punch.
When the power punch is executed properly, the muscles worked include the shoulders, arms, chest, upper back, abdominals, hips and
legs. This movement engages your entire body, therefore throwing a power punch is more fatiguing than throwing a jab.
Customer Service
1 866 498 5269
[email protected]
MODEL NO. 8913TM
11
12
THE
PUNCHES
THE HOOK
The Hook can be thrown with either the right or left arm. It is often thrown in conjunction with a series of
jabs and power punches. The hook is an effective punch against both the head and torso of your
opponent.
Assume the basic boxing stance
(Orthodox or South Paw).
Distribute your weight evenly and
place yourhands in the Pyramid
position. With either arm, let your fist
and elbow unwind from the shoulder and release the punch out and around. Utilizing rotation in the shoulder area,
this is a powerful punch which can strike your opponent from a side angle. Initiate the hook by pulling your arm slightly
down, then lift it up and around. Midway through the punch, your fist and elbow should be parallel to the floor. The power
of the hook is then released straight into the side of the jaw or into the torso region of your opponent. It’s important to note that
your fist should be perpendicular to the ftoor when you contact The Man - with your finger tips curled into a fist facing your body.
KEY ELEMENTS
• The rotation on a hook comes from the shoulder and torso as your elbow comes out and around.
• As you are throwing the hook, remember it is important to power the movement with your entire upper body.
• As you contact The Man, your elbow and fist are parallel to the floor. Your fingertips are facing your body, while your knuckles are your point of
contact.
When the hook is executed properly, the muscles worked include the shoulders, arms, chest, upper back, abdominals, hips and legs.
THE UPPER CUT
The Upper Cut can also be executed with either the right or left arm. This punch is generally used to strike your opponent under the jaw or in the rib
cage area.
Assume the basic boxer stance with knees slightly bent. Starting with your
arms in the Pyramid position, pull one arm slightly down, then power it straight
back up into Slam Man. In order to maximize full range of motion, the shoulder
and hip of your lead side should dip slightly downward in order to allow maximum propulsion upward as the punch is thrown. As you are throwing the upper
cut, think of your body as a spring that retracts tightly down and then explodes
forcefully up into your target. Keep your elbow and fist tight into your rib cage
as you pull your arm down. As you release the upper cut, the fist and elbow
are in a vertical position driving straight up into your strike area. Let your lower
arm rotate slightly so that the inside of your fist (your palm) is facing your body
when you make contact.
KEY ELEMENTS
• The upper cut is designed to use the entire body. The power originates in your legs, moves up through the body and explodes through the
upward movement of your fist and elbow.
• Your hip is used in a pivotal manner, helping to add additional power to the upward momentum of the punch.
• It is important to keep the elbow and fist close to the body as you wind into the punch.
When the upper cut is executed properly, the muscles worked include the shoulders, arms, chest, upper back, abdominals, hips, legs
and calves.
Customer Service
1 866 498 5269
[email protected]
MODEL NO. 8913TM
THE
FOOTWORK
After you are comfortable with all of the punches, begin adding footwork and torso movements to your
workouts. Boxing footwork is low-impact cardio that will increase the intensity of your workout while
challenging your coordination and balance. Torso movements will help strengthen and stabilize your
abdominal and back muscles.
SLIPPING OR DUCKING
Slipping or ducking punches helps a boxer
avoid getting hit. These lower body and foot
movements will strengthen and tone your
hips and legs, and help improve balance and
coordination. Begin in the basic boxer stance.
Start the movement by bending your knees, then roll
your body to the left and straighten back up. Reverse
back to the other side by again, bending at the knees and
rolling your body back to the right. Think of this as a
“sweeping-U” motion. Bending from the hips and knees is critical
in order to execute good slipping technique.
KEY ELEMENTS
• Remember to bend at the knees rather than the waist. Your upper body should always remain upright.
• Always keep your eyes on The Man. Watching your opponent is a defensive technique that will help you avoid getting punched.
• As you are slipping, visualize a punch coming at you and think of“ducking” under it.
LATERAL SLIPPING
Lateral slipping is another form of slipping and dodging punches. Begin in the basic boxer
stance. Start the movement by bending your knees slightly, then flex your upper body from
side to side. The feet remain in place while you move your upper body sideways. This would
enable you to avoid your opponent’s punches if you were in a real fight. This movement works
your abdominals very effectively as well as the hips and legs.
KEY ELEMENTS
• Lateral slipping is a relatively small movement. Do not excessively flex the torso from
side to side.
• Stay at a 3/4 angle facing The Man, with your lead leg forward.
• Keep your knees bent as you move your upper body.
GENERAL BOXING TIPS & TECHNIQUES
Review the following tips and techniques each time you work out withThe Man:
• Never hyperextend the elbow joint. When punching, you should never fully straighten the arm. Aim for about 95% extension.
• When punching, contact the target on your The Man with your index finger knuckle and middle finger knuckle.
• Punches must be retracted as quickly as they are thrown. Throwing the punch is only half of the movement.
• The power of your punch can be increased by using the strength of your entire body. Your abs, shoulders, hips and legs will add extra intensity and
momentum to your punch delivery.
• As any punch is being thrown, you must always keep the other fist in the Pyramid position to protect your face.
• Never bring your feet together when punching. Keeping your feet separated, with your weight evenly distributed, will give you better balance and
agility.
• Position yourself approximately an arms distance from The Man. This distance will allow you full range of motion on each punch without
hyperextending the elbow.
• You may want to play music while boxing with The Man. Suggested tempo is 128-134 beats per minute.
• You can learn a lot about boxing technique by watching fights on television.
Customer Service
1 866 498 5269
[email protected]
MODEL NO. 8913TM
13
14
THE MONITOR
THE MAN ELECTRONIC UNIT OPERATING INSTRUCTIONS:
PROGRAM DESCRIPTION
Eight lights are lit in a specific 15 count sequence dependent on the program selected. Each routine will repeat the same sequence of lights for a specific routine at any level until interrupted or time expires. The Levels
l & 2 will define the time intervals the lights will follow. Level 3 speed is controlled by the internal sensor triggered
by the user.
FUNCTIONS:
1. TIME: From 0.00 - 99.59
2. PUNCHES: From 0 - 9999
3. LEVEL MODE: Level l, Level 2, and Level 3 are shown by three LED lights in the middle of right side.
4. ROUTINE PROGRAMS: I, II, III, IV, V (Random). Five programs are shown by five LED lights
in the middle of the left side.
OPERATIONS:
1. Press any button to activate monitor.
2. Press MODE button to select 3 modes: Program, Level & Timer. A flashing LED indicates the Active mode.
3. In Program mode: Press
buttons to scroll to desired program. There are five routine programs: I, II, III, IV, V.
4. Press MODE button to scroll to next mode: Level Mode. In Level Mode: press
buttons to desired level of
difficulty.
There are Three Levels:
Level 1 (Beginner Program): Lights are lit for 0.5 seconds; 15 light sequence repeats continuously until time expires or Start/Stop button is pressed.
Level 2 (Intermediate Program): Lights are lit for 0.3 seconds; 15 light sequence repeats continuously until time expires or Start/Stop button is pressed.
Level 3 (Advanced Program): Each light remains lit until punched. This level will keep score for you.
(See chart provided on page 27 for you to record your scores.)
5. Press MODE button to scroll to next mode. Timer mode. In Timer Mode: Press
buttons to select amount of time
for routine. The timer will only increase or decrease by minutes, not seconds.
6. Press START /STOP button to begin 15 punch routine based on program selected. Routine repeats until interrupted by Start/Stop button or
countdown timer has expired.
7. At any time, user may press
buttons to scroll through performance information, number of punches, and time elapsed.
8. Press START /STOP button to pause current routine or to select new routine. Please follow the above steps 2 through 6.
9. Computer shuts off automatically if no buttons are pressed for 60 seconds.
RESET: Press and hold MODE button for 4 seconds to reset.
KEEPING SCORE: After the timer starts or game begins, press
button to automatically display the number of punches. Note: The monitor
will automatically shut off after 60 seconds of inactivity to the boxing unit.
Troubleshooting:
Problem
Possible Solution
LCD Cannot display or does not clear
Make sure the batteries are installed properly or replace with new
batteries.
Computer does not activate as signal is input.
Make sure the 15-pin jack is connected properly.
Turn the switch to OFF and ON again.
Static Electricity
If you generate a lot of static electricity during your workout, it is best
to keep your gloves on when you turn off the monitor.
In Level 3 - One punch and many lights go out.
Check your sensor. You may have it adjusted to bee too sensitive.
Customer Service
1 866 498 5269
[email protected]
MODEL NO. 8913TM
15
THE
WORKOUT
WORKING OUT WITH THE MAN
Once you have assembled your The Man and practiced the punches and footwork, you are ready for a
workout! After warming up, program your electronics unit as described in the previous operating instructions. Begin with Program I, level 7 and an 18 minute time segment. (By setting your total boxing workout
time at the start, you will avoid having to frequently remove a glove to reset your electronics unit.) This 18
minute time segment will give you a total of 3 “rounds” of boxing. A round is a 3 minute segment of punching, followed by a 3 minute segment of cardio (aerobic) movement.
Round l/Punching:
Press the “start” button. After 3 - 4 long beeps, the target lights on The Man begin to flash, and coincide with a
shorter beeping sound. Direct a punch at each light as it flashes. Use the diagram on the next page to help you
determine which punches will best target the different locations on The Man’s body. You will notice that there is a
15-light sequence that repeats over and over with each program. Once you have memorized the sequence for Program
I and are able to anticipate where the next light will flash , you are ready to move to Level 2 or Level 3 which speeds up
the punching sequence and makes your workout more challenging. (Remember, each program uses a different sequence
of flashing lights.) Continue punching the targets on The Man for 3 minutes. Your timer will count down backwards from the 18
minute start time. When your timer shows “15 minutes ,” you are ready for a 3 minute “cardio workout.’’ This cardio workout will give
your arms a break from punching, but will keep you burning fat and calories.
Round l /Cardio:
During this 3 minutes it is important to keep your feet moving. The on-line video will show you many ideas that you can choose from. You may practice slipping and ducking punches (imagine The Man is fighting back now!) or slide side-to-side. Grab an imaginary jump rope and jump or shuffle
like a boxer. If you like, keep your upper body moving by “air boxing.” This means that you can practice your punches and footwork without actually
contacting The Man. When your timer shows that you have 12 minutes left, it’s time for Round Two.
Round 2 and Round 3:
Continue as before, with 3 minutes of punching and 3 minutes of cardio work. You will get in 3 rounds of boxing in this workout. When your timer runs
out, make sure you cool down and stretch.
HOW TO PROGRESS
You have many choices to progress your The Man workouts:
1. Stay with the same program and increase the speed of your punching by
moving to Level 2 or 3.
2. Stay with the same program and level, but increase the duration of your
workout. Increase program time in 6 minute increments (for a 3 minute punching
segment and a 3 minute cardio segment).
3. Change your program. You can choose from 4 programs that use repeating
15-light sequences, or a “random” program. When learning a new program, begin
with Level 1 punching speed until that program sequence is comfortable.
4. Vary the punching and cardio time within your workout. Once you set your
total program time, you can vary the amount of time in each round. You may want
to increase your punching time (4 minutes punching/2 minutes cardio per round)
or your cardio time (2 minutes punching/4 minutes cardio per round).
5. Change programs with each round. This means that you will need to set your
timer for 6 minutes only. After completing that round, remove a glove and re-set
to the new program, level and time for that round. You can manipulate the level,
the program and the time for each round.
How To Choose Your Punches
For each target on your The Man, some punches will be more
effective than others. Use the diagram shown here to become
familiar with the target locations and suggested punches.
Customer Service
1 866 498 5269
[email protected]
MODEL NO. 8913TM
16
THE
WORKOUT
COMBINING PUNCHES
Boxers commonly use combinations of punches. These combinations allow you to string 3 - 4 punches
together quickly. Certain punching movements sequence well with other punches. After getting comfortable with each individual punch described earlier in this manual, practice these following sequences or
combinations.
*Note: Learn all sequences on both sides of the body. In the combinations below, L = Left and R = Right.
These combinations are set up to be performed in the Orthodox position, with your left foot and left shoulder
forward. Once you are comfortable with these combinations, place your right foot and right shoulder forward in
the Southpaw position. Reverse the “L’’ or “R” instructions on all punches.
Combination 1: L Jab, L Jab, R Power Punch
Combination 2: L Jab, R Power Punch, L Hook
Combination 3: L Upper Cut, R Upper Cut, L Hook
Combination 4: L Jab, L Jab, R Power Punch, L Upper Cut
Combination 5: L Jab, R Power Punch, L Upper Cut, R Upper Cut
Combination 6: L Jab, L Jab, R Power Punch, L Hook
SAMPLE ROUTINE
This sample routine will help you to learn the sequence of flashing lights used in Program L and to practice a series of punches that could be used
with this program. Remember, there are many ways you can sequence punches in each program. This workout will teach you one, 15 punch sequence. After you get comfortable with this routine, you can use different punches whenever you like.
Begin with your left foot and left shoulder forward (this is the Orthodox position). Place your hands in Pyramid position.
*Note: Once you have learned Program I in the Orthodox position, change sides to a Southpaw position and reverse all of the left/right directions
below.
Flashing Light Sequence
1. Left eye
2. Right eye
3. Center abdomen
4. Left eye
5. Left eye
6. Right eye
7. Left eye
8. Mouth
9. Left eye
10. Left eye
11. Center abdomen
12. Right upper rib
13. Center abdomen
14. Left upper rib
15. Mouth
Customer Service
1 866 498 5269
Corresponding Punches
Left jab
Right power punch
Left jab
Left jab
Left jab
Right power punch
Left jab
Right power punch
Left jab
Left jab
Right power punch
Right upper cut
Left upper cut
Right upper cut
Right hook
[email protected]
MODEL NO. 8913TM
17
CARE & STORAGE
The Man has been carefully designed to require minimum maintenance. To ensure this, we
recommend that you do the following:
• Keep your The Man clean by wiping sweat, dust or other residue
off with a soft. clean cloth after each use.
• Set up and store your The Man in an area away from children
and high traffic areas.
THE
REST...
EXERCISE GUIDELINES
If you are just starting an exercise program, choose a time of day that’s good for you and then stick closely to
it. Try to do your The Man workout three times per week at first, and then gradually progress to four or five days
a week. Choose a time when you feel energetic, when there are few interruptions, and when you have not eaten a
heavy meal for approximately two hours.
Before working out with your The Man, it is important to practice your workout until you are familiar and comfortable with the
boxing punches and footwork. Once you have learned all of the exercises, you are ready to begin learning the different boxing
routines that are programmed into your The Man.
MOTIVATIONAL TIPS
Keep your motivation and interest high by remembering these simple tips:
• Set Goals For Yourself that are challenging but realistic. Remember, it may take a few weeks to be able to complete the entire workout easily, or
to see changes in your weight or fitness level. Just five minutes of exercise, done several times per day, can change your health. Break your overall
goals down into small, measurable steps.
• Monitor Your Progress by using the charts provided at the end of this booklet.
• Celebrate Your Successes - even the small ones! Give yourself incentives for reaching each of your goals, and reward yourself often.
• Take Setbacks In Stride. If you miss a day on your schedule (or even a week), it’s not too late to get back on track. If you are having trouble sticking
to your goals, review them and make sure they are realistic.
Make adjustments as you think they are needed.
WORKOUT PROGRESS CHARTS
On the following pages, you will find exercise progress charts where you can keep track of your workouts and general fitness level.
Use these charts to keep track of your progress over time. Before writing on them, make as many copies as you think you’ll need. We suggest you
keep these in a notebook. You will find it both informative and motivational to look back at what you’ve accomplished, and this data will help you to
chart future fitness goals as you progress.
Customer Service
1 866 498 5269
[email protected]
MODEL NO. 8913TM
Update This Chart Weekly
Date
Customer Service
Weight
Chest
1 866 498 5269
Waist
[email protected]
Hips
Resting HR
MODEL NO. 8913TM
Update This Chart Daily
Date
Length of
Workout
Customer Service
The Man
Scores
1 866 498 5269
Date
Length of
Workout
[email protected]
The Man
Scores
MODEL NO. 8913TM
CARE AND
MAINTENANCE
The Man is designed to be very low maintenance. To ensure this, we recommend that you do the
following:
• Keep The Man clean by wiping sweat, dust or other residue off with a soft. clean cloth after each use.
• Set up and store The Man in an area away from children and high traffic areas.
• Do not store outdoors or in areas exposed to extreme temperatures and/or high humidity.
• Do not store The Man in locations where it will be exposed to long periods of sunlight.
• When storing The Man for extended periods of time, it is recommended that the batteries be removed from
the monitor.
• Never mix battery types or mix old and new batteries.
• Keep away from open flame and bodies of water.
• Alway ensure the base is properly filled before beginning a workout.
FREQUENTLY
ASKED
QUESTIONS
Question: “On Level 3, when I throw one punch, many lights
go out. What is going on?”
Answer: CHECK YOUR SENSOR. YOU MAY HAVE IT ADJUSTED TO BE TOO SENSITIVE.
Question: “The Monitor does not activate/turn on, what should
I do?”
Answer: MAKE SURE THAT THE 15-PIN JACK IS CONNECTED PROPERLY. TURN THE
SWITCH TO OFF, AND THE BACK TO THE ON POSITION.
Question: “I had a part missing from my box” or “something
was damaged in shipping, can you send it to me?”
Answer: IF IT HAS BEEN 30 DAYS OR LESS FROM THE DATE OF YOUR INITIAL
PURCHASE, YOU CAN CONTACT CUSTOMER SERVICE (info below) FOR A REPLACEMENT
PART TO BE ISSUED.
Telephone: 866-498-5269 (9am-5pm, M-F)
Fax: 561-833-1996
Customer Service
1 866 498 5269
[email protected]
MODEL NO. 8913TM