1
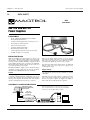
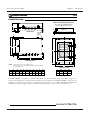
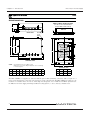
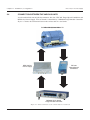
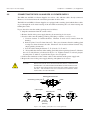
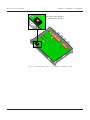
DES Series Power Supply User’s Manual While every precaution has been exercised in the compilation of this document to ensure the accuracy of its contents, Magtrol assumes no responsibility for errors or omissions. Additionally, no liability is assumed for any damages that may result from the use of the information contained within this publication. COPYRIGHT Copyright ©2009 Magtrol, Inc. All rights reserved. Copying or reproduction of all or any part of the contents of this manual without the express permission of Magtrol is strictly prohibited. First Edition English – September 2009 Revisions To This Manual The contents of this manual are subject to change without prior notice. Should revisions be necessary, updates to all Magtrol User’s Manuals can be found at Magtrol’s web site at www.magtrol.com/support/manuals.htm. Please compare the date of this manual with the revision date on the web site, then refer to the manual’s Table of Revisions for any changes/updates that have been made since this edition.. TABLE OF REVISIONS DATE EDITION September 2009 First Edition English CHANGES - i SECTION Table of Contents REVISIONS TO THIS MANUAL.................................................................................................................I TABLE OF REVISIONS........................................................................................................................................................I TABLE OF CONTENTS............................................................................................................................II TABLE OF FIGURES......................................................................................................................................................... III PREFACE................................................................................................................................................ IV PURPOSE OF THIS MANUAL......................................................................................................................................... IV WHO SHOULD USE THIS MANUAL.............................................................................................................................. IV MANUAL ORGANIZATION............................................................................................................................................. IV SYMBOLS USED IN THIS MANUAL............................................................................................................................... V 1. INTRODUCTION..................................................................................................................................1 1.1 GENERAL INFORMATION......................................................................................................................................... 1 1.2 DATA SHEET................................................................................................................................................................. 2 2. INSTALLATION / CONFIGURATION...................................................................................................6 2.1 GENERAL DESCRIPTION.......................................................................................................................................... 6 2.2 MOUNTING WITHOUT COOLING............................................................................................................................ 7 2.3 MOUNTING WITH COOLING PLATE (OPTIONAL) .............................................................................................. 8 2.4 CONNECTION BETWEEN THE VARIOUS UNITS................................................................................................ 10 2.5 CONNECTING THE DES 310 AND DES 311 POWER SUPPLY............................................................................ 11 2.6 CONFIGURATION OF THE DES 310 POWER SUPPLY......................................................................................... 12 2.6.1 Selection of the power supply voltage........................................................................................................... 12 2.6.2 Fuses............................................................................................................................................................... 14 2.6.3 Connecting the DES 310 to the magtrol DSP6001 programmable controller............................................... 15 2.7 CONFIGURATION OF THE DES 311 POWER SUPPLY......................................................................................... 17 2.7.1 Selection of the power supply voltage........................................................................................................... 17 2.7.2 Fuses............................................................................................................................................................... 18 2.7.3 Connecting the DES 311 to the magtrol DSP6001 programmable controller............................................... 19 3. CALIBRATION...................................................................................................................................21 3.1 SAFETY MEASURES................................................................................................................................................. 21 3.2 DES 310 POWER SUPPLY ADJUSTMENT ELEMENTS........................................................................................ 22 3.2.1 solder bridge FT1 - FT2................................................................................................................................ 23 3.2.2 Bridge X18..................................................................................................................................................... 23 3.2.3 Solder points X17, X19 and X20................................................................................................................... 23 3.2.4 Potentiometer RV1 (offset)............................................................................................................................ 23 3.2.5 Potentiometer RV2 (gain).............................................................................................................................. 23 3.3 DES 311 POWER SUPPLY ADJUSTMENT ELEMENTS........................................................................................ 24 3.3.1 Soldering bridge FT3 - FT4........................................................................................................................... 25 3.3.2 Bridge X18..................................................................................................................................................... 25 3.3.3 Soldering points X15, X16 and X17............................................................................................................. 25 3.3.4 Potentiometer RV1 (offset)............................................................................................................................ 25 3.3.5 Potentiometer RV2 (gain).............................................................................................................................. 25 3.4 ADJUSTMENT OF OFFSET AND GAIN . ............................................................................................................... 26 ii Power supply unit Magtrol DES Table of contents 4. REPAIR..............................................................................................................................................27 4.1 REPAIR........................................................................................................................................................................ 27 SERVICE INFORMATION.......................................................................................................................28 RETURNING MAGTROL EQUIPMENT FOR REPAIR AND/OR CALIBRATION...................................................... 28 Returning Equipment to Magtrol, Inc. (United States)................................................................................................ 28 Returning Equipment to Magtrol SA (Switzerland)..................................................................................................... 28 TABLE OF FIGURES 2. INSTALLATION / CONFIGURATION Figure 2–1 Dimensions of DES 310 and DES 311 case....................................................................................................6 Figure 2–2 DES 310 Power Supply mounted to the table of a test bench without cooling.................................................7 Figure 2–3 Cooling Plate (P/N 234-311-900-011).............................................................................................................8 Figure 2–4 DES 311 Power Supply with cooling plate mounted to the test bench table....................................................9 Figure 2–5 Connection between the various units in a test bench ..................................................................................10 Figure 2–6 Stuffing gland (Overview and separated).......................................................................................................11 Figure 2–7 Position of the voltage selector SW1 on the DES 310 circuit.........................................................................13 Figure 2–8 Location of the fuses and the earth terminal on the DES 310 circuit............................................................14 Figure 2–9 Connection of the DES 310 Power Supply to the Magtrol DSP Programmable Controller..........................16 Figure 2–10 Location of the SW1 selector switch on the DES 311 circuit.......................................................................17 Figure 2–11 Location of the fuses and earth terminal on the DES 311 circuit................................................................18 Figure 2–12 Connection of the DES 311 Power Supply to the Magtrol DSP Programmable Controller........................20 3. CALIBRATION Figure 3–1 Location of the adjustment elements on the DES 310 circuit.........................................................................22 Figure 3–2 Location of the adjustment element on the DES 311 circuit..........................................................................24 iii Preface PURPOSE OF THIS MANUAL This manual has all the necessary information regarding the installation, connection and use of Magtrol's DES 310 and 311 Power Supply. To achieve maximum capability and ensure proper use of the system, please read this manual in its entirety before operating. Keep the manual in a safe place for quick reference whenever a question should arise. WHO SHOULD USE THIS MANUAL This manual is for users who want to install and use the Magtrol DES 310 and 311 Power Supply on a dynamometer test bench. The user should have suitable technical training in mechanics and electronics in order to install and use this load monitoring unit without risk. MANUAL ORGANIZATION This section gives an overview of the structure of the manual and the information contained within it. Some information has been deliberately repeated in different sections of the document to minimize cross-referencing and to facilitate understanding through reiteration. Summary of the different chapters : Chapter 1: INTRODUCTION – Contains the technical data sheet for the DES 310 and DES 311 Power Supply and gives its technical characteristics as well as a brief overview of the application fields. Chapter 2: INSTALLATION / CONFIGURATION – Contains the mounting and configuration instructions for the DES 310 and DES 311 Power Supply, the dynamometer and the DSP6001 Programmable Controller. Chapter 3: CALIBRATION – Provides detailed instructions for the adjustment of the gain and the zero of the current delivered by the power supply. Chapter 4: REPAIR – Provides information on returning the unit to Magtrol for repair. iv Preface Power supply unit Magtrol DES SYMBOLS USED IN THIS MANUAL The following symbols and type styles may be used in this manual to highlight certain parts of the text: Note: This is intended to draw the operator’s attention to complementary information or advice relating to the subject being treated. It introduces information enabling the correct and optimal function of the product. Caution:This is used to draw the operator’s attention to information, directives, procedures, etc. which, if ignored, may result in damage to the material being used. The associated text describes the necessary precautions to take and the consequences that may arise if these precautions are ignored. WARNING! THIS INTRODUCES DIRECTIVES, PROCEDURES, PRECAUTIONARY MEASURES, ETC. WHICH MUST BE EXECUTED OR FOLLOWED WITH THE UTMOST CARE AND ATTENTION, OTHERWISE THE PERSONAL SAFETY OF THE OPERATOR OR THIRD PARTY MAY BE AT RISK. THE READER MUST ABSOLUTELY TAKE NOTE OF THE ACCOMPANYING TEXT, AND ACT UPON IT , BEFORE PROCEEDING FURTHER. v 1. Introduction 1.1 GENERAL INFORMATION The Model DES 310 and 311 Power Supplies are designed for use with Magtrol's Eddy-Current and Powder Brake Dynamometers. The DES 310 and DES 311 supply the current to the coils of the brake within the dynamometer. They are controlled by an electronic peripheral, the Magtrol DSP6001 High Speed Programmable Controller. 1 Chapter 1 – Introduction 1.2 DES 310/311 Power Supply DATA SHEET M AGTROL DES Data Sheet DES 310 and DES 311 Power Supplies Features • • • • • • • • ForusewithMagtrolWBEddy-CurrentandPB PowderBrakeDynamometers Controlledcurrentsupply,withovervoltagefactor>5 Analoginputforcurrentset-point Selectionofnominalcurrent Controlbydigitalinputs/outputs Generalalarmprovidedbyrelay 2alarmoutputs(temperatureandelectricalcircuit) Availableineither115or230VAC DesCrIPtION DES 310 and DES 311 Power Supplies are suited to the entire range of Magtrol’s Eddy-current and powder brake dynamometers.Toavoidanydisruptionofthesurrounding electronicmodules,theDES310/DES311suppliesarefitted in an industrial housing made of extruded cast aluminium. Thishousingmustbeinstalleddirectlyonthetestbench,as closetothedynamometeraspossible. TheDES310/DES311suppliescanbecontrolledbyanalog anddigitalset-pointscomingfromanelectronicperipheral, ideallyfromtheDSP6001DynamometerController. Control ThePowersuppliescanbeswitchedonbyremotecontrol. Astand-bycommandallowsthedynamometerpowertobe activated.Theexcitationcurrentiscontrolledbyaset-pointin therangeof0to10VDC.Thenominalvalueoftheexcitation currentisadjustablebyinternalresistorsorremotely. Therearetwodigitaloutputs(alarms):oneisanelectrical faultindicatorandtheotherdetectsoverheatingintheDES unitorthecoolingwater.Ifoneofthealarmsisactivated,a generalalarmissignalledbymeansofrelaycontacts. Forapplicationswithtandemdynamometers,theDES310/ DES 311 units also control the power supply of the electromagneticclutch. Supply Voltage The supply voltage of the DES 310/DES 311 can be selectedtoallowoperationateither230VACor115VAC (50/60Hz). TheDES310powersupplyincludesagalvanicseparation between the supply circuit and the dynamometer power. Becauseofthepowerrequired,thesupplytotheDES311 unitismadedirectlywithoutgalvanicseparation. sYsteM CONFIGuratION Eddy-Current (WB) OR Powder Brake (PB) Dynamometer Speed This drawing illustrates a complete motor test system. A basic test stand can also be configured with just a WB/PB Dynamometer and the DES 31X Power Supply. TSC 401 Torque-Speed Conditioner GPIB or RS-232 PC M-TEST Torque DES 31X POWER SUPPLY Excitation DSP6001 Dynamometer Controller www.magtrol.com 2 Chapter 1 – Introduction DES 310/311 Power Supply Specifications DES DIMeNsIONs DES 311 Water Cooling System (For all 15 series Dynamometers except 1 WB 15 and 1 PB 15) K M DES 311 Q FRONT VIEW J Mounting Screw M6×30 H FRONT VIEW D F C P E B A OVERHEAD VIEW NOTE: Original dimensions are in Metric units. Dimensions converted to English units have been rounded up to 2 decimal places. A B C D E F H J K N OVERHEAD VIEW M N mm 287 272 190 175 ≈16 ≈218 12 10 90 27 in 11.30 10.71 7.48 6.89 0.63 8.58 0.47 0.39 3.54 1.06 mm in P 200 290 7.87 11.42 Q 15 0.59 The DES 310/DES 311 supplies are delivered with integrated cables (including connectors) with a length of 1.5 metersonthedynamometerconnectionsideand5metersonthecontrollerside.TheDES310/DES311unitsaretobe mountedonametallicsurfaceinordertoallowampleheatdissipation.For3–4WB15and4PB15dynamometers, theDES311/131PowerSupplywithintegratedWaterCoolingSystem(see above drawing)shouldbeused. M AGTROL 3 Chapter 1 – Introduction DES 310/311 Power Supply Specifications DES DIMeNsIONs DES 311 Water Cooling System (For all 15 series Dynamometers except 1 WB 15 and 1 PB 15) K M DES 311 Q FRONT VIEW J Mounting Screw M6×30 H FRONT VIEW D F C P E B A OVERHEAD VIEW NOTE: Original dimensions are in Metric units. Dimensions converted to English units have been rounded up to 2 decimal places. A B C D E F H J K N OVERHEAD VIEW M N mm 287 272 190 175 ≈16 ≈218 12 10 90 27 in 11.30 10.71 7.48 6.89 0.63 8.58 0.47 0.39 3.54 1.06 mm in P 200 290 7.87 11.42 Q 15 0.59 The DES 310/DES 311 supplies are delivered with integrated cables (including connectors) with a length of 1.5 metersonthedynamometerconnectionsideand5metersonthecontrollerside.TheDES310/DES311unitsaretobe mountedonametallicsurfaceinordertoallowampleheatdissipation.For3–4WB15and4PB15dynamometers, theDES311/131PowerSupplywithintegratedWaterCoolingSystem(see above drawing)shouldbeused. M AGTROL 4 Chapter 1 – Introduction DES 310/311 Power Supply Specifications DES BlOCk DIaGraM Feedback Current Selection of Nominal Current Excitation Circuit Primary Supply Circuit Excitation Current Control Excitation Control Electrical Alarm Excitation Temp. Control Interface Differential Clutch Control Control Inputs/Outputs Fuse Network Filter + 24 VDC Excitation Current Temperature Alarm Clutch Electrical Alarm Stand-by Primary Supply Control General Alarm Control Input Excitation Set-point Dynamometer Temp. Clutch Supply Inputs/Outputs OPtIONs aND OrDerING INFOrMatION IftheDESisorderedseparately(fromthedynamometer),itisabsolutelynecessarytospecifywhichmodelofEddy-current/ powderbrakewillbeusedwiththepowersupplyinordertolimittheoperatingcurrentandpreventpossibledamagetothe dynamometerbrake.Powervoltage(115VACor230VAC)shouldalsobedefinedwhenordering. DESCRIPTION Power Supply for WB/PB 2.7 and 43 Dynamometers MODEL PART NUMBER DES 310/111 234-310-000-111 Power Supply for WB/PB 65, 115, 1 PB 15 and 1 WB 15 Dynamometers DES 311/121 234-311-000-121 Power Supply with Water Cooling Plate for 3, 4 WB 15 and 4 PB 15 Dynamometers DES 311/131 234-311-000-131 NOTE: AllDES31XPowerSuppliesincludethecorrespondingdynamometerconnectioncables. Due to the continual development of our products, we reserve the right to modify specifications without forewarning. MaGtrOl INC 70 Gardenville Parkway Buffalo, New York 14224 USA Phone: +1 716 668 5555 Fax: +1 716 668 8705 E-mail: [email protected] MaGtrOl sa Centre technologique Montena 1728 Rossens / Fribourg, Switzerland Phone: +41 (0)26 407 3000 Fax: +41 (0)26 407 3001 E-mail: [email protected] 5 Subsidiaries in: Great Britain Germany • France China • India Worldwide Network of Sales Agents DES-US 03/06 www.magtrol.com 2. Installation / Configuration GENERAL DESCRIPTION The housing of the power supply must be electrically and thermally connected to the metal frame of the test bench to allow heat dissipation. The test bench as well as it's structure must be connected to earth (ground). The dimensions necessary for mounting the housing of the power supply are provided in Figure 2-1. The data sheet provides all other dimensions necessary for the installation of the power supply. The housing of the DES 310 and DES 311 has four holes for mounting and includes the necessary four M6 × 30 hexagon socket head fixing screws. To reach the mounting holes, it is necessary to remove six screws from the cover of the power supply. Once the unit is installed and calibrated, for safety reasons, it is necessary to replace and secure the cover of the power supply. 287 mm 190 mm 90 mm 2.1 Figure 2–1 Dimensions of DES 310 and DES 311 case 6 Chapter 2 – Installation / Configuration DES 310/311 Power Supply 2.2 MOUNTING WITHOUT COOLING For a DES 310 Power Supply producing an excitation current of less than 5 A (dynamometer models 1 WB/PB 15 and lower), the natural cooling of the housing is sufficient to dissipate the heat produced. The power supply can be mounted on a support fixed to the table or directly to the test bench. An example of such mounting is given in Figure 2-2. Test bench Housing Support Housing of the DES 310 Power Supply Figure 2–2 DES 310 Power Supply mounted to the table of a test bench without cooling 7 Chapter 2 – Installation / Configuration 2.3 DES 310/311 Power Supply MOUNTING WITH COOLING PLATE (OPTIONAL) For a DES 311 Power Supply producing an excitation current greater than 5 A (dynamometer models 2 WB/PB 15 and larger), the heat produced is such that for it to dissipate it is necessary to place the unit on a water cooled plate (see Figure 2-3). Another solution is to mount the DES 311 on a metal plate having minimal dimensions of 500 mm × 500 mm × 2 mm. It is necessary to mill holes in the metal plate for the feet of the unit so that the bottom of the DES is in contact with the plate and not the feet. This plate can then be mounted to the test bench table. It is advised to use heat sink compound to improve the thermal conduction. In both cases, the power supply is fixed to the cooling plate, which will be then assembled on a support interdependent of the frame or directly on the test bench. An example of assembly is given in Figure 2-4. The flow of water in the cooling plate must be equal to 30 l/h. The water pressure should not be less than 0.05 bar. Furthermore, the pressure difference between the inlet and outlet of the cooling plate should not exceed 1.5 bar. DES 311 Figure 2–3 Cooling Plate (P/N 234-311-900-011) 8 Cooling Plate Chapter 2 – Installation / Configuration DES 310/311 Power Supply Test bench Cooling plate Cover of the DES 311 Power Supply Figure 2–4 DES 311 Power Supply with cooling plate mounted to the test bench table 9 Chapter 2 – Installation / Configuration 2.4 DES 310/311 Power Supply CONNECTION BETWEEN THE VARIOUS UNITS A test bench includes not only the dynamometer, but also a TSC 401 Torque/Speed Conditioner and DES Series Power Supply. The test bench is controlled by a DSP6001 Programmable Controller. Figure 2-5 shows the connection between the various units in a test bench. or PB Dynamometer FreinWB dynamométrique WB ou PB DESUnité 310/311 Power Supply d'alimentation DES TSC 401 Conditionneur Torque/Speed de couple et deConditioner vitesse TSC DSP6001 High Speed Contrôleur de freins DSP Programmable Controller Figure 2–5 Connection between the various units in a test bench 10 Chapter 2 – Installation / Configuration DES 310/311 Power Supply 2.5 CONNECTING THE DES 310 AND DES 311 POWER SUPPLY The DES 310 and DES 311 Power Supplies are sold as a kit, with the cables already connected. However, it is useful to know the connection procedure for these units. The DES 310 and DES 311 Power Supplies are equipped with a stuffing gland which allows cables to pass through the wall of the housing of the unit while maintaining the seal of the housing and holding the cables. To pass the cables into the stuffing gland proceed as follows: 1. Strip the conductors from the various cables. 2. Remove the lid of the power supply housing by unscrewing its six screws. 3. Pass the cables into the stuffing gland by proceeding as follows (see Figure 2-6): a. Unscrew element Counterclockwise. Element must not be removed from the housing. b. Remove joints and from element . These two elements allow the stuffing gland to adapt to various diameters of cable. Element Can be removed from element by simply pushing it outwards. c. Pass the cables through elements , (if used), , and . d. Reassemble the elements of the stuffing gland and, before replacing element , lubricate the seal with silicone as indicated in Figure 2–6. Tighten element so that it projects beyond joints and/or to provide the degree of seal required. 4. Connect the conductors of the various cables to the terminals of the power supply unit. 5. Replace the cover of the power supply housing and tighten its six screws. Caution :Do not damage the seals with sharp edged objects. check that no foreign body can slide between the elements of the stuffing gland. de-grease the surface of the cable that will come in contact with the seal. the stuffing gland seal cannot be guaranteed if these instructions are not followed. Stuffing gland mounted Overflowing of the joint Cable Top Internal joint External joint Grease the frontal part only Oring Figure 2–6 Stuffing gland (Overview and separated) 11 Down Chapter 2 – Installation / Configuration 2.6 DES 310/311 Power Supply CONFIGURATION OF THE DES 310 POWER SUPPLY The configuration of the DES 310 Power Supply requires the selection of the power supply voltage, the selection of fuses according to the dynamometer model and the connection of the various units included in the test bench. 2.6.1 Selection of the power supply voltage Caution : the selection of the power supply voltage must be made before the des 310 power supply is switched on. the unit could be damaged if the incorrect voltage is selected. Selector switch SW1, located on the DES 310 circuit (see Figure 2-7), enables the choice of one of the two following supply voltages: • 115 V AC ±10 % (50 Hz / 60 Hz) • 230 V AC ±10 % (50 Hz / 60 Hz) 12 Chapter 2 – Installation / Configuration DES 310/311 Power Supply SW1 The value of the voltage is registered on the selector. P1 P3 P2 P1 Figure 2–7 Position of the voltage selector SW1 on the DES 310 circuit 13 Chapter 2 – Installation / Configuration 2.6.2 DES 310/311 Power Supply Fuses As shown in Figure 2–8, the DES 310 Power Supply has three fuses: • FU1 • FU2 • FU3 The contact SW2 and SW3 must be closed to allow the DSP to control the primary supply circuit of the DES 310. FU3 SW3 SW2 FU2 FU1 P4 P3 P2 P1 Figure 2–8 Location of the fuses and the earth terminal on the DES 310 circuit. 14 Chapter 2 – Installation / Configuration DES 310/311 Power Supply The FU1 fuse is used to protect the transformer, its value is T4A. Fuse FU2 and FU3 is used to protect the supply unit circuit. Their values are determined as a function of the nominal excitation current and shown in the table below: Dynamometer type Nominal energizing current Supply voltage V AC WB PB A 1 WB 2.7 2 WB 2.7 1 WB 43 1 PB 2.7 2 PB 2.7 1 PB 43 ≤1A 3 WB 2.7 4 WB 2.7 2 WB 43 4 PB 2.7 2 PB 43 >1A Caution: Fuses value FU2 and FU3 115 T2A 230 T1A 115 T2A 230 T2A make sure the fuse value is correct. the unit is no longer protected when the value of one or all of the fuses is too high. however, the fuses are likely to blow prematurely if their value is not sufficient. 2.6.3 Connecting the DES 310 to the magtrol DSP6001 programmable controller The DES 310 Power Supply should be connected to the dynamometer and the DSP6001 controller according to Figure 2-9. The position of the terminals and the SW2 and SW3 contacts on the DES 310 circuit is shown in Figure 2-8. WARNING! THE DES 310 POWER SUPPLY MUST ALWAYS BE GROUNDED. MAKE SURE THE DES 310 IS TURNED OFF AND DISCONNECTED FROM THE CONTROLLER BEFORE REMOVING THE HOUSING COVER. THE USER OR A THIRD PARTY COULD BE SERIOUSLY OR EVEN FATALLY INJURED IF THESE WARNINGS ARE IGNORED. 15 Chapter 2 – Installation / Configuration DES 310/311 Power Supply Earth ground Terminal group P3 5 4 3 2 1 Excitation + Shield Excitation Dynamometer B temp. Dynamometer A temp. 5 4 3 2 1 Main supply WB/PB 2.7 and 43 Dynamometer Electromagnetic Coupling Terminal group P4 Neutral AC Phase AC Phase Coupling Neutral Coupling Earth ground brown blue Transformer yellow/green red blue green white black Alarm switch N/C rose Terminal group P1 10 9 8 7 6 5 4 3 2 1 Current set point 0 V Current set point signal Stand-by Temperature alarm Coupling Electronic alarm Primary supply control 0 V digital Shield Shield Cooler alarm green white brown DSP6001 Controller Terminal group P2 5 4 3 2 1 Main alarm “ON” Main alarm “OFF” Main alarm 0V +24 V yellow black grey red blue black/yellow Figure 2–9 Connection of the DES 310 Power Supply to the Magtrol DSP Programmable Controller 16 Chapter 2 – Installation / Configuration DES 310/311 Power Supply 2.7 CONFIGURATION OF THE DES 311 POWER SUPPLY The configuration of the DES 311 Power Supply requires the selection of the power supply voltage, the selection of fuses according to the dynamometer model and the connection of the various units included in the test bench. 2.7.1 Selection of the power supply voltage The selection of the power supply voltage must be made before the DES 311 is turned on. Caution: the selection of the power supply voltage must be made before the des 311 power supply is switched on. the unit could be damaged if the incorrect voltage is selected. The SW1 selector switch, located on the DES 311 circuit (see Figure 2-10), enables the choice of one of the two following supply voltages: • 115 V AC ±15 % (50 Hz / 60 Hz) • 230 V AC ±15 % (50 Hz / 60 Hz) SW1 Position the selector switch The value of the tension is so the required supply registered on the selector. voltage is displayed (value marked on the switch). P4 P3 P2 P1 Figure 2–10 Location of the SW1 selector switch on the DES 311 circuit. 17 Chapter 2 – Installation / Configuration 2.7.2 DES 310/311 Power Supply Fuses The DES 311 Power Supply has the following two fuses (see Figure 2-11): • FU1 • FU2 The contact SW2 and SW3 must be closed to allow the DSP to control the primary supply circuit of DES 311. FU2 SW3 FU1 SW2 P4 P3 P2 P1 Figure 2–11 Location of the fuses and earth terminal on the DES 311 circuit 18 Chapter 2 – Installation / Configuration DES 310/311 Power Supply These fuses are used to protect the power supply circuit. Their values are determined as a function of the nominal excitation current and shown in the table below: Dynamometer type WB Supply voltage A V AC PB 1 WB 65 1 PB 65 1 WB 115 1 PB 115 ≤3A 2 WB 65 2 PB 65 2 WB 115 2 PB 115 1 WB 15 1 PB 15 3A>I≤8A 2 WB 15 3 WB 15 4 WB 15 Nominal energizing current 2 PB 15 4 PB 15 Caution: >8A Fuses value FU2 and FU3 115 T4A 230 T2A 115 T8A 230 T4A 115 T12.5A 230 T8A make sure the fuse value is correct. the unit is no longer protected when the value of one or all of the fuses is too high. however, the fuses are likely to blow prematurely if their value is not sufficient. 2.7.3 Connecting the DES 311 to the magtrol DSP6001 programmable controller The DES 311 Power Supply should be connected to the dynamometer and the DSP6001 controller according to Figure 2-12. The position of the terminals and the SW2 and SW3 contacts on the DES 311 circuit is shown in Figure 2-11. DANGER! THE DES 311 POWER SUPPLY MUST ALWAYS BE GROUNDED. MAKE SURE THE DES 311 IS TURNED OFF AND DISCONNECTED FROM THE CONTROLLER BEFORE REMOVING THE HOUSING COVER. THE USER OR A THIRD PARTY COULD BE SERIOUSLY OR EVEN FATALLY INJURED IF THESE WARNINGS ARE IGNORED. 19 Chapter 2 – Installation / Configuration DES 310/311 Power Supply Earth Ground Terminal group P3 5 4 3 2 1 Excitation + Excitation + Shield Excitation Excitation Dynamometer C Temp. Dynamometer B Temp. Dynamometer A Temp. 8 7 6 5 4 3 2 1 Main Supply brown blue Transformer yellow/green 6 5 4 D A B C 3 2 1 WB/PB 65, 115 and 15 Electromagnetic Coupling Dynamometer Terminal Group P4 Neutral AC Phase AC Phase Coupling Neutral Coupling Earth Ground black Alarm Switch N/C rose Terminal Group P1 Current Set Point 0 V Current Set Point Signal Stand-by Temperature Alarm Coupling Electronic Alarm Reserve Reserve Primary Supply Control 0 V digital Shield Shield 12 11 10 9 8 7 6 5 4 3 2 1 Cooler Alarm green white brown yellow DSP6001 Controller Terminal Group P2 5 4 3 2 1 Main Alarm “ON” Main Alarm “OFF” Main Alarm 0V +24 V black gray red blue black/yellow Figure 2–12 Connection of the DES 311 Power Supply to the Magtrol DSP Programmable Controller 20 3. Calibration When the DES 310 or 311 Power Supply is purchased as part of a complete motor test system it is calibrated by Magtrol according to the dynamometer with which it will be used. The procedure described in this chapter applies when one power supply is used for several different dynamometers or when the power supply must be replaced. This procedure can also be used to check the value of the nominal excitation current (gain) and the quiescent current (offset). 3.1 SAFETY MEASURES The DES 310 and DES 311 power supplies are connected to a 115 or 230 V AC source. They also deliver currents which can exceed 8 A. It is important to heed the following security measures during the use of these devices: • Wear shoes with insulating soles. • Wear gloves. • Work with tools fitted with an insulating sleeve. • Work on an insulated mat with a minimal thickness of 20 mm. WARNING! THE USER OR A THIRD PARTY COULD BE SERIOUSLY OR EVEN FATALLY INJURED IF THESE WARNINGS ARE IGNORED. 21 Chapter 3 – Calibration 3.2 DES 310/311 Power Supply DES 310 POWER SUPPLY ADJUSTMENT ELEMENTS Figure 3–1 shows the location of the adjustment elements on the DES 310 circuit. X20 X18 RV1 X19 RV2 X17 FT2 FT1 Figure 3–1 Location of the adjustment elements on the DES 310 circuit 22 Chapter 3 – Calibration DES 310/311 Power Supply 3.2.1 solder bridge FT1 - FT2 Soldering a resistor to this bridge enables the gain of the power supply to be roughly adjusted. The resistor values are shown in following table: Dynamometer type 3.2.2 Nominal energizing current Adjustment resistance WB PB A kW 1 WB 2.7 1 PB 2.7 0.5 0 2 WB 2.7 1 WB 43 2 PB 2.7 1 PB 43 1.0 0.75 3 WB 2.7 — 1.5 1.74 4 WB 2.7 2 WB 43 4 PB 2.7 2 PB 43 2.0 2.80 Bridge X18 To obtain a nominal excitation current of 0.5 A, the adjustment resistor should be equal to zero. This operation is carried out by locating the X18 on its support. 3.2.3 Solder points X17, X19 and X20 The rough adjustment of the gain can be done from outside the power supply (remote adjustment) by soldering one end of a cable to points X17, X19 and X20 and the other to an external adjustment resistor (0.25 W). The cable should have two conductors and shielding, the latter being connected to point X19 and the other two conductors to points X17 and X20. 3.2.4 Potentiometer RV1 (offset) This potentiometer allows precise adjustment of the quiescent current (zero adjustment). 3.2.5 Potentiometer RV2 (gain) This potentiometer allows the precise adjustment of the nominal excitation current (adjustment range: ±2%). 23 Chapter 3 – Calibration 3.3 DES 310/311 Power Supply DES 311 POWER SUPPLY ADJUSTMENT ELEMENTS Figure 3–2 shows the location of the adjustment elements on the DES 311 circuit. FT3 X17 RV2 X16 RV1 X18 FT4 X15 Figure 3–2 Location of the adjustment element on the DES 311 circuit. 24 Chapter 3 – Calibration DES 310/311 Power Supply 3.3.1 Soldering bridge FT3 - FT4 Soldering a resistor to this bridge enables the gain of the power supply to be roughly adjusted. The resistor values are shown in following table: Dynamometer type Nominal energizing current Adjustment resistance A kΩ 1 WB 65 1 PB 65 1 WB 115 1 PB 115 2.5 0 1 WB 15 4.0 0.5 2 WB 65 2 PB 65 2 WB 115 2 PB 115 5.0 0.5 2 WB 15 7.5 1.8 10.0 3.5 12.0 3.5 WB PB 1 PB 15 2 PB 15 3 WB 15 4 WB 15 3.3.2 — 4 PB 15 Bridge X18 To obtain a nominal excitation current of 2.5 A, the adjustment resistor should be equal to zero. This operation is carried out by locating the X18 on its support. 3.3.3 Soldering points X15, X16 and X17 The rough adjustment of the gain can be done from outside the power supply (remote adjustment) by soldering one end of a cable to points X15, X16 and X17 and the other to an external adjustment resistor (0.25 W). The cable should have two conductors and shielding, the latter being connected to point X16 and the other two conductors to points X15 and X17. 3.3.4 Potentiometer RV1 (offset) This potentiometer allows precise adjustment of the quiescent current (zero adjustment). 3.3.5 Potentiometer RV2 (gain) This potentiometer allows the precise adjustment of the nominal excitation current (adjustment range: ±2%). 25 Chapter 3 – Calibration 3.4 DES 310/311 Power Supply ADJUSTMENT OF OFFSET AND GAIN Note : The adjustment procedure is identical for both the DES 310 and DES 311 power supply. The adjustment procedure should be carried out with the power supply connected to the dynamometer and turned on: 1. Unplug the AC power to the DES 310 or DES 311 Power Supply. 2. Remove the cover of the power supply housing. 3. Check that the value of the fuses corresponds to the excitation current to be adjusted. 4. Solder the resistor corresponding to the nominal excitation current to the bridge FT1-FT2 (see Figures 3-1 and 3-2). 5. Connect a DC ammeter to the excitation line. 6. Check that the contacts SW2 and SW3 are open. 7. Reapply the AC power to the DES 310 or DES 311 Power Supply. 8. Switch on the DSP6001 Programmable Controller. 9. Adjust the potentiometer RV1 (adjustment of the offset) so that the DC ammeter displays a current equal to zero (turn the potentiometer clockwise starting from a current value >0). 10. Set the excitation set-point to 100 %, 10 V DC, by following the procedure described in the DSP6001 Programmable Controller manual. 11. Adjust the potentiometer RV2 (adjustment of the gain) so that the DC ammeter displays the nominal value of the excitation current. 12. Unplug the AC power from the DES 310 or DES 311 Power Supply, and switch off the DSP6001. 13. Disconnect the DC ammeter from the excitation line. 14. Replace the cover of the power supply housing and tighten the screws. 15. Reapply the AC power to the DES 310 or DES 311 Power Supply. 26 4. Repair 4.1 REPAIR In case of a defect, please refer to the warranty information at the back of this manual. Whether you are directed to ship your equipment to Magtrol. Inc. in the United States or Magtrol SA in Switzerland, it is very important to include the following information with your return shipment: • Model number, part number, serial number, order number and date of acquisition • Description of the defect and the conditions in which it appeared • Description of the test bench (drawing, photographs, sketches, etc.) • Description of the tested object (drawing, photographs, sketches, etc.) • Description of the test cycle To allow Magtrol to complete the work in the best possible time, carefully pack the power supply and follow the procedure outlined here when returning your equipment for repair. Note : Do not hesitate to contact the Magtrol sales department for further information. 27 Service Information RETURNING MAGTROL EQUIPMENT FOR REPAIR AND/OR CALIBRATION Before returning equipment to Magtrol for repair and/or calibration, please visit Magtrol’s Web site at http://www.magtrol.com/support/rma.htm to begin the Return Material Authorization (RMA) process. Depending on where the equipment is located and which unit(s) will be returned, you will be directed to either ship your equipment back to Magtrol, Inc. in the United States or Magtrol SA in Switzerland. Returning Equipment to Magtrol, Inc. (United States) When returning equipment to Magtrol, Inc.’s factory in the United States for repair and/or calibration, a completed Return Material Authorization (RMA) form is required. 1. Visit Magtrol’s Web site at http://www.magtrol.com/support/rma.htm to begin the RMA process. 2. Complete the RMA form online and submit. 3. An RMA number will be issued to you via e-mail. Include this number on all return documentation. 4. Ship your equipment to: MAGTROL, INC. 70 Gardenville Parkway Buffalo, NY 14224 Attn: Repair Department 5. After Magtrol’s Repair Department receives and analyzes your equipment, a quotation listing all the necessary parts and labor costs, if any, will be faxed or e-mailed to you. 6. After receiving your repair estimate, provide Magtrol with a P.O. number as soon as possible. A purchase order confirming the cost quoted is required before your equipment can be returned. Returning Equipment to Magtrol SA (Switzerland) If you are directed to ship your equipment to Switzerland, no RMA form/number is required. Just send your equipment directly to Magtrol SA in Switzerland and follow these shipment instructions: 1. Ship your equipment to: MAGTROL SA After Sales Service Route de Montena 77 1728 Rossens / Fribourg Switzerland VAT No: 485 572 2. 3. 4. Please use our forwarder : TNT • 1-800-558-5555 • Account No 154033 Only ship ECONOMIC way (3 days max. within Europe) Include the following documents with your equipment: • Delivery note with Magtrol SA’s address (as listed above) • Three pro forma invoices with: • Your VAT number • Value - for customs purposes only • Description of returned goods • Origin of the goods (in general, Switzerland) • Noticed failures A cost estimate for repair will be sent to you as soon as the goods have been analyzed. If the repair charges do not exceed 25% the price of a new unit, the repair or calibration will be completed without requiring prior customer authorization. 28 Testing, Measurement and Control of Torque-Speed-Power • Load-Force-Weight • Tension • Displacement MAGTROL INC 70 Gardenville Parkway Buffalo, New York 14224 USA Phone: +1 716 668 5555 Fax: +1 716 668 8705 E-mail: [email protected] MAGTROL SA Route de Montena 77 1728 Rossens / Fribourg, Switzerland Phone: +41 (0)26 407 3000 Fax: +41 (0)26 407 3001 E-mail: [email protected] www.magtrol.com Subsidiaries in: Germany • France China • India Worldwide Network of Sales Agents