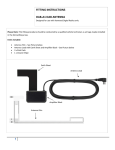
1
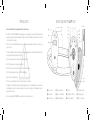
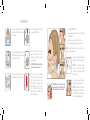
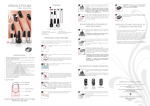
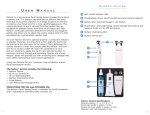
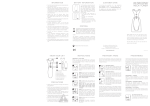
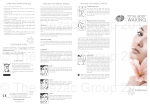
user guide ® www.riobeauty.com UK Rio, Dezac and PROLIFT are trademarks of The Dezac Group Ltd © The Dezac Group Ltd 2011 Manufactured by The Dezac Group Ltd, PO Box 17, Cheltenham, England GL53 7ET 1-IN-TFAC-UK/1.1 PROLIFT If you have any questions, or if you experience any difficulties please call our Rio Careline on: 01242 702345 or email us at: [email protected] IN TR OD U C T I ON PROLIFT ™ 1-IN-TFAC-UK/1.1 Rio PROLIFT helps to reverse the signs of aging with a muscle toning and conditioning face lift. It uses gentle electronic stimulation, known as EMS, to exercise the facial muscles, enabling you to relax while it does all the work. KNO W YO UR RIO PRO LIF T UNIT 2 5 5 3 6 8 4 9 2 M @ 3 • Do NOT use on areas of skin with disorders such as rosacea, pustular acne, abraded skin, sensitive skin, or over scars, moles or varicose veins. OFF/DOWN 3 1 ON/UP 2 • This device should NOT be used in the following cases: benign and malignant tumours, haemorrhages, inflammations of the skin, open and fresh wounds, bruises or broken skin. O • We do NOT recommend Rio PROLIFT to be used by people who are: pregnant, have a pacemaker, suffer from high or low blood pressure, epilepsy, heart problems, diabetes, multiple sclerosis, skin related illnesses, under the influence of alcohol or recovering from recent surgery. SIDE VIEW 7 4 1 RC O • Please read all instructions thoroughly and retain for future reference. I P RE C AU T I ONS 4 RC • Stop use and consult your doctor if you experience discomfort during use. • Do NOT put the pads over any conductive body jewellery. • Do NOT stick the electrodes to each other. Do NOT touch the pads with hands. • Do NOT use while bathing or in a shower. Do NOT use while driving. • Keep out of reach of children and pets. 0 • NOT for the use on children under the age of 14, a helpless person or on an animal. • This appliance is not intended for use by persons with reduced physical, sensory or mental capabilities, or lack of experience and knowledge, unless they have been given supervision or instruction concerning use of the appliance by a person responsible for their safety. • We recommend using the Rio PROLIFT for a maximum of 20 minutes in total per session. 2 ! 1 Remote control 4 Unit off / mode down 7 LEDs 1-4 0 Left headset controller 2 Mode change 5 Remote control indicator 8 Right headset controller ! Detachable gel pad 3 Unit on / mode up 6 Adjustable headband 9 Battery compartment @ Remote control switch 3 F A R A D I C FAC I AL T ONI NG BATTERY INFO RMATIO N Practised for over 40 years in beauty salons, faradic facial toning uses EMS (Electro-Muscle Stimulation) to activate the nerves which control the facial muscles. The pulses gently contract and relax the facial muscles to help tone, lift and tighten. The pulses generated mimic natural nerve signals to exercise the facial muscles. This stimulation also increases local circulation, bringing more oxygen to the skin cells and encourages the removal of toxins from the skin, to leave the skin feeling refreshed and rejuvenated. The main muscles that your Rio PROLIFT will work are shown below. INSERTING THE HEADSET CONTROL BATTERIES Always replace both the left and right headset batteries at the same time. 3 2 RC + 3 2 RC RC + Cell Lithium032 CR2 BUCCINATOR Presses teeth together. Facilitates blowing, sucking and whistling actions and assists with chewing. ORBICULARIS ORIS Sometimes known as the kissing muscle because it is used to pucker the lips. LEVATOR ANGULI ORIS Lifts corners of the mouth to form a smile. DEPRESSOR ANGULI ORIS and DEPRESSOR LABII INFERIORIS Affects facial expression by effecting tiny movements around the lower lip and mouth. PLATYSMA Draws lower lip downward and to the side Used in expressions of sadness or fright. MENTALIS Lifts and wrinkles skin of chin and protrudes lower lip. 4 4 1 3V + Cell Lithium032 CR2 3V 3V 3V 3 2 4 1 + Lithium Cell CR2025 Cell Lithium032 CR2 3V MASSETER Works to open and close the mouth. 4 + Cell Lithium032 CR2 1 3 1 RC NASALIS Used to twitch the nose and flare the nostrils. ZYGOMATICUS MINOR and ZYGOMATICUS MAJOR and LEVATOR LABII SUPERIOR Work together to control the upper lip, so is very important for lots of expressions such as smiling and sneering. 2 When using for the first time, remove the battery case covers on both the right and left headset controls, insert CR2032 batteries into each case with the “+” polarity facing up, then close each battery cover. 2 4 1 ORBICULARIS OCULI Closes the eyelid for sleeping, blinking and winking. CHANGING THE REMOTE CONTROL BATTERY Open the battery compartment: 1. Slide the lever to the left. 2. Pull the compartment out. Insert a CR2025 battery into the tray with the “+” polarity facing up, then close, ensuring that the compartment clicks shut. •If the unit is left unused for a long period of time, remove the batteries to prolong their life. NOTE: There are two locking tabs on the battery cover,both need to be aligned with the slots in the headset before sliding the cover back into place. Push the cover down gently when sliding back into place. • Do NOT use rechargeable batteries. • Please ensure that the batteries are disposed of in the correct manner in accordance with local authority requirements. It must NOT be disposed of with household waste. NOTE: LED 1 will illuminate when the batteries are inserted, pressing the OFF/DOWN button will turn the unit off. • Keep lithium batteries out of reach of children and pets at all times. 5 MO DE SELECTIO N HAND Y T I PS To begin with, the pulses give a mild tingling sensation and as the intensity is increased you will notice muscle contractions. The muscle contractions are smooth and each will start with a slow rise, hold in a contracted position for a few seconds and then gently relax. We recommend starting a low intensity until you get used to the sensation, then building up until muscle contractions are felt. Your teeth may feel slightly sensitive during treatment, this is perfectly normal, for comfort it is advised that you try not to clench your teeth when using the unit. MODE A B C D E F APPEARANCE 2 1 3 2 4 RC 1 3 2 4 RC 3 2 4 1 RC 1 3 2 4 RC 1 3 2 4 RC 1 3 4 RC Effective face toning and firming is based on light and gentle exercise of the facial muscles. Should you experience any discomfort, reduce the intensity by pressing the OFF/DOWN button, or remove the unit from your face. R IO P R OLIFT MOD E S LED DISPLAY LED 1 flashes LED 2 flashes LEDs 1 & 2 flash LED 3 flashes LED 4 flashes LED 3 & 4 flash For best results we recommend using the Rio PROLIFT for 20 minutes every day for the first few weeks, alternating between modes A to C each day. There after, use as required to maintain good tone. Modes D to F can be used for a more varied workout. As a beginner you should always use the mode and intensity that feels comfortable. Best results are achieved by varying the modes used. MODE TYPE Tap toning Firming Enhancement Enhancement & toning Toning, firming & enhancement Deep toning Quick tapping action. Rhythmic contractions with a short interval between each pulse. Long contractions of 3 seconds then resting for 2 seconds. A combination of modes B & C. Operates three different modes: A, B & C. Continuous contractions. • A single press of the M on the remote control (or the MODE buttons on the headset controls), switches from the current mode to the next sequentially. • In each mode the programme will run for 10 minutes. 6 • With every change to the programme mode the unit will revert to the lowest intensity level. • When the device is turned off, the previous mode is saved for future use. MODE FEATURES 7 TR EAT MENT 1. Tie any loose hair back from the face and wash the skin where the pads are to be placed. 2 3 4 1 4. Activate each headset control unit by pressing the ON/UP button. 7. POSITIONING THE HEADSET a. a. 1 Grip the headband where it meets the control unit and hold behind the neck. 2 3 b. Slide the headset around the sides of the neck. 4 RC RC c. b. 1 3 IN JAW L 3 4 RC 8. Increase the intensity level by pressing the ON/UP button, until you feel a tingle. 2 4 1 2 RC c. 4 6. From this point on we recommend using the remote control to change the mode and intensity. Switch the RC switch on the side of the right headset control unit into the ON ( I ) position. The remote control indicator light on the headset control will illuminate orange. NE 3 IMPORTANT: Ensure that both sides have the same mode selected. 3.Remove the protective plastic pad backings, retain and replace after use. 8 RC RC O C HEEK B 2 4 4 E M ON/UP 3 OFF/DOWN 4 2 3 NOTE: You may find it useful to use a mirror to ensure the headset is correctly positioned 1 2 1 5.Press the MODE button on each headset control unit, to select your required mode (see Mode Selection chart on page 7). 1 E N O 3 ON/UP OW RC O MOD 2 OFF/D 2. Connect the gel pads firmly to the right and left headset control units, ensuring that they ‘click’ into place. I RC 1 Lift over the jawline and place below the cheek bone. RC NOTE: If you are using the headset controls you must press the ON/ UP buttons on both the left and right headset controls. 9. You may need to adjust the position slightly to find the best contact point. IMPORTANT: Do not overstretch or pull the headset down over the head, as this will put undue stress on the headset. 2 3 1 RC 9 4 NOTE: It is important to note that when adjusting the position of the headset if contact with the skin is broken for about 25 seconds the unit will turn itself off. T R E A T M ENT C ONT I NU ED . . . 10. The intensity can be increased to level 10 by pressing the ON/UP button. M M ON/UP 13. To turn off the unit press the OFF/DOWN button on the remote control or headset controls until the pulses stop. ON/UP OFF/DOWN OFF/DOWN RC O O 11. To decrease the intensity simply press the OFF/DOWN button. M NO PULSE WEAK PULSE • Low intensity - Increase by pressing the ON/UP button. • No battery installed - Insert batteries. • Low battery - Replace with new batteries - always replace left and right batteries at the same time. • Wrong battery polarity - Follow the instructions on page 5. • Low battery - Replace with new batteries - always replace left and right batteries at the same time. 14. Ensure that the remote control switch is in the OFF ( O ) position to avoid wearing the batteries down. • Aged gel pads - Replace the gel pads. RED SKIN AREA AFTER USE • Over use - Reduce duration and/or frequency of use. LED NOT FUNCTIONING CORRECTLY • Circuit not working properly - Remove battery for 1 minute. Then replace battery and try unit again. • Damaged or dried pad - Dampen the gel with a very small amount of water. If this does not work replace gel pads. • Low battery - Replace with new batteries. LOOSE ATTACHMENT OF THE PADS • The pads are worn out - Replace pads. OFF/DOWN I ON/UP TRO UBLESHO O TING UNIT MAINTENANCE M ON/UP OFF/DOWN 12. Change the mode by pressing the M button on the remote control or alternatively by pressing the MODE button on the headset controls (with use of a mirror). 15. After use replace the transparent plastic gel pad backings. • Keep the transparent plastic pad backings and always replace after use. Note: If the unit is not used for a long period of time, it is advised that you remove the batteries until future use. • Avoid touching the gel side of the pads as this will reduce the adhesiveness of the surface. • Gel pads last for approximately seven uses. • If the unit is left unused for a long period of time, remove the batteries to prolong their life. • Do NOT dissemble or repair. There are no user serviceable parts inside the unit. If you have any problems using the product, contact our Customer Care Department. • You can prolong the life of the adhesive surface of the pads by applying a small amount of water to the gel. 10 11 GE N E R A L IN F OR M A T ION SPECIFICATIONS • It is advised that you store the Rio PROLIFT in its box in a safe place away from sharp objects. • The unit may be cleaned by wiping with a damp cloth. Do NOT use solvents or detergents. • Do NOT immerse the unit in water. • If the unit is damaged do not use it. Power supply: DC 3V / CR2032 Current Consumption 25 mA Power supply: DC 3V / CR2025 Current Consumption 25 mA Output Frequency: 2~100HZ Battery Life: 48 hours use on average Output Frequency: 2~100HZ Battery Life: 74 hours use on average DISPOSAL • Do NOT use near to shortwave or microwave equipment. The Waste of Electrical and Electronic Equipment (WEEE) Directive (2002/96/EC) has been put in place to recycle products using best available recovery and recycling techniques to minimise the impact on the environment, treat any hazardous substances and avoid the increasing landfill. C U ST OM E R C A R E If you have any questions, or if you experience any difficulties with this product, please call our Rio Careline on 01242 702345 or email us at: [email protected] The product is classed as Electrical or Electronic equipment so please ensure that at the end of the life of this product it is disposed of in the correct manner in accordance with local authority requirements. It must NOT be disposed of with household waste. To register your two year guarantee online visit: www.riobeauty.com/warranty_online.htm 12