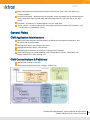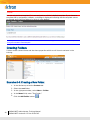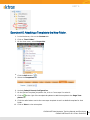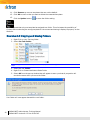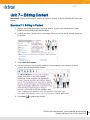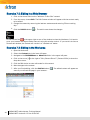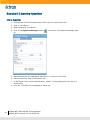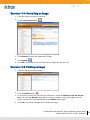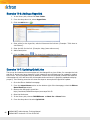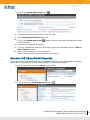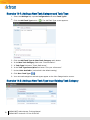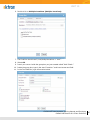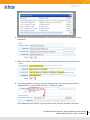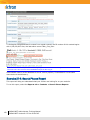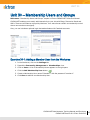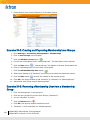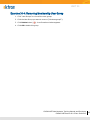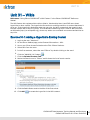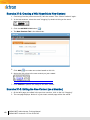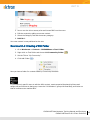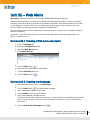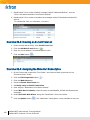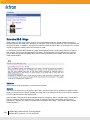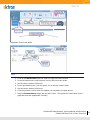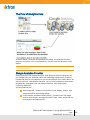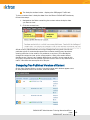
1
CMS400.NET Administrator Training Manual and Exercises
CMS400.NET Version 8.0.2
20101215
CMS400.NET Administrator Training Manual and Exercises
(Doc: Thursday, January 27, 2011)
CMS400.NET
Version 8.0.2
Ektron, Inc.
542 Amherst St.
Nashua, NH 03063
Tel: +1 603-594-0249
Fax: +1 603-594-0258
Email: [email protected]
http://www.ektron.com
© 2010 Ektron, Inc. All rights reserved.
For the latest version Ektron Documents
http://www.ektron.com/documentation
Trademarks
Ektron, the Ektron logo and eIntranet, are trademarks of Ektron Inc.
Other company and product names may be trademarks of their respective owners.
Table of Contents
Table of Contents
3
DAY 1 OBJECTIVES
12
Unit 1 — Basics of a CMS400.NET Web Site
13
CMS400.NET Page Structure
Static vs. Dynamic Web Pages
Sample Template
Templates
Types of Content
Terms
General Roles
CMS Application Administrators
CMS Content Authors & Publishers
Unit 2 — General Administration
13
13
14
14
14
14
15
15
15
17
System Architecture
Installing CMS400.net
The Site Setup Utility
License Keys
Catalog & Database Names
Security Considerations before a site is “live”
Error Logging
Developing on a Local Machine
Site Diagnostics
Information Architecture
Content Inventory
Folder Structure
Taxonomy
Organizing with Metadata
Using Smart Forms
Content and Site Analytics
Using Analytics Data within Ektron CMS400.NET
Google Analytics Provider
Unit 3 — The Workarea
17
17
17
17
17
17
17
18
18
18
18
18
18
19
19
19
19
20
23
Logging into the CMS Workarea
Smart Desktop
How to Personalize the Smart Desktop
Adding a Widget into the Smart Desktop
Adding a Tab to the Smart Desktop
Adding Columns
Restoring Tabs and Widgets
Setting the Default Widgets
Unit 4 — Setup and Configurations
23
23
24
25
26
27
27
28
29
Configuration
29
CMS400.NET Administrator Training Manual and Exercises
CMS400.NET Version 8.0.2
3
Active Directory
Web Alerts
Search
Discussion Boards
URL Aliasing
Personalization
Asset Server Setup
Custom Properties
Fonts
Integrated Search Folder
Indexing Services
Language Settings
Load Balancing
Metadata Definitions
Setup
Smart Form Configurations
Synchronization
Task Types
Template Configuration
Setup
Accessing the Setup Area
License Keys
Module Key
Default Application Language
Maximum Summary Size
System E-Mail Address
System Notifications
Asynchronous Processor Location
Publish in other format
Library Folder Creation
Built In User
Editor Options
Work Page Size / Landing Page
Enable Verify E-mail
Pre-approval Group
System Reset
Unit 5 — Help Systems and Documents
Documentation found in the workarea
Online Context Sensitive Help
Unit 6 — Templates and Folders
Adding Templates to the CMS
Exercise 6-1: Adding a New Template reference.
Exercise 6-2: Updating a Template reference.
Exercise 6-3: Deleting a Template reference.
Creating Folders
Exercise 6-4: Creating a New Folder.
Exercise 6-5: Attaching a Template to the New Folder.
Exercise 6-6: Copying and Moving Folders
4
CMS400.NET Administrator Training Manual and Exercises
CMS400.NET Version 8.0.2
29
29
29
29
29
30
30
30
30
30
30
30
30
31
31
31
31
31
31
32
32
32
32
33
33
33
33
34
34
34
34
34
34
35
35
35
35
37
37
37
39
39
39
39
39
40
40
41
42
Unit 7 — Editing Content
43
Exercise 7-1: Editing in Context
Exercise 7-2: Editing in a Web Browser
Exercise 7-3: Editing in the Workarea
Unit 8 — Adding Content
43
44
44
45
Creating HTML Content
Exercise 8-1: Creating Content in the Workarea.
Exercise 8-2: Applying Styles to Content
Exercise 8-3: Inserting Hyperlinks
Exercise 8-4: Adding a Table
Exercise 8-5: Inserting an Image
Exercise 8-6: Uploading and Inserting an Image
Exercise 8-7: Previewing Content
Adding Other Information to Content
Exercise 8-8: Adding Summary Information
Exercise 8-9: Adding Metadata
Exercise 8-10: Content Scheduling
Exercise 8-11: Adding Comments to Content
Exercise 8-12: Creating Content in another language
Unit 9 — Adding Content to a ListSummary
45
45
47
48
52
52
54
55
56
56
57
58
58
59
61
Exercise 9-1: Creating New Content in a ListSummary
Unit 10 — Adding Images & Hyperlinks to the Library
61
63
Exercise 10-1: Adding an Image
Exercise 10-2: Editing Image Properties
Exercise 10-3: Link Search
Exercise 10-4: Overwriting an Image
Exercise 10-5: Deleting an Image
Exercise 10-6: Adding a Hyperlink
Exercise 10-7: Updating QuickLinks
Exercise 10-8: Library Folder Properties
63
63
64
65
65
66
66
67
Unit 11 — Adding & Creating DMS Content
69
Exercise 11-1: Adding DMS Through the Menu
Exercise 11-2: Mapping a Network Drive to the CMS folders
70
70
Unit 12 — Restoring Content from its History
73
Exercise 12-1: Restoring in the Workarea
Exercise 12-2: Restoring in a Web Browser
Exercise 12-3: Purging the History
Unit 13 — Copying / Moving Content
73
74
74
75
Exercise 13-1: Copying Content
Exercise 13-2: Moving Content
Unit 14 — Using Tasks
75
76
77
CMS400.NET Administrator Training Manual and Exercises
CMS400.NET Version 8.0.2
5
Exercise 14-1: Adding a New Task Category and Task Type
Exercise 14-2: Adding a New Task Type to an Existing Task Category
Exercise 14-3: Creating Tasks for a Content Item
Exercise 14-4: Creating General Tasks
Exercise 14-5: Adding Comment & Changing State on a Task
78
78
79
80
80
Unit 15 — Creating and Assigning a Smart Form
81
Exercise 15-1: Creating a Smart Form
Exercise 15-2: Using a Plain Text Field
Exercise 15-3: Using a Choices Field
Exercise 15-4: Using a Check Box
Exercise 15-5: Using Relevance
Exercise 15-6: Relevance Check
Exercise 15-7: Using a Calendar Field
Exercise 15-8: Using a Rich Area Field
Exercise 15-9: Adding a Smart Form to the Folder Properties
81
82
82
84
85
88
88
88
91
DAY 2 OBJECTIVES
93
Unit 16 — Creating and Assigning Metadata Definitions
Exercise 16-1: Creating a Metadata Definition
Exercise 16-2: Assigning a Metadata Definition to a Folder
Exercise 16-3: Assigning a Metadata Definition to Content
Unit 17 — Creating a URL Alias for Content
Exercise 17-1: Enabling URL Aliasing
Exercise 17-2: Configuring Manual URL Aliasing
Exercise 17-3: Configuring Automatic URL Aliasing (Folder type)
Exercise 17-4: Configuring RegEx URL Aliasing
Exercise 17-5: Configuring Community URL Aliasing
Unit 18 — Users, Groups and Roles
95
95
96
96
97
97
98
99
100
102
105
Exercise 18-1: Adding a User
Exercise 18-2: Deleting a User
Exercise 18-3: Updating User Information
Exercise 18-4: Adding Custom Properties
Exercise 18-5: Creating & Populating User Groups
Exercise 18-6: Assigning a Role to a User
Exercise 18-7: Removing a Role Assigned to a User
106
107
108
108
109
109
110
Unit 19 — Setting Folder Permissions
111
Exercise 19-1: Setting Folder Permissions
Exercise 19-2: Making Content Private
Unit 20 — Content Approval Chains
Exercise 20-1: Setting up an Approval Chain
6
CMS400.NET Administrator Training Manual and Exercises
CMS400.NET Version 8.0.2
111
112
113
113
Exercise 20-2: Approving, Declining and Publishing Content (Smart Desktop)
Exercise 20-3: Approving, Declining and Publishing Content (E-mail Link)
Exercise 20-4: Deleting an Approval Chain
Unit 21 — Search
Exercise 21-1: Synonyms
Exercise 21-2: Suggested Results
Exercise 21-3: Integrated Search
Exercise 21-4: Search Phrase Report
Unit 22 — Taxonomy
Exercise 22-1: Taxonomy
Exercise 22-2: Assigning Content Items to Taxonomy Categories
Exercise 22-3: Assigning a Taxonomy Category to a Content Item
Exercise 22-4: Copying and moving a Taxonomy Category
Unit 23 — Creating Folder Breadcrumbs
Exercise 23-1: Changing a Breadcrumb
Exercise 23-2: Adding Another Level to a Breadcrumb
Exercise 23-3: Site Map from the Breadcrumb Settings
Unit 24 — Menus
Exercise 24-1: Adding a content item to a Menu
Exercise 24-2: Creating a Menu
Exercise 24-3: Adding an External Hyperlink
Exercise 24-4: Adding a Sub Menu
Exercise 24-5: Editing a Menu Item
Exercise 24-6: Reordering Menu Items
Exercise 24-7: Deleting a Menu Item
Exercise 24-8: Deleting a Menu
Unit 25 — Collections
Exercise 25-1: Creating a Collection
Exercise 25-2: Adding Items to a Collection
Exercise 25-3: Removing Items from a Collection
Exercise 25-4: Reordering Collection Items
Unit 26 — Business Rules
Exercise 26-1: How a business rule works (query string example)
Exercise 26-2: How to Set/Read Cookies with Business Rules
Unit 27 — Content Rating and Reviews
Exercise 27-1: Entering a Content Rating on the Web Page
Exercise 27-2: Viewing the Content Rating Report
Unit 28 — Content Flagging
Exercise 28-1: Creating Flagging Definitions
114
114
115
117
117
117
119
120
123
123
124
125
127
129
129
130
130
133
133
133
134
134
135
135
136
136
137
137
137
138
138
139
139
139
143
143
143
145
145
CMS400.NET Administrator Training Manual and Exercises
CMS400.NET Version 8.0.2
7
Exercise 28-2: Edit a Flagging Definition
Exercise 28-3: Assigning a Flagging Definition to a Folder
Exercise 28-4: Viewing Flagged Content
Exercise 28-5: Deleting a Flagging Definition
Unit 29 — Tags and Tag Cloud
Exercise 29-1: Adding Default Group Tags
Creating User-Created Tags
Managing Tags
Tag Cloud
145
146
146
147
149
149
149
149
150
DAY 3 OBJECTIVES
151
Unit 30 — Membership Users and Groups
153
Exercise 30-1: Adding a Member User from the Workarea
Exercise 30-2: Creating and Populating Membership User Groups
Exercise 30-3: Removing a Membership User from a Membership Group
Exercise 30-4: Removing Membership User Group
Unit 31 — Wikis
Exercise 31-1: Adding a Hyperlink to Existing Content
Exercise 31-2: Creating a Wiki Hyperlink to New Content
Exercise 31-3: Editing the New Content (as a Member)
Exercise 31-4: Creating a Wiki Folder
Unit 32 — Web Alerts
Exercise 32-1: Creating a Web Alert subscription
Exercise 32-2: Creating the Messages
Exercise 32-3: Creating an E-mail From List
Exercise 32-4: Assigning the Web Alert Subscription
Exercise 32-5: Enabling Web Alerts for a User
Exercise 32-6: Testing Web Alerts (Optional)
Unit 33 — Calendars
Exercise 33-1: Creating, Editing, and Deleting a Calendar
Exercise 33-2: Adding Events to Calendar
Exercise 33-3: Editing and Removing Events from a Calendar
Delete an Event
Exercise 33-4: Importing Events to an email client
Unit 34 — Blogs
Exercise 34-1: Creating a Blog
Unit 35 — Discussion Boards
Exercise 35-1: Creating a Discussion Board
Exercise 35-2: Adding Forums to the Board
Unit 36 — GeoMapping
8
CMS400.NET Administrator Training Manual and Exercises
CMS400.NET Version 8.0.2
153
154
154
155
157
157
158
158
159
161
161
161
162
162
163
163
165
165
166
167
168
168
171
171
175
175
176
177
Exercise 36-1: Marking a Location on a Map.
Exercise 36-2: Automatic lookup of MapLatitude & MapLongitude
Unit 37 — Creating HTML Forms / Polls / Surveys
177
178
179
Exercise 37-1: Creating a Form
Exercise 37-2: Creating a Post Back Message
Exercise 37-3: Changing Form Properties (Optional)
Exercise 37-4: Creating a Poll
To view the new Poll:
Exercise 37-5: Exporting HTML Form data
179
183
184
185
185
185
Unit 38 — Social Networking Controls
187
Unit 39 — Generating email When Community Activities Occur
188
Exercise 38-1: My Profile
Exercise 38-2: Activity Streams
Exercise 38-3: My Photo Gallery
Exercise 38-4: Private Messages
Exercise 38-5: Documents
Exercise 38-6: Links|Content
Exercise 38-7: Colleagues
Exercise 38-8: Blogs
Exercise 38-9: Message Board
Exercise 38-10: Personalization / Dashboard
Exercise 38-11: Groups
Unit 40 — PageBuilder
Exercise 39-1: PageBuilder Set Up
Exercise 39-2: Add the PageBuilder template into the CMS400
Exercise 39-3: Adding a Page Layout folder
Exercise 39-4: Creating a web page with PageBuilder
Edit Page Layout
Unit 41 — Multivariate Testing
What is it?
Why Use it?
What can you track?
Exercise 40-1: Multivariate Demonstration
Exercise 40-2: Experiment Widget
Exercise 40-3: Multivariate Section Widget Details
Issues
199
201
204
205
206
206
207
208
209
209
210
213
213
213
214
215
216
221
221
221
221
221
225
226
228
Unit 42 — Targeted Content Widget
229
Unit 43 — eSync
239
Certificates
Setup and Usage
Initial Sync complete
239
239
239
CMS400.NET Administrator Training Manual and Exercises
CMS400.NET Version 8.0.2
9
Prerequisites for Content/Folder Sync
Using Content and Folder Level Sync
Unit 44 — Building Your First Web Site and Templates
The process
The Design for Masterpage and Template – Version 1
Design version 2 – Adding CSS styles
Appendix A – CMS Diagnostics
CMS Diagnostics Tool
EktronLog
Appendix B –Workarea/Editor Cheat Sheet Version 3.0
eWebEdit400 Cheat Sheet
Appendix D – Training your users
Resources
Topics to Cover
Formatting Content
Appendix E – E-mail in CMS400.net
E-mail Notification
Example 1 – HTML Form E-mail
Example 2 – Content Request for Approval
Example 3 – Content Approved and Published
Example 4 – Content Declined Approval
Example 5 – Membership Approved
Example 6 – Web Alert E-mail Example (including new article text)
240
240
243
243
243
244
245
245
245
247
250
253
253
254
255
257
257
257
258
258
259
259
259
Appendex F– System Architecture
261
Appendix G: New Analytics
263
Why Use Analytics?
Analytics can help you
The Flow of Analytics Data
Google Analytics Provider
Authorization to View Analytics Data
License Requirements
User Permissions
Page Level Analytics Data
Viewing Page-Level Analytics from the Site
Viewing Page-Level Analytics from a PageBuilder Page
Viewing Page-Level Analytics from the Workarea
Comparing Two Published Versions of Content
URL Filtering
Site Level Analytics Data
10
CMS400.NET Administrator Training Manual and Exercises
CMS400.NET Version 8.0.2
263
263
265
265
266
266
266
266
267
268
268
269
270
271
Site Reports:
Available Reports
Visitors
Visitor Trending
Browser Capabilities
Network Properties
Traffic Sources
Content
Appendix H - Mobile Device Support
272
272
273
273
273
274
274
275
276
CMS400.NET Administrator Training Manual and Exercises
CMS400.NET Version 8.0.2
11
DAY 1 OBJECTIVES
Ektron Overview and CMS basics
Basics of a CMS400.NET web site
Roles of a CMS web site development project
CMS400 Administration
How web pages are created by the developer and how the administrator interfaces with these pages.
System Administration, Information Architecture and other General
Administration areas.
Content, Folders and Workarea
Understanding the Ektron CMS400.net Workarea.
Creating, Editing, and Managing Content.
The Task system.
Creating XML Content with Smart Forms
12
CMS400.NET Administrator Training Manual and Exercises
CMS400.NET Version 8.0.2
UNIT 1
Unit 1 — Basics of a CMS400.NET Web Site
CMS400.NET Page Structure
Static vs. Dynamic Web Pages
CMS400.NET Administrator Training Manual and Exercises
CMS400.NETVersion 8.0.2 Doc:20101215
13
Sample Template
Templates
The CMS site will consist of a series of templates.
A template contains server controls or other code that retrieves content from the CMS and
displays it.
A template holds a variety of servercontrols and code to perform a particular function.
Templates are associated with content folders.
When content is created, a Quicklink is added to the library.
This link uses the assigned template and a Query String variable that instructs the template what content to load.
Types of Content
Web Content
HTML (XHTML)
XML
Managed Content
Office documents
.PDF files
Images
Multimedia files
Terms
CMS - Content Management System for Web site content.
Web site - a collection of pages which contain content & links to other pages.
14
CMS400.NET Administrator Training Manual
CMS400.NET Version 8.0.2 Doc:20101215
UNIT 1
Static web pages have content hard-coded inside physical files (which are difficult to
create & update).
Dynamic web pages – With the use of a template, many web pages can be created dynamically rather than requiring that each individual page have it’s own html file on the web
server.
Template - a container of content objects. Also an .aspx page.
Server control – An object placed into a template that performs basic CMS functions. (e.g.
– ListSummary, ContentBlock. Menu.)
General Roles
CMS Application Administrators
Works with web designers and developers to define the information architecture, site
structure and implementation
Manage CMS Users, User Groups, and Roles
Manage Membership Users, User Groups
Manage folder structures, permissions, and approval processes
Uses CMS features to create Metadata, XML Configurations, Menus, Collections, Calendars, Web Alerts, URLs Aliasing, etc.
CMS Content Authors & Publishers
Add and edit content in the CMS
Upload and manage documents, images, & other files
CMS400.NET Administrator Training Manual and Exercises
CMS400.NETVersion 8.0.2 Doc:20101215
15
UNIT 2
Unit 2 — General Administration
System Architecture
Installing CMS400.net
The CMS400.net installer creates an install base to be used by the Site Setup utility.
Files include the documentation, the software and files for demo & minimum sites.
Installing or upgrading the CMS install base does not affect existing sites until the Site
Setup utility is run.
The Site Setup Utility
Creates a web site that is managed by CMS400.net
Creates several types of site such as CMS400min, Starter sites, Intranet sites, etc.
Creates an asset library/catalog, a web.config file and the required database.
Upgrades web sites and database files.
License Keys
A license key is unique for each URL to a CMS400 web site.
License keys are assigned to Production, Staging and/or development servers.
Multiple license keys should be separated with a comma when entered.
Catalog & Database Names
The Site Setup utility has default names for the asset catalog, asset directories and database. You may customize these during the site setup process.
Security Considerations before a site is “live”
CMS400 sites are installed with three users: “admin”, “builtin” & “jedit”. Change these
passwords before the site goes live.
CMS400min sites contain a login template named “cmslogin.aspx”. The name of the template should be changed before the site goes live.
Error Logging
CMS400.net logs errors in the Windows event log.
This provides the ability to track any errors that might occur on your site.
In addition, this error information can help the Ektron support team diagnose and fix
errors.
CMS400.NET Administrator Training Manual and Exercises
CMS400.NETVersion 8.0.2 Doc:20101215
17
Developing on a Local Machine
In most cases, it is best to install the CMS Web site into the root directory of an IIS site.
On Windows XP Pro, only one Web site is allowed. Windows 2000 Server, Windows Server
2003, Vista and Windows 7 allow multiple Web sites to be created.
If possible, place each Web site in its own directory and change the home directory of the
default Web site as needed.
Site Diagnostics
You can open the site diagnostics page by going to: http://www.mydomain.com/workarea/diagnostics/status.aspx
The diagnostics page contains information like version, license, settings, database, etc.
Information Architecture
Information Architecture is the practice of planning what information a site contains, its structure,
and how users will navigate to it.
Documenting the content inventory and navigation scheme will assist in implementing the
information architecture.
A good information architecture will take into consideration both site visitors and content
authors.
Content Inventory
The content inventory is a list of the content that will be on your site.
It will not be an exact list of every individual piece of content, but rather it defines the
types of content that will be on the site and describes their structure.
With the CMS, your content inventory would also define which content is HTML and which
uses XML/Smart Forms.
Folder Structure
When planning your folder structure, consider both your content authors and the site’s
technical requirements (folder properties).
One technique that can be used is a 3 tier structure.
1. Departments or job roles
2. Content type
3. Categories specific to a content type.
Taxonomy
Taxonomy provides some very useful tools for organization across the folder structure.
Taxonomy is an easy way to organize and display Web site content according to your categories.
18
CMS400.NET Administrator Training Manual
CMS400.NET Version 8.0.2 Doc:20101215
UNIT 2
Organizing with Metadata
Metadata selectors provide the ability to create direct relationships between content
items.
Metadata searchable properties provide the ability to create indirect relationships between
content items, making them searchable via keywords or attributes.
Using Smart Forms
Fields within a smart form should contain data that applies specifically to the content.
Data that relates to other items should use metadata.
Example: contact information fields like title, phone & e-mail would be smart
form fields.
Department or Manager would likely be done with metadata.
Content and Site Analytics
By analyzing the user traffic coming to and interacting with your site, you can better understand key
elements of your Web presence. Traditional Web analytics packages help you understand where
your traffic is coming from, when the traffic is occurring (including high and low points) and what
pages users are interacting with. But this information is often isolated from the Web content and is,
therefore, lacking the context needed to take advantage of it.
Ektron CMS400.NET has a fully-developed, Web traffic analytics provider model. By hooking into
best-of-breed analytics software, like Google Analytics, your Web site’s information is integrated
into CMS400.NET’s Workarea and so is at your fingertips as you use it to optimize the site
experience.
Analytics can help you
determine the popularity of areas of your site
examine click-through rates on your calls to action
analyze site structure and navigation
obtain key information about your site visitors
This information is essential to optimizing your site’s content. Its seamless integration into
CMS400.NET lets you fully leverage the data.
Using Analytics Data within Ektron CMS400.NET
Ektron CMS400.NET’s Workarea provides customized reporting, reflecting exactly the information
you care about. The data can be broken down in many ways, such as
number of visits per day
browser usage
visitor location
visitor language
CMS400.NET Administrator Training Manual and Exercises
CMS400.NETVersion 8.0.2 Doc:20101215
19
top content
referring sites
Google Analytics Provider
Google Analytics is an enterprise-class, Web Analytics solution that gives you rich insights into your
Web site traffic and marketing effectiveness. Powerful, flexible and easy-to-use features let you
see and analyze your traffic data in an entirely new way. With Google Analytics, you're more
prepared to write better-targeted ads, strengthen your marketing initiatives, and create higher
converting Web sites.
As shown above, once you set up Analytics tracking, the Analytics Provider monitors every site
visit. In the Workarea, you can view this data from many angles.
Important: No provider Analytics data is stored in Ektron CMS400.NET -- the CMS retrieves it upon demand from your
Analytics provider.
Its main features are:
Advertising ROI - Measure the success of your display, search, new media and offline
advertising efforts.
Cross Channel and Multimedia Tracking - Compare your site usage metrics with industry
averages and track Flash, video, and social networking sites and applications.
Visualizing Data - Uncover trends, patterns, and key comparisons with funnel visualization, motion charts, mapping, and more.
Customized Reporting - Create the reports, dashboards, and segments that make the
most sense for your business.
20
CMS400.NET Administrator Training Manual
CMS400.NET Version 8.0.2 Doc:20101215
UNIT 2
Sharing and Communicating - Administration controls and email reports allow you to
share data across your organization.
Google Integration and Reliability - Google Analytics complements a suite of related products, all running on the same world renowned infrastructure that powers Google.
CMS400.NET Administrator Training Manual and Exercises
CMS400.NETVersion 8.0.2 Doc:20101215
21
UNIT 3
Unit 3 — The Workarea
Reference: “The Workarea and Smart Desktop” chapter in Ektron CMS400.NET Reference Manual.
Logging into the CMS Workarea
1. Go to the login page supplied by your CMS administrator. (The default location is
http://your_site_name/CMSlogin.aspx.) (Previous to version 7.6, the default login page
was login.aspx.) You will see a Login button.
2. Click the Login button.
3. Enter your User Name and Password in the pop-up box.
Default Username: admin and password: admin
(If your site uses Active Directory, your login page will look like the image on the right.
You will need to login to the proper domain.)
4. Now you see the buttons for Logout, Workarea, Preview, and Help:
5. Click the Workarea button to enter the CMS Workarea.
Smart Desktop
By personalizing your Smart Desktop, you can choose and rearrange items displayed on the desktop
that pertain to your work. To see the Smart Desktop, click the Desktop menu tab (
Workarea’s upper right corner.
) in the
The Smart Desktop looks like this.
CMS400.NET Administrator Training Manual and Exercises
CMS400.NETVersion 8.0.2 Doc:20101215
23
The default Smart Desktop page contains Widgets that provide information about your website. The
page above shows the default widgets for the Ektron Medical starter site.
How to Personalize the Smart Desktop
Reference: “Personalizing the Smart Desktop” section of “The Workarea and Smart Desktop”
chapter in Ektron CMS400.NET Reference Manual.
The Ektron CMS400.NET Workarea can have multiple tabs, letting you organize content by subject –
think of tabbed browsing. You can easily add new tabs and switch between them. Within a tab, you
can add, move or delete Widgets for your own personalized Smart Desktop.
24
CMS400.NET Administrator Training Manual
CMS400.NET Version 8.0.2 Doc:20101215
UNIT 3
Widgets that you use on the Smart Desktop are stored in a widget tray. You can drag and drop
widgets from the tray onto the Smart Desktop into any tab and column.
You control the arrangement of the Smart Desktop Widgets for your own profile.
Adding a Widget into the Smart Desktop
Go to the Workarea > Desktop and follow these steps
1. Click Toggle Widget Tray located in the upper right corner of the Smart Desktop window
(circled below).
2. Next you see the Widget Tray containing widgets that you can drag and drop onto your
Smart Desktop. Use the left arrow or right arrow buttons to see more widgets.
3. Choose the widget you wish to use by dragging and dropping it from the tray into the
Smart Desktop panel.
4.
CMS400.NET Administrator Training Manual and Exercises
CMS400.NETVersion 8.0.2 Doc:20101215
25
Once you have placed the widget into the Smart Desktop, you may drag it to any location on the
desktop.
Adding a Tab to the Smart Desktop
Tabs help you organize your Smart Desktop. By default, there is one tab containing a few standard
widgets. You may wish to add other tabs for eCommerce or Analytics type widgets.
To add an eCommerce widget for example, do the following
1. Click the Options button on the upper right of the Smart Desktop.
2. Click Add Tab. You see the Add Tab dialog window.
3. Enter "Content Reports" for the Tab Label.
4. Click OK to save the Tab Label.
The new tab appears on the top of the Smart Desktop.
26
CMS400.NET Administrator Training Manual
CMS400.NET Version 8.0.2 Doc:20101215
UNIT 3
Adding Columns
By default, 3 columns are placed on the Smart Desktop. You may add columns by following these
steps.
1. Click the Options button on the upper right of the Smart Desktop.
2. Click Add Column.
3. Click the Options button to see the columns below the Widget tray.
4. Now that you have four columns, search for the Content Checked out widget in the widget
tray.
5. Drag and drop the ContentCheckedOut Widget into the first column.
Note: If your developers have not set up your analytics provider you will see the following error message when you try this
exercise ‘Username and/or password not set. Please update the AnalyticsDataProvider section on your web.config.
Parameter name: Username, Password’
Restoring Tabs and Widgets
All users can restore their Smart Desktops to the Default Widget set. To do this, follow these steps.
1. Click the Options button on the right side of the Smart Desktop.
2. Click Remove Widgets and Tabs.
3. When the dialog box appears that confirms you want to delete all Tabs and Widgets, click
OK.
CMS400.NET Administrator Training Manual and Exercises
CMS400.NETVersion 8.0.2 Doc:20101215
27
Setting the Default Widgets
ToSetting the Default Widgets above restore Default Widgets, you must be a member of the
Administrators group.
Refer to ”Restoring Tabs and Widgets” section of the Ektron CMS400.NET Reference Manual to
restore Smart Desktop to the Default Widget set. The Default Widget set is defined by users in the
Administrators group by doing the following.
1. Click the Options button on the right side of the Smart Desktop.
2. Click Edit Default Widgets.
3. Arrange the Smart Desktop with Tabs and Widgets that you wish to be the default.
4. Click the Options button.
5. Click Save Default to save the Default Smart Desktop.
28
CMS400.NET Administrator Training Manual
CMS400.NET Version 8.0.2 Doc:20101215
UNIT 4
Unit 4 — Setup and Configurations
Configuration
After opening the Workarea, click on the “Settings” tab.
Next, open the “Configuration” folder by clicking on the (+) next to the folder icon.
Active Directory
The Active Directory feature allows you to retrieve user and
user group information from the Microsoft Windows Active
Directory (AD) into Ektron CMS400.NET. Users only need to
login to their networks to get access to the CMS400.
(Refer to “Active Directory Feature” section of “Managing Users
and User Groups” chapter in Ektron CMS400.NET Reference
Manual)
Web Alerts
The Web Alert feature enables Ektron CMS400.NET to generate
email for a list of registered users whenever new content
appears on your site, or existing content is updated. (See Unit
32)
Search
Ektron CMS400.NET’s Web site search provides extremely fast
results by using Microsoft Indexing service and maintaining a
catalog of all published content in local indexes. Additionally,
features such as “Suggested Results”, “Synonyms”, and
“Integrated Search” provide a variety of result options for the
web site visitor (See Unit 21)
Discussion Boards
The Discussion Board feature provides an opportunity for topic
discussions on your Web site. A site or membership user with
Add Topic permission creates a topic and posts a starter
question. Site visitors can then reply. (See Unit 35)
URL Aliasing
Aliasing is an Ektron CMS400.NET feature that lets you create alternate URL addresses for your Web
site. This may improve usability and Search Engine Optimization (SEO) results for your site.(See
Unit 17)
CMS400.NET Administrator Training Manual and Exercises
CMS400.NETVersion 8.0.2 Doc:20101215
29
Personalization
This configuration sets the permissions that affect someone’s ability to personalize
a page with widgets. Widgets are user controls that allow a site visitor to perform some sort of
function like Weather, Clocks etc. (More on widgets in the PageBuilder exercises Unit 39)
Asset Server Setup
The Document Management System allows various types of documents and media files to be shown
on a web site. By using drag-and-drop functionality, editors can add/edit these documents
contained in the Asset Server. (See Unit 11)
Custom Properties
Allows you to create custom fields associated to a user. These custom fields appear on the user
Properties and Membership User Properties screens and on the membership server control. (See
Unit 18)
Fonts
As an administrator, you can add, edit, and delete fonts to and from the Ektron CMS400.NET
Workarea. By adding fonts, you are allowing the content contributors to use them when creating
content. (The CSS style sheet must be modified by the developer as well.) Administrators can also
edit the name of a font, and delete a font from the system. Minimizing the number of available
fonts makes the Web site look more uniform.
Integrated Search Folder
Use an Integrated Search if your site’s search should include non-Ektron CMS400.NET files.
Integrated Search locates data in a Web- accessible folder on the server’s file system. This includes
Virtual Folders for the Web Server (IIS). (See Unit 21)
Indexing Services
The Microsoft Windows Indexing service constantly indexes the catalog so that search results are
returned with lightning speed. Another advantage of the indexing service is its robust query
language.
Language Settings
The Language Settings screen lists all languages in which content can be created on your site.
Only members of the Administrator User Group can view, add, or edit language settings.
Enable in Workarea only – This will enable new language support in the Workarea, which
allows you to work in a language other than the default. Because it’s enabled for the Workarea only, content in the new language is not available for public view.
Enable on Web Site – This will enable public viewing of additional languages on your Web
site.
If you enable a language on your Web site for which there is no content, content in the default
language will be displayed instead.
Load Balancing
Asset and Library files may become out of date or lost due to equipment failures, power outages or
other events. In addition to your Load Balance system, Ektron CMS400.NET provides a way to
30
CMS400.NET Administrator Training Manual
CMS400.NET Version 8.0.2 Doc:20101215
UNIT 4
refresh the files contained in the DMS Assets folders and Library Files and Images folders.
Metadata Definitions
Metadata is information about content such as title, description and keywords. There are many uses
for metadata including SEO, content filtering, content association and more. (See Unit 16)
Setup
This section contains the license keys and configuration settings for the Workarea. (This will be
covered in next section of this training manual –Section 4.2.)
Smart Form Configurations
Ektron CMS400.NET’s Smart Forms give you access to the power of XML by separating Web content
from presentation. (See Unit 15)
Synchronization
Ektron CMS400.NET’s eSync automates the process of synchronizing content, folders, databases
and templates. An entire Web site can be synchronized between two servers. This is an optional
feature for Enterprise and Professional level CMS400.NET systems.
Task Types
Tasks can be assigned a Task Category, then a Task Type. This gives users an additional way to
filter their tasks. Task Categories and Task Types have a hierarchical relationship: the Task
Category is the parent, and the Task Type is the child. So, several types can be assigned to each
category. (See Unit 14)
Template Configuration
Templates are created for your Web pages by developers. A template typically includes page
headers and footers as well as placeholders for content, forms, summaries, calendars, collections,
or other page elements and server controls. This configuration feature creates references for the
CMS Workarea to Templates created for the web site. (See Unit 6)
CMS400.NET Administrator Training Manual and Exercises
CMS400.NETVersion 8.0.2 Doc:20101215
31
Setup
Accessing the Setup Area
1. In the Workarea, click the Settings tab.
2. Expand the Configuration section.
3. Click on Setup.
4. Click the Edit button (
).
5. When finished editing, click the Update button (
) to save the changes.
License Keys
A license key typically begins with a base URL (domain name, computer network name, or IP
address) followed by descriptor tags, a question mark, a series of numbers, a hyphen and one or
two digits signifying release number.
For example:
32
CMS400.NET Administrator Training Manual
CMS400.NET Version 8.0.2 Doc:20101215
UNIT 4
dev.mysite.com(exp-2010-10-25)(modifiers)(users-10)?51510837796786063064924334416-80
License keys cannot contain spaces or line breaks.
Multiple license keys can be entered by separating them with comma, with no space in between.
There are three levels of license keys available for use with
Ektron CMS400.NET.
The features that are available in your specific version of
CMS400.NET depend on the license key you purchase.
This table shows the major features at each level.
Module Key
If you are installing the optional image editor WebImageFX, you must enter the module key. The
Module Key is for legacy support for CMS400.NET version 7.5 and earlier, version 7.6 and up has
image editor built in to CMS400.NET.
Default Application Language
Select the default language for the CMS application. A user’s language setting determines the
screens and messages that appear in Ektron CMS400.NET. In the user profile, you can set each
user’s language. You can set any user’s language to system default. Each user whose language is
set to system default uses the language assigned here.
Maximum Summary Size
Administrators can set a limit on the maximum size for the summary.
System E-Mail Address
Enter a valid system e-mail address. All the notification e-mails sent to CMS users will have this email address in the “From” area.
CMS400.NET Administrator Training Manual and Exercises
CMS400.NETVersion 8.0.2 Doc:20101215
33
System Notifications
Enable or disable sending system e-mail to CMS users. (SMTP server configuration needs to be
setup first in the web.config file in order to enable this service.) Email notifications and Web Alert
examples are located in the back of this manual in the Appendix section.
Asynchronous Processor Location
The Web Alerts feature uses the Asynchronous Processor. Enter or update the location of the
asynchronous processor Web Services file. Cut and paste the example location and change the
server name to the appropriate server used by your site.
Publish in other format
Enable or disable publishing of Office documents in PDF format.
Library Folder Creation
Enables or disables the creation of physical file folders for library assets to match the virtual
folders in the CMS content folder structure.
Built In User
Here you can change the Username and Password for the “builtin” user (“builtin” is the default).
This should be done before deployment of your site to the Internet.
Editor Options
Here you can enable or disable MS-Word Styles or Classes preservation, font buttons and
accessibility / Section 508 (Citizens with Disabilities Act) compliance evaluation.
Unless you have a specific need to do otherwise, we recommend leaving the Word preservation
settings disabled and disabling the Fonts buttons. This allows you to control styles and fonts through
style sheets, for ease of modification or design changes.
34
CMS400.NET Administrator Training Manual
CMS400.NET Version 8.0.2 Doc:20101215
UNIT 4
Work Page Size / Landing Page
This is the setup for the size of the Workarea window and landing page after login. Normally, the
default setting is sufficient. Each CMS user can customize their personal work page size and landing
page.
Enable Verify E-mail
Enables sending of verification E-mails to new membership users.
Pre-approval Group
Enables a pre-approval group to evaluate content before it enters the regular approval chain and
generates an automatic task.
System Reset
Use this button if you need to clear the CMS400.NET system cache, which recycles the application
pool. For example, you updated the web.config file but cannot yet see the changes.
Under certain circumstances, Ektron's support group may instruct you to click this button.
Administrators would use this button if they cannot access the hosting servers yet need to reset
their web site. The button is an alternative to submitting a request to their IT department or hosting
company.
CMS400.NET Administrator Training Manual and Exercises
CMS400.NETVersion 8.0.2 Doc:20101215
35
UNIT 5
Unit 5 — Help Systems and Documents
Documentation found in the workarea
Online Context Sensitive Help
This help button is available to provide extra information about the area or procedure currently
active in the Workarea. The HTML help pages provide detailed instructions about a feature or option.
CMS400.NET Administrator Training Manual and Exercises
CMS400.NETVersion 8.0.2 Doc:20101215
37
Ektron Documentation on Public Web Site
http://www.ektron.com/documentation
Make sure you add it to your favorites so it is only a click away if need.
Documents are installed on the Web Server:
> All Programs -> Ektron -> CMS400Vxx -> Documentation
38
CMS400.NET Administrator Training Manual
CMS400.NET Version 8.0.2 Doc:20101215
UNIT 6
Unit 6 — Templates and Folders
Understanding templates and folders is fundamental to understanding how the CMS works.
Templates can be thought of as “content containers” in which content will be displayed. Content
folders must have templates associated with them.
Adding Templates to the CMS
Templates are typically created by developers, with the role of the Administrator being to control
the folder associations and request new templates if necessary. Before a template can be
associated with a folder, a reference to it must be added in the CMS.
Exercise 6-1: Adding a New Template reference.
1. Click on the Settings tab in the left navigation pane of the Workarea.
2. Expand the Configuration section.
3. Click the Template Configuration link.
4. Click the Add button (
). The Add a New Template screen appears.
5. Enter the path to the new template such as “NewTemplate.aspx” and click the Save button
(
).
Note: If the developer has created a template and placed it on the server, you can use the Select button (
to browse to the template and add it by clicking on the name of the template.)
)
Note: If you are adding a PageBuilder Wireframe template, select the “PageBuilder Wireframe” option. (See Unit 39)
Be sure to include the “.aspx” suffix, as it is not added automatically to the filename. If you forget
the suffix, correct it using the update procedure below.
Exercise 6-2: Updating a Template reference.
The update command is used to change all references from an old to a new template.
1. Click on the template name to update the template configuration.
2. A new screen appears.
3. Enter “NewTemplateV2.aspx”.
4. Click the Update Template button (
).
Exercise 6-3: Deleting a Template reference.
To delete a template, click Delete to the right of the template.
CMS400.NET Administrator Training Manual and Exercises
CMS400.NETVersion 8.0.2 Doc:20101215
39
Warning! There is no confirmation before the template reference is deleted, so be certain that you select the correct
template.
You can only delete a template if it is not assigned as a folder’s default template. If you choose a
template that is assigned as a default, a message is displayed indicating that the template cannot
be deleted and it lists the folders for which it is the default:
Note: If you delete a template reference that is not used as a default but is applied to content, that content’s template is
changed to its folder’s default template.
Creating Folders
Folders contain content items and also have properties which we will learn to set later in the
training.
Exercise 6-4: Creating a New Folder.
1. In the Workarea, select the Content tab.
2. Select the root folder.
3. In the right pane toolbar, select New > Folder.
4. In the Name field, enter “Test Folder”.
5. Click the Add Folder button (
40
).
CMS400.NET Administrator Training Manual
CMS400.NET Version 8.0.2 Doc:20101215
UNIT 6
Exercise 6-5: Attaching a Template to the New Folder.
1. In the Workarea, click on the Content tab.
2. Click on “Test Folder”.
3. On the View menu, select Properties.
4. Click the Edit button (
).
5. Select the Templates tab.
6. Uncheck Inherit Parent Configuration.
7. On the [Select Template] dropdown list, click on “news.aspx” to select it.
8. Click on
to the right of the template dropdown to add the template to the Page Templates list.
9. Click the radio button next to the news.aspx template to set it as default template for that
folder.
10. Click on View to view a template.
CMS400.NET Administrator Training Manual and Exercises
CMS400.NETVersion 8.0.2 Doc:20101215
41
11. Click Remove to remove templates that are not the default.
12. Click OK to confirm that you want to delete the unwanted template.
13. Click the Update button (
) to save the folder setting.
We recommend that only one template be assigned to a folder. This eliminates the possibility of
Content Editors selecting the wrong template for the content and having it display improperly on the
Web site.
Exercise 6-6: Copying and Moving Folders
1. Right Click on your Training folder.
2. Select Cut Test Folder.
Note: To copy a folder with all of it’s permissions and properties select copy folder and continue with the next
steps.
3. Select the root Folder.
4. Right Click on Content and select Paste Folder
5. Select OK from the pop up window that will appear to warn you that all properties will
remain the same when you move the folder.
Your folder will now appear beneath the root folder.
42
CMS400.NET Administrator Training Manual
CMS400.NET Version 8.0.2 Doc:20101215
UNIT 7
Unit 7 — Editing Content
Reference: “Editing HTML Content” section of “Content” chapter in Ektron CMS400.NET Reference
Manual.
Exercise 7-1: Editing in Context
1. Login to the CMS400Developer site using “admin” as your user and password. (http://localhost/CMS400Developer/default.aspx)
2. Click on the silver “Access Point” in the upper left corner of the article entitled “Welcome
to our site.”
3. Choose Edit In Context.
4. Edit the Content by removing the sentence “Some examples are hemophilia, cancer,
immune disorders and kidney disease.”
5. Click Save (
) to publish the change.
CMS400.NET Administrator Training Manual and Exercises
CMS400.NETVersion 8.0.2 Doc:20101215
43
Exercise 7-2: Editing in a Web Browser
1. Click on the Access Point on the “Welcome To Our Site” content.
2. From the menu, choose Edit. The Edit Content window will appear with the content ready
to be edited.
3. Change the content by removing the last two sentences and entering “Ektron training
day.”
4. Click the Publish button (
). The article now shows the changes.
Do not use the Red
in the upper right corner of the window to close the Workarea. It is best to
go to your browser and logout rather than exit using this window control. If you use this to close a
content edit window, the content will remain in a “checked out” status.
Exercise 7-3: Editing in the Workarea
1. Open the Workarea.
2. Select the Content tab in the lower left pane.
3. Navigate to the CMS400Demo > About Us folder in the upper left pane.
4. Click on the arrow ( ) to the right of “Why Choose Ektron?” (Content ID 64) to show the
drop down menu.
5. Click the Edit choice to enter edit mode for this content.
6. Make changes to the content.
7. After you finish editing, click the Publish button (
soon as you refresh the page in your browser.
44
CMS400.NET Administrator Training Manual
CMS400.NET Version 8.0.2 Doc:20101215
). The edited content will appear as
UNIT 8
Unit 8 — Adding Content
Reference: “Adding HTML Content” of “Content” chapter in Ektron CMS400.NET Reference Manual.
Content refers to anything that is going to be displayed on your Web site. In this unit, we will create
new HTML content with text, images, tables and links.
Creating HTML Content
Exercise 8-1: Creating Content in the Workarea.
1. Select the Content tab in the Workarea.
2. Select the “Test Folder”. (Created in exercise 6.2.)
3. Move the cursor over the New menu and select HTML Content. This opens the CMS
Editor to allow you to add content:
4. In the title field, enter “Why Choose Ektron Medical?”
5. From the About Us menu on the Ektron Medical site, select “Why Choose Ektron?” (id 64).
6.
Copy the following content and use “Paste Plain Text” (
Text” pop up window.
) to paste it into the “Paste Plain
CMS400.NET Administrator Training Manual and Exercises
CMS400.NETVersion 8.0.2 Doc:20101215
45
7. Click OK to paste the text into the Content area.
Why Choose Ektron Medical?
An Exciting Environment
ektron Medical is a fast-paced technology-driven company that provides its employees
with opportunities for professional growth, as well as the flexibility to achieve a
balance between work and personal life. Being part of ektron Medical means working
with teams that are involved with leading-edge research in groundbreaking areas of
science and technology. It means opportunities to work with new manufacturing
processes and in product development. It involves on-the-job training in sales and
marketing. And it means working in a global environment as the company builds on its
presence in international markets.
A Rewarding Career
ektron Medical provides comprehensive benefit, compensation and development
programs that allow employees to grow in their careers. We encourage our employees
to develop skills to meet the demands of an ever-changing work environment,
providing them with opportunities to achieve personal and professional goals that will
make them valued contributors throughout their careers.
Other rewards for our employees include the feeling of satisfaction when much-needed
dialysis solutions are delivered to a homebound patient. And the feeling of
accomplishment that comes from working towards clearly defined company goals in an
environment that fosters shared values.
46
CMS400.NET Administrator Training Manual
CMS400.NET Version 8.0.2 Doc:20101215
UNIT 8
When pasting into the editor, right mouse to see these options:
When pasting text into the Editor in WYSIWYG mode, you can right click in the text area and select
“Paste Plain Text” to insert clean text into the content. This method removes all the extraneous tags
that exist in Word documents or content copied from other Web sites.
Exercise 8-2: Applying Styles to Content
By default, standard heading formats are available to content authors. Custom styles can also be
created for content that is not going to be styled using external style sheets (CSS). If such styles
exist, they are applied as follows:
1. Continue from the previous exercise.
2. Highlight the text “Why Choose Ektron Medical?”
3. From the Paragraph Format drop down select “Heading 3”
4. “Why Choose Ektron Medical?” should now have a Heading3 style applied.
5. Highlight “An Exciting Environment “.
6. From Apply Style drop down list, select “
”.
7. Do the same thing for “A Rewarding Career “.
8. Highlight the first paragraph and apply style “italic”.
9. Do the same for the second paragraph. Your content should now look like this:
CMS400.NET Administrator Training Manual and Exercises
CMS400.NETVersion 8.0.2 Doc:20101215
47
Exercise 8-3: Inserting Hyperlinks
External Hyperlinks
1. Click the end of the last line and press “Enter” twice to insert a blank line.
2. Type in “Visit Ektron”.
3. Select (highlight) “Visit Ektron”.
4. Click on the Hyperlink Manager button (
up.
) in the menu. The Hyperlink Manager pops-
5. Make sure the text you highlighted “Visit Ektron” is in the Link Text field.
6. Set the URLfield to “http://www.ektron.com”.
7. In the Target Frame, select “New Window (_blank)”, so the resulting link will open in a
new window.
8. Click OK. “Visit Ektron” now appears as a blue link.
48
CMS400.NET Administrator Training Manual
CMS400.NET Version 8.0.2 Doc:20101215
UNIT 8
Adding Bookmarks (Anchor) Hyperlinks
1. Add paragraphs to the content you are editing. (Paste in additional text to make it over
one page long.)
2. After the last line, enter text "Title 2".
3. Click on the Insert Bookmark button (
).
4. Enter the title of the bookmark as “Title2”.
5. Click OK.
6. Go to the top of the content.
7. Enter a new line that says “Go to Title 2”.
8. Highlight the text "Go to Title 2".
9. Click the Hyperlink Button (
).
10. Select the Existing Bookmark for Title 2.
CMS400.NET Administrator Training Manual and Exercises
CMS400.NETVersion 8.0.2 Doc:20101215
49
11. Click OK to save the link to the bookmark.
Email Hyperlinks
1. Go to next line and type “Contact us by email: “
2. Leave the cursor at the end of that line and click on the Hyperlink button (
3. When the Hyperlink window pops up, select the Email tab.
4. Type “[email protected]” in the address field.
5. In the Link Text field, type “[email protected]”.
6. Click OK to close the Hyperlink window.
50
CMS400.NET Administrator Training Manual
CMS400.NET Version 8.0.2 Doc:20101215
).
UNIT 8
Note: This is not a real email address and students should not send email to this address.
Quicklinks link (from the Library) to other content in the CMS
1. Go to the line after the e-mail link.
2. Click on the Hyperlink button (
3.
).
Click the three dots (
) button under the URL field.The Library window is now opened.
Be sure the dropdown list says “Quicklinks”.
4. Select the CMS400Demo ->About Us folder from the left navigation pane to display its
Quicklinks.
5. Click on one of the Quicklinks so it is highlighted in yellow.
6. Click the Insert button (
) to insert the Quicklink.
(Note: Double-clicking on a Quicklink will also insert it into the content and the Link Text
will be the title of the content.)
7. Click Ok in the Hyperlink Manager.
8. Create a new line following the link you just created.
9. Click the Horizontal Line ( ) button in the menu to insert a horizontal line.You should
have something like this in the Content window.
CMS400.NET Administrator Training Manual and Exercises
CMS400.NETVersion 8.0.2 Doc:20101215
51
10. Click the Save button (
) to temporarily save your work.
Exercise 8-4: Adding a Table
1. Move the cursor below the horizontal line in the content.
2. Click the Table button (
).
3. From the popup menu, select Insert Table.
4. Mouse over 1 row and 2 columns. When you click, the table will be inserted.
5. Now you will have a table with 2 cells.
Exercise 8-5: Inserting an Image
1. Click inside the left cell of the table.
2. Click the Library button (
).
3. From the dropdown list, select Images.
52
CMS400.NET Administrator Training Manual
CMS400.NET Version 8.0.2 Doc:20101215
UNIT 8
4. Browse to the folder CMS400Demo > Products > Medications Management.
5. Click on an image.
6. Click the Insert button (
) to insert into the content. The picture will be inserted.
7. You can modify the image size, position, border and spacing by right clicking and choosing
Set Image Properties.
8. Once you are satisfied with the settings, click OK and the picture properties will be
changed.
CMS400.NET Administrator Training Manual and Exercises
CMS400.NETVersion 8.0.2 Doc:20101215
53
Exercise 8-6: Uploading and Inserting an Image
1. Position the cursor where you would like to insert an image and click the Library button (
).
2. Navigate to the folder CMS400Demo->Test Folder.
3. Click the Add Library button (
) to add a new image to the library.
4. Click the Browse button. This opens a standard browser window for browsing local or network drives for an image. Select an image and click Open.
5. Enter a title for the image.
6. Click the Add Library button (
54
) again to add the new image to the Library.
CMS400.NET Administrator Training Manual
CMS400.NET Version 8.0.2 Doc:20101215
UNIT 8
7. Click OK. The image you selected is added to the content.
8. Click the Save button (
) again to temporarily save your work.
Exercise 8-7: Previewing Content
1. THis tool bar appears while editing content. You can Publish, Check-in, Save, Preview content or cancel your changes.
2. Select Preview(
) to see your content as it will look when you publish it.
CMS400.NET Administrator Training Manual and Exercises
CMS400.NETVersion 8.0.2 Doc:20101215
55
3. The content appears in the default template - in this case, news.aspx.
Adding Other Information to Content
Exercise 8-8: Adding Summary Information
Summary information is text that sometimes appears in Search Results and when “Teaser Text” is
shown on ListSummary or Collections. Adjust this text in any way you choose. If the summary is
blank, it is filled in automatically with approximately the first 40 words of the text in the main
content.
56
CMS400.NET Administrator Training Manual
CMS400.NET Version 8.0.2 Doc:20101215
UNIT 8
Exercise 8-9: Adding Metadata
Metadata is important for Search Engine Optimization (SEO), as well as for internal site searches
and tagging content for special attention in the CMS.
1. Click the Metadata tab.
2. For the Title field, enter “Why Choose Ektron Medical?”
3. For the Description field, enter “The two main reasons for choosing Ektron Medical are an
exciting environment and a rewarding career.”
4. For Keywords, enter “Ektron” in the Text box then click “Add”.
5. Add another keyword by entering “Medical” and then click “Add”.
CMS400.NET Administrator Training Manual and Exercises
CMS400.NETVersion 8.0.2 Doc:20101215
57
Exercise 8-10: Content Scheduling
1. Click the Schedule tab.
2. Click the Select a Date and Time button (
) next to the End Date.
3. In the pop up window, select a date and hour you want this content to be archived.
4. Click Done.
5. Select the radio button Archive and remove from site (expire).
6. If you publish the content at this point, the schedule will apply.
Note: Before proceeding with other exercises in class, REMOVE the schedule date by clicking the Delete the Date and
Time button (
). This will allow you to see this content in the next lessons.
Exercise 8-11: Adding Comments to Content
Comments are used for internal communication about content and are not visible to visitors to the
site. Comments make it easier and faster to determine the changes made between versions of the
content.
1. Click the Comment tab.
58
CMS400.NET Administrator Training Manual
CMS400.NET Version 8.0.2 Doc:20101215
UNIT 8
2. Enter your comments in the Comment box.
3. Click the Publish button (
) in the tool bar.
Exercise 8-12: Creating Content in another language
Content can be managed within the CMS translated into different languages. The Language selector
on the website is used to select which translation the visitor will view. Steps to translate content to
Spanish are as follows:
1. Click on Test Folder in the Content Workarea.
2. Click on your first article entitled “Why Choose Ektron Medical?”
3. On the toolbar, select Add: and choose Spanish.
Notice that the Title now indicates you are working on the Spanish version.
A Computer based translator function (machine translation) is available on the editor.
1. While in edit mode of the Spanish version of the content, click on the Translate Content
button.
2. Select English as the source language.
3. Select Spanish as the target language.
CMS400.NET Administrator Training Manual and Exercises
CMS400.NETVersion 8.0.2 Doc:20101215
59
4. Click on the Translate button.
5. After the content is translated, click on the Paste Content button to replace the original
version with the translated version.
6. Click the Publish button (
) to publish your Spanish Content.
To view your content, go to:
http://localhost/cms400developer/news.aspx?id=xxx
xxx=the id of your content
Note: Be sure to remember to translate your “Title” and “Summary” text too..
60
CMS400.NET Administrator Training Manual
CMS400.NET Version 8.0.2 Doc:20101215
UNIT 9
Unit 9 — Adding Content to a ListSummary
Reference: “Website Navigation Aids” chapter in Ektron CMS400.NET Reference Manual.
The ListSummary is used to display a list of content items in a selected folder. Optionally, the
display can include content in all subfolders of the selected folder. It displays each content item’s’
title and summary, as in the following example from the About Us > News folder:
Exercise 9-1: Creating New Content in a ListSummary
1. On the Ektron Medical home page, go to the About Us > News page.
2. Hover over Access Point and choose “Add HTML Content” from the menu.
3. Click Add HTML Content then add some text.
4. Publish the new content.
Note: The content must be published to show in a ListSummary. New Content that is checked-in or saved or scheduled to
go-live later will not appear in a ListSummary.
The new content is added automatically to the ListSummary.
CMS400.NET Administrator Training Manual and Exercises
CMS400.NETVersion 8.0.2 Doc:20101215
61
UNIT 10
Unit 10 — Adding Images & Hyperlinks to the
Library
Reference: “Library Folder” chapter in Ektron CMS400.NET Reference Manual.
Adding Images and Hyperlinks to the CMS Library makes them readily available for use when
creating or editing content.
Exercise 10-1: Adding an Image
1. In the Workarea select the Library tab.
2. Go to the folder CMS400Demo >Test Folder.
3. From the drop down list, select Images.
4. Click the Add button (
).The Add Library Item window appears.
5. Click the Browse button to browse your local or network drives to locate an image.
6. Enter a title for the image and add a Description if needed.
7. Click the Save button (
). The image is added to the Library.
Exercise 10-2: Editing Image Properties
1. In the Library, click the image you want to edit.
2. Click the Edit button (See figure.)
3. Edit the title or description of the image.
CMS400.NET Administrator Training Manual and Exercises
CMS400.NETVersion 8.0.2 Doc:20101215
63
4. Click Update (
).
Exercise 10-3: Link Search
1. Click Library at the top of the library folders tree.
2. Click on the Ektron CMS400.NET Logo image (id 326).
3. Click the Link Search (
) button to show content that uses this library item.
4. You now will see a list of content items that use this image.
64
CMS400.NET Administrator Training Manual
CMS400.NET Version 8.0.2 Doc:20101215
UNIT 10
Exercise 10-4: Overwriting an Image
1. Click the image you want to overwrite.
2.
Click the Overwrite button (
).
3. Click Browse to select the replacement image.
4. Click Update (
).
5. Click OK in the popup box to overwrite the old image with the new one.
Exercise 10-5: Deleting an Image
1. Click the image you want to delete
2. Click the Delete button (
).
3. If you want to remove the file from the CMS server, check the Remove from the server
box, then click the Delete button again. If you only want to remove the image from the
folder, leave the box unchecked and click the Delete button again.
4. Click OK in the popup message box to delete the image.
CMS400.NET Administrator Training Manual and Exercises
CMS400.NETVersion 8.0.2 Doc:20101215
65
Exercise 10-6: Adding a Hyperlink
1. In the Library tab, choose the Test Folder.
2. From the drop down list, select Hyperlinks.
3. Click the Add button (
).
4. Enter a title for the hyperlink, which will become the link text. (Example: “Click here to
visit Ektron”).
5. Enter the URL for the link. (Example: http://www.ektron.com)
6. Add a Description.
7. Click the Save button (
). The hyperlink is added to the Library.
Exercise 10-7: Updating QuickLinks
There may be instances where templates will be changed for a given folder, for example the look
and feel or layout may have changed. In this instance a new template may be created to replace
the old one. The new template may be added to a folder but the individual contents that used the
old template will still reference the old template and must have it’s Quicklink updated to display
properly. The following exercise will show the steps to accomplish the Quicklink update.
1. Go to the Ektron Medical homepage.
2. From the Latest News section on the bottom right of the homepage, select the Ektron
Rated Positive content.
3. Observe the URL and it should be:
http://localhost/CMS400Developer/news.aspx?id=32
4. Open the Workarea.
5. In the Library tab, choose CMS400Demo > About Us > News folder.
6. From the drop down list select QuickLink.
66
CMS400.NET Administrator Training Manual
CMS400.NET Version 8.0.2 Doc:20101215
UNIT 10
7. Click on the Update QuickLink button (
).
8. Change news.aspx to dynamic.aspx in the “To” field.
9. Select Ektron Rated Positive QuickLink.
10. Click on the Update QuickLink (
ic.aspx template.
) button to replace news.aspx template with dynam-
11. Go to the Ektron Medical homepage.
12. From the “Latest News” section on the bottom right of the homepage, select the Ektron
Rated Positive content.
13. Observe the URL and it will have changed to:
http://localhost/CMS400Developer/dynamic.aspx?id=32
Exercise 10-8: Library Folder Properties
The library folder properties contains library-related information, including load balance settings,
image and file types that are allowed to be uploaded, as well as other settings.
1. In the Library tab, choose the Library (Root) folder.
2. Click on the Library View Properties button. (
)
CMS400.NET Administrator Training Manual and Exercises
CMS400.NETVersion 8.0.2 Doc:20101215
67
3. Click on the Edit (
) button.
4. You can now change the image and file types that will be allowed to be uploaded into the
Library.
68
CMS400.NET Administrator Training Manual
CMS400.NET Version 8.0.2 Doc:20101215
UNIT 11
Unit 11 — Adding & Creating DMS Content
Reference: “Content” chapter in Ektron CMS400.NET Reference Manual.
CMS400 stores DMS assets according to the configurations in the AssetManagement.config file.
An administrator can change these settings by going to the Settings Tab > Configuration >
Asset Server Setup.
To modify an Asset Management Configuration Tag
1. Click on Asset Server Setup.
2. Click the Edit button (
) to the left of the tag you want to edit.The Value field for that
tag changes to a text box.
3. Change the information in the text box.
4. Click the Save button (
).
CMS400.NET Administrator Training Manual and Exercises
CMS400.NETVersion 8.0.2 Doc:20101215
69
Exercise 11-1: Adding DMS Through the Menu
1. In your Test Folder select New > DMS Document.
2. For the title type in Sample Document.
3. Click the Browse option to browse to a document or image on your desktop.
4. Put in information in the other tabs such as
summary and metadata.
5. Then Publish this document.
6. You will see Sample Document as a piece of
content in your Test folder.
Exercise 11-2: Mapping a Network Drive to the CMS folders
1. Open up My Computer.
2. Go to Tools > Map Network Drive…
3. Click on Sign up for online storage or connect to a network server.
4. Click Next.
5. Make sure that Choose another network location is highlighted and click Next.
6. Enter in this address: http://localhost/CMS400Developer/ekdavroot and click Next.
70
CMS400.NET Administrator Training Manual
CMS400.NET Version 8.0.2 Doc:20101215
UNIT 11
7. Login using your CMS credentials.
Note: If you check the Remember my password box, the User Name and Password fields will be populated
for you when you log into the mapped drive later.
8. Change the name for the network place to “CMS400 Root”.
9. Click Next.
10. Uncheck Open this network place when I click Finish.
11. Click Finish. Wait – it may take a few moments to create the mapped network drive.
12. In your file browser, go to the new network place CMS400 Root.
13. Login using your CMS credentials. You can now use this standard windows functionality in
conjunction with the CMS.
CMS400.NET Administrator Training Manual and Exercises
CMS400.NETVersion 8.0.2 Doc:20101215
71
UNIT 12
Unit 12 — Restoring Content from its History
Reference: “Content” chapter in Ektron CMS400.NET Reference Manual.
A complete history is maintained for content in the CMS. You can view older versions, compare the
current published version with older versions and restore versions of content as desired.
Exercise 12-1: Restoring in the Workarea
1. In the Workarea, navigate to the CMS400Demo > About Us folder.
2. Click on the content entitled Why Choose Ektron (content ID 64). (This is content that
you have edited and published with changes in exercise 7-2.)
3. Click the History button (
). The Content History window opens.
4. Select a version to view the differences between the most recent version and an earlier
version. The whole number indicates a published version while a decimal number indicate
any content that has been checked in.
Note: The compare radio buttons are for comparing the analytics between versions.
5. Click the View Diff (
) button to view the differences between the live version and that
historical version. When finished, close this window.
6. Restore the selected historical version by clicking on the Restore button (
tent History window will close and you will return to the Workarea window.
). The Con-
Note: The content is in a “Staged” state – that is, it is “Checked In” but not published.
7. Click the View Stage button (
) to see the historical version you’ve restored.
8. To make the restored version appear on your web page, click the Edit button (
any changes you like, then publish the changes.
), make
CMS400.NET Administrator Training Manual and Exercises
CMS400.NETVersion 8.0.2 Doc:20101215
73
Exercise 12-2: Restoring in a Web Browser
1. In a browser, navigate to the About Us > Why Choose Ektron Medical.
2. Scroll over the silver access point and select View History from the menu.
3. Follow steps from the previous exercise: Restoring in the Workarea on previous page.
Exercise 12-3: Purging the History
Note to instructor: Fresh installs of CMS400 Developer sites do not have content history as they are
purged before shipping the product.
1. Click on the Test Folder.
2. Choose menu View > Folder Properties.
3. Click on the Purge History button on the tool bar. (
)
4. Set the today’s date to purge. Uncheck the options for Recursive Purge or Purge versions
marked as published, as shown below:
5. Click on the Purge History button to start the purge process (
).
When the purge is complete, only the published versions of the content will be left in the history. If
you want to remove all older versions of content, check the Purge versions marked as published
box before purging.
74
CMS400.NET Administrator Training Manual
CMS400.NET Version 8.0.2 Doc:20101215
UNIT 13
Unit 13 — Copying / Moving Content
Reference: “Content” chapter in Ektron CMS400.NET Reference Manual.
Users can copy or move content from one folder to another folder, but they cannot copy or move an
entire folder.
Note: To achieve something like moving a folder, a user must create a new folder with the same settings as the original
one, then move all the content from the original folder to the new folder.
If the original folder uses a Smart Form, make sure the destination folder uses the same Smart.
When moving content, the content’s ID does not change. When copying a piece of content, the
original will keep its original ID and the copy of that content will have a new ID, since they are
separate content items.
Exercise 13-1: Copying Content
1. Navigate to the CMS400 > About Us folder.
2. Click on HTML Content next to the "About Us" content to highlight it.
3. Right Click and select Copy.
4. Browse to “Test Folder”
5. Right click and Paste Content.
Click ALL to accept the change.
CMS400.NET Administrator Training Manual and Exercises
CMS400.NETVersion 8.0.2 Doc:20101215
75
Exercise 13-2: Moving Content
1. Create a new folder under Test Folder and call it Test 2.
2. Browse to the Test Folder.
3. Click on HTML Content next to the "About Us" content to highlight it.
4. Right Click and select Cut.
5. Browse to Test 2
6. Right click and select Paste Content.
7. Click Continue to finish moving the content.
76
CMS400.NET Administrator Training Manual
CMS400.NET Version 8.0.2 Doc:20101215
UNIT 14
Unit 14 — Using Tasks
Reference: “Managing Tasks” chapter in Ektron CMS400.NET Reference Manual.
Tasks can be assigned a Task Category, then a Task Type. Task Categories and Task Types have a
hierarchical relationship: the Task Category is the parent and the Task Type is the child. Several
types can be assigned to each category. Some examples of Task Categories might be Engineering,
Sales, Documentation or Web Design. Examples of Task Types might be Edit Content, Update
Documents or Contact Customer. Task Categories and Task Types provide a way to filter tasks.
Tasks are under the reports section.
Reports > Tasks
CMS400.NET Administrator Training Manual and Exercises
CMS400.NETVersion 8.0.2 Doc:20101215
77
Exercise 14-1: Adding a New Task Category and Task Type
1. Select the Settings tab, expand Configuration and select Task Types.
2. Click the Add Task Type button (
). The Add Task Type screen appears.
3. Click the Add Task Type to New Task Category radio button.
4. In the New Task Category field enter “Documentation”.
5. In Task Type field enter “Check References”.
6. In the Task Type Description field enter “Cite your references”.
7. Uncheck Not Available. (unchecked is the default setting)
8. Click Save Task Type (
).
9. Your new task categories and task types appear on the View Categorization screen.
Exercise 14-2: Adding a New Task Type to an Existing Task Category
78
CMS400.NET Administrator Training Manual
CMS400.NET Version 8.0.2 Doc:20101215
UNIT 14
1. Click the Add Task Type button (
). The Add Task Type screen appears.
2. Click the Add Task Type to Existing Task Category radio button or click the drop
down box.
3. Choose a category from the drop down box such as “Documentation”.
4. Add a task type name in the Task Type field such as “Check grammar”.
5. Enter a Task Type Description like “check grammar according to style guide”.
6. Uncheck Not Available.
7. Click Save Task Type (
).
8. Your new task categories and task types appear on the View Categorization screen.
Exercise 14-3: Creating Tasks for a Content Item
1. In the Workarea, click on the Content tab.
2. Select the Test Folder.
3. Open a piece of content.
4. Click the Add Task button (
). The Add Task page appears.
5. Enter a title for the task.
6. Assign the task to someone by clicking on the Select User or Group link.
Note: By default, the task is assigned to you.
7. Set the Priority to High.
8. Select the Task Category & Task Type. If the Category & Type are not in the list, click
Add to add a new Category and/or Type like “Documentation” and “Check References”.
9. Set the Start Date and Due Date, if needed.
10. Enter a Description of the task.
11. Click the Save button (
).
CMS400.NET Administrator Training Manual and Exercises
CMS400.NETVersion 8.0.2 Doc:20101215
79
Exercise 14-4: Creating General Tasks
1. In the tabs section, click on Reports and select "Assigned by and to me in the left side navigation tree. The Tasks report list will be displayed.
2. Click the Add button (
) to create a new task.
3. The Task creation process will be the same as above exercise. The only differences are
you can select Language and Content here.
4. Click the Save button (
).The new task will appear in the View Tasks list.
Exercise 14-5: Adding Comment &
Changing State on a Task
In the Workarea, click the Reports Tab.
Select Reports > Tasks > Assigned by and to
me.
A list of tasks appears.
Click the title of any task.
Click the Add Comment button (
text for the comment.
) and enter the
Click on Insert to add the comment to the task.
Click the Edit button (
) to change the settings for
the task, such as the State, or to re-assign it to
someone else.
Click the Update button (
80
) when finished editing.
CMS400.NET Administrator Training Manual
CMS400.NET Version 8.0.2 Doc:20101215
UNIT 15
Unit 15 — Creating and Assigning a Smart
Form
Reference: “Smart Forms” chapter in Ektron CMS400.NET Reference Manual.
Smart Forms (XML Content) provide a method for creating structured data. This is useful for
custom programming or if you need more control over the display of content. Like metadata
definitions, smart forms must be assigned to folders to make them available. [For more information
about Smart Forms, please refer to the Admin Manual – Managing XML Content.] content designer.
Exercise 15-1: Creating a Smart Form
1. In the Workarea, click the Settings tab,
2. Expand Configuration.
3. Click on Smart Form Configuration.
4. Click the Add Smart Form button (
) to create a new smart form.
5. For the Title of the Smart Form, enter “Job Listing”.
6. Click the Save button (
).
CMS400.NET Administrator Training Manual and Exercises
CMS400.NETVersion 8.0.2 Doc:20101215
81
Exercise 15-2: Using a Plain Text Field
1. In the design area, type “Job Title: ”
Note: There is a space after the colon.
2. Add a Plain Text Field (
dow pops up.
) to the right of the text. The Plain Text Field properties win-
3. Enter the information circled in red in the following picture:
4. Click OK.
5. Click to the right of the Plain Text Field and press <Enter> to create a new line.
Exercise 15-3: Using a Choices Field
1. Type “Department: ” on the new line.
2. Add a Choices field (
82
) to the right of Department. The properties window pops up.
CMS400.NET Administrator Training Manual
CMS400.NET Version 8.0.2 Doc:20101215
UNIT 15
3. Enter the following information:
4. Creating a list of selections. The Content Editor will be able to select from this list when
entering data into the Smart Form.
a. Type “[Select]” in the Text box.
b. Click Add. “[Select]” will be added to the Item List on the left side.
c. In the Text box, highlight “[Select]” and type “Sales”, then click Add.
d. Repeat the process to add more departments as shown below.
e. Check the box next to First item is not a valid selection.
f. Check the box to the left of “[Select]” to make it the default selection.
If you don’t check an item, the first one in the list will become the default.
The result will look something like this:
CMS400.NET Administrator Training Manual and Exercises
CMS400.NETVersion 8.0.2 Doc:20101215
83
The order of the items in the list can be changed by highlighting an item and
using the Move Up and Move Down buttons. Items can be removed using the
Remove button.
g. Click OK.
Exercise 15-4: Using a Check Box
1. Create a new line and type “Multiple Locations: ”
2. Select the Check Box (
) to the right of “Multiple Locations:”.
3. Enter the following information and click OK.
84
CMS400.NET Administrator Training Manual
CMS400.NET Version 8.0.2 Doc:20101215
UNIT 15
Exercise 15-5: Using Relevance
1. Create a new line and click the Group box icon (
)
2. Type “Multi Check” in the descriptive name, field name and Caption.
3. Select the Relevance tab.
CMS400.NET Administrator Training Manual and Exercises
CMS400.NETVersion 8.0.2 Doc:20101215
85
4. Select from the example dropdown: “ A checkbox field is checked ({x} = true)
5. Click the cursor in front of “{x}=’true’” and then select MultipleLocations (Multiple Locations)
86
CMS400.NET Administrator Training Manual
CMS400.NET Version 8.0.2 Doc:20101215
UNIT 15
6. Double click on Multiple Locations (Multiple Locations).
7. The Condition should read “/root/MultipleLocations = ‘true’”.
8. Select OK.
9. Insert your cursor inside the group box you just created called “Multi Check.”
10. Inside the group box, type in the word “Location:” and insert a new text field.
11. In the Text field Box, type information below
CMS400.NET Administrator Training Manual and Exercises
CMS400.NETVersion 8.0.2 Doc:20101215
87
12. Select More than one underneath the allow box
13. Click OK.
Exercise 15-6: Relevance Check
Once you have successfully created your relevance, you can check to make sure it is working
properly by using the view data entry checker to check the smart form functionality.
1. Select the icon called “view data entry”. This option will simulate the function of the smartform.
2. Select the check box “multiple locations”. This should make the group box “multi check”
to appear.
3. Select the first icon to go back to design view.
Exercise 15-7: Using a Calendar Field
1. Create a new line and type “Starting Date: ”
2. Select the Calendar Field (
) to the right of Starting Date:.
3. Enter the following information and click OK.
Note: This field is not indexed.
Exercise 15-8: Using a Rich Area Field
1. Create a new line and type “Job Description: ”
2. Add a Text Field (
) below “Job Description”.
3. Select the “allow rich formatting” option and the “allow multiple lines” will automatically
be selected.
88
CMS400.NET Administrator Training Manual
CMS400.NET Version 8.0.2 Doc:20101215
UNIT 15
4. Check off the rich area text field The page should look like this:
5. Click the Update button (
) to update the Smart Form design and save the XML configuration. The Edit Full Text Search page appears showing the XPath for the fields that
have an index setting.
No settings need to be changed here.
CMS400.NET Administrator Training Manual and Exercises
CMS400.NETVersion 8.0.2 Doc:20101215
89
6. Click on the Update button (
). The View Smart Form Configuration screen appears:
If you need to make changes later to the smart form, use the Data Design tool located on the Smart
Form configuration screen shown above.
“Edit” Smart Form Configuration
90
“Data Design” - Edit Smart Form XML
Configuration
CMS400.NET Administrator Training Manual
CMS400.NET Version 8.0.2 Doc:20101215
UNIT 15
View XSLT
Exercise 15-9: Adding a Smart Form to the Folder Properties
1. Click the Content tab.
2. Select “Test Folder”.
3. Within “Test Folder”, create a new folder called “Jobs.”
4. Remove “Inherit Parent Template” and add the default template “jobs.aspx”.
5. Click on the Smart Forms tab.
6. Uncheck the Inherit Parent Configuration box and click OK on the popup window.
7. Remove the “Event” smart form.
8. Select “Job Listing” from the select list.
9. Click Add.
10. Check the Require Smart Forms box
CMS400.NET Administrator Training Manual and Exercises
CMS400.NETVersion 8.0.2 Doc:20101215
91
11. Click the radio button next to “Job Listing”.
12. Click the Add Folder button (
).
13. Select the “Jobs” folder.
14. Select New > Job Listing.
15. Fill out the form to create a new Job Listing.
16. Publish or Submit the content. Note the ID number of this new Job Listing.
17. You can view this new Job Listing by entering this URL on your browser:
“ http://localhost/cms400developer/jobs.aspx?id=xx “ where xx is the ID number of the
Job Listing you created.
(e.g., http://localhost/cms400developer/jobs.aspx?id=280)
92
CMS400.NET Administrator Training Manual
CMS400.NET Version 8.0.2 Doc:20101215
UNIT 15
DAY 2 OBJECTIVES
Content, Folders and Workarea review and XML content
Review Day 1
SEO & Special Content Management
SEO
Metadata
URL Aliasing
Users, Groups, Roles & Permissions
Users and User Groups
Special Roles
Setting Permissions
Approval chains
Navigation
Learning about Search
Taxonomy and Categorizing Content
Folder Breadcrumbs
Menus
Collections
Business Rules
Content Rating and Reviews
Content Flagging
CMS400.NET Administrator Training Manual and Exercises
CMS400.NETVersion 8.0.2 Doc:20101215
93
UNIT 16
Unit 16 — Creating and Assigning Metadata
Definitions
Reference: “Metadata” chapter in Ektron CMS400.NET Reference Manual.
Metadata definitions determine the metadata values that are available to content on your site. Using
a metadata definition involves two steps: creating the definition and assigning it to a folder.
Exercise 16-1: Creating a Metadata Definition
1. Click on the Settings tab in the Workarea.
2. Click on the Configuration folder.
3. Click on Metadata Definitions.
4. Click the Add Metadata Definition button (
).
5. Name the new “Featured”
6. Set the Type to Searchable Property.
7. Set the Style to be Yes or No.
CMS400.NET Administrator Training Manual and Exercises
CMS400.NETVersion 8.0.2 Doc:20101215
95
8. Leave the Default box unchecked.
9. Click the Save button (
).
Exercise 16-2: Assigning a Metadata Definition to a Folder
1. Click the Content tab and select “Test Folder”.
2. Create a new folder called “Announcements”.
3. Click the Metadata tab.
4. Uncheck the Inherit Parent Configuration box.
5. Assign the “Featured” metadata value.
6. Click the Update Folder button (
).
Exercise 16-3: Assigning a Metadata Definition to Content
1. Create a new piece of HTML content in the “Announcements” folder.
2. Click the Metadata tab
3. Scroll down the page until you see the Search Data section, then check the “Featured”
box to assign it to the content.
4. Click (
96
) to publish revised content.
CMS400.NET Administrator Training Manual
CMS400.NET Version 8.0.2 Doc:20101215
UNIT 17
Unit 17 — Creating a URL Alias for Content
Reference: “URL Aliasing” chapter in Ektron CMS400.NET Reference Manual.
Aliasing is an Ektron CMS400.NET feature that lets you create alternate addresses for your Web
site’s pages. By default, Ektron CMS400.NET Web pages have the following format.
You may want to change a URL to an easy to read format like:
http://www.example.com/help.aspx?id=27
to
http://www.example.com/support/
or
http://www.example.com/help/technical_suppport.aspx
Exercise 17-1: Enabling URL Aliasing
1. In the Workarea, click on the Settings tab.
2. Next open the Configuration > Url Aliasing > Settings folder.
3. Click Edit button (
) to configure URL Aliasing.
4. Enable Manual, Automatic, RegEx and Community aliasing.
CMS400.NET Administrator Training Manual and Exercises
CMS400.NETVersion 8.0.2 Doc:20101215
97
5. Add an extension “,.htm”. (This will show how an aspx page can look like .htm page.)
Note: Be sure to check on restrictions to extensions in the documentation for IIS 7 and non-aspx file types.
6. When finished, click the Save button (
).
Exercise 17-2: Configuring Manual URL Aliasing
1. Click on the Configuration > Url Aliasing > Manual.
2. Click on the Add button (
).to add a new manual alias.
3. Be sure Active and Primary are checked.
4. Enter the alias as “Ektron_Rated_Positive.”
5. Click the link Select A Content Block and choose "Ektron Rated Positive" content
from the folder \CMS400Demo\About Us\News. Notice the QuickLink is updated automatically to show “news.aspx?id=32”.
6. Click the Save button(
).
7. See the new page on your browser by entering the URL
http://localhost/cms400Developer/Ektron_Rated_Positive.aspx.
98
CMS400.NET Administrator Training Manual
CMS400.NET Version 8.0.2 Doc:20101215
UNIT 17
Exercise 17-3: Configuring Automatic URL Aliasing (Folder type)
1. Click on the Configuration->Url Aliasing->Automatic.
2. Click on the Add button (
).to add a new automatic alias.
3. Be sure “Active”” is checked.
4. Set the Source Type to “Folder”.
5. Set the Alias Root to “CMS400Demo”
6. Set the Alias Format to “ContentTitle”
7. Set the Extension to “/”.
8. Set the Space replacement character to “_”.
9. Select the Customized Alias Path to exclude the path “CMS400Demo”
10. Click the Save button (
).
11. See the automatic alias that has been assigned to the content by looking at the ALIAS tab
of the content. Look at content "Ektron Rated Positive"in the folder “CMS400Demo>About Us->News”.
CMS400.NET Administrator Training Manual and Exercises
CMS400.NETVersion 8.0.2 Doc:20101215
99
12. You can browse to the page by entering the URL:
http://localhost/cms400developer/About_Us/News/Ektron_Rated_Positive/
Note: Taxonomy-based Aliasing is set in a similar manner. Both can be used on the site at the same time.
Exercise 17-4: Configuring RegEx URL Aliasing
RegEx expressions allow site visitors to enter a human-readable URL into the browser address field
and transform that entry into the query string component of an Ektron CMS400.NET page. The
benefit is that the site visitor can “guess” other pages based on an easily recognizable pattern.
The objective of this exercise is to take a URL that looks like this:
http://localhost/cms400dev765/blogs.aspx?blogmonth=3&blogyear=2006&blogday=13&blogid=41
and transform it to look like this:
http://localhost/cms400dev765/blogs/2006/03/13/41/
1. In the Workarea, click on the Settings > Configuration > Url Aliasing > Regex.
2. Click on the Add a Regular Expression button (
).
3. Enter a name of Blogs/Year/Month/Day/ID. (The name will help you understand how this
alias works.)
4. Click on Expression Library to open a list of preconfigured Regular Expressions.
5. Choose the first RegEx in the Expression Library (It is the closest option to apply to the
pattern we want.)
100
CMS400.NET Administrator Training Manual
CMS400.NET Version 8.0.2 Doc:20101215
UNIT 17
6. The Expression text field and Expression map field are automatically populated with the
expression.
7. Make the following modifications so the expression and expression map look like this:
8. Test this expression by copying from the “Example URL” into the Expression Testing
“Requested URL:” text box and click on the “Transform” button.
If the Requesting URL solution (in gray) looks correct, then the expression will work.
CMS400.NET Administrator Training Manual and Exercises
CMS400.NETVersion 8.0.2 Doc:20101215
101
9. Click the Save button to save the new Reg Ex URL.
10. To see the results, go to a browser and enter the URL:
http://localhost/cms400developer/blogs/2006/03/13/41. You will see a blog created on
March 13, 2006.
Exercise 17-5: Configuring Community URL Aliasing
1. In the Workarea, Click Settings->Configuration->Url Aliasing->Community
2. Click Add a new alias button (
).
3. Be sure “Active” is checked.
102
CMS400.NET Administrator Training Manual
CMS400.NET Version 8.0.2 Doc:20101215
UNIT 17
4. Set the Source Type to “User”.
5. Leave the Alias Path blank
6. Set the Extension to “/”.
7. Set the Space replacement character to “_”.
8. Click Save (
).
9. Navigate to Settings>Users>Admin.
10. Select the Profile Links tab to see the user alias you created.
CMS400.NET Administrator Training Manual and Exercises
CMS400.NETVersion 8.0.2 Doc:20101215
103
UNIT 18
Unit 18 — Users, Groups and Roles
Reference: “Managing Users and User Groups” chapter in Ektron CMS400.NET Reference Manual.
Ektron CMS has a User, Groups, and Permissions model based upon Windows’ user model. It can
also synchronize with Active Directory.
User Properties
Username
First Name
Last Name
Password
User Language
E-Mail Address
Disable E-Mail Notifications
User Group Memberships
User Language
Application Menus and messages
Language SDK
Builtin User
"Emergency User" in case of an Active Directory misconfiguration
The Password and Username should be changed.
Doesn't count against licensed users
Can't be included in a workflow
Can't be a member of any user groups
Can't edit content
Deleting a User
A user is only marked deleted in the database; all information about the user
remains, for references such as Last User to Edit.
Content that is currently checked out by a deleted user is automatically checked
in
The user is removed from any workflows and in-process content blocks are
bumped to the next stage, which may cause them to be published. For this reason Ektron recommends that workflows be created with user groups instead of
individual users.
Roles
Give CMS Users or User Groups partial CMS Administrator privileges
The CMS has built-in roles and supports custom roles
CMS400.NET Administrator Training Manual and Exercises
CMS400.NETVersion 8.0.2 Doc:20101215
105
Exercise 18-1: Adding a User
1. In the Workarea, click on the Settings tab.
2. Click on Users and a list of available users will appear in the right pane.
3. Click the Add User button (
).
4. Create a user named “User1” with the following information:
Username: “User1”
First Name: “User”
Last Name: “One”
Display Name: “User1”
Password: “user1”
Confirm Pwd: “user1”
User Language: “App Default”
E-Mail Address: “[email protected]”
Forum Editor: “eWebEdit400”
Avatar: leave blank
Address: 03060
Check Disable Receiving of System Notification E-mail.
*Region – select any region
106
CMS400.NET Administrator Training Manual
CMS400.NET Version 8.0.2 Doc:20101215
UNIT 18
5. Click the Save button (
) to save the new user.
6. Repeat steps 4-6 to create users:
“Manager1” with password “manager1”
“Ima Gone” with password “ima”
Add yourself as a user. (remember your password)
Exercise 18-2: Deleting a User
There are two ways to delete users in the CMS.
1. Click on Users to view all the users.
2. Delete “Ima Gone” by checking the boxes next to the name.
3. Click the delete button (
).
Note: Do not delete yourself from the User list.
CMS400.NET Administrator Training Manual and Exercises
CMS400.NETVersion 8.0.2 Doc:20101215
107
Exercise 18-3: Updating User Information
To update user information, click on the user name. There are tabs for general, work page, custom
and activities.
Exercise 18-4: Adding Custom Properties
1. In the Workarea, select the Settings > Configuration > Custom Properties > User
Properties.
2. To add new Custom Properties select the Add icon (
).
3. Add the following information:
4. Click the Save button (
108
) to add the new custom property.
CMS400.NET Administrator Training Manual
CMS400.NET Version 8.0.2 Doc:20101215
UNIT 18
Exercise 18-5: Creating & Populating User Groups
1. In the Workarea, select the Settings tab, then click on User Groups.
2. Click the Add User Group button (
).
3. For the User Group Name, enter “Group1”. The Description field is optional.
4. Click the Save button (
) to save the group. Now you should see the User Group
Name list, with “Group1” added.
5. Click on “Group1” to view users in the group. Since it’s a new User Group, there won’t be
any users in it.
6. Click the Add User button (
). The complete list of users will appear in the right pane.
7. Check the following users:
“User1”
“Manager1”
Yourself
8. Click the Save button (
) to add these users into the Group. A pop-up window will ask
“Are you sure you want to add selected user(s) into this group?”
9. Click OK.
10. Add the following groups:
“Content Editors”
“Content Approvers”
11. Add “User1” to the “Content Editors” group and add “Manager1” to the “Content Approvers”
group.
EDITORS
User1
APPROVERS
Manager 1
Exercise 18-6: Assigning a Role to a User
Specific roles can be given to various users or groups that give permissions that normally only ad
administrator would have. By doing this, you can provide additional functionality without assigning
them all the privileges of an administrator.
We will give “Manager1” the role of “Folder User Admin” and the ability to copy and move content.
CMS400.NET Administrator Training Manual and Exercises
CMS400.NETVersion 8.0.2 Doc:20101215
109
1. In the Workarea click on the Settings tab.
2. Open Roles > Built-In > Folder-Specific.
3. Click on Folder User Admin.
4. Click the Add Role Member button (
).
5. Check the box beside “Manager1”
6. Click the Save button (
).The user is added to the Role Member Name list.
Exercise 18-7: Removing a Role Assigned to a User
1. Click the minus sign [
] in the toolbar
2. Check the box beside the username “jedit”.
3. Click the Delete button (
110
). The user is removed from the Role Member Name list.
CMS400.NET Administrator Training Manual
CMS400.NET Version 8.0.2 Doc:20101215
UNIT 19
Unit 19 — Setting Folder Permissions
Reference: “Permissions” chapter in Ektron CMS400.NET Reference Manual.
Exercise 19-1: Setting Folder Permissions
1. On the Content tab, select “Test Folder”.
2. On the View menu, select Folder Properties.
3. Click the View Permissions button (
).
4. Uncheck Allow this object to inherit permissions, then click OK on the popup message.
5. Click the Add Permission button (
).
6. Select the following CMS groups below to add to folder:
Content Approvers – Full Permissions, as well as advanced permissions
Content Editors – Read Only, Edit, Add, Delete, Library read only, Add images
Content Publishers – Read Only
Group 1 – Read only, edit, add, delete, library read only, add images
Manager1 – Full Permissions, as well as advanced permissions
CMS400.NET Administrator Training Manual and Exercises
CMS400.NETVersion 8.0.2 Doc:20101215
111
7. Click the Save button (
).
8. Click the Delete Permission button (
) and select “Everyone”.
9. Click the Delete Permission button (
) and select “jedit”.
10. Click OK in the pop up to delete the Everyone Group’s permissions for this folder.
Exercise 19-2: Making Content Private
This makes the content in this folder private. This means it is only viewable by authorized CMS
users and membership users.
1. On the Content tab, select the “Test Folder” and view its properties.
2. In the View Permissions screen, check The content in this folder is private and
can only be viewed by authorized users and members. A popup message asks you
to confirm.
3. Take note of a Content ID number inside this folder (for step 5 below)
4. Click OK.
5. Logout of the CMS.
6. Check the content on the site by entering the following URL:
http://localhost/cms400developer/news.aspx?id=xx (where xx is your content ID
number.)
The private content will no longer be visible.
7. After seeing the Private effect, go back to the Test Folder and uncheck the Private setting.
112
CMS400.NET Administrator Training Manual
CMS400.NET Version 8.0.2 Doc:20101215
UNIT 20
Unit 20 — Content Approval Chains
Reference: “Approval Chains” chapter in Ektron CMS400.NET Reference Manual.
Content approval chains can be as simple or as complex as required to suit the needs of your
organization. Since it is more efficient to manage User Groups than individual users, we
recommend creating your approval chain with User Groups.
Exercise 20-1: Setting up an Approval Chain
1. In the Workarea, select the “Test Folder”.
2. Create a new folder called Approvals.
3. After you add the ‘Approval’ folder go to View > Folder Properties.
4. Click the View Approvals button (
5. Click on the Add button (
).
).
6. Select the “Content Approvers” group and click OK.
You now have a simple approval chain for this folder.
7. Logout, then Login as “User1” (a member of the “Content Editors” group)
8. Create a new content item in the “Test Folder”.
9. Click the Submit button (
) to submit the content for approval.
10. After adding content, click on the “Test Folder” to see that the content has submitted,
Notice the Status “S” for submitted content.
11. To see this effect on existing content, edit existing content and Submit it.
CMS400.NET Administrator Training Manual and Exercises
CMS400.NETVersion 8.0.2 Doc:20101215
113
Exercise 20-2: Approving, Declining and Publishing Content (Smart
Desktop)
1. Login as “Manager1” (a member of the Content Approvers group) and open the Workarea.
2. You will need to create an approval tab in the Smart Desktop, and drag and drop the
approval widget into an open column.
3. After you drop the widget in you will see your content that is waiting for your approval.
4. Click on one the title of the content you are approving and the following screen will
appear:
As Manager1 (a member of the Content Approvers group) you will see options to Publish,
Decline, Edit, View Published, View Diff, or Back.
a. Either click the Publish button (
) to publish the content to the live site, ...
b. Or click the Decline button (
) to decline the content. A pop-up window will
appear where you can enter the reason for declining the content, then click OK.
Exercise 20-3: Approving, Declining and Publishing Content (E-mail
Link)
Note: Email configurations must be set in the Setup area and the CMS User profile must contain a valid email that is
enabled for the following exercise to work.
114
CMS400.NET Administrator Training Manual
CMS400.NET Version 8.0.2 Doc:20101215
UNIT 20
When content is submitted for approval, an e-mail is sent to the approver(s) informing them that
there is content awaiting approval. The e-mail contains a URL to the page where the content will be
displayed:
1. If you received an e-mail, Click on the URL Link. You will be taken to that content page.
2. Log in to the CMS.
Note: The revised content will not be visible as it has not yet been approved.
3. Hover over the access point and see the menu.
Note: If the content is new it may appear blank on the web page.
4. To see the new version of the content, select Preview from the dropdown list. The content awaiting approval will appear a new window.
5. Alternately, you can select View Content Difference to see what has changed in the content.
6. To Approve, Decline or Edit the content, click on the Approve button to open the content
in the Workarea, then perform the required action.
Exercise 20-4: Deleting an Approval Chain
1. Login as “Admin” and go to the Workarea.
2. Go to the Content tab and select the “Test Folder”.
3. View the Folder Properties.
4. Click the View Approvals button (
).
CMS400.NET Administrator Training Manual and Exercises
CMS400.NETVersion 8.0.2 Doc:20101215
115
5. Click on the Delete button (
),
6. Select “Content Approvers” and click OK. The approval chain is deleted.
Note: We recommend that you turn off approval chains after this exercise
116
CMS400.NET Administrator Training Manual
CMS400.NET Version 8.0.2 Doc:20101215
UNIT 21
Unit 21 — Search
Reference: “Search” chapter in Ektron CMS400.NET Reference Manual.
Exercise 21-1: Synonyms
Synonyms allow the administrator to set results for searches when the visitor misspells or uses old
terms.
1. In the Workarea, open the Settings Tab.
2. Select the Configuration > Search folder and open it.
3. Click on Synonyms.
4. To add a suggested result click on the Add Synonym Set (
).
5. Set the Set Name to “Training Set”.
6. Add a list of terms that you want to be synonymous with training (including the word training) such as: training, education, traing, and edu.
Note: Add a semi colon between each of the terms.
7. Click the Save button (
) when done. Searching for any of the terms in the synonym set
will return the same results.
Exercise 21-2: Suggested Results
1. In the Workarea, open the Settings Tab.
2. Select the Configuration > Search folder and open it.
3. Click on Suggested Results.
4. To add a suggested result click on the Add New Suggested Results Set (
).
CMS400.NET Administrator Training Manual and Exercises
CMS400.NETVersion 8.0.2 Doc:20101215
117
5. Add a single term called “training”.
6. Click in the Suggested Results box, select “Add” from the menu and fill out the fields like
this:
7. Click the Add button (
), then the Save button (
) when done.
Note: The indexing system may take a couple of minutes to add this new suggested result to the search results. If you do
not see the results immediately, try again in a few minutes.
To search the site:
1. Click on >> Site Search on the Ektron Medical site home page:
118
CMS400.NET Administrator Training Manual
CMS400.NET Version 8.0.2 Doc:20101215
UNIT 21
2. Enter “training” and click the Search button.
Results of a search look like this:
Exercise 21-3: Integrated Search
You can expand the Web search to any Web-accessible files on your server, even if they are not part
of Ektron CMS400.NET. The Integrated Search only works with a Web Search server control that is
placed on a Web page. It does not work with the Workarea search or any other search server
control. Use an Integrated Search if your site’s search should include non-Ektron CMS400.NET files
which, nevertheless, need to be searchable by site visitors.
Since creating a virtual folder is a Windows procedure, the procedure is explained in
http://support.microsoft.com/kb/301392/en-us?FR=1&PA=1&SD=HSCH.
This illustrates an IIS Virtual Directory called “CMSDocuments” that is pointed to the folder called:
C:\Program Files\Ektron\CMS400v80\Documentation.
Add the Virtual Directory name in the Settings->Configuration->Integrated Search Folders
configuration.
CMS400.NET Administrator Training Manual and Exercises
CMS400.NETVersion 8.0.2 Doc:20101215
119
To distinguish Integrated Search content from regular content, the ID number of this content begins
with 1,000,000,000. Also, the last author name is Non_Cms_User.
Note: Allow a few minutes to pass before searching integrated content so that the indexing service has time to refresh.
Then search for a term not found in the CMS400Developer site like “Plug-In”
DEVELOPERS need to set the WebSearch Server control property “CustomSearch” to the same
name as the virtual directory.
Exercise 21-4: Search Phrase Report
This report will help you understand what your visitors are looking for on your web site.
To run this report, select the Reports tab > Contents > Search Phrase Reports.
120
CMS400.NET Administrator Training Manual
CMS400.NET Version 8.0.2 Doc:20101215
UNIT 21
CMS400.NET Administrator Training Manual and Exercises
CMS400.NETVersion 8.0.2 Doc:20101215
121
UNIT 22
Unit 22 — Taxonomy
Reference: “Taxonomy” chapter in Ektron CMS400.NET Reference Manual.
Ektron CMS400.NET’s Taxonomy Feature lets you assign custom information categories to folders or
individual content items. You can then place a listing of those categories (Taxonomy) on any section
of a Web page. When that page displays, all published items in that Taxonomy appear. Taxonomy is
an easy way to organize and display Web site content according to your categories. You can assign
any number of content items from any folder to a Taxonomy.
This exercise will add a new category to the Ektron Products taxonomy and apply it to content
already existing in the Ektron Medical site.
Taxonomy categorizes content but is unlike folders in the Workarea.
The “directory server control” is used to display the taxonomy categories.
Taxonomy displays content categories in a way that makes sense to the site visitor
instead of the administrator or content editors.
Taxonomy allows a single piece of content to appear in many different categories on a
web site.
There is no limit to the number of category levels you can assign to a taxonomy.
Individual content items can be assigned categories or entire folders can be associated to
a taxonomy.
Taxonomy is a useful tool when filtering Search Results.
Taxonomy categories can be set for content, content folders, blogs, discussion topics, templates, URL Alias, Users, Members, and Groups.
Only administrators or users to whom the Taxonomy-Administrator role has been
assigned can see the Taxonomy option in the content tab.
Taxonomies can be assigned to content at the folder level. So, taxonomy on one folder
may not be available in another.
Taxonomy display style can be controlled by EKML.
Taxonomy data can be exported and imported as XML files.
Exercise 22-1: Taxonomy
1. In the Workarea, select the Content tab and select the taxonomies tab on the left hand
side.
CMS400.NET Administrator Training Manual and Exercises
CMS400.NETVersion 8.0.2 Doc:20101215
123
2. Click on Ektron Products (id 48).
3. Right-click “Ektron Products” then select Add Category .
4. For the Category Title enter “Conditions”.
5. Click the Save button (
).
6. Click on the category “Conditions”.
7. Right-click “Conditions” and select Add Category to add new categories under Conditions.
8. Add three conditions: “Heart Disease”, “Cancer” and “Kidney Disease”
Exercise 22-2: Assigning Content Items to Taxonomy Categories
1. Select the cancer taxonomy and select the add items to taxonomy icon (
).
2. In the folder display, navigate to: CMS400Demo > Conditions > Wellness Articles
and check cancer-related articles.
124
CMS400.NET Administrator Training Manual
CMS400.NET Version 8.0.2 Doc:20101215
UNIT 22
3. Click the Update button (
).
4. Repeat steps 1 through 3 for the following folder:
CMS400Demo > Book Store.
5. Assign items (at least one each) to the “Kidney Disease” and “Heart Disease” categories.
6. To see the results, go to the Ektron Medical page in Contact Information > Wiki: http://localhost/CMS400Developer/wiki.aspx. Near the bottom, you will see the Category display with “Conditions” as one of the choices.
7. Click on “Conditions”, then one of the diseases to see all the content in its taxonomy.
Exercise 22-3: Assigning a Taxonomy Category to a Content Item
1. In the Workarea, click on the Content tab, then go to the CMS400Demo > Conditions
folder.
2. View the folder Properties.
3. Click the Edit icon (
).
4. Click the Taxonomy tab.+Inherit Parent Configuration should be unchecked.
CMS400.NET Administrator Training Manual and Exercises
CMS400.NETVersion 8.0.2 Doc:20101215
125
5. Check Ektron Products.
6. Click the Update button (
).
7. Click on the “Conditions” folder.
8. Click on the content item named “Cancer” (ID 38). Note that if you look at the Category
tab, it is blank.
9. Click the Edit button (
) and choose the Category tab.
10. Select the Ektron Products > Conditions > Cancer taxonomy item (expand the categories by clicking the plus sign next to them).
11. Click the Publish button (
).
12. To see the results, go to the Ektron Medical page Contact Information > Wiki: http://localhost/CMS400Developer/wiki.aspx. Near the bottom, you will see the Category display with “Conditions” as one of the choices.
13. Choose Conditions > Cancer. You will see the new Cancer content you added.
126
CMS400.NET Administrator Training Manual
CMS400.NET Version 8.0.2 Doc:20101215
UNIT 22
Exercise 22-4: Copying and moving a Taxonomy Category
This feature allows you to change the order and structure of your taxonomy easily after adding
items to the categories. Not only with the taxonomy categories move, but it will also keep anything
you have previously associated with that category.
1. Place your cursor over the taxonomy node “conditions” that we just created.
2. Right click and select “cut conditions”
3. Click on the “support” taxonomy node.
4. Right click and select Paste Taxonomy.
You can also copy using the same method as above, only selecting “copy conditions” instead of cut.
CMS400.NET Administrator Training Manual and Exercises
CMS400.NETVersion 8.0.2 Doc:20101215
127
UNIT 23
Unit 23 — Creating Folder Breadcrumbs
Reference: “Breadcrumbs” chapter in Ektron CMS400.NET Reference Manual.
Breadcrumbs are navigational aids for visitors to your site, which show them the path to the page
they’re on. Check with your developers regarding the actual links to use in the Folder Breadcrumbs.
[To read more about Breadcrumbs, please read the Breadcrumbs section in Admin Manual –
Managing Content.]
Exercise 23-1: Changing a Breadcrumb
1. In a browser, navigate to the About Us > News page. Notice the breadcrumb that says
Home > About Us > News.
2. Go to the Workarea and select the folder About Us > News.
3. Go to View > Folder Properties.
4. Click the Edit button (
).
5. Click on the Breadcrumb tab.
6. Remove the “About Us” path in the breadcrumb by clicking the Delete Path button (
7. Click the Update button (
).
).
8. Navigate to the About Us > News page again. Notice the breadcrumb change.
CMS400.NET Administrator Training Manual and Exercises
CMS400.NETVersion 8.0.2 Doc:20101215
129
Exercise 23-2: Adding Another Level to a Breadcrumb
1. In the Workarea and select the folder About Us > News.
2. Go to View > Folder Properties.
3. Click the Edit button (
).
4. Click on the Breadcrumb tab.
5. Enter“Events” in the Title Field.
6. Enter “events.aspx” in the URL Link field.
7. Click the Add button.
8. Move the “Events” breadcrumb up one level by first clicking on it (it will display in blue)
then use the green UP arrow. Your breadcrumb order should now be Home > Events >
News.
9. Click the Update button (
).
10. Navigate to the About Us > News page again. Notice the breadcrumb change.
Exercise 23-3: Site Map from the Breadcrumb Settings
The Folder Breadcrumb control automatically generates a site map, which you can view as follows:
In your browser, go to the Ektron Medical page, click on Contact Information > Site Map. This
shows the site map that is automatically created as you create the folder breadcrumb settings.
Notice that the site map reflects the Home > Events > News hierarchy.
130
CMS400.NET Administrator Training Manual
CMS400.NET Version 8.0.2 Doc:20101215
UNIT 23
A SiteMap server control is added to the template by the developer. The sample results are shown
here.
CMS400.NET Administrator Training Manual and Exercises
CMS400.NETVersion 8.0.2 Doc:20101215
131
UNIT 24
Unit 24 — Menus
Menus are used to create a consistent navigational structure for your site with easy maintenance by
the site administrators.
Exercise 24-1: Adding a content item to a Menu
1. Login as Admin on the Ektron Medical site and go to the Workarea.
2. Click the Content Tab.
3. Click the Menu bar in the lower left.
4. Click About Us.
5. Select the Add Items (
).
6. Choose Content Item and click the Next button.
7. Browse to the CMS400Demo>About Us folder.
8. Check the box next to the “About Us” content.
Note: You can also add DMS documents or Library assets to the menu.
9. Click the Add button (
) to add the content items to the menu.
Exercise 24-2: Creating a Menu
1. Select the “Test Folder”.
2. Go to New > Menu.
3. Enter the Title “Training Menu”.
4. On the URL Link field, click on the Select Page button (
menu item.
) to choose the content for this
5. In the folder structure, select a content.
6. Click the Save button (
) to save the content selection.
CMS400.NET Administrator Training Manual and Exercises
CMS400.NETVersion 8.0.2 Doc:20101215
133
7. Click the Save button (
vious exercise.
) to save the menu. The new menu can be edited as in the pre-
Create Menus at the folder level, so the Menus will inherit the permissions of the folders in which
they are created. It is not recommended to create menus on the root level located in the Content
tab. Menus created directly within the folder structure will allow give the ability to apply
permissions to the menus.
Exercise 24-3: Adding an External Hyperlink
1. In the Workarea>Content>Menus, right-click on “Training Menu”.
2. Click Add Items. The Add New Item page appears.
3. Check External Hyperlink.
4. Click the Next button.
5. Enter “Ektron” in Title field and “http://www.ektron.com” in the Link field.
6. Click the Save button (
).
Exercise 24-4: Adding a Sub Menu
1. In the Workarea>Content>Menus, right-click on “Training Menu”.
2. Click Add Items. The Add New Item page appears.
3. Choose Sub Menu.
4. Click Next.
5. Enter “Sub Menu” in the Title field.
134
CMS400.NET Administrator Training Manual
CMS400.NET Version 8.0.2 Doc:20101215
UNIT 24
6. Click the Save button (
).
7. Right-click on "Sub Menu".
8. Click Add Items
9. Check External Hyperlink.
10. Click the Next button.
11. Enter “Ektron” in Title field and “http://www.ektron.com” in the Link field.
12. Click the Save button (
).
Exercise 24-5: Editing a Menu Item
1. In the Workarea>Content>Menus, click on “Training Menu”.
2. Click "Ektron" content to edit this menu.
3. For Target, click “Popup”.
4. Click the Save button (
).
Exercise 24-6: Reordering Menu Items
1. Select the Reorder Icon (
) to shift the content items
2. Select a menu item.
3. Use the Up or Down arrow on the right to move that item up or down the order. Note that
“Sub Menu” is included in the list.
4. Click the Update button (
) when done.
CMS400.NET Administrator Training Manual and Exercises
CMS400.NETVersion 8.0.2 Doc:20101215
135
Exercise 24-7: Deleting a Menu Item
1. In the Workarea>Content>Menus, click on “Training Menu”.
2. To delete "Ektron" from the menu, click the Remove Items button (
Note: Be careful not to choose the Delete Menu (
) button that will remove the entire menu.
Exercise 24-8: Deleting a Menu
1. Select the “Training Menu.”
2. Click Delete Menu (
136
) to remove the menu.
CMS400.NET Administrator Training Manual
CMS400.NET Version 8.0.2 Doc:20101215
).
UNIT 25
Unit 25 — Collections
Reference: “Collections” chapter in Ektron CMS400.NET Reference Manual.
Collections permit content items from multiple folders to be displayed in a single area. They can
also be used to add dynamic elements to your site that present different content each time a visitor
accesses the site.
Exercise 25-1: Creating a Collection
1. In the Workarea select the Content Tab.
2. On the left, select Collections.
3. Right-click on Collections at the top of the list.
4. Click Add Collection.
5. Enter “Test Collection” as the Title of the collection.
6. Check Include Subfolders.
7. Click Save (
). “Test Collection” is added.
Exercise 25-2: Adding Items to a Collection
1. Click on “Test Collection”.
2. Click the Add button (
).
3. Select content for the collection by checking the box next to the content title.
4. Click the Add button (
) to add the content to the collection.
5. Select content from multiple folders.
6. Click add (
) to add the content into the collection.
CMS400.NET Administrator Training Manual and Exercises
CMS400.NETVersion 8.0.2 Doc:20101215
137
To view the new collection on a web page:
1. Right-Click on "Test Collection" and select View Properties.
2. Note the ID number of the collection.
3. In a browser, enter the URL:
“http://localhost/CMS400Developer/aboutus.aspx?Coll_ID=xx“ where xx is the number of
the Collection you created.
For example: http://localhost/CMS400Developer/aboutus.aspx?Coll_ID=11.
Exercise 25-3: Removing Items from a Collection
1. Click on “Test Folder” then View > Collections.
2. Click on “Test Collection”.
3. Click the Remove button (
).
4. Check all the items you would like to remove from the Collection.
5. Click the Delete button (
) to remove them from the Collection.
Exercise 25-4: Reordering Collection Items
1. Click the Reorder button (
).
2. Select a collection Item.
3. Use the Up or Down arrow on the right to move that item up or down the order.
4. Click the Update button (
138
) when done.
CMS400.NET Administrator Training Manual
CMS400.NET Version 8.0.2 Doc:20101215
UNIT 26
Unit 26 — Business Rules
Reference: “Business Rules” chapter in Ektron CMS400.NET Reference Manual.
Business Rules allow you to define conditions for Web pages on your site. You choose an action
based on whether the conditions are true or false when a site visitor browses your site. For
example:
Condition - a site visitor visits your site for the first time
Action - add a cookie and pop up a welcome message
With Business Rules, you do not write code to set conditions and initiate actions. You simply
complete the information requested in the Business Rules wizard, have your developer add a
Business Rules server control to your Web form, and assign the server control the Business Rules
Ruleset..
[Instructors: Be sure Symantec Ad Pop Blocker is off for the following exercise to work.]
Exercise 26-1: How a business rule works (query string example)
1. Logout of the Workarea if you are logged in.
2. Go to the home page of the Ektron Medical site. (http://localhost/cms400developer/default.aspx)
3. Now add this string to the end of the URL “?patient=false”.
4. When you press <enter>, notice that the membership signup page opens because the business rule is instructed to do so when this query string parameter is found.
5. Close the pop-up window before proceeding to the next exercise.
Exercise 26-2: How to Set/Read Cookies with Business Rules
This exercise sets cookies according to a query string parameter then displays content according to
the cookie that is found.
1. In a browser, go to the Ektron Medical Home page and LOGIN.
2. Go to the Business Rules server control at the bottom of the home page.
3. Hover over the access point and select Edit.
4. Click on New > Add New to create a new rule for rule set number 8.
CMS400.NET Administrator Training Manual and Exercises
CMS400.NETVersion 8.0.2 Doc:20101215
139
5. Add a new rule to set a cookie if the query string has “?product=nutrition”
a. Select Conditions. Check and enter the following:
b. Actions for TRUE conditions
c. Action for FALSE condition – set nothing
d. Name of rule
6. Add the following rules in the same manner as above;
Condition
Action if TRUE
If QueryString param
“product”
equals value “none”
If QueryString param
“product”
equals value “safety”
If cookie param
“product”
Equals value “safety”
If cookie param
“product”
Equals value
“nutrition”
Display a message
“cookie set to none”
Set cookie “product”
to value “none”
Set Product
Cookie to none
Display a message
“cookie set to
Set Product
safety”
Cookie to
Set cookie “prodsafety
uct”
to value “safety”
Display Content
Block ID “53”
Display Safety
Content
Display Content
Block ID “55”
Display
Nutrition
Content
Now the rule set looks like this:
140
Name
CMS400.NET Administrator Training Manual
CMS400.NET Version 8.0.2 Doc:20101215
UNIT 26
Now to see the results of these rules, do the following
1. Enter this URL to see the current state without cookies set.
Notice at the bottom of your web page that the business rules icon looks like this:
2. Enter this URL to see a cookie set for a safety product
Notice at the bottom of your web page that the business rules icon looks like this:
Now refresh the page and look at the bottom of the page to see the content that is
displayed because the “safety” cookie is found.
You see this:
CMS400.NET Administrator Training Manual and Exercises
CMS400.NETVersion 8.0.2 Doc:20101215
141
Remember in these exercises the cookie is set when the query string is discovered. The
next refresh of the page discovers the cookie and performs accordingly.
3. Now set the cookies to “product=nutrition” and “product=none”. See what happens at the
bottom of the page.
142
CMS400.NET Administrator Training Manual
CMS400.NET Version 8.0.2 Doc:20101215
UNIT 27
Unit 27 — Content Rating and Reviews
Reference: “Content Rating” chapter in Ektron CMS400.NET Reference Manual.
Ektron CMS400.NET provides a rating system, based on stars, so site visitors can rate content on
your Web site. A visitor can rate content on a scale of one through five stars. Optionally, half star
rating increments can be used and site visitors may be allowed to submit comments.
Note: If a visitor is not logged in as a CMS or membership user, browser cookies must be enabled in order to submit a
content rating.
Exercise 27-1: Entering a Content Rating on the Web Page
1. In a browser, select the menu Conditions > Cancer.
2. Click on the link to the article “The Diet / Cancer Link”.
3. Go to the bottom of the page and you will see the content rating area.
4. Choose a rating and enter an optional comment.
5. Click the Submit button.
6. Go to the bottom of the article again and notice that the Rating Level is displayed now.
Exercise 27-2: Viewing the Content Rating Report
All content rating and review data for a content item is maintained and can be displayed in detail
and summary formats.
Using the article in the above exercise view the Content Rating report by doing the following:
1. Browse to the content item.
2. Hover on the sliver access point.
3. Select View Advanced Report.
Or:
Navigate to the content item in the Workarea:
1. On the Content tab, navigate to the folder that contains the content.
2. Select the content item.
3. Click the View Rating Reports toolbar button (
).
4. To view the detailed rating report, click on the Get Result button.
CMS400.NET Administrator Training Manual and Exercises
CMS400.NETVersion 8.0.2 Doc:20101215
143
144
CMS400.NET Administrator Training Manual
CMS400.NET Version 8.0.2 Doc:20101215
UNIT 28
Unit 28 — Content Flagging
Reference: “Content Flagging” chapter in Ektron CMS400.NET Reference Manual.
Flagging Content enables a site visitor to flag content and provide feedback. Administrators can
define a list of flags and apply the choices to a folder. Lists can be centered on content that wrong or
not appropriate for all viewers. For example:
Sexually Inappropriate
Copyright Violation
Inaccurate
It can also be used to indicate if a content item is above average. This helps organizations to create
a recommended content list.
Loved This Content
Hated This Content
I Could Take It or Leave It
Content flagging can spread the moderation of your site to your site visitors. Flagging can also help
site visitors feel vested in the site.
Exercise 28-1: Creating Flagging Definitions
To create a flagging definition, follow these steps.
1. In the Workarea, navigate to Settings Tab > Community Management > Flagging >
Flagging Definitions.
2. Select a language with which the flagging definition will be associated. (Class use English.)
3. Click the Add button (
). The Add Flagging Definition screen appears.
4. Enter a Name and Description for the flagging definition.
5. Click the Option button (
) to add a flag to this flagging definition.
6. Continue to click the Option button to add additional flags.
7.
If necessary, change the order of the flags by clicking the Sorting buttons (
If you create a flag you want to remove, click the Remove button (
8. Click the Save button (
).
).
).
Exercise 28-2: Edit a Flagging Definition
To edit a flagging definition, follow these steps.
1. In the Workarea, navigate to Settings Tab > Community Management > Flagging >
Flagging Definition.
2. Click the flagging definition Name link or the ID link.
CMS400.NET Administrator Training Manual and Exercises
CMS400.NETVersion 8.0.2 Doc:20101215
145
3. Edit the available fields.
4. Click the Save button (
).
Exercise 28-3: Assigning a Flagging Definition to a Folder
Once you have created a flagging definition, you can assign it to one or more folders. All content in
the folders will have the selected flagging definitions applied to it. Follow these steps.
1. Click the Content folder bar.
2. Navigate to the folder where the content to be flagged is located.
3. Select View > Folder Properties from the View menu. The View Properties screen
appears.
4. Click the Edit button (
).
5. Find the Flagging area.
6. Make sure the Inherit Parent Flagging Configuration check box is not checked.
7. Select an available flagging definition from the Flagging drop down.
8. Click the Save button (
).
Note: Developers add the Content Flagging server control with the dynamic parameter “id” to the templates for flagging to
show on the web pages.
Exercise 28-4: Viewing Flagged Content
The Flagged Content areas of the Workarea allow you to view and manage content that’s been
flagged and the flags themselves. There are three places in the Workarea for flagged content:
146
CMS400.NET Administrator Training Manual
CMS400.NET Version 8.0.2 Doc:20101215
UNIT 28
The Smart Desktop. This area deals with the most recent content flags associated with
any content.
In the Settings Tab > Community Management > Flagging > Flagged Content.
In Reports Tab > Contents > Content Flags.
Exercise 28-5: Deleting a Flagging Definition
When you no longer want to use a flagging definition, delete it.
When a flagging definition is deleted, it is removed from all folders with which it is associated.
To delete a flagging definition, follow these steps.
1. In the Workarea, navigate to Settings Tab > Community Management > Flagging >
Flagging Definition.
2. Click the flagging definition Name link or the ID link.
3. Click the Delete button (
).
CMS400.NET Administrator Training Manual and Exercises
CMS400.NETVersion 8.0.2 Doc:20101215
147
UNIT 29
Unit 29 — Tags and Tag Cloud
Tags are keywords that can be assigned to users, groups, content, and library items.
On a Web site, tags for a user or group appear in a profile, helping site visitors to learn about a user
or group. Tags can also be searched.
Exercise 29-1: Adding Default Group Tags
The Default Group Tags screen lets you add tags that may be assigned to community groups.
1. In the Workarea, navigate to Settings Tab > Community Management > Tags >
Default Group Tags.
2. Select a language for the tag. (Class use English.)
3. Add the tags in the empty text box as shown below. If no empty box appears, click the
Add button (
) then enter the tag.
Creating Default tags for Users, Content and the Library is done in a similar manner.
Creating User-Created Tags
In addition to applying default tags, users, community group leaders, and content editors can create
their own tags. This allows for a more diverse and creative list of tags.
For example, a user is editing content. He reviews the default tags but decides that none are
correct. So, he creates and assigns a new tag: Rosebud. That tag is now applied to that content.
Managing Tags
Administrators manage tags from the Settings Tab > Community Management > Tags screen.
This screen displays all default and user-created tags. You can filter the list by language.
CMS400.NET Administrator Training Manual and Exercises
CMS400.NETVersion 8.0.2 Doc:20101215
149
Click any tag’s name to see its details.
Tag Cloud
150
CMS400.NET Administrator Training Manual
CMS400.NET Version 8.0.2 Doc:20101215
UNIT 29
DAY 3 OBJECTIVES
Web 2.0 and Social Networking
Memberships, Users and Groups
Wiki editing
Web Alerts
Calendars
Blogs
Discussion Boards
Geo Mapping
HTML Forms/Polls and Surveys
Social Controls – Users and Groups
Personalization
Advanced Options
PageBuilder
Multivariate Testing
eSync
Building your first Web page
Creating a CMS400min site
Workarea folders
Setting up Visual Web Developer Express
Master page creation
Template creation
CMS400.NET Administrator Training Manual and Exercises
CMS400.NETVersion 8.0.2 Doc:20101215
151
UNIT 30
Unit 30 — Membership Users and Groups
Reference: “Membership Users and Groups” chapter in Ektron CMS400.NET Reference Manual.
CMS400.NET enables you to easily add interactivity to your site with Blogs, Discussion Board and
Wikis. These are all features enjoyed by Members. Your web site can contain a membership control
where new members can signup.
Also, you can include an optional login that authenticates with Facebook accounts.
Exercise 30-1: Adding a Member User from the Workarea
1. In the Workarea, click on the Settings tab.
2. Expand the Community Management > Memberships view.
3. Click on Users. A list of Membership Users appears in the right pane.
4. Click the Add Membership User button (
).
5. Create a Membership User named “Member1” with the password “member1”.
6. Click Save to add the new Membership User.
CMS400.NET Administrator Training Manual and Exercises
CMS400.NETVersion 8.0.2 Doc:20101215
153
7. Create another user named “Member2” in the same manner.
Exercise 30-2: Creating and Populating Membership User Groups
1. Go to Settings > Community Management > Memberships.
2. Click on User Groups in the left pane.
3. Click the Add User Group button (
).
4. For the User Group Name, enter “Membersgroup1”. The Description field is optional.
5. Click the Save button (
). “Membersgroup1” will appear in the User Group Name list.
6. Click on “Membersgroup1” to view users in that group.
7. Click the Add Membership User button (
).
8. Select both “Member1” & “Member2” by clicking on the check box beside the names.
9. Click the Save button (
) to save the member to the member group.
10. Click OK in the popup window to add “Member1” & “Member2” to “Membersgroup1”.
11. Add another User Group named “Membergroup2”.
Exercise 30-3: Removing a Membership User from a Membership
Group
1. Click “Membersgroup1” in the group list.
2. Click the user you want to remove from Group1 (“Member1”).
3. You see “Member1”’s profile.
4. Click the Delete button (
).
5. Click OK in the pop-up window to delete the user.
6. “Member1” is now removed from “Membersgroup1”.
154
CMS400.NET Administrator Training Manual
CMS400.NET Version 8.0.2 Doc:20101215
UNIT 30
Exercise 30-4: Removing Membership User Group
1. Click “User Groups” to view all the user groups.
2. Click the User Group you want to remove (“Membersgroup2”).
3. Click Delete button (
). A confirmation window appears.
4. Click OK to delete this group
CMS400.NET Administrator Training Manual and Exercises
CMS400.NETVersion 8.0.2 Doc:20101215
155
UNIT 31
Unit 31 — Wikis
Reference: “Using Ektron CMS400.NET’s Wiki Feature” in the Ektron CMS400.NET Reference
Manual.
The Wiki feature lets registered site visitors (that is, Membership Users) and CMS users insert
hyperlinks to other content. The hyperlinks can connect to existing content or to content that doesn’t
exist yet. If the hyperlink’s destination does not yet exist, the Wiki creates both the hyperlink and
the new content item to which it jumps. This collaborative authoring style is used in Wiki sites such
as Wikipedia (http://en.wikipedia.org), where any author can contribute new content and articles at
any time.
Exercise 31-1: Adding a Hyperlink to Existing Content
1. Login as the user “Member1”.
2. On the Ektron Medical page, select Contact Information > Wiki.
3. Hover over Silver Access Point above the Title: Ektron Products.
4. Select Edit from the menu.
5. In the first sentence, select the word “Ektron” by double clicking on the word.
6. Click the “Add Wiki link” button (
).
7. Click the Related Content Tab.
8. Notice the Search term is "Ektron" and it shows the list of search results.
9. Click the Radio Button next to the title of the first article.
10. Click Add (
) to create the hyperlink in the Wiki content.
CMS400.NET Administrator Training Manual and Exercises
CMS400.NETVersion 8.0.2 Doc:20101215
157
Exercise 31-2: Creating a Wiki Hyperlink to New Content
1. Continuing from the previous exercise, edit the content "Title: Ektron Products" again.
2. In the last sentence, select the word “blogging” by double clicking on the word.
3. Click the Add Wiki Link button (
).
4. The New Content Tab is the default tab.
5. Click Add (
) to create new content based on this link.
6. Notice the link points to the new content you just created.
Note: Note: In FireFox browsers, this link is underlined with dots.
7. Click Publish to publish the change to this Wiki content.
Exercise 31-3: Editing the New Content (as a Member)
1. On the Wiki page you edited in the previous exercise, click on the link “blogging”.
2. The new page displays. Notice it is just a basic content page with a few words.
158
CMS400.NET Administrator Training Manual
CMS400.NET Version 8.0.2 Doc:20101215
UNIT 31
3. Hover over the silver access point and choose Edit from the menu.
4. Edit the content by adding some new content.
5. Select the Category Tab and choose any category.
6. Publish it.
Your new content is now published on the site.
Exercise 31-4: Creating a Wiki Folder
1. Go to Workarea > Content > CMS400Demo >Test Folder.
2. Right-click on Test Folder and choose Add Community Folder (
)
3. Set the Title to “My Community”.
4. Click Add Folder (
).
Now you have a folder for content edited by Community Members.
If you want only specific users to edit the Wiki content, create a special Membership Group and
assign edit permissions to that group. Leave the “All Members” group with Read Only permission so
that all members can read the Wiki.
CMS400.NET Administrator Training Manual and Exercises
CMS400.NETVersion 8.0.2 Doc:20101215
159
UNIT 32
Unit 32 — Web Alerts
Reference: “Web Alert Feature” in the Ektron CMS400.NET Reference Manual.
Web Alert subscriptions are created in the Workarea and assigned to folders. A legally-compliant
web alert must have Opt-Out, Unsubscribe and Default messages. Web alerts must also use a valid
e-mail address from the E-mail From List. Web Alerts require setup of the necessary services,
which is detailed in the Setup Manual included with CMS400.NET.
[For more information on what a Web Alert is and how to use it, please refer to the Admin Manual –
Web Alert Feature.]
[Instructor – note that some sites may require that the Web Alert feature be installed from the
Ektron > Utilities menu.]
Exercise 32-1: Creating a Web Alert subscription
1. Click the Settings tab.
2. Open the Configuration folder.
3. Open the Web Alerts folder.
4. Click Subscriptions.
5. Click the Add button (
).
6. Enter the Subscription Name “Newsletter”.
7. Click the Enabled check box.
8. Click the Save button (
).
Exercise 32-2: Creating the Messages
1. Under the Web Alerts folder, click Messages.
2. Click the Add button (
) to create a new message.
3. Enter “Newsletter OptOut” as the title.
4. Select OptOut from the type dropdown.
5. Enter a brief OptOut message such as:
“You have received this newsletter because you subscribed to it on the Ektron Medical Web
site. If you do not wish to receive similar messages in the future, use the “Unsubscribe”
link below.”
6. Click the Add E-mail Message button (
).
CMS400.NET Administrator Training Manual and Exercises
CMS400.NETVersion 8.0.2 Doc:20101215
161
7. Repeat steps 2–6 to create a Default message entitled “NewsletterDefault”, such as:
“Here is the latest newsletter from Ektron Medical!”
8. Repeat steps 2–6 to create an Unsubscribe messages entitled “NewsletterUnsubscribe”,
such as:
“To unsubscribe from our newsletter, click here.”
Exercise 32-3: Creating an E-mail From List
1. Under the Web Alerts folder, click E-mail From List.
2. Click the Add New E-mail button (
).
3. Enter the e-mail address “[email protected]”.
4. Click the Save button (
).
Exercise 32-4: Assigning the Web Alert Subscription
1. On the Content tab, expand the “Test Folder” and view the folder properties for the
“Announcements“ folder.
2. Click the Edit Properties button (
)
3. Click the Web Alerts tab.
4. Check the Break Inheritance box.
5. Set Notify Only on Initial Publication.
6. Enter subject: “Newsletter from Ektron Medical”
7. Under Web Alert Contents, select the newly-created OptOut, Default and Unsubscribe
messages.
8. Under Available Web Alerts, assign the “Newsletter” alert to the folder.
9. Click the Update button (
162
). The “Newsletter” subscription is now available for any con-
CMS400.NET Administrator Training Manual
CMS400.NET Version 8.0.2 Doc:20101215
UNIT 32
tent items in the “Announcements” folder.
Exercise 32-5: Enabling Web Alerts for a User
1. On Settings tab, select Users, then your username.
2. Edit the properties as follows:
3. Enter a valid E-mail address that you can readily check.
4. Uncheck the Disable Receiving of System Notification E-mail box.
5. Select the appropriate subscription(s).
6. Save the new settings.
Exercise 32-6: Testing Web Alerts (Optional)
If Web Alerts are configured and enabled, the functionality can be tested as follows:
1. Create new content in the folder for which Web Alerts are enabled.
2. Publish the content.
3. After a few minutes, have the person to whom the email was sent check their email
account.
CMS400.NET Administrator Training Manual and Exercises
CMS400.NETVersion 8.0.2 Doc:20101215
163
UNIT 33
Unit 33 — Calendars
(Refer to the “Web Calendars” in the Ektron CMS400.NET Reference Manual)
Web Calendars in Ektron CMS400.NET perform the same function as a paper calendar - they keep
visitors informed about upcoming events. They can be displayed to all visitors to your Web site, and
any authorized user can add events to a calendar.
Typical calendar events could include
company meeting
reserving a conference room for an interview
company holidays
community group events
personal events
training dates
Web Calendars allow you to create many calendars for your Web site. Users may add events that
are posted for visitors to see.
Exercise 33-1: Creating, Editing, and Deleting a Calendar
1. In the Workarea, go to the Content tab and CMS400demo > Test Folder.
2. Click New > Add Calendar.
3. Under the properties tab, type the name of the calendar called “Test Calendar”
4. Under the template tab, uncheck the Inherit Parent Configuration box.
5. Click on Add a New Template.
6. Name the template “events.aspx” and select (
).
7. Select events.aspx as the default template.
8. Click the Add Calendar button (
).
9. Click on the Test Calendar folder to view it.
10. Click View > Properties to view the properties for this calendar.
Note: Please write down your Calendar ID number for later in this exercise.
CMS400.NET Administrator Training Manual and Exercises
CMS400.NETVersion 8.0.2 Doc:20101215
165
Exercise 33-2: Adding Events to Calendar
1. Go to Content > Test Folder > Test Calendar.
2. Click the New > Add Calendar Event.
3. Enter the following information:
Event Title: “Ektron Training”
Event Location: “Training Room”.
4. Enter a brief description.
5. Below the Description select a Date and a Start and End time
Note: If there is no timeframe for the event, check the box next to “All Day” in the bottom right hand corner of
your screen (
)
6. Click the save button at the bottom of the screen (
event.
166
CMS400.NET Administrator Training Manual
CMS400.NET Version 8.0.2 Doc:20101215
) to add your calendar
UNIT 33
7. To view the new Calendar:
a. Note the ID number of the calendar in test Calendar > View > Properties.
b. In a browser, enter the URL:
“ http://localhost/CMS400Developer/events.aspx?Calid=xx “ where xx is the
number of the calendar you created.
(e.g., http://localhost/CMS400Developer/events.aspx?Calid=8)
Note: To create a Recurring Event, click on the Recurring tab when creating the event. Choose a Start & End date for the
event. This can only be done when initially creating the event.
Exercise 33-3: Editing and Removing Events from a Calendar
1. Hover over the date and event you want to edit or remove the event from.
2. To edit double click on the event title.
Note: If the event is reoccurring it will ask you to edit this occurrence or the series of occurrences.
3. Change the title to "Ektron Admin Training".
4. Click Recurrence Tab.
5. Check Recurrence.
CMS400.NET Administrator Training Manual and Exercises
CMS400.NETVersion 8.0.2 Doc:20101215
167
6. Set Weekly ending after 5 occurances as shown below.
7. Click Save.
Delete an Event
1. To delete, click on the red X to the right of the event title to remove it.
2. Hit Ok.
Exercise 33-4: Importing Events to an email client
You can place Web Calendar Events on other Calendar types. The iCalendar Feature produces an
.ics file you can import to your calendar.
1. Scroll over the event Ektron Training
2. Click on the download link.
168
CMS400.NET Administrator Training Manual
CMS400.NET Version 8.0.2 Doc:20101215
UNIT 33
3. Select Open from the download popup to add the event to your Calendar Application such
as an Outlook calendar.
CMS400.NET Administrator Training Manual and Exercises
CMS400.NETVersion 8.0.2 Doc:20101215
169
UNIT 34
Unit 34 — Blogs
Reference: the “Blogs” in the Ektron CMS400.NET Reference Manual.
Blogs (short for Web Logs) are a form of online information sharing. A blog is often set up so a
group of people can share their thoughts on a subject. One person creates the main post and others
comment on it. In addition, Blogs can be used to create an online diary of everyday life.
In the CMS, blogs and blog posts have a similar relationship to folders and content. The Blog is
equivalent to a folder and the posts are the equivalent of content items. While blogs and blog post
have a few unique properties, for the most part, they work the same as folders and content.
Blogs consist of multiple elements that allow site visitors to view or create a blog post, add
comments and see a roll of other associated blogs (the “Blogroll”). If a calendar is present, visitors
can see which days have blog posts.
Exercise 34-1: Creating a Blog
1. In the Workarea, click the Content tab and select the “Test Folder”.
2. Go to New > Blog.
3. Name the Blog Name: “Company Blog.”
4. Enter the Blog Title: “The Official Company Blog”.
5. In the Visibility dropdown, select Public.
6. Uncheck the Moderate Comments and Require Authentication options.
7. Click the Subjects tab.
8. Click the Add New Subjects link 3 times.
9. Enter the following subjects “Product Vision”, “Company News”, and “Other”
CMS400.NET Administrator Training Manual and Exercises
CMS400.NETVersion 8.0.2 Doc:20101215
171
10. Click the Blog Roll tab.
11. Click Add New Roll Link.
12. Name the link “IE Blog”.
13. Enter the URL: “http://blogs.msdn.com/ie”.
14. For the Short Description, enter “The Official IE blog”.
15. Click the Add Blog button (
).The Blog is created in the “Test Folder”.
16. To view the new Blog:
a. Under “Test Folder”, click on “Company Blog”, then View > Folder Properties. Note
the ID number of the Blog.
b. In a browser, enter the URL:
“ http://localhost/CMS400Developer/blogs.aspx?blogID=xx ” where xx is the
number of the blog you created.
(e.g., http://localhost/CMS400Developer/blogs.aspx?blogID=214)
17. The empty blog will appear with the Add Post link.
18. Click Add Post and create a post with the title “Test Blog Post”.
19. Enter some text.
20. Select the Summary tab and check one or more of the Subjects.
21. Click Publish. The new post will appear.
22. To the right of the new blog, you will see Blogroll under the calendar. Beneath it you will
see a link for the IE Blog you created. Clicking on the link will take you to the IE Blog.
172
CMS400.NET Administrator Training Manual
CMS400.NET Version 8.0.2 Doc:20101215
UNIT 34
CMS400.NET Administrator Training Manual and Exercises
CMS400.NETVersion 8.0.2 Doc:20101215
173
UNIT 35
Unit 35 — Discussion Boards
Reference: the “Discussion Boards” in the Ektron CMS400.NET Reference Manual.
The Discussion Board feature provides an opportunity for topic discussions on your Web site. A site
or membership user with Add Topic permission creates a topic and posts a starter question. Site
visitors can then reply. An example of a Discussion Board is below. As you can see, the first screen
has general topics, the second screen’s topics are more specific, and a third screen displays posts to
the forum.
New Discussion Board Message Type
Discussion Board messages can now be generated when a forum post is reported. The new message
type is ReportForumPost.
Exercise 35-1:
Creating a Discussion Board
Discussion boards consist of two parts. The category and forum structure is set in the Workarea.
The topics and replies are user-contributed. Topics and replies can be moderated in the Workarea or
in the forum itself.
1. In the Workarea, click the Content tab.
2. Select the “Test Folder”.
3. Go to New > Discussion Board.
4. For the Board Name, enter “Company Discussion Board”.
5. For the Board Title, enter “Discussions about Company projects”.
6. Uncheck the Require Authentication box.
7. For the CSS Theme, select Standard.
8. In the Templates tab, select “forum.aspx”.
9. Click the Subjects tab.
10. Click the Add New Subjects link 2 times.
CMS400.NET Administrator Training Manual and Exercises
CMS400.NETVersion 8.0.2 Doc:20101215
175
11. Enter “Current Projects” and “Off-Topic” as categories.
12. Click the Add Discussion Board button (
).
Exercise 35-2: Adding Forums to the Board
1. Under the “Test Folder”, click on “Company Discussion Board”.
2. Go to New > Discussion Forum.
3. Name the forum “Project 1”.
4. In the Subjects dropdown, select “Current Projects”.
5. Click the Add Discussion Forum button (
).
6. Create another new forum called “Project 2” and set the Subject to “Current Projects”.
7. Create a third new forum called “American Idol” and set the Subject to “Off-topic” category. The result should look like this:
8. To view the new Discussion Board and Forums:
a. Under “Test Folder”, click on “Company Discussion”, then view its properties.
b. Note the ID number.
c. In a browser, enter the URL:
“http://localhost/CMS400Developer/forum.aspx?boardID=xx ” where xx is the
number of the Discussion Board you created.
(e.g., http://localhost/CMS400Developer/forum.aspx?boardID=216)
d. The empty “Company Forum” will appear with the Forum Categories and Forums you created.
e. Click on “American Idol”.
f. Click the New Topic button.
g. Enter “What do you think of this season’s singers?” as the title and enter some
text in the Message field.
h. Click Post. The new post will appear. You can click on the link to view it.
176
CMS400.NET Administrator Training Manual
CMS400.NET Version 8.0.2 Doc:20101215
UNIT 36
Unit 36 — GeoMapping
Reference: “Geo Mapping” chapter in Ektron CMS400.NET Reference Manual.
CMS400.NET allows the use of internet-based mapping services to add mapping-related
functionality to a Web site.
Exercise 36-1: Marking a Location on a Map.
1. In the Workarea, click the Content tab.
2. Navigate to the CMS400Demo > Map folder.
3. In the CMS400Demo > Map folder, click on New > HTML Content.
4. Enter a title for the new location.
CMS400.NET Administrator Training Manual and Exercises
CMS400.NETVersion 8.0.2 Doc:20101215
177
5. Select the Metadata tab and enter the information shown:
6. Select the Category tab
7. Check the “Business” category.
8. Click Publish.
When you view the map, there will be a marker at the location. To see the results, view the map in
a browser at CMS400Demo > Contact Information > Map-VE.
Exercise 36-2: Automatic lookup of MapLatitude & MapLongitude
Note: When you published the above content item, CMS400.NET automatically determines the location’s latitude and
longitude.
1. Select the “Ektron Training Center” content item from the “Map” content folder.
2. Select the Metatdata tab and note the Search Data fields.
3. To see the results, view the map in CMS400Demo > Contact Information > Map-VE.
178
CMS400.NET Administrator Training Manual
CMS400.NET Version 8.0.2 Doc:20101215
UNIT 37
Unit 37 — Creating HTML Forms / Polls /
Surveys
Reference: the “Working with HTML Forms” in the Ektron CMS400.NET Reference Manual.
Forms, Polls and Surveys allow you to collect specific information from the visitors to your site.
They can be very useful for creating mailing lists and obtaining feedback on various topics.
Note: .NET 2.0 only allows one form per page.
Exercise 37-1: Creating a Form
1. Click on Workarea > Content tab, select the “Test Folder”.
2. Create a new folder named “Forms”.
3. Remove “Inherit Parent Template” and assign “contactinformation.aspx” as the default
template.
4. Select the folder Test Folder - Forms.
5. Go to New > HTML Form/Survey. Note the 5 step indicator in the tool bar.
a. Select Blank Form, then click the Next button.
b. Enter title “Contact Me form”, then click the Next button.
c. Leave the Assign Task as unassigned and click the Next button.
d. Leave the default post back message; we’ll make changes to it later. Click the
Next button.
e. The setup is complete. Click the Done button. You will have an empty form like
the following figure:
CMS400.NET Administrator Training Manual and Exercises
CMS400.NETVersion 8.0.2 Doc:20101215
179
6. Highlight “Place form elements here…” and remove it.
Note: Do not use the BACKSPACE key to remove the text – this will cause a browser action to go to previous
page.
7. In the first line of the design area, enter “Please enter your contact information below and
one of our agents will contact you.”
Notice the form fields are located on the bottom tool bar to the right starting with the Text
Field.
8. Press <Enter> to go to the next line.
9. Enter “Your Name: “.
10. Add a Text Field by double-clicking the Text Field icon (
).
11. In the popup window, enter the fields of information as follows:
Descriptive Name: “Name”,
Field Name: “name”
Tool Tip Text: “Please enter your name”
12. Select the Validation Tab and set it to Cannot be blank.
13. Click OK.
14. Press <Enter> to go to the next line.
15. Enter the text “Your Phone:”
180
CMS400.NET Administrator Training Manual
CMS400.NET Version 8.0.2 Doc:20101215
UNIT 37
16. Add another Text Field to the right of the text.Pl
Descriptive Name: “Phone”
Field Name: “phone”
Tool Tip Text: “Enter your phone number”
17. Choose the Validation tab. Set the Validation to Telephone Number (US & Canada)
(required).
18. Click OK .
19. Press <Enter> to go to the next line
20. Enter “Your e-mail: “.
21. Add a Text Field.
22. Add another text field to the right of the text.
Descriptive Name: “Email”
Field Name: “email”
Tool Tip Text: “Enter your email address”
23. Choose the Validation Tab. Set the Validation to E-mail address (required).
24. Click OK .
25. Press <Enter> to go to the next line.
26. Enter “Date you prefer to be contacted: ”
27. Add a Calendar Field.
Descriptive Name: “Date”
Field Name: ContactDate
Tool Tip Text: “What date do you wish us to call?”
Default Value: (Leave blank)
28. Choose the Validation Tab. Set the Validation to Cannot be blank.
29. Click OK and go to the next line.
30. Enter “Select time frame: ”
31. Add a Choices Field (
).
Descriptive Name: “Timeframe”,
Field Name: “timeframe”
Tool Tip Text: “Please select a time frame”
CMS400.NET Administrator Training Manual and Exercises
CMS400.NETVersion 8.0.2 Doc:20101215
181
32. Add items to the Item list: “Morning”, “Afternoon”, “Evening”. (Use the +Option button (
) to add fields to the list.)
33. Choose Appearance - DROP LIST.
34. Click OK and go to the next line.
35. Enter “Comments:”
36. Add a Text Field.
Descriptive Name: “Comments”,
Field Name: “comments”
Tool Tip Text: “Please enter your comments”
37. Set the Dimensions Width to 60 characters and Height to 4 characters.
38. Leave the Validation as No validation.
39. Click OK.
40. The form looks like this.
182
CMS400.NET Administrator Training Manual
CMS400.NET Version 8.0.2 Doc:20101215
UNIT 37
Exercise 37-2:
Creating a Post Back Message
1. With the form open for edit, click on the Post back message tab.
2. Choose Display a message.
3. Delete “Place post back message here…” in the design area.
4. Enter the post back message as shown below.
Note: NOTE: Click the Note: Merge fieldNote: button (
Note: ) to choose fields from the form to enter.
CMS400.NET Administrator Training Manual and Exercises
CMS400.NETVersion 8.0.2 Doc:20101215
183
5. The fields in blue boxes can be added by selecting the field in the Merge Field dropdown
shown:
6. Publish your new form.
Exercise 37-3: Changing Form Properties (Optional)
1. From the View Form “Contact Me” page, click the Edit Properties button (
).
Note: This button is different from the Edit button.
2. Select the Mail Properties Tab.
3. Choose the Mail Properties tab.
4. Select E-mail from the drop down list associated with the To: field. This is the e-mail that
the visitor to the site is going to enter.
Note: If you didn’t select the validation E-mail address (required) for the e-mail field during the creation of the
form, you won’t see the drop down list.
5. In the From: field, type “[email protected]”.
6. In the Subject: field, type “Ektron Contact Me Information”.
7. Click the Save button (
).
8. To view the new form:
a. Click on “Test Folder” and note the ID number for the “Contact Me” form.
b. In a browser, enter the URL:
184
CMS400.NET Administrator Training Manual
CMS400.NET Version 8.0.2 Doc:20101215
UNIT 37
“ http://localhost/CMS400Developer/contactinformation.aspx?ekfrm=xx ”
where xx is the number of the form you created.
(e.g., http://localhost/CMS400Developer/contactinformation.aspx?ekfrm=868)
c. The “Contact Me” form page will appear.
9. Enter the information and click the Submit Form button. Your post back message will be
displayed.
Exercise 37-4: Creating a Poll
1. On the Content tab, select the folder “Forms” beneath “Test Folder”.
2. Go to New > HTML Form/Survey.
3. Choose Standard Poll (which has a 4 step setup process), then click the Next button.
4. Enter a Title “Favorite Dinner Food” and Description “Dinner poll”. Click the Next
button.
5. Enter the Question for the poll “What food do you like best for dinner?”
6. Enter the Choices that you wish to see on the poll. then click the Next button. The setup
is complete.
7. Click the Done button.
8. Click Publish.
To view the new Poll:
1. Click on “Forms” and note the ID number for the Poll.
2. In a browser, enter the URL:
“http://localhost/CMS400Developer/contactinformation.aspx?ekfrm=xx “where xx is the
number of the poll you created.
(e.g., http://localhost/CMS400Developer/contactinformation.aspx?ekfrm=870)
The poll page will appear.
3. Answer the questions and click the Vote button. The poll results will be displayed.
Note: Note: For Polls & Surveys, you can limit how many times visitors can vote or submit. Go to Edit Properties, check
Limit submissions and set the Number of submissions to the desired amount.
Exercise 37-5: Exporting HTML Form data
1. Click on the Content tab then select the folder “Contact Information”.
2. Click on the form “Contact Form” to view it.
3. Click on the Report (
) button to see the Forms Report.
4. Select the “Table Of Values” Report Display and click the Get Report button.
CMS400.NET Administrator Training Manual and Exercises
CMS400.NETVersion 8.0.2 Doc:20101215
185
5. Click the Export Report button.
Save the new spreadsheet on your desktop.
186
CMS400.NET Administrator Training Manual
CMS400.NET Version 8.0.2 Doc:20101215
UNIT 38
Unit 38 — Social Networking Controls
The Community Platform provides easy collaboration between colleagues and groups. Ektron
CMS400.NET users and administrators can access their pages.
When a person signs up to be member, they define information about themselves. Additionally, they
can create Blogs; create comments for others to read; create documents, links, and Photo Gallery
images.
Additionally, a CMS400.NET user or member can create Groups to which they can invite others to
join and participate by sharing documents and blogs and other objects that enhance collaboration
within the enterprise.
Social Networking Page (Business Colaboration) from the EktronTech Starter Site.
CMS400.NET Administrator Training Manual and Exercises
CMS400.NETVersion 8.0.2 Doc:20101215
187
Unit 39 — Generating email When Community
Activities Occur
Ektron CMS400.NET's Community Feature can generate email when a user completes an activity.
For example, if a member posts a comment to a community message board, group members who
signed up for email notification in their user profile receive an email that contains the comment.
Recipients can reply to the email. Replies are posted on the community group's message board.
You can also enable the attachment of files to email notifications. So, if a group manager uploads a
PDF file to a group message board, the email notification message contains the PDF file as an
attachment. Users can reply to that message and, if they attach an updated version of the file, it
can replace the file on the group's message board.
Finally, you can set up an email address for a group. This makes it easy for anyone to broadcast a
message to all group members.
Step One: Enter Sending Email Address Information
Important: You must have permission to edit files on the Ektron CMS400.NETserver to complete
this step.
The site root/web.config file collects the outgoing email address information. To define the "From:"
address of community email sent from your Web site, follow these steps.
1. On the server that hosts your Web site, open the site root/web.config file with a text editor (such
as Notepad).
2. Find the section below the <notificationAgent> <providers> elements.
3. Define the elements in the following table. Do not change other elements in that section.
Field
Description
smtpServer Enter the name of the server that hosts your Ektron CMS400.NET Web site.
188
smtpPort
Enter the port that sends outgoing email from the site.
username
Optionally, enter the username to authenticate against the smtp server.
password
Optionally Enter the password to authenticate against the smtp server.
from Email
Enter the “from” email address of all outgoing community email. When a recipient gets
an email, this value appears in the From: field.
CMS400.NET Administrator Training Manual
CMS400.NET Version 8.0.2 Doc:20101215
UNIT 38
Step 2: Review the Community Activity Notification Message
Ektron CMS400.NET provides a message that is emailed when each community activity is
completed. To view the message in the Ektron CMS400.NET Workarea, choose Settings >
Community Management > Notifications > Messages and click Email Message Reply.
Here is a sample message.
You can modify the message as described in Notification Messages.
Step Three: Set Up email Preferences
Ektron CMS400.NET provides a default set of Notifications that apply to all newly-created users.
After a user is created, he can change his preferences by editing his profile, selecting the Activities
tab, and checking or unchecking activities and agents.
Similarly, a community group member can access any community group profile and click Edit Group
Notification Preferences to set the group's preferences.
You can apply three types of default settings via screens on the Workarea Settings tab (illustrated
below).
CMS400.NET Administrator Training Manual and Exercises
CMS400.NETVersion 8.0.2 Doc:20101215
189
Notification of colleagues’ activities
Notification of community group activities
Notification of your activities to other users or community groups
Note: If you are upgrading to Version 8.0, all activities are checked for the Activity Stream agent
by default. No activities are checked for the other agents by default.
Step 3A: Setting Default Colleague Notifications
To set default Notifications for colleagues, follow these steps.
1. Log in to the Ektron CMS400.NET Workarea as an administrator.
2. Navigate to Settings > Community Management > Notifications > System Default
Preferences > Colleagues.
3. Click the Edit button ( ).
4. Place a check mark next to each a default Notification.
190
CMS400.NET Administrator Training Manual
CMS400.NET Version 8.0.2 Doc:20101215
UNIT 38
CMS400.NET Administrator Training Manual and Exercises
CMS400.NETVersion 8.0.2 Doc:20101215
191
5. Click the save button.
Step 3B: Setting Default Community Group Notifications
To set the default Notifications of community group activities, follow these steps
Community group members can modify their group's preferences. To do this, they access any
community group's profile, then click Edit Group Notification Preferences.
1. Log into the Workarea as an administrator.
2. Navigate to Settings > Community Management > Notifications > System Default
Preferences > Community Groups.
3. Click the Edit button.
4. Place a check mark in each box you want to be a default Notification.
192
CMS400.NET Administrator Training Manual
CMS400.NET Version 8.0.2 Doc:20101215
UNIT 38
5. Click the save button
Step 3C: Setting Default Notifications For Your Activities
To set the default Notifications of the logged-in user’s activities that will be sent to other users and
groups, follow these steps.
1. Log into the Workarea as an administrator.
2. Navigate to Settings > Community Management > Notifications > System Default
Preferences > My Activities.
3. Click the Edit button.
4. Place a check mark in each box you want to be a default Notification.
CMS400.NET Administrator Training Manual and Exercises
CMS400.NETVersion 8.0.2 Doc:20101215
193
5. Click Save Button.
Step Four: Set up the email Reply Feature
The optional email Reply Feature consists of additional text in a community notification that
prompts a recipient to reply, as shown in the following example.
If the recipient replies, the resulting email is posted to the group's message board.
Important: The Community email Reply feature is only available with group activities, such as
uploading a document to a group workspace. It is not available with user activities.
Prerequisite: The community notification feature must be enabled.
Step 4A: Enter the Receiving Email Address Information
Specify the email address that will receive email replies in the Community Notification Settings
screen.
194
CMS400.NET Administrator Training Manual
CMS400.NET Version 8.0.2 Doc:20101215
UNIT 38
Prerequisite: You must be a member of the Administrators group or the community group
administrator.
To enter receiving email address information, follow these steps.
1. From the Ektron CMS400.NET Workarea, choose Settings > Community Group > Notifications >
Settings.
2. Use the following table to complete the screen.
Field
Description
Enable Email Replies
Check this box to access the fields in the lower part of the screen.
Email Account Name
Enter the address that receives email delivered to your Web site. The
email account must be the same as the account used to send email.See
Also: Step One: Enter Sending Email Address Information
Important: Each community group's email
address must be unique.
Email Account Password Enter the password for that email address.
Email Server
Enter the POP mail server that retrieves email for this account.
Email Server Port
Enter the port number used to retrieve email for this account.
Use SSL
Check this box if you use SSL when retrieving email.
Test Connection
After you complete the above fields, click this button to verify the information and your ability to connect to the mail server.
CMS400.NET Administrator Training Manual and Exercises
CMS400.NETVersion 8.0.2 Doc:20101215
195
Note: If you are using Gmail as the SMTP server to fetch email replies, after the notification service processes the emails, you probably want to delete them from the Inbox. To set up automatic
deletion of this email from the Inbox, got to Gmail's Settings screen > Forwarding and POP/IMAP
tab >Pop Download Area > 2. When messages are accessed with POP > select delete Gmail's
copy.
Step 4B: Review the email Reply Message
Community activity that generates an email also can include a reply statement, as shown in the
following example.
Note: The activity message text is determined by the activity. For example, if the activity is a blog
post, the message text is retrieved from the New Blog Post notification message.
To review and modify email reply text, follow these steps.
Prerequisite: You must be a member of the Administrators group or the community group
administrator.
1. In the Workarea, choose Settings > Community Management > Notifications > Messages.
2. Click Email Message Reply.
3. You cannot edit the Title, Type, Sub Type or Default check box.
4. The Subject field is not used.
5. Edit the message text. You can create an HTML-based and a plain text message for each activity.
Typically, HTML messages are sent as email or to the ActivityStream server control, while plain
text is used in SMS style messages.
Messages typically combine text and tokens, Ektron-defined variables surrounded by at signs (@).
When a message is generated, tokens retrieve information about Ektron CMS400.NET users,
groups, and objects.
196
CMS400.NET Administrator Training Manual
CMS400.NET Version 8.0.2 Doc:20101215
UNIT 38
How email Replies are Handled
Activity notifications can prompt recipients to reply. The following table shows how each activity
treats email replies.
Note: If you are in a load-balanced environment, the same reply may appear several times. If this
problem occurs, stop the Ektron notification service on all but one of the servers in the cluster.
Activity that Triggers Message
How email Reply Handled
User adds a colleague
Comment on Activity Stream
User adds content to Ektron CMS400.NET
Post to Content Message Board
Event is added or changed on Web Calendar
Comment on Activity Stream
User uploads content to community group Workspace
Post to Content Message Board
User comments on group workspace content or asset
Comment on Activity Stream
User uploads content to his profile
Post to Content Message Board
Comment on user workspace content or asset
Comment on Activity Stream
User comments on a blog post
Comment to same blog post
User posts to his blog
Comment on post
User posts to a message board associated with content Reply to post
User creates a community group
Comment on Activity Stream
User posts to a Forum
Reply to post
User replies to a Forum post
Reply to post
User comments on a community group’s blog post
Comment on same blog post
User posts to community group blog
Comment on post
User posts to a community group message board
Reply to post
User joins community group
Comment on Activity Stream
User posts micro-message
Comment on Activity Stream
User updates his status
Comment on Activity Stream
User posts to another user's message board
Reply to post
Message board reply
Reply to same post
CMS400.NET Administrator Training Manual and Exercises
CMS400.NETVersion 8.0.2 Doc:20101215
197
Step Five: Enable Attachments to Notifications
Ektron CMS400.NET can attach assets to a notification. For example, a user uploads a PDF
document to a group workspace, which generates aGroup Content Added notification and attaches
the asset.
If you enable attachments and the email Reply feature, message recipients can download an
attached asset to their computer, modify it, and reply to the email and attach the modified asset. If
they do, Ektron CMS400.NET replaces the community group asset with the attached file.
If a group administrator does not want the revision, he can use the asset history to restore the
original asset. See Also: Viewing and Restoring Previous Content
Important: If a message's email signature includes an image, the email Reply feature uploads it as
a group asset. To avoid this, remove the image from the signature before replying.
To set up notification attachments for a community group, follow these steps.
1. From the community group page, click Edit Group.
Alternatively, in the Ektron CMS400.NET Workarea, choose Settings > Community
Management > Community Groups > click a community group.
2. Near the bottom of the screen, check the Attach Documents in Email Notifications
box.
3. Click Save ( ).
Define a Community Group's email Address
You can set up Ektron CMS400.NET's Community Feature to let anyone email a post to a community
message board. To set up this capability, each community group administrator (or Ektron
CMS400.NET administrator) must define information about the receiving email account, as shown in
the following steps.
1. On community site's group page, go to Edit Group > Properties tab > Enable Group emails
checkbox.
198
CMS400.NET Administrator Training Manual
CMS400.NET Version 8.0.2 Doc:20101215
UNIT 38
Alternatively, from the Workarea, choose Settings > Community Management > Community
Groups. Click the group, then click itsProperties tab and check the Enable Group emails checkbox.
2. Enter the group's email address, account name and password.
Exercise 38-1: My Profile
One of the advantages to the Social Networking system is that individuals can manage their own
profile information. Information can be updated and immediately made available to anyone viewing
a profile.
Objective
Learn to edit your personal profile information.
CMS400.NET Administrator Training Manual and Exercises
CMS400.NETVersion 8.0.2 Doc:20101215
199
Scenario
You have been recognized for your expertise to work on large complex projects and have taken the
opportunity to work in the Project Management Office of your company. Your new phone and
extension will be 603-555-1234. Update your profile information.
Also consider: Is it time to update the Avatar? Did you remember to change the department in the
Category tab too? Are your tags up to date?
200
CMS400.NET Administrator Training Manual
CMS400.NET Version 8.0.2 Doc:20101215
UNIT 38
Is Privacy Important?
Users can determine if their profile is viewable via the Private Profile drop down box on the
Membership Registration screen and the Edit Profile screen. If Private Profile is set to Private,
profile information is suppressed. If it is set to Colleagues, only a user’s colleagues can see his
profile. When set to public, everyone can see a user’s profile information.
Exercise 38-2: Activity Streams
The Activity Stream allows you to see what is going on in your groups or with your colleagues.
Through your activity stream, you can see if there have been any blogs or message board anyone
associated to you through colleagues or groups have posted to.
CMS400.NET Administrator Training Manual and Exercises
CMS400.NETVersion 8.0.2 Doc:20101215
201
Objective: To learn how to manage what you see through your activity stream, and what activities
you allow your colleagues and group members see.
Scenario:
Go to your profile page and edit your profile. Choose the Activities Tab. You can manage not only
what you see that your groups and colleagues do, but what you do that they will show in their
activity streams. Also Update your status. Then go back to the home page, refresh and you will
see a link to the Company Activity Stream with your new status update.
202
CMS400.NET Administrator Training Manual
CMS400.NET Version 8.0.2 Doc:20101215
UNIT 38
Status Updates are limited to 2000 characters
Also Consider: Can you see who has updated their latest blogs or status? What are people working
on at this moment?
Commenting on an Activity Stream Event
Each activity in a stream has a Comment link below its text (see example below).
CMS400.NET Administrator Training Manual and Exercises
CMS400.NETVersion 8.0.2 Doc:20101215
203
When you click it, a Comment box opens for you to add a comment.
When you finish, the comment link displays the number of comments on that activity. Users can
click the number to view the comments.
Only the user who made the comment or a member of the Ektron CMS400.NETAdministrators group
can delete the comment.
Exercise 38-3: My Photo Gallery
The old Chinese proverb says “A picture is worth 10,000 words” or does it?* In the Social
Networking Photo Gallery, you can add pictures and images needed to share any important
information for your associates to view and enjoy.
Objective
Learn to use the Photo Gallery
Scenario
As part of your new Project Management job, you need to be sure that everyone understands where
you are coming from. Find pictures and insert them into the Photo Gallery that represents you best.
204
CMS400.NET Administrator Training Manual
CMS400.NET Version 8.0.2 Doc:20101215
UNIT 38
* If you want to know….
This is the original "Chinese proverb" from the streetcar advertisement.
The quotation has wrongly been translated as: A Picture Is Worth One Thousand Words.
In fact, the literal translation is: A Picture's Meaning Can Express Ten Thousand Words.
Somehow the phony Chinese proverb over the years has been given the literal meaning
that a picture is equivalent to a thousand words setting up a clash between words and
pictures in the minds of users of the two. With digital hegemony, visual messages have
reasserted their position as an important communication medium, but at the cost of not
recognizing the combination of words and pictures as vital in communication. With the
correct interpretation of the proverb, words and pictures live in harmony as they are
both used equally in order to understand the meaning of any work that uses them both.
(Credit to: http://commfaculty.fullerton.edu/lester/writings/letters.html)
Exercise 38-4: Private Messages
Logged in users can send private messages to one another within the Social Networking
environment. Only the sender and receiver can view private messages. This requires both users to
be either a CMS400.NET user or a Membership user.
Objective
Learn to use the message system in the collaboration area.
Scenario
You need to let a fellow coworker know that the photos or images you put in your Photo gallery are
available. Send them a private message to invite them to view them.
CMS400.NET Administrator Training Manual and Exercises
CMS400.NETVersion 8.0.2 Doc:20101215
205
Also consider: Would you like to find others to include on this message? (Did you see how to browse
users to add more? Would adding styles, hyperlinks or images from the library help with your
message?
Exercise 38-5: Documents
The Documents area allows you to add assets and HTML content to Ektron CMS400.NET and
associate it with your profile. You can create subfolders to separate content by category. Folders
and files in the Documents area are separate from the Content folder structure and its files. Assets
and HTML content in this list have the same properties and actions available to those found in the
Content folder structure. You load documents by using the DMS drag-and-drop functionality.
Objective
Learn to use the Document Management and sharing area in the personal profile.
Scenario
Project documents constantly change. Key documents that you create or maintain should be easy
for your teammates to find. By housing key Microsoft Office PowerPoint, Word Documents or Excel
files in your profile document area, you can find and easily manage them.
You need to make three documents available in your profile area. Place any three types of
documents you have into the document area.
Also consider: Did you update the summary information so it makes sense? Did you set a category
for the document?
Exercise 38-6: Links|Content
Placing links to your favorite sites or content makes this information quick to find and use.
206
CMS400.NET Administrator Training Manual
CMS400.NET Version 8.0.2 Doc:20101215
UNIT 38
Objective
Learn to use the Links/Content feature.
Scenario
In project management, you will need to quickly get to other sites that help you do you job. Find
some external sites to use and place links to these places into your Favorite Links Section. Also add
some Favorite Content links into the Content section.
Also consider: Do you have web site links that you use every day? Would it help to have these links
here as a favorite? Maybe you should have a link to your own web site home page for your
company?
Objective
Learn how to use colleague invitations
Scenario
Now that you’ve begun to work in your department – the group of collegues in your Project
Management Office are different. (In more ways than one you say?) It’s probably a good idea for
you to update your colleagues list. Drop the ones that you feel you don’t need or organize them into
another folder. Select some new collegues.
Also consider: If you invited them to become your friend, what must they do to accept the
invitation? If you remove a friend, what happens? Do they feel the pain? ;)
Exercise 38-7: Colleagues
Establishing a connection to your Colleagues via Social Networking allows you to share your
information with specific people. When the connection to others is made, you will be able to visit
their page and gather comments, blogs, pictures, documents and other information that will be
helpful as you work with them. You are able to see their information when you need it.
CMS400.NET Administrator Training Manual and Exercises
CMS400.NETVersion 8.0.2 Doc:20101215
207
Exercise 38-8: Blogs
Blogs (short for Web Logs) are a form of online information sharing. A blog is often set up so a
group of people can share their thoughts on a subject. One person creates the main post and others
comment on post. In addition, a blog can be used to create an online diary of everyday life – even a
regular progress or status report for the boss to read.
In the Ektron CMS400.NET Workarea, blogs and blog posts have a relationship similar to folders
and content. The blog is the equivalent of a folder, and blog posts are the equivalent of content
items. While blogs and blog posts have a few unique properties, they mostly work the same as
folders and content.
Objective
Learn how to enter blog posts on your personal journal.
Scenario
The time flies when we’re having fun right? Well, the boss wants you to update your blog to show
what you’ve learned this week. Update your blog with everything you know so no one will read the
fine print at the bottom! Get started now….
Also consider: Did you think about categorizing your subject so that it could be easily found later?
Did you include a link to someone else’s blog or content? Would a picture help tell the story?
(Advanced – maybe you ought to comment on somebody else’s blog – won’t that make you feel
better anyway?)
208
CMS400.NET Administrator Training Manual
CMS400.NET Version 8.0.2 Doc:20101215
UNIT 38
Exercise 38-9: Message Board
Just like a hallway message board, information that you want to share can be placed here. From
time to time, your colleagues may leave you messages or comment on subjects you care about or
read your own comments.
Objective: Learn to post messages on the personal message board.
Scenario
Go to your message board and explain what you believe you will be doing in the next few weeks of
your new Project Management job.
Also consider: Should you also leave a message on another message board for others to see? Did
the person receive an email when you posted the message on the board?
Messages are limited to 2000 characters.
Exercise 38-10: Personalization / Dashboard
The dashboard in the user’s personal area allows customization with the use of widgets. These
widgets can be used for many types of content including: CMS content, CMS Listsummary;
Calendars, RSS Feeds, Weather or Time, Speical interfaces.
Objective: Learn to customize your Dashboard.
Scenario
Go to your Dashboard and create a new “Project Management” tab. Inside of this tab, insert widgets
that you can utilize in your project management role.
Also consider: Is there outside content from news feeds you would like to use? Should there be an
interface to a CRM system? Should you be looking for the latest updates inside of a content folder?
Wouldn’t a flickr picture of some cute dogs make your day?
CMS400.NET Administrator Training Manual and Exercises
CMS400.NETVersion 8.0.2 Doc:20101215
209
Adding a Widget to the Dashboard
Exercise 38-11: Groups
Groups within the Social Networiing tools allow for specialized access to teams of people to work
together. The same functionality used by individuals (blogs, comments, documents, content) can
also be used by groups.
210
CMS400.NET Administrator Training Manual
CMS400.NET Version 8.0.2 Doc:20101215
UNIT 38
Objective: Create a group and connect others to it.
Scenario
Your first project in the Project Management Office is to establish a
location for the working group that is responsible for implimenting
ISO9001 in your office. Create the group and invite the team
members.
Also consider: Should this be private or public? If you make it
private, can you distribute documents to people outside the group?
How?
CMS400.NET Administrator Training Manual and Exercises
CMS400.NETVersion 8.0.2 Doc:20101215
211
UNIT 39
Unit 40 — PageBuilder
Reference: “PageBuilder” in the Ektron CMS400.NET Reference Manual.
Note: The EktronTech sample site will be used for the following exercise.
PageBuilder is a technology that is aimed at providing marketing departments and other nontechnical users the tools to build entire Web pages on their own. The Ektron developer community
can also leverage the PageBuilder as a simple way to reuse and share common functionality from
one Ektron-powered site to another.
While the PageBuilder addresses non-technical departmental needs, technical resources still control
the overall site framework. Developers build the templates and develop the functional “Widgets.”
Site administrators determine where non-technical users are empowered to build new pages and
with which specific Widgets.
Exercise 39-1: PageBuilder Set Up
Manual URL Aliasing must be turned on for this feature. With this, you can apply a “friendly” URL to
your page.
1. Navigate to the Workarea Settings > Configuration> URL Aliasing > Settings.
2. Enable the Manual alias type.
3. Then click Save (
).
Exercise 39-2: Add the PageBuilder template into the CMS400
Note: The training site (EktronTech) that you are using already has sample pagebuilder wireframe templates that will be
used for training. Exercise 39-2 is provided as reference on how to register new pagebuilder wireframe template with
CMS400.NET Administrator Training Manual and Exercises
CMS400.NETVersion 8.0.2 Doc:20101215
213
CMS400.
1. In the Workarea, go to Settings > Configuration -> Template Configuration.
2. Click the Add button (
3. Use the
).
button to choose from the available templates on the server.
4. Choose the pagebuilder wireframe template that was created by your developer. For
example “MyWireFrame.aspx” template.
5. Check the “PageBuilder Wireframe” box.
6. Select the widgets that you want made available to your PageBuilders for this wireframe
template. When you have these selected, the background color of these widgets will
change.
7. Click the Add New Template button (
).
Exercise 39-3: Adding a Page Layout folder
1. Go to Workarea -> Content -> Pages folder.
2. Add a new folder named “My Page Layouts”.
3. Add “threeCol.aspx” as the default template for this folder.
214
CMS400.NET Administrator Training Manual
CMS400.NET Version 8.0.2 Doc:20101215
UNIT 39
4. Click the Update button (
) to create the new folder called “My Page Layout”.
Exercise 39-4: Creating a web page with PageBuilder
1. From the Workarea Content tab, select the “My Page Layout” folder.
2. Click on New -> Page Layout and an “Add New Page” wizard will appear.
3. Click Next.
4. Enter the page title as “My Web Page”.
5. The system will automatically use the page title as the alias. In this case “My_Web_
Page.aspx”. You can manually change the alias and extension if you desire.
CMS400.NET Administrator Training Manual and Exercises
CMS400.NETVersion 8.0.2 Doc:20101215
215
6. Select “Services -> Training -> Consulting” for the Taxonomy.
7. Click Next and fill in the Metadata information.
8. Click the Finish button and “Page Creation Successful” will appear.
9. Click OK and blank PageBuilder page window appears.
Edit Page Layout
After entering OK in the previous step, the Edit Page Layout will appear. Otherwise, you may go to
the “My Page Layout” folder and Edit the “My Web Page” PageBuilder content. The page layout
controls will appear.
Fixed Column and Width
216
CMS400.NET Administrator Training Manual
CMS400.NET Version 8.0.2 Doc:20101215
UNIT 39
Adjustable Column and Width
Note: Perform steps 1 – 5 for PageBuilder page with “Add Column” and “Edit Column Width” enabled, otherwise skip to
Step 6.
1. Click on the Add Column button to make our Page have two columns.
2. In the left hand column click the pencil icon to edit the column width.
3. Set the column width to 300 pixels
4. In the right hand column, click the pencil icon to edit the column width.
5. Set the column width to 450 pixels.
6. Click the pullchain icon to show the widgets you may add to the page layout.
7. Drag the Content Block widget into the Left Column. (This places a Content Block on the
page and shuts the PageBuilder Tool Bar.)
CMS400.NET Administrator Training Manual and Exercises
CMS400.NETVersion 8.0.2 Doc:20101215
217
8. Click on the Edit Properties “pencil” for the Content Block.
9. Select the Content > XML Elements > Image Rotators folder and then select the
“Featured Customers” in the View Results box. Click Save button.
10.
Open the PageBuilder tool bar again by hitting the Orange
left corner of the page.
Open/Close tool in the upper
11. Click the pullchain and drag the Listsummary widget below the Calendar in the Left hand
column.
12. Set the Widget Properties by clicking the pencil on the gray bar.
218
CMS400.NET Administrator Training Manual
CMS400.NET Version 8.0.2 Doc:20101215
UNIT 39
13. Select the Content > Corporate > About Us folder and click Save button.
14. In the Middle column, add a Content Block widget. Set it to the “About Us” content found in
the “About Us” folder.
15. In the Right Column add a Content Block Widget. Select the “Root” folder and select the
“Ektron In The News” content and then click Save.
16. In the Right Column drag a “RSS Feed” widget below the content block.
17. Set the “RSS Feed” widget properties and set the feed to:
http://news.google.com/news?pz=1&ned=us&hl=en&q=ektron&output=rss
Your new page will look like this.
CMS400.NET Administrator Training Manual and Exercises
CMS400.NETVersion 8.0.2 Doc:20101215
219
18. Publish your changes from the PageBuilder menu bar.
After you publish your page from the file menu, you can go to your browser page and enter the
following URL: http://localhost/EktronTech/My_Web_Page/
220
CMS400.NET Administrator Training Manual
CMS400.NET Version 8.0.2 Doc:20101215
UNIT 40
Unit 41 — Multivariate Testing
Reference: “Multivariate Testing”” in the Ektron CMS400.NET Reference Manual.
What is it?
Simply put Multivariate Testing method (or multi-variable testing) compares the performance of
content variations in multiple locations on a page.
“Multivariate testing helps determine the optimum page layout for Web pages. By adjusting page
layouts, Web site managers increase the number of visitors to a target page. With Ektron
CMS400.NET Multivariate Testing, these adjustments occur automatically and the optimal page
layout becomes the actual page web site visitors see.”
Why Use it?
Launch campaigns with multiple landing pages and determine which one works best with Ektron
multivariate testing. Leverage widget-based PageBuilder technology to automate the process and
maximize you results, fast.
Old way was complicated and costly
1. One form of multivariate testing is done through Page Tag (metadata); a complex process
where the website creator inserts Javascript into the site to learn about visitor behavior.
2. Another form of multivariate testing is done with or without the need for page tagging
called a non-intrusive approach. This approach uses a solution that is hosted externally $$
as software as a service (SaaS) or run internally within an enterprise’s own datacenter.
What can you track?
Headlines
Images
Copy Placement
Exercise 40-1: Multivariate Demonstration
CMS400.NET Administrator Training Manual and Exercises
CMS400.NETVersion 8.0.2 Doc:20101215
221
222
CMS400.NET Administrator Training Manual
CMS400.NET Version 8.0.2 Doc:20101215
UNIT 40
Steps
CMS400.NET Administrator Training Manual and Exercises
CMS400.NETVersion 8.0.2 Doc:20101215
223
1. Create or edit the PageBuilder page you wish to use during the experiment.
2. Place the Multivariate Target widget in any location on your web page.
224
CMS400.NET Administrator Training Manual
CMS400.NET Version 8.0.2 Doc:20101215
UNIT 40
Save The Page
3. Create The Experiment Page
Exercise 40-2: Experiment Widget
This controls the experiment. Settings include the target content number, start/stop button and the
Report hide/show button.
CMS400.NET Administrator Training Manual and Exercises
CMS400.NETVersion 8.0.2 Doc:20101215
225
This is only available when logged in and editing the PageBuilder experiment page.
Below is an example of a Multivariate Experiment widget while an experiment is running. If
desired, you can click the Stop button to stop the experiment.
The experiment widget also shows reports to indicate how each variation has performed during the
experiment.
Click the Show Reports button to see the experiment’s progress.
The reports show:
The percent conversions compared to visits
The number of conversions
The total number of visits to each variation
Exercise 40-3: Multivariate Section Widget Details
The Multivariate Section widget contains the content variations for the experiment. By using a
variety of content combinations, the experiment tests the best arrangement of content to
accomplish the desired conversion goals. The content is presented randomly to the site visitor.
226
CMS400.NET Administrator Training Manual
CMS400.NET Version 8.0.2 Doc:20101215
UNIT 40
1. Drag a content Block Widget into the Section Widget
2. Then Click the Plus Button on the Right Side and Repeat with desired content
The examples below demonstrates the slider control for variation 1/2 and 2/2.
CMS400.NET Administrator Training Manual and Exercises
CMS400.NETVersion 8.0.2 Doc:20101215
227
Publish the Experiment Page
Issues
Cookies in Multivariate Testing
When visitors view the experiment page, a cookie is set in the browser. This cookie indicates the specific variation seen by the visitor. From this point forward, if they next visit
the target page, this cookie is read and the proper variation counter is increased.
A cookie persists forever or until the cookies are removed from the browser cache. The
cookie gives a visitor a consistent page variation each time they revisit during the experiment. Visitors that block cookies are not counted in conversions. Also, they see random
page variations each time they visit the page.
Note: Multivariate Testing results can seen from http://training.ektron.com/eanalytics.
228
CMS400.NET Administrator Training Manual
CMS400.NET Version 8.0.2 Doc:20101215
UNIT 40
Unit 42 — Targeted Content Widget
Configurations
A Targeted Content Configuration is a Targeted Content widget that you create and store in the
Ektron CMS400.NET Workarea. Then, when dropping a Targeted Content widget onto a PageBuilder
page, you can select the configuration. The advantage of a configuration is that it lets you reuse the
same Targeted Content widget on any number of pages.
Using Targeted Content Configurations
A Targeted Content Configuration is a Targeted Content widget that you create and store in the
Ektron CMS400.NET Workarea. When users drop a Targeted Content widget onto a PageBuilder
page, they can select from any of the configurations defined in the Workarea. (See the following
example.) A configuration lets you reuse the same Targeted Content widget on any number of
pages.
If you later change a configuration setting, all widgets using that configuration are automatically
changed.
Use the Targeted Content Configuration screen to create, store, edit and delete configurations.
Important: If you apply no conditions to a configuration and reference it in a Targeted Content
widget on a PageBuilder page, nothing appears on the page.
This screen lets you create a new Targeted Content Configuration or edit an existing one.
CMS400.NET Administrator Training Manual and Exercises
CMS400.NETVersion 8.0.2 Doc:20101215
229
Creating a Targeted Content Configuration
If you have created a Targeted Content widget, the process of creating a Targeted Content
Configuration is almost identical.
Prerequisite: To access this screen, you must be a member of the Administrators group or be
assigned the Personalization Admin role.
To create a Targeted Content Configuration, follow these steps.
1. In the Ektron CMS400.NET Workarea, choose Settings > Personalizations > Target
Content Configuration.
2. Click Add. The Add Target Content Configuration screen appears.
3. Enter a Title.
4. Complete the steps to create a Targeted Content Configuration.
5. Click Save.
Referring to a Targeted Content Configuration
Prerequisite: The PageBuilder page must include the Targeted Content widget.
1. Edit a PageBuilder page, as shown below
2. Drag and drop a Targeted Content widget.
3. Click Select Global Configuration (circled in the following figure).
4. Select the Targeted Content Configuration you want to place on the page.
230
CMS400.NET Administrator Training Manual
CMS400.NET Version 8.0.2 Doc:20101215
UNIT 40
5. Save, check in, or publish the page.
Note: You can apply a global configuration to an existing widget. If you do, the global configuration
replaces all conditions and results you previously applied.
Editing a Targeted Content Configuration
If you edit a Targeted Content Configuration that is placed on one or more PageBuilder pages, they
will reflect the edit after you publish the page.
Prerequisite: To access this screen, you must be a member of the Administrators group or be
assigned to the Personalization Admin role.
1. In the Ektron CMS400.NET Workarea, choose Settings > Personalizations > Target
Content Configuration.
2. Click Edit to the left of the configuration you want to edit. The widget appears.
3. Edit as necessary. See Also: Creating a Targeted Content Widget
4. Click Save.
Deleting a Targeted Content Configuration
Important: If you delete a Targeted Content Configuration that was placed on one or more
PageBuilder pages, they display a blank area where the widget was dropped.
Prerequisite: To access this screen, you must be a member of the Administrators group or be
assigned to the Personalization Admin role.
1. In the Ektron CMS400.NET Workarea, choose Settings > Personalizations > Target
Content Configuration.
2. Click Delete.
3. Check the box to the left of the configuration you want to delete.
4. Click Delete .
CMS400.NET Administrator Training Manual and Exercises
CMS400.NETVersion 8.0.2 Doc:20101215
231
Creating a Targeted Content Widget
To create a Targeted Content widget, follow these steps.
Prerequisite: The Targeted Content widget must be on the list of widgets assigned to the page's
template. See Also: Adding the Wireframe and Widgets into the CMS
1. Drag and drop the Targeted Content widget onto a PageBuilder page.
2. By default, Condition 1 is added to the widget. Click Edit Condition.
Show me.
3. Give the condition a name.
4. Click the +or button to set up the first condition.
5. A dropdown list of condition criteria appears.
The following table describes the criteria options.
Criterion
Use this criterion to specify widgets
that will appear if
Search Engine
If the site visitor was referred to this
page from any search engine (or not)
Or
If the search engine from which the site visitor was
referred is one of the following
- Google
- Bing
- Yahoo
- Other
- None
Or
If the search engine's keywords are (are not, contain,
start with, or end with) a specified value
Referring URL
The referring host matches a string
value (for example, www.example.com).
This is helpful for determining the site from which a visitor
came to your site, such as a Facebook fan page.
URL parameter
For example, you create a campaign selling gold jewelry
and base its content on the URL parameter cid=gold.
232
CMS400.NET Administrator Training Manual
CMS400.NET Version 8.0.2 Doc:20101215
The current page contains the specified
URL parameter.
UNIT 40
If the URL of the page that hosts the Targeted Content
widget contains cid=gold (for example, http://www.mystore.com/product.aspx?cid=gold), then display
widgets assigned to that Targeted Content widget.
A cookie matching the specified pattern
is found on the site visitor's computer.
Cookie
Cookies are generally stored as name value pairs, such as
UserID - A9A3BECE0563982D. When checking for a
cookie, you complete three fields.
cookie ID
logic (is, is not, contains, starts with, ends with)
a value
For example, if a certain campaign placed cookies beginning with A9A, you would set up the criterion like this:
Note: The cookie criterion does not support subkeys, such
as ecm.userid orecm.sitepath.
To work around this problem, use a contains operator and
enter the text following .ecm, such as sitepath.
The user's device matches a Device
Configuration that you specify. For
example, a content block displays only
if a user accesses your Web site with a
Smart Phone.
Device Configuration
To learn about Device Configurations, see Adding a Device
Configuration andSupporting Mobile Devices.
Logged in
The user is or is not logged in.
User is in group
Note: Only applies to logged-in users.
User is member of a Ektron CMS400.NET User or Membership Group that you select from dropdown list. See
Also: Membership User Groups, Managing User Groups
User is in community
Note: Only applies to logged-in users.
User is a member of an Ektron CMS400.NET Community
Group that you select from dropdown list. See Also: Community Groups
User Properties
Note: Only applies to logged-in users.
The value of the logged-in user's custom property satisfies
the logic for the value you specify. See Also: Custom User
Properties
Example:
Zip code is a Custom User Property. You want to display a
list of stores in New Hampshire for users whose Zip Code
begins with 03.
CMS400.NET Administrator Training Manual and Exercises
CMS400.NETVersion 8.0.2 Doc:20101215
233
Condition / result
Zip code = 03458 true
Zip code = 02103 false
Date and Time: Day
The actual date (according to the web
server's clock) and a date you enter
satisfy the specified logic.
Logic operators:
is
is not
less than
greater than
equal to or less than
equal to or greater than
Examples:
Assume today's date is 2010-01-01
Condition / result
Date = 2010-01-01 true
Date < 2010-01-01 false
Date >= 2009-12-01 true
Date and Time: Day of Week
The current day (according to the web
server's clock) satisfies the specified
logic.
Logic operators:
is
is not
Examples:
Assume today's date is 2010-03-01 (Monday)
Condition / result
Day of week is Monday true
Day of week is Tuesday false
Day of week is not Tuesday true
Date and Time: Day of Month
Logic operators:
is
is not
less than
greater than
equal to or less than
234
CMS400.NET Administrator Training Manual
CMS400.NET Version 8.0.2 Doc:20101215
The actual date (according to the web
server's clock) and a date you enter
satisfy the specified logic.
UNIT 40
equal to or greater than
Examples:
Assume today's date is 2010-03-01 (Monday)
Condition / result
Day of month is 01 true
Day of month is not 01 false
Date >= 2009-12-01 true
The actual hour (according to the web
server's clock) and number between 1
and 23 you enter satisfy the specified
logic. The numbers are based on a 24
hour clock so, for example, 5 p.m. is
17.
Date and Time: Hour of Day
Logic operators:
is
is not
less than
greater than
equal to or less than
equal to or greater than
Examples:
Assume current time is 18:30:00
Condition / result
Hour of day is 18 true
Hour of day is 23 false
Hour of day >= 12 true
Enter the user's country or state, or
both. State selections are limited to
states in the United States.
User Regional Info
This information is retrieved from the IP address of the
person who is using your Web site. In order to retrieve
this information, you need to enable eWebEdit400's Targeting Content with GeoIP Information.
If the criterion matches information in
the user's Facebook profile, display the
widgets inserted into this condition.
Facebook Info
For example, if the criterion is Marital Status is Single and
the user's Facebook Profile matches that value, display
the assigned widgets.This criterion only works with users
who log in via Facebook Login.
You can apply any of these facebook fields.
Age
CMS400.NET Administrator Training Manual and Exercises
CMS400.NETVersion 8.0.2 Doc:20101215
235
Gender
Marital Status
Likes
Employment
Use Contains with Free Text Fields
On fields that use free text (such as Likes), Ektron recommends using the containsoperator, as opposed to is or
is not. Contains is more flexible and finds a partial match.
For example, if the user likes U.S. Soccer and you enter
the term soccer and thecontains operator, a partial match
is made, so the user sees the related widget.
On the other hand, if the user likes U.S. Soccer and you
enter the term soccer and the is operator, an exact match
is not made, so the user does not see the related widget.
The Likes Field
The Likes field lets you search through users' Facebook
profile Likes and Interests. Or, you can narrow it down to
a specific like/interest. For example, you could display a
widget promoting Red Sox merchandise if, in their Facebook profile, users like a Sports Team that contains Red
Sox.
Otherwise
No condition evaluates to true.
Note: You would typically use this criterion last, since it
always evaluates to true. Any conditions below this are
ignored.
6. Add additional criteria as desired. Click the Save button.
7. Drag to the area below the new condition one or more widgets that appear if the
condition evaluates to true.
8. If the widget requires you to fill out properties, click the edit button ( ) and complete
the screen.
Device Detection
The Targeted Content widget can detect the site visitor's device and only display a
widget if it is on a configuration list. So for example, a certain content block would only
display if a user is accessing the page from a smart phone.
Facebook Integration
The Targeted Content widget lets a widget designer use the following Facebook
information as criteria: Age, Gender, Marital Status, Likes, Employment. For example,
236
CMS400.NET Administrator Training Manual
CMS400.NET Version 8.0.2 Doc:20101215
UNIT 40
you could display New York Yankees' merchandise to users who "like" the Yankees their
Facebook profile.
GeoIP Integration
The Targeted Content widget lets a widget designer use geographic information as
criteria. You can use either a country or a state within the United States. For example,
your eCommerce Web site is having a special on snow blowers. That content only
appears to people in Northern states.
CMS400.NET Administrator Training Manual and Exercises
CMS400.NETVersion 8.0.2 Doc:20101215
237
UNIT 41
Unit 43 — eSync
Reference: the “eSync” in the Ektron CMS400.NET Reference Manual.
(Included in Enterprise edition and optional in Professional Edition)
Ektron CMS400.NET’s eSync automates the process of synchronizing content, folders, or an entire
Web site between two servers. Synchronization is a process which ensures that information on two
computers is exactly the same.
Certificates
During the setup process, certificates that allow access between servers must be created and
installed in the proper locations.
Setup and Usage
You administer eSync through Ektron CMS400.NET’s Workarea >Settings > Configuration >
Synchronization screens. The screens let you establish a sync configuration between two
databases, then specify any number of sync profiles for each configuration.
Initial Sync complete
CMS400.NET Administrator Training Manual and Exercises
CMS400.NETVersion 8.0.2 Doc:20101215
239
Prerequisites for Content/Folder Sync
You are a member of the Administrators group or assigned to the Synchronization Admin
role
Content/folder sync is enabled in web.config.
The server has a sync configuration whose initial sync has been run
Existing folders: folder information has not been updated since the last database sync
using the selected profile. If any folder property is changed (for example, a new metadata value is assigned), a database sync must be run before you can synchronize content
in that folder and the folder itself. Furthermore, any child folder (and its content) that
inherits that property from the parent folder can only be synchronized after the next database sync.
New folders: a database sync must be run before you can synchronize content in the new
folder and the folder itself.
Content: No new tags or taxonomy categories have been added since the last time the
selected profile was synched. If either event has occurred, a database sync must be run
before you can synchronize that content.
Using Content and Folder Level Sync
1. Navigate to the content.
2. Click the arrow to the right of the content to see its dropdown menu. Also, a Synchronize
button (shown below) is also available from the View Content screen.
3. Click Synchronize.
240
CMS400.NET Administrator Training Manual
CMS400.NET Version 8.0.2 Doc:20101215
UNIT 41
4. All profiles that sync the database in a bidirectional or upload direction appear. Select the
appropriate one.
5. Click Sync Now.
6. The content is synchronized with the selected database.
Note: If you performed a database sync and the site being synched uses URL aliasing, you must go to its URL Aliasing
Configuration screen and click the Refresh button (
) to update its aliasing information.
CMS400.NET Administrator Training Manual and Exercises
CMS400.NETVersion 8.0.2 Doc:20101215
241
UNIT 42
Unit 44 — Building Your First Web Site and
Templates
The purpose of this exercise is to teach the administrator the basics of creating masterpages and
templates. Additionally, they will become familiar with Visual Web Developer Express and how
Ektron Server Controls are placed on a page to interact with the CMS400.NET Workarea.
The process
Create a design
Install the CMS400.NET min site
Create the folders and content within the CMS
Create the Masterpage
Create the Template
View the results in a browser!
The Design for Masterpage and Template – Version 1
CMS400.NET Administrator Training Manual and Exercises
CMS400.NETVersion 8.0.2 Doc:20101215
243
Design version 2 – Adding CSS styles
244
CMS400.NET Administrator Training Manual
CMS400.NET Version 8.0.2 Doc:20101215
Appendix A – CMS Diagnostics
CMS Diagnostics Tool
To access the CMS Diagnostics, go to:
http://localhost/CMS400Developer/WorkArea/diagnostics/status.aspx
The diagnostics will help you narrow down the cause of errors on your site. It
will also reduce troubleshooting time when you contact Ektron Support.
When everything is running fine, you should see OK next to all the fields that
this tool checks.
Any thing failed means you need to fix it.
EktronLog
The other place CMS administrators or IT personnel can find information about
CMS is from the Event Viewer. There is a separate log called EktronLog which
logs any Error or Information from running the Ektron CMS.
CMS400.NET Administrator Training Manual and Exercises
CMS400.NET Version 8.0.2
245
Appendix B –Workarea/Editor Cheat
Sheet Version 3.0
1. Workarea Tabs
Desktop smart personalization desktop
Content Locate folders, contents, DMS, taxonomies, collections and menus
Library Content folder structure, stores images, files ,
hyperlinks and quicklinks
Settings Manage CMS Settings based upon permissions
Reports Content reports and Site analytics
Help In Workarea and in context help section
Content Tab Types
2 - Folder Tab Select to view folder architech structure of CMS
3 - Taxonomy Tab Select to view Taxonomy Structure and options
4 - Collections Tab Select to view Collections and options
5 - Menu Tab Select to view Menus and options
CMS400.NET Administrator Training Manual and Exercises
CMS400.NET Version 8.0.2
247
Folder Types
6 - Content Folder Regular folder for contents, select to view contents
in that folder.
7 - Blog Folder Select to view the posts and comments on this blog.
8 - Forum Folder Select to view the discussion forums, categories,
topics, and replies.
9 - eCommerce Folder Select to view the ecommerce items
10 - Calendar Folder Select to view and plan events on the calendar
11 - Community Folder Folders for membership uses to edit content,
select to view contents.
Dropdown Menus
12 - New menu Create new content, forms documents, Folders menus
and collections
13 - View menu View Language, Properties and archived content and
more.
14 - Delete menu Used to delete multiple items. Administrators can
delete folders.
15 - Action menu Export for translation, Search, move/copy content,
eSync
16 - DMS/ Add asset Pop up the window for drag and drop documents
from local machine.
17 - In Context Help Click to get in context help anywhere in the
workarea
18 - Content Organization Bar Ability to sort content by the title
Content Types
19 - Content Items Can be HTML Content, Forms, DMS, or Multimedia
Content
20 - Quick Edit Menu For content editing, properties and content
esync.
21 - Language Flag Indicate the content language version.
22 - Content ID Automatically generated by system.
23 - Content Status Shows the current status of a piece of content.
(A) Approved Published and on the website.
(O) Checked Out Only available for editing by the content
editor who checked it out.
( I ) Checked In Available for editing.
248
CMS400.NET Administrator Training Manual and Exercises
CMS400.NET Version 8.0.2
(S) Submitted Currently in the approval chain. Waiting for
acceptance.
(M) Deletion Marked for deletion.
(T) Awaiting Tasks Currently awaiting completion of tasks.
(P) Pending Awaiting scheduled start date.
(D) Pending Deletion Pending deletion but created with a
future start date.
24 - Date Modified Last modified date of the content.
25 - Last Editor Editor who made the last modification.
CMS400.NET Administrator Training Manual and Exercises
CMS400.NET Version 8.0.2
249
eWebEdit400 Cheat Sheet
1. Content Options (From left to right)
Publish / Submit – Saves changes, closes editor, and
(depending on approval rights) either publishes the content
or submits it to the next person in the approval chain.
Checkin – Saves changes, closes editor, checks in the content, but does not publish or submit for approval.
Note: Use this to create a record in the history, and to allow
other content authors to edit it.
Save – Saves changes; does not submit into the approval
chain, check content in or even close the editor.
Preview- Allows you to preview the content as it would look
in context.
Cancel – Discards changes, cancels check out.
250
CMS400.NET Administrator Training Manual and Exercises
CMS400.NET Version 8.0.2
2. Title – The CMS title for the current block of content.
3. Language – Indicate the content language.
Tabs
4. Content Tab – Default tab; select to view/modify the main body of content.
5. Summary Tab – Click this tab to view/modify the brief summary of a
content block.
6. Metadata Tab – Click this tab to view/modify metadata values related
to this content block. Used for search engine optimization, advanced
search/navigation, content relationships, etcetera.
7. Alias Tab (Optional) – Click to create alias (friend URL) for content.
8. Schedule Tab – Click this tab to view / set the go live and end dates
for this content block, and the action taken when the end date occurs.
9. Comments Tab – Click this tab to view/modify a comment viewable
by content authors/publishers only.
10. Web Alerts (Optional) – Click this tab to modify settings for email notification to subscribers. Administrators set the defaults and identify
which folders are included in a subscription.
11. Templates (Optional) – Click this tab to select an alternate template
to display this content block. Administrators specify which choices are
available / appropriate.
12. Category (Optional) – Click to select taxonomy for content. Administrator specifies the taxonomy can be used in folder properties.
13. Standard Toolbar (From left to right)
Select All / Cut / Copy / Paste
Paste Plain Text – Paste copied text without formatting.
Find and Replace / Print / Undo / Redo
Spell Check – Checks content spelling using web based dictionary.
Insert Anchor – Creates anchor point within the content.
Hyperlink Manager – Insert a hyperlink to anchor link, or
modify an existing hyperlink.
Remove Link – Remove a selected link.
Library – Click to browse the library, allowing you to insert
images, links to files/forms, links to other content blocks
(Quicklinks), and stored hyperlinks.
Add Wiki Link – Create a Wiki link.
CMS400.NET Administrator Training Manual and Exercises
CMS400.NET Version 8.0.2
251
Translate content – Click to open translate content window,
providing a machine translation of your content block into
one of a handful of languages.
Horizontal Rule – Inserts a horizontal line.
Insert Symbol – Insert symbols and special characters.
Validation – Checks to make sure all HTML is XHTML compliant.
14. Style Toolbar
Styles – Select and apply style characteristics to selected
content, overriding the default characteristics.
Heading – Similar to styles, applies heading characteristics
to selected content, or select Normal to remove any formatting to the text.
15. Formatting Toolbar
Bold / Italic / Underline / Strikethrough
Superscript / Subscript / Number List / Bullet List
Outdent / Indent
Align Left / Center / Right / Justify / Remove Alignment
16. Table Toolbar – For creating and editing table, column, row, and cell
properties.
17. Design View – WYSIWYG view of the content.
18. HTML View – HTML source of the content.
19. Property Screen – display properties based what’s been selected in
the content body. (Screen shot shows Image Properties of the image
select in content body.)
252
CMS400.NET Administrator Training Manual and Exercises
CMS400.NET Version 8.0.2
Appendix D – Training your users
Resources
User Manual
CMS400 Dev Center, the online community for CMS users http://dev.Ektron.com
To illustrate the elements of design that relate to the user training, here is a list
of questions that need to be answered to plan end user training:
1. Please provide an overview of the installation - what type of site it is,
the goals of the project, the timeline of the project, features of the
CMS that are especially important, unusual or special requirements of
the site, other web applications that are used, etc.
2. What areas of the site or pages have received the most development
effort?
3. What are the major types of content on the site?
4. Are there serial content types like press releases or news articles anywhere?
5. What XML content types are used? What XML Indexing searches or
lists are used?
6. How does a user add a page to the site? (The answer to this might be
"The site isn't designed to allow users to add new pages.")
7. How does a user add a section to the site? (The answer to this might
be "The site isn't designed to allow users to add new sections.")
8. How many CMS templates are in the site? How many of these are
dynamic and which CMS folders do they relate to?
9. Dynamic Lists:
a. Where are CMS menus used?
b. List Summaries?
c. Archive List Summaries?
d. Collections?
e. Other list controls?
10. Is there any content reuse - content appearing on more than one
page?
11. How would CMS users create new CMS-managed HTML forms?
12. Are CMS calendars used anywhere?
13. How would CMS users create new CMS calendars?
CMS400.NET Administrator Training Manual and Exercises
CMS400.NET Version 8.0.2
253
14. How is CMS metadata used? Would CMS users be editing CMS metadata values?
15. Is it a multi-lingual site? Which languages are enabled? Who would
translate the content?
16. Are there any private content or extranet sections on the site?
17. What CSS styles are available to CMS users and how would each style
be used?
18. What general styling guidelines should CMS users follow?
19. Is there a "palette" of HTML snippets for CMS users to cut and paste
from?
20. How are CMS permissions set? Are administrator users expected to
make extensive changes to permissions settings?
21. What approval processes are set up? Are administrator users
expected to make extensive changes to permissions settings?
Topics to Cover
Business Impact (Note: what users need to know during training often
has more to do with your business processes and Web site configuration than the features of the CMS.)
What is the CMS?
What does the CMS do for your organization?
How will the Web site change or what will the new site be
like?
Site layout
Appearance and style
New Content
How will the users’ responsibilities change?
Basic demonstration of the CMS
Log in to CMS
Edit an existing content block
Add a new content block
Add a hyperlink to the new content block
Preliminaries
Ektron Plugins (ewebeditproclient.exe, ewebdiff.exe,
dms400client.exe)
Explain that plugins are like Flash Player, etc., and
necessary for using CMS
254
CMS400.NET Administrator Training Manual and Exercises
CMS400.NET Version 8.0.2
How does the user acquire?
Auto-install via IE
Download or retrieve from network
share and run .exe file
IT Department will visit and manually
install
Pushed to clients through .msi or network management
In case of problems, who should user contact?
Basic editing process
Describe different parts of the editing screen
Staging version versus Published version
Change control - check in / check out
Difference between three save buttons
Formatting Content
1. Explain formatting rules and guidelines for your site - how do you
want your users to format content?
2. Two basic formatting approaches:
a. Cut and paste
b. "From Scratch" using editor's formatting features
3. Overview of editing
a. Word-processor-type features
b. "Paste text" buttons
c. Uploading images and files
d. Creating and editing images
i. With Ektron's WebImageFX, if you have purchased
a license
ii. Otherwise with Microsoft Paint or another tool
available to all users
e. Web editing techniques
i. Layout and positioning with tables
f. Describe the CSS styles that you have created and how
users will apply them
4. XML Content
a. Demonstrate editing and creating each type of XML content
b. Explain where the XML content is used on the site and how it
is displayed
c. Demonstrate editing and creating each type of XML content
CMS400.NET Administrator Training Manual and Exercises
CMS400.NET Version 8.0.2
255
5. Other things you can do with content
a. Scheduling
b. Translation
i. Manual Translation
ii. Export to XLIFF
6. Permissions - what will particular users be able to do in particular
parts of the site?
7. Approval Process
a. Explain approval process in general
b. How to check the status of a content block
c. Show an approval e-mail
d. Demonstrate logging in and approving changes
e. Describe the approval processes set up in the different parts
of your site
i. When a user edits content, who will approve those
changes
ii. Will the users attending training need to approve
changes made by others?
8. Work Area
a. Demonstrate how a user would edit their profile
b. Collaboration Tools
i. Instant E-mail
ii. Content Change Control
iii. Content Approval Process
iv. History Comments, Task Comments, and Inline
Comments
v. Task Management
vi. Explain any features of work area you'll want your
users to access
9. Closing
a. Explain your CMS deployment plan and timeline
i. When will users have access to begin using CMS?
b. Resources for end users - describe links available in "Help"
section of Work Area
Who in your organization should users contact with questions and problems?
256
CMS400.NET Administrator Training Manual and Exercises
CMS400.NET Version 8.0.2
Appendix E – E-mail in CMS400.net
E-mail Notification
See Also: “Configuring E-Mail Notifications” in the Ektron CMS400.NET Setup
Manual.
E-mail notification is sent by the CMS on these occasions:
A task is assigned to a user.
A task is redirected to a user.
A task is submitted for content approval. E-mail is sent to the first
user in the approval chain.
The approval process moves on to the next approver.
The content is declined at an approval stage. E-mail is sent to the
assigned user.
The content is published. E-mails are sent to the creator, assigned
user and the approvers.
Where User Groups are used in lieu of individual users (recommended practice
for Approval Chains), all members in the group will be sent notification E-mails.
(Note: In order to receive system E-mail notifications, a user must have their
E-mail enabled in the User Setup.)
Example 1 – HTML Form E-mail
This E-mail is sent when an HTML form is submitted from the site. The E-mail
property must be set on the form for this to be sent when the form is
submitted.
From: [email protected]
[mailto:[email protected]]
Sent: Tuesday, May 01, 2007 3:09 PM
To: [email protected]
Subject: New Student Form
Data from form "Roger Contact Info" was received on 5/1/2007
3:08:33 PM.
Contact information.
Field
Subject
Full Name
Address
City
Value
Contact Form
Roger
1 street
city
CMS400.NET Administrator Training Manual and Exercises
CMS400.NET Version 8.0.2
257
State
Zip
Country
Business Phone
Home Phone
E-mail Address
South Carolina
11111
usa
603-888-1234
603-888-1234
[email protected]
E-mail "New Student Form" originally sent to
[email protected] from [email protected] on
5/1/2007 3:08:33 PM.
Example 2 – Content Request for Approval
From: [email protected]
[mailto:[email protected]]
Sent: Tuesday, May 01, 2007 1:31 PM
To: [email protected]
Subject: Request for content approval
The content Editor adds new content has been submitted for your
approval by editor editor".
To locate the content, the folder path in your workarea is:
\CMS400Demo\Test Folder.
The following link will take you to the submitted content block on
the Web site:
http://localhost
/CMS400Developer/login.aspx?id=858&LangType=1033
.
Please Note: You must login and select the preview icon to view the
changes.
The content was submitted for approval on: 01-May-2007 1:30:46
PM.
Approvals: [approver]
Comment:
Example 3 – Content Approved and Published
From: [email protected]
[mailto:[email protected]]
Sent: Tuesday, May 01, 2007 2:49 PM
To: [email protected]
Subject: Content changes have been made
258
CMS400.NET Administrator Training Manual and Exercises
CMS400.NET Version 8.0.2
The changes to the content About Us have been approved. The
content changes went live immediately.
Example 4 – Content Declined Approval
Content sent for approval was declined and an E-mail was returned to the
content author. The content is in a “Checked In” state.
From: [email protected]
[mailto:[email protected]]
Sent: Tuesday, May 01, 2007 1:32 PM
To: [email protected]
Subject: Content approval request declined
Your submitted approval request for the content Editor adds new
content has been declined by approver approver. Reason: I DON"T
LIKE IT.
Example 5 – Membership Approved
Activate Account
From: [email protected]
To: [email protected]
Welcome to the Ektron CMS400.NET Web Alerts system.
You have registered to receive updates from our Web site when
content is added or updated.
For security and identity reasons, you must active your account by
clicking the link displayed below.
http://localhost
/CMS400Developer
/WorkArea/activateuser.aspx?uid=
jmember&acc=797c9c3297f449e896531cd379900ce0
Make note of your username and password:
Your user name is: [email protected].
Your account id is: 797c9c3297f449e896531cd379900ce0
Example 6 – Web Alert E-mail Example (including
new article text)
From: [email protected]
CMS400.NET Administrator Training Manual and Exercises
CMS400.NET Version 8.0.2
259
Sent: Wednesday, June 20, 2007 9:18 AM
To: [email protected]
Subject: Wellness Article Update!!!
You have received this newsletter because you subscribed to it on
the Ektron Medical Web site. If you do not wish to receive similar
messages in the future, go to the bottom of this page and use the
"Unsubscribe" link.
Don't Get Cancer
by: Simon Mitchell, Ektron
One antidote to cancer is information
In general our responses to cancer are converging, but very slowly.
Presently all cancer authorities are agreed on only one thing:
cancer cannot take hold in a healthy immune system
<remainder of article removed for brevity>
Read More: http://localhost/CMS400Developer/wellness_
article.aspx?id=119
You have been subscribed to receive E-mail alerts from the Ektron
Medical Demo site web alerts system. Follow the link to
unsubscribe from these alerts:
http://localhost/CMS400Developer/wellness_alerts_
unsubscribe.aspx
260
CMS400.NET Administrator Training Manual and Exercises
CMS400.NET Version 8.0.2
Appendex F– System Architecture
CMS400.NET Administrator Training Manual and Exercises
CMS400.NET Version 8.0.2
261
Appendix G: New Analytics
Why Use Analytics?
By analyzing the user traffic coming to and interacting with your site, you can
better understand key elements of your Web presence. Traditional Web
analytics packages help you understand where your traffic is coming from,
when the traffic is occurring (including high and low points) and what pages
users are interacting with. But this information is often isolated from the Web
content and is, therefore, lacking the context needed to take advantage of it.
Ektron CMS400.NET has a fully-developed, Web traffic analytics provider
model. By hooking into best-of-breed analytics software, like Google Analytics,
your Web site’s information is integrated into CMS400.NET’s Workarea and so
is at your fingertips as you use it to optimize the site experience.
Analytics can help you
determine the popularity of areas of your site
examine click-through rates on your calls to action
analyze site structure and navigation
obtain key information about your site visitors
This information is essential to optimizing your site’s content. Its seamless
integration into CMS400.NET lets you fully leverage the data.
Using Analytics Data within Ektron CMS400.NET
Ektron CMS400.NET’s Workarea provides customized reporting, reflecting
exactly the information you care about. The data can be broken down in many
ways, such as
number of visits per day
browser usage
visitor location
visitor language
top content
referring sites
Analytics data is available for your entire site as well as individual pages. A
sample Analytics display is below.
CMS400.NET Administrator Training Manual and Exercises
CMS400.NET Version 8.0.2
263
The Analytics widget can be placed on your dashboard, so that you have instant
access. Also, the software is integrated into the content history. This makes
your traffic analytics more relevant: you can see what modifications were
made, when, and how they
impact traffic to that page. You can react immediately, restoring content that
performed better or changing the current content to better reflect your goals.
This full integration makes your analysis more efficient; there is no
reconfiguration of the analytics tool and no learning curve.
Customer reporting, segmentation, and legacy data are easier to access, and
Ektron CMS400.NET becomes the central hub for all of your Web site’s
information, bringing it together so that it is no longer siloed. Having all
information in one place puts it in context, making it easier to draw the
conclusions you need to optimize your Web presence.
264
CMS400.NET Administrator Training Manual and Exercises
CMS400.NET Version 8.0.2
The Flow of Analytics Data
As shown above, once you set up Analytics tracking, the Analytics Provider
monitors every site visit. In the Workarea, you can view this data from many
angles.
Important: No data is stored in Ektron CMS400.NET -- the CMS retrieves it upon demand from
your Analytics provider.
Google Analytics Provider
Google Analytics is an enterprise-class, Web Analytics solution that gives you
rich insights into your Web site traffic and marketing effectiveness. Powerful,
flexible and easy-to-use features let you see and analyze your traffic data in an
entirely new way. With Google Analytics, you're more prepared to write bettertargeted ads, strengthen your marketing initiatives, and create higher
converting Web sites.
Its main features are:
Advertising ROI - Measure the success of your display, search, new
media and offline advertising efforts.
Cross Channel and Multimedia Tracking - Compare your site usage
metrics with industry averages and track Flash, video, and social networking sites and applications.
CMS400.NET Administrator Training Manual and Exercises
CMS400.NET Version 8.0.2
265
Visualizing Data - Uncover trends, patterns, and key comparisons with
funnel visualization, motion charts, mapping, and more.
Customized Reporting - Create the reports, dashboards, and segments
that make the most sense for your business.
Sharing and Communicating - Administration controls and email
reports allow you to share data across your organization.
Google Integration and Reliability - Google Analytics complements a
suite of related products, all running on the same world renowned
infrastructure that powers Google.
Authorization to View Analytics Data
License Requirements
Ektron CMS400.NET Professional or Enterprise License
User Permissions
Only the following users can view Analytics data.
Members of the Administrators Group
Users assigned to the Analytics Viewer role.
Alfred works for ABC Corp and wants to know what the site analytics are used
for. He wants to construct a new marketing campaign and wants to know how
much traffic is currently looking at the content with the correct subject matter
that is already there. This will help Alfred to determine if marketing in this
direction would be worth while for his company.
Alfred has two choices on viewing the data on his current website:
Viewing Analytics Data
The Analytics feature provides two basic types of data:
Page data
Site data
Page Level Analytics Data
After you enable Analytics tracking, your provider retains data on every visited
page (that is, a unique URL) such as http://dev.ektron.com/articles.aspx or
http://dev.ektron.com/
template.aspx?id=6572). Data is tracked when the quicklink is used, as well as
any alias assigned to the content.
266
CMS400.NET Administrator Training Manual and Exercises
CMS400.NET Version 8.0.2
Viewing Page-Level Analytics from the Site
Any authorized user can view Analytics for a page on your Web site by following
these steps. Alfred has the correct permissions so how does he view page level
analytics? This is how:
1. Log in to the Web site.
2. Navigate to the page whose Analytics data you wish to view.
3. Hover the cursor over the Web Site Content menu.
4. Click View Page Activity, as shown below.
The SEO page’s Traffic tab appears.
CMS400.NET Administrator Training Manual and Exercises
CMS400.NET Version 8.0.2
267
Bounce rate - the percentage of single-page visits (that is, visits in
which the visitor exited your site from the entrance page) This shows
Alfred how many people were looking for information but then decided
that his company wasn’t a good fit after seeing the first page.
% Exit - the percentage of site exits that occurred from this Page
This shows Alfred how many people left after looking at this particular
page and deciding that his company wasn’t a good fit. This helps
Alfred by showing him how many people were interested in this
particular page but then left. Perhaps there was something on the
page that was turning customers off to his products that he needs to
investigate.
Viewing Page-Level Analytics from a PageBuilder Page
Any authorized user can view Analytics for a PageBuilder page by following
these steps.
Note: You cannot drag and drop the Analytics widget onto a PageBuilder page.
1. Use the right arrow button (circled below) to open the PageBuilder
menu.
2. From the menu, select View > Analytics.
3. The SEO page’s Traffic tab appears.
Alfred has logged into the CMS and is in the workarea, How does he
see page analytics from the workarea? Here is how.
Viewing Page-Level Analytics from the Workarea
The Ektron CMS400.NET Workarea provides two page-level views of Analytics
data.
The View Content History screen - compares Analytics data for any
two published versions
268
CMS400.NET Administrator Training Manual and Exercises
CMS400.NET Version 8.0.2
The Analytics toolbar button - displays the SEO page’s Traffic tab.
To view a content item’s Analytics data from the Ektron CMS400.NET Workarea,
follow these steps.
1. Navigate to the folder containing the content whose Analytics data
you want to view.
2. Click the content item.
Alfred recently identified that the wrong message was being sent out with one
particular piece of content and suspects the contents wording may have been
causing confusion in the need for his products or services. So he decided to
change the content to clear up the misconception. After a few weeks Alfred
decides to see if there is any notable differences in traffic. He can now do this.
He simply compares the two content versions to see if there is any difference in
traffic. How does the accomplish this? Simple…
Comparing Two Published Versions of Content
On the View Content History screen, blue and orange radio buttons appear next
to each published version of content, as shown below.
CMS400.NET Administrator Training Manual and Exercises
CMS400.NET Version 8.0.2
269
To compare Analytics data, click the appropriately-colored radio button next to
each version, then click the Compare button
Alfred spent a great deal of money on a third party consultant to organize his
content using URL aliasing. After paying the initial cost Alfred is suffering from
buyers remorse, how does he know If his companys investment was worth the
money. It would definitely help to justify the cost if he could show his CEO the
improvement in hard data. He can now using the analytics:
URL Filtering
The URL Filtering tab of the Compare Analytics screen lets you break down the
data by each of these identifiers. So, for example, you can drill down to view
only the data collected when site visitors accessed a page by typing its manual
alias into the browser.
The above information has been FANTASTIC for Alfred as he can see the data he
needs at any time. But bouncing between site and drop downs and methods has
gotten a little annoying. Alfred would also like to keep an eye on how things are
going but he doesn’t want to have to repeat the above processes every time.
Alfred quickly discovers he can use the smart desktop with the reports to see
the data the first time he logs into the workarea and can monitor it from there
without having to bounce all over the place. Here is how he accomplishes that:
270
CMS400.NET Administrator Training Manual and Exercises
CMS400.NET Version 8.0.2
Site Level Analytics Data
You can view Analytics data for any site via the Analytics Report Widget and
several reports.
Hard Data. CEO’s and COO’s prefer hard data. The wish to have this information
available to them at any time without having to know what the information was
ahead of time and compare to right now. Alfred steps in to help by showing his
CEO And COO exactly how they can get the information when they need it and
how they need it.
Alfred also knows that he will more then likely have to provide this information
daily or quarterly as his CEO and COO cant be bothered to run reports every
time they need it. Isn’t that what they are paying Alfred for?
Here is how he gets at the information
CMS400.NET Administrator Training Manual and Exercises
CMS400.NET Version 8.0.2
271
Site Reports:
Available Reports
272
CMS400.NET Administrator Training Manual and Exercises
CMS400.NET Version 8.0.2
Visitors
Visitor Trending
Browser Capabilities
Optimizing your site for the appropriate technical capabilities helps make your
site more engaging and usable and can result in higher conversion rates and
more sales.
CMS400.NET Administrator Training Manual and Exercises
CMS400.NET Version 8.0.2
273
Network Properties
Traffic Sources
274
CMS400.NET Administrator Training Manual and Exercises
CMS400.NET Version 8.0.2
Content
CMS400.NET Administrator Training Manual and Exercises
CMS400.NET Version 8.0.2
275
Appendix H - Mobile Device Support
Mobile Device Support
The new Device Configurations settings define templates for mobile devices
that are automatically substituted for generic page templates used on desktop
browsers. A Wireless Universal Resource File (WURFL) is used to provide
information about capabilities and features of many mobile devices.
Overview
Your website may be optimized for the desktop experience and may need help
translating to mobile use. Mobile applications require different, more compact
navigational aids, and content must fit into a smaller footprint. Mobile websites
need "click to call" options to take advantage of cellular technology, a robust
search, flexible menus, and quick access to content. Tables and figures may
need to be adjusted to avoid unnecessary "pinching" and scrolling.
Separating Content from Presentation
Ektron CMS400.NET separates content from presentation so that content
developers can concentrate on composition. Ektron recommends developing
templates designed for mobile devices that use content you have prepared for
any page in the CMS. Associate these templates to your web site templates by
creating mobile configuration groups. Then when the mobile device is detected,
the mobile template designed for that device is used.
Determining the Device that Accesses Your Website
Ektron CMS400.NET detects the device that a person uses (such as a Smart
Phone or tablet) to access your website. It also detects specific characteristics
of a particular device, such as the differences between the Android Droid X and
the Android Droid 2. Knowing these characteristics lets you determine how to
render the user experience. For example, one device may support Flash
technology and another may not.
Determining Configuration Groups with Business Analytics
To determine which mobile devices to add to your device configurations, look at
your Business Analytics report in Ektron CMS400.NET Reference. From this
report, you can see what mobile devices are currently browsing your site.
To see the Browser and OS report, follow these steps.
1. In the Workarea, select Reports > Traffic Analytics > Visitors >
Browser Capabilities > Browsers and OS.
2. Modify the time period and rank if needed.
276
CMS400.NET Administrator Training Manual and Exercises
CMS400.NET Version 8.0.2
Mobile Device Analytics
The example below shows that two mobile device types have browsed pages:
Android and iPhone. Create templates and device configurations to improve the
visitor's experience.
CMS400.NET Administrator Training Manual and Exercises
CMS400.NET Version 8.0.2
277