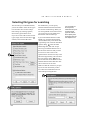
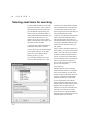
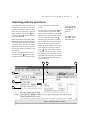
1
Filehand™ Search 3.0
Rediscover the Universe in Your Computer™
User Manual
Information in this document, including URLs and internet domain names, is subject to change without notice.
Filehand, LLC may have patents, patent applications, trademarks, copyrights, or other intellectual property rights
covering the subject matter of this document. Except as expressly provided in any written license agreement
from Filehand, the furnishing of this document does not give you any license to these patents, trademarks, copyrights, or other intellectual property.
Licensed under U.S. Patent No. 4,558,302 and foreign counterparts.
© 2005 Filehand, LLC. All rights reserved.
Filehand, “Discover the Universe in Your Computer” and “Rediscover the Universe in Your Computer”are trademarks of Filehand, LLC.
http://www.filehand.com
The names of companies and products mentioned in this manual may be trademarks of their respective owners.
Part No. 101-00100
Revision M
Printed in the United States of America
Filehand, LLC
215 S. Broadway, Suite 124
Salem, NH 03079
Table of Contents
Welcome to Filehand Search ................................................................... 1
Introducing Filehand Search .................................................................................... 2
Supported file types ................................................................................................. 3
Where to find information ........................................................................................ 4
Using Filehand Search ............................................................................. 5
Selecting folders for searching ................................................................................. 6
Selecting file types for searching ............................................................................. 7
Selecting email items for searching ......................................................................... 8
Searching with the short form .................................................................................. 9
Reviewing the search results .................................................................................. 10
Navigating text extracts ......................................................................................... 11
Viewing search results as icons, file names or details ........................................... 12
About indexing ....................................................................................................... 14
More short form techniques ................................................................................... 15
Searching with the advanced form ......................................................................... 16
Searching for file and email item types ................................................................. 17
Searching within email fields ................................................................................. 18
Searching file names .............................................................................................. 19
Using keyboard shortcuts ....................................................................................... 20
Using hotkeys ......................................................................................................... 21
Registering the program ......................................................................................... 22
Menus and configuration settings ......................................................... 25
Starting, exiting and printing .................................................................................
System tray icon and quick query form .................................................................
Selecting and copying text .....................................................................................
Selecting program options .....................................................................................
Using the indexing menu .......................................................................................
Accessing help and other information ...................................................................
26
27
28
29
33
35
Managing the indexer and folders ......................................................... 37
Deleting the index .................................................................................................. 38
Examining detailed index status ............................................................................ 39
Accessing external and network drives .................................................................. 40
Software License Agreement ................................................................. 41
ii
C H A P T E R
1
1
Welcome to Filehand Search
Using Filehand Search you can find files and
information stored on your computer system
with the same ease and speed that you find information on the internet using search engine sites
such as Google and Yahoo.
With Filehand Search you can:
•
Instantly search the contents of up to one
million Word, Excel, PowerPoint, WordPerfect, PDF, MP3, HTML, text files, Outlook
email items and Zip archives.
•
Quickly review the search results, including
extracts, shown in order of relevance.
•
Choose how you want the results displayed:
web style or lists.
•
View extracts within the results, and scroll
through the extract for any file.
•
Instantly view the next relevant extract for
any search result.
•
Click on a document title to open a file.
•
Click on a file name to open a folder.
•
Drag a file from the results into another
application.
•
Search for a file name or partial file name.
•
Search for files that were modified on a specific date or a range of dates.
•
Exclude files with specific words or phrases.
In summary, Filehand Search brings the power of
internet-style searching to your own files, so you
can rediscover the universe in your computer.
And, it’s free!
Topics in this chapter
Introducing Filehand Search ...................... 2
Supported file types ................................... 3
Where to find information ........................... 4
2
C H A P T E R
1
Introducing Filehand Search
Filehand Search was created to eliminate a paradox that many computer
users encounter. Namely, it is often
much easier to find information on the
internet than on your own computer.
This common experience is a result of
several factors:
an internet search engine for your own
files, and Outlook email.
If you have tried other programs to find
information on your computer, you were
probably disappointed by the performance, lack of flexibility and complicated user interfaces. Even worse, these
other search utilities can consume all of
the processor and memory resources on
your computer.
•
The capacity of disk drives and
internet download speeds make it
easy for us to accumulate massive
amounts of information.
•
Many people who use a computer in
their personal or professional lives
have created thousands of their own
documents, over years or decades.
•
Few of us can afford the time to
organize the information stored on
our computer.
Filehand Search was designed from the
ground up to respect the fact that you
have other uses for your computer. It
uses a modest amount of memory and it
runs at the lowest available priority. Yet
Filehand Search typically responds to
any search request in a fraction of a second, even when searching 100,000 files.
•
The information we have is multifaceted, so it is impossible to organize it in a way that anticipates all
of its uses.
If you already know how to search for
information on the internet through web
sites such as Google or Yahoo, then you
know how to use Filehand Search.
•
Search tools commonly bundled
with operating systems are inadequate in both performance and features.
Filehand Search 3.0 for free. After the
30 day trial period, you merely need to
register your copy on our website by
supplying your name and email address.
We do nothing with the information that
you supply to us other than inform you
of updates, from which you can opt out.
In contrast, internet search sites devote
sophisticated algorithms and large scale
computing to solve information search
and retrieval problems.
Filehand Search is a revolutionary desktop application that reconciles the information retrieval paradox. It’s like having
Why is it free? We want to share Filehand Search with as many users as possible while we develop other products
based on our technology.
W E L C O M E
T O
F I L E H A N D
Supported file types
Filehand Search works with these file
formats:
present in the file. Not all mp3 files
include such tags.
•
Microsoft Outlook
•
Microsoft Word (.doc)
The ability search txt, pdf and mp3 files
is built into Filehand Search.
•
Microsoft PowerPoint (.ppt)
•
Microsoft Excel (.xls)
•
Corel WordPerfect (.wpd)
•
Plain text files (.txt)
•
Adobe PDF (.pdf)
•
Music (.mp3)
•
Hypertext (.htm,.mht)
•
Zip archives.
Filehand Search cannot examine the
content of pdf files that were encrypted
when the file was created. The creator of
a pdf file may choose to encrypt its content, to restrict how the content can be
used. About 10% of pdf files employ
encryption.
The searchable content of mp3 files is
limited to whatever information tags are
To search the content of files produced
with Microsoft applications, Filehand
Search automatically accesses certain
text filters on your computer. These filters are pre-installed with the Windows
operating systems that are supported by
Filehand. They are in fact the same filters that are used by the Microsoft Windows Indexing Service.
If you know about Windows Indexing
Service, rest assured that you do NOT
have to enable the Windows Indexing
Service to allow Filehand Search to
work with the Microsoft files. In fact,
most people disable the Indexing Service because it can dramatically slow
down the computer while it is working.
Filehand Search does NOT use the Windows Indexing Service.
S E A R C H
3
4
C H A P T E R
1
Where to find information
In addition to this manual you can also
use these resources:
•
While using Filehand Search, position the cursor over a button or link
and a tool tip describing the function will pop up. If a tool tip does
not pop up, select Preferences from
the Options menu and check the
“Show Tool Tips” box.
•
Click on the Help button within a
Filehand Search dialog box for
more information about that dialog
box.
•
Select Help | Help Contents to open
the integrated Filehand Search help.
•
Find answers to common questions
at www.filehand.com/faq.htm.
•
Visit www.filehand.com for information about the company and our
products.
•
If you need more help, send email
to [email protected].
If you have trouble installing Filehand
Search please send an email to [email protected] describing the problem.
If you have registered Filehand Search
and have a problem, please supply your
registration information in email that
you send to us. Usually, your email
address is sufficient.
2
Using Filehand Search
This section provides a brief tour of the basic
features. If you know how use internet search
sites such as Google or Yahoo, you already know
how to use Filehand Search.
If you will be searching folders that reside on
removable drives, such as a USB or FireWire
drive, or on network drive, please see page 40 for
important information.
Topics in this chapter
Selecting folders for searching .................. 6
Selecting file types for searching ............... 7
Selecting email items for searching ........... 8
Searching with the short form .................... 9
Reviewing the search results ................... 10
Navigating text extracts ........................... 11
About indexing ......................................... 14
More short form techniques ..................... 15
Searching with the advanced form .......... 16
Searching for file and email item types .... 17
Searching within email fields ................... 18
Searching file names ............................... 19
Using keyboard shortcuts ........................ 20
Using hotkeys .......................................... 21
Registering the program .......................... 22
6
C H A P T E R
2
Selecting folders for searching
If you are selecting
folders that reside on
network drives or an
external drive such
as a USB or
FireWire drive, see
page 40 for important information.
The first time you run Filehand Search
on your computer, you will be asked to
select the file folders and file types (see
page 7) that you wish to prepare for
searching.
You must select one or more folders to
be prepared for searching. The Select
Folders dialog box will automatically
select the folder named “My Documents” if it exists in your personal work
space on the computer. If you wish to
A
B
C
change this selection, click on the boxes
A to check or un-check the folders.
Click on a + sign B to see folders
below a given folder.
It is not possible to select folders on
removable media such as a CDROM.
You can change your folder selections at
any time using the Options menu. C
U S I N G
F I L E H A N D
S E A R C H
7
Selecting file types for searching
The first time you run Filehand Search,
you will be asked to select the file types
to be searched. You can also change
these settings by selecting Options |
Select File Types from the menu.
If you are not sure what to select for file
types, simply leave all of the boxes A
checked, and click the OK button.
A
For HTML files, you can specify
whether Filehand Search should index
the contents of HTLM tags. When you
are viewing HTML with a web browser,
you cannot see tags. By default, Filehand Search will not index tags.
If you want Filehand Search to index
HTML tags, click the Options button
near the HTLM entry in the Select File
Types dialog. This will show the HTLM
Options dialog. B Click the Index
HTLM Tags box, and click Accept.
You can give Filehand Search a list of
the file name extensions that you want
to treat as text files. Click on the
Options button near the Text entry in the
Select File Types Dialog. This will show
the Text Options dialog. C There is
also an item that can be checked to have
Filehand Search assume that files without an extension are text files.
Make sure that the extensions you specify are for files that actually contain
text. Otherwise Filehand Search will
waste time processing the files.
C
B
For an instant productivity boost,
make sure all of your
favorite text file
types are searchable. Specify their
extensions with the
Text Options form.
8
C H A P T E R
2
Selecting email items for searching
To select Outlook folders you want Filehand Search to index, choose Options |
Outlook Options from the menu to display the Outlook Options dialog box.
When you select an Outlook folder to
index, Filehand Search assumes that you
want all the folders below it to be
indexed. If you do not want a certain
folders to be indexed, select it again, and
that folder will be excluded.
A light-grey check means that there is
some folder below that is selected.
You can select any or all Outlook folders
to be indexed. However, most might
prefer not to select Deleted Items.
Indexing archived .pst files
You can index Outlook archive files.
These are files that either you or Out-
look have saved older emails and other
items. Filehand Search uses Outlook to
scan the folders and access the items.
You must open the archive files that you
want Filehand Search to index.
To do this, from Outlook, select the File
| Open | Personal Folders File menu
item. Browse for the file or files you
want Filehand Search to index. Now you
can open the Filehand Search Outlook
Options and see the archive files you
just opened.
After you have selected the folders you
want to index, you may close the archive
folders. You only need to open them in
Outlook to add to the folder selection.
You do not need to have email folders
open in Outlook in order to perform the
index or to perform any searches. In
fact, you do not need to have Outlook
open to search for email.
Smart Indexing
Filehand Search avoids re-scanning
Outlook folders that have not changed
since the last indexing. It looks at the
number of items in the folder and at the
top item. If neither has changed Filehand Search will not scan the folder.
In rare circumstances, the Outlook
folder could have changed in way that
Filehand Search could not detect. If this
happens, the new items will not be
indexed. You can force the folder to be
indexed in one of two ways: add or
delete an item, or uncheck the Smart
Indexing check box which will force all
Outlook folders to be scanned.
U S I N G
F I L E H A N D
9
S E A R C H
Searching with the short form
To use Filehand Search, you enter information into a form similar to that of an
internet search engine. Initially, you are
shown the short search form. Type your
search terms into the text box, A click
the Search button B and the results are
shown immediately.
When you click the Search button Filehand Search displays the title, filename
and an extract for each file that contains
your search terms. The files are listed in
order of relevance, so the ones towards
the top of the list are more likely to suit
your purpose.
You can scroll though the list with the
vertical scroll bar. C When you get to
the bottom of the first 10 results, there is
a link you can click on the see more
results.
To open a file, click on the title. D You
can also hold the mouse button down
over the title and drag the file to another
application. To open the folder containing a file, click on the file name. E
You can specify the number of characters to display in each extract using the
Options | Preferences menu selection.
D
E
See page 16 for a
description of the
advanced form.
Within the search results, you can right
click the mouse to bring up a context
menu. F This allows you to select all
of the text in the search results, or copy
the selected text the clipboard. You can
also start a new search using the selected
text, or add the selected text to the current search terms.
F
A
Lean more about
searching with the
short form on
page 15.
B
C
10
C H A P T E R
2
Reviewing the search results
Use the browsing
tools that appear
above an extract to
quickly find more
information in a file.
When you click the Search button, the
results are immediately displayed, with
navigation links and a summary of the
number of results shown on the first two
lines. A
to the relevance of the first file. The relevance of first file is always 100%.
Each result is numbered. B The first
result is usually the most relevant for
your query. The relevance for each file
is shown as a percentage C compared
You can go back to the previous page by
clicking the back button E or return to a
later page with the forward button.
E
A
B
C
D
There are 10 results shown per page. To
see more results, click on the link at the
top or bottom of the window. D
U S I N G
F I L E H A N D
S E A R C H
11
Navigating text extracts
Filehand Search provides a unique
method for quickly finding information
within a file. A set of browsing controls
A automatically appears as you move
the cursor over the extracts.
These work very much like VCR controls. Hold the mouse over a control to
see a message that tells you what the
control does. C
The most powerful of these controls
quickly locate the relevant sections in a
A
B
file (<< and >>). Other controls let you
scroll backward, forward, and move to
the beginning or end of the file. You can
also change the size of the extract.
You don’t always
have to open the file
to find the information you need. Use
the extract browsing
tools to find more
information in any
result.
12
C H A P T E R
2
Viewing search results as icons, file names or details
Filehand Search lets you choose how the
results are displayed. So far in this manual you have seen the “web” view,
which displays search results in a format
similar to a typical web search engine.
When you click on a result, the extract
pane shows the extract for that result.
The extract navigation tools are shown
above the extract, and can be used in the
same was as for the web view.
Alternatively, you can view the results
as a list of icons, file names, or file
details. Use the View menu selections to
display the results in the format that you
prefer.
You can increase or decrease the size of
the extract pane by clicking and dragging the splitter that is shown above the
extract navigation tools. To do this,
position the mouse over the splitter and
hold down the mouse button while moving the mouse.
When an alternative view type is displayed, the window elements are presented differently. The central part of
the window shows the results. The
search input form is shown in the left
side of the window, and a separate
pane at the bottom of the window
shows the extract for the currently
selected result.
U S I N G
The icon view shows the results in the
form of icons for each file. As with the
web view, the results are shown in order
of relevance. Click on an icon to see the
extract for that result. Click on the icon
again to open the file.
The list view shows the file names. This
is the most compact way of viewing the
results. Click on a file name to see the
extract, and click again to open the file.
The detail view shows a table with
information about each result. Click on
any line in the table to display the
extract for the result. Click on the file
name or title to open the file. Click on
the folder name to open the folder that
contains the file.
As with all other views, the detail view
normally shows the results sorted by rel-
F I L E H A N D
evane. You can sort the displayed results
by different criteria simply by clicking
on a label in the column header. Click on
the label again to reverse the order that
the search results are displayed.
The results of each search are initially
shown in order of relevance. When you
click on a column label to sort by a different criteria, the sorting affects only
the results that are currently displayed,
not the search results as a whole. For
example, if you are viewing results 101
through 200 for a search and you click
the Date column header to sort by date,
the same results 101 through 200 will be
shown, but sorted in order of the date
instead of relevance.
S E A R C H
13
14
C H A P T E R
2
About indexing
Skip this section if
you don’t care about
behind the scenes
details.
Learn how to control
the indexer on
page 26.
For more information
about folder selections and the indexer
see page 39.
By now you have probably noticed that
while Filehand Search is running, there
is some activity in the lower right corner
of the window. This shows you the status of the indexer. Normally, you won't
care about what the indexer is doing.
But when you first start using Filehand,
Search you may notice some peculiar
effects that will go away over time.
Programs such as Filehand Search and
web search engines use a powerful technique of pre-indexing files so that when
you enter your search request, the results
can be shown to you instantly. In effect,
the answers (an index) to all possible
questions are built ahead of time.
You can see a summary of the number of
files indexed in your folders with the
Indexing | Show Status menu selection.
Naturally, it takes some time to build up
this list of answers. Depending on the
sizes of your files, Filehand Search adds
500 to 5,000 files per hour to its index.
But you don’t have to wait for the entire
index to be constructed before you
search. You can search any time, and
Filehand Search will consult the index
that has been built up to that time.
All words and numbers are added to the
index. To conserve disk space, the
indexer is selective about the phrases it
saves. Phrases are limited to four words.
All two word phrases are stored in the
index. Three and four word phrases are
stored in the index if they comprise at
least 0.1 percent of the total words in the
file. Three and four word phrases that
fall within the first 2000 words of the
file are always added to the index.
For efficiency, the indexer processes
files in batches of up to 5000 files at a
time. The lower right corner of the Filehand Search window shows the progress
of the indexer. The top bar shows
progress of the current batch. The bottom bar shows the overall progress.
The amount of disk space used by the
index is shown to the left of the indexing
progress bars. This number will increase
and decrease as the indexer creates and
deletes temporary files.
The indexer is designed to work in the
background without affecting the performance of your system. However, if you
wish to stop or pause the indexer, you
can do so through the Indexing menu.
Stopping the indexer abandons the current batch and frees up memory and disk
space. Pausing may leave more memory
and disk space in use, but allows the
indexer to quickly resume working. You
can set the time of day that the indexer
runs using Options | Preferences.
The Indexing menu allows you to delete
the index. If you un-install the program,
the index is automatically deleted.
You can speed up indexing by limiting
the amount each file that is searched.
See page 31 for details.
U S I N G
F I L E H A N D
S E A R C H
15
More short form techniques
All search terms can be entered in upper
or lower case and they will have the
same effect. The only exception is the
reserved word OR, described below.
Generally, just type words in lower case
to save typing trouble.
To search for an exact phrase, enclose
the phrase in double quotes. For example, "fox without a tail" will
find files that contain those four words
consecutively. The phrases you enter
may contain up to four words.
In the Short search form, you can enter a
word or list of words in the text box.
Filehand Search will show the files that
contain all of the words in your list.
You can also combine the different types
of search components to make complex
queries. For example aesop fox OR
bird -stork -goat will find all
files that contain the word aesop and
contain the words fox or bird, and do not
contain the words stork or goat.
You can also separate words in the list
with OR. For example fox OR bird
(OR must be capitalized). Then Filehand
Search shows the files that contain any
of the words in your list.
To exclude files that contain a specific
word, precede it with a minus sign. For
example -cat means files NOT containing the word cat
After using it for a while, you will find
that it is easy to get high quality search
results when you use these techniques.
If you don’t like to
use complicated
syntax, see page 16
to learn about the
easy-to-use
Advanced search
form.
16
C H A P T E R
2
Searching with the advanced form
Everything
described here,
except searching by
dates and filenames,
can also be done
with the Short form.
See page 15.
See page 19 to learn
how to search file
names with the
advanced form.
Filehand Search gives you a choice of
how to enter your search request. Initially, you are shown the Short form.
You can click on the Advanced button to
view the advanced form. Within the
advanced form, click the Short button to
view the short form again.
Despite its name, you may find the
advanced form is easier to use than the
short form. It supplies several text boxes
containing different parts of a query so
you don’t have to worry about the syntax of complex requests. Filehand
Search will find files that match all of
the requirements you enter in the boxes.
For example, entering the words fox
bird in the all box is the equivalent of
entering those two words in the short
form text box.
Entering the words stork goat in the
at least one box is the equivalent of
entering stork OR goat in the short
form.
You can fill in more than one box. An
easy way to see how the advanced form
works is to click alternately on the Short
and Advanced links when there is a
query entered in the text boxes. The
query is automatically converted and
stuffed into the text boxes when the format is switched.
The advanced form also lets you search
by date. You can enter a date or a range
of dates. You can also use relative terms
such as 2 days ago, or last week.
To see examples for typing in dates, type
help into the date box and click the
Search button.
You can limit the search to specific document types or email items. See
page 17. You can also use the advanced
form to search the names of your files.
See page 19.
U S I N G
F I L E H A N D
Searching for file and email item types
In the short form, you can limit the document types that are searched, to specific file types or Outlook items. If you
precede the search term with the pound
sign "#", Filehand Search will interpret
that as a document type.
aesop fox OR bird -stork
-goat #pdf #word
Finds all PDF and Microsoft Word
files that contain the word "aesop"
and either "fox" or "bird" (or both)
and not "stork" and not "goat".
To limit your search to one or more particular document type, add one or more
of the following terms to the search
phrase.
Note, in the advanced form’s “only in
these document types” box, you do not
need the "#":
You can combine types. For example,
you can add the terms #pdf #word to
limit your search to only PDF and
Microsoft word files.
Note for advanced users: When you
combine document and item types, Filehand Search will OR the terms internally. Filehand Search allows you to
specify only one group of OR terms for
searching. But internally, Filehand
Search uses a second OR grouping for
types and items.
Type Code
Files Searched
#pdf
Adobe Acrobat files (.pdf)
#word, #doc
Microsoft Word files (.doc)
#powerpoint, #ppt
Microsoft PowerPoint files (.ppt)
#excel, #xls
Microsoft Excel files (.xls)
#wordperfect, #wpd
Borland WordPerfect files (.wpd)
#mp3
MP3 music files (.mp3)
#html, #htm
Web page files (.html or .htm)
#mht
Web page archive files (.mht)
#text, #txt
Text files, as you have selected
in the preferences menu
S E A R C H
17
18
C H A P T E R
2
Searching within email fields
You can limit searches to Outlook fields,
such as the email subject line or contact
name. You type in the field name, and
then the word or phrase that you want to
search in it.
You also can use the right mouse button
over the search window to select a field
name without having to type it.
subject: stork
Finds all email items with the word
"stork" in the subject line.
You can also search for phrases:
subject: "aesop's fox"
Note: Filehand Search will change both
so that it looks like a phrase with the
field item as the first word. You can do
the same:
"subject: stork"
You can treat this as one phrase in a
more complex search:
subject: stork from:
aesop
Finds all emails from aesop that has the
word "stork" in the subject line.
Finally, you can build a complex search
within one field:
subject: stork subject:
bird OR subject: goat
Finds all email items where the subject
line contains the word "stork" and either
"bird" or "goat"
You can limit your search to one or more
of these Outlook item types:
#email
#contact
#task
#appointment
#note
#journal
#meeting
You can press the right mouse button
from within a search text box to see a
list of all the supported types and fields.
You can limit searches to specific fields
of certain Outlook item types. You type
in the field and add a colon (:) to the end
of the field name, then type the text you
want to search for.
You can search within these specific
fields of Outlook items:
Email
subject:
to:
from:
Contacts
name:
email:
company:
phone:
Notes, Journals, Meetings, Tasks,
Appointments
subject:
U S I N G
F I L E H A N D
Searching file names
You can enter all or part of a file name in
the advanced search form to narrow a
search to a set of file names.
To search within the file name, enter any
word that is part of the filename in the
filename includes this text box. For
example, if you enter the word fox, then
Filehand Search will return only those
documents that match the search other
search terms and have a file name that
contains the word “fox”.
You can enter multiple file words in the
file name box. Filehand Search will
return all files that match any the names
you enter.
For example: entering fox lion will
return all files that contain the words fox
or lion in the file name (and match the
other search requirements).
Note that the extension of the file is not
included in the file name search. If you
want to limit the search to certain file
types, see page 17.
S E A R C H
19
20
C H A P T E R
2
Using keyboard shortcuts
Keyboard shortcuts
are predefined by
Filehand Search.
Filehand Search allows you to use certain key combinations to perform common operations quickly. These are
called keyboard shortcuts.
can use it quickly by pasting directly
into the search form in this manner.
shift-ctrl-V
If you are familiar with the keyboard
shortcuts that are commonly used by
other Windows programs, then you may
already know most of the shortcuts that
work from within Filehand Search.
This is the same as shift-ctrl-C, except it
adds it to the current search. This allows
you to refine the current search with
terms you find in the extracts. This helps
if there are a lot of matches from your
original search terms.
ctrl-Q
ctrl-A
Quit Filehand Search.
Select all of the text in the current
results.
ctrl-C
Copy the selected text into the Windows
clipboard. Do this if you want to then
paste that text in another application, or
in the search form.
ctrl-P
ctrl-V
Minimize the search form into the system tray (bottom-right corner of Windows).
Paste the text from the Windows clipboard to the search form. Note that the
text in the clipboard could have copied
from any application.
shift-ctrl-C
Copy the selected text from the extracts
directly into the search form and perform the search. If you don't know
exactly what you are looking for, you
can look for something you do know,
and then when you see something in the
extracts that is a better search term, you
Print the current result page.
ctrl-W
ctrl-F
Change to the short search form, and
bring focus (move the mouse cursor) to
the search text window.
alt-left arrow
Go back to the previous search results.
alt-right arrow
Go forward to the next search results.
U S I N G
F I L E H A N D
S E A R C H
21
Using hotkeys
Filehand Search provides “hotkeys”,
that are like shortcuts, except that they
work from anywhere in Windows, not
just from within Filehand Search.
Note that other applications also may
define hotkeys, and the hotkeys that you
select my be in use by another application. Even the default hotkeys may
already be used by another application.
The other way is also true: if you start
Filehand Search, then it is possible that
another application that starts afterword
wants to use the same hotkey. The rule is
(set by Windows) whichever application
gets the hotkey first, keeps it.
The actions of the default hotkey settings are described below. If you wish,
try different settings using the Options |
Preferences form until you get a combination that you prefer.
shift-ctrl-F
This brings Filehand Search to the front,
even if it was minimized to the system
tray. This is a fast way to open Filehand
Search, instead of using the mouse.
shift-ctrl-S
This is the same as shift-ctrl-F, except
that it also pastes any text that was in the
clipboard and then performs a search. To
use this hotkey:
1.
2.
3.
4.
In another application, say, Internet
Explorer, find a word or phrase that
you want to search.
Select (highlight) the word or
phrase.
Press ctrl-C to copy it into the Window's clipboard.
Press shift-ctrl-S to perform the
search with Filehand Search.
Hotkeys are configured in the Options |
Preferences form.
See page 32.
22
C H A P T E R
2
Registering the program
You can use Filehand Search for 30 days
without registering the program. All features are enabled during the 30 trial,
including the ability to search up to one
million files.
After 30 days, Filehand Search will only
show the first 10 results. Extract browsing tools, opening files, and opening
folders are disabled. The indexer is disabled, but you can search files that were
indexed before the evaluation period
expired.
You can restore access to all features by
registering Filehand Search. We ask that
you do this so we know how many
active users we have, and so that we can
stay in touch with you if you decide you
want to learn about updates and other
Filehand products.
If you decide to register, please visit
www.filehand.com/register.htm for
instructions.
After you register Filehand Search, a
registration code will be sent to you via
email. You must use the registration
code to use the program longer than the
30 day trial period.
You do not have to download and reinstall Filehand Search to register a copy
that you have already installed on your
system.
To register the program, start Filehand
Search if it is not already running on
your computer. Select Help | Register
from the menu. If this menu item does
not appear, select Help | About Filehand
Search and click the Register button.
You will then be shown a form that you
use to enter your registration information.
The registration email that you receive
includes your name and a registration
code. You must type or copy your name
and the registration code from the email
message into the boxes of the registration form, shown below. Be sure to enter
these exactly as they appear in the registration email. Then, click the Validate
Registration button to unlock your copy
of Filehand Search.
3
Menus and configuration settings
This section explains how to use the Filehand
Search menus. Most of the time that you are
using Filehand Search, you are interacting with
the search forms. You use the menus for tasks
like setting options or controlling the indexer.
Topics in this chapter
Starting, exiting and printing .................... 26
System tray icon and quick query form .... 27
Selecting and copying text ....................... 28
Selecting program options ....................... 29
Using the indexing menu ......................... 33
Accessing help and other information ...... 35
26 C H A P T E R
3
Starting, exiting and printing
You can exit Filehand Search by typing Control-Q (hold
down the Ctrl key
and press Q).
To get the most out
of Filehand Search,
leave it running all of
the time. Then you
have instant access
to searches.
Click on the X in the
upper right corner of
the main window, or
type Control-W, to
close the window
and leave Filehand
Search running.
To start Filehand Search, you can click
on the program icon A on your desktop. If you decided not to create the
desktop icon during installation, the icon
will not be present on the desktop.
Another way to start the program is with
the Windows Start menu. Select Start |
All Programs | Filehand Search | Filehand Search to run the program.
If you start Filehand Search while it is
already running, Filehand Search will
open the main window of the copy that
is already running. A second copy of the
program will not be started.
Filehand Search was designed so you
can leave it running for instant searching. But, there may be times when you
wish to exit the program. For example if
you are installing new software on your
system, it is generally recommended
that you exit all other applications.
To exit Filehand Search from the main
window, select File | Exit from the menu
B and Filehand Search will exit imediately.
A
B
C
If you previously closed the main Filehand Search window, you can exit the
program using the icon C in the system
tray, usually in the lower right corner of
your computer screen. Simply rightclick the Filehand Search icon and select
Exit.
If indexing is in progress when you exit
the program, the current batch will be
abandoned. When you start Filehand
Search later, indexing will automatically
resume.
You can print the search results that are
currently displayed using the File | Print
menu selection. Use File | Page Setup if
you want to change the layout of the
page.
M E N U S
A N D
C O N F I G U R A T I O N
S E T T I N G S
27
System tray icon and quick query form
Filehand Search was designed so that
you can leave it running for instant
searching. If you need to hide the Filehand Search window so you can use
some other application, click the X in
the upper right corner of the main window. This will close the window, but
leave Filehand Search running for
instant access.
You can perform a variety of actions
using this icon.
The first time you close the Filehand
Search window in this way, you will be
shown a message that explains how you
can open the Filehand Search window. If
you don’t want to be shown this message again, check the preference item
that is included in the message.
The Quick Query form C provides a
convenient way to enter a search request
when the Filehand Search main window
is not displayed. Type your search terms
into the form, and click the Go button or
press the enter key. Filehand Search will
open its main window and display the
results instantly.
•
•
•
When the Filehand Search main window
is closed, you can access Filehand
Search via the icon A in the system
tray area, usually in the lower right corner of your screen.
Right-click the icon to bring up a
short menu of choices. B
Double click the icon to open the
main Filehand Search window.
Single click the icon to open the
Quick Query form.
To close the quick query form, click on
the X in the upper right corner of the
window border.
A
B
C
28 C H A P T E R
3
Selecting and copying text
Use the Edit menu if
you want to transfer
text from Filehand
Search to another
application.
You can drag and
drop an entire file
from the search
results into another
application or a Windows folder. See
page 10.
Use the keyboard
shortcuts Ctrl-A to
select all of the text
in the main window,
and Ctrl-C to copy
the selected text to
the clipboard.
The Edit menu allows you to select and
copy information from our search
results into another document.
choosing Edit | Copy from the menu.
The text that is currently hilited is copied to the clipboard.
You can use the mouse to select portions
of the text in the current window. Position the cursor to the start of the text you
wish to select. Press and hold down the
left mouse button, and move the cursor
forward in the text to end of the region
you want to select. Then release the
mouse button. The text that you have
selected will be hilited.
The text is stored to the clipboard using
Rich Text Format (RTF). This is a
Microsoft format that allows all of the
properties of the displayed text, such as
font sizes and bold face, to be preserved
in the text that is copied.
You can select all of the text in the current window by choosing Edit | Select
All from the menu.
After you have selected some text, you
can copy it to the Windows clipboard by
After you copy text to the clipboard, you
can paste it into another document by
opening the corresponding application
and selecting Paste from the application’s Edit menu. Alternatively, you can
usually type Ctrl-V to perform the Paste
function within most applications.
M E N U S
A N D
C O N F I G U R A T I O N
S E T T I N G S
29
Selecting program options
With the Options menu you can specify
file types, folders and email to make
searchable. See page 6 for these settings.
Logging - Determines the depth of logging that is provided for debugging
purposes.
To change other settings select Options |
Preferences to display the Preferences
dialog. There are seven tabbed forms
within the Preferences dialog. Select the
tab to change the options within these
categories:
When you install Filehand Search, the
preferences are set to values are appropriate for a typical user. You can change
them at any time.
Search - Provides settings that affect all
searches.
Search
Display - Determines how the search
results are displayed.
Execution - Controls how Filehand
Search is started and terminated.
Updates - Optionally allow Filehand
Search to determine if a new version
of the program is available.
Indexing - Controls the indexing process, such as depth of indexing and
time of day to index.
Hotkeys - Allows you to select keystroke combinations that will open
Filehand Search when it is not in the
foreground.
The rest of this section describes the
each preference category in detail.
Normally Filehand Search will only
search the content of the file. In the
advanced search form, you can also
search the file name of folder name.
Instead of using the advanced search
form for this, you can have all of your
search terms automatically applied to
the file and/or the folder name. To do so,
simply check one or both boxes in the
Search options form.
30 C H A P T E R
3
Display
Within the Preferences form, the Display Options allow you to change the
font sizes used in the query forms and
the results.
Some of the options have two settings:
one for the web view and one for the list
view. When you switch view types, File-
hand Search will automatically switch to
the settings that you selected for that
view type.
The Font Size setting controls the size of
the fonts in the main window. The Normal setting should be appropriate for
most displays.
The Results per Page setting determines
how many results are shown in each
batch.
The Default Extract Size setting allows
you to specify the approximate number
of characters displayed in extracts.
Filehand Search normally displays small
popup boxes called tool tips to guide
you through its operation. You can disable this by removing the check mark in
the Show Tool Tips check box.
Execution
Using the Execution Options you can set
up Filehand Search to start when you
start Windows, determine whether the
icon is shown in the system tray (also
known as the notification area), and
enable or disable a warning message
when you exit Filehand search.
M E N U S
A N D
C O N F I G U R A T I O N
Updates
The Update Notification option allows
you to set up Filehand Search to check
for the availability of an update to the
program.
If you are connected to the internet, you
can set Filehand Search to check for
updates every day, week, or month. Or,
you can simply press the Check For
Updates Now button. If there is an
update available, you will be directed to
the Filehand web site so that you may
download a new version.
Indexing
With the Indexing Options you can
change the period of time that the
indexer sleeps before is scans your folders for changes. You can also control the
time of day that the indexing runs.
Two options allow you to limit the
amount of CPU time that Filehand
Search uses for indexing, and to automatically pause the indexer when your
system is busy with other tasks.
You can also limit the amount of each
file that is processed for indexing. This
results in faster indexing, but degrade
the quality of searches. For example, if
you have large files and a particular
appears only at the end of the file, the
file might not show when searching for
that word.
S E T T I N G S
31
32 C H A P T E R
See page 21 for
more information
about how to use
hotkeys.
3
Hotkeys
The Hotkeys option B allow you to
change the hotkeys that open Filehand
Search from anywhere within Windows.
A “hotkey” is a keyboard key, or combination of keys, that can pressed from
any application and will do something in
Filehand Search. Filehand Search has
two hotkeys: one that opens up the
search form; the other takes the text that
you just copied (from whatever application you were in) and preforms a search.
You can choose a letter, number, or
function (F1-F12) key, and add to it alt,
shift, and/or ctrl. For example, the
default setting for the first hotkey is
shift-ctrl-S. Press shift and control, hold
them down, then press S and the search
form will pop up, regardless of what
application you were in.
There are three restrictions on which
hotkey combinations are allowed:
1) Filehand Search will not allow you
choose a simple letter or number without ctrl or alt.
2) Filehand Search will not allow you
choose a combination that Filehand
Search already uses for keyboard shortcuts. (See page 20.)
3) Other applications that you are running may also have defined hotkeys.
Windows will not allow Filehand Search
to define a hotkey that is already being
used. Filehand Search cannot know if a
hotkey is being used until after you
press OK in the Preferences form. If the
key is being used, Filehand Search will
show you a warning. You may choose to
ignore it, because hotkeys are not necessary to the operation of Filehand Search.
It's just a convenience. Or, you can go
back into the preferences form and try a
different combination.
Logging
Filehand Search normally logs information such as errors encountered while
filtering files. This information is saved
in the index folder. You can disable logging or, if requested by Filehand support, expand the logging to cover more
events.
M E N U S
A N D
C O N F I G U R A T I O N
S E T T I N G S
33
Using the indexing menu
Filehand Search decides when to run the
indexer based on a few settings. Under
most conditions you can just keep the
default settings.
To restart the indexer:
The Filehand Search indexer is designed
to have minimal impact on the system
performance and other applications.
Still, in some circumstances you may
notice a difference. Or, maybe you want
to conserve power while your laptop is
running on battery power.
•
In normal operation, the indexer will
index all of the files you have selected
and then go to sleep for a period of time,
which is normally two hours. After the
sleep period has passed, the indexer
scans your selected folders to look for
changes to your files, and updates the
index accordingly. This repeats indefinitely unless you change the settings.
The most direct way to control the
indexer is to start, stop or pause it using
the Indexing menu.
The indexer status is shown in the status
bar in the bottom right corner of the
main Filehand Search window.
If the indexer is running, you can select
Pause or Stop from the Indexing menu.
Pausing the indexer allows it to quickly
resume its work later (when you select
Indexing | Start from the menu). Stopping the indexer frees up more memory
and temporary disk space, but will waste
some of the work that was already performed by the indexer.
•
•
If the indexer is paused, select Start
from the Indexing menu to resume
its work.
If the indexer is stopped, select Start
from the Indexing menu to make it
sleep for the configured sleep
period, or sleep until the proper
time of day, if enabled.
If the indexer is sleeping, select
Start from the Indexing menu to
make the indexer start immediately.
You can also control the sleep period or
the time of day that the indexer runs,
using the Options | Preferences menu
selection. See page 29.
Changing the sleep period affects how
quickly the indexer recognizes changes
that you have made to the contents of
your folders.
You may find it more convenient to limit
indexing to certain time of day. For
example if you are indexing shared folders on a mapped network drive, it might
be better to limit the indexer to run during the night.
See page 14 for an
overview of the
indexer.
You can change the
indexer pause duration or limit the time
of day that it runs.
See page 29
Read about the
indexer in more
detail in Chapter 4
34 C H A P T E R
3
You can select Indexing | Show Status
from the menu to view the progress of
the indexer in detail. See page 39 for
details.
Normally, Filehand Search will store its
database files in the user’s application
data folder. For example, C:\Documents
and Settings\<user>\Application
A
Data\Filehand Search. You can change
the location of the database files by
selecting Indexing | Move Index from
the menu. The Move Index Data dialog
box A appears showing you the current
location of the index.
Click the Move Index button to see the
Browse for Folder dialog box. B Make
sure that you choose an empty folder.
When you click OK, Filehand Search
will move its database to the folder that
you selected.
Use the Indexing | Delete Index menu
item to delete the index from your system. page 38 See for other ways of
deleting the index. You will not be able
to search again until you have rebuilt the
index.
B
M E N U S
A N D
C O N F I G U R A T I O N
S E T T I N G S
Accessing help and other information
The Help menu provides access to the
Filehand Search help file and other
information:
•
•
•
•
Select Help Contents to view the
table of contents of the Filehand
Search integrated help.
To read your license terms select
View License from the help menu.
This is the same license you were
shown when you installed the program.
Select Register for information
about how to purchase the program
or to register your copy. See
page 20 for more details. Note, if
you have already registered the program, this menu selection is not
shown.
To see what version you are running, select About Filehand Search.
You can also view the registration
form by clicking the Register button
in this dialog box.
35
36 C H A P T E R
3
4
Managing the indexer and folders
This section describes how to manage the
indexer and your folder selections. In most cases
you do not need to worry about what the indexer
is doing. However, you may want to review the
material in this chapter if any of the following
apply to you.
•
•
•
•
•
•
•
You have less than 512 MB of memory.
You are running applications not designed
for Windows XP or Windows 2000 and they
seem perform poorly while Filehand Search
is running.
You have exceeded the maximum number of
files supported by Filehand Search (1 million).
One or more of the folders that you have
selected for indexing resides on an external
drive (e.g. a FireWire or USB drive) or on a
network drive.
You would like to verify that Filehand
Search has successfully indexed all of the
files that you have selected for indexing.
You want to conserve power on your laptop
computer when it is running on the battery.
You are running low on disk space and you
need to quickly recover some space.
The indexer is designed to run in the background. You can use other applications and perform searches while the indexer is running.
Topics in this chapter
Deleting the index .................................... 38
Examining detailed index status .............. 39
Accessing external and network drives ... 40
Related topics in other chapters
About indexing ......................................... 14
Using the indexing menu ......................... 33
38
C H A P T E R
4
Deleting the index
The disk space used
by Filehand Search
is typically 15% to
20% of the space
taken by files that
are indexed.
There may be times when you wish to
delete the index that is maintained by
Filehand Search. For example, if you are
running low on disk space, you can
delete the index to free up space until
you can do some house cleaning.
Additional temporary space is used
while the indexer is
running.
The status bar at the bottom of the main
Filehand Search window shows the
amount of disk space that is used by the
index and any temporary files. This is
typically about 20% of the space that is
used by the files being indexed.
You can specify the
folder where Filehand Search should
store its index. See
page 34.
Filehand Search will not fill up your
hard disk. It will stop indexing if there is
less then 50 MBytes of free space available. It will also stop indexing if the
amount of free space is less than 1.5
times the space currently in use by Filehand Search. This precaution is necessary because Filehand Search can use
large amounts of temporary space on the
hard disk.
Use the Indexing | Delete Index menu
selection to delete the index. You will be
asked to confirm the operation. Clicking
OK will free up all of the disk space
used by the index and the temporary
files. A small amount of space, typically
2 KB, will remain in use to retain your
settings, such as folder selections.
If you need to remove Filehand Search
from your system, use the provided
uninstaller. You can find this in your
Windows start menu, in the control
panel’s Add or Remove Programs item,
or (typically) in the C:\Program
Files\Filehand Search folder. Using the
provided uninstaller will automatically
remove all files that were created by
Filehand Search.
If for some reason Filehand Search or its
uninstaller are not available and you
want to ensure that an index is not
present on your system, you can look for
the C:\Documents and Settings\<user>\Application Data\Filehand Search folder on your system,
where <user> is your user name.
You can manually delete all the files in
the Filehand Search folder to recover the
disk space. Note that the Application
Data folder is usually hidden. You must
set Windows to display hidden files to
see it.
If you have changed the location where
Filehand Search stores its index, the
uninstaller will remove the index files
from the index location that you specified. If you wish to double check this,
before you uninstall Filehand Search
select Indexing | Move Index from the
menu to find out where the index is
being stored. See page 34 for details.
Filehand Search will not operate correctly if you modify the contents of the
index folder. Do not add or remove files
from this folder. The above information
is provided only to help you recover disk
space in extraordinary situations.
M A N A G I N G
T H E
I N D E X E R
A N D
F O L D E R S
Examining detailed index status
You can use the Indexing | Show Status
menu selection to see a report of the
folders that you have selected for indexing, and the status of each folder.
This report is based on the results of the
last folder scan that was performed by
the indexer, or the results last batch,
whichever is the most recent.
For each folder, the report indicates:
•
•
•
The number of files selected for
searching.
The number of files that have
been indexed.
A message indicating
whether the folder is currently available on your system.
The report also provides a summary of the index status indicating:
•
•
•
The total number of files
selected for searching.
The total number of files that
were indexed.
If applicable, a message indicating that the number of
indexed files indexed has
•
reached the maximum allowed
(1,000,000).
If applicable, a message indicating
that some files could not be indexed
after repeated attempts.
39
40
C H A P T E R
4
Accessing external and network drives
Examples of external drives are USB
and FireWire drives.
You can physically
disconnect these
drives from your system.
Network drives are
logical drives that
you create from Windows Explorer with
the Map Network
Drive selection in the
Tools menu. You can
also disconnect a
network drive
through the Explorer
Tools menu.
Note, drives that use
removable media,
such as a CDROM
drive, are not supported by Filehand
Search.
When you select Options | Select Folders, your external and network drives are
included in the dialog box. You can
select folders on these drives for searching like any other folder.
By their nature, such folders may not
always be accessible from your computer, and it is important to understand
how this affects indexing and searching.
Filehand Search will index and search
files on external and network drives
when the drives are accessible on your
system. You can select Indexing | Show
Status from the menu to see if there are
any folders that cannot be accessed.
If the indexer determines that a drive has
been disconnected, it will not modify
any index entries corresponding to files
that it found on the drive while it was
connected. You can still search the contents of such files, as long as they were
indexed before the drive was disconnected. The search results will also
include the extract for these files. However, if you try to open such a file, Filehand Search will display a message
indicating the file is on a drive that is
currently disconnected from your system.
When you re-connect an external or network drive to your system, Filehand
Search will be able to index it again. The
next time the indexer runs, the drive is
examined for any changes in the folders
you have selected, and the index is
updated accordingly.
Important: If you re-connect an external
or network drive containing folders that
you selected for searching, make sure
that the drive uses the original letter
code (e.g. E:, Z:). If you do not do this,
Filehand Search will not recognize that
the drive is available.
If you have selected folders from an
external or network drive for searching
and you decide to permanently remove
the drive from your system, you should
inform Filehand Search so that it will
remove all related information from the
index. Select Options | Select Folders
from the menu. Then click on the applicable folder names in list at the bottom
of the dialog box, and click the Remove
button.
Software License Agreement
PLEASE READ THIS SOFTWARE LICENSE AGREEMENT CAREFULLY BEFORE USING THE SOFTWARE.
BY CLICKING THE “I ACCEPT” BUTTON DURING INSTALLATION OF THE SOFTWARE, YOU ARE
CONSENTING TO BE BOUND BY THIS AGREEMENT.
Single User License Grant: Filehand, LLC (“Filehand”) grants to you the customer (“Customer”) a nonexclusive
and nontransferable license to use the Filehand Search 3.0 software (“Software”) in object code form solely on a
single personal computer owned or leased by Customer.
CUSTOMER SHALL NOT: MODIFY THE SOFTWARE; REVERSE COMPILE OR REVERSE ASSEMBLE
ALL OR ANY PORTION OF THE SOFTWARE; OR RENT, LEASE, DISTRIBUTE, SELL, OR CREATE
DERIVATIVE WORKS OF THE SOFTWARE OR DOCUMENTATION.
NO WARRANTY. Software is provided AS IS. In no event does Filehand warrant that the Software is error free
or that Customer will be able to operate the Software without problems or interruptions. SOFTWARE IS AVAILABLE FOR EVALUATION PRIOR TO REGISTRATION.
DISCLAIMER. ALL EXPRESS OR IMPLIED CONDITIONS, REPRESENTATIONS, AND WARRANTIES
INCLUDING, WITHOUT LIMITATION, ANY IMPLIED WARRANTY OF MERCHANTABILITY, FITNESS
FOR A PARTICULAR PURPOSE, NONINFRINGEMENT OR ARISING FROM A COURSE OF DEALING,
USAGE, OR TRADE PRACTICE, ARE HEREBY EXCLUDED TO THE EXTENT ALLOWED BY APPLICABLE LAW.
IN NO EVENT WILL FILEHAND BE LIABLE FOR ANY LOST REVENUE, PROFIT, OR DATA, OR FOR
SPECIAL, INDIRECT, CONSEQUENTIAL, INCIDENTAL, OR PUNITIVE DAMAGES HOWEVER
CAUSED AND REGARDLESS OF THE THEORY OF LIABILITY ARISING OUT OF THE USE OF OR
INABILITY TO USE THE SOFTWARE EVEN IF FILEHAND HAS BEEN ADVISED OF THE POSSIBILITY OF SUCH DAMAGES.
This License shall be governed by and construed in accordance with the laws of the State of New Hampshire,
United States of America, as if performed wholly within the state and without giving effect to the principles of
conflict of law. If any portion hereof is found to be void or unenforceable, the remaining provisions of this
License shall remain in full force and effect. This License constitutes the entire License between the parties with
respect to the use of the Software.
Filehand, LLC
215 S. Broadway, Suite 124
Salem, NH 03079