1
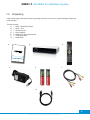
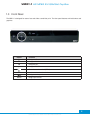
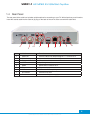
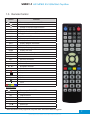
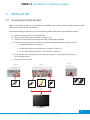
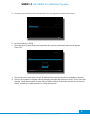
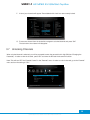
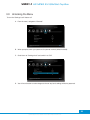
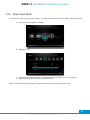
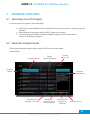
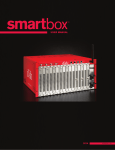
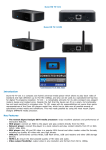
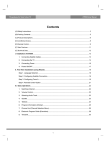
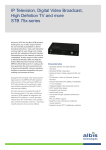
User Manual
VMX1-1 HD MPEG-2/4 QAM Set-Top Box
VMX1-1 HD MPEG 2/4 QAM Set-Top Box
Table Of Contents
1
INTRODUCTION............................................................................................................... 3
1.1
1.2
1.3
1.4
1.5
Important Information...................................................................................................................................... 3
Unpacking........................................................................................................................................................ 4
Front Panel....................................................................................................................................................... 5
Rear Panel........................................................................................................................................................ 6
Remote Control................................................................................................................................................ 7
2
INSTALLATION................................................................................................................. 8
2.1
Connecting the Set-Top Box........................................................................................................................... 8
2.2
Troubleshooting............................................................................................................................................. 10
3
SYSTEM SET-UP............................................................................................................ 12
3.1
3.2
3.3
3.4
3.5
Programming the Remote Control................................................................................................................ 12
Changing the Menu Language...................................................................................................................... 13
Parental Controls........................................................................................................................................... 13
Changing the Password ............................................................................................................................... 14
Locking Channels.......................................................................................................................................... 15
3.6
3.7
3.8
3.9
3.10
Remove Channels from a Locked List.......................................................................................................... 17
Unlocking Channels....................................................................................................................................... 18
Locking the Menu.......................................................................................................................................... 19
Unlocking the Menu....................................................................................................................................... 20
Power Save Mode.......................................................................................................................................... 21
4
ADVANCED FEATURES................................................................................................. 22
4.1
4.2
4.3
4.4
4.5
4.6
Recording a Live TV Program........................................................................................................................ 22
Electronic Program Guide ............................................................................................................................ 22
Schedule/Manage Recordings...................................................................................................................... 23
Playing Back a Program................................................................................................................................ 24
Email Messages from the Cable Company .................................................................................................. 25
Favorites......................................................................................................................................................... 26
Document History: Version 1.0
2
Specifications subject to change. Copyright ® 2015 by Pico Digital Inc. All rights reserved. REV. 090115
VMX1-1 HD MPEG 2/4 QAM Set-Top Box
1. INTRODUCTION
This user manual is for the VMX1-1 cable set-top box. This set-top box is equipped for you to customize your settings
and place parental controls for programming that you prefer your children not view. This set-top box is SD/HD compliant,
providing you with the ability to view all content from your cable provider.
This box has been designed for ease of use and is simple to upgrade to take advantage of any advanced features we
may release in the future.
1.1 Important Information
POWER REQUIREMENTS:
100 V - 240 VAC ~ 50 Hz/60 Hz
LIQUIDS:
Take care not to spill any liquids over the receiver or splash it.
Avoid placing objects with liquids on or next to the receiver.
SMALL OBJECTS:
Avoid placing small metallic objects close to the unit. These could accidentally enter through the
ventilation slots and cause serious damage.
CLEANING:
Unplug the receiver from the mains before cleaning it.
Use a slightly damp, soft cloth (no detergent) to clean the outside of the receiver.
VENTILATION:
Place the receiver in a well-ventilated area so that the slots are not blocked in any way. Avoid
exposure to the sun or to other sources of heat.
Do not place on top of other equipment.
CONNECTIONS:
Carry out the recommended connections only to avoid any possible damage.
3
Specifications subject to change. Copyright ® 2015 by Pico Digital Inc. All rights reserved. REV. 090115
VMX1-1 HD MPEG 2/4 QAM Set-Top Box
1.2 Unpacking
Upon receipt inspect the box and note any damage to the box or the unit. In case of damage contact your
cable operator.
The box includes:
A. 1 - VMX1-1 Quick Start Guide
B. 1 - VMX1-1 unit
C. 1 - Remote control
D. 1 - Power adaptor
E. 2 - Batteries for the remote control
F. 1 - Composite cable
G. 1 - HDMI cable
A
B
C
User Ma
nual
VMX1-1 HD
MPEG-2/4
QAM Set-To
p Box
(Verimatrix ®
D
CAS)
E
F
G
4
Specifications subject to change. Copyright ® 2015 by Pico Digital Inc. All rights reserved. REV. 090115
VMX1-1 HD MPEG 2/4 QAM Set-Top Box
1.3 Front Panel
The VMX1-1 is designed for ease of use and offers a small foot print. The front panel features minimal buttons and
graphics.
Button
▲
▲
▼
Function
Navigate UP
Navigate DOWN
Navigate LEFT
▲
Navigate RIGHT
Turns the receiver on/off (STBY)
OK
Used to make selections in the menu
Navigate to the previous menu
MENU
Brings up the menu
5
Specifications subject to change. Copyright ® 2015 by Pico Digital Inc. All rights reserved. REV. 090115
VMX1-1 HD MPEG 2/4 QAM Set-Top Box
1.4 Rear Panel
The rear panel of the cable box includes multiple options for connecting to your TV. With all options you will need to
insert the coaxial cable into the Cable In (2) plug on the back of the unit in order to receive the cable feed.
1
2
3.1
3
4
5
6
7
8
Label
Function
1
Cable Out
Coaxial cable out for loop through to TV – connect to TV
2
Cable In
Input of coaxial cable as content source
3
Video and L/R Audio
Composite cable to connect to TV
3.1
SPDIF
Optical digital audio
4
HDMI
HDMI cable to connect to TV
5
Ethernet
Ethernet cable for Internet access
6
USB
USB 2.0 for PVR capability
7
IR Extender
External IR receiver
8
Power
Connect to 12V power supply
6
Specifications subject to change. Copyright ® 2015 by Pico Digital Inc. All rights reserved. REV. 090115
VMX1-1 HD MPEG 2/4 QAM Set-Top Box
1.5 Remote Control
Button
CBL
Function
Press to turn set-top box ON/OFF
Mute ON/OFF
AV
Change set-top box HDMI resolution
CC
Closed captions ON/OFF
MAIL
AUDIO
SUB
Displays e-mail messages (if available)
Toggles mono/stereo audio options
Subtitles ON/OFF
MEDIA
Displays recorded “Library”
FAV
Displays “Favorites” list
INFO
Displays program information
Back
Return to previous menu
EPG
Displays the program guide
MENU
EXIT
Displays the menu
Leaves the menu/program information
OK
Select
VOL +
Increase the volume
VOL -
Decrease the volume
CH ▲
▲
CH
▲
▲
▲
▲
0...9
Channel up
Channel down
Navigation directions
Channel/password numbers
Record
Stop
▲
▲
▲
▲▲
Play
Fast forward
Rewind
Pause
Menu selection buttons
Programmable:*
TV
Press to turn TV ON/OFF
TV/AV
SET
CUSTOM
Changes TV source
Program remote
Can be programmed as any other button.
VOL +
Increase the volume
VOL -
Decrease the volume
CH
▲
▲
CH
Channel up
Channel down
*Note: These buttons can be programmed as any other button. The functions listed are suggested.
Specifications subject to change. Copyright ® 2015 by Pico Digital Inc. All rights reserved. REV. 090115
7
VMX1-1 HD MPEG 2/4 QAM Set-Top Box
2. INSTALLATION
2.1 Connecting the Set-Top Box
When you receive the set-top box, it will include the small VMX1-1 unit, a power cable, composite cables, an HDMI
cable, and the remote control with batteries.
We recommend that you make sure you have all necessary cables before starting the installation process.
A.
B.
C.
D.
Disconnect power from the TV and set-top box.
Plug the cable TV cable into the “Cable In.” (Figure 2.1.1)
Connect an external HDD to the set-top box using a USB cable (if available).
Connect the set-top box to your television. There are three different connection options for this:
1. HDMI cable (included) - Figure 2.1.2
2. Composite (yellow, red and white cable - included) - Figure 2.1.2
3. RF out (Coaxial cable for cable TV - not included) - Figure 2.1.2
E. Plug the power cord into the back of the set-top box (Figure 2.1.3) and plug the power supply
into your power source.
F. Reconnect power to the TV.
Figure 2.1.2
Figure 2.1.1
Figure 2.1.3
Power Adapter
Cable TV
Coaxial
Video/Audio
HDMI
8
Specifications subject to change. Copyright ® 2015 by Pico Digital Inc. All rights reserved. REV. 090115
VMX1-1 HD MPEG 2/4 QAM Set-Top Box
G. The set-top box will start an Auto Channel Scan. This will program the channels into the box.
H. Let this continue to 100%
I. Once this Auto Channel Scan has completed, the number of detected channels will appear.
Press “OK.”
J. The set-top box is now ready for use. All detected channels should now be available for viewing.
K. View the first channel to appear without changing channels after exiting the menu. This is the home
channel. Verify that reception is clear without visible artifacts. If the home channel is not received
clearly, contact your cable operator for further instructions.
9
Specifications subject to change. Copyright ® 2015 by Pico Digital Inc. All rights reserved. REV. 090115
VMX1-1 HD MPEG 2/4 QAM Set-Top Box
2.2 Troubleshooting
2.2.1 Reset to First-Time Installation
If the set-top box is not working, then the first step is to restart the box. If this does not work, then try resetting the
box to first-time installation. This is done by following these instructions:
A. With the TV switched ON and the set-top box switched ON, press the “MENU” button on the remote control.
This brings up the following menu:
B. Go to the “Settings” option and press “OK.” This will take you into the settings menu.
10
Specifications subject to change. Copyright ® 2015 by Pico Digital Inc. All rights reserved. REV. 090115
VMX1-1 HD MPEG 2/4 QAM Set-Top Box
C. Select the “Version” option and scroll down to the “Reset to Factory Default” option. Press “OK.”
Confirm by pressing “OK” once more.
*The set-top box will then reboot and start a scan and find all of the available channels. If this does not work, please contact your cable operator for more troubleshooting options.
2.2.2 Help Menu
More detailed information about set-top box functions can be found in the “Help” menu.
A. With the TV switched ON and the set-top box switched ON, press the “MENU” button on the remote control.
B. Navigate to the “Help” option and press “OK.”
11
Specifications subject to change. Copyright ® 2015 by Pico Digital Inc. All rights reserved. REV. 090115
VMX1-1 HD MPEG 2/4 QAM Set-Top Box
3. SYSTEM SET-UP
3.1 Programming the Remote Control
In order to program your remote control, follow these steps:
A. On the set-top box remote, press and hold the “SET” button until the red light at the top turns bright red.
B. Point the remote that you would like to copy and the set-top box remote at one another.
C. On the set-top box remote, press and hold the button that you would like to program (eg. Channel up) until
the light flashes.
D. On the remote you want to copy, press and hold the corresponding button (Channel up) until the light flashes
again.
E. Repeat this process until all of the buttons are programmed.
F. Press the “SET” button once more to save and exit the remote control programming.
12
Specifications subject to change. Copyright ® 2015 by Pico Digital Inc. All rights reserved. REV. 090115
VMX1-1 HD MPEG 2/4 QAM Set-Top Box
3.2 Changing the Menu Language
Each set-top box can be set to show the menus in your preferred language. The box is currently set for Spanish.
To change this:
A. Go to the Menu.
B. Select “Settings.”
C. Inside the “Region” menu, scroll down to “Language.”
D. Select your preferred language by scrolling to the left or right.
E. Once selected, exit out of the menu.
F. The menu will begin showing your chosen language.
3.3 Parental Controls
Parental controls allow you to manage the channels that your children are able to view. This locking system can be used
to block specific channels or to lock the whole menu from being used without entering a password, safeguarding your
children from viewing any content you don’t want them viewing.
13
Specifications subject to change. Copyright ® 2015 by Pico Digital Inc. All rights reserved. REV. 090115
VMX1-1 HD MPEG 2/4 QAM Set-Top Box
3.4 Changing the Password
The current default password is 0000. This password can be customized and updated by using the following steps:
A. Go into the menu.
B. Select “Settings.”
C. Navigate to the “Parental” menu.
D. When prompted, enter the current password (default is 0000).
14
Specifications subject to change. Copyright ® 2015 by Pico Digital Inc. All rights reserved. REV. 090115
VMX1-1 HD MPEG 2/4 QAM Set-Top Box
E. Scroll down to “Set PIN” and press “OK.”
F. Enter and confirm a new password, then press “OK” to return to the menu.
3.5 Locking Channels
In order to set parental controls and lock specific channels, use the following steps:
A. Go into the menu.
B. Select “Settings.”
15
Specifications subject to change. Copyright ® 2015 by Pico Digital Inc. All rights reserved. REV. 090115
VMX1-1 HD MPEG 2/4 QAM Set-Top Box
C. Navigate to the “Parental” menu.
D. If prompted, enter your current password for parental controls (default is 0000).
E. Select “Select Locked Channels” and press “OK.”
F. A list of your channels will appear. Navigate to those you would like to lock
and press “OK” on each.
G. A lock icon will appear next to each channel that you choose to be locked.
H. Once you are finished selecting channels to lock, press the yellow button on the
remote to return to the menu.
16
Specifications subject to change. Copyright ® 2015 by Pico Digital Inc. All rights reserved. REV. 090115
VMX1-1 HD MPEG 2/4 QAM Set-Top Box
3.6 Remove Channels from a Locked List
To unlock a channel, use these steps:
A. Go into menu.
B. Select “Settings.”
C. Navigate to the “Parental” menu.
D. If prompted, enter your password for parental controls (default is 0000).
E. Select “Select Locked Channels” and press “OK.”
17
Specifications subject to change. Copyright ® 2015 by Pico Digital Inc. All rights reserved. REV. 090115
VMX1-1 HD MPEG 2/4 QAM Set-Top Box
F. A list of your channels will appear. Those labeled with a lock icon are currently locked.
G. To remove a channel from the locked list, navigate to a locked channel and press “OK.”
The lock next to the channel will disappear.
3.7 Unlocking Channels
When a locked channel is selected, you will be prompted to enter the parental lock 4-digit PIN (see “Changing the
Password”). In order to view the channel, press “OK” and enter the PIN and the channel will unlock.
Note: This will turn OFF the “Parental Control” in the “Parental” menu. In order to re-lock channels, go to the “Parental”
menu and turn the setting to “ON.”
18
Specifications subject to change. Copyright ® 2015 by Pico Digital Inc. All rights reserved. REV. 090115
VMX1-1 HD MPEG 2/4 QAM Set-Top Box
3.8 Locking the Menu
To lock the menu, follow these steps:
A. From the menu, navigate to “Parental.”
B. If prompted, enter your password for parental controls (default is 0000).
C. Scroll down to “Settings Lock” and switch it to ON.
D. Once you leave the menu and re-enter “Settings,” you will be prompted to enter your password in
order to make changes.
19
Specifications subject to change. Copyright ® 2015 by Pico Digital Inc. All rights reserved. REV. 090115
VMX1-1 HD MPEG 2/4 QAM Set-Top Box
3.9 Unlocking the Menu
To turn the “Settings Lock” feature off:
A. From the menu, navigate to “Parental.”
B. When prompted, enter your password for parental controls (default is 0000).
C. Scroll down to “Settings Lock” and switch it to “Off.”
D. You will now be able to make changes to the set-top box’s settings without a password.
20
Specifications subject to change. Copyright ® 2015 by Pico Digital Inc. All rights reserved. REV. 090115
VMX1-1 HD MPEG 2/4 QAM Set-Top Box
3.10 Power Save Mode
The set-top box ships in normal power mode. If you prefer to set this to “Power Save Mode” follow these steps:
A. From the menu, navigate to “Settings.”
B. Navigate to “TV.”
C. Scroll down to Energy Mode. You can toggle between “Quick Start Up” and “Low Power.”
D. Toggle the setting to “Low Power” and exit the menu.
Note: In Low Power Mode, the set-top box may take longer to power up and be ready for use.
21
Specifications subject to change. Copyright ® 2015 by Pico Digital Inc. All rights reserved. REV. 090115
VMX1-1 HD MPEG 2/4 QAM Set-Top Box
4. ADVANCED FEATURES
4.1 Recording a Live TV Program
In order to record a live program, follow these steps:
A. Make sure an external USB hard drive is connected to the set-top box (See “2.1 Connecting the SetTop Box”).
B. While watching a live program, press the “REC” button on your remote.
C. The current program will begin recording immediately and can be found in the “Library.”
(See 4.4 “Playing Back a Program”).
4.2 Electronic Program Guide
To bring up the Electronic Program Guide, press the “EPG” button on your remote.
Guide Interface:
Program Name
Future
Times/Programs
Cur rent
Date/Time
Channel
Name
Program
Descr iption
Set selected
program to record
Schedule a
reminder for a
future program
Search for a
program or
channel
Exit the menu
22
Specifications subject to change. Copyright ® 2015 by Pico Digital Inc. All rights reserved. REV. 090115
VMX1-1 HD MPEG 2/4 QAM Set-Top Box
4.3 Schedule/Manage Recordings
In order to record a future program, follow these steps:
A. Press the “EPG” button on your remote control.
B. In the EPG, navigate to the program that you would like to record.
C. When the program is highlighted, press the “Red” button on the remote to schedule a
future program to be recorded.
In order to view/manage your scheduled recordings, follow these steps:
A. From the menu, navigate to “Timers.”
B. Here you will find any previously scheduled future recordings and reminders.
23
Specifications subject to change. Copyright ® 2015 by Pico Digital Inc. All rights reserved. REV. 090115
VMX1-1 HD MPEG 2/4 QAM Set-Top Box
C. Select from the list and press “OK” to bring up options for managing your
scheduled reminder/recording.
4.4 Playing Back a Program
In order to play back an existing recording, follow these steps:
A. From the menu, navigate to “Library.”
B. Here you will find a list of previously recorded programs.
24
Specifications subject to change. Copyright ® 2015 by Pico Digital Inc. All rights reserved. REV. 090115
VMX1-1 HD MPEG 2/4 QAM Set-Top Box
C. From this list, select the program that you would like to play and press “OK”
to bring up detailed information about the recording.
D. Press “OK” again to start watching the recorded program.
4.5 Email Messages from the Cable Company
To view important messages from the cable company, follow these steps:
A. When you receive a message, a number will appear in the “Messages” icon (see below).
B. From the menu, navigate to “Messages.”
C. Here you will find a list of important messages from the cable company.
D. Navigate to the desired message and press “OK” to view.
25
Specifications subject to change. Copyright ® 2015 by Pico Digital Inc. All rights reserved. REV. 090115
VMX1-1 HD MPEG 2/4 QAM Set-Top Box
4.6 Favorites
4.6.1 Creating a Favorites List
A. From the menu, navigate to “Settings.”
B. Select “Favorites.”
C. Press the “Green” remote button to create a new list.
D. Create a name for your playlist using the number keypad on the remote or by selecting
each of the letters on-screen and pressing “OK.”
26
Specifications subject to change. Copyright ® 2015 by Pico Digital Inc. All rights reserved. REV. 090115
VMX1-1 HD MPEG 2/4 QAM Set-Top Box
E. A list of channels will appear. Navigate to the channels you would like to include in your “Favorites” list
and press “OK.”
F. A heart icon will appear next to the channels you’ve selected. To remove a channel from the list, press
“OK” again and the heart icon will disappear.
G. When you are finished, exit out of the menu.
H. To select your custom “Favorites” channel list, press the “FAV” button on your remote or navigate to
the “Settings” menu and select “Favorites.”
To delete a “Favorite Channels” list, follow these steps:
A. From the “Settings” menu, select “Favorites.”
B. Select the list you would like to delete and press “OK.”
27
Specifications subject to change. Copyright ® 2015 by Pico Digital Inc. All rights reserved. REV. 090115
VMX1-1 HD MPEG 2/4 QAM Set-Top Box
C. Scroll down to “Delete” and press “OK.” Confirm by pressing “OK” once more.
Note: Here you may also view the list to make further changes or rename the list.
4.6.2 Using a Favorites List
A. On the remote control, press the “FAV” button. This will bring your previously created “Favorites” lists
(see “Creating a Favorites List”).
B. Navigate to the desired list and press “OK.”
Note: This will restrict the set-top box to only showing channels on the selected list. In order to return to all channels,
follow these steps:
A. Press the “FAV” button on the remote control.
B. Select “All Channels” and press “OK.”
28
Specifications subject to change. Copyright ® 2015 by Pico Digital Inc. All rights reserved. REV. 090115