1
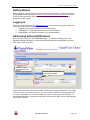
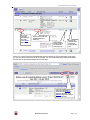
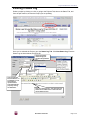
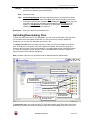
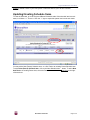
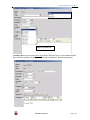
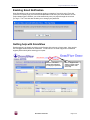
GrandView User Guide Dear GrandView User: We appreciate your business and look forward to a successful working relationship! To ensure the best possible outcome, we welcome you to our project management and team collaboration system, GrandView.TM By logging into the GrandView website devoted to your project, we encourage you to participate in the process of project collaboration. The key to any successful project is communication, and GrandView facilitates that communication. For example, when a status changes within your project, you can enable GrandView to notify you via email. This brief manual is a reference for your use of the GrandView system. Please use it to learn how to: Log in to your site View and update project statuses View and update project schedules Exchange files and documents Set up your email notification and change your password Get help using GrandView support Thank you for choosing RoviSys. We look forward to success! Best Regards, Tom Dormo Director Project Collaboration at its Best! Getting Started Before logging in, make sure that your Internet Explorer web browser is configured correctly to access GrandView by reviewing the GrandView Web Client Software Requirements document. This document will also help you through any other known issues when trying to login to GrandView for the first time. Logging in Go to the RoviSys GrandView link, www.rovisys.com, and go to the log-in section, found in the bottom left corner. Enter the following information: PROFILE: (If necessary, provided to you by administrator) USERNAME: Your Username (provided to you by administrator) PASSWORD: You Password (provided to you by administrator) Addressing Actions/Notifications When you log in, you will be at the Dashboard page – your personal “landing page”. The dashboard displays information concerning any alarms or tasks that need attention as well as quick links to other information. The Actions module shows items that need attention. Click on project links to quickly view project information. Simply click on the links in the Actions module to address items that need attention. For example, if you click on the Project Status Logs link, you will be taken to the Status Logs page where you can view, acknowledge, and respond to status logs entered by your project team member. To acknowledge status logs, simply check off the item, and press the “Save” button to acknowledge, then close the window. GrandView User Guide Page 2 of 8 Project Collaboration at its Best! Be sure to check the Acknowledge box, then press Save to Apply ! Click on this icon to view file attachments for a status log. Click the Reply Arrow to reply to this particular status log entry. See who has read this status log entry by clicking the Ack icon. Clicking on a project link from the dashboard page will display the Project Summary page where you can view more information about your project. You can view/create status logs and schedule items as well as upload/download files from this page. Can’t see expected status logs here? Press the Filter >> button and change the way tasks are displayed. Click Refresh to apply filter settings to the current view. GrandView User Guide Page 3 of 8 Project Collaboration at its Best! Entering a Status Log Select a project by clicking on a link or going to the Projects Tab, then to the Status Tab, and from the pull down list, choose the Project you are updating. Once you‟ve selected the Project, go to the Status Log Tab. Click New Status Log. Enter the Status Log as shown below, then click OK. __++_+ Choose the subject matter Category for your New Project Status Log . Choose the type of Status Log. If you choose New File, File Revision, or Transmittal, you can add existing or upload new files associated with this project by clicking the Add button. Type your status log here – this uses Rich Text, so html can be added. Links to other web sites can be added here too! GrandView User Guide Page 4 of 8 Project Collaboration at its Best! Category: The area of subject matter you are posting the Status Log about (these areas have been pre-defined by the Administrator). Date: Defaults to today Type: Acknowledge Request will require others on project to view and check off that they‟ve seen the Project Status Post. Note simply adds information to the Status Log without requiring team members to acknowledge it. New File will let everyone know that a file has been uploaded and attached as an icon to the left of the Status Log. File Revision is an update of an existing file. Transmittal is an official release of an electronic document. Description: Enter your Status Log information here. Uploading/Downloading Files To alert your team that a new file is in GrandView, you can create a new status log of type „New File‟ as shown above and attach multiple files to it. If the file has not yet been uploaded to GrandView, you can click the Add button and upload a file. To upload a new file before any status log entry is made, go to ProjectsStatus LogsFiles tabs. At the bottom of the screen, click on the Upload icon (folder with arrow facing up), and browse to the file location on your local hard drive. Click OK to begin upload. GrandView will ask you if the file is shared. Click OK. DO NOT click on the ADD/DELETE buttons to upload files (these are used to Add or Delete directories). Note: Customer users can only upload files into the Shared\Customer Upload folder. Click the Update button to download all marked files. Click here to add comments to a file. Click here to share a file so customers can see it. Click here to move the file to a different folder. Click here to mark a file for download. Click here to upload a file to the project. To download a file to your local hard drive, go to ProjectsStatus LogsFiles tabs. Click on the Download icon (folder with arrow facing down) under the Actions heading in the list of files. Click GrandView User Guide Page 5 of 8 Project Collaboration at its Best! Update to initiate a Save to your local system. GrandView will tell you if the file is shared. Click OK. Updating/Creating Schedule Items To view the Schedule, go to the ProjectsStatusSchedule tabs. If the schedule item has subtasks, it will have a “+” next to it. Click the “+” sign to expand the parent item into the sub-tasks. You may add a New (Parent) Schedule Item, or a Sub-Task to an existing Parent Schedule Item. To add a New (Parent) Schedule Item, click on the New Schedule Item… button. To add a New Sub-Task to an existing Parent item, select the Parent item and click the Arrow icon to the right of the task row. GrandView User Guide Page 6 of 8 Project Collaboration at its Best! Type your Schedule Item details or comments here. To edit an item, simply click the pencil icon for Edit. In the Edit screen, you can update the Start Date, End Date, number of units (days), who the task is assigned to, and Percent Complete. GrandView User Guide Page 7 of 8 Project Collaboration at its Best! Enabling Email Notification Want GrandView to tell you when something needs your attention? Just click on the Tools link (next to the company logo), then select Email Notification and enter your email address. As new project status logs are entered, you will be notified only once per project through the next time you log in. The Tools links also enables you to change your password. Getting help with GrandView Getting support is as simple as clicking on the Support link at the top of every page. Also use this link to suggest enhancements to GrandView. You should see an email reply from a GrandView support person shortly after entering your request. Click the Tools link to enable email notification or change your password. GrandView User Guide Click the Support link to submit a support request or the Help link to view online Help. Page 8 of 8