1
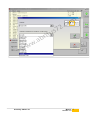
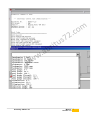
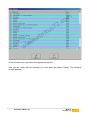
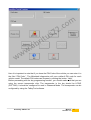
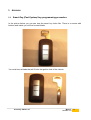
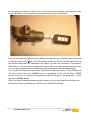
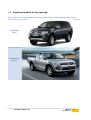
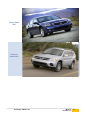
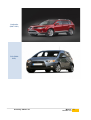
November
10.2014
ABRITES Diagnostics for Mitsubishi User Manual
ABRITES Diagnostics for Mitsubishi
User Manual
Issued by: Abrites ltd.
Manual Version: 1.2
November
10.2014
ABRITES Diagnostics for Mitsubishi User Manual
List of Revisions
Date
29.Aug.2012
06.Jun.2013
02.Oct.
2013
Chapter
Description
First version of the document.
Update.
Update for latest version
Issued by: Abrites ltd.
Revision
1.0
1.1
1.2
Manual Version: 1.2
1 INTRODUCTION
“ABRITES diagnostics for Mitsubishi” is a Windows PC based professional diagnostic
software for vehicles from the Mitsubishi Motors group. With the help of this software you
can perform complete diagnostic operations of all CAN-based vehicles from the Mitsubishi
group, which are in most cases unsupported from the producer diagnostic testers. The
“ABRITES diagnostics for MITSUBISHI” provides also complete standard diagnostics
(read faults, erase faults, current data, actuator tests, adaptations) for MITSUBISHI
vehicles.
Our PC USB diagnostic interface supports K-Line and CAN-BUS interface.
Diagnostics is performed via the OBD-II connector.
Issued by: Abrites ltd.
Manual
Version: 1.2
3
2 VEHICLE DIAGNOSTICS WITH “ABRITES DIAGNOSTICS FOR MITSUBISHI”
The “ABRITES diagnostics for MITSUBISHI” consists basically of two parts:
– Standard diagnostic functions like reading/clearing fault codes (DTC), scanning
available control units in the car, displaying actual values (measured parameters),
performing actuator tests and performing adaptations.
– Special functions like Key Programming, Engine Control Unit Reflashing and Dump
Tool.
2.1
Standard Diagnostic Functions
All devices, which may be present in the car, are listed in the main screen of the
“ABRITES diagnostics for MITSUBISHI”. If you want to connect to a specific device,
please double click on it or select it ant press the “Connect” button. The “ABRITES
diagnostics for MITSUBISHI” will try to connect to the device.
The Abrites diagnostics for Mitsubishi supports multiple languages both for the user
interface of the program as well as the display of fault codes. To change the default
English language, please click on “Options” and then “Advanced” and the following
screen will appear:
Issued by: Abrites ltd.
Manual
Version: 1.2
4
Issued by: Abrites ltd.
Manual
Version: 1.2
5
When a control unit is connected it is possible to read its fault codes, actual values,
perform output tests (actuators) and make adaptations.
Issued by: Abrites ltd.
Manual
Version: 1.2
6
Issued by: Abrites ltd.
Manual
Version: 1.2
7
2.2
Special Functions
The appropriate special function is opened by selecting it from the list box and doubleclicking on it, or by selecting it and then pressing the “Open” button.
2.2.1
“Key Programming”
The key programming function currently works by CAN. Please, see below the supported
vehicles. In the next versions we will add more vehicles to this list FREE for all customers
who own the key learning function. We also plan to support vehicles with KLine interface.
Keys can be programmed when the pin code of the vehicle is known. The Mitsubishi
diagnostics has a database of default pin codes. The pin code can be changed with the
Mitsubishi diagnostics. If the pin code is changed - next time when a key is programmed
the new pin code should be used.
Attention: L200 models, which are produced in Mexico after year 2010 do not use the
default PIN code. Instead, each L200 car has its own PIN code.
Attention: most Mitsubishi Grandis vehicles produced after year 2006 are diagnosed on
CAN, but there are some which are diagnosed on K-Line. The K-Line vehicles are not
supported yet.
When you select this special function the following screen appears:
Issued by: Abrites ltd.
Manual
Version: 1.2
8
At this moment you must select the appropriate vehicle.
After you are ready with the selection you must press the button 'Select'. The following
screen appears:
Issued by: Abrites ltd.
Manual
Version: 1.2
9
Here it is important to note that if you know the PIN Code of the vehicle you can enter it in
the field “PIN Code:”. The Mitsubishi diagnostics will use a default PIN code for each
vehicle model. The default PIN codes can be seen by clicking the button “Help”.
Before proceeding with the key programming function, you should make sure that you are
using the correct transponder chip. The transponder in the key should be HITAG
(PCF7936). It should be configured to work in Password Mode. The transponder can be
configured by using the TaKeyTool software.
Issued by: Abrites ltd.
Manual
Version: 1.2
10
Issued by: Abrites ltd.
Manual
Version: 1.2
11
After the transponder has been pre-programmed correctly, you may click the buttons
“Program a Key” or “Erase Keys”.
Programming Keys
The key programming procedure is started by clicking the button “Program Key” . Then just
follow the prompt messages, which the Abrites diagnostics for Mitsubishi will display. It is
important to note that if you see a message “Password Incorrect”, or “PIN Code could not
be verified” this probably means that the PIN code is incorrect. You should not try to use
this PIN more than 3 times, because the immobilizer will get locked. If the immobilizer gets
locked, you must wait with Ignition ON for 15-30 minutes.
In the Appendix you can find a detailed explanation of the smart key (fast system) key
programming procedure.
Erasing Keys
If a programmed key is lost, you need to erase the available keys from the system’s
memory. This will prevent the lost key from starting the vehicle. All of the remaining keys
must then be reprogrammed.
2.2.2
“Dump Tool”
By using this special function it is possible to calculate odometer values, display PIN
codes, etc.. This application needs the EEPROM dump from the corresponding control
unit. After the dump is loaded, some modifications will be made and you need to store the
resulting dump as a new file, which you can program with a special programmer into the
device that the dump is from. The dump tool receives as input a dump file from the
corresponding unit (input dump is loaded with the “Load dump” button). The dump file can
be read either via OBDII but also with a programmer (especially for units where reading
via OBDII is not possible). As output the dump tool displays some data extracted from the
input file and/or makes some modifications to the input data. If modifications were made
(for some sub-functions there are no modifications made, only data are visualized) the
user has to write the modified dump to the desired file (with the “Save dump” button), and
then this modified dump should be saved back to the device via OBDII or with a
programmer. If data are read/written with a programmer the user must make sure that the
proper byte order is used. Because most of the programmers are reading the data on
16bit words, the byte order in the dump depends on the used programmer – some
programmers produce dumps starting with the least significant byte, and some produce
dumps starting with the most significant byte. This means that for the same unit two
Issued by: Abrites ltd.
Manual
Version: 1.2
12
different programmers can produce different dumps. For that purpose a button “Swap
bytes” is provided. This buttons changes alternatively the byte order into the dump. So, if
after loading the dump file into the dump tool data cannot be extracted or modified, please
try to swap the bytes to get a correct result.
Issued by: Abrites ltd.
Manual
Version: 1.2
13
3
3.1
APPENDIX
Smart Key (Fast System) key programming procedure
In the picture below you can see how the smart key looks like. There is a remote with
buttons and inside you will find a metal blade.
You must have a blade that will fit into the ignition lock of the vehicle.
Issued by: Abrites ltd.
Manual
Version: 1.2
14
On the ignition loc there is a black cover. You must remove this black cover and put in the
metal key blade. Turn the ignition on and put the smart key on the blade.
Now you may start to program the key. Make sure that you are using the correct PIN code
by pressing the button “Help”. If the PIN code is correct the first key will be registered and
the Abrites diagnostics for Mitsubishi will inform you that the procedure is successful.
After that you may proceed to register more keys. After you finish programming the keys
you are ready to proceed with the KOS key (this is the remote control programming).
Turn Ignition ON and press the button “Synchronize Remote Control”. The software will
ask you to press twice the <LOCK> button. If everything is fine, you will hear a BEEP
sound. Then you can proceed to program the second remote in the same way – press
twice the <LOCK> button.
When you have finished programming the remotes you can verify that the car starts and
the remote works by pressing the <LOCK> and <UNLOCK> buttons.
Issued by: Abrites ltd.
Manual
Version: 1.2
15
3.2
Supported models for key learning
Here is the list of currently supported vehicles for which the Key Learning function may be used.
L200 (20062011)
L200 Hunter
(2011+)
Issued by: Abrites ltd.
Manual
Version: 1.2
16
Hunter (20072011)
Pajero (20062011)
Grandis
(2006-2011)
Issued by: Abrites ltd.
Manual
Version: 1.2
17
Shogun (20062011)
Montero
(2006-2011)
Eclipse (20062011)
Issued by: Abrites ltd.
Manual
Version: 1.2
18
Galant (20062011
Endeavor
(2006-2011)
Issued by: Abrites ltd.
Manual
Version: 1.2
19
Lancer (20072011)
Lancer
Evolution
(2008-2011)
Issued by: Abrites ltd.
Manual
Version: 1.2
20
Outlander
(2007-2011)
Colt (20062011)
Issued by: Abrites ltd.
Manual
Version: 1.2
21
Raider
ASX
Issued by: Abrites ltd.
Manual
Version: 1.2
22
Triton
Issued by: Abrites ltd.
Manual
Version: 1.2
23
4
SUPPORT
For support, please write an email with a detailed explanation to [email protected] .
Be sure to check the News Section at our website frequently to be informed about all the latest
updates: www.Abrites.com .
Issued by: Abrites ltd.
Manual
Version: 1.2
24