1
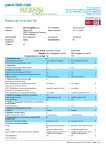
Rescue Parachute User Manual
Sky Paragliders, a.s.
Kadlčákova 1466
739 11 Frýdlant nad Ostravicí
CONTENT
CHAPTER I.
Technical Specification of Rescue Parachute SKY DRIVE
1)
2)
3)
4)
5)
6)
7)
8)
9)
10)
11)
12)
Intended Use
Technical-Tactical Parameters
Design
Warranty
Parachute Durability
Operating Conditions
Storage time
Parachute Installation
Parachute Function
Parachute Assembly
Technical Specification of Individual Parachute Parts
Materials
CHAPTER II.
Instructions for Parachute Use
1) Preparing the parachute prior to takeoff
2) Opening the parachute
CHAPTER Ill.
Parachute Storage Instructions
1) Storage conditions
CHAPTER IV.
Parachute Packing Instructions
CHAPTER I.
Technical Specification of Rescue Parachute SKY DRIVE
1 ) Intended Use:
Rescue parachute SKY DRIVE is intended for paragliding, for installation into paragliding harnesses.
2) Technical-Tactical Parameters:
-
canopy area
weight
min. a max. pilot weight
maximum speed upon opening parachute
maximum descending speed at 110 kg load
maximum forward speed at 110 kg load
26 m2
2,4 kg
70- 110 kg
115 km/h
5,3 m/s
5,4 m/s
3) Design:
The parachute is produced in a standard design. The following options are available upon request:
- various colours available
4) Warranty:
The warranty period is 6 months and is valid from the date of dispatch. The manufacture shall not honour
claims in the following cases:
if the user breaches conditions for parachute packing, storage and treatment
- if the parachute is damaged when used otherwise than intended and designed
- if the parachute is damaged by catching on other equipment, tree or other fixed object
5) Parachute Durability:
If any damage or wear of parachute material is found, contact the manufacture or your dealer immediately.
The parachute owner is obliged to inspect and check the condition of the parachute after every use, and
after 10 uses the parachute must be returned to the manufacturer or authorised person for thorough
inspection.
6) Operating Conditions:
The parachute functions are guaranteed in an air temperature range from -40°C to +80°C and relative
humidity corresponding to this temperature range.
The parachute is designed for a maximum speed of 115 km/h.
7) Storage time:
The parachute may be packed for a maximum period of 1 year prior to use.
8) Parachute Installation
The parachute is designed for use in paragliding harnesses as a rescue parachute. The parachute is
attached to the harness by means of threaded buckles (type Maillon) with a minimum declared strength of
4500 N. The right strap, which is marked R (right), is attached to the right eye for the rescue parachute,
control handles to the rear, on the harness; the left is attached analogously. The placement of the rescue
parachute into the rescue parachute casing is subject to technical specification of the used harness. The
parachute can be used for all standard locations (in front, under the harness, on the side).
Only qualified persons or the manufacturer may install the rescue parachute into the harness.
9) Parachute Function:
The rescue parachute is used as a safety measure for paragliders. The parachute is activated by pulling
out the release, which is fixed to the container where the rescue parachute is located, and throwing this
container to the side. The container must be thrown in such a manner as to avoid it getting tangled in the
paraglider. After the container is thrown aside it opens, the cords extend, and the rescue parachute
canopy is released and filled with air.
Provided the pilot has sufficient height and weather conditions are suitable, the control handles can be
used to adjust the descend trajectory to avoid obstacles or to land in a suitable area.
10) Parachute Assembly:
The parachute has the following main parts:
I.
II.
III.
IV.
V.
Container
Canopy with cords
Threaded buckles
H-shaped support straps
Control handles
11) Technical Specification of Individual Parachute Parts:
11.1. Container:
The container accommodates the folded canopy and cords. The trigger is attached to the container. The
trigger can be connected to the centre or side of the container. The container has two side flaps and one
top flap. The container is closed by a loop of cords inserted into a closing rubber eye.
11.2. Canopy with cords:
The canopy with an area of 26 m2 is made of polyamide with a permeability of 0-3 l. The canopy is delta
shaped and has 22 support cords attached in four rows. Forces from the cord eyes are distributed into the
canopy through straps (13 and 25 mm thick). Other stressed canopy sections are reinforced by 13mm
thick straps.
11.3. Threaded buckles:
Threaded buckles are located at the ends of cords and are used to connect cords with support straps.
Maillon buckles with a guaranteed strength of min. 4500 N are used.
11.4. Support straps:
These H-shaped straps are used to connect the rescue parachute to the harness. The right strap is
marked with the letter R (right).
11.5. Control handles:
These are used to control and parachute. The control cords are terminated at the control handles.
12) Materials:
Material type:
Manufacture:
Use:
polyamide fabric 9024
polyamide strap 13 mm
polyamide strap 25 mm
polyamide strap 15 mm
polyamide cord D=4mm
polyamide strap 25 mm
threaded buckles Mailon 4500N
polypropylene fabric
Porcher marine
Stap
Stap
Stap
Lanex Bolatice
A. Mouka
Peguet
Technolen
canopy
canopy reinforcement
canopy reinforcement
canopy reinforcement, cord eyes
support cords
connecting straps
strap-cord connection
container material
CHAPTER II.
Instructions for Parachute Use
1 ) Preparing the parachute prior to takeoff:
Prior to takeoff the parachute and release system must be checked. If any defects are found, takeoff must
be aborted.
2) Opening the Parachute:
The rescue parachute is used when the paraglider is defective or damaged to such an extent that it
doesn’t allow for safe landing. The parachute is activated by pulling out the release, which is fixed to the
container where the rescue parachute is located, and throwing this container to the side. The container
must be thrown in such a manner as to avoid it getting tangled in the paraglider. After the container is
thrown aside it opens, the cords extend, and the rescue parachute canopy is released and filled with air. At
this moment the rescue parachute is fully functional. The non-functional paraglider must be suitably
collapsed or otherwise disposed of, so that it doesn’t affect the reliable function of the rescue parachute.
If the connection between the paraglider and harness allows for quick release, this function should be used
to dispose of the paraglider and land using only the rescue parachute.
One must remember that the rescue parachute has quite a high forward speed and an inappropriate
procedure during its opening and handling with a defective paraglider could lead to both becoming
entangled and collapsing.
3) Controlling the Parachute:
The parachute is controlled using control handles located on the support straps. The rescue parachute
parameters enable sufficient manoeuvring capability for emergency landing.
Control is done in a typical manner, i.e. pulling on the right control handle turns the parachute to the right,
pulling on the left control handle turns the parachute to the left. Pulling on both control handles
simultaneously slows the parachute speed and descending down only slightly, which means that the
increase in lift upon landing as with a paraglider. Avoid unnecessary interference with steering, alternative
pulling on both control handles, etc. could cause the parachute to swing which is dangerous during
landing. When flying and landing with a collapsed paraglider we recommend controlling the rescue
parachute with one hand. The other hand should continuously keep check of the collapsed paraglider to
avoid unwanted inflation and potential entangling with the rescue parachute. If conditions allow, always
land with the rescue parachute into the wind. We recommend turning into the wind towards the selected
landing area and not intervening in steering below a height of 40 m.
CHAPTER Ill.
Parachute Storage Instructions
1) Storage Conditions:
Parachutes are stored in a dry, dark and well ventilated area. If the parachute is stored for longer than one
year, it must be stored unpacked. Parachutes shall under no circumstances be stored together with acids,
oils, diluents or other aggressive substances.
RESCUE PARACHUTE PACKING INSTRUCTIONS
SKY DRIVE
1) Checking the canopy:
Prior to actual packing the parachute must be thoroughly checked and in case any defects are found
the parachute must not be packed for use.
Take care that the cords are tensed throughout the packing procedure.
2) Checking cords:
Lay the canopy on the packing table with the front section facing up and separate the cords from one
another. The canopy and cords should now be arranged. If the cords are tangled, they must be untangled
and straightened out. In case of doubt consult an authorised packer. Check the right procedure by
rechecking the cords.
Divide the cords into a right and
left half according to the loose
ends, the border between the left
and right section in the canopy is
a 2,5 cm thick strap with central
cords. With the parachute
arranged in this manner, lay it on
the packing table with the trailing
edge towards the ground and tip
pointing upwards. Check that
cords pass freely from the loose
ends to the canopy in the
following order: F, F1, E, E1, D,
D1, C, C1, B, B1, A. The first cord
from the centre of the parachute
at the loose ends leads to the
canopy tip and the last cord at
the loose ends leads to the
centre of the trailing edge.
Fig. 1
3) Arrange the centre of the parachute so that both centre rows of cords lie on top of each other and fold
the right canopy side (in direction of flight) to the left side.
Align the parachute centre so
that both centre cord rows, in
order F, E, D, C, B, A lie on
top of each other, fold the
right canopy side (in direction
of flight) to the left side.
Fold the canopy from the
trailing edge towards the tip, left
and right side separately. Take
care that cords are tensed at all
time during packing.
Fig. 2
4) Fold the first part in an S-shape into thirds into a triangle and then fold the entire section in half towards
the centre of the parachute according to Fig. 3.
The centre cord marked F is used as the first and basic cord for packing, to which the following cords are
added in the given order.
The first added cord is marked F1 (control cord) is placed next to centre cords. The shape of the first field
in the bottom section is demarcated by a strap between strap F1 and F; in the top section it is a piece of
fabric between the centre strap and point “X”. Point X is determined by extending the axis of cord F1
through to the point of crossing reinforcement straps. The bottom strap of the first field is folded towards
the centre so that it is parallel to the cords axis. Now repeat the entire operation (the result is a folded field
in the shape of a triangle). Take care that the cords are tensed at all times.
Fig. 3
Fig. 4
Fig. 5
Arrange the other sections so that the
strap from the support cord lies
immediately next to and parallel to the
arranged parachute centre. The bottom
edge of the section is folded towards the
parachute centre (Fig. 2) and then folded
according to the bottom section (Fig. 3).
Then lay the next cord E1 onto F1
towards the centre of the parachute. In
the cord axis continues a strap into the
parachute, this is laid down onto the
centre strap. Fold the bottom strap of this
second field towards the parachute
centre parallel to the centre cords. (the
result is a field folded in a triangular
shape). Take care that the cords are
tensed at all times.
Fig. 6
Fig. 7
Fig. 8
5) Layout the next section, fold the
bottom edge of the section towards
the parachute centre and then fold it
in half towards the parachute centre.
Place the next cord D1 onto E1 towards
the parachute centre. In the cord axis
continues a strap into the parachute, this
is laid down onto the centre strap. Fold
this field lengthwise in half towards the
parachute centre. (the result is a field
folded in a rectangular shape). Take care
that the cords are tensed at all times.
Fig. 9
Fig. 10
Fig. 11
6) Fold the next section in exactly
the same way.
Place the next cord C1 onto D1
towards the parachute centre. In the
cord axis continues a strap into the
parachute, this is laid down onto the
centre strap. Fold this field
lengthwise in half towards the
parachute centre. (the result is a field
folded in a rectangular shape). Take
care that the cords are tensed at all
times.
Fig. 12
Fig. 13
Fig. 14
7) Again, folding of the next section is
exactly the same. Make the folds so
that individual support cord rows are
next to each other and cords are
tensed.
Place the next cord B1 onto C1 towards
the parachute centre. In the cord axis
continues a strap into the parachute, this is
laid down onto the centre strap. Fold this
field lengthwise in half towards the
parachute centre. (The result is a field
folded in a rectangular shape). Take care
that the cords are tensed at all times.
Fig. 15
Fig. 16
Fig. 17
8) Layout the last section and fold it
towards the parachute centre into
a triangular shape
The last centre tag marked “A” remains
on the centre parachute axis. Fold the
bottom strap of this last field towards
the parachute centre parallel to the
centre cords. (the result is a field folded
in a triangular shape).
Fig. 18
Fig. 19
9) Weigh down the folded half of
the parachute with weights; fold
the remaining half (unfolded)
over this first half and fold it in
exactly the same way.
Fig. 20
Fig. 21
Fig. 22
10) Fold the parachute into thirds
After gathering the left and right halves of the canopy check
that individual cords pass freely from the canopy to the loose
ends. After checking the canopy cords, separate them
lengthwise into thirds and place the side bundles onto the
centre one.
Fig. 23
Fig. 24
Fold the parachute in an S shape so that its size in the folded state corresponds to the size of the
container. Now fold the canopy transversely into a pyramid whose base shall have the size of the
container.
Fig. 25
Fig. 26
Fig. 27
Fig. 28
11) Place the parachute into the container; fold the cords in an S shape, secure with rubber rings. Close
the container by passing the rubber eye through a steel ring of the opposite side flap and then through the
ring of the top flap. Finally, close the container by a loop made of cords inserted into the rubber eye.
Caution! Do not pass the strap with cords through the closing rubber.
12) Test the opening of the container by grabbing the straps of the rescue parachute and attempting to lift
the parachute. If the last loop of cords became loose and the container opened, your packing was correct;
if not then you made a mistake somewhere (see Caution in Article 11.).
13) Close the container again according to Article 11.
Important:
If during packing you used “weights” or other objects to hold down the already folded section of the
parachute, check that you have the same number after finishing packing.
Weights or any other objects must not be packed into the rescue parachute!
14) Place the container with rescue parachute into the harness as per technical specification of the
harness used. The parachute can be used in all standard locations (front, rear, sides).
Installation of the rescue parachute into the harness must be done by a duly qualified and authorised
person or the manufacturer.
Packing the rescue parachute in the container into the casing.
• Connect the trigger to the container by passing the loop on the trigger through the eye on the
container and then pass the handle through the loop – you will get a knot between the trigger and
eye on the container.
• Fold the straps of the rescue parachute in an S shape at the bottom of the casing
• Place the rescue parachute with attached trigger so that the trigger is on top
• After closing the casing of the rescue parachute you will need a piece of rope about 40cm long.
Thread the rope through the rope eye sewn onto flap “A”
• Gradually (A-F) thread the rope through steel eyes so that you pull a cord eye from the last steel
eye and secure it with a steel pin
• Pull the rope from the cord eye, best under the pin
• Fix the handle by velcro straps to flap A and B
• Push the corners of the rescue parachute casing under the flap