1
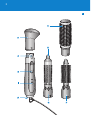
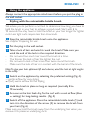
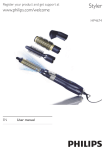
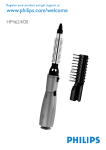
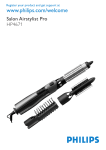
HP4674
1
English 6
Dansk 14
Deutsch 22
Ελληνικα 31
Español 40
Suomi 48
Français 55
Italiano 63
Nederlands 71
Norsk 79
HP4674
Português 86
Svenska 94
Türkçe 102
English
Introduction
Congratulations on your purchase and welcome to Philips! To fully benefit
from the support that Philips offers, register your product at www.philips.
com/welcome.
The new Philips Airstylist Ion has been specially designed to give beautiful
styling results in a fast and easy way. The styler comes with exchangeable
attachments for various hairstyles. The ioniser produces streams of ions
which surround and condition your hair. The ions reduce frizz and static
electricity and leave your hair looking soft, smooth and shiny.
General description (Fig. 1)
A
B
C
D
E
F
G
H
I
Air inlet grille
Control slide
m: Off
~ : gentle airflow for easy styling
6 (red): warm airflow for fast styling
6 (blue): cool airflow
Release button
Volume brush
Bristle retraction knob
Super Shine natural bristle brush
Retractable bristle brush
Nozzle
Ion on/off switch
Important
Read this user manual carefully before you use the appliance and save it
for future reference.
-
Danger
Keep the appliance away from water. Do not use it near or over
water contained in baths, washbasins, sinks etc. When you use the
appliance in a bathroom, unplug it after use. The proximity of water
presents a risk, even when the appliance is switched off.
English
-
-
-
-
-
-
Do not insert metal objects into the air inlet grille to avoid electric
shock.
Warning
Check if the voltage indicated on the appliance corresponds to the
local mains voltage before you connect the appliance.
Check the condition of the mains cord regularly. Do not use the
appliance if the plug, the mains cord or the appliance itself is damaged.
If the mains cord is damaged, you must have it replaced by Philips, a
service centre authorised by Philips or similarly qualified persons in
order to avoid a hazard.
This appliance is not intended for use by persons (including children)
with reduced physical, sensory or mental capabilities, or lack of
experience and knowledge, unless they have been given supervision
or instruction concerning use of the appliance by a person
responsible for their safety.
Children should be supervised to ensure that they do not play with
the appliance.
Caution
For additional protection, we advise you to install a residual current
device (RCD) in the electrical circuit that supplies the bathroom. This
RCD must have a rated residual operating current not higher than
30mA. Ask your installer for advice.
The attachments become hot during use. Prevent contact with the
skin.
Never block the air inlet grille.
If the appliance overheats, it switches off automatically. Unplug the
appliance and let it cool down for a few minutes. Before you switch
the appliance back on, check the grilles to make sure they are not
blocked by fluff, hair, etc.
Always unplug the appliance after use.
Wait until the appliance has cooled down before you store it.
Always switch off the appliance before you put it down, even if it is
only for a moment.
Do not wind the mains cord round the appliance.
Do not use the appliance on artificial hair.
-
English
Do not use the appliance for any other purpose than described in
this manual.
Never use any accessories or parts from other manufacturers or that
Philips does not specifically recommend. If you use such accessories
or parts, your guarantee becomes invalid.
Keep the attachments clean and free of dust, dirt and styling products
such as mousse, spray and gel.
Electromagnetic fields (EMF)
This Philips appliance complies with all standards regarding
electromagnetic fields (EMF). If handled properly and according to the
instructions in this user manual, the appliance is safe to use based on
scientific evidence available today.
Preparing for use
Hair
Do not use the appliance on wet hair, dry your hair with a towel first. The
Airstylist Ion is most effective on towel-dry hair.
1 Comb or brush the hair so that it is untangled and smooth.
2 Use a comb to divide the hair into locks.
Do not put too much hair in one lock.
Connecting and disconnecting attachments
Always connect the appropriate attachment before you put the plug in
the wall socket.
1 Choose the appropriate attachment and snap it onto the appliance
(‘click’) (Fig. 2).
2 To remove the attachment from the appliance, press the release
button (1) and pull the attachment off the appliance (2). (Fig. 3)
English
Using the appliance
Always connect the appropriate attachment before you put the plug in
the wall socket.
Styling with the retractable bristle brush
We advise you to perform a curl test to determine how long you have to
hold the brush in your hair to achieve a good result. Start with 8 to
10 seconds. You may have to hold the brush in your hair longer for tighter
curls. Less tight curls require less than 8 seconds.
1 Snap the retractable bristle brush onto the appliance.
See chapter ‘Preparing for use’.
2 Put the plug in the wall socket.
3 Take a lock of hair and wind it round the brush. Make sure you
wind the end of the lock in the required direction.
- Do not wind too much hair round the brush at a time.
- The thinner the lock of hair, the tighter the curl.
- Do not wind a lock of hair more than twice round the brush.
- Make sure the lock of hair is in contact with the barrel of the brush.
Note:To give your hair optimum lift and volume, wind the hair at right angles
to the scalp.
4 Switch on the appliance by selecting the preferred setting (Fig. 4).
~: gentle airflow for easy styling
6 (red): warm airflow for fast styling
5 Hold the brush in place as long as required (normally 8 to
10 seconds).
6 As soon as the hair feels dry, fix the curl with a cool airflow (blue
6 setting) for long-lasting results. (Fig. 5)
7 Switch off the appliance. Press the retractable bristle knob (1) and
turn it in the direction of the arrow (2) to remove the brush from
your hair (Fig. 6)
Make sure you hold the brush away from the underlying hair when you
remove it to preserve underlying curls.
10
English
8 Let the curls cool down before you comb, brush or finger-comb
the hair into its final style.
Styling with the volume brush
Use the volume brush to add maximum volume and body to your hair.
1 Snap the volume brush onto the appliance.
See chapter ‘Preparing for use’.
2 Place the brush in the hair.
3 Select setting ~ or 6 (red) to switch on the appliance.
4 Brush against the direction of hair growth while you touch your
scalp with the brush pins.
5 Move the brush away from the head while turning the brush.
The hair is lifted and falls lightly back onto the head.
6 When you have finished styling your hair, switch off the appliance.
Super Shine natural bristle brush
Use the Super Shine natural bristle brush to add shine and create texture,
especially for medium-length hair
1 Snap the natural bristle brush onto the appliance.
See chapter ‘Preparing for use’.
2 Place the brush in the hair.
3 Select setting ~ or 6 (red) to switch on the appliance.
4 Make brushing movements from the top of the head downwards
while you slightly turn the brush (inwards or outwards, depending
on the desired effect).
5 Finish off with a cool airflow (blue 6 setting) to fix your style.
6 When you have finished styling your hair, switch off the appliance.
Drying
1 Snap the nozzle onto the appliance.
English 11
See chapter ‘Preparing for use’.
2 Put the plug in the wall socket.
3 Select the preferred setting to switch on the appliance (Fig. 4).
4 When you have finished drying your hair, switch off the appliance.
Reducing frizz and static electricity
The ioniser inside the hairstyler produces streams of ions that surround
and condition your hair. The ions reduce frizz and static electricity and
leave your hair looking soft, smooth and shiny.
You can use the ioniser at any setting and with any attachment.
1 To activate the ioniser, push the ion on/off slide upwards (Fig. 7).
Cleaning
Remove the attachments from the appliance before you clean them.
Never rinse the appliance with water.
1 Make sure the appliance is unplugged.
2 Clean the appliance with a small brush or a dry cloth.
3 Clean the attachments with a moist cloth.
Make sure the attachments are dry before you use or store them.
Storage
1 Make sure the appliance is unplugged.
2 Detach the attachment (see chapter ‘Preparing for use’).
3 Put the appliance in a safe place and let it cool down before you
store it.
Do not wind the mains cord round the appliance.
12
English
Environment
-
Do not throw away the appliance with the normal household waste
at the end of its life, but hand it in at an official collection point for
recycling. By doing this, you help to preserve the environment (Fig. 8).
Guarantee & service
If you need information or if you have a problem, please visit the Philips
website at www.philips.com or contact the Philips Customer Care
Centre in your country (you find its phone number in the worldwide
guarantee leaflet). If there is no Customer Care Centre in your country,
go to your local Philips dealer or contact the Service Department of
Philips Domestic Appliances and Personal Care BV.
Troubleshooting
If problems arise with your hairstyler and you are unable to solve them
with the information below, please contact the nearest Philips service
centre or the Philips Customer Care Centre in you country.
Problem
Solution
The appliance
does not work
at all.
Perhaps there is a power failure or the socket is not
live. Check if the power supply works. If it works,
plug another appliance into the socket to check
whether the socket is live.
Perhaps you did not switch on the appliance. Make
sure the appliance is plugged in. Then select the
preferred setting to switch on the appliance.
Perhaps the appliance overheated and switched itself
off. Unplug the appliance and let it cool down for a
few minutes. Before you switch the appliance back
on, make sure the grille is not blocked by fluff, hair,
etc.
English 13
Problem
Solution
Perhaps the appliance is not suitable for the voltage
to which it is connected. Make sure that the voltage
indicated on the appliance corresponds to the local
mains voltage.
If the mains cord is damaged, you must have it
replaced by Philips, a service centre authorised by
Philips or similarly qualified persons in order to avoid
a hazard.