1
Fluid Templating System
Sebastian Kurfürst
Fluid Templating System
Sebastian Kurfürst
Copyright © 2008, 2009 Sebastian Kurfürst
Abstract
Fluid is a Templating System which is used by default for FLOW3-based applications.
Table of Contents
1. Introduction ................................................................................................................................. 1
What does it do? ...................................................................................................................... 1
Example .................................................................................................................................. 1
2. User Manual ................................................................................................................................ 3
Basic concepts ......................................................................................................................... 3
Variables and Object Accessors .......................................................................................... 3
View Helpers ................................................................................................................... 3
Arrays ............................................................................................................................ 5
Passing data to the view ............................................................................................................ 5
Layouts ................................................................................................................................... 5
Writing a layout ............................................................................................................... 5
Using a layout ................................................................................................................. 6
Writing your own View Helper ................................................................................................... 6
Initializing arguments ........................................................................................................ 6
Rendering the View Helper ................................................................................................ 7
TagBasedViewHelper ........................................................................................................ 8
Facets ........................................................................................................................... 10
Standard View Helper Library .................................................................................................. 10
3. Software Design .......................................................................................................................... 11
Design Decisions .................................................................................................................... 11
The Core ............................................................................................................................... 11
The upper layers for FLOW3 .................................................................................................... 11
4. Lorem Ipsum .............................................................................................................................. 12
5. Lorem ipsum .............................................................................................................................. 13
iii
List of Examples
1.1.
2.1.
2.2.
2.3.
2.4.
2.5.
Basic Fluid Example ...................................................................................................................
Tags and Namespace declarations .................................................................................................
Creating a link with arguments .....................................................................................................
An example layout .....................................................................................................................
A template for the above layout ....................................................................................................
Implementing a loop ...................................................................................................................
iv
1
4
4
6
6
8
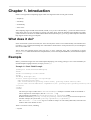
Chapter 1. Introduction
Fluid is a next-generation templating engine which was engineered with several goals in mind:
• Simplicity
• Flexibility
• Extensibility
• Ease of use
This templating engine should not be bloated, instead, we try to do it "The Zen Way" - you do not need to learn too
many things, thus you can concentrate on getting your things done, while the template engine handles everything
you do not want to care about. In XML Schema aware editors (like Eclipse), you even get autocompletion and inline
help support while writing your template.
What does it do?
In the current MVC system of FLOW3, the View currently does not have a lot of functionality. The standard view
provides a render method, and nothing more. That makes it cumbersome to write powerful views, as most designers
will not write PHP code.
That is where the Template Engine comes into play: It "lives" inside the View, and is controlled by a special
TemplateView which instanciates the Template Parser, resolves the template HTML file, and renders the template
afterwards.
Example
Below, you'll find a snippet of a real-world template displaying a list of blog postings. Use it to check whether you
find the template language intuitive (we hope you will ;-) )
Example 1.1. Basic Fluid Example
{namespace f3=F3\Fluid\ViewHelpers}
<html>
<head><title>Blog</title></head>
<body>
<h1>Blog Postings</h1>
<f3:for each="{postings}" as="posting">
<h2>{posting.title}</h2>
<div class="author">{posting.author.name} {posting.author.email}</div>
<p><f3:link action="details" arguments="{id : posting.id}">{posting.teaser}</f3:
</f3:for>
</body>
</html>
The Namespace Import makes the F3\Fluid\ViewHelper namespace available under the shorthand f3.
This is important for View Helpers, like the <f3:link /> tag.
This essentially corresponds to foreach($postings as $posting) in PHP.
With the dot-notation ({posting.title}, or {posting.author.name}), you can traverse objects. In
the latter example, the system calls $posting->getAuthor()->getName().
The <f3:link>...</f3:link> tag is a so-called ViewHelper. It calls arbitary PHP code, and in this case
renders a link to the "details"-Action.
There is a lot more to show, including:
• Layouts
1
Introduction
• Autocompletion in Eclipse
• Custom View Helpers
We invite you to explore Fluid some more, and please do not hesitate to give feedback!
2
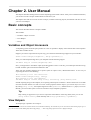
Chapter 2. User Manual
This chapter describes all things the users of the templating system needs to know. After you've read the introduction,
you can dive into the concepts of Fluid which are relevant to you.
The chapter starts with an overview of basic concepts, continues with using layouts, and finishes with how to write
your own view helpers.
Basic concepts
This section describes all basic concepts available.
This includes:
• Variables / Object Accessors
• View Helpers
• Arrays
Variables and Object Accessors
A templating system would be quite pointless if it was not possible to display some external data in the templates.
That's what variables are for:
Suppose you want to output the title of your blog, you could write the following snippet into your controller:
$this->view->assign('blogTitle', $blog->getTitle());
Then, you could output the blog title in your template with the following snippet:
<h1>This blog is called {blogTitle}</h1>
Now, you might want to extend the output by the blog author as well. To do this, you could repeat the above steps,
but that would be quite inconvenient and hard to read. 1
That's why the template language has a special syntax for object access, demonstrated below. A nicer way of
expressing the above is the following:
This should go into the controller:
$this->view->assign('blog', $blog);
This should go into the template:
<h1>This blog is called {blog.title}, written by {blog.author}</h1>
Instead of passing strings to the template, we are passing whole objects around now - which is much nicer to use both
from the controller and the view side. To access certain properties of these objects, you can use Object Accessors.
By writing {blog.title}, the template engine will call a getTitle() method on the blog object, if it exists.
Besides, you can use that syntax to traverse associative arrays and public properties.
Tip
Deep nesting is supported: If you want to output the email address of the blog author, then you can use
{blog.author.email}, which internally calls $blog->getAuthor()->getEmail().
View Helpers
All output logic is placed in View Helpers.
1
Besides, the semantics between the controller and the view should be the following: The controller says to the view "Please render the blog object I give to
you", and not "Please render the Blog title, and the blog posting 1, ...". That's why passing objects to the view is highly encouraged.
3
User Manual
The view helpers are invoked by using XML tags in the template, and are implemented as PHP classes (more on
that later).
This concept is best understood with an example:
Example 2.1. Tags and Namespace declarations
{namespace f3=F3\Fluid\ViewHelpers}#
<f3:link controller="Administration">Administration</f3:link>
Namespace Declaration: You import the PHP Namespace F3\Fluid\ViewHelpers under the prefix f3.2
Calling the View Helper: The <f3:link...> ... </f3:link> tag renders a link.
Now, the main difference between Fluid and other templating engines is how the view helpers are implemented: For
each view helper, there exists a corresponding PHP class. Let's see how this works for the example above:
The <f3:link /> tag is implemented in the class \F3\Fluid\ViewHelpers\LinkViewHelper.
The class name of such a view helper is constructed for a given tag as follows:
• The first part of the class name is the namespace which was imported (the namespace prefix f3 was expanded to
its full namespace F3\Fluid\ViewHelpers)
• The unqualified name of the tag, without the prefix, is capitalized (Link), and the postfix ViewHelper is
appended.
The tag and view helper concept is the core concept of Fluid. All output logic is implemented through such
ViewHelpers / Tags! Things like if/else, for, ... are all implemented using custom tags - a main difference to
other templating languages.
Some benefits of this approach are:
• You cannot override already existing view helpers by accident.
• It is very easy to write custom view helpers, which live next to the standard view helpers
• All user documentation for a view helper can be automatically generated from the annotations and code
documentation. This includes Eclipse autocompletion3
Most view helpers have some parameters. These can be plain strings, just like in <f3:link
controller="Administration">...</f3:link>, but as well arbitary objects. Parameters of view
helpers will just be parsed with the same rules as the rest of the template, thus you can pass arrays or objects as
parameters.
This is often used when adding arguments to links:
Example 2.2. Creating a link with arguments
<f3:link controller="Blog" action="show" arguments="{id : blogPost.id}">... read m
Here, the view helper will get a parameter called arguments which is of type array.
Warning
Make sure you do not put a space before or after the opening or closing brackets of an array. If you type
arguments=" {id : blogPost.id}" (notice the space before the opening curly bracket), the array
is automatically casted to a string (as a string concatenation takes place).
This also applies when using object accessors: <f3:do.something with="{object}" /> and
<f3:do.something with=" {object}" /> are substantially different: In the first case, the view
helper will receive an object as argument, while in the second case, it will receive a string as argument.
This might first seem like a bug, but actually it is just consistent that it works that way.
4
User Manual
Arrays
Some view helpers, like the SelectViewHelper (which renders an HTML select dropdown box), need to get
associative arrays as arguments (mapping from internal to displayed name). See the following example how this
works:
<f3:form.select options="{edit: 'Edit item', delete: 'Delete item'}" />
The array syntax used here is very similar to the JSON object syntax4. Thus, the left side of the associative array is
used as key without any parsing, and the right side can be either:
• a number
{a : 1,
b : 2
}
• a string; Needs to be in either single- or double quotes. In a double-quoted string, you need to escape the " with
a \ in front (and vice versa for single quoted strings).
{a : 'Hallo',
b : "Second string with escaped \" (double quotes) but not escaped ' (single quo
}
• a nested array
{a : {
a1 : "bla1",
a2 : "bla2"
},
b : "hallo"
}
• a variable reference (=an object accessor)
{blogTitle : blog.title,
blogObject: blog
}
Passing data to the view
You
can
pass
arbitary
objects
to
the
view,
using
$this->view>assign(#IdentifierString, #Object) from within the controller. See the above paragraphs about
Object Accessors for details how to use the passed data.
Layouts
In almost all web applications, there are many similarities between each page. Usually, there are common templates
or menu structures which will not change for many pages.
To make this possible in Fluid, we created a layout system, which we will introduce in this section.
Writing a layout
Every layout is placed in the Resources/Private/Layouts directory, and has the file ending .html. A layout
is a normal Fluid template file, except there are some parts where the actual content of the target page should be
inserted.
4
Actually, it should be the same. If not, please tell us!
5
User Manual
Example 2.3. An example layout
{namespace f3=F3\Fluid\ViewHelpers}
<html>
<head><title>My fancy web application</title></head>
<body>
<div id="menu">... menu goes here ...</div>
<div id="content">
<f3:render section="content" />
</div>
</body>
</html>
With this tag, a section from the target template is rendered.
Using a layout
Using a layout involves two steps:
• Declare which layout to use: <f3:layout name="..." /> can be written anywhere on the page (though we
suggest to write it on top, right after the namespace declaration) - the given name references the layout.
• Provide the content for all sections used by the layout using the <f3:section>...</f3:section> tag:
<f3:section name="content">...</f3:section>
For the above layout, a minimal template would look like the following:
Example 2.4. A template for the above layout
{namespace f3=F3\Fluid\ViewHelpers}
<f3:layout name="example.html" />
<f3:section name="content">
This HTML here will be outputted to inside the layout
</f3:section>
Writing your own View Helper
As we have seen before, all output logic resides in View Helpers. This includes the standard control flow operators
such as if/else, HTML forms, and much more. This is the concept which makes Fluid extremely versatile and
extensible.
If you want to create a view helper which you can call from your template (as a tag), you just write a plain PHP
class which needs to inherit from F3\Fluid\Core\AbstractViewHelper (or its subclasses). You need to
implement at least two methods to write a view helper:
• initializeArguments(): Inside this method, you need to register all the arguments you expect the view
helper to use.
• render(): Render the view helper and return the result (usually as string).
Initializing arguments
As previously mentioned, initializing arguments takes place inside the initializeArguments() method. Call
$this->registerArgument(...) once for each argument.
See the section about the TagBasedViewHelper for some more possibilities.
6
User Manual
Rendering the View Helper
We refresh what we have learned so far: When a user writes something like <blog:displayNews /> inside
a template (and has imported the "blog" namespace to F3\Blog\ViewHelpers), Fluid will automatically
instanciate the class F3\Blog\ViewHelpers\DisplayNewsViewHelper, and invoke the render()
method on it.
This render() method should return the rendered content as string.
You have the following possibilities to access the environment when rendering your view helper:
• $this->arguments is a read-only associative array where you will find the values for all arguments you
registered previously.
• $this->renderChildren() renders everything between the opening and closing tag of the view helper and
returns the rendered result (as string).
• $this->variableContainer is an instance of F3\Fluid\Core\VariableContainer, with which
you have access to all variables currently available in the template.
Additionally, you can add variables to the container with $this->variableContainer>add($identifier, $value), but you have to make sure that you remove every variable you added again!
This is a security measure against side-effects.
It is also not possible to add a variable to the VariableContainer if a variable of the same name already exists again to prevent side effects and scope problems.
Now, we will look at an example: How to write a view helper giving us the foreach functionality of PHP.5
5
This view helper is already available in the standard library as <f3:for>..</f3:for>. We still use it as example here, as it is quite simple and shows
many possibilities.
7
User Manual
Example 2.5. Implementing a loop
A loop could be called within the template in the following way:
<f3:for each="{blogPosts}" as="blogPost">
<h2>{blogPost.title}</h2>
</f3:for>
So, in words, what should the loop do?
It needs two arguments:
• each: Will be set to some object6 which can be iterated over.
• as: The name of a variable which will contain the current element being iterated over
It then should do the following (in pseudocode):
foreach ($each as $$as) {
// render everything between opening and closing tag
}
Implementing this is fairly straightforward, as you will see right now:
public function render() {
$out = '';
foreach ($this->arguments['each'] as $singleElement) {
$this->variableContainer->add($this->arguments['as'], $singleElement);
$out .= $this->renderChildren();
$this->variableContainer->remove($this->arguments['as']);
}
return $out;
}
The above example demonstrates how we add a variable, render all children (everything between the opening and
closing tag), and remove the variable again to prevent side-effects.
Sometimes, the above possibilities to interact with the environment are not enough - that is where facets come into
play.
TagBasedViewHelper
Many view helpers output an HTML tag - for example <f3:link ...> outputs a <a href="..."> tag.
There are many view helpers which work that way.
Very often, you want to add a CSS class or a target attribute to an <a href="..."> tag. This often leads to
repetitive code like below. (Don't look at the code too thoroughly, it should just demonstrate the boring and repetitive
task one would have without the TagBasedViewHelper).
class LinkViewHelper extends \F3\Fluid\Core\AbstractViewHelper {
public function initializeArguments() {
$this->registerArgument('class', 'string', 'CSS class to add to the link');
$this->registerArgument('target', 'string', 'Target for the link');
... and more ...
}
public function render() {
$output = '<a href="..."';
if ($this->arguments['class']) {
$output .= ' class="' . $this->arguments['class'] . '"';
}
if ($this->arguments['target']) {
8
User Manual
$output .= ' target="' . $this->arguments['target'] . '"';
}
$output .= '>';
... and more ...
return $output;
}
}
Now, the TagBasedViewHelper introduces two more methods you can use inside initializeArguments():
• registerTagAttribute($name, $description, $required): Use this method to register an
attribute which should be directly added to the tag
• registerUniversalTagAttributes(): If called, registers the standard HTML attributes (class, id, dir,
lang, style, title).
It also adds a method called renderTagAttributes() which you can use inside render(), which will add
all the tagname="tagvalue"-style attributes to the tag.
With the above methods we get, the LinkViewHelper from above can be condensed as follows:
class LinkViewHelper extends \F3\Fluid\Core\AbstractViewHelper {
public function initializeArguments() {
$this->registerUniversalTagAttributes();
... and more ...
}
public function render() {
$output = '<a href="..."' . $this->renderTagAttributes() . '>';
... and more ...
return $output;
}
}
Additionally, we now already have support for all universal HTML attributes.
You might now think that the building blocks are ready, but there is one more nice thing to add:
additionalTagArguments! Read about it in the next section.
additionalArguments
Sometimes, you need some HTML attributes which are not part of the standard. As an example: if you use the
Dojo JavaScript framework, using these non-standard attributes makes life a lot easier.7We think that the templating
framework should not constrain the user in his possibilities - thus, it should be possible to add custom HTML attributes
as well, if they are needed (People who have already worked with JSP know that it can be difficult to archive this).
Our solution looks as follows:
Every view helper which inherits from TagBasedViewHelper has a special property called
additionalArguments which allows you to add arbitary HTML attributes to the tag.
additionalArguments should be an associative array, where the key is the name of the HTML attribute.
If the link tag from above needed a new attribute called fadeDuration, which is not part of HTML, you could
do that as follows:
<f3:link ... additionalArguments="{fadeDuration : 800}">Link with fadeDuration set
7
There are always some religious discussions whether to allow non-standard attributes or not. People being against it argue that it "pollutes" HTML, and makes
it not validate anymore. More pragmatic people see some benefits to custom attributes in some contexts: If you use JavaScript to evaluate them, they will be
ignored by the rendering engine if JavaScript is switched off, and can enable special behavior when JavaScript is turned on. Thus, they can make it easy to
provide degradable interfaces.
(Before bashing Dojo now: Of course you do not need the additional HTML arguments, but they make work with it a lot more comfortable)
9
User Manual
This attribute is available in all tags that inherit from F3\Fluid\Core\TagBasedViewHelper.
TODO: Rename to additionalAttributes??
Facets
The possibilities you get when you base your view helper on F3\Fluid\Core\AbstractViewHelper should
be enough for most use cases - however, there are some cases when the view helper needs to interact in a special way
with its surroundings - an example is the "if/else" view helper group.
If a view helper needs to know more about its surroundings, it has to implement a certain facet. Facets are plain
PHP interfaces.
SubNodeAccess Facet
Sometimes, a view helper needs direct access to its child nodes - as it does not want to render all of its children, but
only a subset. For this to work the SubNodeAccessInterface has been introduced.
Let's take if/then/else as an example and start with two examples how this view helper is supposed to work:
<f3:if condition="...">
This text should only be rendered if the condition evaluates to TRUE.
</f3:if>
This above case is the most simple case. However, we want to support if/else as well:
<f3:if condition="...">
<f3:then>If condition evaluated to TRUE, "then" should be rendered</f3:then>
<f3:else>If condition evaluated to FALSE, "else" should be rendered</f3:else>
</f3:if>
To implement the functionality of the <f3:if> view helper, a standard $this->renderChildren() will not
be sufficent, as the if-Tag has no control whether the <f3:then> or <f3:else> is rendered. Thus, the <f3:if>
tag needs more information about its environment, namely it needs access to its subnodes in the syntax tree.
To
make
this
work,
the
<f3:if>-tag
implements
the
F3\Fluid\Core\Facets
\SubNodeAccessInterface. Now, the method setChildren(array $childNodes) (defined in the
interface) will be called before the render() method is invoked. Thus, the view helper has all of its subnodes
directly available in the render() method and can decide which subnodes it will render based on arbitary
conditions.
PostParse Facet
Standard View Helper Library
Should be autogenerated from the tags.
10
Chapter 3. Software Design
This chapter will explain some of the inner workings of Fluid. It is meant for people who want to help developing
Fluid, and understand the inner workings of it.
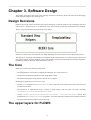
Design Decisions
Fluid was born in the context of FLOW3, but from the beginning, we saw the needs for such a templating system in
other contexts - namely TYPO3 v4, or stand-alone usage. That's why the core design of Fluid reflects this thinking.
We are using a layered architecture for Fluid, shown below:
Fluid Core consists of the parts which do not change depending on the environment, such as the template parser.
The upper layer, consisting of the Standard View Helpers and the TemplateView, are currently FLOW3-specific, but
there will be separate layers for different contexts (like TYPO3 v4) which provide standard view helpers adjusted to
the different platforms, different Fluid initialization code, etc.
The Core
Fluid Core consists of the following components:
• The TemplateParser, which takes a template file and builds up a syntax tree from it.
• The Syntax Tree Elements (which have logic inside them as well)
• The AbstractViewHelper, being the base class for all view helpers.
Rendering a template always involves two steps:
• Call the parse method in the TemplateParser class, which will return a SyntaxTree. This Syntax Tree will
be cached in the future.
• The SyntaxTree is implemented using a Composite design pattern, with all syntax tree nodes extending
\F3\Fluid\Core\SyntaxTree\AbstractNode.
• Call the render(\F3\Fluid\Core\VariableContainer $variableContainer) method. This
method needs a VariableContainer as argument - this means all bound variables which should be rendered.
• The result of the render() method is the output string.
The upper layers for FLOW3
11
Chapter 4. Lorem Ipsum
• Technical information; Installation, Reference of TypoScript, configuration options on system level, how to extend
it, the technical details, how to debug it.
• Language should be technical, assuming developer knowledge of FLOW3. Small examples/visuals are always
encouraged.
• Target group: Developers
12
Chapter 5. Lorem ipsum
A full point-a-to-b-to-c walk-through of an application of the package. Include screenshots.
13