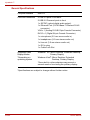
1
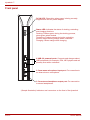
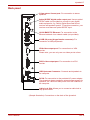
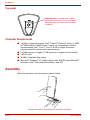
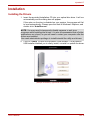
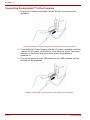
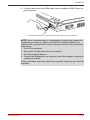
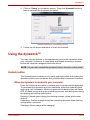
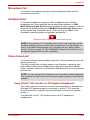
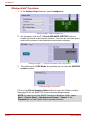
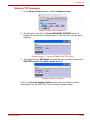
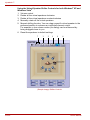
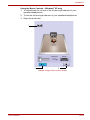
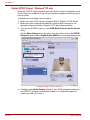
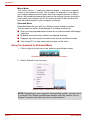
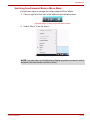
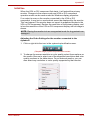
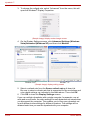
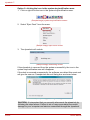
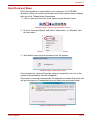
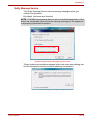
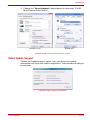
User’s Manual
dynadock™
dynadock™
Contents
Introduction................................................................................................11
Features ..............................................................................................11
Front panel ..........................................................................................12
Back panel...........................................................................................13
Top panel.............................................................................................14
Computer Requirements .....................................................................14
Assembly...................................................................................................14
Installation .................................................................................................15
Installing the Drivers ............................................................................15
Background Utility Program .................................................................17
Connecting the dynadock™ to the Computer......................................18
Uninstalling................................................................................................20
Using the dynadock™ ...............................................................................21
Undock button .....................................................................................21
USB 2.0 Ports ......................................................................................22
Ethernet Port .......................................................................................22
Microphone Port ..................................................................................23
Headphone Port ..................................................................................23
Stereo lineout port ...............................................................................23
Video Port (VGA and DVI) ...................................................................29
How Standby/Sleep or Hibernation Mode Affects Devices
Attached to the dynadock™ ................................................................35
Using the dynadock™ Utility .....................................................................35
Eject Dock ...........................................................................................35
Eject Dock and Sleep ..........................................................................37
Changing the dynadock Utility Settings ...............................................38
Select Audio Device ............................................................................40
Select Update Support ........................................................................41
Select Help ..........................................................................................42
Select About ........................................................................................42
Specifications ............................................................................................43
EN-2
User’s Manual
dynadock™
Regulatory Compliance
FCC Information
FCC notice “Declaration of Conformity Information”
This equipment has been tested and found to comply with the limits for a
Class B digital device, pursuant to part 15 of the FCC rules. These limits
are designed to provide reasonable protection against harmful interference
in a residential installation. This equipment generates, uses and can radiate
radio frequency energy and, if not installed and used in accordance with the
instructions, may cause harmful interference to radio communications.
However, there is no guarantee that interference will not occur in a
particular installation. If this equipment does cause harmful interference to
radio or television reception, which can be determined by turning the
equipment off and on, the user is encouraged to try to correct the
interference by one or more of the following measures:
n Reorient or relocate the receiving antenna.
n Increase the separation between the equipment and receiver.
n Connect the equipment into an outlet on a circuit different from that to
which the receiver is connected.
n Consult the dealer or an experienced radio/TV technician for help.
WARNING: Changes or modifications made to this equipment, not
expressly approved by TOSHIBA or parties authorized by TOSHIBA could
void the user’s authority to operate the equipment.
FCC Conditions
This equipment has been tested and found to comply with Part 15 of the
FCC Rules. Operation is subject to the following two conditions:
(1) This device may not cause harmful interference
(2) This device must accept any interference received, including
interference that may cause undesired operation.
Contact
User’s Manual
Address:
TOSHIBA America Information Systems, Inc.
9740 Irvine Boulevard
Irvine, California 92618-1697
Telephone:
(949) 583-3000
EN-3
dynadock™
EU Declaration Comformity
This product and - if applicable - the supplied accessories are marked with
“CE” and comply therefore with the applicable harmonized European
standards listed under the Low Voltage Directive 2006/95/EC and/or the
EMC Directive 2004/108/EC.
Responsible for
CE-marking:
Manufacturer:
TOSHIBA EUROPE GMBH, Hammfelddamm 8,
41460 Neuss, Germany.
Toshiba Corporation, 1-1 Shibaura 1-chome,
Minato-ku, Tokyo, 105-8001, Japan
The complete official EU CE Declaration can be found at:
http://epps.toshiba-teg.com/
Working Environment Legal Text in EU Countries
The Electromagnetic Compliance (EMC) of this product has been verified
typically for this product category for a so called Residential, Commercial &
Light Industry Environment. Any other working environment has not been
verified by Toshiba and the use of this product in these working
environments is maybe restricted or cannot be recommended. Possible
consequences of the use of this product in non verified working
environments can be: Disturbances of other products or of this product in
the nearby surrounding area with temporarily malfunction or data loss/
corruption as result. Example of non verified working environments and
related advices:
Industrial environment (e.g. environments where a mains voltage of 380V
three-phase is being used mainly): Danger of disturbances of this product
due to possible strong electromagnetic fields especially near to big
machinery or power units.
Medical environment: The compliance to the Medical Product Directive has
not been verified by Toshiba, therefore this product cannot be used as a
medical product without further verification. The use in usual office
environments e.g. in hospitals should be no problem if there is no restriction
by the responsible administration.
This product is not certified as a medical product according to the Medical
Product Directive 93/42 EEC.
Automotive environment: Please search the owner instructions of the
related vehicle for advices regarding the use of this product (category).
Aviation environment: Please follow the instructions of the flight personnel
regarding restrictions of use.
EN-4
User’s Manual
dynadock™
Additional environments not related to EMC
Outdoor use: As a typical home/office equipment this product has no
special resistance against ingress of moisture and is not strong shock
proofed.
Explosive atmosphere: The use of this product in such special working
environment (Ex) is not allowed.
WEEE Information
Following information is only valid for EU-member States:
Disposal of products
The crossed out wheeled dust bin symbol indicates that products must
be collected and disposed of separately from household waste.
The black bar indicates that the product was placed on the market after
August 13, 2005. By participating in separate collection of products, you
will help to assure the proper disposal of products and thus help to
prevent potential negative consequences for the environment and
human health. For more detailed information about the collection and
recycling programmes available in your country, please visit our website
(http://eu.computers.toshiba-europe.com) or contact your local city
office or the shop where you purchased the product.
Safety Instructions
Always read the safety instructions carefully:
Do not disassemble, modify, tamper with or repair your product
n Do not attempt to disassemble, modify, tamper with or repair product
(including AC adaptor). Disassembly, modification, tampering or
repairing the product could cause fire or electric shock, possibly
resulting in serious injury.
Please contact an authorized Toshiba service provider for any repair
service.
User’s Manual
EN-5
dynadock™
Handling the AC adaptor and power cables/cords or plugs
When handling the power cable/cord, follow these precautions:
n Never tamper with the power cable/cord or plug.
n Never splice or alter a power cable/cord.
n Never bend or twist a power cable/cord.
n Never pull on a power cable/cord to remove a plug from a socket.
Always grasp the plug directly.
n Never place heavy objects on a power cable/cord.
n Never run a power cable/cord through a pinch point such as a door or
window.
n Never place a power cable/cord near a heat source.
n Never use nails, staples or similar objects to fasten or attach cord in
place.
n Never attempt to disassemble or repair an AC adaptor.
Doing any of the above may damage the cables, and/or result in a fire or
electric shock, possibly resulting in serious injury.
Attaching the power cable/cord
n Always confirm that the power plug (and extension cable plug if used)
has been fully inserted into the socket, to ensure a secure electrical
connection. Failure to do so may result in a fire or electric shock,
possibly resulting in serious injury.
n Be careful if you use a multiple connector. An overload on one socket
could cause a fire or electric shock, possibly resulting in serious injury.
Dust on the power plug connectors or connector base
n If dust gets on the power plug connectors or connector base, turn the
power off and disconnect the power plug. Then clean the connector
and/or connector base with a dry cloth. Continuing to use the product
without cleaning the power plug may result in a fire or an electric shock,
possibly resulting in serious injury.
Only use TOSHIBA AC adaptor
n Always use the TOSHIBA AC adaptor that was provided with your
product (that may have been provided with your product), or use AC
adaptors specified by TOSHIBA to avoid any risk of fire or other
damage to the product. Use of an incompatible AC adaptor could cause
fire or damage to the product possibly resulting in serious injury.
TOSHIBA assumes no liability for any damage caused by use of an
incompatible adaptor or charger.
EN-6
User’s Manual
dynadock™
Use correct power source
n Never plug the AC adaptor into a power source that does not
correspond to both the voltage and the frequency specified on the
regulatory label of the unit. Failure to do so could result in a fire or
electric shock, possibly resulting in serious injury.
Only use approved power cables/cords
n Always use or purchase power cables/cords that comply with the legal
voltage and frequency specifications and requirements in the country of
use. Failure to do so could result in a fire or electric shock, possibly
resulting in serious injury.
Do not handle the power plug with wet hands
n Never attempt to connect or disconnect a power plug with wet hands.
Failure to follow this instruction could result in an electric shock,
possibly resulting in serious injury.
Choking hazards
n Never leave small parts such as covers, caps and screws within the
reach of infants or small children. Swallowing a small part may cause
choking and suffocation resulting in death or serious injury. If a part is
swallowed, immediately take appropriate emergency action and consult
a doctor.
Avoid liquids, moisture and foreign objects
n Never allow any liquids to spill into any part of your product, and never
expose the product to rain, water, seawater or moisture. Exposure to
liquid or moisture can cause electric shock or fire, resulting in damage
or serious injury. If any of these eventualities should accidentally occur,
immediately:
1. Turn off the product.
2. Disconnect the AC adaptor from the power plug socket and
product.
Do not turn on the power again, until you have taken the product to an
authorized service center. Failure to follow these instructions could
result in serious injury or permanent damage to the product.
Never place your product in locations with excess heat
n Never place your product where it will be exposed to excess heat, such
as in direct sunlight, an unventilated vehicle or near a heater. This may
result in a system failure, malfunction, loss of data or damage to the
product.
User’s Manual
EN-7
dynadock™
Never place your product in a location with extremely low
temperatures
n Never place your product in a location where it will be exposed to
extremely low temperatures. This may result in a system failure,
malfunction or loss of data.
Never subject your product to sudden temperature variations
n Never subject your product to sudden temperature variations. This may
result in condensation, causing a system failure, malfunction or loss of
data.
Never place your product or AC adaptor on a heat sensitive surface
n Never place your product or AC adaptor on a wooden surface, furniture,
or any other surface that could be marred by exposure to heat since the
product base and AC adaptor's surface increase in temperature during
normal use.
n Always place your product or AC adaptor on a flat and hard surface that
is resistant to heat damage.
Never operate your product during a thunderstorm
n Never operate your product on AC power during a thunderstorm. If you
see lightning or hear thunder, immediately turn off the product. An
electric surge caused by the storm, may result in a system failure, loss
of data or hardware damage.
EN-8
User’s Manual
dynadock™
Copyright Statement
No part of this publication may be reproduced in any form by any means
without prior written permission. Other trademarks or brand names
mentioned herein are trademarks or registered trademarks of their
respective companies.
Disclaimer
Information in this document is subject to change without notice.
The manufacturer does not make any representations or warranties
(implied or otherwise) regarding the accuracy and completeness of this
document and shall in no event be liable for any loss of profit or any
commercial damage, including but not limited to special, incidental,
consequential, or other damage.
March 2008, Rev1.0
Trademarks
Intel, Intel Core, Pentium and Celeron are trademarks or registered
trademarks of Intel Corporation.
Microsoft, Windows and Windows Vista are either registered trademarks or
trademarks of Microsoft Corporation in the United States and/or other
countries.
AMD, AMD K6, Athlon and Duron are registered trademarks or trademarks
of Advanced Micro Devices Incorporated.
Ethernet is a registered trademark and Fast Ethernet is a trademark of
Xerox Corporation.
Adobe and Reader are either registered trademarks or trademarks of
Adobe Systems Incorporated in the United States and/or other countries.
Other brands and product names are trademarks or registered trademarks
of their respective companies.
User’s Manual
EN-9
dynadock™
Precautions for Microsoft® Windows® XP,
Microsoft® Windows Vista®
The Fn + F5 functionality detailed in the electronic User’s Guide for your
TOSHIBA computer only controls the internal video controller of your
computer.
The TOSHIBA dynadock utilizes an advanced video graphics controller to
display the video on the external monitor connected to it. However, due to
USB 2.0 transfer speed limitations, some or all portions of DVD playback
may appear slow or choppy. This is not a malfunction of the dynadock.
Move the video playback from the external monitor to your computer
display for optimal video performance when viewing DVDs. On Windows®
XP systems, DVDs may not display correctly on an external monitor. Use
your computer’s built-in monitor to view DVDs.
This product does not support 3D programs.
In some software application programs that utilize certain directdraw
commands such as some 2D-Games, the display on the external monitor
connected to the dynadock will not be supported. If you want to play these
games in fullscreen, we suggest you disconnect the dynadock.
This product is unable to enter full screen DOS mode when using the
external monitor connected to the dynadock.
The internal speakers on your computer maybe disabled when the
dynadock is connected. See Select Audio Device section for further
information.
The sound may be distorted or delayed when you play some media files.
If it couldn’t be played normally, we suggest you play it without connecting
the dynadock.
Depending on your computer system, you may receive a warning message
if the external monitor connected to your dynadock is used as your primary
display.
USB, CPU resources, mouse movement and other devices may be
affected when playing movies or transferring large amounts of data via the
dynadock.
EN-10
User’s Manual
dynadock™
Introduction
Thank you for purchasing the Toshiba dynadock, the universal docking
station that enables you to connect your deskspace peripherals through
one USB cable to just about any Windows-based notebook. The dynadock
is software upgradable to enable you to keep your dynadock in line with
technological advances. Visit dynadock.com for the latest software driver
support updates.
Features
n
n
n
n
n
n
n
n
n
n
User’s Manual
Single USB cable connection to your computer
Upright slim design saves desktop space
Easily accessible ports located on the front
Supports resolution up to 1920 x 1200 VESA CVT standard (Video
Electronics Standards Association Coordinated Video Timing) video on
external monitor
Hot swappable; you can add or remove most devices without rebooting
the computer
Virtual 7.1 channel surround sound
Includes all video and audio drivers to get you started. Please visit
www.dynadock.com for the latest software driver updates
Includes TOSHIBA dynadock Utility to customize dynadock settings
Charges your USB peripherals with the front powered USB ports
The undock button allows you to easily and safely dock and undock the
dynadock from your computer.
EN-11
dynadock™
Front panel
DC-IN LED: Glows blue when power is being correctly
supplied from the AC power adaptor.
Status LED: Indicates the status of docking, undocking
and charging functions.
Docking: Flashes green during the docking process,
glows green when docked.
Undocking: Flashes orange during the undocking
process, stops flashing orange when undocked.
Charging: Glows orange when charging.
2 USB 2.0 powered ports: Connects and charges select
USB peripherals (for example, PDA, MP3 players and cell
phones) even when undocked.
3.5 mm mono microphone input port: For connection to
an external mono microphone.
3.5 mm stereo headphone output port: For connection
to stereo headphones.
(Sample Illustration) Indicators and connectors on the front of the dynadock
EN-12
User’s Manual
dynadock™
Back panel
3.5mm stereo lineout port: For connection to stereo
speakers.
0ptical S/PDIF digital audio output port: Use an optical
S/PDIF cable (not provided) to connect to your digital
audio equipment, e.g, Dolby® Digital Surround Sound
receiver and speaker system. To use this connection, your
receiver must have an optical S/PDIF input.
10/100 BASE-TX Ethernet: For connection to the
Ethernet network via a network cable (not provided).
4 USB 2.0 ports (A type female connector): For
connection to USB peripherals.
VGA video output port: For connection to a VGA
monitor.
Please note, you can only use one video port at a time.
DVI-D video output port: For connection to a DVI
monitor.
USB Upstream Connector: Connects and dynadock to
the computer.
DC IN 15V
DC-IN: For connection to the provided AC power adaptor.
The dynadock always needs an external power supply for
operation, as it does not take power from the USB bus of
the computer.
Cable Lock Slot: Allows you to connect a cable lock to
help prevent theft.
(Sample Illustration) Connections on the back of the dynadock
User’s Manual
EN-13
dynadock™
Top panel
Undock button: Controls dock, undock
and charging functions. For more detailed
information see the Undock button section
on page 21.
Computer Requirements
n 1.2GHz or higher processor. Intel® Pentium®/Celeron® family, or AMD
K6®/AMD Athlon™/AMD Duron™ family, or compatible processor
recommended (Intel® Core™ 2 Duo 2.0 GB or higher processor
recommended for optimal video performance)
n 512 MB memory or higher (1 GB memory or higher recommended)
n USB 2.0 port
n 30 MB of available disk space
n Microsoft® Windows® XP (32bit edition), with SP2/SP3 and Microsoft®
Windows Vista® (32bit and 64bit edition), with SP1
Assembly
Slide the dynadock onto the base as shown below.
(Sample Illustration) Assembling the dynadock and base
EN-14
User’s Manual
dynadock™
Installation
Installing the Drivers
1. Insert the provided Installation CD into your optical disc drive. It will run
automatically and the dialog box will appear.
If the auto-run function is disabled on your system, the program will fail
to load automatically. Please open the disk in Windows® Explorer, and
double click “AutoRun.exe”.
NOTE: You may need to temporarily disable spyware or anti-virus
programs while installing the drivers. It is also recommended that all other
applications are closed, as you will need to restart your computer after the
drivers are installed.
You need administrator privilege to install/uninstall the utility and drivers.
2. Click on “Setup” to open the dynadock USB Installer. The dynadock
USB installer enables you to easily install, uninstall or update the driver.
(Sample Illustration) dynadock Install Menu
User’s Manual
EN-15
dynadock™
3. Click the Install button to install the selected programs. The Status area
in the right center of the screen indicates the drivers installed.
(Sample Illustration) dynadock USB Installer
The following drivers are installed during the installation process:
Driver Type
n dynadock Utility
n Network Driver
n Audio Driver
n Video Driver
Driver Name
-dynadock Utility II
-AX88772A & AX88772
-USB Multi-Channel Audio Device
-DisplayLink Core Software/
TOSHIBA dynadock
In addition, these icons are added to the Notification Area / System Tray:
Toshiba dynadock Utility
USB Multi-Channel Audio Device
DisplayLink Core Software
EN-16
User’s Manual
dynadock™
4. Follow the on-screen directions to finish the installation.
If there’s any previous version installed, dynadock setup package will
auto detect the installed version, and pop up the following screen.
Please follow the on-screen directions to finish the installation.
(Sample Illustration) Updating Screen
Background Utility Program
After the dynadock utility is installed and the computer is restarted, a
program named ‘TOSDockApp.exe’ will run automatically in the
background. It can be viewed in the Windows Task Manager. The program
detects the insertion and removal of the dynadock.
NOTE: The utility program does not impact any other programs on your
computer. Please do not turn it off.
User’s Manual
EN-17
dynadock™
Connecting the dynadock™ to the Computer
1. Plug the AC adaptor cord/cable into the DC-IN on the back of the
dynadock.
(Sample Illustration) Connecting the AC adaptor cord to the dynadock
2. Connect the AC Power Adaptor with the AC power cord/cable, and then
connect the AC power cord/cable to a live electrical outlet. The power
indicator on the front panel glows blue when the dynadock is
powered on.
3. Plug the square end of the USB cable into the USB upstream port on
the back of the dynadock.
(Sample Illustration) Connecting the USB cable to the dynadock
EN-18
User’s Manual
dynadock™
4. Plug the other end of the USB cable into an available USB 2.0 port on
your computer.
(Sample Illustration) Connecting the USB cable to your computer
NOTE: Some computers may not immediately recognize the dynadock is
connected upon start-up. This is not malfunction of the dynadock, it is
related to the computers BIOS start up sequence.If this occurs, follow the
steps below:
1. Turn off the computer.
2. Disconnect the dynadock from the computer.
3. Turn the computer back on.
4. Connect the dynadock to the computer once the computer’s operation
system has loaded.
Please note these steps may need to be repeated every time you start the
computer.
User’s Manual
EN-19
dynadock™
Uninstalling
To remove the dynadock Utility and all the drivers from your computer,
please follow the following procedures.
NOTE:
n Before starting the steps below, you must eject the dynadock™ from
your computer using the undock button or TOSHIBA dynadock™ utility
icon on your Notification Area/System Tray.
n Disconnect the dynadock™ from the computer. Any devices connected
to the dynadock™ will be disabled.
n Close all other programs and applications.
n Do not use any other previous dynadock CD.
1. Open the uninstall screen by one of the following two ways.
n Click Start > All programs > dynadock USB > Uninstall dynadock
USB, or
n Insert the provided Installation CD into your optical disc drive. It will run
automatically and the dialog box will appear.
(Sample Illustration) Initial Screen
EN-20
User’s Manual
dynadock™
2. Click on “Setup” on the above screen. Then click Uninstall button to
start to uninstall the programs you select.
(Sample Illustration) Uninstalling Screen
3. Follow the on-screen directions to finish the uninstall.
Using the dynadock™
You may connect devices to the appropriate ports on the dynadock while
your computer is running. A slight delay and display flickering is normal
before the computer recognizes the new device.
NOTE: You can also unistall the dynadock drivers from the control panel.
Undock button
The Undock button enables you to easily and safely dock and undock the
dynadock to/from your computer and provides other convenient functions.
When the dynadock is docked to your computer
Press the Undock button once to undock your computer and the dynadock.
To reconnect the dynadock and your computer, press the Undock button
again and it will reconnect. When you press the Undock button the Status
LED will flash orange during the undocking process and flash green during
the docking process as listed below:
Docking: Flashes green during the docking process, glows green when
docked.
Undocking: Flashes orange during the undocking process, stops flashing
orange when undocked.
Charging: Glows orange when charging.
User’s Manual
EN-21
dynadock™
When the dynadock is not connected to your computer, or the
computer’s power is off
Press the Undock button once to put the dynadock into charging mode.
The Status LED will glow orange when charging. Press the Undock button
again to stop the charging process. This applies to both USB powered ports
on the front of the dynadock. These ports charge select USB peripherals
(for example, PDA, MP3 Players and Cell phones) even when undocked.
NOTE: When the dynadock is not connected to your computer, or the
computer’s power is off, only two front USB ports have the charge function.
The charge and non-charge function depends on the charge mode setting
in the dynadock utility. See page 38 for setting the charge mode. Not all
devices can be charged through these ports.
USB 2.0 Ports
Connect any USB device to one of the dynadock’s six USB ports.
n If your USB device, such as a printer or optical drive, etc., came with its
own AC adaptor, make sure that it is plugged into the device and a live
electrical outlet.
Ethernet Port
Connect one end of a network cable (not provided) to the Ethernet port
(RJ-45) on the dynadock and the other end to your network for high
performance network access. To configure the network properties of the
Ethernet adapter:
In Windows Vista®, select Start > Control Panel > View network
status and tasks > Manage network connections.
In Windows® XP, select Start > Connect to > Show all Connections.
In the Network Connections folder, double-click the connection icon for
the dynadock’s Ethernet adapter, which is indicated by ASIX AX88772A
USB2.0 to Fast Ethernet Adapter. This will open the Local Area
Connection Properties window for you to configure the network settings
as required according to your network environment. If you are unsure about
the settings, consult your network administrator for assistance.
NOTE: The LAN port does not support wake-up-on-LAN.
The Local Area Connection icon in the System Tray/Notification Area will
not show a connection. Open “Network Connections” to view the Ethernet
Connection.
EN-22
User’s Manual
dynadock™
Microphone Port
To connect a microphone, plug the 3.5mm microphone jack into the
microphone input port.
Headphone Port
To connect headphones, plug the 3.5mm headphone jack into the
headphone port. After installing the provided audio software, a USB
Multi-Channel Audio Device utility is installed in your computer. It can be
accessed by double-clicking the USB Multi-Channel Audio Device icon
on the system tray /notification area. (The icon may be hidden if the
Windows® operating system recognizes it as inactive.)
(Sample Image) USB Multi-Channel Audio Device
NOTE: Once dynadock™ is installed, the sound on the computer will be
disabled, enabling you to connect external speakers. For information on
how to re-enable sound through your computer see the “Select Audio
Device” section on page 40. The USB Multi-Channel Audio Device is not
the default playback device after installation.
Stereo lineout port
To connect external stereo speakers plug the 3.5mm speaker jack into the
stereo lineout port.
The utility comes with a friendly graphic user interface to optimize your
audio effects. Most of the settings can be adjusted using the available
sliders, images or buttons. Just make the adjustments to suit your personal
preferences.
NOTE: You can connect the headphone or the speaker to the headphone
port, however the lineout port has the audio higher-quality for the external
speaker.
Using Virtual 7.1CH Function on 2CH Speakers/headphones
The audio output port is used to connect stereo speakers or headphones.
Although 2CH speakers may be connected, a virtual 7.1CH surround
sound experience is possible using the software’s virtual multi-channel
function.
To enable the virtual 7.1CH audio function on 2CH speakers or
headphones:
User’s Manual
EN-23
dynadock™
Windows Vista® Operations
1. In the Analog Output section, select headphone.
(Sample Image) Select headphone
2. On the panel, click the 7.1 Virtual SPEAKER SHIFTER button to
enable the virtual multi-channel function. The icon will turn blue and a
mark will be shown in the rightside window when selected.
(Sample Image) 7.1 Virtual SPEAKER SHIFTER button
3. The button next to DSP Mode string allows you to enter the SHIFTER
control window.
(Sample Image) DSP button
Click on the Virtual Speaker Shifter button to open the Shifter controls.
See page 26 for the SHIFTER Control window sample image.
NOTE: In order to use the S/PDIF function in Windows Vista®, select
Start > Control Panel > Hardware and Sound > Sound. In the
Playback tab, set the Digital Output as default device.
EN-24
User’s Manual
dynadock™
Windows® XP Operations
1. In the Analog Output section, select headphone icon.
(Sample Image) Select headphone
2. On the panel, click the 7.1 Virtual SPEAKER SHIFTER button to
enable the virtual multi-channel function. The icon will turn blue when
selected.
(Sample Image) 7.1 Virtual SPEAKER SHIFTER button
3. The button next to DSP Mode string allows you to switch between the
SHIFTER control and basic control window.
(Sample Image) DSP button
Click on the Virtual Speaker Shifter button open the Shifter controls.
See page 26 for the SHIFTER Control window sample image.
User’s Manual
EN-25
dynadock™
Using the Virtual Speaker Shifter Controls for both Windows® XP and
Windows Vista®
1. Volume control
2. Rotate all the virtual speakers clockwise
3. Rotate all the virtual speakers counterclockwise
4. Manually rotate all the virtual speakers
5. Manual shifting function. You can drag a specific virtual speaker to the
preferred position to enhance an individual channel output.
For example, a low-volume center (for dialog) can be enhanced by
being dragged closer to you
6. Reset the speakers to default settings
1
2
3
4
5
6
(Sample Image) Shifter Controls
EN-26
User’s Manual
dynadock™
Using the Basic Controls - Windows® XP only
1. To adjust/reset the volume of the left and right channel of your
speakers/headphones
2. To test the left and right channel of your speakers/headphones
3. Stops the audio test
1
2
3
(Sample Image) Basic controls screen
User’s Manual
EN-27
dynadock™
Digital S/PDIF Output - Windows® XP only
Using the S/PDIF output function you can directly output the digital sound
source from the computer to your home theater equipment without loss of
sound quality.
To experience true digital sound quality:
1. Make sure your DVD content supports Dolby® Digital or DTS format.
2. Make sure your external decoder/AV receiver that connects to the
dynadock supports Dolby® Digital or DTS decoding capability.
3. Turn on the S/PDIF function in the USB Multi-Channel Audio Device
utility.
On the Main Setting tab of the utility, click the button next to the S/PDIF
Output string and select Digital Audio 48KHz from the drop-down menu.
(Sample Image) S/PDIF selection
4. Configure the Audio Output setting of your DVD playback software to
use S/PDIF. (Access the software’s setup or configuration panel to
locate the Audio Out item.)
EN-28
User’s Manual
dynadock™
Video Port (VGA and DVI)
Connection
The dynadock has both the following types of video ports:
VGA – for connection to VGA interface monitors
DVI – for connection to DVI interface monitors
NOTE: Only one monitor can be connected to the dynadock.
Although the ports and video drivers are different, the connection and setup
is the same.
Connect the monitor cable (not provided) to the video output port on the
dynadock and the external monitor. This cable can be connected and
disconnected any time without disconnecting the dynadock from the USB
port on your computer.
NOTE: The dynadock should be connected to a USB 2.0 port for optimal
video performance. The dynadock will work when connected to a USB1.1
port, however video performance will be compromised. The USB
connector may be plugged and unplugged while the dynadock is on.
You can customize the video settings of the dynadock. See Adjusting Video
Settings for more information.
Viewable screens
The dynadock video drivers give you the option of viewing a total of three
screens.
1. The screen on the notebook
2. An external monitor connected to the video port on the notebook
(if available)
3. An external monitor connected to the dynadock
NOTE: The external monitor connected to the dynadock may be identified
as either “2” or “3” on the Windows® Display Properties screen (depending
on your model) although there may not be a total of 3 viewable screens.
Video Modes
The dynadock video output works in two modes:
n Mirror Mode
n Extended Mode
User’s Manual
EN-29
dynadock™
Mirror Mode
This mode “mirrors” – creates an identical display – from your computer
screen to the external monitor. This is useful, for example, if you want to
use a larger desktop monitor rather than the computer screen. In Mirror
Mode, the dynadock automatically selects the settings (screen resolution,
color quality and refresh rate) for the external monitor that will allow the
best resolution based on your computer’s settings.
Extended Mode
Extended Mode lets you split your display across multiple monitors.
This provides a number of advantages to increase productivity:
n View your large spreadsheets across two or three screens with display
continuity.
n Multitask more effectively without overlapping windows
n Compare two documents simultaneously across two/three screens
n View videos/TV on one screen and reviews on the other
Set up the dynadock for Extended Mode
1. Click or right-click the icon in the system tray/notification area.
(Sample Image) system tray/notification screen
2. Select “Extend” from the menu.
(Sample Image) display mode change screen
NOTE: Depending on your computer and operating system, you may need
to “uncheck” the “Extend my Windows desktop onto this monitor” box in
Display Properties when the dynadock is disconnected.
EN-30
User’s Manual
dynadock™
Switching from Extended Mode to Mirror Mode
Follow these steps to change the video output to Mirror Mode:
1. Click or right-click the icon in the system tray/notification area.
(Sample Image) system tray/notification screen
2. Select “Mirror” from the menu.
(Sample Image) display mode change screen
NOTE: You can also use the Windows® Display properties screen to switch
between Extended Mode and Mirror Mode.
User’s Manual
EN-31
dynadock™
Adjusting Video Settings
There are three components that make up the screen mode:
Resolution: In common usage, this refers to the number of pixels
displayed on the screen horizontally and vertically.
Color Depth: This defines the number of different colors that can be shown
on the screen at the same time.
Refresh rate: Measures the speed that the entire screen is rescanned.
Higher frequencies reduce flicker.
Below is a list of refresh rates supported at various resolutions and color
depths for the VGA and DVI component:
Color
Depth 640x480
Resolution
800x600
1024x768
1280x768
1280x960
1280x1024
16 bit
60 72 75
56 60 72
75 85
60 70 75
85
60 75 85
60 85
60 75 85
32 bit
60 72 75
56 60 72
75 85
60 70 75
85
60 75 85
60 85
60 75
1280x800
1440x900
1600x1200 1680x1050 1920X1200
16 bit
60
60
60
60
60
32 bit
60
60
60
60
60
Note that interlaced modes are not supported and the resolutions listed
above may not be supported by your monitor.
Additional modes may be offered, depending upon the connected monitor,
but these are not currently guaranteed.
If the monitor does not advertise the supported modes, the VGA or DVI
component will choose a set of common screen modes.
If cloning the primary display, the VGA or DVI component will try to use the
preferred monitor mode. In some cases, this may not be the most
appropriate mode for the mirrored desktop. It is recommended that the
primary display resolution be changed to closer match the default
resolution of the dynadock monitor.
NOTE: For more information on supported modes, be sure to check the
documentation supplied with your monitor.
EN-32
User’s Manual
dynadock™
Initial Use
When the VGA or DVI component first starts, it will extend the primary
monitor. Changes to the screen mode and VGA or DVI component
operation mode can be made under the Windows display properties.
If no output is seen on the monitor connected to the VGA or DVI
component, it may be in a mode which cannot be displayed by the monitor.
This can happen if the monitor does not report its supported modes to the
VGA or DVI component. Reduce the resolution of the primary display, and
in turn the resolution of the VGA or DVI component display until an image is
shown.
NOTE: Placing the monitor into an unsupported mode for long periods can
damage it.
Adjusting the Video Settings for the monitor connected to the
dynadock
1. Click or right-click the icon in the system tray/notification area.
(Sample Image) system tray/notification screen
2. To change the screen resolution or color quality, select those options on
the screen. Be sure to select one of the supported resolutions and color
quality numbers in the table above. For an external monitor, you can
also select any resolution or color quality supported by that monitor.
(Sample Image) display mode change screen
User’s Manual
EN-33
dynadock™
3. To change the refresh rate, select “Advanced” from the menu, this will
open the Windows® Display Properties.
(Sample Image) display mode change screen
4. On the Display Settings screen, click Advanced Settings (Windows
Vista)/Advanced (Windows XP) and then click Monitor.
Windows Vista®
Windows® XP
(Sample Image) display setting screen
5. Select a refresh rate from the Screen refresh rate pull down list.
Be sure to select a refresh rate that is supported for the resolutions and
color depth settings, as indicated in the table above. Then click OK.
6. Click OK to close the Display Settings screen.
If you use multiple dynadocks with a single computer, for example, one at
work and one at home, the video settings for each dynadock are saved when
you disconnect the computer. This enables you to have your dynadock set
up with different video settings for different locations. The settings will be
retained each time you use the dynadock with your computer.
EN-34
User’s Manual
dynadock™
How Standby/Sleep or Hibernation Mode Affects Devices Attached to
the dynadock™
External Monitors
The external monitor connected to the dynadock will go blank if the
computer goes into Standby/Sleep or Hibernation Mode.
When in Mirror Mode, the external monitor keeps the same settings it had
before the computer went into Standby/Sleep or Hibernation Mode once
the computer returns to an active state
When in Extended Mode, windows that were previously on the external
monitor will not move back to that external monitor once the computer
returns to an active state
Also, if the external monitor is in Extended Mode and the computer requires
a login after Standby/Sleep or Hibernation Mode, the login screen appears
on the primary computer monitor, not the external monitor. This is
consistent with Windows® Operating System standards.
Other Devices
If another device is connected to a port on the dynadock and the computer
goes into Standby/Sleep or Hibernation Mode, that device will not function.
For example, if you are using the Ethernet port for high-speed network
access, network access will not be available until the computer returns to
an active state.
Using the dynadock™ Utility
Eject Dock
When the dynadock is connected to your computer, the TOSHIBA
dynadock Utility can remove all devices with one-click. You can eject the
dock by using one of the following two options:
Option 1- pressing the undock button:
1. Press the undock button on the top panel once, and the dynadock
will undock.
(Sample Image) Undocking screen
Note: The status LED will flash orange. When the undocking is finished,
the status LED will stop flashing. Pressing this button again will re-dock the
computer to the dynadock.
User’s Manual
EN-35
dynadock™
Option 2- clicking the icon in the system tray/notification area:
1. Click or right-click the icon in the system tray/notification area.
(Sample Image) system tray/notification screen
2. Select “Eject Dock” from the menu.
(Sample Image) Eject Dock screen
3. The dynadock will undock.
(Sample Image) Undocking screen
If the dynadock is removed from the system successfully, the icon in the
system tray/notification area will disappear.
If the dock is removed unexpectedly, the software can detect this event and
will give the user an “Unexpected remove”dialog box as shown below.
(Sample Image) Warning message
CAUTION: It is important that you correctly disconnect the dynadock by
following the steps above. Failure to do so may cause data loss and/or
damage to your computer and devices connected through the dynadock.
EN-36
User’s Manual
dynadock™
Eject Dock and Sleep
When the dynadock is connected to your computer, the TOSHIBA
dynadock Utility can remove all devices and let the system sleep instantly
with one-click. Please follow these steps:
1. Click or right-click the icon in the system tray/notification area.
(Sample Image) system tray/notification screen
2. Point to “Eject and Sleep” and select “Hibernation” or “Standby” from
the sub menu.
(Sample Image) Eject and Sleep screen
3. Wait before removing the dynadock from the system.
(Sample Image) Undocking screen
If the dynadock is removed from the system successfully, the icon in the
system tray/notification area will disappear.
If the dock is removed unexpectedly, the software can detect this event and
will give the user an “Unexpected remove”dialog box as shown below.
(Sample Image) Warning message
User’s Manual
EN-37
dynadock™
4. After the dynadock is removed from the system successfully, the
system will go into sleep mode.
CAUTION: It is important that you correctly disconnect the dynadock by
following the steps above. Failure to do so may cause data loss and/or
damage to your computer and devices connected through the dynadock.
Changing the dynadock Utility Settings
The TOSHIBA dynadock Utility setting program allows users to change the
“Eject Dock” setting.
Opening the Setting Dialog box
1. Click “Start” and then click “Control Panel”.
2. Double-click the “TOSHIBA dynadock Utility” icon.
Note: If you can not find the “TOSHIBA dynadock Utility” icon, please click
“classic view” on the left of the control panel window.
3. Setting dialog will appear.
Setting charge mode
This will allow users to set the charge mode after the dynadock is
disconnected from computer or the computer’s power is turned off.
n Check the “Set charge mode after undock” box to enable the USB
charge function when the dynadock is disconnected from the computer
or the computer’s power is off. When the charge function is active, the
Status LED will glow orange. You can press the undock button to switch
between charge and non-charge.
(Sample Image) charge mode screen
EN-38
User’s Manual
dynadock™
Notify Message Service
The Notify Message Service shows warning messages when you
undock the dynadock.
By default, the boxes are checked.
NOTE: TOSHIBA recommends that you do not uncheck these boxes. If the
boxes are unchecked, there will be no warning messages if the dynadock
is improperly ejected/disconnected.
(Sample Image) Notify message service screen
“Show undocking complete message”option lets users see a dialog box
like the following to announce that undocking is successful.
(Sample Image) Prompt message
User’s Manual
EN-39
dynadock™
“Show unexpected remove message” option lets users see a warning
dialog box like the following when the user disconnects the USB dock
directly.
(Sample Image) Warning message
Select Audio Device
Once dynadock™ is installed, the sound on the notebook will be disabled,
enabling you to connect external speakers. To re-enable sound through
your notebook, please follow these steps:
1. Click or right-click the icon in the system tray/notification area.
(Sample Image) system tray/notification screen
2. Select “Select Sound Device” from the menu.
(Sample Image) Select Sound Device screen
EN-40
User’s Manual
dynadock™
3. Change the “Sound playback” default device to other than “3-USB
Multi-Channel Audio Device”.
Windows Vista®
Windows® XP
(Sample Image) Change Sound Device screen
Select Update Support
Choose the “Update support” option. User can receive the update
information from the e-mail used for registration. There would be a dialog to
prompt user:
(Sample Image) Support information
User’s Manual
EN-41
dynadock™
Select Help
If you select “Help”, the online user manual opens.
Select About
If you select “About”, you will see the following information:
(Sample Image) About dynadock utility
EN-42
User’s Manual
dynadock™
Specifications
This section summarizes the dynadock’s technical specifications.
Physical Dimensions
Weight
About 490g/17.2 ounces (including the Base)
Size
42 (w) x 77 (d) x 222 (h) mm/1.7" (w) x 3.0" (d) x 8.7" (h)
(not including the parts that extend beyond the main
body)
112.5 (w) x 130 (d) x 234 (h) mm/4.4" (w) x 5.2" (d) x 9.3"
(h) (including the Base)
Environmental Requirements
Conditions
Ambient temperature
Relative humidity
Operating
5°C to 35°C (41°F to 95°F)
20% to 80%
Non-operating
-20°C to 65°C (-4°F to 149°F) 10% to 90%
Thermal Gradient
20°C per hour maximum
Wet-bulb Temperature
26°C maximum
Power Requirements
AC adaptor
100-240 volts AC
50-60 hertz (cycles per second)
15V DC
3.0/4.0 amperes (different for each model)
User’s Manual
EN-43
dynadock™
General Specifications
Computer Interface
USB 2.0
Ports and Connectors
4 USB 2.0 ports in the back
2 USB 2.0 Powered ports in front
1 x S/PDIF (optical digital audio output)
1 x Ethernet Port (10/100 Base-T Ethernet RJ-45
connector)
VGA x 1 (Analog D-SUB 15pin Female Connector)
DVI-D x 1 (Digital 24-pin Female Connector)
1 x microphone (3.5 mm mono audio in)
1 x headphones (3.5 mm stereo audio out)
1 x line-out (3.5 mm stereo audio out)
1 x DC-in plug
1 x Cable Lock Slot
Supported Video
Display Modes
Windows® XP: Mirror Desktop, Extended Desktop,
Primary Display
*Depending on
operating system
Windows Vista®: Mirror Desktop, Extended
Desktop, Primary Display
*Some built-in video adapters may prevent a
second monitor from being the primary display.
*Specifications are subject to change without further notice.
EN-44
User’s Manual