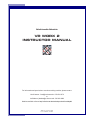
1
Multimedia Module
VR WORX 2
INSTRUCTOR MANUAL
For information and permission to use these training modules, please contact:
Limell Lawson - [email protected] - 520.621.6576
or
Joe Brabant - [email protected] - 520.621.9490
Modules available online at http://mll.arizona.edu/workshops.shtml?tutorialpdfs
VRWorx_Instructor.pmd
Last modified: 06/20/02
2
VR WORX 2: Instructor Manual
TABLE OF CONTENTS
Instructor Setup ............................................................................................................................. 3
Introduction and Overview .............................................................................................................. 5
Lecturette 1: The QTVR Panorama ................................................................................................ 6
Lecturette 2: The QTVR Object ...................................................................................................... 8
Lecturette 3: The QTVR Scene ...................................................................................................... 9
Exercise 1: Prepare Images for Importing .................................................................................... 10
Exercise 2: Set Up Your Panorama File ........................................................................................ 11
Exercise 3: Importing Images and Stitching the Panorama .......................................................... 12
Exercise 4: Set Correct Compression and Playback Settings ..................................................... 13
Exercise 5: Export the QTVR Movie ............................................................................................ 13
Exercise 6: Importing a Single Panoramic Image to Create a Panorama ..................................... 14
Exercise 7: Set Correct Compression and Playback Settings ..................................................... 14
Exercise 8: Export the QTVR Movie ............................................................................................ 15
Exercise 9: Create and Add Nodes to Scene .............................................................................. 15
Exercise 10: Link Nodes Together ............................................................................................... 16
Exercise 11: Defining the URL and Hot Spots for the “Chapel_In” Node ....................................... 17
Exercise 12: Defining Hot Spots for the “Chapel_Out” Node ........................................................ 18
Exercise 13: Compose Scene and Export Final Panorama .......................................................... 18
Conclusion ................................................................................................................................... 19
Criterion Test ................................................................................................................................ 20
File name: VRWorx_Instructor.pmd
Last modified: 06/20/02
Copyright Arizona Board of Regents, 2002
University of Arizona
3
VR WORX 2: Instructor Manual
INSTRUCTOR SETUP:
Materials:
♦
♦
♦
♦
♦
VR Worx Instructor Manual with disk of accompanying files
VR Worx User Manual (1 copy per user)
2 Job Aids (1 copy per user)
Several pieces of blank paper
Scotch tape
Equipment::
♦
♦
♦
♦
♦
♦
Electronic Classroom
PC or Mac workstations (1 per user) with the VR Worx, QuickTime player, and a web
browser installed
Instructor PC or Mac workstation with all of the above installed
Overhead projector connected to instructor workstation
Digital Still Camera, QTVR panning head, Tripod (optional items, only if available to
instructor
Flip Chart and markers
Setup:
♦
♦
♦
♦
♦
♦
♦
♦
Session length is approximately 2 hours
Instructor should be familiar with all aspects/components of this VR Worx module
Check that all computers and equipment are functioning properly
Turn on and test projector
Prepare flip chart of key points/items to be covered. Make sure view is unobstructed
Have users sit at their own computer
Copy the “Images for Stitching” folder and the Chapel_In.pict image file to the desktops
of each computer, including Instructor computer
Open a web browser and leave the following windows open for the lesson:
♦
♦
♦
♦
♦
FOR PANORAMA: http://www.apple.com/quicktime/products/gallery/paris.html
FOR OBJECT: http://www.apple.com/hardware/gallery/imacdots0222_320.html
FOR SCENE: http://mll.arizona.edu/hardware.shtml?qtvr.one
The Instructor Manual is set up so that you can see the corresponding User Manual page
next to it. To make copies of the User Manual for the participants of the workshop, print
out the PDF version from http://mll.arizona.edu/workshops.shtml?tutorialpdfs
When teaching this module, make sure you demonstrate steps and ideas for the
users FIRST. Do not allow them to follow along on their own while you are
demonstrating; they will have the opportunity to practice steps on their own after.
Be sure to go through ALL material, as the users may not have all of the information
in their User Manuals
File name: VRWorx_Instructor.pmd
Last modified: 06/20/02
Copyright Arizona Board of Regents, 2002
University of Arizona
4
VR WORX 2: Instructor Manual
Flip Chart Preparation:
♦
Page #1: QTVR Panorama
♦
♦
♦
♦
♦
Page #2: QTVR Object
♦
♦
♦
♦
♦
Def. A QTVR Panorama lets you view an environment, such as a room or an
outdoor vista, from a variety of angles.
Equipment needed: Tripod, QTVR Pan Head, Camera (Film, Digital, or Video)
40-50% overlap between images
For a full panorama: 360 / # of images = Degrees Between Images
Def. A QTVR Object lets you view a three-dimensional object, such as a cell
phone, a statue, or a computer from a variety of angles.
Equipment needed: Tripod, QTVR Pan Head, Camera, Lazy Susan or motorized
rig.
ROWS: The number of images shot in the vertical plane (up and down) of the
object make up the number of rows of the object.
COLUMNS: The number of images shot in the horizontal plane (side to side) of
the object make up the number of columns of the object.
Page #3: QTVR Scene Terms
♦
♦
File name: VRWorx_Instructor.pmd
Last modified: 06/20/02
Def. A QTVR Scene is a collection of QTVR panoramas, objects, and other
media.
HOT SPOTS: areas in a node that when clicked on are linked to the other
nodes of the scene.
Copyright Arizona Board of Regents, 2002
University of Arizona
5
VR WORX 2: Instructor Manual
INTRODUCTION AND OVERVIEW
Instructor Note: At this time, pass out the User Manual to the students. Also, pass out the two job aids,
informing the users that they contain information that will be presented to them during the workshop and
are meant to help them access that information easily on the job. Indicate that the students are Not to
get ahead and do anything without the instructor. Indicate that the students are Not to do anything on the
computer besides the indicated tasks at the indicated times. Remind them that they are to watch you
first as you demonstrate, then they will be able to practice on their own.
In this class you will learn the basic layout and key terms to using VR Toolbox’s VR Worx program.
We will cover basic QuickTime Virtual Reality concepts, such as equipment setup and shooting, and
the various types of QTVR media, and show how to create this media using the VR Worx.
We will go over importing into the program, stitching, panorama creation, and scene creation. Output
to the web and CD-Rom will also be covered.
File name: VRWorx_Instructor.pmd
Last modified: 06/20/02
Copyright Arizona Board of Regents, 2002
University of Arizona
6
VR WORX 2: Instructor Manual
LECTURETTE 1: THE QTVR PANORAMA
Instructor’s Note: Make sure flip chart is opened to Page #1, and you have the several pieces of blank
paper and tape. Ensure that your computer hooked up to the projector has the web pages opened so you
can quickly get to them.
For this, and the next couple of sections, we will go through and define much of the terminology of a
QuickTime Virtual Reality project. Using examples you will be able to clearly understand what
these terms are. We all know that you will not be expected to actually go out there and shoot a
QTVR project. However, having an understanding of what goes on will allow you to help the ILC
client in a more useful manner.
A QTVR Panorama lets you view an environment, such as a room or an outdoor vista, from a variety
of angles. A full panorama can be panned horizontally 360 degrees to provide the illusion that you
are standing in the center of the panorama. Note: Not all panoramas have to be 360 degrees; some
could be, say only 180 degrees. Here is an example of a QTVR panorama.
Instructor’s Note: Show the users the web site example of the panorama and demonstrate the following
points.
You can view a QTVR panorama by pressing the mouse button and dragging the pointer over the
image in the direction you want to view.
You can also zoom in on parts of the image for a closer look by clicking the zoom button in the
lower left area of the play back window.
Instructor’s Note: If you have the optional QTVR gear, show them to the users as you discuss the following
information.
To make a QTVR Panorama, a camera, a special panning head, and tripod are placed in the
center of the environment and a picture is taken at each appropriate DEGREE mark, rotating around
the focal point of the lens. The special panning head is what rotates the camera and has markings in
degrees for the photographer to use. Conversely, you can take one panoramic image and have the
QTVR software wrap the edges together.
The number of images you need to take depends on the size of lens your camera uses. Basically,
you want to take enough images so that from one shot to the next, you have about a 40-50 percent
overlap.
Instructor’s Note: At this point, arrange the individual pieces of paper so they are overlapping by about
half and tape them together. Just tape enough so they get the idea of how the images get “stitched”
together in the software.
You need this overlap so the stitching software can properly align and stitch the two together. On
page 3 of your User Manuals, there is an example of this overlap with two images. The most common
numbers of images to take are either 12 or 18, again depending on what size lens your camera has.
So, depending on the number of images you have to take, you know how much, in DEGREES, to
rotate the camera. For example: If I know I need to take 18 images, and I want a 360 panorama, 360
divided by 18 is 20 degrees. I must therefore take a picture every 20 degrees in order to make that
360. The QTVR pan head has the degree markings on it so you don’t have to guess.
Job Aid #1 has a chart that will help you determine how many images to take with different camera
lenses.
File name: VRWorx_Instructor.pmd
Last modified: 06/20/02
Copyright Arizona Board of Regents, 2002
University of Arizona
7
VR WORX 2: Instructor Manual
QUESTIONS FOR REVIEW:
Q: If I were taking 12 images to make a 180-degree panorama, how many degrees
would be in between each image?
A: 180 degrees/12 images = 15 degrees in between
Q: What are the three pieces of equipment needed for a QTVR Panorama Shoot?
A: A camera, a QTVR pan head, and a tripod
Now that we have discussed what a panorama is, let us turn our attention to the QTVR object.
File name: VRWorx_Instructor.pmd
Last modified: 06/20/02
Copyright Arizona Board of Regents, 2002
University of Arizona
8
VR WORX 2: Instructor Manual
LECTURETTE 2: THE QTVR OBJECT
Instructor’s Note: Turn flip chart to page #2.
A QTVR Object lets you view a three-dimensional object, such as a cell phone, a statue, or a
computer from a variety of angles. It gives you the illusion that you are holding the object and are
manipulating it by rotating it. Here is an example of a QTVR object on the web.
Instructor’s Note: Display the web page for the OBJECT on the overhead.
To rotate an object, click on the image and drag the mouse horizontally left or right.
The object is made from a series of images that are stitched together in the QTVR software. Using
a manual or motorized rig to take the images from all angles of the object, and in sequence, yield
the best results.
The number of images shot in the vertical plane (up and down) of the object make up the number
of ROWS of the object.
The number of images shot in the horizontal plane (side to side) of the object make up the number
of COLUMNS of the object. Look at the illustration of rows and columns in your user manual.
Instructor’s Note: Allow a few seconds for the participants to locate the illustration and look it over.
If you don’t have access to a motorized rig, placing your object on a simple “lazy Susan” and
rotating it while the camera is stationary can yield a good object.
For objects, there is not as much concern with what type of lens you use and how many images you
must take. However many images you do take for one row however, remember to divide that it by
360 to get the number of degrees between each image.
The more pictures you take, the better quality of motion you will get when rotating your final
object. Keep in mind though that more images equals larger file size, so if your object was going
to the web, you would want to limit the number of images you took.
Instructor’s Note: Ask the users if there are any questions. Also, ask the following questions to them for
review.
QUESTIONS FOR REVIEW:
Q: Why do you suppose more images of the object is better than fewer?
A: Because having more shots will yield a much smoother motion when rotating the object.
There are more angles of the object that are covered.
File name: VRWorx_Instructor.pmd
Last modified: 06/20/02
Copyright Arizona Board of Regents, 2002
University of Arizona
9
VR WORX 2: Instructor Manual
LECTURETTE 3: THE QTVR SCENE
Instructor’s Note: Turn flip chart to page #3
A QTVR Scene is a collection of QTVR panoramas, objects, and other media. Each media element
in a scene is called a NODE. A scene looks just like a panorama, but unlike a simple panorama,
you can interact with parts of the scene.
Scenes have HOT SPOTS which are areas in a node that are linked to the other nodes of the scene.
For example, a hot spot in a computer lab scene could link to another room in the lab (another
node), or it could allow you to manipulate one of the computers in the lab (yet another node). These
hot spots can also link to Web Sites and a variety of other media. Here is an example of a QTVR
scene on the web.
Instructor’s Note: Display the web page for the SCENE on the overhead. When your mouse rolls over a
Hot Spot, the cursor icon changes. Point this out to the users so they are aware of how to locate the Hot
Spots. Click on the Hot Spot so it can take you to another node.
Creating the scene and hot spots are done in the VR Worx program. Further in today’s lesson, we will
go over how to make a hot spot using the nodes we will make.
Instructor’s Note: Ask the users if there are any questions. Also, ask the following questions to them for
review.
QUESTIONS FOR REVIEW:
Q: Why would one want to create a QTVR scene?
A: INTERACTIVITY! Adding hot spots allows the user to have a more interactive experience with
the panoramas and objects. Also, it’s a nice way to bring all of the nodes you have created
together in an interesting way.
Q: In the computer lab example of a scene, what were some of the hot spots we saw?
A: The computer stations, the area leading to the other side of the room.
You all now have a pretty good grasp of some of the terminology that we will be using for the rest of
the lesson. Now lets turn to actually importing images into and using the VR Worx software.
File name: VRWorx_Instructor.pmd
Last modified: 06/20/02
Copyright Arizona Board of Regents, 2002
University of Arizona
10
VR WORX 2: Instructor Manual
EXERCISE 1: PREPARE IMAGES FOR IMPORTING
Instructor Note: Remember to demonstrate first, then allow the users to complete the exercise on their
own, following the steps in their User Manuals.
Steps:
1.
Create a new folder for the images on the hard drive
It is important to group the images in a folder as opposed to leaving them scattered in
the hard drive. If they are not, you will not be able to simply add them all at once to
the program because there could be other files you do not want.
2.
Copy the images from the disk (zip, flash card, cd-rom, etc.) to the folder
For our lesson I have already copied the files needed to each of your workstations.
But this is just a reminder that you must have them copied off of the disk. NEVER
work off the disk, as doing so will cause a slower run time and could possibly crash
the computer.
3.
Ensure image files are named in an ordered alphanumeric format
The alphanumeric format will again simplify adding the images to the program later, as
they will be in the correct order you want. Remember, however to have double digits
of numbers. For example, Picture1 is not acceptable, but Picture01 is. Why?
Because if you had 10 images or more, naming them the first way will order them
like: Picture1, Picture10, Picture2, Picture3, etc. Naming them with double digits will
result in: Pic01, Pic02…Pic10
Each of you will find the files at your workstation in a folder called Images for Stitching. Since they
are already copied you will not have to do that step, but go through and make sure that they are
ready for importing into the Studio, such as ensuring their naming sequence is correct. You will have
1 minute to complete this check.
Instructor Note: Allow the users one minute to do this. After they have finished, ask if there are any questions.
Also, ask the following questions to them.
QUESTIONS FOR REVIEW:
Q: How will you help a client who has their images on a disk in no order whatsoever?
A: View each image to determine which comes before which, then rename them with alphanumeric
names.
Q: Other than a disk, how else might a client bring in their images?
A: Flash card, digital camera, negatives to scan…
File name: VRWorx_Instructor.pmd
Last modified: 06/20/02
Copyright Arizona Board of Regents, 2002
University of Arizona
11
VR WORX 2: Instructor Manual
EXERCISE 2: SET UP YOUR PANORAMA FILE
Instructor Note: Remember to demonstrate first, then allow the users to complete the exercise on their
own, following the steps in their User Manuals.
Steps:
1.
Open the VR Worx application.
2.
Select File -> New
Ensure the Create a Panorama Option is checked. Note the other options:
Create an Object– For stitching images for a QTVR object.
Create a Scene – For creating a scene out of different nodes.. We will cover the Create
a Scene steps later in the lesson.
3.
Save the file on the desktop and name it “Chapel_Out”.
4.
Click OK.
The VR Worx interface window pops up and you are defaulted to the “Setup Tab.” With
the way the interface is laid out, we start from the left tab and work our way to the
right.
5.
Select Source Format -> Multiple Images
6.
Select Node Sweep -> 360
7.
Select Max Frames -> 18
The frames are how many images we are going to import. For our lesson, we have 18
images.
8.
In the lens param section, click the length radio button, and select 38 from the drop
down menu.
This is where we specify the information of the camera lens used to capture our
images. They were shot using a Nikon Cool Pix 950 digital camera. We choose
38mm as the lens we used because that is the 35 mm equivalent of the Nikon Cool pix
lens. All digital camera lens sizes must be converted to its 35 mm equivalent, and it is
this equivalent that we tell the QTVR software was the size of the lens used. To help
you in determining these equivalents, use the job aid that I previously passed out,
which lists many types of digital cameras, and their 35 mm equivalent lens sizes.
9.
Click the image size drop down menu. Select 324 X 432 as the pixel width and height
of the images.
If this specification is not available, choose custom and enter the numbers manually.
When you are helping an ILC client, make sure you find out the dimensions of their
images beforehand.
Instructor Note: Allow the users to complete the steps. When they are done, ask if there are any questions.
Also, ask the following questions to them.
File name: VRWorx_Instructor.pmd
Last modified: 06/20/02
Copyright Arizona Board of Regents, 2002
University of Arizona
12
VR WORX 2: Instructor Manual
QUESTIONS FOR REVIEW:
Q: What is the difference between the Panorama Maker option and the Panorama Stitcher
option?
A: Panorama Maker only takes one image and wraps it to create the panorama. The Panorama
Stitcher takes a series of images and “stitches” them together side by side to create the panorama.
Q: Why bother rotating the images once in the studio?
A: Because the images are stitched side by side. If they were all sideways, they would be
stitched incorrectly.
EXERCISE 3: IMPORTING IMAGES AND STITCHING THE
PANORAMA
Instructor Note: Remember to demonstrate first, then allow the users to complete the exercise on their
own, following the steps in their User Manuals.
Steps:
1.
Click the acquire tab. Select the Multiple image button.
2.
Locate and open the images for stitching folder
You can use images that are in a format supported by QuickTime, such as PICT,
TIFF, JPEG, and GIF
3.
Click the add 18 button. Then Click done.
This will quickly select all of the images. Note why it is important to have the
images ordered correctly. There is no time wasted in repositioning them later.
Notice that in this case, the images are not oriented properly when they are added to
the VR Worx workspace. They must appear right side up. Remember, they will be
stitched side by side, so their edges must be able to meet and match each other.
Let’s correct that now.
4.
Select Edit -> rotate all-> +90 degrees.
The images are now right side up.
5.
Click the stitch tab.
6.
Click the stitch button within the stitch tab.
Leave the other options to their defaults. The information we gave the program in the
Setup Tab will allow it to be able to automatically stitch the images properly.
7.
Click the blend tab. Click the blend button within the blend tab.
Notice the black dividing lines are now removed.
File name: VRWorx_Instructor.pmd
Last modified: 06/20/02
Copyright Arizona Board of Regents, 2002
University of Arizona
13
VR WORX 2: Instructor Manual
EXERCISE 4: SET CORRECT COMPRESSION AND PLAYBACK SETTINGS
Instructor Note: Remember to demonstrate first, then allow the users to complete the exercise on their own,
following the steps in their User Manuals.
Steps:
1.
Click the compress Tab.
We are going to skip the hot spot section for now. We will add our hot spots later when we
make the scene.
2.
Click the set button in the compression box.
For out lesson today, well will use settings as if this movie was going to be for the web.
Depending on the final output of the ILC clients movie, these settings will vary. Consult the job
aid for the settings for different outputs, like CD-Rom, Kiosk, Web.
3.
Click on the first compressor drop down menu. Select photo-jpeg.
4.
Select medium on the quality scale.
5.
Click OK.
6.
Click the compress button.
7.
Click the playback tab.
8.
Scroll through the movie to the location where you see the chapel building.
9.
Click the set button for the initial constraints.
This is located on the lower left hand side. Now, when this movie file is opened, it will
automatically be oriented to this position.
EXERCISE 5: EXPORT THE QTVR MOVIE
Instructor Note: Remember to demonstrate first, then allow the users to complete the exercise on their own,
following the steps in their User Manuals.
Steps:
1.
Click the Export movie button in the playback tab.
2.
Title your move “Chapel_Out” and Save it. This .mov file is your final product.
File name: VRWorx_Instructor.pmd
Last modified: 06/20/02
Copyright Arizona Board of Regents, 2002
University of Arizona
14
VR WORX 2: Instructor Manual
EXERCISE 6: IMPORTING A SINGLE PANORAMIC IMAGE
TO CREATE A PANORAMA
Instructor Note: Remember to demonstrate first, then allow the users to complete the exercise on their own,
following the steps in their User Manuals.
Steps:
1.
Select File -> New.
2.
Ensure the create a Panorama option is selected. Click OK.
3.
Click on the source format drop down menu and select single panorama.
4.
Ensure node sweep is at 360, and dimensions are set to auto.
5.
Click on the blend tab.
6.
Click on the Import button. Locate the image file Chapel_In and open it.
7.
Click on the Import button once more to fix the orientation of the image. Select the
Chapel_In image file.
8.
Click on the rotation drop down menu and select +90 degrees. Click open.
EXERCISE 7: SET THE CORRECT COMPRESSION AND
PLAYBACK SETTINGS
Instructor Note: Remember to demonstrate first, then allow the users to complete the exercise on their own,
following the steps in their User Manuals.
Steps:
1.
Click the compress Tab.
2.
Click the set button in the compression box.
3.
Click on the first compressor drop down menu. Select photo-jpeg.
Depending on the output the user would like, the following settings could change. Consult
the job aid for compression settings for other output (i.e.. Cd-rom, Kiosk, etc)
4.
Select medium on the quality scale.
5.
Click OK.
6.
Click the compress button.
File name: VRWorx_Instructor.pmd
Last modified: 06/20/02
Copyright Arizona Board of Regents, 2002
University of Arizona
15
VR WORX 2: Instructor Manual
8.
Click the playback tab.
9.
Scroll through the movie to the location where you see the altar (at the opposite end
of the doorway)
10.
Click the set button for the initial constraints.
EXERCISE 8: EXPORT THE QTVR MOVIE
Instructor Note: Remember to demonstrate first, then allow the users to complete the exercise on their own,
following the steps in their User Manuals.
Steps:
1.
Go to the file menu and select export. Make sure you are still in the playback tab.
2.
Title your move “Chapel_In” and Save it.
It would be a good idea to keep everything together, so make sure you save this
movie with your previous one. You will also need to use this file later in the lesson.
EXERCISE 9: CREATE AND ADD NODES TO SCENE
Instructor Note: Remember to demonstrate first, then allow the users to complete the exercise on their own,
following the steps in their User Manuals.
Steps:
1.
Select File -> New
2.
Select the Create a Scene option and click OK.
3.
In the Name box, type “Chapel_Scene”.
4.
Set the Master size and Playback size to 320 X 240, if it is not already so.
The master size is the size of the original movie, which we made 320 x 240. The
playback size is the size we want the final movie to be, which we want the same size.
We are going to skip the background tab, which is not necessary and go straight to the
nodes tab.
File name: VRWorx_Instructor.pmd
Last modified: 06/20/02
Copyright Arizona Board of Regents, 2002
University of Arizona
16
VR WORX 2: Instructor Manual
5.
Click on the Nodes tab.
6.
Click on the Add button. Locate the file Chapel_Out and click Open.
7.
Click on the Add button once more. Locate the file Chapel_In and click Open.
8.
Locate the tools box. Click on the URL tool, which is on the bottom-right of the tools.
Then click again anywhere in the white grid workspace.
If you want to rearrange the nodes, you must change your tool back to the arrow tool to
move them.
EXERCISE 10: LINK NODES TOGETHER
Instructor Note: Remember to demonstrate first, then allow the users to complete the exercise on their own,
following the steps in their User Manuals.
Steps:
1.
Click the single link button located in the tools.
2.
Press and hold the mouse button over the “Chapel_In.mov” node and drag the line to
the “URL 1” node.
We use the single link because we can get from our movie to the url, but we cannot
make a hot spot on that web page to take us back to the movie. So, we are traveling
one way.
3.
Click the dual link button located in the tools.
4.
Press and hold the mouse button over the “Chapel_In.mov” node and drag the line to
the “Chapel_Out.mov” node.
We use the dual link in this case because we want to be able to travel back and forth
between these two nodes, as opposed to the single link to the URL. Your screen
should look similar to the image below.
File name: VRWorx_Instructor.pmd
Last modified: 06/20/02
Copyright Arizona Board of Regents, 2002
University of Arizona
17
VR WORX 2: Instructor Manual
EXERCISE 11: DEFINE THE URL AND THE HOT SPOTS
FOR THE CHAPEL_IN NODE
Instructor Note: Remember to demonstrate first, then allow the users to complete the exercise on their own,
following the steps in their User Manuals.
Steps:
1.
Double click on the URL node.
There are no hot spots to make here, but we do need to define the URL that we want.
2.
Click on the change button on the bottom-right of the screen. Type http://
www.arizona.edu. Click OK.
3.
Close the Node Browser window.
4.
Double click on the Chapel_In node.
On the right you will see the image of your panorama. You will also see auto generated
hot spots that look like colored rectangles. One should read “To: Chapel_Out.mov”, and
the other should read “To: URL 1.” The area inside these rectangles is the area that a
user can later click on to get to that particular destination. Let’s move these hot spots
around to where we want them to be.
5,
Click on the hot spots tab. Resize the window so you can see the doorway and the
auto-generated hot spots.
6,
Using the arrow tool, move the Chapel_Out.mov hot spot so it is positioned over the
doorway.
If you need to change the size of the rectangle shape, drag the resize handles on the
corners of the rectangle.
7.
Move the url 1 hot spot so it is positioned over the picture frames to the left of the
doorway.
8.
Close the node browser window.
File name: VRWorx_Instructor.pmd
Last modified: 06/20/02
Copyright Arizona Board of Regents, 2002
University of Arizona
18
VR WORX 2: Instructor Manual
EXERCISE 12: DEFINE HOT SPOTS FOR THE CHAPEL_OUT
NODE
Instructor Note: Remember to demonstrate first, then allow the users to complete the exercise on their own,
following the steps in their User Manuals.
Steps:
1.
Double click on the Chapel_Out.mov node. We will make the hot spots a little differently this time. Instead of using the auto generated one, we will make our own.
2.
Locate the auto-generated hot spot and delete it by pressing the delete key.
3.
Click on the square tool in the tools box located to the right of the arrow tool.
4.
Locate the chapel building. Draw a square over the building.
5.
Double click on the hot spot you just created.
6.
Under the General tab, in the Name text box, type in “to Chapel_In”
7.
Click on the Link tab. Select “Chapel_In.mov” in the destination Node ID drop down
menu. Click OK.
This sets the destination of the hot spot to the Chapel_In node.
EXERCISE 13: COMPOSE SCENE AND EXPORT FINAL
PANORAMA
Instructor Note: Remember to demonstrate first, then allow the users to complete the exercise on their own,
following the steps in their User Manuals.
Steps:
1.
Click on the Compose tab, then click on the Compose button.
2.
Click on the Playback tab.
3.
Test the scene by clicking on all three hot spots we created.
4.
Click the Export button. You could also go to File -> Export to export the movie.
5.
Name the movie “Chapel_Scene”
6.
Click Save. This is the final product! This is the only file that you will need to upload to
a web site, or burn to CD, or whatever the final destination is. The “Chapel_Scene” is
the finished complete movie!
File name: VRWorx_Instructor.pmd
Last modified: 06/20/02
Copyright Arizona Board of Regents, 2002
University of Arizona
19
VR WORX 2: Instructor Manual
CONCLUSION
We have now learned the fundamentals of QuickTime Virtual Reality and the VR Worx program. You
all will now take a Criterion Test to test yourselves on what you have learned in this training session.
You will have 10 minutes to complete the test and will not be able to use your users manuals.
Any questions before we begin the Criterion Test?
File name: VRWorx_Instructor.pmd
Last modified: 06/20/02
Copyright Arizona Board of Regents, 2002
University of Arizona
20
VR WORX 2: Instructor Manual
CRITERION TEST:
10 min
Instructor Note: Instruct the students to turn to the last page of their User’s Manuals. Inform the students
they have 10 minutes to complete the Criterion Test, which should be more than enough time. At the end
of the time allowed, check the students’ final products to ensure they have passed successfully.
This is the criterion test for the VR Worx module. It is going to test your comprehension of the module you
just participated in or allow you to test out of the VR Worx module.
1.
What is the number of degrees between the following images (assuming they will make a 360
degree panorama)
a.) 15
2
b.) 20
c.) 25
d.) 30
What is the average percent of overlap needed between each image when shooting a QTVR
panorama?
a.) 10 – 15 %
b.) 40 – 50 %
c.) 70 – 90%
3.
What are the three main pieces of equipment needed to shoot a QTVR panorama?
TRIPOD , QTVR PAN HEAD, CAMERA
4.
Complete the following:
♦
♦
♦
♦
♦
Delete the movie files we created in the training session. Be sure to leave the source
image files – do not trash them.
Create a new project with VR Worx in which you will stitch the same images we did
in the training session and prepare it for web output.. Again they are located in the
Images for Stitching folder and were shot with an 38mm lens.
You must make this panorama rotate a full 360 degrees.
Name your project “Chapel.”
After you have made the Chapel panorama, you must add a hot spot to just the bell
on the roof of the chapel which when clicked, will take a user to the following URL :
http:/./www.hibberts.co.uk.
At the end of the time, your instructor will check your final product.
INSTRUCTOR - CHECK FOR:
Final pano file is named “Chapel.mov”
♦
♦
Pano looks correct (i.e.. It is correctly aligned, does not look distorted)
♦
Hot spot is on the bell off the roof of the chapel and correctly linked to
www.hibberts.co.uk
File name: VRWorx_Instructor.pmd
Last modified: 06/20/02
Copyright Arizona Board of Regents, 2002
University of Arizona