1
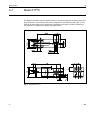
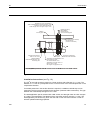
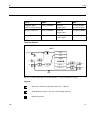
User Manual FIT® Digital load cells Hardware and Functions I1696-3.0 en HBM Content 1 Content Typographical conventions ...................................................................................................... 3 Important information................................................................................................................ 3 Safety information ..................................................................................................................... 4 1 Use ....................................................................................................................................... 5 2 Special features................................................................................................................... 6 3 Models, versions, interfaces .............................................................................................. 8 4 5 FIT 3.1 Overview of FIT® variants..................................................................................................................... 8 3.2 Models................................................................................................................................................. 9 3.3 Versions..............................................................................................................................................11 3.4 Interfaces............................................................................................................................................11 Mechanical construction .................................................................................................. 12 4.1 Model FIT® /1.......................................................................................................................................12 4.2 Model FIT® /4 (Cable output facing down) ............................................................................................15 4.3 Model FIT® /0.......................................................................................................................................19 4.4 Model FIT® /5.......................................................................................................................................22 Electrical configuration .................................................................................................... 24 5.1 Function..............................................................................................................................................25 5.2 Signal processing................................................................................................................................26 5.2.1 Trigger function .......................................................................................................................27 5.2.2 Limit value switches.................................................................................................................28 5.2.3 Extreme value function ............................................................................................................28 5.2.4 Dosing and filling control..........................................................................................................28 5.2.5 Diagnostic function ..................................................................................................................29 5.2.6 Inputs 5.2.7 Outputs (E version only) ..........................................................................................................31 5.2.8 Dosing control (E version only) ................................................................................................32 .................................................................................................................................29 HBM 2 Content 6 Electrical connection ........................................................................................................ 33 6.1 FIT® wiring assignment........................................................................................................................33 6.2 Supply voltage ....................................................................................................................................39 6.3 Serial interface....................................................................................................................................40 6.4 6.3.1 RS232 / RS485 4-wire interfaces (UART) ................................................................................40 6.3.2 CANOpen interface .................................................................................................................42 6.3.3 DeviceNet interface .................................................................................................................43 6.3.4 Diagnostic channel RS485 2-wire ............................................................................................44 Inputs and outputs...............................................................................................................................45 6.4.1 Electrical data of inputs ...........................................................................................................45 6.4.2 Data of outputs........................................................................................................................46 Index ......................................................................................................................................... 48 HBM FIT Typographical conventions 3 Typographical conventions For clear identification and improved legibility, the following conventions have been used in this documentation: Important paragraphs are marked with a symbol to draw attention to them. CE Designation Statutory marking requirements for waste disposal Italics “File Open“ “Start” MSV Points out external documents and files All menus and menu commands appear in quotes, here the “File” menu and the “Open” submenu. Quotes and italics are used for buttons, input fields and user input. All commands are set out in a bold font face or as a link to the command description. Important information The device must not be modified from the design or safety engineering point of view except with our express agreement. Any modification shall exclude all liability on our part for any damage resulting there from. Repair is specifically forbidden. Repairs must only be carried out by HBM. All the factory defaults are stored at the factory where they are safe from power failure and cannot be deleted or overwritten. They can be reset at any time by using the command TDD0. The production number set at the factory must not be changed. FIT HBM Safety information 4 Safety information FIT load cells are exclusively designed for weighing technology measurement tasks and directly associated control and regulatory tasks. Use for any purpose other than the above shall be deemed to be inappropriate. Each time, before starting up the modules, you must first run a project planning and risk analysis that takes into account all the safety aspects of automation technology. This particularly concerns personal and machine protection. There are not normally any hazards associated with this product, provided the notes and instructions for project planning, assembly, appropriate operation and maintenance are observed. It is essential to comply with the safety and accident prevention regulations specific to the particular application. Installation and start-up must only be carried out by suitably qualified personnel. During installation and when connecting the cables, take action to prevent electrostatic discharge as this may damage the electronics. The required power supply is an extra-low voltage (10...30 V) with safe disconnection from the mains. When connecting additional devices, comply with the safety requirements 1) . Shielded cables must be used for all connections. The screen must be connected extensively to ground on both sides. The CE mark enables the manufacturer to guarantee that the product complies with the requirements of the relevant EC directives (the declaration of conformity is available at http://www.hbm.com/HBMdoc). In accordance with national and local environmental protection and material recovery and recycling regulations, old devices that can no longer be used must be disposed of separately and not with normal household garbage. If you need more information about waste disposal, please contact your local authorities or the dealer from whom you purchased the product. 1) HBM Safety requirements for electrical equipment for measurement, control, and laboratory use FIT Use 1 5 Use The FIT® load cells belong to the digital load cells and measurement chain family specially developed by HBM for rapid dynamic weighing processes. They acquire measurement signals from strain gages, process them digitally, output them and can network them for buses on request. The load cells deliver a completely filtered, scaled and digitalized output signal to a direct connection in bus systems or PC's. They operate with sampling rates of up to 1200 measurements per second and can be easily and rapidly adapted to the actual weighing system by means of adjustable parameters. The integrated trigger function enables an event-controlled weight value generation which, e.g. significantly reduces external software requirements for Checkweigher applications. The load cells are optionally delivered with the following interfaces: RS232 RS485 CANOpen DeviceNet FIT® load cell models FIT®/1, FIT® /4 and FIT®/5 are completely encapsulated in stainless steel and are particularly suitable for applications in corrosive environments. FIT® load cell models FIT®/0 with round connectors for electrical connection are cost effective and space-saving in application. The construction meets basic requirements for corrosion resistance. In addition to the standard version (S), another version (E) with control functions (two connection cables) is available. This offers additional application areas with limit values and dosing control functions (sorting systems, filling systems). The limit switches and dosing function are available in all versions of FIT®. The FIT® control functions are described in the Online Help (AED_help_e). The PC software AED PANEL 32 is available to facilitate parameter settings, to display dynamic measurement signals and for comprehensive analysis of the dynamic system. The HBM display unit DWS2103 can be connected to all FIT load cells. These operating instructions describe the hardware and the functions of the FIT® digital load cells. FIT HBM Special features 6 2 Special features High overload limits High torsion and bending strength High resonance frequencies 4 limit value switches with hysteresis Control of filling and dosing functions Rapid digital filtering and scaling of the measurement signal Serial interfaces: Optionally RS232 or RS485-4-wire (UART), CANOpen, DeviceNet All settings made via the serial interface Power fail safe parameter storage Indestructible storage of factory defaults Selection of output speed of measured values up to 1200 measured values/sec. Automatic zero tracking (±2 %) Automatic zero on start-up (±2 %...±20 %) Trigger functions (internal level pre-/post- triggering, external pre-/post- triggering) Diagnostic function Operating voltage 10 V...30 VDC Galvanically isolated power supply Galvanically isolated control inputs and outputs HBM FIT Special features 7 FIT® model FIT ®/1 : Integrated vertical overload protection Corrosion resistant, laser-welded Degree of protection IP55 FIT® model FIT ®/4: Integrated vertical overload protection Corrosion resistant, laser-welded Degree of protection IP66 FIT® model FIT ®/0 (previously PW 18i): Electrical connection via connector Degree of protection IP67 FIT® model FIT ®/5: Hermetically sealed version Integrated vertical overload protection Corrosion resistant, laser-welded Electrical connection via connector Degree of protection IP68 (connectors IP69K) FIT HBM Models, versions, interfaces 8 3 Models, versions, interfaces 3.1 Overview of FIT® variants The product number characterises the FIT® variants as follows: 1 - FIT / a b c d e / xx KG Nominal capacity: 05, 10, 20, 50, 75 kg Cable length: 0 = without (plug), 1 = 3 m, 2 = 6 m, 3 = 12 m Accuracy: 3 = C3, 4 = C4 Interface: A = RS232, B = RS485, C = CANOpen, D = DeviceNet Function: S = Standard, E = Extended Housing type: 0 = without, 1, 4, 5 = hermetical sealed, stainless steel Product family FIT3 HBM has defined so-called preferred variants which are described in the documentation "Overview of product numbers" (see documentation CD 1-AED/FIT_Doc.). All other variants (non-preferred types) are available on request. The various construction variants are described in the following chapters. HBM FIT Models 3.2 9 Models FIT digital platform load cells are supplied encapsulated in laser-welded stainless steel enclosures with permanently fixed connection cables with the following type name: FIT®/1bcde/xxKG The stainless steel enclosure enables use under corrosive environmental conditions to degree of protection IP 55 (Fig. 1). FIT®/4bcde/xxKG The stainless steel enclosure enables use under corrosive environmental conditions to degree of protection IP 66 (Fig. 3). FIT®/5bcde/xxKG An hermetically sealed model of the FIT® (Fig. 4) is available in laser-welded stainless steel enclosure with plug connectors. Alternatively there is a model without stainless steel enclosures, but with full FIT® functionality (Fig. 2) with the type name: FIT®/0bcde/xxKG It is characterised by an aluminium measuring body with integrated electronics and plug connectors. This model is space-saving and cost-effective at degree of protection IP 67 if greater corrosion resistance is not required. FIT® load cells are produced for max. capacities 5 to 75 kg. FIT® /5 load cells only for 5 kg, 10 kg, 20 kg capacities. In the type name, the symbol "a" characterises the actual model, "xx" the max. capacity in kg. FIT HBM Models 10 HBM Fig. 1: FIT® load cell FIT®/1bcde/xxKG Fig. 2: FIT® load cell FIT®/0bcde/xxKG Fig. 3: FIT® load cell FIT®/4bcde/xxKG Fig. 4: FIT® load cell FIT®/5bcde/xxKG FIT Versions 3.3 11 Versions FIT® load cells are available in two versions: Standard version (S) Extended version (E) The standard version (S) with just one connection cable or connector comes with all functions necessary for dynamic weighing, including the external trigger function. In the Extended version (E), the FIT® has two connection cables. The second cable or second connector contains the connections for the digital inputs and outputs (2 inputs, 4 outputs). These I/O can be used to output four limit value states or to automatically control the FIT® filling and dosing processes. In the type name, the symbol "b" characterises the actual version. The diagnostic bus (as a second communication channel) is only available in the version extended (E version). In this case the digital input 1 is located in the cable 2. 3.4 Interfaces All models and versions can be optionally equipped with one of the following serial interfaces: RS232 RS485-4-wire CANOpen DeviceNet In the type name, the symbol "c" characterises the actual version. The diagnostic bus (as a second communication channel) is only available in the version extended (E version). In this case the digital input 1 is located in the cable 2. Details about the electrical connection of the interfaces can be found in Section 6 of these operating instructions. FIT HBM Mechanical construction 12 4 Mechanical construction 4.1 Model FIT®/1 The load cell in the model FIT®/1 is fully protected by a laser-welded stainless steel enclosure (Fig. 5), the seal between the load application part (1) and enclosure is ensured by a silicone membrane. The pressure compensation between the interior of the load cell and environment, which is necessary for function, is implemented via venting channels under the load application part. The load cell is designed for degree of protection IP55. Fig. 5: Dimensions FIT®/1 HBM FIT Model FIT®/1 13 2xM6 Festigkeitsklasse 10.9 Anzugsmoment 14Nm 2xM6 strength class 10.9 tighten. torque 14Nm Plattform mounting plate Belastungsrichtung Mitte Plattform loading direction center of mounting plate FIT/1 Basisplatte base plate 4xM8 Festigkeitsklasse 10.9 Anzugsmoment 25Nm 4xM8 strength class 10.9 tighten. torque 25Nm empfohlene Ebenheit der Platte 0.1mm an der Verbindungsfläche recommended flatness 0.1mm at mounting area Fig. 6: Installation FIT®/1 Installation instructions (see Fig. 6): The load cell is fastened in place with 4 M8 screws, the strength class 10.9 with a torque of 25 Nm is recommended. The flatness of the installation surface must be better than 0.1 mm to avoid tension in the base plate. Tension in the base plate can affect the function of the overload protection and cause measurement errors. The weighing platform is fixed by means of two reamed holes (6 H7, 8 mm deep) and two threaded M6 holes (7 mm deep), the strength class 10.9 and a torque of 14 Nm is recommended. FIT HBM Model FIT®/1 14 It is recommended that the load unit is mounted in the centre of the platform to minimise corner load errors and torques. The following must be noted when installing several FIT® 's in a system with a bus system: The printed production number (rating plate) is required for setting up the data communication. If the rating plate can no longer be seen after installation, the numbers of all FIT® should be noted beforehand. This enables address assignment during the initial start-up. Alternatively, before connection to the bus line, each FIT® can be individually connected to a PC in order to set different addresses. (see ADR command, help file AED_help_e; “Description of the basic commands”). The following precautionary measures must be complied with during mounting and operation: The fastening screws of the load application part must never be undone. The silicone membrane lies mechanically protected under the load application part. The gap between enclosure and load application part must in no circumstances be cleaned with sharp objects or high pressure cleaners. During cleaning, the load application part and the gap to the enclosure must not be completely submerged in water as, under unfavourable circumstances water can penetrate into the interior of the load cell via the venting holes. The depth of the M6 threaded holes is 7 mm. Please note this dimension when selecting the fastening screws. FIT® load cells have effective overload protection in the tensile and compressive directions. Please note the permissible maximum values for eccentric loads and take into account overloads from knocks. Avoid force shunts during setup. HBM FIT Model FIT®/4 (Cable output facing down) 4.2 15 Model FIT®/4 (Cable output facing down) The load cell in the model FIT®/4 is fully protected by a laser-welded stainless steel enclosure (Fig. 7), the seal between the load application part (1) and enclosure is ensured by a silicone membrane. The pressure compensation between the interior of the load cell and environment, which is necessary for function, is implemented via a venting tube facing downwards. The load cell is designed for degree of protection IP66. The cable output is implemented through the base. FIT HBM 16 Model FIT®/4 (Cable output facing down) Fig. 7: Dimensions FIT®/4 (cable and venting tube outputs facing downwards) HBM FIT Model FIT®/4 (Cable output facing down) 17 2xM6 Festigkeitsklasse 10.9 Anzugsmoment 14 Nm 2xM6 strength class 10.9 tighten. torque 14 Nm Belastungsrichtung Mitte Plattform loading direction center of mounting plate Plattform mountin0g plate FIT/4 Basisplatte base plate empfohlene Ebenheit der Platte 0.1 mm an der Verbindungsfläche recommended flatness 0.1 mm at mounting area 4xM6 Festigkeitsklasse 10.9 Anzugsmoment 14 Nm 4xM6 strength class 10.9 tighten. torque 14 Nm Fig. 8: Installation FIT®/4 Installation instructions (see Fig. 8): The load cell is fastened in place with 4 M6 screws, the strength class 10.9 with a torque of 14 Nm is recommended. The flatness of the installation surface must be better than 0.1 mm to avoid tension in the base plate. Tension in the base plate can affect the function of the overload protection and cause measurement errors. The weighing platform is fixed by means of two reamed holes (6 H7, 8 mm deep) and two threaded M6 holes (7 mm deep), the strength class 10.9 and a torque of 14 Nm is recommended. FIT HBM Model FIT®/4 (Cable output facing down) 18 It is recommended that the load unit is mounted in the centre of the platform to minimise corner load errors and torques. The following must be noted when installing several FIT® 's in a system with a bus system: The printed production number (rating plate) is required for setting up the data communication. If the rating plate can no longer be seen after installation, the numbers of all FIT® should be noted beforehand. This enables address assignment during the initial start-up. Alternatively, before connection to the bus line, each FIT® can be individually connected to a PC in order to set different addresses. (see ADR command, help file AED_help_e; “Description of the basic commands”). The following precautionary measures must be complied with during mounting and operation: The fastening screws of the load application part must never be undone. The silicone membrane lies mechanically protected under the load application part. The gap between enclosure and load application part must in no circumstances be cleaned with sharp objects or high pressure cleaners. The depth of the M6 threaded holes is 7 mm. Please note this dimension when selecting the fastening screws. FIT® load cells have effective overload protection in the tensile and compressive directions. Please note the permissible maximum values for eccentric loads and take into account overloads from knocks. Avoid force shunts during setup. HBM FIT Model FIT®/0 4.3 19 Model FIT®/0 The digital FIT® /0 load cells are characterised by a compact aluminium measuring body and plug connectors. The electronics are directly integrated in the measuring body (Fig. 9). The load cell is space-saving and cost-effective, especially where great corrosion resistance is not required. It is designed for degree of protection IP67. Fig. 9: Dimensions FIT®/0 FIT HBM Model FIT®/0 20 Befestigung FIT/0 an Lasteinleitung 4xM6 Festigkeitsklasse 10.9 Anzugsmoment 14 Nm attachment FIT/0 at load introduction 4xM6 strength class 10.9 tighten. torque 14 Nm Belastungsrichtung Mitte Plattform loading direction center of mounting plate Plattform mounting plate Lasteinleitung (Konstruktion durch Kunden) load introduction (customer construction) empfohlene Ebenheit der Platte 0.1 mm an der Verbindungsfläche recommended flatness 0.1 mm at mounting area Basisplatte base plate Alternative Lasteinleitung alternative load introduction 4xM6 DIN 912 Festigkeitsklasse 10.9 Anzugsmoment 10 Nm max. Einschraubtiefe 7 mm 4xM6 DIN 912 strength class 10.9 tighten. torque 10 Nm max. length of engagement 7 mm In Belastungsrichtung auf 1000 %. If the load cell is mounted on a base plate with a flatness of <0.1 mm, the safe load limit in loading direction increases to 1000 %. Fig. 10: Installation FIT®/0 Installation instructions (see Fig. 10): The FIT®/0 load cell must be mounted on a clean surface with a flatness of < 0.1 mm. The flatness of < 0.1 mm is a prerequisite for the correct function of the overload protection in the compressive direction. If overload protection in the tensile direction is required, a suitable overload stop can be mounted in the front groove provided for this purpose (customer-side construction). The gap between the overload stop and groove is 0.1 mm. The load application part is mounted with 4 M6 screws, the strength class 10.9 with a torque of 14 Nm is recommended. The flatness of the connection surface must be < 0.1 mm. The load application part should only touch the load cell on this connection surface in order to achieve optimal measuring properties. HBM FIT Model FIT®/0 21 The load application part must be produced by the customer and can be mounted above or below. This allows an alternative load application through the base plate. 4 threaded holes are available to mount the FIT® /0 on the base plate, the strength class 10.9 with a torque of 10 Nm is recommended. Please note the maximum thread depth of 7 mm as screws with a greater screw-in length can damage the load cell. It is also recommended, with the FIT® 0 load cell, that the load application part is mounted in the centre of the platform to minimise corner load errors and torques. Suitable connection cables are available from HBM (see data sheet). The following must be noted when installing several FIT®’ s in a system with a bus system: The printed production number (rating plate) is required for setting up the data communication. If the rating plate can no longer be seen after installation, the numbers of all FIT® should be noted beforehand. This enables address assignment during the initial start-up. Alternatively, before connection to the bus line, each FIT® can be individually connected to a PC in order to set different addresses. (see ADR command, help file AED_help_e; “Description of the basic commands”) The following precautionary measures must be complied with during mounting and operation: The gap between the base plate and load cell can only function as an overload protection if it is kept clean. Contamination of this gap can also cause force shunts which can lead to measurement errors. If there is danger of contamination, it is recommended that overload protection is provided in another manner, e.g. punctiform with adjusting screws. The length of the fastening screws must be selected so that the maximum screw-in length of 7 mm is not exceeded. Non-compliance can cause damage to the load cell. An effective overload protection can be achieved with the FIT® /0 load cell if the installation instructions are complied with. Please note the permissible maximum values for eccentric loads and take into account overloads from knocks. Avoid force shunts during setup. FIT HBM Model FIT®/5 22 4.4 Model FIT®/5 The model FIT®/5 is hermetically sealed and composed of stainless steel. (Fig. 11), This model comes with integrated overload stops in vertical direction. The output is implemented through the base by two (one) female plugs (8 pins). The protection class is IP 68. The protection class of the associated cables / connectors is IP 69K. A-A 1:1 Fig. 11: Dimensions FIT®5 HBM FIT Model FIT®/5 23 Belastungsrichtung Mitte Plattform loading direction center of mounting plate Plattform mounting plate 2 x M6 Festigkeitsklasse 10.9 Anzugsmoment 10 Nm strength class 10.9 tighten. torque: 10 Nm Zwischenstück Spacer empfohlene Ebenheit der Basisplatte 0,02 mm an der Verbindungsfläche recommended flatness 0.02 mm at mounting area Alternative Lasteinleitung alternative load introduction Basisplatte base plate empfohlene Ebenheit der Basisplatte 0,02 mm an der Verbindungsfläche recommended flatness 0.02 mm at mounting area 2 x M6 Festigkeitsklasse 10.9 Anzugsmoment 10 Nm strength class 10.9 tighten. torque: 10 Nm Fig. 12: Installation FIT®/5 Installation instructions (see Fig. 12): The load cell is fastened in place with 2 M6 screws, the strength class 10.9 with a torque of 10 Nm is recommended. The length of the mounting area measured from the rearward rim of the FIT®/5 must not exceed 70.5 mm. The weighing platform is fixed by means of two threaded M6 holes, the strength class 10.9 and a torque of 10 Nm is recommended. The platform can be fixed alternatively at the top side or at face side of the transducer. When the platform is mounted on the top side the length of the mounting area must not exceed 30.5 mm measured from the face side. The following must be noted when installing several FIT® 's in a system with a bus system: The printed production number (rating plate) is required for setting up the data communication. If the rating plate can no longer be seen after installation, the numbers of all FIT® should be noted beforehand. This enables address assignment during the initial start-up. Alternatively, before connection to the bus line, each FIT® can be individually connected to a PC in order to set different addresses. (see ADR command, help file, AED_help_e; “Description of the basic commands”). FIT HBM Electrical configuration 24 The following precautionary measures must be complied with during mounting and operation: The depth of the M6 threaded holes is 12 mm. Please note this dimension when selecting the fastening screws. FIT® load cells have effective overload protection in the tensile and compressive directions. Please note the permissible maximum values for eccentric loads and take into account overloads from knocks. Avoid force shunts due to setup. 5 Electrical configuration The electronics of the digital FIT® load cell basically comprises the following function groups: Single-point load cell Amplifier Analog/digital converter (A/D) Evaluating unit (µP) Power fail safe parameter storage (EEPROM) Serial interface Galvanically isolated power supply Galvanically isolated control inputs and outputs (E version) HBM FIT Function 5.1 25 Function Galvanic Isolation Voltage regulator Power Supply UB1 Voltage regulator Interface A D µP Trigger Trigger Diagnostic channel Linearisation Serial number Digital filter Measuring rate Sensitivity Zero set FIT Interface Diagnostic channel Power Supply UB2 IN Digital I/O OUT E-version only Fig. 13: Block diagram The analog transducer signal is first amplified, then filtered and converted to a digital value in the analog/digital converter. The digitised signal is processed in the microprocessor and forwarded via the serial interface. All the parameters can be stored power fail safe in the EEPROM. The FIT load cells are calibrated in the factory with zero load and max. capacity. The electronics determine a default characteristic curve from these measured values and use this characteristic curve to display the subsequent measured values. Depending on the output format (COF), the following measured values are returned: Output format Input signal Meas. values for NOV = 0 Meas. values for NOV > 0 Binary 2 chars. (integer) 0...Max. capacity 0...20000 Digit 0...NOV Binary 4 chars. (long integer) 0...Max. capacity 0...5120000 Digit 0...NOV ASCII 0...Max. capacity 0...1000000 Digit *) 0...NOV *) Delivery condition FIT HBM Signal processing 26 The two parameters LDW and LWT give you the opportunity to adapt the curve to meet your requirements (scale curve) and you can use the NOV command to standardize the measured values to the required scaling value (e.g. 3000 d). Detailed information can be found in help file, AED_help_e; "Description of the basic commands". 5.2 Signal processing FMD ASF ICR SZA SFA Filter Sampling rate Factory calibration Gross measured value LIC TAV, TAS Amplifier Measuringbridge NOV, RSN LDW LWT Userdefined scaling Linearization Net Net measured value MIN/ MAX Extreme values ADC RUN BREAK Dosing control IMD Coarse flow 1 Trigger Fine flow 2 Tare Ready Alarm Limit value LIV 1...4 Fig. 14: Signal flow plan After amplification and A/D conversion, the signal is filtered by adjustable digital filters. The commands ASF, FMD are used to set the cutoff frequency of the digital filters. The command ICR is used to change the output rate (measured values per second). The user can set their own curve (commands LDW, LWT, NOV) without changing the factory calibration. Gross/net selection is also available (command TAS). Command ZSE activates an automatic zero function on start-up. There is also an automatic zero tracking function (ZTR). HBM FIT Trigger function 27 Command (LIC) is available for linearization of the scale characteristic curve (with a third order polynomial). The polynomial parameters can be set using the HBM PC program AED_Panel 32. The current measured value is read out using the command MSV?. The format of the measured value (ASCII or binary) is set with the command COF. You can also use command COF to select automatic data output. Five types of digital filter are implemented in the FIT® and these are selected using the FMD command. With FMD0, filters are also available below the 1 Hz cut-off frequency. In filter mode FMD1, fast-settling filters with high damping in the stop band are activated. Detailed information can be found in the help file AED_help_e, “Description of the basic commands”. 5.2.1 Trigger function The FIT® includes four trigger functions to support measurements in packing machines and checkweighers: Internal pre-triggering via an adjustable level External triggering via a digital trigger input (pre-trigger) Internal post-triggering via an adjustable level External triggering via a digital trigger input (post-trigger) Gross or net measured values can be used for triggering (TAS). The trigger function is described in the help file AED_help_e (chapter: “Description of the commands for signal processing”). FIT HBM Limit value switches 28 5.2.2 Limit value switches The FIT® includes four limit values which can be set by the command LIV. The limit value outputs are available as hardware outputs and additionally as logical outputs in the status information of the measured value. The input signal for the limit value monitoring can be the gross value, the net value, the trigger result or the extreme values (MIN/MAX). (see chapter 5.2.7: “Outputs”) Detailed information can be found in the help file AED_help_e. 5.2.3 Extreme value function The FIT® includes an extreme value function which is able to monitor alternatively the gross or net measured values. The command PVA carries out the output of both extreme values (MIN and MAX). At any time you can clear the extreme values using the command CPV. You can activate the extreme values using the command PVS. Detailed information can be found in the help file AED_help_e. 5.2.4 Dosing and filling control The filling and dosing function is activated using the command IMD2. In this case the setting of the limit value function as well as the trigger function is of no significance for the digital inputs/outputs. Detailed information regarding the dosing function can be found in the help file AED_help_e, “Description if the commands for the filling and dosing applications”. HBM FIT Diagnostic function 5.2.5 29 Diagnostic function A diagnostic function has been built into the FIT® to monitor dynamic measurement. This function includes a memory for 512 (binary) measured values and associated status information. Different recording modes are available so that the processes can be analysed without interrupting measurement. The advantage of this diagnostic function is that the measured values are stored in real time (without loss of data) and then read out slowly (OFF-line). This means that it is possible to access this real-time data even at low communication rates. The diagnostic function can be accessed in two modes : Via the main communication channel of the FIT® (UART with RS232/RS485, CAN bus or DeviceNet) Via a second communication channel (2-wire RS485), (E-version only) The diagnostic function is described in the help file AED_help_e, “Diagnostic commands, Digital inputs/outputs”. 5.2.6 Inputs The S version of the FIT® electronics has a digital input in cable 1. Two galvanically isolated inputs are included in cable 2 with the E version. The inputs can be assigned various functions using the IMD software command. FIT IMD0 The status of the inputs has no influence on the measuring process, it can however be queried with the command POR?;. In this manner, any digital signals (e.g. from limit switches) can be acquired by the control software without needing to install additional lines and I/O modules. IMD1 The inputs are assigned functions for the automation of the measurement process (e.g. trigger function for checkweighers). IMD2 The inputs are assigned functions for the dosing control. HBM Inputs 30 Inputs IMD0; IMD1; IMD2; "Trigger" input (cable 1, version S only) Query via POR? External trigger input Function like IN1 (see next section) IN1 (only version E) Query via POR? External trigger input Stop dosing (BRK) IN2 (only version E) Query via POR? Tare, select net value output Start dosing (RUN) Function diagram: IMD1 trigger "Trigger" tare GND 1 signal In1 limit sw. 1 In2 limit sw. 2 OUT1 OUT2 GND2 Fig. 15: Processing digital signals (example with IMD = 1 and two activated limit values) Legend: Galvanical isolation (measuring electronics cable 2) Slope detection (input 1, only when set for trigger function) Debouncing 20 ms HBM FIT Outputs (E version only) 31 Information about using the inputs: The input function is not activated in the factory. The applicable settings must be made to use the trigger function (IMD, TRC commands). This also applies to the input in cable 1. The inputs "Trigger" and "In1" differ in their electrical properties (galvanical isolation, reference potential and input level). Details regarding the various input levels can be found in the Technical Data, section 7. 5.2.7 Outputs (E version only) The Out 1 and Out 2 outputs of the FIT® load cell can be used either as limit value outputs (LIV command) or as digital outputs that can be set with the command POR. The OUT 3 and OUT 4 outputs can be activated as limit values 3 and 4. Limit value switch The output is controlled by the limit value function when the output is activated as a switching signal with the LIV command (see help file AED_Hilfe_e.). Output via POR An output not used as a limit value switch can be switched on or off with the POR command. In this manner, process functions can be triggered by the control software without installing additional lines and I/O modules. Notes: The selection of the function is implemented individually for each output by the assigned LIV command. The limit value functions are blocked when IMD2 is set (see section 5.2.8: “Dosing control (E-version only)”). FIT HBM Dosing control (E version only) 32 Function of switch outputs (where IMD = 0 or IMD = 1) Outputs Limit values (LIV) switched off Limit values (LIV) switched on OUT1 Settings via POR Settings via LIV1 OUT 2 Settings via POR Settings via LIV2 OUT 3 - Settings via LIV3 OUT 4 - Settings via LIV4 The status of the inputs/outputs can be read out using the command RIO?. 5.2.8 Dosing control (E version only) The operating mode IMD2 activates the dosing control which assigns all inputs and outputs with special functions. Previously set limit values (LIV) and inputs via the POR command then have no influence on the status of the outputs. A further series of parameters, described in Part 3 of these instructions, must be input for the control of dosing processes. Inputs IMD2; Dosing IN1 Stop (BRK) IN2 Start (RUN) Depending on the output mode command (OMD, help file AED_help_e; “Description of the commands for filling and dosing applications”) the following output functions are activated: HBM FIT Electrical connection 33 1) Outputs OMD0 OMD1 OMD2 OUT1 Coarse flow Coarse flow Coarse flow OUT2 Fine flow Fine flow Fine flow OUT3 Ready signal / Emptying 1) Ready signal / Emptying 1) Ready signal / Emptying 1) OUT4 Tolerance + exceeded Outside tolerance +/- Alarm When emptying time = 0 (EPT) OUT3 is ready signal after determination of the real value. when emptying time > 0 (EPT) OUT3 is emptying control by set time. 6 Electrical connection 6.1 FIT® wiring assignment The connection diagrams for FIT® load cells are shown below. The FIT® in stainless steel enclosures have one or two permanently fixed cables. Suitable cables are available from HBM in various lengths for the plug connectors of the H0/H5 model versions, however they can also be supplied by the user. The diagrams are also suitable for the wiring of these cables. Notes regarding cable connection: The enclosure of the FIT® load cell is connected to the shield of both cables (1 cable with S version). To obtain EMC-compliant connection (EMC = electromagnetic compatibility), the shield at the cable end must be connected to the enclosure of the connected device or the earth potential. The shield must be connected directly and with low impedance (e.g. with EMC-compliant PG feed throughs). FIT HBM FIT® wiring assignment 34 Use shielded, low-capacitance cables only for all connections (interfaces, supply and auxiliary equipment) - (the HBM measurement cables fulfil these requirements). Electrical and magnetic fields often induce interference voltages in the measurement electronics. Do not route the measurement cables parallel to power lines and control circuits. If this is not possible, protect the measurement cable with steel conduit for example. Avoid stray fields from transformers, motors and contact switches. The S-version comes without the diagnosis channel, but the diagnosis function can be used via the communication interface. The FIT® can be operated with a supply voltage of up to 30 V. Incorrect connections between the supply and interface lines can cause irreversible damage. Check the correct assignment of the connections carefully before switching on the first time. Ensure that cables 1 and 2 are not incorrectly connected. Any HBM guarantee is rendered invalid for damage caused by incorrect connections. The ground of the interface driver is related to the GND1 terminal (cable 1). The interface driver of the master should be also connected to this GND1. Only a connecting cable with a screen grounded on two sides should be used as the interconnecting cable between the FIT ® and the master. The shield of the FIT ® cable is connected to the housing of the FIT ®. The diagnostic bus (as a second communication channel) is only available in the version extended (E version). In this case the digital input 1 is located in the cable 2. HBM FIT FIT® wiring assignment 35 Kabel 1 cable 1 Schirm screen RS232 RS485 CANOpen/ DeviceNet braun brown Diag Rb/Tb Diag Rb/Tb Diag Rb/Tb gelb yellow Diag Ra/Ta oder Trigger Diag Ra/Ta Oder Trigger Diag Ra/Ta oder Trigger grau grey CanL in schwarz black CanL out grün green CanH in blau blue CanH out weiss white rot red braun brown gelb yellow grau grey schwarz black grün green Schirm screen blau blue weiss white rot red Fig. 16: Wiring assignment FIT®/1 FIT HBM FIT® wiring assignment 36 Kabel 1 cable 1 Schirm screen braun brown gelb yellow grau grey schwarz black grün green blau blue weiss white rot red braun brown gelb yellow grau grey schwarz black grün green Schirm screen blau blue weiss white Kabel/cable 2(opt.) rot red Fig. 17: Wiring assignment FIT®/4 HBM FIT FIT® wiring assignment 37 optional: 2. Stecker für Steuerfunktionen optional: 2. cable for control functions Verwendete Stecker: Fa. Binder Rundsteckverbinder Serie 423 8 pol. DIN 09-0173-90-08 used plugs: Binder circular connector series 423 8 pins. 09-0173-90-08 Fig. 18: Wiring assignment FIT®/0 FIT HBM FIT® wiring assignment 38 Verwendete Kupplung: Fa. Lumberg Einbaukupplung: PRKFM 8-polig used female plugs: Lumberg PRKFM 8 pins Fig. 19 Wiring assignment FIT®/5 HBM FIT Supply voltage 6.2 39 Supply voltage Regulated DC voltage of +10…+30 V on cable 1 (line UB1/GND1) is required to operate the measurement electronics and serial communication. Voltage source requirements: The supply voltage must be sufficiently filtered (effective value minus residual ripple > 6 V). The FIT® electronics has a low loss regulator that consumes 2 W during operation. The power consumption is therefore dependent on the level of the supply voltage: Current consumption[A] 2W Voltage[V] When switched on, the electronics briefly consume a current of approx. 0.2 A. To ensure a safe start-up, the supply must be able to provide this current without a clipping being triggered. This must be complied with in particular when supplying several FIT® load cells from one power supply unit. The sustained loading is in contrast calculated from the equation shown above. Connection to a wide-ranging supply network is not permitted as this often causes interfering voltage peaks to be coupled into the transducer. Instead, a local supply must be provided for the FIT® load cells (even when grouped). The supply voltage (UB1, GND1) must be insulated from the shield potential. A connection from GND1 to the enclosure is not necessary, however the potential difference may only be maximum 30 V. The supply ground connector (GND1) is also used as the reference potential for the interface signals and the "Trigger" input in cable 1. In layouts with several transducers, the supply can be laid together with the RS485 bus lines in a 6 pin cable (e.g. with HMB junction boxes VKK1-4 or VKK206). Ensure that there is sufficient wire cross-section provided as some cable sections will conduct the supply current for all connected FIT® load cells. FIT HBM Serial interface 40 6.3 Serial interface 6.3.1 RS232 / RS485 4-wire interfaces (UART) The FIT® load cells are delivered as required either with an RS232 or RS485 4-wire interface. Baud rates of 1200…115200 bit/s can be set for both interfaces. The ground reference for all interface signals is based on the power supply ground of the FIT® load cell (GND1). The RS232 interface is only suitable for a point to point connection (one FIT® load cell per interface). Only the signals RxD (Receive Data), TxD (Transmit Data) and GND1 are required. TxD RxD GND TxD RxD GND For communication with an external device the TxD line must be connected with the RxD of the FIT and vice versa Fig. 20: Schematic connection of RS232 interface Multi-channel measurements are possible with a bus layout using FIT® load cells with the RS485 interface. All transducers on a line are switched in parallel and are differentiated using software to assign different addresses. When the control computer has an RS232 interface, then an interface converter is required (e.g. HBM SC232/422B). The correct assignment of transmission and reception lines can be seen in Fig. 21 (Bus line Ra to Ta of the converter, etc.). The converter already includes bus termination resistors. Another bus termination must be installed on the load cell furthest away (500 , Fig. 21). The following must be noted when installing several FIT® 's in a system with an RS485 bus system: The printed production number (rating plate) is required for setting up the data communication. If the rating plate can no longer be seen after installation, the numbers of all FIT® should be noted beforehand. This enables address assignment during the initial start-up. Alternatively, before connection to the RS485 line, each FIT® can be individually connected to a PC in order to set different addresses (see ADR command in the help file AED_help_e, “Description of the basic commands”). The ground of the interface driver is related to the GND1 terminal (cable 1). The interface driver of the master should be also connected to this GND1. Only a connecting cable with a screen grounded on two sides should be used as the interconnecting cable between the FIT® and the master. The shield of the FIT® cable is connected to the housing of the FIT® . HBM FIT RS232 / RS485 4-wire interfaces (UART) 41 4-wire physical circuit Line termination +5 V Line termination +5 V 500 TB TA 500 500 500 +5 V 500 RB +5 V RA 500 500 TxD on/off RxD Computer = Master TxD on/off RxD TxD on/off RxD FIT = Slave 00 ............ Slave 89 Fig. 21: Connection of several FIT® load cells to a computer via one RS485 bus, 4-wire Fig. 22 shows the necessary connections on cable 1 (RS232 version) for connection to a computer. Earth Sub D9 - 6 9 1 2 3 5 Power + FIT RS232 RxD red blue TxD GND white UB1 TxD RxD GND1 Screen Housing / Earth ground Fig. 22: Connection of a FIT® to the power supply and computer via RS232 The wiring of the RS485 is implemented in a similar way with the lines Ra, Rb, Ta, Tb, GND1 and UB1. FIT HBM CANOpen interface 42 6.3.2 CANOpen interface The interface is set up using the CANOpen standard CiA DS301. RS485 bus 2-wire Bus termination Bus termination TB/RB 500 500 TA/RA Master (PC/PLC) AED/ FIT AED/ FIT Fig. 23: Connection of a FIT® to the Can bus Bit rate and length of the bus cable For the CANOpen-bus the length of the cable depends on the bit rate: Bit rate [kbit/s] Max. length of cable [m] 10 20 50 125 250 500 800 1000 5000 2500 1000 500 250 100 50 25 The maximum cable length is the sum of the lengths of all branch lines per node (bus member) and the lengths of the cable between the nodes. The length of the branch lines per node is limited and depends on the used bit rate (see additional documentation CAN-Bus: CiA DS102 V2.0). Setting of the address: The address is set via the bus: CAN bus: 0…127 (default at delivery: 63) Setting of the Bit rate: The bit rate is set via the bus using the field bus-configuration tool (default at delivery: 125 kbit/s). Explanations for CANOpen communication can be found in the help file AED_help_e. HBM FIT DeviceNet interface 6.3.3 43 DeviceNet interface The interface is designed to the DeviceNet specification Release 2.0 ODVA. CAN bus 2-wire Bus termination Bus termination CAN_L 120 120 CAN_H OUT Master (PC/PLC) OUT IN AED/ FIT IN AED/ FIT Fig. 24: Connection of a FIT® to the DeviceNet bus ( = CAN bus) Bit rate and length of the bus cable: For the DeviceNet-Bus the length of the cable depends on the bit rate: Bit rate [kbit/s] 125 250 500 Max. length of cable [m] 500 250 100 The maximum cable length is the sum of the lengths of all branch lines per node (bus member) and the lengths of the cable between the nodes. The length of the branch lines per node is limited and depends on the used bit rate (see additional documentation DeviceNet: DeviceNet specification Volume 1, Appendix B, cable profiles. Setting of the address: The address is set via the bus: DeviceNet: 0…63 (default at delivery: 63) Setting of the Bit rate: The bit rate is set via the bus using the field bus-configuration tool (default at delivery: 125 kbit/s). Explanations for DeviceNet communication can be found in the help file AED_help_e. FIT HBM Diagnostic channel RS485 2-wire 44 6.3.4 Diagnostic channel RS485 2-wire Bus termination RS485 bus 2-wire Bus termination TB/RB 500 500 TA/RA Master (PC/PLC) AED/ FIT AED/ FIT Fig. 25: Bus structure for diagnostic channel / RS485 2-wire The diagnostic bus is only available in the version extended (version E). The diagnostic channel provides as an analysis tool of dynamic processes. The bus is designed as RS485 2-wire-bus ( lines:TB/RB and TA/RA, GND ).This bus works independently of the CANOpen or DeviceNet or RS 232 or RS 485 4-wire interface. The connection diagram is shown in Fig. 25. The interface setting of the bus is fixed and cannot be changed ( 38400 bit/s, 8E1). The interface converter of HBM can be used to connect the RS485 bus to a COM-port of the PC (RS232). The functions and commands of the diagnostic channel are specified in the user manual of the transducer electronics AD103C / FIT® , chapter “Description of the commands for the diagnostic functions”. The address corresponds to the address of the transducer electronics AD103C / FIT®, command ADR (00…89, default: 31, see help file, AED_help_e; "Description of the basic commands"). Additionally you can carry out the following functions via the bus: Parameter Writing only (changing not possible) Measured values Reading of single measured values MSV? Results Trigger- and dosing-results readable The diagnostic functions can be carried out using the HBM program AED_Panel32 (only with version V3.0.0). The HBM display unit DWS2103 can be connected with this interface. Than all implemented functions and parameters are accessible. This is independent from the main communication channel. HBM FIT Inputs and outputs 45 6.4 Inputs and outputs 6.4.1 Electrical data of inputs The control signal must be applied between the input and the specified ground reference. The input in cable 1 can be directly actuated by a logic signal (HCMOS), but tolerates voltages up to 12 V. The inputs in cable 2 are galvanically isolated from the measurement circuit supply and are suitable for PLC signals. The functions are described in Section 0. Signal form The following tables show the assignment of the logic states to the voltage values at the input. Levels between the given high and low ranges lead to undefined states and should be avoided. All functions, with exception of the external trigger, are internally debounced. The function is actuated when an active level is present at least 20 ms. This prevents unintended triggering by interference peaks or multiple pulses that often occur during mechanical contacts. The trigger function reacts to the falling slope of a switching pulse and is not debounced to ensure a defined reaction time. When connecting the trigger device (light barrier, etc.), ensure that there is a clean signal without interference coupling, as each pulse will trigger a measurement procedure (see notes on cabling, Section 6.1 ). Function Ext. Trigger TAR, BREAK, RUN Quescient level defined high or low level * Low Triggering event High-low transition High level, debounced *) Stable level at trigger input used. The other line (IN1 or "Trigger") must be set to low level or be un assigned! See Section 5.5. Debouncing is dependent on the function set (IMD command), but not on the input used (cable 1 or cable 2). FIT HBM Data of outputs 46 The differences between the various inputs must be noted for the electrical data: 6.4.2 Trigger input (cable 1) Inputs IN1, IN2 Reference potential GND1 GND2 Low level 0...1 V 0...6 V High level 3...12 V 10...30 V Input resistance 10 k >3 k Data of outputs The output driver of the FIT® switch outputs is a PLC compatible High-Side driver (static switch). The circuit is galvanically isolated from the FIT® measurement electronics and must be supplied by the external operating voltage UB2. When an output is activated, a positive level is given on the corresponding output line, voltage is dependent on UB2. The consumer must be connected between the output and the minus pole of the power supply (GND2). The outputs are not set to specific consumers (lamps, relays). HBM FIT Data of outputs 47 Fig. 26: Example for output configuration When using the outputs, the GND2 connection must also be connected. A connection from GND2 with GND1 is not necessary. The potential difference between both wires is maximum 30 V. All four outputs have the same electrical properties and can switch ohmic or inductive loads (relays, valves) up to the permissible maximum current. Fig. 26 shows examples of various consumers. A free-wheeling diode must be switched in parallel for inductive loads. FIT HBM 48 Index Index A address CANOpen......................................................................................................................................................... 42 DeviceNet ........................................................................................................................................................ 43 diagnosis.......................................................................................................................................................... 44 B baud rate diagnosis.......................................................................................................................................................... 44 bit rate CANOpen......................................................................................................................................................... 42 DeviceNet ........................................................................................................................................................ 43 block diagram FIT ................................................................................................................................................ 25 C cable length CANOpen......................................................................................................................................................... 42 DeviceNet ........................................................................................................................................................ 43 CANOpen interface.............................................................................................................................................. 42 D data of digital outputs........................................................................................................................................... 47 DeviceNet interface.............................................................................................................................................. 43 diagnostic channel RS485.................................................................................................................................... 44 diagnostic function ............................................................................................................................................... 29 digital inputs......................................................................................................................................................... 29 digital outputs (only E version) ................................................................................................................................................ 31 dimensions FIT/0 ................................................................................................................................................. 19 dimensions FIT/1 ................................................................................................................................................. 12 dimensions FIT/4 ................................................................................................................................................. 16 dimensions FIT/5 ................................................................................................................................................. 22 dosing and filling control....................................................................................................................................... 28 HBM FIT Index 49 E electrical data of digtal inputs ............................................................................................................................... 46 extreme value function......................................................................................................................................... 28 F FIT model /0 properties........................................................................................................................................................... 7 FIT model /1 and /4 properties........................................................................................................................................................... 7 FIT model /5 properties........................................................................................................................................................... 7 FIT variants pictures ............................................................................................................................................................ 10 I I/O dosing control (E versions only)............................................................................................................................................... 32 installation FIT/0 .................................................................................................................................................. 20 installation FIT/1 .................................................................................................................................................. 13 installation FIT/4 .................................................................................................................................................. 17 installation FIT/5 .................................................................................................................................................. 23 L limit value switches .............................................................................................................................................. 28 M mode of access.................................................................................................................................................... 29 modes FIT ........................................................................................................................................................... 29 O order number key ..................................................................................................................................................................... 8 overview of FIT variants ......................................................................................................................................... 8 R RS232 / RS485.................................................................................................................................................... 40 HBM FIT en 50 Index S signal flow plan FIT .............................................................................................................................................. 26 supply voltage...................................................................................................................................................... 39 T trigger function..................................................................................................................................................... 27 W wiring assignment FIT/0 ....................................................................................................................................... 37 wiring assignment FIT/1 ....................................................................................................................................... 35 wiring assignment FIT/4 ....................................................................................................................................... 36 wiring assignment FIT/5 ....................................................................................................................................... 38 HBM FIT HBM FIT en HBM FIT HBM FIT en Modifications reserved. All details describe our products in general form only. They are not to be understood as express warranty and do not constitute any liability whatsoever. Hottinger Baldwin Messtechnik GmbH Postfach 100151 D-64201 Darmstadt Im Tiefen See 45 D-64293 Darmstadt Tel.: +49/6151/803-0 Fax: +49/6151/8039100 I1696-3.0 en E-mail: [email protected] · www.hbm.com